![]()
In the previous chapter, you learned how to install MongoDB on two commonly used platforms (Windows and Linux), as well as how to extend the database with some additional drivers. In this chapter, you will shift your attention from the operating system and instead examine the general design of a MongoDB database. Specifically, you’ll learn what collections are, what documents look like, how indexes work and what they do, and finally, when and where to reference data instead of embedding it. We touched on some of these concepts briefly in Chapter 1, but in this chapter, we’ll explore them in more detail. Throughout this chapter, you will see code examples designed to give you a good feeling for the concepts being discussed. Do not worry too much about the commands you’ll be looking at, however, because they will be discussed extensively in Chapter 4.
As you learned in the first two chapters, a MongoDB database is nonrelational and schemaless. This means that a MongoDB database isn’t bound to any predefined columns or datatypes as relational databases are (such as MySQL). The biggest benefit of this implementation is that working with data is extremely flexible because there is no predefined structure required in your documents.
To put it more simply: you are perfectly capable of having one collection that contains hundreds or even thousands of documents that all carry a different structure—without breaking any of the MongoDB databases rules.
One of the benefits of this flexible schemaless design is that you won’t be restricted when programming in a dynamically typed language such as Python or PHP. Indeed, it would be a severe limitation if your extremely flexible and dynamically capable programming language couldn’t be used to its full potential because of the innate limitations of your database.
Let’s take another glance at what the data design of a document in MongoDB looks like, paying particular attention to how flexible data in MongoDB is compared to data in a relational database. In MongoDB, a document is an item that contains the actual data, comparable to a row in SQL. In the following example, you will see how two completely different types of documents can coexist in a single collection named Media (note that a collection is roughly equivalent to a table in the world of SQL):
{
    "Type": "CD",
    "Artist": "Nirvana",
    "Title": "Nevermind",
    "Genre": "Grunge",
    "Releasedate": "1991.09.24",
    "Tracklist": [
        {
        "Track" : "1",
        "Title" : "Smells Like Teen Spirit",
        "Length" : "5:02"
        },
        {
        "Track" : "2",
        "Title" : "In Bloom",
        "Length" : "4:15"
        }
    ]
}


{
    "type": "Book",
    "Title": "Definitive Guide to MongoDB: A complete guide to dealing with Big Data using MongoDB 2nd, The",
    "ISBN": "987-1-4302-5821-6",
    "Publisher": "Apress",
    "Author": [
        "Hows, David"
        "Plugge, Eelco",
        "Membrey, Peter",
        "Hawkins, Tim    ]
}
As you might have noticed when looking at this pair of documents, most of the fields aren’t closely related to one another. Yes, they both have fields called Title and Type; but apart from that similarity, the documents are completely different. Nevertheless, these two documents are contained in a single collection called Media.
MongoDB is called a schemaless database, but that doesn’t mean MongoDB’s data structure is completely devoid of schema. For example, you do define collections and indexes in MongoDB (you will learn more about this later in the chapter). Nevertheless, you do not need to predefine a structure for any of the documents you will be adding, as is the case when working with MySQL, for example.
Simply stated, MongoDB is an extraordinarily dynamic database; the preceding example would never work in a relational database, unless you also added each possible field to your table. Doing so would be a waste of both space and performance, not to mention highly disorganized.
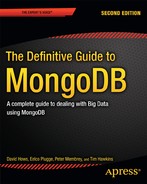
As mentioned previously, collection is a commonly used term in MongoDB. You can think of a collection as a container that stores your documents (that is, your data), as shown in Figure 3-1.
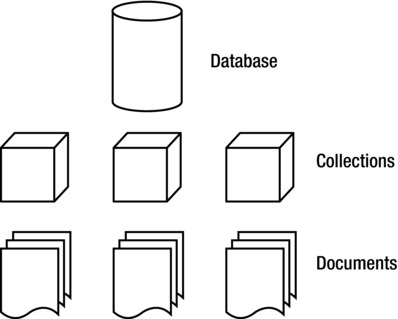
Figure 3-1. The MongoDB database model
Now compare the MongoDB database model to a typical model for a relational database (see Figure 3-2).
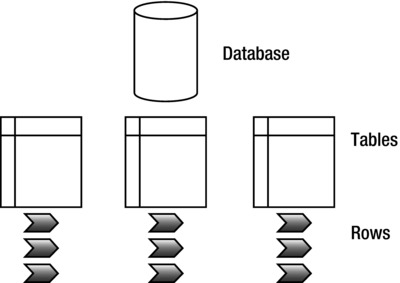
Figure 3-2. A typical relational database model
As you can see, the general structure is the same between the two types of databases; nevertheless, you do not use them in even remotely similar manners. There are several types of collections in MongoDB. The default collection type is expandable in size: the more data you add to it, the larger it becomes. It’s also possible to define collections that are capped. These capped collections can only contain a certain amount of data before the oldest document is replaced by a newer document (you will learn more about these collections in Chapter 4).
Every collection in MongoDB has a unique name. This name should begin with a letter, or optionally, an underscore (_) when created using the createCollection function. The name can contain numbers and letters; however, the $ symbol is reserved by MongoDB. Similarly, using an empty string (“ ”) is not allowed; the null character cannot be used in the name and it cannot start with the “system.” string. Generally, it’s recommended that you keep the collection’s name simple and short (to around nine characters or so); however, the maximum number of allowed characters in a collection name is 128. Obviously, there isn’t much practical reason to create such a long name.
A single database has a default limit of 24,000 namespaces. Each collection accounts for at least two namespaces: one for the collection itself and one more for the first index created in the collection. If you were to add more indexes per collection, however, another namespace would be used. In theory, this means that each database can have up to 12,000 collections by default, assuming each collection only carries one index. However, this limit on the number of namespaces can be increased by providing the nssize parameter when executing the MongoDB service application (mongod).
Using Documents
Recall that a document consists of key-value pairs. For example, the pair "type" : "Book" consists of a key named type, and its value, Book. Keys are written as strings, but the values in them can vary tremendously. Values can be any of a rich set of datatypes, such as arrays or even binary data. Remember: MongoDB stores its data in BSON format (see Chapter 1 for more information on this topic).
Next, let’s look at all of the possible types of data you can add to a document, and what you use them for:
- String: This commonly used datatype contains a string of text (or any other kind of characters). This datatype is used mostly for storing text values (for example, "Country" : "Japan"}.
- Integer (32b and 64b): This type is used to store a numerical value (for example, { "Rank" : 1 } ). Note that there are no quotes placed before or after the integer.
- Boolean: This datatype can be set to either TRUE or FALSE.
- Double: This datatype is used to store floating-point values.
- Min/Max keys: This datatype is used to compare a value against the lowest and highest BSON elements, respectively.
- Arrays: This datatype is used to store arrays (for example, ["Membrey, Peter","Plugge, Eelco","Hows, David"]).
- Timestamp: This datatype is used to store a timestamp. This can be handy for recording when a document has been modified or added.
- Object: This datatype is used for embedded documents.
- Null: This datatype is used for a Null value.
- Symbol: This datatype is used identically to a string; however, it’s generally reserved for languages that use a specific symbol type.
- Date *: This datatype is used to store the current date or time in Unix time format (POSIX time).
- Object ID *: This datatype is used to store the document’s ID.
- Binary data *: This datatype is used to store binary data.
- Regular expression *: This datatype is used for regular expressions. All options are represented by specific characters provided in alphabetical order. You will learn more about regular expressions in Chapter 4.
- JavaScript Code *: This datatype is used for JavaScript code.
The asterisks mean that the last five datatypes (date, object ID, binary data, regex, and JavaScript code) are non-JSON types; specifically, they are special datatypes that BSON allows you to use. In Chapter 4, you will learn how to identify your datatypes by using the $type operator.
In theory, this all probably sounds straightforward. However, you might wonder how you go about actually designing the document, including what information to put in it. Because a document can contain any type of data, you might think there is no need to reference information from inside another document. In the next section, we’ll look at the pros and cons of embedding information in a document compared to referencing that information from another document.
Embedding vs. Referencing Information in Documents
You can choose either to embed information into a document or reference that information from another document. Embedding information simply means that you place a certain type of data (for example, an array containing more data) into the document itself. Referencing information means that you create a reference to another document that contains that specific data. Typically, you reference information when you use a relational database. For example, assume you wanted to use a relational database to keep track of your CDs, DVDs, and books. In this database, you might have one table for your CD collection and another table that stores the track lists of your CDs. Thus, you would probably need to query multiple tables to acquire a list of tracks from a specific CD.
With MongoDB (and other nonrelational databases), however, it would be much easier to embed such information instead. After all, the documents are natively capable of doing so. Adopting this approach keeps your database nice and tidy, ensures that all related information is kept in one single document, and even works much faster because the data is then co-located on the disk.
Now let’s look at the differences between embedding and referencing information by looking at a real-world scenario: storing CD data in a database.
In the relational approach, your data structure might look something like this:
|_media
    |_cds
        |_id, artist, title, genre, releasedate
    |_ cd_tracklists
        |_cd_id, songtitle, length
In the nonrelational approach, your data structure might look something like this:
|_media
    |_items
        |_<document>
In the nonrelational approach, the document might look something like the following:
{
    "Type": "CD",
    "Artist": "Nirvana",
    "Title": "Nevermind",
    "Genre": "Grunge",
    "Releasedate": "1991.09.24",
    "Tracklist": [
        {
        "Track" : "1",
        "Title" : "Smells Like Teen Spirit",
        "Length" : "5:02"
        },
        {
        "Track" : "2",
        "Title" : "In Bloom",
        "Length" : "4:15"
        }
    ]
}
In this example, the track list information is embedded in the document itself. This approach is both incredibly efficient and well organized. All the information that you wish to store regarding this CD is added to a single document. In the relational version of the CD database, this requires at least two tables; in the nonrelational database, it requires only one collection and one document.
When information is retrieved for a given CD, that information only needs to be loaded from one document into RAM, not from multiple documents. Remember that every reference requires another query in the database.
![]() Tip The rule of thumb when using MongoDB is to embed data whenever you can. This approach is far more efficient and almost always viable.
Tip The rule of thumb when using MongoDB is to embed data whenever you can. This approach is far more efficient and almost always viable.
At this point, you might be wondering about the use case in which an application has multiple users. Generally speaking, a relational database version of the aforementioned CD app would require that you have one table that contains all your users and two tables for the items added. For a nonrelational database, it would be good practice to have separate collections for the users and the items added. For these kinds of problems, MongoDB allows you to create references in two ways: manually or automatically. In the latter case, you use the DBRef specification, which provides more flexibility in case a collection changes from one document to the next. You will learn more about these two approaches in Chapter 4.
Creating the _id Field
Every object within the MongoDB database contains a unique identifier to distinguish that object from every other object. This identifier is called the _id key, and it is added automatically to every document you create in a collection.
The _id key is the first attribute added in each new document you create. This remains true even if you do not tell MongoDB to create the key. For example, none of the code in the preceding examples used the _id key. Nevertheless, MongoDB created an _id key for you automatically in each document. It did so because _id key is a mandatory element for each document in the collection.
If you do not specify the _id value manually, the type will be set to a special BSON datatype that consists of a 12-byte binary value. Thanks to its design, this value has a reasonably high probability of being unique. The 12-byte value consists of a 4-byte timestamp (seconds since epoch, or January 1st, 1970), a 3-byte machine ID, a 2-byte process ID, and a 3-byte counter. It’s good to know that the counter and timestamp fields are stored in Big Endian format. This is because MongoDB wants to ensure that there is an increasing order to these values, and a Big Endian approach suits this requirement best.
![]() Note The terms Big Endian and Little Endian refer to how individual bytes/bits are stored in a longer data word in the memory. Big Endian simply means that the most significant value is saved first. Similarly, Little Endian means that the least significant value is saved first.
Note The terms Big Endian and Little Endian refer to how individual bytes/bits are stored in a longer data word in the memory. Big Endian simply means that the most significant value is saved first. Similarly, Little Endian means that the least significant value is saved first.
Figure 3-3 shows how the value of the _id key is built up and where the values come from.
Figure 3-3. Creating the _id key in MongoDB
Every additional supported driver that you load when working with MongoDB (such as the PHP driver or the Python driver) supports this special BSON datatype and uses it whenever new data is created. You can also invoke ObjectId() from the MongoDB shell to create a value for an _id key. Optionally, you can specify your own value by using ObjectId(string), where string represents the specified hex string.
Building Indexes
As mentioned in Chapter 1, an index is nothing more than a data structure that collects information about the values of specified fields in the documents of a collection. This data structure is used by MongoDB’s query optimizer to quickly sort through and order the documents in a collection.
Remember that indexing ensures a quick lookup from data in your documents. Basically, you should view an index as a predefined query that was executed and had its results stored. As you can imagine, this enhances query-performance dramatically. The general rule of thumb in MongoDB is that you should create an index for the same sort of scenarios where you would want to have an index in MySQL.
The biggest benefit of creating your own indexes is that querying for often-used information will be incredibly fast because your query won’t need to go through your entire database to collect this information.
Creating (or deleting) an index is relatively easy—once you get the hang of it, anyway. You will learn how to do so in Chapter 4, which covers working with data. You will also learn some more advanced techniques for taking advantage of indexing in Chapter 10, which covers how to maximize performance.
Impacting Performance with Indexes
You might wonder why you would ever need to delete an index, rebuild your indexes, or even delete all indexes within a collection. The simple answer is that doing so lets you clean up some irregularities. For instance, sometimes the size of a database can increase dramatically for no apparent reason. At other times, the space used by the indexes might strike you as excessive.
Another good thing to keep in mind: you can have a maximum of 40 indexes per collection. Generally speaking, this is far more than you should need, but you could potentially hit this limit someday.
![]() Note Adding an index increases query speed, but it reduces insertion or deletion speed. It’s best to consider only adding indexes for collections where the number of reads is higher than the number of writes. When more writes occur than reads, indexes may even prove to be counterproductive.
Note Adding an index increases query speed, but it reduces insertion or deletion speed. It’s best to consider only adding indexes for collections where the number of reads is higher than the number of writes. When more writes occur than reads, indexes may even prove to be counterproductive.
Finally, all index information is stored in the system.indexes collection in your database. For example, you can run the db.indexes.find() command to take a quick peek at the indexes that have been stored so far. To see the indexes created for a specific collection, you can use the getIndexes command:
db.collection.getIndexes()
Implementing Geospatial Indexing
As Chapter 1 briefly mentioned, MongoDB has implemented geospatial indexing since version 1.4. This means that, in addition to normal indexes, MongoDB also supports geospatial indexes that are designed to work in an optimal way with location-based queries. For example, you can use this feature to find a number of closest known items to the user’s current location. Or you might further refine your search to query for a specified number of restaurants near the current location. This type of query can be particularly helpful if you are designing an application where you want to find the closest available branch office to a given customer’s ZIP code.
A document for which you want to add geospatial information must contain either a subobject or an array whose first element specifies the object type, followed by the item’s longitude and latitude, as in the following example:
> db.restaurants.insert({name: "Kimono", loc: { type: "Point", coordinates: [ 52.37045
1, 5.217497]}})
Note that the type parameter can be used to specify the document’s object type, which can be a Point, a LineString or a Polygon. As can be expected, the Point type is used to specify that the item (in this case, a restaurant) is located at exactly the spot given, thus requiring exactly two values, the longitute and latitude. The LineString type can be used to specify that the item extends along a specific line (say, a street), and thus requires a beginning and end point, as in the following example:
> db.streets.insert( {name: "Westblaak", loc: { type: "LineString", coordinates: [ [52.36881,4.890286],[52.368762,4.890021] ] } } )
The Polygon type can be used to specify a (nondefault) shape (say, a shopping area). When using this type, you need to ensure that the first and last points are identical, to close the loop. Also, the point coordinates are to be provided as an array within an array, as in the following example:
> db.stores.insert( {name: "SuperMall", loc: { type: "Polygon", coordinates: [ [ [52.146917,5.374337], [52.146966,5.375471], [52.146722,5.375085], [52.146744,5.37437], [52.146917,5.374337] ] ] } } )
In most cases, the Point type will be appropriate.
Once this geospatial information is added to a document, you can create the index (or even create the index beforehand, of course) and give the ensureIndex() function the 2dsphere parameter:
> db.restaurants.ensureIndex( { loc: "2dsphere" } )
![]() Note The ensureIndex() function is used to add a custom index. Don’t worry about the syntax of this function yet—you will learn how to use ensureIndex() in depth in the next chapter.
Note The ensureIndex() function is used to add a custom index. Don’t worry about the syntax of this function yet—you will learn how to use ensureIndex() in depth in the next chapter.
The 2dsphere parameter tells ensureIndex() that it’s indexing a coordinate or some other form of two-dimensional information on an Earth-like sphere. By default, ensureindex() assumes that a latitude/longitude key is given, and it uses a range of -180 to 180. However, you can overwrite these values using the min and max parameters:
> db.restaurants.ensureIndex( { loc: "2dsphere" }, { min : -500 , max : 500 } )
You can also expand your geospatial indexes by using secondary key values (also known as compound keys). This structure can be useful when you intend to query on multiple values, such as a location (geospatial information) and a category (sort ascending):
> db.restaurants.ensureIndex( { loc: "2dsphere", category: 1 } )
![]() Note At this time, the geospatial implementation is based on the idea that the world is a perfect sphere. Thus, each degree of latitude and longitude is exactly 111km (69 miles) in length. However, this is only true exactly at the equator; the further you move away from the equator, the smaller each degree of longitude becomes, approaching zero at the poles.
Note At this time, the geospatial implementation is based on the idea that the world is a perfect sphere. Thus, each degree of latitude and longitude is exactly 111km (69 miles) in length. However, this is only true exactly at the equator; the further you move away from the equator, the smaller each degree of longitude becomes, approaching zero at the poles.
Querying Geospatial Information
In this chapter, we are concerned primarily with two things: how to model the data and how a database works in the background of an application. That said, manipulating geospatial information is increasingly important in a wide variety of applications, so we’ll take a few moments to explain how to leverage geospatial information in a MongoDB database.
Before getting started, a mild word of caution. If you are completely new to MongoDB and haven’t had the opportunity to work with (geospatial) indexed data in the past, this section may seem a little overwhelming at first. Not to worry, however; you can safely skip it for now and come back to it later if you wish to. The examples given serve to show you a practical example of how (and why) to use geospatial indexing, making it easier to comprehend. With that out of the way, and if you are feeling brave, read on.
Once you’ve added data to your collection, and once the index has been created, you can do a geospatial query. For example, let’s look at a few lines of simple yet powerful code that demonstrate how to use geospatial indexing.
Begin by starting up your MongoDB shell and selecting a database with the use function. In this case, the database is named restaurants:
> use restaurants
Once you’ve selected the database, you can define a few documents that contain geospatial information, and then insert them into the places collection (remember: you do not need to create the collection beforehand):
> db.restaurants.insert( { name: "Kimono", loc: { type: "Point", coordinates: [ 52.37045
1, 5.217497] } } )

> db.restaurants.insert( {name: "Shabu Shabu", loc: { type: "Point", coordinates: [51.9
15288,4.472786] } } )

> db.restaurants.insert( {name: "Tokyo Cafe", loc: { type: "Point", coordinates: [52.36
8736, 4.890530] } } )
After you add the data, you need to tell the MongoDB shell to create an index based on the location information that was specified in the loc key, as in this example:
> db.restaurants.ensureIndex ( { loc: "2dsphere" } )
Once the index has been created, you can start searching for your documents. Begin by searching on an exact value (so far this is a “normal” query; it has nothing to do with the geospatial information at this point):
> db.restaurants.find( { loc : [52,5] } )
>
The preceding search returns no results. This is because the query is too specific. A better approach in this case would be to search for documents that contain information near a given value. You can accomplish this using the $near operator. Note that this requires the type operator to be specified, as in the following example:
> db.restaurants.find( { loc : { $geoNear : { $geometry : { type : "Point", coordinates:
 [52.338433,5.513629] } } } } )
This produces the following output:
{
  "_id" : ObjectId("51ace0f380523d89efd199ac"),
  "name" : "Kimono",
  "loc" : {
    "type" : "Point",
    "coordinates" : [ 52.370451, 5.217497 ]
  }
}
{
  "_id" : ObjectId("51ace13380523d89efd199ae"),
  "name" : "Tokyo Cafe",
  "loc" : {
    "type" : "Point",
    "coordinates" : [ 52.368736, 4.89053 ]
  }
}
{
  "_id" : ObjectId("51ace11b80523d89efd199ad"),
  "name" : "Shabu Shabu",
  "loc" : {
    "type" : "Point",
    "coordinates" : [ 51.915288, 4.472786 ]
  }
}
Although this set of results certainly looks better, there’s still one problem: all of the documents are returned! When used without any additional operators, $near returns the first 100 entries and sorts them based on their distance from the given coordinates. Now, while we can choose to limit our results to say, the first two items (or two hundred, if we want) using the limit function, even better would be to limit the results to those within a given range.
This can be achieved by appending the $maxDistance operator. Using this operator you can tell MongoDB to return only those results falling within a maximum distance (measured in meters) from the given point, as in the following example and its output:
> db.retaurants.find( { loc : { $geoNear : { $geometry : { type : "Point", coordinates:  [52.338433,5.513629] }, $maxDistance : 40000 } } } )
{
  "_id" : ObjectId("51ace0f380523d89efd199ac"),
  "name" : "Kimono",
  "loc" : {
    "type" : "Point",
    "coordinates" : [ 52.370451, 5.217497 ]
  }
}
As you can see, this returns only a single result: a restaurant located within 40 kilometers (or, roughly 25 miles) from the starting point.
![]() Note There is a direct correlation between the number of results returned and the time a given query takes to execute.
Note There is a direct correlation between the number of results returned and the time a given query takes to execute.
In addition to the $geoNear operator, MongoDB also includes a $geoWithin operator. You use this operator to find items in a particular shape. At this time, you can find items located in a $box, $polygon, $center and $centerSphere shape, where $box represents a rectangle, $polygon represents a specific shape of your choosing, $center represents a circle, and $centerSphere defines a circle on a sphere. Let’s look at a couple of additional examples that illustrate how to use these shapes.
![]() Note With version 2.4 of MongoDB the $within operator was deprecated and replaced by $geoWithin. This operator does not strictly require a geospatial indexing. Also, unlike the $near operator, $geoWithin does not sort the returned results, improving their performance.
Note With version 2.4 of MongoDB the $within operator was deprecated and replaced by $geoWithin. This operator does not strictly require a geospatial indexing. Also, unlike the $near operator, $geoWithin does not sort the returned results, improving their performance.
To use the $box shape, you first need to specify the lower-left, followed by the upper-right coordinates of the box, as in the following example:
> db.restaurants.find( { loc: { $geoWithin : { $box : [ [52.368549,4.890238], [52.368849,4.89094] ] } } } )
Similarly, to find items within a specific polygon form, you need to specify the coordinates of your points as a set of nested arrays. Again note that the first and last coordinates must be identical to close the shape properly, as shown in the following example:
> db.restaurants.find( { loc :
  { $geoWithin :
    { $geometry :
      { type : "Polygon" ,
        coordinates : [ [
          [52.368739,4.890203],  [52.368872,4.890477],  [52.368726,4.890793],
          [52.368608,4.89049], [52.368739,4.890203]
        ] ]
      }
    }
  } )
The code to find items in a basic $circle shape is quite simple. In this case, you need to specify the center of the circle and its radius, measured in the units used by the coordinate system, before executing the find() function:
> db.restaurants.find( { loc: { $geoWithin : { $center : [ [52.370524, 5.217682], 10] } } } )
Note that ever since MongoDB version 2.2.3, the $center operator can be used without having a geospatial index in place. However, it is recommended to create one to improve performance.
Finally, to find items located within a circular shape on a sphere (say, our planet) you can use the $centerSphere operator. This operator is similar to $center, like so:
> db.restaurants.find( { loc: { $geoWithin : { $centerSphere : [ [52.370524, 5.217682], 10] } } } )
By default, the find() function is ideal for running queries. However, MongoDB also provides the geoNear() function, which works like the find() function, but also displays the distance from the specified point for each item in the results. The geoNear() function also includes some additional diagnostics. The following example uses the geoNear() function to find the two closest results to the specified position:
> db.runCommand( { geoNear : "restaurants", near : { type : "Point", coordinates: [52.338433,5.513629] }, spherical : true})
It returns the following results:
{
  "ns" : "stores.restaurants",
  "results" : [
    {
      "dis" : 33155.517810497055,
      "obj" : {
        "_id" : ObjectId("51ace0f380523d89efd199ac"),
        "name" : "Kimono",
        "loc" : {
          "type" : "Point",
          "coordinates" : [
            52.370451,
            5.217497
          ]
        }
      }
    },
    {
      "dis" : 69443.96264213261,
      "obj" : {
        "_id" : ObjectId("51ace13380523d89efd199ae"),
        "name" : "Tokyo Cafe",
        "loc" : {
          "type" : "Point",
          "coordinates" : [
            52.368736,
            4.89053
          ]
        }
      }
    },
    {
      "dis" : 125006.87383713324,
      "obj" : {
        "_id" : ObjectId("51ace11b80523d89efd199ad"),
        "name" : "Shabu Shabu",
        "loc" : {
          "type" : "Point",
          "coordinates" : [
            51.915288,
            4.472786
          ]
        }
      }
    }
  ],
  "stats" : {
    "time" : 6,
    "nscanned" : 3,
    "avgDistance" : 75868.7847632543,
    "maxDistance" : 125006.87383713324
  },
  "ok" : 1
}
That completes our introduction to geospatial information for now; however, you’ll see a few more examples that show you how to leverage geospatial functions in this book’s upcoming chapters.
Using MongoDB in the Real World
Now that you have MongoDB and its associated plug-ins installed, and you have gained an understanding of the data model, it’s time to get to work. In the next five chapters of the book, you will learn how to build, query, and otherwise manipulate a variety of sample MongoDB databases (see Table 3-1 for a quick view of the topics to come). Each chapter will stick primarily to using a single database that is unique to that chapter; we took this approach to make it easier to read this book in a modular fashion.
Table 3-1. MongoDB Sample Databases Covered in This Book
Chapter |
Database Name |
Topic |
|---|---|---|
| 4 | Library | Working with data and indexes |
| 5 | Test | GridFS |
| 6 | Contacts | PHP and MongoDB |
| 7 | Inventory | Python and MongoDB |
| 8 | Test | Advanced Queries |
Summary
In this chapter, we looked at what’s happening in the background of your database. We also explored the primary concepts of collections and documents in more depth; and we covered the datatypes supported in MongoDB, as well as how to embed and reference data.
Next, we examined what indexes do, including when and why they should be used (or not).
We also touched on the concepts of geospatial indexing. For example, we covered how geospatial data can be stored; we also explained how you can search for such data using either the regular find() function or the more geospatially based geoNear database command.
In the next chapter, we’ll take a closer look at how the MongoDB shell works, including which functions can be used to insert, find, update, or delete your data. We will also explore how conditional operators can help you with all of these functions.