
![]()
Like many of its relational cousins, MongoDB supports the replication of a database’s contents to another server in real-time or near real-time. MongoDB’s replication features are simple to set up and use. They are also among the key features in MongoDB that, along with sharding, bolster the claim that the database is both a Web 2.0 and a cloud-based datastore.
There are many scenarios where you might want to use replication, so the replication support in MongoDB has to be sufficiently flexible that it can cope with all of them. The architects of MongoDB at MongoDB, Inc. have gone to great lengths to make sure that its implementation of replication meets all of today’s needs.
In this chapter, we will cover the basics of replication within MongoDB, including the following topics:
- What is replication in MongoDB?
- What is a primary?
- What is a secondary?
- What is the oplog?
![]() Note Replication is a feature that continues to evolve in MongoDB, and you can expect some changes in how replication works as the product develops. This is particularly true with respect to the clustering of database servers. There have already been a number of changes between the first and second editions of this book. MongoDB, Inc is investing considerable effort in ensuring that MongoDB meets and exceeds everybody’s expectations for scalability and availability; replication support is one of the key features that MongoDB. Inc is counting on to help it meet those expectations.
Note Replication is a feature that continues to evolve in MongoDB, and you can expect some changes in how replication works as the product develops. This is particularly true with respect to the clustering of database servers. There have already been a number of changes between the first and second editions of this book. MongoDB, Inc is investing considerable effort in ensuring that MongoDB meets and exceeds everybody’s expectations for scalability and availability; replication support is one of the key features that MongoDB. Inc is counting on to help it meet those expectations.
Before looking at replication setup in detail, let’s review the goals the various setups are designed to achieve. We’ll also outline some of the fundamentals of how replication currently functions in MongoDB and look at the oplog and its role in the replication of data between members of a replica set. These topics form the fundamental basis for understanding replication.
Spelling Out MongoDB’s Replication Goals
Among other things, replication can be used to achieve scalability, durability/reliability, and isolation. In the upcoming sections, we’ll explore how you can use replication to achieve these goals along the way, while pointing out potential traps and mistakes to avoid.
Improving Scalability
For web applications in particular, scalability is a critical design requirement, especially those that rely heavily on backend databases. Replication can help you create more scalable applications in two ways:
- Improve redundancy: Replication can help you improve redundancy by enabling you to host an application in several data centers. In this approach, you ensure that there is a local copy of the data in each data center, so that the application can have high-speed access to it. Users can then be connected to the data center that is closest to them, minimizing latency.
- Improve performance: Replication can under certain circumstances, help you improve an application’s raw performance. This is particularly true for cases where you have a large web application with a predominantly read-based dataset, and you want to distribute queries to multiple database servers to increase parallelism. Or with query loads that have widely different working sets such as reporting or aggregation.
![]() Note MongoDB also supports a feature called sharding, which is designed to assist you in creating more scalable applications with or without replication for truly high scalability. See Chapter 12 for more information about using sharding and replication together in MongoDB.
Note MongoDB also supports a feature called sharding, which is designed to assist you in creating more scalable applications with or without replication for truly high scalability. See Chapter 12 for more information about using sharding and replication together in MongoDB.
Improving Durability/Reliability
Replication is commonly used to help guard against hardware failure or database corruption and allows flexibility when performing backups or other potentially high-impact maintenance activity with little or no impact – as these tasks can be performed individually on members of the set without impacting the set as a whole. Some specific examples where people use replication in this manner include the following:
- When you want to have a duplicate of your database that is running at a delay. You may want to protect yourself against flaws in your application or provide a simple mechanism to provide trend information by highlighting the differences between the results of queries against both datasets. This can also provide a safety buffer for human errors and avoids the need to fully restore from backup.
- When you want a backup system in case of a failure. You may want to run a replica as a backup in cases where normal backup schemes would take too long to restore in the event of a system failure.
- When you want a redundant system for administrative purposes. You may want to run a replica so you can rotate between nodes for administrative tasks such as backups or upgrades.
Providing Isolation
There are some processes that, if run against the production database, would significantly impact that database’s performance or availability. You can use replication to create synchronized copies that isolate processes from the production database, for example:
- When you want to run reports or backups without impacting the performance of your production system: Maintaining a hidden secondary replica enables you to isolate queries from your reporting system and make sure that the end-of-month reports don’t delay or otherwise impact your normal operations.
Replication Fundamentals
As you have seen, a replica set (or replSet) is a way to set up multiple MongoDB instances to contain the same data for redundancy and other related measures. In addition to knowing this, you should also understand how MongoDB accomplishes its replication, so you’ll know how best to administer your own replica set.
You are already aware of the goals of replication in MongoDB, and if you have read the first edition of this book or have been using MongoDB since its early days, you will know that there have been a number of different ways that one could accomplish replication, including these:
- Master/Slave Replication
- Master/Master Replication
- Replica Pairs
These methods of replication have all been superseded by the concept of the replica set. In MongoDB a replica set is made up of a primary node and a number of secondary or arbiter nodes. A replica set should be made up of an odd number of members, meaning a minimum of three. This requirement arises because MongoDB replica sets have a rule that the primary must be able to see a majority of other nodes in order to allow it to continue being primary. This rule is enforced to avoid a “split brain” situation, where you have two primaries because of a potential fault in networking, as illustrated in Figure 11-1.
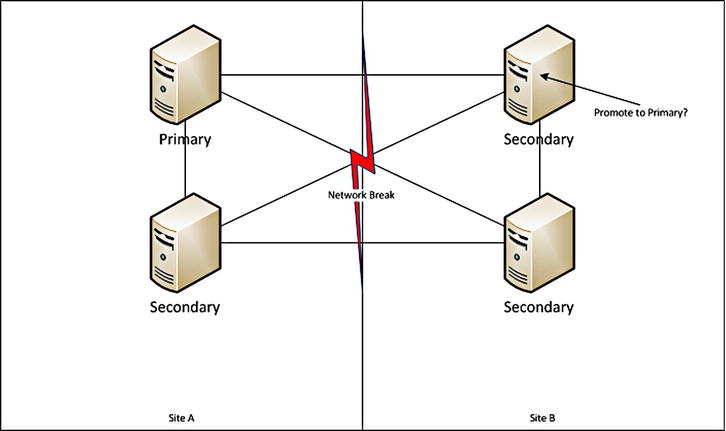
Figure 11-1. The Split-brain problem
In replica set terms, a primary is the source of truth at a given moment for your replica set. It is the only node in the set to which data can be written and from which all other nodes replicate their data. A primary is elected by agreement of a majority of all voting members, known as a quorum.
Once a primary is elected, all secondaries will use it as the source of truth for their replication, and as such all writes must be directed to this member.
A secondary member is a data-carrying nonprimary member, which can (barring a few exceptions) theoretically become a primary. It is a node, which can be read from and which replicates its data from the primary of its set in as close to real-time as possible. By default, if you directly connect to a secondary without any read preference, you cannot perform read operations. This is done to reinforce that with any read to a nonprimary, if there is a delay in replication, you may be reading from older data. You can use the command rs.slaveOk()to set the current connection you are on to read from secondaries. Or, if you are using a driver, you can set a read preference, as we will discuss later in this chapter.
![]() Note The concept of a primary is and should be ephemeral. That is, ideally you should have no “fixed” concept of which node is primary. In a replica set, all of the secondaries are writing the same data as the primary in order to keep up with replication. Therefore, if the secondaries are substantially less capable, they may not be able to cope in the event they are promoted to primary.
Note The concept of a primary is and should be ephemeral. That is, ideally you should have no “fixed” concept of which node is primary. In a replica set, all of the secondaries are writing the same data as the primary in order to keep up with replication. Therefore, if the secondaries are substantially less capable, they may not be able to cope in the event they are promoted to primary.
What Is an Arbiter?
An arbiter is a non–data-bearing node that is used to provide an additional vote to help maintain a majority for replica set elections. It does not cast a deciding vote or direct which node is the primary, but participates and can be a member of a quorum to decide a primary. Arbiters are best used to help avoid the “split brain” problem described earlier. Consider the diagram shown in Figure 11-2. With the addition of an arbiter to Site A, we can always have one side that can create a majority. This means in the event of the network break, we don’t wind up with two primaries! We can add further redundancy by having an arbiter in a third Site C. This way, if Site A goes down we can still form a majority from the nodes in Sites B and C. Using a third site like this we can always continue in the event we lose connectivity to any one site.
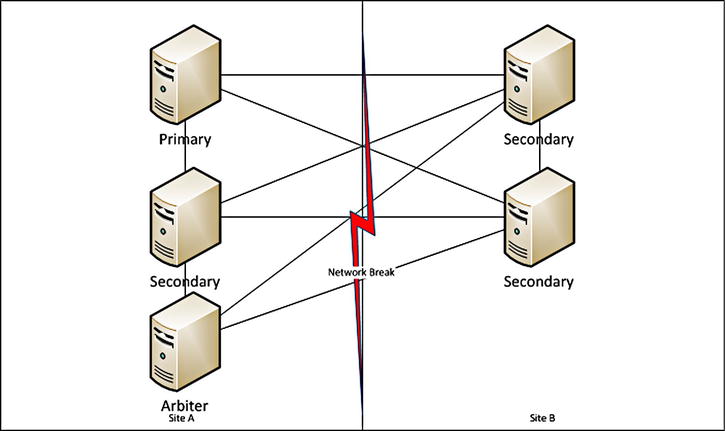
Figure 11-2. Split Brain Problem Solved
Drilling Down on the Oplog
In simple terms, the oplog (operation log)is a capped collection with a rolling record of the changes that a primary instance makes to its databases for the purpose of replaying those changes to a secondary to ensure that the databases are identical. Each member of a replica set maintains its own oplog, and the secondaries query the primary’s (or other more up-to-date secondary’s) oplog for new entries to apply to their own copies of all databases.
The oplog creates a timestamp for each entry. This enables a secondary to track how far it has read from the oplog during a previous read, and what entries it needs to transfer to catch up. If you stop a secondary and restart it a relatively short later time, it will use the primary’s oplog to retrieve all the changes it has missed while offline.
Because it is not practical to have an infinitely large oplog, the oplog is limited or capped at a particular size.
You can think of the oplog as a window on the recent activity of your primary instance; if that window is too small, then operations will be lost from the oplog before they can be applied to the secondaries. If an oplog has not yet been created on the current instance, the --oplogSize startup option allows you to set the size of your oplog in MB By default for a Linux or Windows 64-bit system, the oplogSize will be set to five percent of the free disk space available for data storage. If your system is write/update intensive, then you may need to increase this size to ensure that slaves can be offline for a reasonable amount of time without losing data.
For example, if you have a daily backup from the slave that takes an hour to complete, the size of the oplog will have to be set to allow the slave to stay offline for that hour plus an additional amount of time to provide a safety margin.
It’s critical that you take into account the update rate on all the databases present on the master when calculating a suitable size for the oplog.
You can get some idea about a suitable size for your oplog by using the db.printReplicationInfo() command, which runs on the master instance:
$mongo
>db.printReplicationInfo()
configured oplog size: 15000MB
log length start to end: 6456672secs (1793.52hrs)
oplog first event time:  Wed Mar 20 2013 17:00:43 GMT+1100 (EST)
oplog last event time:   Mon Jun 03 2013 09:31:55 GMT+1000 (EST)
now:                     Mon Jun 03 2013 20:22:20 GMT+1000 (EST)
This command shows the current size of your oplog, as well as the amount of time it will take to fill up at the current update rate. From this information, you can estimate whether you need to increase or decrease the size of your oplog. You can also look at how far behind a given member of your replica set is from the primary by reviewing the repl lag section in MongoDB Monitoring Service (MMS). If you have not installed MMS already, I truly suggest you do now, as the larger and more scaled your MongoDB cluster becomes, the more important stats like those MMS provides become. For more background, you should review the MMS section of Chapter 9.
Implementing a Replica Set
In this section, you will learn how to set up a simple replica set configuration. You will also learn how to add and remove members from the cluster. As discussed earlier, replica sets are based on the concept of a single primary server and a number of secondary or arbiter servers that will replicate writes from the primary (see Figure 11-3).
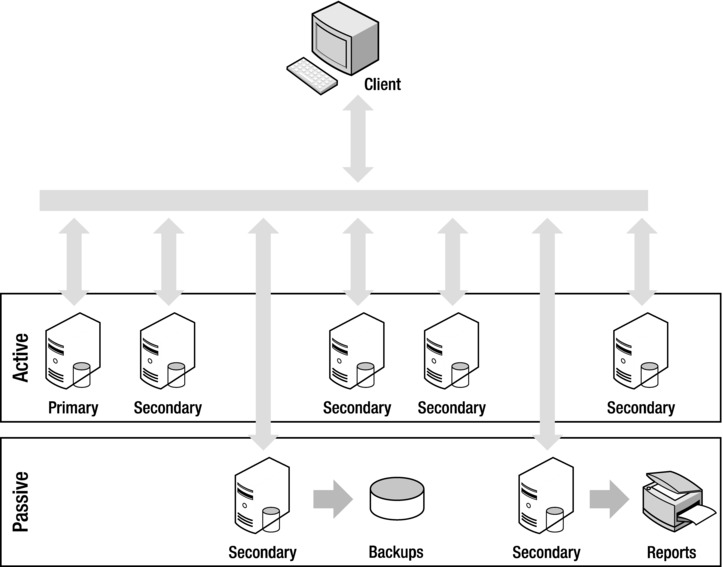
Figure 11-3. A cluster implemented with a replica set
Replica sets also feature the concept of active and passive members. Passive secondary servers don’t participate in elections for a new primary when the current primary becomes unavailable; instead, they serve the same purpose as hidden members, and they can be used as reporting or backup datasets.
Member servers of replica sets do not need to be designated as set members on startup. Instead, configuration is done through server-level commands that are sent through the normal server interface. This makes it easier to create configuration management tools that allow dynamic configuration and management of clusters of machines.
In the upcoming sections, you will learn how to accomplish the following:
- Create a replica set.
- Add a server to a replica set.
- Add an arbiter to a replica set.
- Inspect and perform operations on a replica set.
- Configure individual members of a replica set.
- Connect to a replica set from your application.
- Set Read Preference from within your application
- Set Write Concern from within your application
- Use Replica Set tags with Read Preference and Write Concern
- Use the web interface to inspect the status of your replica set
Creating a Replica Set
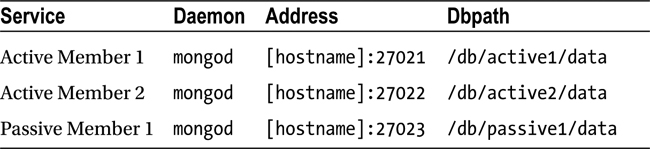
The best way to learn how to create a replica set is by looking at an example. In the example that follows, you will create a replica set called testset. This set will have three members (two active and one passive). Table 11-1 lists the members of this set.
Table 11-1. Configuring the Replica Set
Replica sets will allow you to use localhost as an identifier, but only when all machines are co-located on one server. This occurs as each member of a replica set must be able to contact all other MongoDB instances via hostname for replication to function.
Normally when working with replica sets we use hostnames; you can find the current hostname by using the hostname command, as in the following example:
$hostname
Pixl.local
In the examples that follow, replace the term [hostname] with whatever value is returned by running the hostname command on your own system.
Getting a Replica Set Member Up and Running
The first step is to get the first active member up and running. To do so, open a terminal window and type the following:
$ mkdir -p /db/active1/data
$ mongod --dbpath /db/active1/data --port 27021 --replSet testset
The --replSet option tells the instance the name of the replica set it is joining. This is the first member of the replica set, so you can give it the address of any other member, even if that member has not been started up yet. Only one member address is required, but you can also provide the names of other members by separating their addresses with commas, as shown in the following example:
$ mongod --dbpath /db/active1/data --port 27021 --replSet testset
![]() Note If you don’t wish to run each of these MongoDB instances in its own shell instance, you can add the –-fork and –-logpath <file> options to tell this instance to open itself in the background and direct its logging to the specified file.
Note If you don’t wish to run each of these MongoDB instances in its own shell instance, you can add the –-fork and –-logpath <file> options to tell this instance to open itself in the background and direct its logging to the specified file.
To keep things simple, this example will rely on only one address. The next step is to get the other members up and running. Do so by opening two more terminal windows, and then type the following into the first window to get the second member up and running:
$ mkdir -p /db/active2/data
$ mongod --dbpath /db/active2/data --port 27022  --replSet testset
Next, type this into the second window to get the final (passive) member up and running:
$ mkdir -p /db/passive1/data
$ mongod --dbpath /db/passive1/data --port 27023 --replSet testset
At this point, you have three server instances running and communicating with each other; however, you do not quite have your replica set running, because you haven’t yet initialized the replica set and instructed each member about its role and responsibilities.
To do that, you need to attach to one of the servers and initialize the replica set. The following code selects the first server to attach to:
$mongo [hostname
]:27021
Next, you need to initialize the first member of this set to create its oplog and a default configuration document. You can see the MongoD instance suggesting that you need to do this in your logfiles:
Mon Jun  3 21:25:23.712 [rsStart] replSet can't get local.system.replset config from self or any seed (EMPTYCONFIG)
Mon Jun  3 21:25:23.712 [rsStart] replSet info you may need to run replSetInitiate -- rs.initiate() in the shell -- if that is not already done
So run the rs.initiate command:
> rs.initiate()
{
     "info2" : "no configuration explicitly specified -- making one",
     "me" : "[hostname]:27021",
     "info" : "Config now saved locally. Should come online in about a minute.",
     "ok" : 1
}
Finally, you should check the status of the replica set to determine whether it has been set up correctly:
>rs.status()
{
     "set" : "testset",
     "date" : ISODate("2013-06-03T11:28:58Z"),
     "myState" : 1,
     "members" : [
          {
               "_id" : 0,
               "name" : "[hostname]:27021",
               "health" : 1,
               "state" : 1,
               "stateStr" : "PRIMARY",
               "uptime" : 264,
               "optime" : {
                    "t" : 1370258919,
                    "i" : 1
               },
               "optimeDate" : ISODate("2013-06-03T11:28:39Z"),
               "self" : true
          }
     ],
     "ok" : 1
}
The output here indicates that all is OK: you’ve successfully configured, set up, and initialized a new replica set. Remember that you should use the name of your own machine in place of [hostname] because neither “localhost” nor “127.0.0.1” will work.
Adding a Server to a Replica Set
Now that you have started your new replica set, you need to start adding members to it. Let’s start by adding your first secondary. You can do this by simply adding the rs.add() command and providing the hostname and port of this instance. To add that, connect to your primary and run the following:
$ mongo [hostname
]:27021
> rs.add("[hostname
]:27021")
{ "ok" : 1 }
You will need to wait a minute or two as this node brings itself online, creates its own oplog, and readies itself. You can monitor the progress with rs.status() while waiting till this node comes online as a secondary:
>use admin
>rs.status() {
     "set" : "testset",
     "date" : ISODate("2013-06-03T11:36:37Z"),
     "myState" : 1,
     "members" : [
          {
               "_id" : 0,
               "name" : "[hostname]:27021",
               "health" : 1,
               "state" : 1,
               "stateStr" : "PRIMARY",
               "uptime" : 723,
               "optime" : {
                    "t" : 1370259331,
                    "i" : 1
               },
               "optimeDate" : ISODate("2013-06-03T11:35:31Z"),
               "self" : true
          },
          {
               "_id" : 1,
               "name" : "[hostname]:27022",
               "health" : 1,
               "state" : 2,
               "stateStr" : "SECONDARY",
               "uptime" : 66,
               "optime" : {
                    "t" : 1370259331,
                    "i" : 1
               },
               "optimeDate" : ISODate("2013-06-03T11:35:31Z"),
               "lastHeartbeat" : ISODate("2013-06-03T11:36:35Z"),
               "lastHeartbeatRecv" : ISODate("2013-06-03T11:36:36Z"),
               "pingMs" : 0,
               "syncingTo" : "[hostname]:27021"
          }
     ],
     "ok" : 1
}
Now let’s make use of that third passive member. First add the member as usual with rs.add():
$ mongo [hostname]:27022
> rs.add("[hostname]:27022")
{ "ok" : 1 }
Now we need to make a copy of the config document and modify it. Run the following command to create a document called conf, which contains your current replica set configuration.
> conf = rs.conf()
{
     "_id" : "testset",
     "version" : 3,
     "members" : [
          {
               "_id" : 0,
               "host" : "[hostname]:27021"
          },
          {
               "_id" : 1,
               "host" : "[hostname]:27022"
          },
          {
               "_id" : 2,
               "host" : "[hostname]:27023"
          }
     ]
}
Now that your configuration document is loaded you need to modify it. We want to set the node to be hidden and have a priority of 0, so it will not be elected to be the primary. Notice that the document has a members array, which contains a document for each member of the replica set. You need to pick the member you wish to access using the array operator []. So to create a value of hidden : true for the third member, we need to update the array element at 2 (remember, arrays start at 0). Run the following:
> conf.members[2].hidden = true
true
Now we can set a priority value of 0 using the same commands:
> conf.members[2].priority = 0
0
You can output this config document by simply executing the name of the variable you placed the config document into:
> conf
{
     "_id" : "testset",
     "version" : 3,
     "members" : [
          {
               "_id" : 0,
               "host" : "[hostname]:27021"
          },
          {
               "_id" : 1,
               "host" : "[hostname]:27022"
          },
          {
               "_id" : 2,
               "host" : "[hostname]:27023",
               "hidden" : true,
               "priority" : 0
          }
     ]
}
As you can see, this member now has the hidden value set and a priority of 0. Now all we need to do is update the replica set configuration to use this document. We do this by issuing the rs.reconfig ( ) command with our new config document as an argument.
> rs.reconfig(conf)
Tue Jun  4 20:01:45.234 DBClientCursor::init call() failed
Tue Jun  4 20:01:45.235 trying reconnect to 127.0.0.1:27021
Tue Jun  4 20:01:45.235 reconnect 127.0.0.1:27021 ok
reconnected to server after rs command (which is normal)
Your whole replica set lost connectivity and then reconnected! This happens because of the reconfiguration. Any changes to a replica set will potentially cause a replica set to reconfigure itself and have a new election, which under most circumstances has the previous primary step back into its role. Now if we re-run the rs.conf() command you can see your new replica set configuration in action.
> rs.conf()
{
     "_id" : "testset",
     "version" : 4,
     "members" : [
          {
               "_id" : 0,
               "host" : "[hostname]:27021"
          },
          {
               "_id" : 1,
               "host" : "[hostname]:27022"
          },
          {
               "_id" : 2,
               "host" : "[hostname]:27023",
               "priority" : 0,
               "hidden" : true
          }
     ]
}
Notice that this replica set configuration’s version number has now increased. This happens automatically as part of the reconfiguration to ensure that any replica set members don’t have the wrong configuration document.
You should now have a fully configured and working three-member replica set with an active primary and a hidden “passive.”
Adding an Arbiter
Adding an arbiter to be a voting member of your replica set is an easy process. Let’s start by spinning up a new member.
$ mkdir -p /db/arbiter1/data
$ mongod --dbpath /db/ arbiter1/data --port 27024  --replSet testset –rest
Now that you have a new member created, it’s just a matter of adding the new arbiter with the rs.addArb() command:
>rs.addArb("[hostname]:27024")
{ "ok" : 1 }
And if you now run rs.status(), you will see your arbiter in the output:
{
     "_id" : 3,
     "name" : "Pixl.local:27024",
     "health" : 1,
     "state" : 7,
     "stateStr" : "ARBITER",
     "uptime" : 721,
     "lastHeartbeat" : ISODate("2013-06-07T11:21:01Z"),
     "lastHeartbeatRecv" : ISODate("2013-06-07T11:21:00Z"),
     "pingMs" : 0
}
You may have recognized a problem here; we have four nodes now. That’s an even number, and even is bad! If we continue to run like this, your MongoDB nodes will start logging the following:
[rsMgr] replSet total number of votes is even - add arbiter or give one member an extra vote
To fix that, we know that we need to have an odd number of members; so one potential solution is to add another arbiter as the log message suggests, but that’s not strictly elegant as we add extra complexity that isn’t required. The best solution is to stop one of the existing nodes from voting and being viewed as a member of the quorum. We can do this by setting votes to zero for our hidden secondary. We do this in the same manner as we did to set the hidden and priority values.
conf = rs.conf()
conf.members[2].votes = 0
rs.reconfig(conf)
And that’s it. We have now set our passive node to be truly passive: it will never become primary; it is viewed as part of the replica set by clients; and it cannot participate in elections or be counted toward a majority. To test this, you can try shutting down the passive node, and the arbiter and your other two nodes will continue on primary unchanged; whereas before, the primary would have stepped down, citing that it could not see a majority of nodes.
Replica Set Chaining
You have seen that normally a member of a replica set will attempt to sync data from the primary of that set. But that is not the only place replica set secondaries can sync from; they can also sync-from other secondaries. In this manner your secondaries can form a “sync-chain,” in which each one syncs the latest data from other secondaries in your replica set.
Managing Replica Sets
MongoDB provides a number of commands for managing the configuration and status of a replica set. Table 11-2 shows the available commands that you can use to create, manipulate, and inspect the state of a cluster in a replica set.
Table 11-2. Commands for Manipulating and Inspecting Replica Sets
Command |
Description |
|---|---|
| rs.help() | Returns the list of the commands in this table. |
| rs.status() | Returns information about the current state of the replica set. This command lists each member server, along with information about its status, including the last time it was contacted. This call can be used to provide a simple health check of the entire cluster. |
| rs.initiate() | Initializes a replica set using default parameters. |
| rs.initiate(replSetcfg ) | Initializes a replica set using a configuration description. |
| rs.add("host :port ") | Adds a member server to the replica set with a simple string that provides hostname and (optionally) a specific port. |
| rs.add(membercfg ) | Adds a member server to the replica set using a configuration description. You must use this method if you want to specify specific attributes (for example, a priority for the new member server). |
| rs.addArb("host:port") | Adds a new member server to operate as an arbiter. The member does not need to have been started with a --replSet option; any mongod instance running on any reachable machine can perform this task. Take care that this server is reachable by all members of the replica set. |
| rs.stepDown() | Makes the primary server relinquish its role and forces the election of a new primary server in the cluster when you run this command against the primary member of a replica set. Note that only active secondary servers are available as candidates for becoming the new primary server and the original primary may be re-elected if no other candidate member is available after 60 seconds of waiting. |
| rs.syncFrom("host:port") | Make a secondary sync from a given member. Can be used to form a sync chain. |
| rs.freeze(secs) | Freeze a given member and make it ineligible from becoming a primary for the specified number of seconds. |
| rs.remove("host:port") | Remove a given member from a replica set. |
| rs.slaveOk() | Set this connection so that it will allow reads from secondaries. |
| rs.conf() | Redisplays the configuration structure of the current replica set. This command is useful for obtaining a configuration structure for a replica set. This configuration structure can be modified and then supplied to rs.initiate() again to change the structure’s configuration. This technique provides the only supported way to remove a member server from a replica set; there is currently no direct method available for doing that. |
| db.isMaster() | This function is not specific to replica sets; rather, it is a general replication support function that allows an application or driver to determine whether a particular connected instance is the master/primary server in a replication topology. |
The following sections take a closer look at some of the more commonly used commands listed in Table 11-2, providing additional details about what they do and how to use them.
Inspecting an Instance’s Status with rs.status( )
As you should be aware to from our earlier adventures in adding members to a replica set, rs.status()is probably the command that you will use most often when working with replica sets. It allows you to inspect the status of the instance you are currently attached to, including its role in the replica set:
>rs.status()
> rs.status();
{
     "set" : "testset",
     "date" : ISODate("2013-06-04T10:57:24Z"),
     "myState" : 1,
     "members" : [
          {
               "_id" : 0,
               "name" : "[hostname]:27021",
               "health" : 1,
               "state" : 1,
               "stateStr" : "PRIMARY",
               "uptime" : 4131,
               "optime" : Timestamp(1370340105, 1),
               "optimeDate" : ISODate("2013-06-04T10:01:45Z"),
               "self" : true
          },
          {
               "_id" : 1,
               "name" : "[hostname]:27022",
               "health" : 1,
               "state" : 2,
               "stateStr" : "SECONDARY",
               "uptime" : 3339,
               "optime" : Timestamp(1370340105, 1),
               "optimeDate" : ISODate("2013-06-04T10:01:45Z"),
               "lastHeartbeat" : ISODate("2013-06-04T10:57:23Z"),
               "lastHeartbeatRecv" : ISODate("2013-06-04T10:57:23Z"),
               "pingMs" : 0,
               "syncingTo" : "[hostname]:27021"
          },
          {
               "_id" : 2,
               "name" : "[hostname]:27023",
               "health" : 1,
               "state" : 2,
               "stateStr" : "SECONDARY",
               "uptime" : 3339,
               "optime" : Timestamp(1370340105, 1),
               "optimeDate" : ISODate("2013-06-04T10:01:45Z"),
               "lastHeartbeat" : ISODate("2013-06-04T10:57:22Z"),
               "lastHeartbeatRecv" : ISODate("2013-06-04T10:57:23Z"),
               "pingMs" : 0,
               "syncingTo" : "[hostname]:27021"
          }
     ],
     "ok" : 1
}
Each field shown in the example has a meaning, as described in Table 11-3. These values can be used to understand the status of current members of the replica set.
Table 11-3. Values for the rs.status Fields
Value |
Description |
|---|---|
| _id | The ID of this member as part of the replica set |
| Name | The member’s hostname |
| Health | The health value of the replSet |
| State | The numeric value of the state |
| StateStr | The string representation of this replica set member’s state |
| Uptime | How long this member has been up |
| optime | The time of the last operation applied on this member, in the format of a timestamp and an integer value |
| optimeDate | The date of the last applied operation |
| lastHeartbeat | The date of the last heartbeat sent |
| lastHeartbeatRecv | The date of the last heartbeat received |
| pingMs | The ping time between the member on whom rs.status() was run and each remote member |
| syncingTo | The member of the replica set to which this given node is syncing to match |
In the preceding example, the rs.status() command was run against the primary server member. The information returned for this command shows that the primary server is operating with a myState value of 1; in other words, the “Member is operating as a primary (master).”
Forcing a New Election with rs.stepDown( )
You can use the rs.stepDown() command to force a primary server to stand down for 60 seconds; the command also forces the election of a new primary server. This command is useful in the following situations:
- When you need to take the server hosting the primary instance offline, whether to investigate the server or to implement hardware upgrades or maintenance.
- When you want to run a diagnostic process against the data structures.
- When you want to simulate the effect of a primary failure and force your cluster to fail over, so you can test how your application responds to such an event.
The following example shows the output returned if you run the rs.stepDown() command against the testset replica set:
> rs.stepDown()
> rs.status()
{
     "set" : "testset",
     "date" : ISODate("2013-06-04T11:19:01Z"),
     "myState" : 2,
     "members" : [
          {
               "_id" : 0,
               "name" : "[hostname]:27021",
               "health" : 1,
               "state" : 2,
               "stateStr" : "SECONDARY",
               "uptime" : 5428,
               "optime" : Timestamp(1370340105, 1),
               "optimeDate" : ISODate("2013-06-04T10:01:45Z"),
               "self" : true
          },
          {
               "_id" : 1,
               "name" : "[hostname]:27022",
               "health" : 1,
               "state" : 2,
               "stateStr" : "SECONDARY",
               "uptime" : 4636,
               "optime" : Timestamp(1370340105, 1),
               "optimeDate" : ISODate("2013-06-04T10:01:45Z"),
               "lastHeartbeat" : ISODate("2013-06-04T11:19:00Z"),
               "lastHeartbeatRecv" : ISODate("2013-06-04T11:19:00Z"),
               "pingMs" : 0,
               "syncingTo" : "[hostname]:27021"
          },
          {
               "_id" : 2,
               "name" : "[hostname]:27023",
               "health" : 1,
               "state" : 2,
               "stateStr" : "SECONDARY",
               "uptime" : 4636,
               "optime" : Timestamp(1370340105, 1),
               "optimeDate" : ISODate("2013-06-04T10:01:45Z"),
               "lastHeartbeat" : ISODate("2013-06-04T11:19:01Z"),
               "lastHeartbeatRecv" : ISODate("2013-06-04T11:19:00Z"),
               "pingMs" : 0,
               "lastHeartbeatMessage" : "db exception in producer: 10278 dbclient error communicating with server: [hostname]:27021",
               "syncingTo" : "[hostname]:27021"
          }
     ],
     "ok" : 1
}
In this example, you ran the rs.stepDown() command against the primary server. The output of the rs.status() command shows that all members of the replica set are now secondaries. If you run rs.status() subsequently, you should see that another member has stepped up to be primary (assuming one is eligible).
Determining If a Member Is the Primary Server
The db.isMaster() command isn’t strictly for replica sets. Nevertheless, this command is extremely useful because it allows an application to test whether a current connection is to a primary server:
>db.isMaster()
{
     "setName" : "testset",
     "ismaster" : true,
     "secondary" : false,
     "hosts" : [
          "[hostname]:27022",
          "[hostname]:27021"
     ],
     "primary" : "[hostname]:27022",
     "me" : "[hostname]:27022",
     "maxBsonObjectSize" : 16777216,
     "maxMessageSizeBytes" : 48000000,
     "localTime" : ISODate("2013-06-04T11:22:28.771Z"),
     "ok" : 1
}
If you run isMaster() against your testset replica set cluster at this point, it shows that the server you have run it against is not a master/primary server ("ismaster" == false). If the server instance you run this command against is a member of a replica set, the command will also return a map of the known server instances in the set, including the roles of the individual servers in that set.
Configuring the Options for Replica Set Members
The replica set functionality includes a number of options you can use to control the behavior of a replica set’s members. When you run the rs.initiate(replSetcfg) or rs.add(membercfg) options, you have to supply a configuration structure that describes the characteristics of a replica set’s members:
{
  _id : <setname>,

  members: [
    {
      _id : <ordinal>,
      host : <hostname[:port]>,
      [ priority: <priority>, ]
      [arbiterOnly : true, ]
      [ votes : <n>, ]
      [ hidden: true, ]
      [ tags: { document }, ]
      [ slaveDelay: <seconds>, ]
      [ buildIndexes: true, ]
    }
    , ...
  ],

  settings: {
    [ chainingAllowed : <boolean>, ]
    [ getLastErrorModes: <modes>, ]
    [ getLastErrorDefaults: <lasterrdefaults>, ]
  }
}
For rs.initiate(), you should supply the full configuration structure, as shown here. The topmost level of the configuration structure itself includes three levels: _id, members, and settings. The _id is the name of the replica set, as supplied with the --replSet command-line option when you create the replica set members. The members array consists of a set of structures that describe each member of the set; this is the member structure that you supply to the rs.add() command when adding an individual server to the set. Finally, the settings array contains options that apply to the entire replica set.
Organization of the members Structure
The members structure contains all the entries required to configure each of the member instances of the replica set; you can see all of these entries listed in Table 11-4.
Table 11-4. Configuring Member Server Properties
Option |
Description |
|---|---|
| members.$._id | (Mandatory) Integer: This element specifies the ordinal position of the member structure in the member array. Possible values for this element include integers greater than or equal to 0. This value enables you to address specific member structures, so you can perform add, remove, and overwrite operations. |
| members.$.host | (Mandatory) String: This element specifies the name of the server in the form host:port; note that the host portion cannot be localhost or 127.0.0.1. |
| members.$.priority | (Optional) Float: The element represents the weight assigned to the server when elections for a new primary server are conducted. If the primary server becomes unavailable, then a secondary server will be promoted based on this value. Any secondary server with a nonzero value is considered to be active and eligible to become a primary server. Thus, setting this value to zero forces the secondary to become passive. If multiple secondary servers share equal priority, then a vote will be taken, and an arbiter (if configured) may be called upon to resolve any deadlocks. The default value for this element is 1.0. |
| members.$.arbiterOnly | (Optional) Boolean: This member operates as an arbiter for electing new primary servers. It is not involved in any other function of the replica set, and it does not need to have been started with a --replSet command-line option. Any running mongod process in your system can perform this task. The default value of this element is false. |
| members.$.votes | (Optional) Integer: This element specifies the number of votes the instance can cast to elect other instances as a primary server; the default value of this element is 1. |
| members.$. hidden | (Optional) Boolean: This hides the node from the output of db.isMaster() and so prevents read operations from occurring on the node, even with a secondary read preference. |
| members.$.tags | (Optional) Document: This allows you to set the tags for replica set tagged read preferences. |
| members.$.slaveDelay | (Optional) Integer: This allows you to set the slave to be “delayed” a specified number of seconds behind the primary. |
| members.$.buildIndexes | (Optional) Boolean: This option is used to disable the building of indexes. It should never bet set on a node that can theoretically become primary. This capability can be useful for backup nodes and the like when indexes are unimportant and you wish to save space. |
Exploring the Options Available in the Settings Structure
Table 11-5 lists the replica set properties available in the Settings structure. These settings are applied globally to the entire replica set; you use these properties to configure how replica set members communicate with each other.
Table 11-5. Inter-server Communication Properties for the Settings Structure
Option |
Description |
|---|---|
| settings.chainingAllowed | (Optional) Boolean: Allows you to specify if the member is allowed to replicate from other secondaries. Defaults to true |
| settings.getLastErrorModes | (Optional) Modes: Used in setting custom write concerns, as described later in this chapter. |
| Settings.getLastErrorDefaults | (Optional) Defaults: Used in setting custom write concerns |
Connecting to a Replica Set from Your Application
Connecting to a replica set from PHP is similar to connecting to a single MongoDB instance. The only difference is that it can provide either a single replica set instance address or a list of replica set members; the connection library will work out which server is the primary server and direct queries to that machine, even if the primary server is not one of the members that you provide. For this reason it is often best to specify multiple members in your connection string regardless; this way, you remove the risk associated with trying to discover from only one member which may be offline. The following example shows how to connect to a replica set from a PHP application:
<?php

$m = new MongoClient("mongodb://localhost:27021,
        localhost:27022", array("replicaSet" => "testSet"));
...
?>
Setting Read Preference from within Your Application
A read preference in MongoDB is a way to select which members of a replica set you wish to read from. By specifying a read preference to your driver you tell it to run queries against a particular member (or members) of a replica set. Currently there are five modes that you can set as read preference on your driver, as listed in Table 11-6.
Table 11-6. Read Preference Options
Option |
Description |
|---|---|
| Primary | Reads will only be directed at the primary. This read preference is blocked if used explicitly in conjunction with tagged read preferences. This is also the default read preference. |
| PrimaryPreferred | Reads will be directed at the primary, unless there is no primary available; then reads will be directed at a secondary. |
| Secondary | Reads will only be directed at secondary nodes. If no secondary is available, this option will generate an exception. |
| SecondaryPreferred | Reads will be directed at a secondary unless none is available; then reads will be directed at a primary. This corresponds to the behavior of the old “slaveOk” secondary read method. |
| Nearest | Reads from the nearest node regardless of whether that is a primary or secondary. Nearest uses network latency to determine which node to use. |
![]() Note If you set a read preference that means your reads may come from a secondary, you must be aware that this data may not be fully up to date; certain operations may not have been replicated from your primary.
Note If you set a read preference that means your reads may come from a secondary, you must be aware that this data may not be fully up to date; certain operations may not have been replicated from your primary.
You can set a read preference in PHP using the setReadPreference() command on a connection object as follows:
<?php
$m = new MongoClient("mongodb://localhost:27021,
        localhost:27022", array("replicaSet" => "testSet"));
$m->setReadPreference(MongoClient::RP_SECONDARY_PREFERRED, array());
...
?>
And from now, any queries you make on that connection will be run against secondary nodes in your cluster. You can also set read preference by adding a read preference tag to your URI. A URI with a read preference of nearest specified would look like this:
mongodb://localhost:27021,localhost:27022?readPreference=nearest
Setting Write Concern from within Your Application
Write concern is a similar concept to read preference. You use write concern to specify how many nodes this data needs to have been safely committed to before it is considered to be “complete. “This test is done using MongoDB’s Get Last Error (GLE) mechanism to check the last error that occurred on the connection. You can set several write concern modes, which allow you to configure how certain you are that a write will be persisted when it is executed. Each is listed in Table 11-7.
Table 11-7. MongoDB Write Concern Levels
Option |
Description |
|---|---|
| W=0 or Unacknowledged | A fire-and-forget write. The write will be sent, but no attempt to acknowledge if it was committed will be made. |
| W=1 or Acknowledged | A write must be confirmed by the primary. This is the default. |
| W=N or Replica Set Acknowledged | The primary must confirm the write, and N–1 members must replicate this write from the primary. This option is more robust but can cause delays if there is replication lag on members in your replica set, or if not enough members are up at the time the write is committed because of an outage or the like. |
| W=Majority | A write must be written to the primary and replicated by enough members that a majority of members in the set have confirmed the write. As with w=n, this can cause problems during outages or if there is replication lag. |
| J=true or Journaled | Can be used with w= write concerns to specify that the write must be persisted to the journal to be considered confirmed. |
In order to use a write concern with an insert, you simply add the w option to the given insert() function, as shown here:
$col->insert($document,array("w" => 1));
This attempts to insert a document into our collection with a w=1 value for an acknowledged write.
Using Tags for Read Preference and Write Concern
In addition to the read preference and write concern options just discussed, there is another way you can proceed—tags. This mechanism allows you to set custom tags on members of your replica sets and then use these tags with your read preference and write concern settings to direct operations in a more granular fashion. So, without further ado, let’s get started. You can set tags on your replica set by adding them to the tags section of your replica set config file. Let’s start by adding tags for sites of a and b to our replica set config:
conf=rs.conf()
conf.members[0].tags = {site : "a"}
conf.members[1].tags = {site : "b"}
conf.members[2].tags = {site : "a"}
rs.reconfigure(conf)
Now we can check out our new config and you can see that we have set our two sites in place; they are defined in the tags section of each configuration document.
rs.conf()
{
     "_id" : "testset",
     "version" : 8,
     "members" : [
          {
               "_id" : 0,
               "host" : "Pixl.local:27021",
               "tags" : {
                    "site" : "a"
               }
          },
          {
               "_id" : 1,
               "host" : "Pixl.local:27022",
               "tags" : {
                    "site" : "b"
               }
          },
          {
               "_id" : 2,
               "host" : "Pixl.local:27023",
               "priority" : 0,
               "hidden" : true,
               "tags" : {
                    "site" : "a"
               }
          },
          {
               "_id" : 3,
               "host" : "Pixl.local:27024",
               "arbiterOnly" : true
          }
     ]
}
Now let’s start making use of our new tags! We can set a read preference of the nearest member of our replica set in site a.
$m->setReadPreference(MongoClient::RP_NEAREST, array( array('site' => 'a'),));
Now that we have tackled read preference, let’s start on write concern. Write concern is slightly more complex, as we first need to modify our replica set configuration to add the extra getLastErrorModes. In this case we want to create a write concern stating that a given write must be committed to enough nodes to have been written to two different sites. This means a write must at minimum be committed to site a and site b. To do this we need to set the getLastErrorModes variable to be a document that contains the name of our new write concern and a rule that says we want it written to two different “site” tags. This is done as follows:
conf = rs.conf()
conf.settings. getLastErrorModes = { bothSites : { "site": 2 } } }
rs.reconfig(conf)
Now we need to insert our document and specify our new write concern.
$col->insert($document, array("w" => "bothSites"));
It’s as easy as that. Now we can guarantee that our writes are committed to both sites! Now, let’s say we want to make this the default write concern for any write made to our cluster.
conf = rs.conf()
conf.settings.getLastErrorDefaults = { bothSites : 1 } }
rs.reconfig(conf)
Now any writes we make will be made using the default write concern of bothSites. So if we just perform a vanilla insert!
Summary
MongoDB provides a rich set of tools for implementing redundant and robust replication topologies. In this chapter, you learned about many of these tools, including some of the reasons and motivations for using them. You also learned how to set up many different replica set topologies. Additionally, you learned how to inspect the status of replication systems using both the command-line tools and the built-in web interface. And finally, you learned how to set up and configure read preferences and write concerns to ensure that you are reading from and writing to the correct places.
Please take the time required to evaluate each of the options and functions described in this chapter to make sure you build a replica set best suited to your particular needs before attempting to use one in a production environment. It is incredibly easy to use MongoDB to create test beds on a single machine; just as we have done in this chapter. Therefore you are strongly encouraged to experiment with each method to make sure that you fully understand the benefits and limitations of each approach, including how it will perform with your particular data and application.