CHAPTER 7
Capture User-Centric Requirements
Frame desired functionality from your user’s point of view and remain adaptable to new learning.
What you’ll learn in this chapter
1 How to collaborate with a broad range of stakeholders to define powerful customer and business-centric requirements.
2 What methodologies to use to capture product-requirement details and the expected outcomes in a way that is flexible and time-efficient.
3 How to create and regularly groom a product backlog, ensuring you execute the most critical, timely needs.
Collaborate on—Do Not Collect—Requirements
Now that you have completed high-level specifications for your initiative’s goals and functionality (Chapter 6) and have stakeholder support, your prioritized project moves into execution mode. Next, you need to define detailed requirements so that your team can determine the set of experiences, technologies, and systems it must build. In turn, this will ascertain the resourcing requirements, dependencies, and timing.
When compiled, a set of requirements will cover the following:
• How specific customer and user segments will benefit from using the product in unique and different ways.
• The functional needs of each user segment on all supported platforms (if your product is user-facing, these needs will also require interaction and visual designs).
• The set of inputs and outputs, as well as outcomes, the system must support.
• What you need to support a product (marketing, sales, operations, tracking, and reporting) and required integrations with partner or company systems.
• Nonfunctional constraints and considerations (such as those of authentication, legal, security, or throughput/scale).
• Edge cases, error handling, and exception management.
There are many ways to specify product requirements; companies and teams adapt how and when they define and document them to suit their needs. They collectively decide how much clarity is needed to prioritize initiatives and to make go/no go decisions, as well as how much detail engineering needs to deliver the technology.
Reach an agreement with your team on the best requirements definition, approach, and tools. Keep the end goal in mind—you want a high-performing team that knows what’s expected and has the necessary details to deliver value to your customers and organization. Your agreed approach must provide a mutual understanding of what items are required, why, and in what priority. The resulting processes, on the surface, may not look much like those of other companies or even teams within the same company.
Specifically, great product requirements:
• Explicitly express needs in terms of the business and customer value they will deliver. (Don’t just list a set of features or tasks.)
• Invite engagement and negotiation with implementation teams and stakeholders and enable flexibility with learning through “just-in-time” elaboration.
• Avoid wasteful discussion and documentation by not introducing detail too early that might potentially be wrong or need to be discarded.
• Keep estimation simple and high-level but allow for a predictable project timeline to emerge over time. (You might start, for example, with a rough “level of effort” [LOE] and become more exact as more details surface.)
• Prevent premature commitment to design options or solutions and leave technical decisions to the architects, engineers, and testers.
• Provide clarity on acceptance criteria so all involved know what the definition of “done” is.
• Organize needs such that their relative priority to one another is clear.
Your job is not to collect requirements. Don’t ask customers or managers for what features they want in the product, for you to add to your backlog. Also, do not define your own set of requirements in isolation—don’t just specify what you think should be in the product and how you think it should function, while preempting the clarification questions that you think your team might ask.
At its core, capturing requirements is a collaborative exercise, not a gathering exercise. You will collaborate with four key groups:
• Product development teams—Your user experience group has access to consumer insights and specializes in exploring alternative solutions. Your engineering team is immersed in the product and can guide you toward feasible technical solutions and identify possible tradeoffs.
• Peers and colleagues—Your peer product managers can provide a second opinion on scope and priorities, and identify dependencies with their own products.
• Cross-functional business teams—Often overlooked, other departments can also inform your requirements needs. Some must support your new product once it’s in the market and, therefore, they may require operational processes, tools, data, and tracking and reporting to be defined. In addition, marketing, sales, and customer support are excellent sources for identifying market trends, pinpointing existing problems, and providing input on prioritizing product features. Likewise, consumer insights and analytics teams can help you gather or access data to drive your decision-making.
• Customers—Don’t ask customers to tell you what they want, but do observe them. It will help you to prioritize their pain points and new needs and to validate improvements to your solutions. Avoid selection bias—talk with not only current customers but also potential customers, lapsed customers, and customers using competitors’ products.
This chapter is intended to be a starting point—outlining principles and techniques you can adapt to your unique environment. I’ll focus on user stories and product backlogs since, when used well, these frameworks embody all the best practices outlined. User stories capture the needs of the customer and business, and you can enlarge or refine them as you learn more details. A product backlog is a loosely prioritized collection of requirements at different levels of completeness, detail, and size, which you can add to or change at any time.
Avoid Introducing Wasteful Requirements Detail Too Early
Early in my career, I worked at an organization with a culture common to older enterprise companies. Decision-makers wanted all the details up front to help them manage the approvals process, set deadlines, identify risks, and confirm resource allocations. The engineering team needed highly specific requirements before it could engage in this process.
I was to create a mobile application for enterprise users—an automated travel assistant for employees’ travel, accommodations, and dining needs.
The four documents required before the project could be approved took two months to draft:
• Market requirements (MRD)—20 pages
• Product requirements (PRD)—32 pages
• UI flow specification—18 pages
• Detailed UI functional specification—56 pages
Engineering had limited availability, and I knew of only one engineer who ever read all the documentation. By the time implementation could kick off, many features needed removal from the first version of the product due to feasibility and resourcing constraints. There were many rewrites of the PRD and frequent updates to the UI specifications.
The team recommended alternatives and helped to prioritize features requiring less effort—those that were more achievable but still important. The resulting application changed substantially over the course of the project. The version outlined in my detailed documentation was barely recognizable in the final working version. We realized only a fraction of the full product I’d spent so much time defining and designing.
To illustrate user stories in action, I’ll use examples for a fictitious financial literacy application (Centsible). This mobile-only application targets millennials—in particular, recent college graduates—who wish to improve their management of personal finances.
Users validate their knowledge by taking quizzes, and their answers are used to recommend the video content or articles they need to improve their financial literacy. They can link credit cards to track their spending and receive personalized recommendations. The product makes money through affiliate commissions received from recommending financial products, such as credit cards or loans, and through online advertising. You can view an introduction to the product (and a short demo) and a link to a set of partially completed user stories for the application in the product backlog at http://www.influentialpm.com. (You’ll find the stories under “Current/backlog” and “Epics” in the linked backlog.)
Overview of User Stories
There are many ways to structure your requirements, but however you do it, ensure you follow industry standard practices. A popular approach is the user story. Even if you do not use user stories in your environment, understanding the overall design and applying the underlying methodology can help you write and manage better requirements.
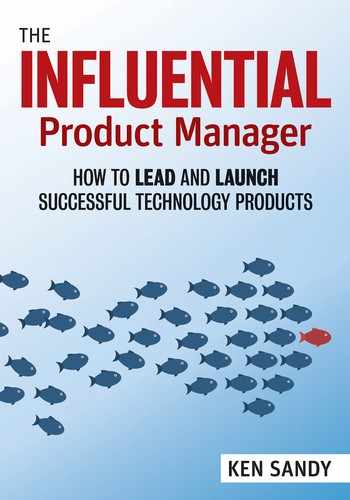
As illustrated in Figure 7.1, the user-story template comprises three components:
1. The card—This is the most familiar element of a user story. Don’t mistake the card as the user story—as we will see, it is just the starting point.
2. The conversation—This component comprises the details and specifications for the requirement generated through questions and clarifications with stakeholders and team members (it is not written in isolation).
3. The confirmation—Also known as acceptance criteria, this element includes the tests that the user story must pass for you to consider it done (“potentially deployable code” as in functionally complete with a requisite level of proven quality).
1. The Card
The card syntax can be any useful description of the contents of the user story. However, the most common format uses the following statement (which captures the user-centric intent of the story):
As a [type of user], I want [to do something] so that [benefit or value].
The card encapsulates these questions:
• Who are we building this for? (Which target user or stakeholder?)
• What are we building? (As described by the target user’s intention.)
• Why are we building it? (What is its value to the target user?)
This format has the advantage of anchoring product development in terms of value to the customer and business, rather than as a feature request or systems specification. It enables you and your team to understand why you are working on a requirement and the intended end result, so you can collaborate to find the best solution to get there. Nothing in the statement dictates precisely how you must build your product or solution.
User stories—or any requirement format—can exist at any level of specificity. You can capture a user story whether it is vague and high-level or detailed and at an incremental feature level. Here are some examples of typical user stories:
“As a recent college graduate, I want to learn about responsible personal finance so that I can confidently manage my money.”—A high-level user story for the finance application Centsible.
Within this high-level story exist smaller, constituent user stories such as this one:
“As a user, I can take a multiple-choice quiz consisting of 10 questions that are relevant to the lesson.”
But this is a poor user story: the word “user” is too generic, the solution is prescribed, and no user value (the why) is given.
So a better variant might be,
“As a newly registered user, I want a formative assessment of my current knowledge so that I can be guided toward relevant lessons and improve my skills efficiently.”
You might break down this smaller story into highly specific user stories detailing individual components. Consider the following stories, for example:
“As a test taker, I want to receive a score at the end of the quiz so that I know my level of mastery.”
“As a test taker, I want to receive hints during the quiz so that I learn even when I get stuck.”
“As a test taker, I can quit a quiz and save my progress so that I can return later and pick up where I left off.”
“As a content production employee, I want to be able to write new questions and answers so that I can keep available tests relevant and engaging for users.”
User stories can be for any kind of user, not just end users. In the last story above, the user is an internal stakeholder—the content production employee who is writing tests for users. This requirement captures the need for an administration tool to create and manage the tests offered to end users, which will be used by personnel within the company.
The cards capture the intent for the development of discrete business value. They are a reminder to discuss with your team the goal and the best way to implement it.
2. The Conversation
The conversation is where you answer questions, clarify intent, specify functionality and implementation details, and record the decisions made along the way. Do not confuse this with documenting specifics in isolation, without input from the team—conversation is intended to be precisely that; a dialog you have with the team to elaborate needed information.
A product manager and team will find that some stories require a lot of detail while others need very little. Avoid wasting your time and energy on the low-detail stories—a short few minutes chatting or commenting on a ticket might satisfy the team’s need for guidance. Focus your energies, instead, on those user stories requiring more detail. These may require substantive elaboration—such as breaking down larger stories into smaller ones, answering team questions, and linking to supporting materials. Efficiency in communication over the completeness of the documentation is preferable.
Capture the outcomes of conversations as notes inside the user story to serve as a record of the decisions you have taken. Consider the user story “As a test taker, I want to receive a score at the end of the quiz, so I know my level of mastery.” Here’s an example of the type of conversation details that you might add to this story, after discussion and clarification with your team:
1. Why should the user care about getting a score? What is the intended outcome?
2. How is the score calculated?
3. What would a final score look like? (The number of correct answers out of 10 or a letter grade?)
4. Where and when is the score shown? (Progressively or only upon completion?)
5. Can the user retake the test? What happens to the previous score?
6. What happens after the user takes the test, and under what conditions? (Various conditions might include if the user fails, passes, or achieves a perfect score.)
7. What device platforms, markets, and languages are supported?
8. Under what conditions might a score not be able to be shown? What happens then? (These are also known as edge cases.)
To see the resulting conversation details for this user story, visit the Centsible backlog and open the top story and scroll down to the “Activity” section.
Don’t let conversations disappear into the air. Capture them from emails and briefly comment, recording conclusions from meetings at the appropriate points within the user story—enough so a new team member (or someone reading the user story for the first time) can follow it. Keep your conversations organized and readable.
Don’t, however, add every little detail; stick to the outcomes relevant to challenges with the current implementation. Similarly, do not write anything that you can more easily show in a picture. Diagrams, photos of whiteboards, and simple mock-ups can illustrate a decision, containing much useful information regarding how a system or interface should look and work. Cross-reference with links to useful secondary documentation or notes inside your user story.
Sometimes you won’t be able to answer a question. In these instances, you can do one of the following:
1. explicitly leave it to the team’s discretion to decide the best course of action;
2. delay the story for a future development cycle, so you can gather more data, seek input from stakeholders, or explore options; or
3. prioritize a research task (called a spike) to discover the answer.
3. The Confirmation
The confirmation contains the acceptance criteria your solution must meet to be considered complete and working. Acceptance criteria flow naturally from the conversation and define the minimum expectations for functionality, visual design, performance, and robustness (such as error and edge-case handling).
Acceptance criteria adhere to the following guidelines:
• They are deterministic and testable—They usually consist of a single statement with a clearly stated desired outcome (including a target if required).
• They are established before you work on a user story—New criteria should not emerge during development, since this makes it hard for developers to predict the amount of work a user story will take. New criteria identified during development become a separate user story. (However, you can give your engineering team discretion to make changes to acceptance criteria in a user story that they are currently implementing, if they can easily address them. You may also do so if it means you avoid having to complete work you know isn’t going to be valuable given new information.)

“My Engineering Team Expects Too Much Detail”
Some development teams might expect to receive highly specific and detailed specifications before any work starts. They may view the user-story approach to requirements definition as being too vague. They may think the product manager doesn’t know exactly what he or she wants. And they may not want to give up time to meet, discuss the conversational details, and ask clarifying questions.
To address this situation, before you meet with the team add some questions to the conversation that you would expect them to have. You allow your team to react and probe, clarifying details as they go, instead of working from a blank slate. In this way, you can ease your team into becoming more comfortable with user stories and other collaborative processes.
Working with your team, identify which stories need the most elaboration and why. Then ask which stories already have too much detail. What might emerge are patterns or types of stories where more detail is generally needed. For example, certain stories may require the team to work on a complex system with many user states and edge cases. Recognizing this, you know that future stories involving the same system will require more detail.
Another approach is to ask the team to put a level-of-effort (LOE) estimate against each story. Once asked, they will naturally start to ask clarifying questions, so they understand more about the scope and can make an accurate estimate.
• User stories are either “done” or “not done”—There is no “percent” done. If just one test fails, you cannot finish the user story. While any team member can write acceptance criteria, you, as product manager, are the ultimate arbiter of whether criteria are met or not. Developers shouldn’t determine whether their own code meets expectations.
One key benefit of well-written acceptance criteria is to allow the engineering team to build automated tests in parallel with development. This allows for continual debugging of code, increasing the likelihood that the user story will pass. You can avoid last-minute testing of an entire development cycle at the end, overwhelming quality assurance (QA) with a rush of code submissions that must be tested to make a deadline. Furthermore, these tests can be rerun at any time in the future to ensure later user stories did not break earlier user stories.
To see the acceptance criteria for the user story “As a test taker, I want to receive a score at the end of the quiz, so I know my level of mastery,” open the top story in the Centsible backlog.
“As a User”—Not All Users Are the Same
To avoid confusion as to the intended outcome of a user story, always specify precisely whom the story aims to serve.
For example, consider the story “As a newly registered user, I want a formative assessment of my current knowledge, so that I can be guided toward relevant lessons and improve my skills efficiently.”
If the story had begun, instead, with just “As a user” the team may have assumed the story was for all users of Centsible and not have optimized the feature around the needs of newly registered users.
Here are common classifications for different types of users:
• A target-user segment—While the product needs for many users might be identical (in which case, “As a user” suffices), each user segment may have some unique needs. If any product functionality is specifically designed to serve the needs of one persona and not another, make that explicit. Doing so is especially helpful if you are prioritizing work to deliver functionality to one user segment over another, since you can more easily group requirements and increase their priority.
• Lifecycle stages—Your users will be at different stages in their lifecycle with you. Some will be visiting your product for the first time, while others will be highly loyal repeat users. Feature development that targets new users may be irrelevant to repeat users. Similarly, subscription or freemium products commonly offer trial or limited free offerings, while reserving premium services for paid users. You must explicitly define user stories for each.
• Complementary customer types—Multiple user types deriving different benefits from the same product require their own user stories. For example, media offerings require stories to serve content to consumers, but also require stories to target advertisers’ needs (yes, ads are a product!). For enterprise offerings, the economic decision-maker, managers, and employees all need your product for different reasons. They are rarely the same individual, so you must use separate stories for each, such as “As a sales executive . . .,” “As a system admin . . .,” or “As a trainer of new employees . . . .”
![]() Refer to Chapter 3 to review target-user segments and personas, common lifecycle segments, and complementary customer types. Each may be a source for a unique set of user stories.
Refer to Chapter 3 to review target-user segments and personas, common lifecycle segments, and complementary customer types. Each may be a source for a unique set of user stories.
• Business stakeholders—You can also write stories for internal users of your system. These stakeholders require the product to meet their needs in specific ways that might not be obvious or important to your end users. Here are some typical examples:
![]() Your marketing team may want tools to segment users and personalize messaging throughout customer touch-points.
Your marketing team may want tools to segment users and personalize messaging throughout customer touch-points.
![]() Your sales and account management teams need tools to support sales, customer onboarding, and relationship management.
Your sales and account management teams need tools to support sales, customer onboarding, and relationship management.
![]() Your finance team needs stories to describe how revenue is realized, collected, and reported, along with many other metrics.
Your finance team needs stories to describe how revenue is realized, collected, and reported, along with many other metrics.
![]() Your legal team may need stringent security or compliance stories.
Your legal team may need stringent security or compliance stories.
![]() Your technical operations team requires stories for how they monitor your product and what they do when something goes wrong.
Your technical operations team requires stories for how they monitor your product and what they do when something goes wrong.
![]() You and your data analytics team need stories to define the type of data to be captured by your systems, so that you can track your KPIs and other product metrics.
You and your data analytics team need stories to define the type of data to be captured by your systems, so that you can track your KPIs and other product metrics.
How to Make Large User Stories Smaller
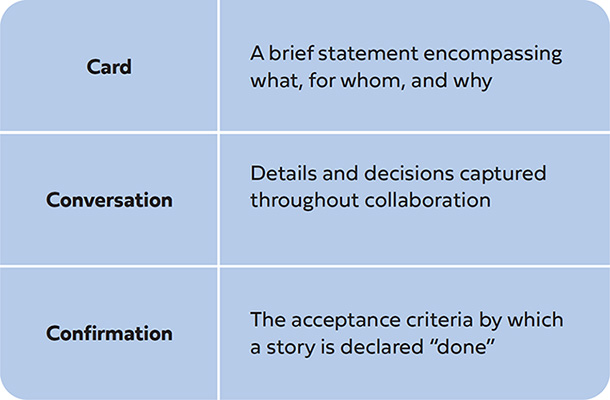
High-level stories are useful for defining an overarching user goal based on a set of product functionalities. Even if the high-level requirements are apparent, most details become clear only as you develop a system. As illustrated in Figure 7.2, for user stories to be a useful implementation tool, you must progressively break the large, vague stories into smaller, specific stories. These smaller stories have the detail necessary to enable your developers to deliver discrete pieces of functionality in a short timeframe.
User stories start with just the right level of detail to enable planning, letting you flesh out specifics as you go, in a “just-in-time” manner. High-priority detailed stories enable focus on what matters right now and with the best information available. Lower-priority, high-level stories remind you of future work without requiring you to invest in adding details until necessary. User stories are naturally easy to adapt, remove, add, or reprioritize, given new information and learning. You make decisions when they are pertinent and only once you have sufficient information to make a confident choice.
There is no canonical distinction between a high-level user story and a detailed user story. The team gets to decide which stories are too big (or too small). Your team might use development criteria, deciding that stories are too big when they take more than a couple days’ work or, if using Scrum, when they exceed a story-points threshold. The intent is to enable a high-performing team to complete quality work that contributes to your business and company goals. Keep breaking down your stories until they feel they can meet their goals.
You will break down stories both in preparation for your team (when grooming your backlog, as described later in this chapter) and, importantly, in collaboration with your team during the conversation and estimation process.
Mike Cohn, in his book User Stories Applied (2004),9 outlines seven questions to answer to help identify where larger stories can be broken down into smaller ones:
1. What are the component user workflow steps? Map out a customer journey or a conceptual wireframe of your solution. Break out each of the workflow steps into smaller stories—every separate action a user can take in each workflow could be a different story.
2. Are there multiple user types? A story that has multiple target-user types might be better broken down, one version for each of the target users. The first story will be more focused, while the second story will leverage the work of the first story and, as a result, be smaller—the “delta” required to add support for the second user type.
3. Are there multiple user operations? This is a typical scenario when manipulating data. Rather than write a single story covering multiple operations on the data, pick one operation first and include the others in subsequent stories. For example, if a user can add, edit, delete, update, filter, sort, or restore data, you can make each operation a different story.
4. Are there many data attributes? This is common when presenting structured data to the user—for example, when providing search results or multicolumn reports. Start with delivering one or two attributes to simplify your story, allowing the development team to focus on the work to get a basic case in place. Once the core work is complete, lower-priority stories might contain all the other data attributes.
5. Is the user interface complex? If there are complex interactions or tricky design components, make a simple version first and refine it later. For example, your first story for the user interface might merely be a basic form or even a command-line entry, with little or no visuals. Obviously, you’d not launch this to the end user without some visual design, so later stories can capture the implementation of detailed designs around a basic interface.
6. Can we defer complexities? Typically, functionality has three components:
![]() Core functionality, also called the “happy path,” works 99 percent or more of the time users interact with it.
Core functionality, also called the “happy path,” works 99 percent or more of the time users interact with it.
”As a User . . . So That . . .” Fatigue
As stories become highly granular and specific, it may become tedious to write the user type and articulate the benefit when the target user and outcome are obvious or trivial. Provided your team can avoid confusion and everyone fully appreciates the context for each story, you can simply focus on the desired functionality, and drop the user and benefit reference when writing smaller stories.
![]() Edge and error cases are how you handle situations when things go wrong—such as when users enter data incorrectly or do something unexpected.
Edge and error cases are how you handle situations when things go wrong—such as when users enter data incorrectly or do something unexpected.
![]() Performance is the ability, at launch, to operate smoothly at the required scale.
Performance is the ability, at launch, to operate smoothly at the required scale.
You can separate each component into distinct user stories, with complexities left for later. Complete core functionality first and then edge cases, with performance hardening last (and perhaps much later after you complete the initial story).
7. Do we need a spike? You add discovery stories or “spikes” when you must make a critical decision before you can address your user story. If there are too many open questions remaining, run a proof-of-concept, build a prototype, experiment, or conduct additional research to get answers. Create and prioritize a separate spike user story and return to the original user story only after the spike is complete and new learning can be usefully applied.
At http://www.influentialpm.com, you will find a detailed breakdown applying each of these seven techniques to the high-level Centsible story “As a recent college graduate, I want to learn about responsible personal finances so that I can confidently manage my money.”
How to Define Acceptance Criteria
If you and your team have been carefully documenting details in the conversation component of the user story, you can easily define acceptance criteria. These details will suggest tests you might run. You do not usually need to identify every single use case or scenario. Look to write tests that will demonstrate a robust system but not place undue burden on the development or testing team. Passing all of these critical tests means the user story can be declared done.
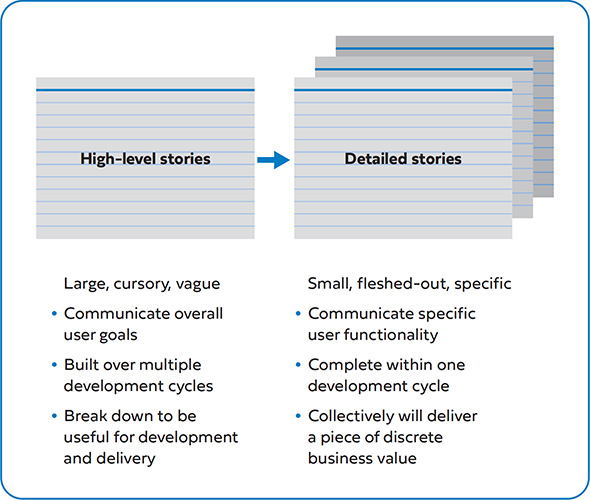
Encapsulate acceptance criteria in a simple statement describing what the test will be. Complement it with a target outcome if the intended result is not apparent. For example, in the Centsible application, you will likely allow users to use popular credit cards (like Visa, MasterCard, and maybe American Express) and mandate their usage in acceptance criteria. Don’t just validate that functionality works as expected but include unexpected user or system behavior that may lead to an undesirable outcome. For Centsible, you might also add a test against linking debit cards but require this case to fail (if you do not support tracking activity on debit cards).
Pay attention to the following areas in your validation process:
• Functionality—Ensure that features work for all of the agreed-upon cases (such as credit cards) and don’t work for the defined counter cases (debit cards, for instance).
• Design—Assuming your product has a user interface, include visual inspection of the service as validated against the provided design specs. State the platforms you will support but consider whether you should split stories for features across multiple platforms into separate stories (for example, supporting both iOS and Android may not be in a single user story).
• Performance—Validate nonfunctional specifications and constraints to ensure the application will work at the expected scale. Possible acceptance criteria might include:
![]() response time (speed)
response time (speed)
![]() data tracking, accuracy
data tracking, accuracy
![]() testability (coverage)
testability (coverage)
![]() availability (uptime)
availability (uptime)
![]() security
security
![]() throughput (capacity)
throughput (capacity)
Usually, performance criteria are determined in collaboration with your technical teams and are not necessary for stories very early in the product-development process—or they may be separated into their own set of stories to prioritize later. Do not set unreasonable levels but do test at your expected “peaks” (not averages). Too many performance criteria burden development, so be judicious.
• Stress tests—Think about all the things that could go wrong, either through user error or unexpected system responses. Common examples include:
![]() incomplete, incorrect, or skipped user data entry;
incomplete, incorrect, or skipped user data entry;
![]() corrupted data;
corrupted data;
![]() a sudden loss of connectivity or a sudden switch to “offline” mode (on mobile phones);
a sudden loss of connectivity or a sudden switch to “offline” mode (on mobile phones);
![]() security or DOS attacks (hackers are happily intent on stress-testing your applications—better you find the holes before they do).
security or DOS attacks (hackers are happily intent on stress-testing your applications—better you find the holes before they do).
Table 7.1 illustrates the four types of criteria, with four examples each, for the “link credit card” feature in Centsible.
TABLE 7.1 Acceptance criteria for a Centsible user story
The Product Backlog
The product backlog is a flexible master list of all the requirements for your active product initiative. It is a forced-rank prioritized list of requirements put roughly in the order you’d like them to be implemented. It will likely be a mixture of smaller, detailed, high-priority requirements (those that you will implement soon) and more substantial, vague, lower-priority requirements (describing future functionality) as illustrated in Figure 7.3.
You refine and change your backlog as you learn more about your product and customer needs. Sweat the details at the top of the backlog. Since you will work on requirements closer to the top before those that are lower down, concentrate on adding details and accurate estimates and carefully prioritize the most important. For immediate priorities, you must have broken the stories down and ensured there is sufficient detail in the conversation for development to proceed. Your team needs clarity for anything likely to be considered in the next few iterations. Beyond that, approximations are okay.
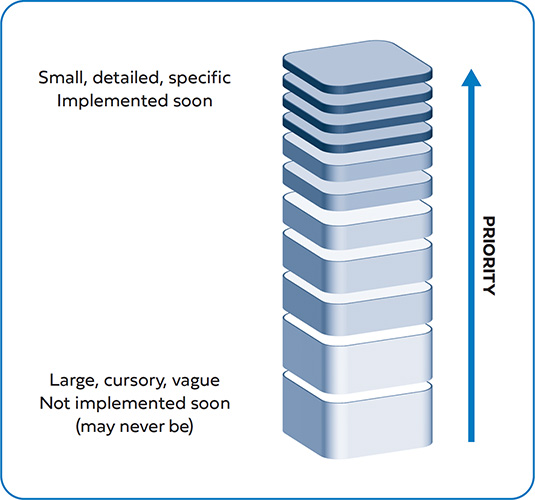
FIGURE 7.3 A conceptual product backlog
Your product backlog contains requirements that relate to currently prioritized and committed initiatives—whether active or soon-to-be active.
Other kinds of backlogs are the idea backlog and the icebox. In the idea backlog, you place potential future initiatives—any ideas you’ve gathered from stakeholders, projects you would like to get to eventually, and anticipated but (as of yet) uncommitted items on your roadmap.
In the icebox, place any old or low-priority items (anything you are not likely to work on anytime soon). That way, you don’t pollute your product backlog with random entries.
Whether you combine these backlogs into one area within a single tool or split them is up to you and your team. For an idea backlog, you might use a simple spreadsheet: include brief descriptions of each idea and use columns to rank overall priorities (see Chapter 4). For a product backlog, you might use a ticket-based project management tool, so the team can quickly move requirements through development phases.
Alternatively, you may combine your product, ideas, and icebox backlogs into one location to make management easier, eliminate content duplication, and avoid arguments with stakeholders over when an idea will be “promoted” into the product backlog. Label the different backlogs clearly—say, as different tabs—to avoid confusion. Developers will usually be assigned to work on single items in the product backlog, while product managers will be assigned to explore or prioritize multiple ideas.
At http://www.influentialpm.com, you’ll find recommended tools for product roadmaps and backlogs.
Have a single product backlog for your team to draw from, even if you are working on several initiatives concurrently. Since you must allocate the available work for the same team, you want visibility. Keep track of which stories belong to which epic or initiative—most tools have tagging tools that make this easy.
1. Build Your Product Backlog
Some product managers tend to add requirements into a backlog only when they have all the details—sometimes just days before development will commence. Unfortunately, this leaves the team blind to possible future work and makes it impossible to get a sense of when a project will be delivered.
Instead, establish a backlog for any new product initiative as early as possible—even when product discovery is still underway to define the scope. Start with a first pass, capturing and breaking down requirements. Create just the cards, as placeholders, and then add, rewrite, or delete as you learn more.
Here are the benefits of establishing your backlog early:
• You have a bird’s eye view of the known scope, making it easier to recognize the full extent of the project. It’s easier to make early prioritization and descoping decisions or to revisit timeline or other goals that may seem unreasonable, once you have an understanding of known scope.
• You can have more productive, fact-based conversations about dates (the time to market) and resources with the team and stakeholders.
• You have a plan on record for stakeholders to react to, where they can flag missing scope and provide other input.
• When preparing for each new development iteration, you have an incremental amount of work to do (breaking down stories, filling in details, grooming the backlog) rather than having to create entirely new stories.
2. Prioritize Your Product Backlog
Prioritizing requirements is an art more than a science; it is highly situational to your product, company, team, and business priorities and to how well you understand your customers’ needs.
Fortunately, product backlogs make prioritization easier, simply because they allow you to change your mind at (almost) any time. You can move requirements up and down in priority as the product takes shape and as you learn more about customer and business needs. You don’t have to be right the first time.
Force-rank requirements from most important to least. Do not label groups (for example, as High, Medium, and Low; as 1 through 5; or as Must-have, Should-have, and Nice-to-have.) Instead, carefully sequence the more fleshed-out priorities at the top of your backlog—then you need only to roughly order the rest.
You should not, however, reprioritize a requirement once the team has started implementing it—at least, not without a great reason. Also, your force-ranked list of priorities may not be the order that requirements actually get worked on. For example, engineering often alters sequencing to accommodate technical needs, to optimize resource allocation, or to wait until a requirement has enough detail to start.
Getting a Product Backlog Started
1. Take high-level requirements and write a card or ticket for each.
• Add each requirement as a separate entry in your backlog tool.
• Don’t fill in many details (conversations or confirmation) yet.
2. Roughly prioritize the requirements.
3. Break down the essential requirements (which will now be at the top of your backlog) using the approach outlined previously in “Making Large User Stories Smaller.” It is particularly useful at this early stage to sketch out the customer journey or a conceptual wireframe. List what the user wants to do at each step; this will help you generate feature-level requirements.
4. Brainstorm with your team using a story-writing workshop. Taking each high-level requirement in turn, identify smaller increments, and add missing requirements.
• Stop when requirements feel small enough to do in a single iteration or when you don’t have enough information yet to break them down further.
• Do not debate details or priorities (go for breadth over depth), as you can progressively fill in details and priorities over time.
• Make sure every added story is relevant to your original goals.
5. Conduct interviews with select stakeholders to surface internal requirements, such as tools or reports—expect them to focus on their own needs so be careful of what you promise.
6. Prioritize and roughly estimate everything with a T-shirt size (see “Estimating Your Product Backlog” later in this chapter).
• Your first pass through all priorities and estimates helps establish a sense of the time-to-market and a rough plan of action.
• Keep in mind that anything at this early stage is just a hypothesis, not an established project plan.
To prioritize your requirements, use these practices and roughly order according to the following steps (from highest to lowest priority):
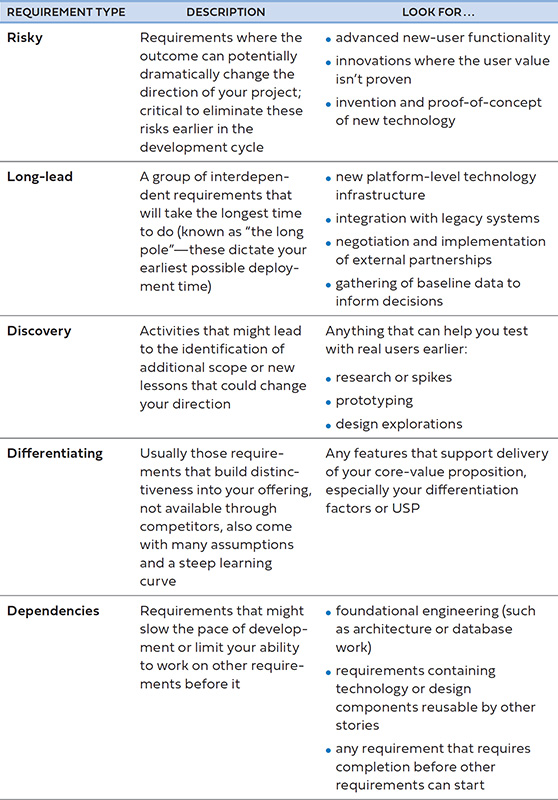
1. Prioritize requirements with the highest learning or complexity—Certain requirements can have a significant impact on the scope and priority of other requirements or even on the project as a whole. It makes sense to place these at the top of your backlog and deliver these earlier, so you don’t have major dependencies, long-lead items, or critical information surfacing late in development. Table 7.2 illustrates these types of stories to surface and rank higher in the backlog.
2. Identify key customer and business goals to move relevant stories higher—Show progress toward key project goals or “hot buttons” earlier by ranking those below your highest priority stories from step 1. For example, if your project will include the addition of new revenue-generating features and this is a key project goal, deliver them before non-revenue-generating items. Or if there is a feature or tool that stakeholders are particularly excited about, build confidence, support, and momentum by showing progress in that feature or tool. Stakeholders will be more excited to see progress against a single key area rather than piecemeal components. With this approach, you are also more likely to demonstrate early delivery of larger discrete contributions to business value.
3. Group together related requirements—To prioritize the remaining scope, group related requirements together. In addition to making grooming much easier (you can review, add to, and move them around together), it allows your team to focus longer and more completely on one area without too much context-switching.
Look for and group requirements that
![]() came from the same high-level requirement (user story),
came from the same high-level requirement (user story),
![]() serve the same user-type, or
serve the same user-type, or
![]() are part of the same flow.
are part of the same flow.
For example, for our hypothetical application Centsible, it is better to complete all the “link my credit card” stories over one or two iterations and deliver them together than to provide, say, one story for login, one feature for credit cards, and another story for viewing video.
3. Estimate Your Product Backlog
Each requirement in the backlog should have a preliminary estimate, whether or not it will be worked on soon. There are three key advantages to having such estimates:
• They encourage elaboration on details for the conversation—Estimation starts a process for exploring how to tackle each requirement. Asking your team for an estimate for the level of effort (LOE) forces more than a cursory discussion—it gets them to ask clarifying questions, to debate design and engineering options, and to identify the most significant risks.
• They surface stories that need further work—If a story estimate is too high, the team has a wide variance in opinion, or the team cannot estimate it at all, that suggests you may need to break the story down further. Or it may have too many unknowns (and need further research). Alternatively, you may decide it is less important than once thought, as it appears too costly or challenging to implement—in that case, drop it into the icebox.
• They size the overall project and bound timelines—Estimating your backlog will help size the overall project and provide a range of completion dates, challenging you to reduce the scope to what’s absolutely necessary. Rather than asking your development team to provide a delivery date based on a high-level project description, you can build it bottom-up by estimating each requirement and comparing it to the cumulative amount of work on past projects of similar size and scope.
Once a specific requirement is about to be worked on, your team might complete preliminary designs and technical specifications—understanding and breaking down tasks sufficiently enough to provide precise estimates. However, before that detail is available, it is unwise to expect your team to make anything other than high-level estimates.
Use a T-shirt-size methodology to strike a balance. Assign a relative size—from S to XXL (or a number, say from 1 to 5)—to each requirement in your backlog. Do this in collaboration with your team, allowing them to seek scope clarification and collectively vote on the size to assign each. Put estimates clearly on the requirement description (for example, on the card or as an easily viewed tag within the ticket). That way, you’ll always be able to see the LOE involved, which will help you and your team prioritize quickly, and identify requirements that need further work.
Larger stories might span several development cycles, making them incompatible with iterative development methods (since it may be many weeks before you see any results). Break these down more, especially the stories toward the top of your backlog (because you will work on them sooner rather than later).
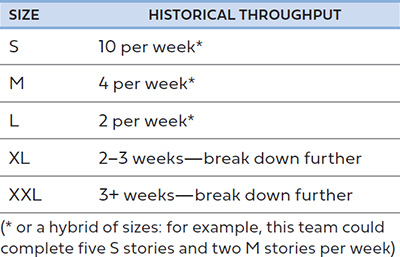
While each estimate might have a low level of confidence, when taken in aggregate, they are usually a good indication of how long it will take you to finish the known scope. Based on your experience, and with your team’s input, you can now roughly estimate how long completing all of the known scope might take you (see the example in Table 7.3). If you have the data, do this by counting all the S, M, L, and other sizes and multiplying them by historical averages for throughput. If you do not have enough historical data, you will have a much better idea once you start development and can see how fast you are burning through the backlog.
Recognize (as discussed in Chapter 9) that you will discover new requirements along the way and that, as you add details to existing requirements, estimates will almost always increase.
Finally, note that T-shirt sizing is all right for rough backlog-level estimation. But once you add detailed scope and conversation, and once the team chooses to start working on it, you will need to reestimate the requirement. For example, if you are using Scrum methodologies, you may replace the T-shirt size estimate with a story points estimate.
4. Regularly Groom Your Product Backlog
A backlog is emergent. You are continually adding, removing, and moving requirements based on business, market, and customer information. Project priorities change. You learn new things from your customers. You discover new scope or alternative solutions as your product takes shape. Be flexible and responsive.
Even if the high-level requirements are apparent, most details become clear only as you develop a system. Start with just the right level of detail to enable planning, fleshing out details as you go, in a “just-in-time” manner. Adapt, remove, add, or reprioritize given new information and learning—make decisions when they are pertinent and only after you have sufficient information to make a confident choice.
High-priority, detailed stories enable focus on what matters right now and with the best information available. Lower-priority, high-level stories remind you of future work without requiring you to invest in adding the details until necessary.
While any member of the team or any stakeholder can identify new requirements or suggest changes to existing requirements in the backlog, it is your responsibility to own the backlog and groom it frequently. Grooming is a process in which you do the following (see Figure 7.4):
• Close completed requirements—Once requirements have passed their acceptance criteria, archive them. Do not delete them entirely. (This will keep them accessible should you need to revisit them later.) Discard old entries and cruft.
• Add new requirements—Additional requirements can be added based on new learnings. They can be inserted anywhere in the priority order.
Any completed requirement that passed the acceptance criteria but that you received feedback or requested changes for, or that you later identified as needing additional acceptance criteria, is still closed. If you simply add these to an existing requirement, you risk creating a perception of scope creep, frustrating your team and stakeholders from seeing progress and disrupting any tracking of the team’s throughput. Instead, add a new requirement or task (as a new ticket) to capture the new functionality or acceptance criteria.
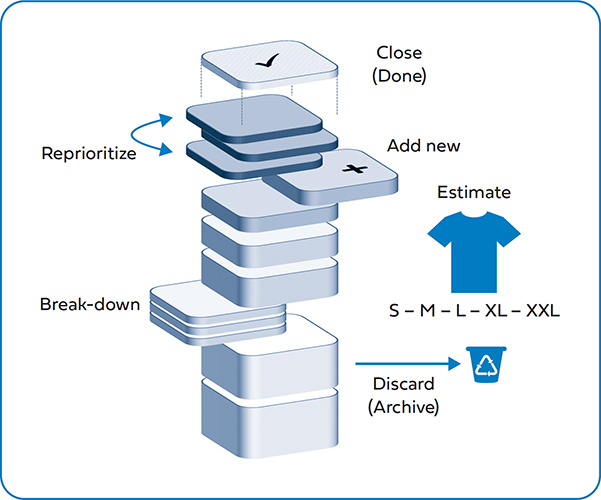
FIGURE 7.4 Grooming your product backlog
• Break down high-level requirements—Any larger item eventually needs to be broken down. Do so long before it becomes a priority for development. Make sure the smaller requirements are, collectively, a complete replacement for the larger requirement and can be independently prioritized.
When you break down a larger requirement, do not lose track of the original. For example, if you are using a ticket-based, requirement-management tool, it helps to cross-reference the original ticket from which the new requirements came. You can do so by adding a link to or tagging new tickets or by making a new ticket a “child” of the original.
• Add details—Any requirement closer to the top of the priority list must be fleshed out with conversation and acceptance criteria before you can start work on it.
• Reprioritize the backlog—Backlog items can be prioritized at any time, except once the team has started work on them. Always make sure the next-most-important work is at the top, so that you focus your efforts on discussing and adding details where it matters most.
• Estimate new or changed stories—Estimate any new stories, broken-down stories, or stories with substantive scope additions. Don’t waste time reestimating existing stories unless they have substantially changed.
Set aside a regular time to complete grooming. You must complete grooming before asking development to start work. In Scrum, for example, you must groom the backlog before sprint planning, so that you are ready to go with a precise list of the next set of priorities and documented details.