
Chapter 7
Taking Your Browser for a Spin
In This Chapter
![]() Saving and printing web pages
Saving and printing web pages
![]() Browsing in several windows or tabs (or both!)
Browsing in several windows or tabs (or both!)
![]() Bookmarking your favorite pages
Bookmarking your favorite pages
![]() Making your browser remember website usernames and passwords
Making your browser remember website usernames and passwords
![]() Controlling cookies stored on your computer
Controlling cookies stored on your computer
![]() Covering your tracks, browsing-wise
Covering your tracks, browsing-wise
![]() Stopping pop-ups from taking over your screen
Stopping pop-ups from taking over your screen
![]() Adding plug-ins to your browser
Adding plug-ins to your browser
If you’ve read Chapter 6, you’re all set to browse the web. But to be an efficient, downright clever web surfer, you need to know about other browser features, such as printing web pages, displaying more than one web page at the same time, and storing the addresses of web pages you like to visit often. You also need to know how to handle spyware, an Internet menace we describe in Chapter 2. This chapter is your guide to these extra features and how you can make the most of them right away.
Saving Stuff from the Web
Frequently, you see something on a web page that’s worth saving for later. Sometimes it’s interesting information, a picture, or another type of file. There’s not much point to saving an entire page: It’s usually made up of several files — one for the text, one for each picture, and sometimes other files — so your browser can’t just save the page in a file. However, you can save images and text from a page.
 If you want to remember a page and come back to it, bookmark it in your browser, as explained later in this chapter.
Saving text from a page
You can copy and paste text from a web page into a word processing document or another type of file. Select the text with your mouse (click and drag the mouse over the text) and press Ctrl+C (Command+C on the Mac) to save the text on your computer’s Clipboard. Then switch to the word processing or other type of program, position the cursor where you want the text to appear, and press Ctrl+V (Command+V on the Mac) to paste it. You’ll probably need to do some reformatting once the text is in your document.
Saving an image
To save an image you see on a web page, follow these steps:
- Right-click the image.
- Choose Save Image As (in Firefox, Chrome, or Safari) or Save Picture As (in Internet Explorer) from the menu that appears.
- In the Save Image or Save Picture dialog box, move to the folder or directory in which you want to save the graphics file, type a filename in the File Name text box, and click the Save button.
 A note about copyright: Almost all web pages, along with almost everything else on the Internet, are copyrighted by their authors. (A notable exception is U.S. federal government websites, which are all free of copyright.) If you save a web page or a picture from a web page, you don’t have permission to use it any way you want. Before you reuse the text or pictures, send an email message to the owner of the site. If an address doesn’t appear on the page, write for permission to webmaster@domain.com, replacing domain.com with the domain name part of the page’s web address.
Printing pages
To print a page, press Ctrl+P (Windows) or Command+P (Mac). Depending on your browser, you can also click something:
- Firefox: Click the Menu button in the upper-right corner of the window and choose Print from the menu that appears.
 Chrome: Click the Menu button (the three lines at the right end of the Address bar) and choose Print.
 IE: Click the Tools button (the little gear icon to the right of the Address bar and tabs) and choose Print.
 Safari: If you print a lot, you can use View⇒Customize Toolbar to add the Print button.
The browser has to reformat the page to print, which can take a minute, so remember that patience is a virtue. Fortunately, each browser displays a progress window to let you know how it’s doing. You’ll see your computer’s usual Print dialog box, where you can choose your printer.
Chrome, Firefox, and Safari can print a page to a PDF file, which you can save and open later (as with any other PDF) with the Adobe Acrobat reader. It can be a handy way to save the whole page, images and all.
A Few of Your Favorite Things
You’ll find some web pages that you want to visit repeatedly. (Both of us have visited the Google website thousands of times by now.) The makers of fine browsers have, fortunately, provided a handy way for you to remember those URLs so that you don’t have to write them on the wall and type them again later.
The idea is simple: Your browser lets you add a web address to a list on your computer. Later, when you want to go back, you just go to your list and pick the page you want. Firefox, Chrome, and Safari call these saved web addresses bookmarks; Internet Explorer calls them favorites.
Bookmarking with Firefox
![]() When you’re looking at a page you want to bookmark, click the Bookmark This Page icon (a little star) at the right end of the Address bar. The star turns gold — the page is bookmarked.
When you’re looking at a page you want to bookmark, click the Bookmark This Page icon (a little star) at the right end of the Address bar. The star turns gold — the page is bookmarked.
![]() To see your bookmarks, click the Show Your Bookmarks button that appears next to the Bookmark This Page icon. A menu of your items appears, including your bookmarks, as shown in Figure 7-1.
To see your bookmarks, click the Show Your Bookmarks button that appears next to the Bookmark This Page icon. A menu of your items appears, including your bookmarks, as shown in Figure 7-1.

Figure 7-1: Your list of Firefox bookmarks can quickly get out of control.
To go to one of the pages on your bookmark list, just choose its entry from the menu.
If you’re like most users, your bookmark menu grows and grows and crawls down your screen and eventually ends up flopping down on the floor, which is both unattractive and unsanitary. Fortunately, you can smoosh (technical term) your menu into a more tractable form. Click the Show Bookmarks button and choose Show All Bookmarks (or press Ctrl+Shift+B in Windows or Command+Shift+B on a Mac) to display the Library window, which shows various kinds of items you can save.
When you create a bookmark, it appears in the Unsorted Bookmarks folder. You can click it and double-click any bookmark to see that bookmarked page. (You can leave this window open while you move around the web, or close it by clicking the X in its upper-right corner.) You can also organize your bookmarks into folders and rename your bookmarks with meaningful names — web page titles can be long and uninformative.
If you want to organize your growing list of bookmarks into folders, right-click the Bookmarks Menu folder, choose New Folder, give your folder a name, and click Add. Now you can put bookmarks into this folder, which appears as a submenu on the Bookmarks menu. Drag an item to a folder to put it in that folder’s submenu, and click a folder to display or hide that submenu. Because any changes you make in the Bookmarks sidebar are reflected immediately on the Bookmarks menu, you can easily fiddle with the bookmarks until you have them arranged as you like. Firefox starts out your bookmarks with pages that the Firefox developers want you to look at, but feel free to delete those pages if your tastes are different from theirs.
Another way to create a bookmark, and put it where you want it on the Bookmarks menu, is to find the little icon at the left end of the Address bar. (The icon changes depending on the page.) Drag the icon over to the Bookmarks button, which responds by displaying your list of bookmarks. Keep dragging the icon down the list to where you want the bookmark to appear.
Creating one-click bookmarks in Firefox
Okay, you’ve got the Bookmarks menu, which is what you see when you click the Bookmarks button. You’ve got the Library window, described in the preceding section. Wait — there’s more! The Bookmarks toolbar is a row of buttons that appears just below the Address bar. (If it doesn’t appear, right-click just above the Address bar and choose Bookmarks Toolbar from the menu that appears.) This row of buttons gives you one-button access to a bunch of Firefox developers’ favorite websites. Wouldn’t it be nice if your favorite websites appeared there instead?
No problem! When you organize your bookmarks in the Library window, drag your favorite sites into the Bookmarks Toolbar folder — any sites in this folder automagically appear on the Bookmarks toolbar. Feel free to delete the bookmarks that come with Firefox — the only one we like is the Latest Headlines bookmark, which displays a menu of breaking news stories on the BBC website.
Storing favorites in Internet Explorer
Internet Explorer uses a URL-saving system similar to the one in Firefox, although it calls the saved URLs favorites rather than bookmarks: You can add the current page to your Favorites folder and then look at and organize your Favorites folder. If you use Windows, this Favorites folder is shared with other programs on your computer. Other programs also can add things to your Favorites folder, so it’s a jumble of web pages, files, and other elements. (To avoid insanity, most people use favorites only for web pages.)
![]() Internet Explorer 9 and later have the Favorites icon — a star — just above the upper-right corner of the web page. To add the current page to your favorites, click the Favorites icon (or press Alt+C) and choose Add to Favorites from the menu that appears. (Or, press Ctrl+D.) The Add a Favorite dialog box, shown in Figure 7-2, displays the page name (which you can edit) and the folder in which the favorite will be saved. Click the Create In box to choose a folder, or click the New Folder button to create a new folder in which to contain the page’s address. Click Add when you’re ready to save the favorite.
Internet Explorer 9 and later have the Favorites icon — a star — just above the upper-right corner of the web page. To add the current page to your favorites, click the Favorites icon (or press Alt+C) and choose Add to Favorites from the menu that appears. (Or, press Ctrl+D.) The Add a Favorite dialog box, shown in Figure 7-2, displays the page name (which you can edit) and the folder in which the favorite will be saved. Click the Create In box to choose a folder, or click the New Folder button to create a new folder in which to contain the page’s address. Click Add when you’re ready to save the favorite.

Figure 7-2: Adding a web page to your Internet Explorer favorites.
To return to one of your favorite pages, click the Favorites icon to see a menu of your favorites, shown in Figure 7-3. Click an item to view that page. Your Favorites menu can contain folders, too, so that you can organize pages into groups; click a folder to open it and see what’s inside.

Figure 7-3: The Internet Explorer Favorites menu.
Creating one-click bookmarks in Internet Explorer
For quicker access to your top favorite pages, Internet Explorer has a Favorites bar that you can display just below the row of tabs. (If you don’t see it, right-click above the Address bar and choose Favorites Bar from the menu that appears.) Click an icon on the Favorites bar to display that page. This feature is seriously handy for websites you visit often.
If you want to reorganize your Favorites menu, click the Favorites icon, click the down arrow to the right of the Add to Favorites button, and choose Organize Favorites. In the Organize Favorites window you can move favorites around, edit them, or delete them. To see what’s in a folder, click it. When you’re done organizing your favorite items, click Close.
In the Organize Favorites window, the Favorites Bar folder contains whatever you’ve added to your Favorites bar for instant access. Drag your favorite sites and folders into this folder — any sites in this folder automagically appear on the Favorites bar. Delete any sites in the Favorites bar folder that aren’t your favorites. You can also delete icons right from the Favorites bar; right-click one and choose Delete from the menu that appears.
Adding web pages to your Windows taskbar
IE enables you to add an icon for a web page to the Windows taskbar (the icons that run along the bottom edge of your screen, with one for every running program and open document). To create an icon, click and drag a tab in Internet Explorer to the Windows taskbar.
Bookmarking (including one-click) with Chrome
![]() Google Chrome has a clean, spare look with no menus and only a few icons to clutter its window. But the features we love are there, including bookmarks. To add the current page to your list of bookmarks, click the Bookmark This Page star icon at the right end of the Address bar. A Bookmark Added box pops up so that you can edit the name for the bookmark and choose which bookmark folder to put the web page in. (Click Remove if you clicked this icon accidentally!) After a page is in your bookmarks, the star icon turns gold.
Google Chrome has a clean, spare look with no menus and only a few icons to clutter its window. But the features we love are there, including bookmarks. To add the current page to your list of bookmarks, click the Bookmark This Page star icon at the right end of the Address bar. A Bookmark Added box pops up so that you can edit the name for the bookmark and choose which bookmark folder to put the web page in. (Click Remove if you clicked this icon accidentally!) After a page is in your bookmarks, the star icon turns gold.
![]() To edit your bookmarks, click the Menu icon, the three lines to the right of the Address bar, and choose Bookmarks⇒Bookmark Manager from the menu that appears. The Bookmark Manager, shown in Figure 7-4, opens in a new tab. Click Organize to add folders into which you can drag your bookmarks.
To edit your bookmarks, click the Menu icon, the three lines to the right of the Address bar, and choose Bookmarks⇒Bookmark Manager from the menu that appears. The Bookmark Manager, shown in Figure 7-4, opens in a new tab. Click Organize to add folders into which you can drag your bookmarks.

Figure 7-4: In Chrome, you can organize your bookmarks on the Bookmark Manager tab.
When you drag a bookmark into the Bookmarks Bar folder, it appears (where else?) on the Bookmarks bar, between the Address bar and the top edge of the web page in the Chrome window. (If you don’t see bookmarks below the Address bar, click the Customize and Control icon, choose Tools, and choose Always Show Bookmarks Bar so that it has a check mark next to it.)
One click and drag bookmarking with Safari
Safari comes from Apple, and Apple always does things a little differently. Unlike the other three browsers, new versions of Safari have an icon you click to show you your bookmarks, where you can then add your new bookmark. Ctrl+Command+1 also shows or hides the Bookmarks sidebar (see Figure 7-5).
The bookmarks pane has three tabs:
- The actual bookmarks, indicated by a little book, including the Favorites.
- The Reading List, indicated by a little pair of glasses, is a list of pages you intend to read real soon now.
- Social bookmarks, indicated by an @ sign, which are supposed to connect with your social media accounts.
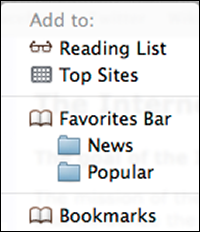
Figure 7-5: Safari shows your bookmarks in the sidebar.
The Favorites section in the bookmarks are what appear on the Favorites bar, and are the buttons you see when you create a new tab, so that’s usually the best place to make a new bookmark.
To make a bookmark, click in the address bar and drag the address into the place in the bookmark pane where you want your bookmark to be. (Bet you thought it’d be more complicated.) You can also drag bookmarks up and down in the bookmarks bar to reorganize them.
Once your bookmarks are perfect, click the bookmark icon at the top of the window again to make the bookmark pane disappear.
Your page history is in the History menu at the top of the screen. Select History, then the page you want to go back to, or History⇒Show History to see your history as a page of clickable links.
Filling In Forms
The web isn’t just for reading — it’s for buying stuff, signing up for stuff, and expressing your opinion about stuff. To put your two cents into a web page, you usually fill out a form that has boxes to type in, check boxes to select, and maybe other clickable stuff. Then you click a Submit button (or a button with another name) to send in the information you entered. Figure 7-6 shows a typical form.

Figure 7-6: Just fill out a few forms.
Text boxes in a form are white, fill-in boxes in which you type information, in this case, your name and email address. Check boxes are little square boxes in which you check whichever ones apply (all of them, we hope, on our sample form). Radio buttons, the little round buttons, are similar to check boxes except that you can choose only one of them from each set. In Figure 7-6, you also see a list box, in which you can choose one possibility in the box. In most cases, you see more entries than can fit in the box, so you scroll them up and down. You can usually choose only one entry, although some list boxes let you choose more.
Forms also include buttons that determine what happens to the information you enter on the form. Most forms have two of these buttons: one that clears the form fields to their initial state and sends nothing, and one, usually known as the Submit button, that sends the filled-out form back to the web server for processing.
Some pages have Search bars, which are one-line forms that let you type some text for which to search. Depending on the browser, a Submit button may be displayed to the right of the text area, or you may simply press Enter to send the search words to the server. For example, the Google search page at www.google.com has a box in which you type a word or phrase; when you press Enter or click the Google Search button, the search begins. (See Chapter 13 to find out what happens!)
Your browser can remember the entries, such as your name and address, that you frequently type into web page forms. As you type, your browser may try to spot entries you made earlier and suggest the rest of the entry so that you don’t have to type it. If a suggestion pops up from your browser as you’re filling in a form, you can click the suggestion to accept it. If you don’t like the suggestion, just keep typing.
Knowing Where to Start
When you run your browser, it displays your start page. Unfortunately, the people who make browsers usually don’t pick pages that we particularly like. Why not tell your browser to start where you want to start? You may want to start at the Yahoo! page (www.yahoo.com), which we describe in Chapter 6; or Google (www.google.com); or Wikipedia (en.wikipedia.org for the English language encyclopedia); or the home page of your local newspaper. You can even start with more than one page by setting multiple start pages, and your browser can open each one in a separate tab.
![]() You can also specify a separate home page, which is the page you see if you click the Home icon in your browser. Where’s the Home icon? Firefox, Chrome, and Internet Explorer display the Home icon automatically, and we tell you how to display one in Safari in the following sections.
You can also specify a separate home page, which is the page you see if you click the Home icon in your browser. Where’s the Home icon? Firefox, Chrome, and Internet Explorer display the Home icon automatically, and we tell you how to display one in Safari in the following sections.
The following sections show you how to set both your start page and your home page. Most people set them to the same page (or pages) anyway.
Specifying where Firefox starts
Display the page that you want to use as your start page and home page, and then follow these steps:
- Click the Firefox button in the upper-left corner, and choose Options or Preferences.
You see the Options dialog box, shown in Figure 7-7.

Figure 7-7: In the Options dialog box in Firefox, you can set your favorite website as your start page.
- Click the General icon, if it isn’t already selected.
This icon may already be selected, and its settings appear in the rest of the Options dialog box. The settings you’re concerned with are in the Startup section.
- Set the When Firefox Starts option.
You can choose Show My Home Page (you set your home page in the next step), Show a Blank Page (make Firefox start faster), or Show My Windows and Tabs from Last Time.
- Set your home page(s) to the current page(s) by clicking (you guessed it!) the Use Current Pages button.
- Click OK.
You can set Firefox or Chrome to display a bunch of pages when it starts up, each on its own, separate tab. For example, you might want to have Firefox open a weather-reporting page, such as Weather Underground (www.wunderground.com), the New York Times (www.nytimes.com), or even a silly page (such as cuteoverload.com) every time you start Firefox. First display the web pages you want to start with. Then follow the preceding instructions to make the entire set of tabs open when you start your browser.
Configuring Internet Explorer start and home pages
Display the page that you want to use as your start page and home page, and then follow these steps:
- Click the Tools icon above the upper-right corner of the web page and choose Internet Options from the menu that appears.
You see the Internet Options dialog box.
- Click the General tab, along the top of the dialog box.
It’s probably already selected, but we say this in case you’ve been looking around at what’s on the other tabs.
- In the Home Page section, click the Use Current button.
The URL of the current page appears in the Address text box. To start with no page, click the Use Blank button.
- Click OK.
Telling Chrome what to display at start-up
Display the page or pages that you want to use as your home page, and then follow these steps:
- Click the Menu three-line icon above the upper-right corner of the web page and choose Settings from the menu that appears.
You see the Settings page in a new tab. (It isn’t a web page, but it looks like one.)
- In the On Startup section, choose Open the New Tab Page, Continue where you left off, or Open a specific page or set of pages.
If you choose the last option, you can click Set Pages to set the current page as your start page (or one of several start pages, using tabs).
- Set your home page to the current page by clicking Set Pages (in the On Startup section), then click Use current pages.
If you had more than one page open, it adds all of them. If you don’t want one, mouse over it, which makes an X appear to the right of the URL, then click the X to get rid of that page.
- In the Appearance section, select Show Home button, if it’s not already checked.
- Click Close.
You might consider setting your home page so that it’s the New Tab page (as Chrome refers to it), shown in Figure 7-8. This page is pretty cool, actually — Chrome displays a bunch of tiny pages, like thumbnail pictures of the pages, each with a title, showing the pages you’ve visited most often. It also shows bookmarks you’ve recently used and pages you’ve recently closed. Very useful! It’s the home page we use.

Figure 7-8: The New Tab page in Chrome tells you what you visit most often and what you’ve seen recently.
Setting Safari’s home page
Display the page that you want to use as your start page and home page, and then follow these steps:
- Click the Settings icon above the upper-right corner of the web page and choose Preferences. Or choose Safari⇒Preferences.
You see the General dialog box. If you don’t, click the General Tab.
- Set the New Windows Open With option to Home Page.
On a Mac, enter the URL of your home page into the Homepage box, or if you have that page open, click Set to Current Page.
- Click the Close button in the upper-right corner of the window.
You can tell Safari to display the Home icon by clicking the Settings icon above the upper-right corner of the web page, choosing Customize Toolbar, and dragging the Home icon to your Safari toolbar. (For example, you can drag it to between the Address bar and the Tools icon.)
Safari has a cool Top Picks page, which shows the web pages you view most frequently. You can tell Safari to display it whenever you open a new tab or window by setting the New Windows Open With setting or the New Tabs Open With option to Top Sites. It’s similar to Chrome’s New Tab page (refer to Figure 7-8).
Who Can Remember All Those Passwords?
We certainly can’t remember all our passwords. Many websites ask you to enter a username and password. If you’re buying an item from an online store such as Amazon (www.amazon.com), you create an account with a username and password that you enter every time you want to buy something. Amazon.com remembers your name, address, and credit card information as part of your account, so you don’t need to enter it every time. If you want to read the New York Times online at www.nytimes.com, you create an account with a password, too. The account remembers what kinds of news you’re interested in reading. After you use the web for a while, you pile up a heap of usernames and passwords.
See Chapter 2 for advice on choosing passwords and keeping track of them safely.
Browsers offer to remember your usernames and passwords for you. Using this feature can be dangerous if other people use your computer or if you use a computer in a public place, such as a library or an Internet café. But if you’re the only person who uses your computer, you may want to let your browser do the work of remembering some, if not all, of your usernames and passwords.
When a web page asks for a username and password, your browser may pop up a little window that offers to remember the username and password you enter, or the question may appear just above the top edge of the web page. If you click Yes, the next time you arrive at the same page, your browser may fill in your username and password for you.
Depending on who else has access to your computer, you might let your browser remember only passwords to accounts that don’t involve spending money or revealing personal information. For example, if we have an account at a Harry Potter fan site that enables us to participate in online discussions, the danger of having someone break into this account is a lot less daunting than the thought of someone hacking into an online bank account. Unless your computer is in a physically secure place, don’t let your browser remember passwords that have any real power.
Storing passwords in Firefox
You can control whether and how your browser stores these passwords. In Firefox, follow these steps:
- Click the Menu icon, then select Options.
You see the Options dialog box, with a list of the categories of options across the top (refer to Figure 7-7 earlier in this chapter). On a Mac, choose Firefox⇒Preferences.
- Click the Security icon and look in the Passwords section.
- Set the Remember Passwords for Sites check box.
Click the box to clear the check mark if you want to turn off this feature (or click the box again to turn it back on).
- If you want to see the list of usernames that Firefox has saved, click the Saved Passwords button.
You can review or delete usernames that Firefox is remembering for you. You can even see the passwords by clicking the Show Password button. (And so can anyone else with access to your computer!) Click Close when you’re done.
- Select the Use a Master Password check box to set a master password that you need to type only once, at the beginning of every Firefox session.
This option reduces the number of passwords you need to remember while maintaining some security. Don’t forget the master password.
- Click OK to close the Options dialog box.
Storing passwords in Internet Explorer
In Internet Explorer, remembering usernames and passwords is the job of the AutoComplete feature, which you set up by following these simple steps:
- Click the Tools icon, choose Internet Options, and click the Content tab.
You see the Content tab in the Internet Options dialog box.
- In the AutoComplete section, click the Settings button.
You see the AutoComplete Settings dialog box.
- Select the check boxes to control which kinds of entries Internet Explorer stores.
IE doesn’t show you a list of the passwords you saved, but you can turn the feature on and off by selecting the Ask Me Before Saving Passwords check box. The User Names and Passwords On Forms check box controls whether Internet Explorer fills in your stored passwords on forms.
- Click OK to close the AutoComplete Settings dialog box, and click OK again to close the Internet Options dialog box.
Storing passwords in Chrome
The Chrome settings for remembering passwords are more like those in Firefox. Follow these steps:
- Click the Menu three-line icon and choose Settings from the menu that appears.
You see the Settings page on a new tab.
- Click Show advanced settings at the bottom, then scroll down to Passwords and Forms.
- In the Passwords section, check or uncheck Offer to save your web passwords.
It’s your choice, depending on whether you trust the other people who use your computer.
- If you want to review the passwords that Chrome has already saved, click Manage Passwords.
You see web addresses and the usernames, and you can remove any you don’t want saved by clicking the X to its right. To display a password, click the dots that represent it and click Show. Click Close when you’re done.
- Click Close.
Storing passwords in Safari
Same old, same old — Safari works similarly to other browsers. Follow these steps:
 Click the Setting icon and choose Preferences or choose Safari⇒Preferences.
- Click the AutoFill icon.
These settings control which personal information Safari stores and then supplies on web page forms.
- Click the User Names and Passwords check box if you want Safari to remember these items.
- To see and edit the usernames and passwords that Safari has stored, click the Edit button to the right of the User Names and Passwords check box.
- Click the Close button in the upper-right corner of the window.
Cookies Are (Usually) Your Friends
To enhance your online experience, browser makers invented a type of special message, known as a cookie, that lets a website recognize you when you revisit that site. They thoughtfully store this info on your very own machine. See Chapter 2 for a full description of cookies and how they compare to more serious security threats. You can control which sites can store cookies on your computer.
Usually, the website that sets a cookie is the only one that reads the cookie. However, third-party cookies can be set by one website and read by another. Third-party cookies are used by servers that deliver advertisements and those annoying pop-up and pop-under ads. We recommend that you accept most cookies but block third-party cookies.
Burning cookies in Firefox
Choose Firefox⇒Options (on a Mac Firefox⇒Preferences), click the Privacy icon, and look in the History section. If Remember History is selected, Firefox stores cookies. If you want more control over which cookies it stores, change it to Use Custom Settings for History. This setting displays these cookie-related check boxes:
- Accept Cookies from Sites: We recommend that you leave this one selected.
- Accept Third-Party Cookies: We recommend you set this to “From visited”.
You can specify which sites can and cannot store cookies by clicking the Exceptions button. You can enter the web addresses that you definitely trust with your cookies (such as the shopping sites you frequent) or that you don’t trust (such as advertising sites).
You can take a look at the cookies on your computer, too. Click the Show Cookies button and scroll down the list of sites. If you see one that you don’t recognize or that sounds suspicious, click it and click the Remove Cookie button.
Exploring cookies in Internet Explorer
![]() Click the Tools icon, choose Internet Options, and click the Privacy tab on the Internet Options dialog box that appears. Internet Explorer displays a slider that you can drag up and down to increase or decrease your level of privacy. By default, Internet Explorer sets your privacy level to Medium, allowing cookies except for third-party cookies. If you want to specify exactly how cookies are saved, click the Advanced button to see the Advanced Privacy Settings dialog box and then select the Override Automatic Cookie Handling check box. The options are
Click the Tools icon, choose Internet Options, and click the Privacy tab on the Internet Options dialog box that appears. Internet Explorer displays a slider that you can drag up and down to increase or decrease your level of privacy. By default, Internet Explorer sets your privacy level to Medium, allowing cookies except for third-party cookies. If you want to specify exactly how cookies are saved, click the Advanced button to see the Advanced Privacy Settings dialog box and then select the Override Automatic Cookie Handling check box. The options are
- First-Party Cookies: You can choose to accept or to block or to be prompted to choose, though this option grows tiresome quickly if you encounter a lot of cookies. Some sites can store three or more cookies per page. Choose Accept.
- Third-Party Cookies: Just say no to (that is, choose Block) third-party cookies.
- Always Allow Session Cookies: This check box lets through all session cookies, a type of cookie used to track a single instance of your visit to a website. These cookies are commonly used by shopping sites such as Amazon.com and are harmless. Select this option so that it contains a check mark.
Cookies and Chrome
![]() Click the Menu icon, and choose Settings from the menu. In the Privacy section, click the Content Settings button to display the Content Settings dialog box. In the Cookies section, select the setting labeled Allow Local Data to Be Set. (In our humble opinion, it’s your best bet.) Check Block third-party cookies, if it’s not already checked. Then click Done.
Click the Menu icon, and choose Settings from the menu. In the Privacy section, click the Content Settings button to display the Content Settings dialog box. In the Cookies section, select the setting labeled Allow Local Data to Be Set. (In our humble opinion, it’s your best bet.) Check Block third-party cookies, if it’s not already checked. Then click Done.
Safari with cookies
![]() In Safari, click the Settings icon and choose Preferences or choose Safari⇒Preferences. Then click the Privacy icon in the window that appears. Set Block Cookies and Other Website Data to From Third Parties and Advertisers or to Allow From Current Website Only.
In Safari, click the Settings icon and choose Preferences or choose Safari⇒Preferences. Then click the Privacy icon in the window that appears. Set Block Cookies and Other Website Data to From Third Parties and Advertisers or to Allow From Current Website Only.
Where Have You Been?
Browsers keep a history list of the websites you’ve been to. No, your browser isn’t spying on you; the history list remembers pages you went to earlier, even days ago, so that you can find them again.
Your browsing history
You can see your history list, and you can return to any page on it by clicking it. Here’s how:
- Firefox: Click the Menu button, then History to display the Library window with the History list selected. You can also press Ctrl+H to display the list down the left side of your browser window, arranged by day. Close the History list by clicking the X in its upper-right corner.
 Internet Explorer: Click the Favorites icon, click the History tab on the menu that appears, and then click a day (for example, Today).
- Chrome: Click and hold the Back button (or right-click it) to see a list of the pages you’ve been to recently. Or, click and hold and then choose Show Full History from the bottom of the menu. You see a new tab with a list of web pages by day, with the time you viewed each page.
- Safari: Select History⇒Show History to see the History tab.
Oh, nowhere, really
Some of our readers have asked us how to clear out their browsing, presumably because they meant to type www.disney.com but their fingers slipped and it came out www.mega-xxx-babes.com instead. (It could happen to anyone.)
If you’re using someone else’s computer, and especially if you’re using a public computer in a library or Internet café, you should delete your browsing history and any other information about your session that might be stored on the computer. Otherwise, the next person to sit down at the computer might find your browsing history rather interesting, especially if the browser has thoughtfully stored the usernames and password you entered.
Whether you, um, mistyped web addresses or you don’t want to leave your personal information on someone else’s computer, follow these procedures:
- Firefox: Click the Menu button, then History, and click the Clear Your Recent History link. Choose how far back to forget and click Clear Now.
- Internet Explorer: Click the Tools icon, choose Safety, and choose Delete Browsing History from the menu that appears. (Hmm, it’s right at the top. There must be a lot of sloppy typists out there.) In the Delete Browsing History dialog box, decide which information to clear (by selecting check boxes), and click Delete.
- Chrome: Press Ctrl+H (or Function+Y on a Mac) to display the History tab, then click Clear Browsing Data, then select how far back to delete, and if you want what kind of history to delete, then the Clear Browsing data button. Or in the history page, click the checkboxes next to the individual page(s) you want to forget, then click Remove Selected Items.
- Safari: Press Option+Command+2 (on a Mac, because no one uses Safari on Windows) or choose History⇒Show History to see the History tab. The pages you visited are arranged by day; click a day to see the pages you viewed. To remove one page from the list, right-click it and choose Delete.
Some browsers let you browse in a kind of “stealth mode,” which leaves no trace:
- Firefox: Choose File⇒New Private Window or click the Menu button and choose New Private Window.
- IE: Click the Tools icon, choose Safety, and choose InPrivate Browsing.
- Chrome: You can browse incognito. (Don’t forget your trench coat and fedora.) Click the Menu button and choose New Incognito Window.
- Safari: Click the Settings icon, choose Private Browsing, and click OK. On a Mac, choose Safari⇒Private Browsing or File⇒New Private Window.
Blocking Pop-Up Windows
Pop-up windows, as described in Chapter 2, are browser windows that open without your asking for them, usually at the command of the website you’re viewing. Some websites display so many pop-ups that your computer becomes unusable until you can close them all. If you’ve encountered these sites, you’ll be glad to hear that your browser can block most (though not all) pop-up windows.
No pop-ups in Firefox
Click the Menu button and choose Options or Preferences, click the Content icon, and you see the Block Pop-up Windows check box. We leave it selected.
Blocking all pop-ups makes a few websites stop working. In particular, some shopping sites pop up small windows in which you have to type credit card verification information. Online help sometimes appears in pop-ups, too. Firefox thoughtfully includes an Exceptions button that lets you specify websites whose pop-ups are okay with you.
When a website tries to display a pop-up, you see at the top of the web page a message saying “Firefox prevented this site from opening a popup window.” Click the Options button and choose from the menu that appears:
- Allow Popups from Sitename puts this site on your Allowed list.
- Enable Popup Blocker Options displays the Allowed Sites dialog box so that you can edit your list of sites.
- Don’t Show This Message When Popups Are Blocked continues to block pop-ups, without asking each time it blocks one.
Click the red X at the right end of the message to make the message go away.
Blocking pop-ups in Internet Explorer
![]() Microsoft finally added a pop-up blocker in response to the growing popularity of Firefox. Click the Tools icon, choose Internet Options to display the Internet Options dialog box, click the Privacy tab, and click the Turn On Pop-Up Blocker check box to turn this feature off or back on. (We leave the check box selected.) You can tell Internet Explorer to allow pop-ups from specific sites by clicking the Settings button and adding web addresses to a list.
Microsoft finally added a pop-up blocker in response to the growing popularity of Firefox. Click the Tools icon, choose Internet Options to display the Internet Options dialog box, click the Privacy tab, and click the Turn On Pop-Up Blocker check box to turn this feature off or back on. (We leave the check box selected.) You can tell Internet Explorer to allow pop-ups from specific sites by clicking the Settings button and adding web addresses to a list.
The Internet Explorer pop-up blocker displays a “Pop-up blocked” message at the top of the web page whenever it blocks a pop-up window, and clicking the message displays a similar set of options.
Chrome and pop-ups
Chrome includes a pop-up blocker, too. When Chrome blocks a pop-up, you see a message in the lower-right corner of the browser window. You can either click the message and choose the first option (the exact address of the pop-up) to display it or choose Always Allow Popups to allow pop-ups from the site. To set up Chrome to block all pop-ups, follow these steps:
- Click the Menu icon and choose Options or Settings.
- Click Show Advanced Settings.
You might have scroll to the bottom of the window.
- Click the Content Settings button in the Privacy section at the top of the page and scroll down to the Pop-ups section.
- Select the Do Not Allow Any Site to Show Pop-ups check box. Click the Manage Exceptions button to allow specific websites to display pop-ups.
Safari stops pop-ups
![]() In Safari, click the Settings icon or choose Safari⇒Preferences, select the Security tab in the settings window, and choose Block Pop-Up Windows from the menu that appears to turn the pop-up blocker on or off.
In Safari, click the Settings icon or choose Safari⇒Preferences, select the Security tab in the settings window, and choose Block Pop-Up Windows from the menu that appears to turn the pop-up blocker on or off.
When Browsers Go Bad
If your browser looks odd, try these tricks:
- If the web page looks garbled, click the Reload or Refresh icon (the circular arrow) to load the page again. Maybe it was damaged during its arduous trek across the Net.
- If the whole top of the window is gone — you have no window title bar or menu bar — you’re in Full Screen mode. In Windows, press F11 to return to normal. On a Mac, hover your mouse at the top center of the screen until an icon appears in the upper right corner of the screen; click it to get your screen back to normal.
- If the browser restarted and is telling you which fabulous new features it now has, it probably just downloaded an updated version of the program and had to restart itself to complete the installation. Read the message appreciatively and then close the tab or window.
- If your browser is just acting weird, close all your browser windows, take a few deep breaths, and run your browser again. If the situation is ugly, try restarting the computer. (Save any unsaved work first.)
- If your browser still looks strange, especially if it’s showing a lot of ads that you didn’t ask for, your computer is probably infected with spyware. See Chapter 2 for a definition of spyware, and see the section in Chapter 4 about detecting spyware for advice on getting rid of it.
Getting Plugged In with Plug-Ins
Web pages with text and pictures are old hat. Now web pages must have pictures that sing and dance or calendars that let you create events or games such as chess that play against you. Every month, new types of information appear on the web, and browsers have to keep up. You can extend your browser’s capabilities with plug-ins — add-on programs that glue themselves to the browser and add even more features. Internet Explorer can also extend itself by using ActiveX controls, which are another (less secure) type of add-on program.
What are you to do when your browser encounters new kinds of information on a web page? Get the plug-in program that handles that kind of information and glue it to the browser program. Star Trek fans can think of plug-ins as parasitic life forms that attach themselves to your browser and enhance its intelligence.
When you restart your browser, maybe because it updated itself, it may display messages about add-ons that are installed or that need to be updated. You can display a list of your plug-ins at any time:
- Firefox: Click the Menu button and choose Add-ons to see a page about all kinds of add-ons and extensions. Click the Plugins tab to see a list of which ones are installed. You can click the More link for more information and click the Disable button if you don’t want to keep the plug-in.
- IE: Choose Tools⇒Internet Options, click the Programs tab, and click Manage Add-ons. To disable a plug-in, select it and click the Disable button at the bottom of the Manage Add-ons dialog box.
- Chrome: Type “about:plugins” in the address box and press Enter. If you don’t like the look of a plug-in, click Disable to turn it off.
- Safari: Click the Settings icon or choose Safari⇒Preferences and then select Extensions.
Four essential plug-ins
Here are four useful plug-ins you may want to add to your browser:
- Flash Player: Plays both audio and video files in addition to other types of animations. Widely used on web pages, it’s available at www.adobe.com/products/flashplayer. Using Flash, you can view videos on YouTube (see Chapter 14). Flash can also play streaming sound and video files while you download them. Our favorite site with streaming audio is the National Public Radio website (www.npr.org), where you can hear recent NPR radio stories. Another favorite is the BBC at www.bbc.co.uk, with news in 43 languages (really) and other BBC programs 24 hours a day. For a combination of political and technical reasons, Flash is not available on tablets or most smartphones, but many sites have apps to get you your streaming stuff anyway.
- QuickTime: Plays videos in a number of formats. Download it from www.apple.com/quicktime/download. (Mac users already have it.)
- Java: All sorts of extensions are written in Java, from browser based animations games to remote control consoles. Java isn’t available on tablets or smartphones, either, for similar reasons to Flash.
- Adobe Reader: Displays PDF (Portable Document Format) files formatted exactly the way the author intended. Lots of useful PDF files are out there, including many U.S. tax forms (at www.irs.gov). You can find Acrobat at http://get.adobe.com/reader.
How to use plug-ins
After you download a plug-in from the web, run it (double-click its icon or filename) to install it. Depending on what the plug-in does, you follow different steps to try it out — usually, you find a file that the plug-in can play and watch (or listen) as the plug-in plays it.
After you install the plug-in, you don’t have to do anything to run it. It fires up automatically whenever you view a web page containing information that requires the plug-in.
Plug-ins, particularly Flash and Adobe Reader, are subject to security problems, and they may not be automatically updated by Windows Update or Apple’s Software Update. Drop by the Flash and Adobe Reader websites at get.adobe.com/flashplayer and www.adobe.com/products/reader from time to time to see whether they have new versions.