![[Chapter 3] Looking for Lenses](https://imgdetail.ebookreading.net/cover/cover/202311/EB9781681985800.jpg)
[CHAPTER 3]Looking for Lenses
How to choose a lens is probably the thing I’m asked about the most when it comes to lensball photography, and it is also the most debated subject depending on your style and end goal for the image.
Before we dive into this topic, you will need to know whether your camera has a cropped or full-frame sensor. Your compositions may require different focal lengths depending on your sensor size. For example, if a crop-sensor camera has a crop factor of, say, 1.6x, a 50mm lens will act more like an 80mm lens. It is notable that having a larger sensor will produce better images, but the best sensor size for you is really dependent on what your photography goals are.
Crop-sensor cameras are lightweight and compact, along with their lens selection. These setups are great for those who are on a budget and are capturing photos primarily as a hobby. Full-frame bodies contain sensors that match the common size of 35mm film. These cameras will require more expensive glass and are a prime choice for most professional photographers. There are also medium-format cameras, which have an even larger sensor for studio use and can cost a few thousand dollars for just the body alone. Image quality is really high, but at the cost of large file sizes. I shot all the content for this book with a full-frame mirrorless camera, so all the lenses I mention are true to size.
The topic of lenses can be split up into two categories: prime versus zoom, and wide versus telephoto. As a recap, prime lenses have a fixed focal length and are known to be sharper, faster, and more lightweight than zoom lenses. However, zoom lenses offer more versatility to change the focal length, which makes them ideal for on-the-go shooting. Wide versus telephoto simply differentiates lenses with focal lengths less than or greater than 50mm, respectively.
As a portrait photographer, you will find me sporting telephoto prime lenses on a majority of my shoots, primarily because they help me capture sharp images with a lot of compression. And just as likely, you will see a lot of landscape or real-estate photographers mounting wide zoom lenses on their cameras because they frequently shoot in different locations and need to capture more of the environment. However, for lensball shots, you can use either practice interchangeably. Due to the sphere’s unique wide distortion, you can use a range of focal lengths to capture the same scenes and produce amazingly different results. The question you want to ask yourself here is if you mind carrying multiple lenses with you to produce very sharp images. Or, on the other hand, you may prefer to travel lightweight with one lens and do not mind the difference in image quality. One additional consideration to keep in mind is that prime lenses have the ability to use wide apertures like f/1.2 to f/1.8; however, as previously stated, wide apertures are not practical for getting a sharp lensball image.

Figure 3.1a
[50mm | f/2.8 | 1/1250s | ISO 100]
This illustrates the amount of real estate lost from an image when using a crop-sensor camera. It essentially crops the image from a 50mm view to an 80mm view. This may seem like a lot of space, but it can be compensated for by using wider-angle lenses to expand the frame. There are, however, other issues that come with smaller sensors, such as a decrease in image quality and low-light performance. For the sake of this book, we will focus primarily on the properties of a full-frame camera.

Figure 3.1b
This diagram shows how different angles of view work with your scenery. A 14mm focal length will work great for capturing an entire scene, while a 200mm focal length will tighten the frame and make the subject appear closer.
For the following examples, I took pictures of the lensball at common focal lengths to demonstrate how the framing and background compression looks. All photos were captured at each lens’s lowest aperture.
14mm
This is typically the widest full-frame lens most photographers will have in their arsenal. With the ability to capture a viewing angle of around 115 degrees, this lens is an excellent choice if you’re trying to envelop an entire scene with one shot. As mentioned earlier in regard to the shutter speed and focal length relationship, the 14mm focal length will allow you to capture better shots in low-light conditions, as motion blur may not be much of an issue. Many astrophotographers take advantage of this property to capture long exposures of the Milky Way without introducing star trails from the Earth’s rotation.
Although this lens does sound versatile, it may defeat the purpose of using a lensball as the subject. The background of the image may overpower the details within the lensball due to the distortion of an ultra-wide-angle lens. The end product will look more like a fish-eye view of the landscape with a glass sphere interrupting the composition. Don’t get me wrong, there are many unique setups that can incorporate a 14mm lens into their photography workflow, but it may not be feasible for everyday lensball photography.
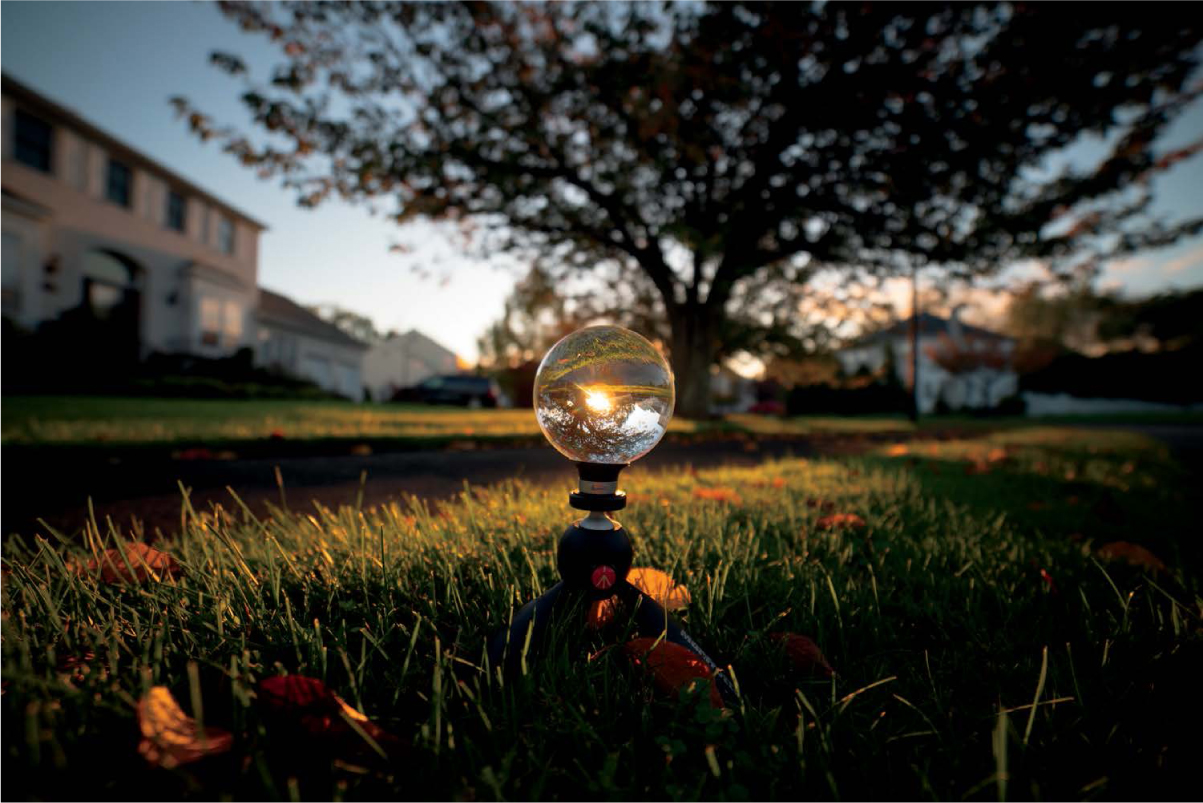
Figure 3.2
14mm | f/2.8 | 1/250s | ISO 100
24mm
The 24mm pancake lens is what most photographers recognize as their first prime landscape lens. Similar to 14mm, this focal length is excellent for capturing landscapes as well as interior spaces. It is wide enough to provide a grand view of your surroundings, but still provides emphasis on your subject. Because of how close you will need to be positioned to a subject, this focal length is generally not desirable for portrait photography due to the wide-angle distortion and lack of separation between subject and background. It is advisable to have a lens that includes this focal length if you wish to encompass more of the background in your lensball photography. You will be able to capture a sharp focus on the ball while creating a subtle blur with the backdrop.

Figure 3.3
24mm | f/2.8 | 1/250s | ISO 100
35mm
The 35mm focal length moves us into the wide, portrait category. This lens is wide but not too wide, and is an excellent all-around lens for street photography. Because this is wider than “normal,” you will have more opportunities to capture more of the background to tell a better story while still drawing attention to the main subject. Since most digital cameras have higher resolutions at their disposal, you can always crop for a more detailed frame without sacrificing much image quality.
The field of view at this focal length manages to avoid a good amount of distortion and still produce images with a shallow depth of field. Also, the focusing distance works great for handheld lensball shots if you do end up using a prime version of this lens. The further up you move in telephoto lenses, the longer the minimum focus distance they will require.

Figure 3.4
35mm | f/2.8 | 1/250s | ISO 100
50mm
The 50mm focal length on a full-frame camera has a very similar field of vision to what your eyes provide. Many photographers refer to this as a medium/natural lens, not wide nor telelphoto. Subjects in front of the camera will not look closer or farther away than they actually are. In my experience, the 50mm prime is the best lens to learn composition and framing with. From here, you can experiment with whether you want your images to look more compressed or spread out, allowing you to make informed decisions on your next focal length.
In terms of lensball photography, the 50mm focal length offers an excellent balance of the background and the details within the ball. If you compare figure 3.5 with figure 3.4, you will notice the details in the back become flat rather than stretched and warped. As you use longer telephoto lenses, the backdrop will appear flatter and more compressed.

Figure 3.5
50mm | f/2.8 | 1/250s | ISO 100
70mm
The 70–85mm focal range is where most portrait photographers comfortably reside. This is the starting point to the realm of telephoto lenses and is great for subject separation. However, in order to keep the lensball within the frame of the shot, you will need to position yourself farther away from the subject to achieve a composition similar to what you would get with a wider-angle lens.
I capture a lot of my lensball photos at 70mm because I love incorporating the falloff at the edge of the ball into the compressed background of the image. Shooting handheld also gets fairly difficult with this focal length, as the minimum focusing distance is almost the length of my arm. As mentioned earlier, a drawback of shooting with telephoto lenses is the apparent introduction of camera shake or motion blur in your pictures. Be sure to compensate by either shooting with high-speed multi-shot settings or bumping up the ISO for a faster shutter speed.

Figure 3.6
70mm | f/2.8 | 1/250s | ISO 100
100mm
Shooting at 100mm will require you to be a few feet away from the ball in order to capture the entire subject in the frame. The purpose of shooting past 70mm is to bring out more detail within the ball, at the expense of blurring out the background. I would reserve this telephoto for shooting something really interesting like a pattern or a subject inside the lensball, and using the background blur to avoid any distractions or unwanted elements. A 100mm lens is commonly known as a go-to macro lens, which basically means it gives you an insanely close focusing distance. The purpose of shooting a lensball this close would be to capture just the refracted image. You may not even see the edges, depending on how close up you compose for.
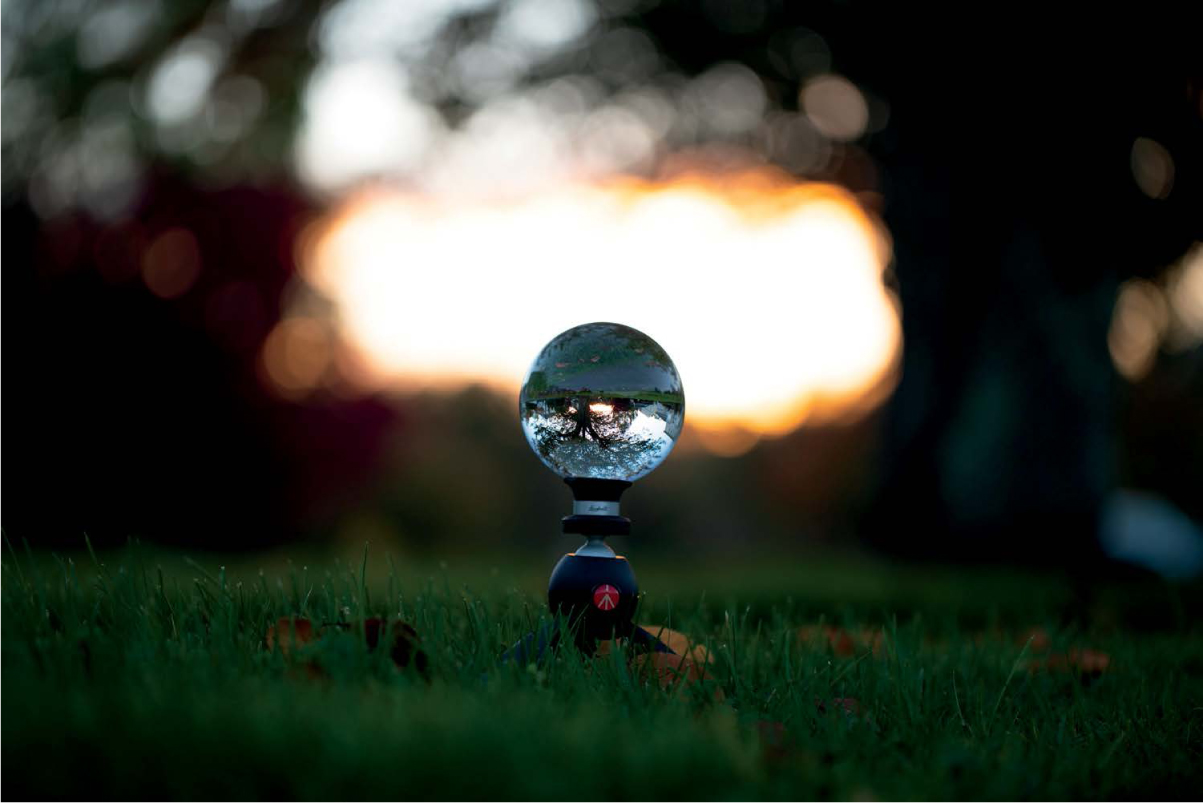
Figure 3.7
100mm | F/2.8 | 1/200s | ISO 125
200mm
Now we’re moving on to the limits of what I would even consider using during a lensball photoshoot. The 200mm focal length is commonly known as the maximum focal length of most classic telephoto lenses. I had to move back at least five feet in order to capture the ball within the similar frame set. As you can see, the background has been blurred out to oblivion and the bokeh is actually the small opening in the tree. I typically have to raise my ISO to around 200–400 when shooting at this focal length. Photographing at 200mm can help you achieve a dreamy look, but will make it more difficult to plan out the composition, depending on what’s behind the lensball.

Figure 3.8
200mm | F/2.8 | 1/400s | ISO 200
400mm
I don’t know why you would use a 400mm lens to shoot a lensball, but I might as well include it in the list. The lens I shot this with is generally used for photographing birds or planes. Due to the properties of this 100–400mm lens, the lowest aperture is f/4.5–f/5.6, based on the zoom length, respectively. To capture a similar composition, you will need to be positioned around 10 to 12 feet away from the subject. Although you do get very nice bokeh, you lose almost all detail in the background and will basically be taking a warped, upside-down image of the scenery through a glass ball.

Figure 3.9
400mm | f/5.6 | 1/400 | ISO 640
So Which Lens Should You Choose?
One thing you will notice when shooting with various focal lengths is that the composition inside the sphere does not change as drastically as the compression behind the ball. This is primarily because the inside image is affected by the distance between the ball and the environment, whereas the compression of the background relates to the distance between the camera and the lensball.
Typically, I would choose a wide focal length when the overall scene is the main focus of the capture and the refraction within the ball is not too interesting. This is where external leading lines and landscapes are utilized to help tell a story or guide the audience toward the subject. Telephoto lenses should be reserved for a more isolated look where you want to eliminate all background distractions. For this, I use a focal length between 50mm and 70mm when the background does not work too well with the composition, but I want to capture the inside of the ball as much as I can.
The lens I keep on my camera when shooting with lensball is the Canon 24–70mm f/2.8 L series lens. I never have a need to go wider or narrower than the range this offers, and the focusing distance is perfect for handheld shots. I also enjoy the versatility of being able to cycle through different focal lengths without having to dig through my bag and swap lenses on location. You may hear some pushback from prime lens shooters, as they would argue a fixed focal length will coerce you to be more creative, which I do agree with, but this may come with the sacrifice of missing a once-in-a-moment photo. Additionally, the minimum focusing distance of some prime lenses can make it very difficult to capture lensball images up close. I would definitely recommend confirming these limitations before dropping money on a new lens.
My Lensball Travel Kit
I primarily shoot with a Sony a7R II mirrorless camera with a Canon 24–70mm f/2.8 L series lens and a Metabones adapter. I try my best to travel light and most of my equipment can fit inside a messenger bag or sling.
When I first began shooting with a lensball, I would just drop it in with the rest of my camera equipment when I was heading out for a shoot. I didn’t really conduct any planning and would just snap a shot when I found it convenient. Throughout the years, I’ve tried out different tools to see what works well with my workflow and what items are necessary to bring on location. As shown in figure 3.10, I currently have a dedicated messenger bag for when I have certain concepts or places I want to shoot in mind. I prefer not to lug around a large backpack unless I am planning on bringing multiple lenses.
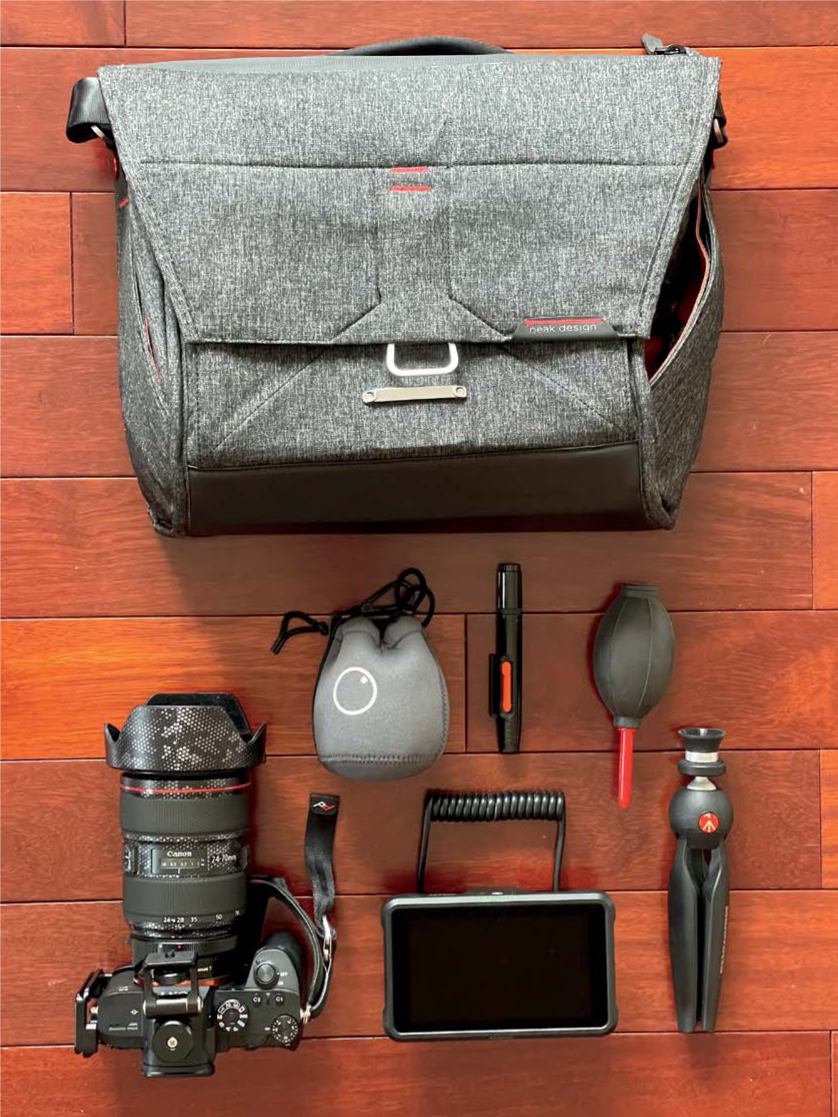
Figure 3.10
My kit consists of a Canon 24–70mm lens, Sony a7R II mirrorless camera body, Lensball, external monitor, mini tripod with a Lensball mount, and a cleaning kit. All of these items fit perfectly in my Peak Design messenger bag for a lightweight day carry.

Figure 3.11a

Figure 3.11b
I mount an Atomos Shinobi external monitor on my camera, which gives me a much better view of the framing for each shot.
For most of my shoots, I attach an external monitor to the camera so I can get a clearer view of my composition and focus (figures 3.11a and 3.11b). A lot of my lensball photos require me to place the ball on the ground and there were times when the flip-out screen wasn’t doing it for me. Using an external monitor does improve my workflow, as I can see the framing much clearer. The one I currently use is the Atomos Shinobi and it is super helpful when capturing video or taking self-portraits. The screen is significantly brighter than the LCD on the back of my camera, allowing me to accurately set the exposure on a sunny day. Some monitors also have helpful tools like large histograms and zebra-stripe exposure warnings. Having this additional monitor does add a good amount of weight to the camera and will be an excellent workout for your forearm.
For instances where there is uneven terrain or unstable ground, I have the lensball sit on a silicon mount from Lensball (figure 3.13). This is attached to a small Manfrotto tripod with a ball-mount head. This setup is ideal to use if you need to capture a photo where the lensball is eye level to the camera.

Figure 3.12
I suggest upgrading the bag for your lensball, as the one it comes with isn’t the best. I’ve had some luck with a Camera Lens bag (right) for a while. It protected the ball from scratches and, surprisingly, even from drops. However, the newer one from Lensball (left) is even better and is currently is my go-to carrier. It has a cinch cord and carabiner so you can latch it onto your camera bag or strap.
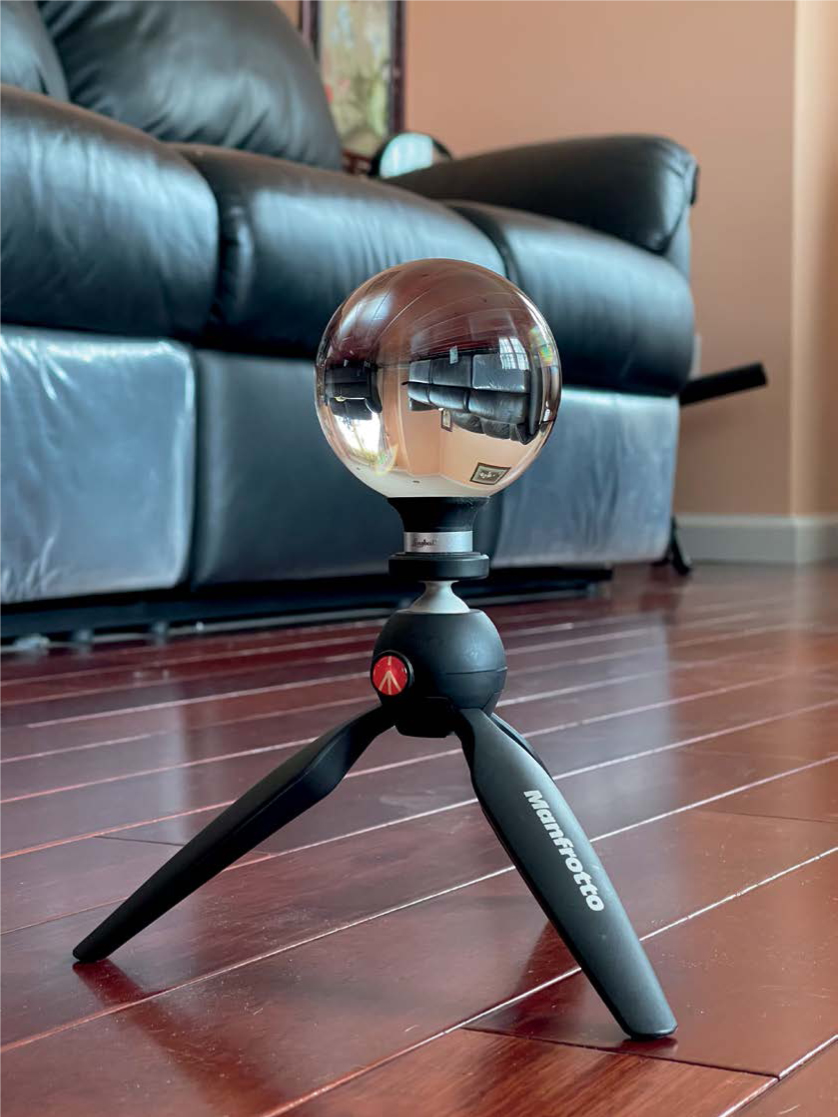
Figure 3.13
My lensball atop a silicon mount attached to a tripod. There is nothing too special about this setup, other than that it is portable and sleek.

Figure 3.14
I always carry some cleaning supplies to ensure the lensball and camera are spotless. I found that the Lens Wipes from Zeiss work really well on the glass and are fairly cheap for a large box. You can find these in the camera aisle at Walmart. I also bring a dust blower and a lens pen to remove any debris from the ball without repositioning it and ruining the composition.
All of these items fit perfectly into a 13-inch messenger bag and make it easy to access in most scenarios on location. Try out different tools and setups to see what works best for your workflow.

Figure 3.15