![[Chapter 8] You Do You](https://imgdetail.ebookreading.net/cover/cover/202311/EB9781681985800.jpg)
[CHAPTER 8]You Do You
Although all the previous chapters appear to be set rules and guidelines on how to shoot, the last chapter is for encouraging you to develop your own style. There have been many times when I have been inspired by compositions and edits others have used for their photos and tried to incorporate them into my own work. Nowadays, every photographer knows the technical aspects of how to properly expose a scene and press the shutter button, but what is hard to come by are those who challenge themselves to test new techniques and concepts. Inspiration may not always lead to creation, but it is the culmination of ideas you gather through viewing someone’s portfolio that spark ideas for your own work. In this chapter, I will provide some examples that I tried out for fun just because it is nice to entertain certain concepts.
Self-Portraits
While it is difficult for people who like to be behind the camera to take self-portraits, it is something you ought to try out when you get the chance. I don’t believe practice always makes perfect, but it does push you further toward the finish line than those who do not try. For my twenty-fifth birthday, I decided to try a self-portrait inside a lensball to see how it would turn out. As seen in figure 8.1a, the concept was to have me holding a lensball with me floating inside. This project consisted of three separate images to build what you see in the final image. Although it is not one of my best images, it was still extremely fun to do and can teach you different ways of photographing and post-processing. Figures 8.1b, 8.1c, and 8.1d break down the steps I took to create the final image.
This next shot is one of my most seen images, which was shot basically on a whim (figure 8.2a). The picture, titled Reminiscence, is composed of two separate photos taken on two different occasions that were warped together in Photoshop. figure 8.2b is the first picture I ever took of a lensball, which wasn’t even mine. My friend Michael decided to bring the ball to the beach as a prop during one of our shoots. I took a few shots of it on the sand and in the water and didn’t think much of it for a while. I didn’t even create the final image until a few months later when I thought of a neat idea for a couple portrait for Nicole and I.
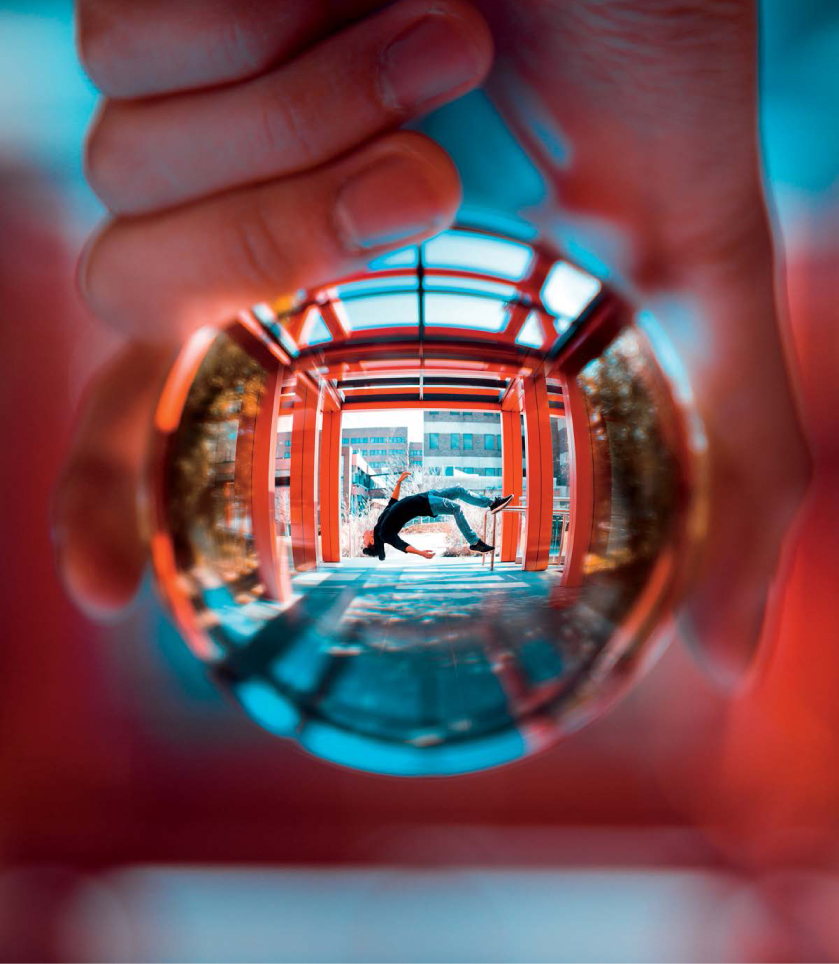
Figure 8.1a
70mm | F/2.8 | 1/640s | ISO 100
This photo was captured at the entrance of one of my university buildings and is a composite of three separate images.

Figure 8.1b
70mm | F/2.8 | 1/640s | ISO 100
This is the first shot to develop the overall setting and how I wanted the frame to look. Things I look for are overall leading lines or interesting colors.
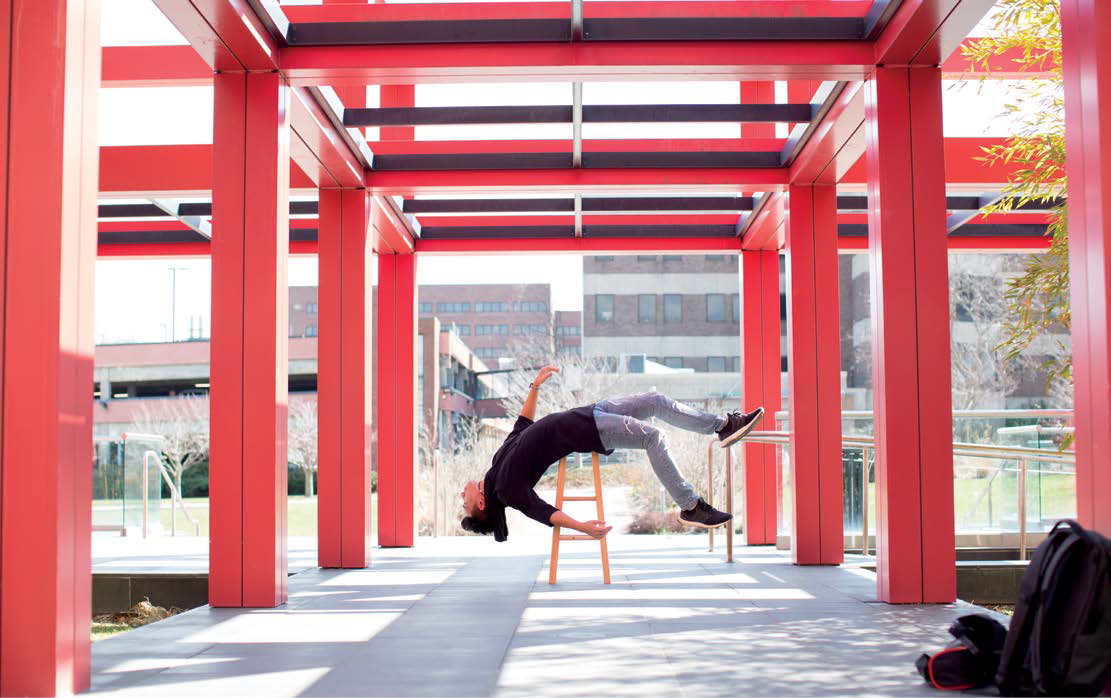
Figure 8.1c
50mm | F/2.8 | 1/250s | ISO 100
The next step was to capture myself (with a remote shutter) to later place in the ball. I had the camera placed on a tripod at a similar height as where I took the original photo. Looking back, I should have used a wider lens to capture more of the environment so I could warp it better with the original image.

Figure 8.1d
50mm | F/2.8 | 1/250s | ISO 100
This was shot seconds after the self-portrait so I could use the background to remove the stool I was resting on. Having multiple captures of a background can facilitate any removal editing you may want to do when you get home.
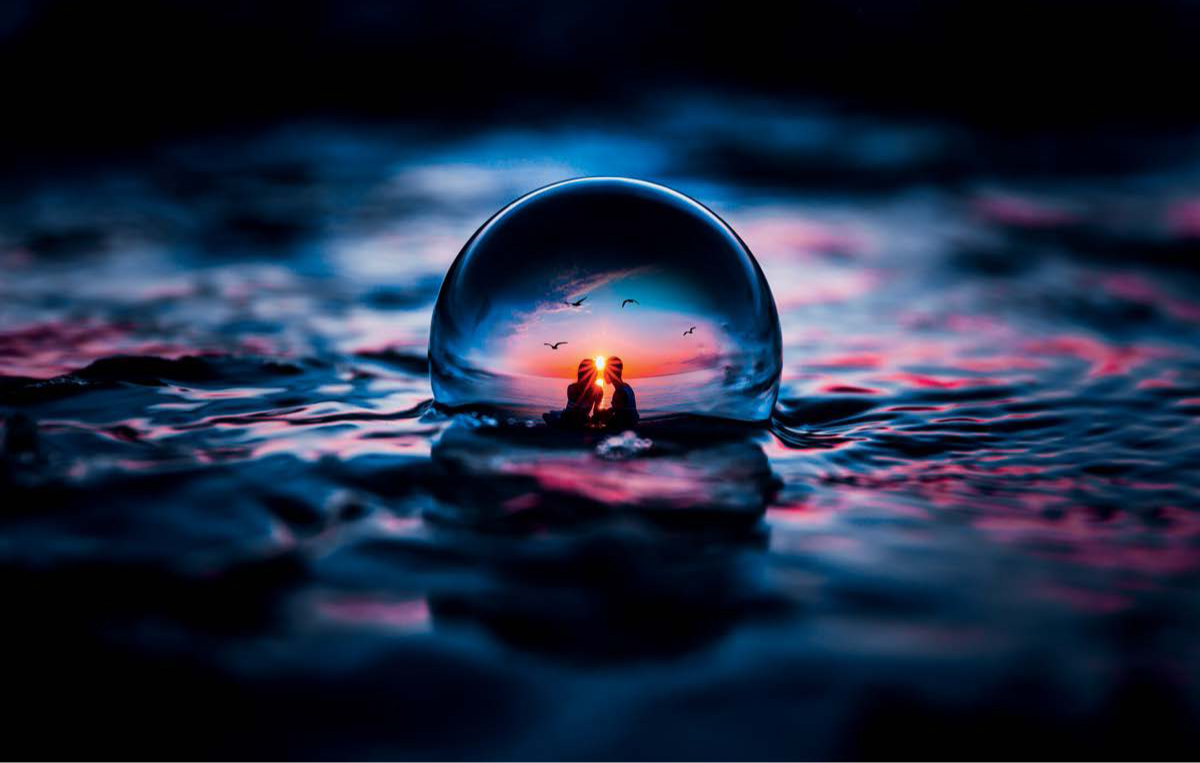
Figure 8.2a
70mm | F/2.8 | 1/125s | ISO 100
This image consists of two separate photos (figures 8.2b and 8.2c) that were color graded to match the overall tone. The self-portrait was masked out into a circle, which was then warped into a curved image to match the inside of the lensball.

Figure 8.2b
70mm | F/2.8 | 1/125s | ISO 100
This is my first lensball image ever. Nothing too exciting and there was a complete void in the middle of the ball. I kept it in my Lightroom library in case I had a use for it one day.

Figure 8.2c
24mm | F/2.8 | 1/250s | ISO 100
The camera was set up on a mini tripod and captured the photo with a timer. At the time, I did not own an infrared remote, so there were many shots of me running back and forth to readjust and capture. This was the couple self-portrait I took of Nicole and I at our favorite beach when we first started dating. Side note, this is the same location where I proposed to her.
Figure 8.2c was an initial couple self-portrait I took with Nicole earlier that summer, and I saw that I could color grade it to match the tones in the lensball photo. After a few back-and-forth edits, I created one of the most recognized lensball photos just because I had an idea and ran with it. You never know when you will create your masterpiece unless you go out and keep capturing.
Create Props for Your Prop
There are some photos where your props may need props (figure 8.3a). At one point in my photography career, I designed bokeh filters with intricate cut-out shapes that could be placed over your lens to transform the background lights into whatever the shape was (figure 8.3b). Figure 8.4 is an example of a snowflake filter I made to frame a lensball photo of a Christmas tree. My other hobbies like 3D printing integrated well into my lensball photography as I designed and printed different stands to hold up the ball for a Halloween themed shot (figure 8.5). Utilizing your other creative outlets can make your photos stand out from the rest.

Figure 8.3a
85mm | F/1.2 | 1/40s | ISO 100
I used a leaf bokeh filter in this image paired with some string lights in the back to resemble a spill of autumn from the cup. This was captured at my local Starbucks.

Figure 8.3b
These filters can either be created with a 3D printer or cut out on cardstock. The shape and size of the hole is contingent on the focal length and minimum aperture of the lens. It is better to shoot wide open with a prime lens than to be limited by a small aperture on a zoom lens.
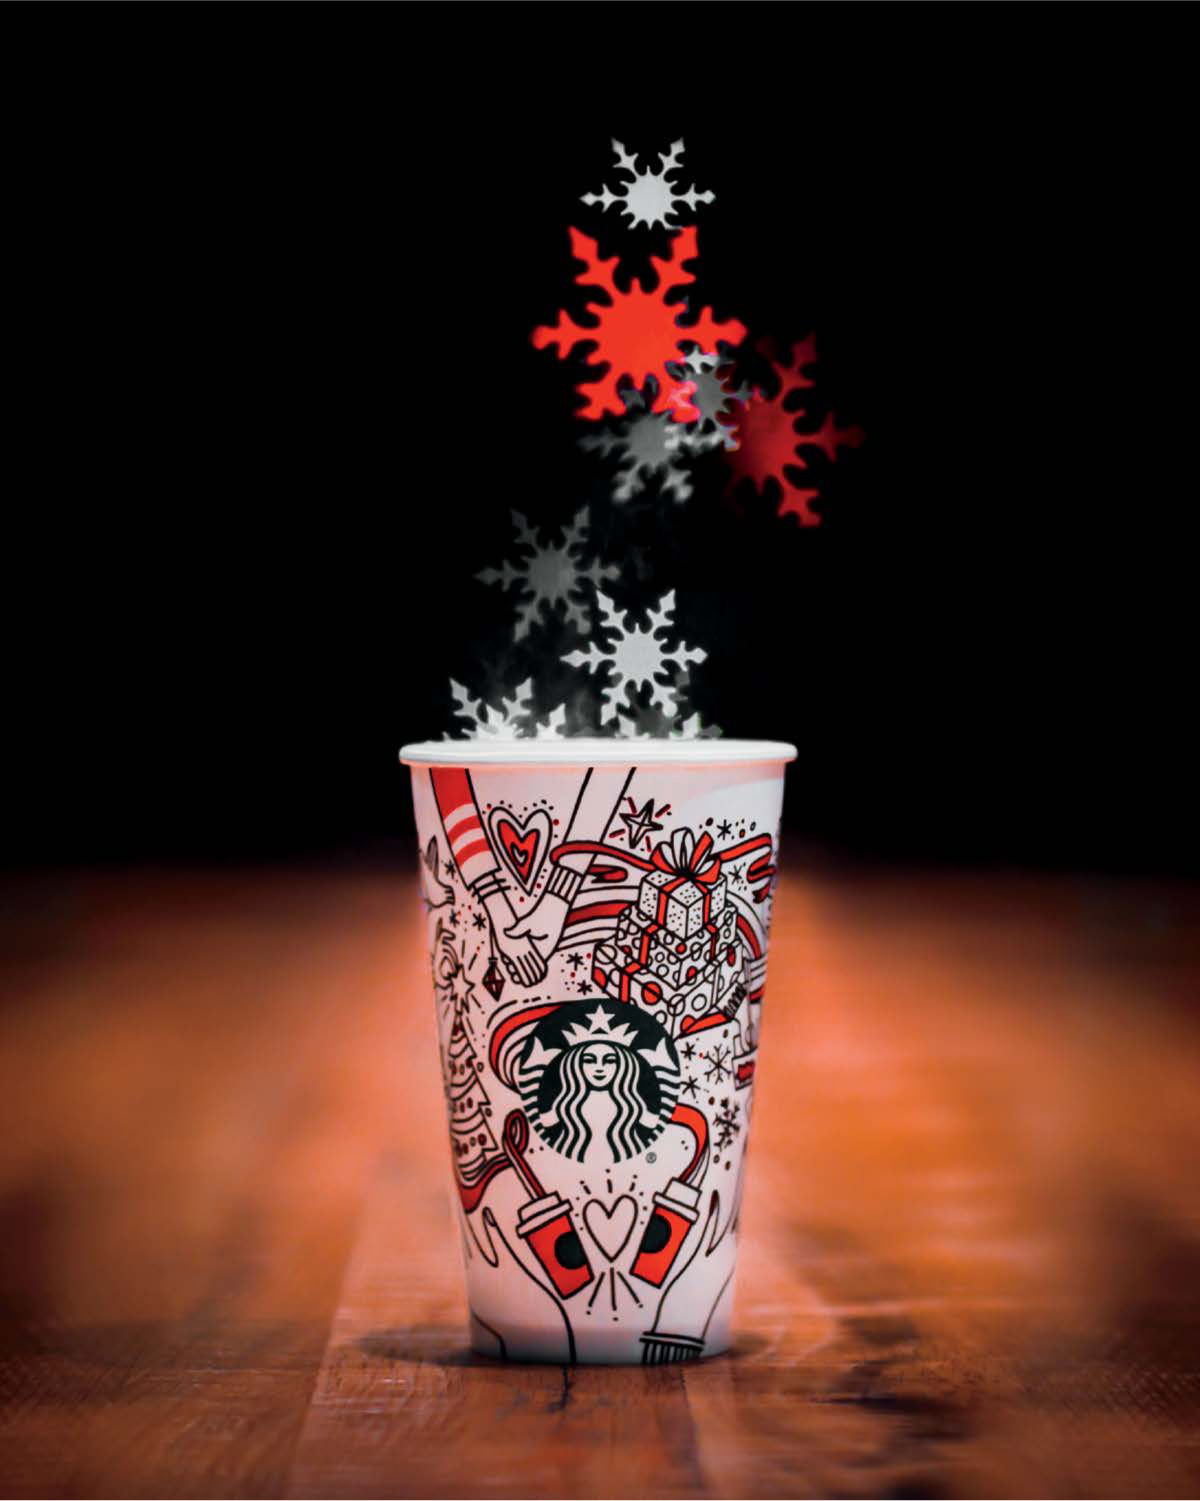
Figure 8.3c
85mm | F/1.2 | 1/60s | ISO 200
Shooting with a wide-open aperture like f/1.2 along with a telephoto lens will allow the bokeh lights in the background to appear bigger. The string lights were hung at the end of the long table in Starbucks, and the red snowflake is actually a traffic light outside the cafe.

Figure 8.4
85mm | F/1.4 | 1/100s | ISO 1600
This image was captured with my snowflake bokeh filter, which transformed the Christmas lights in the tree into the shape of snowflakes. Because this was shot on a telephoto lens like the 85mm, the background is extremely compressed and only showcases the tree lights and not the empty space around the tree.

Figure 8.5
85mm | F/1.4 | 1/250s | ISO 250
I 3D printed a stand to hold up a lensball for a jack-o-lantern–style lensball image. The shape in the back was cut out and placed in front of a lamp, while I used string lights as leading lines toward the center of the image.
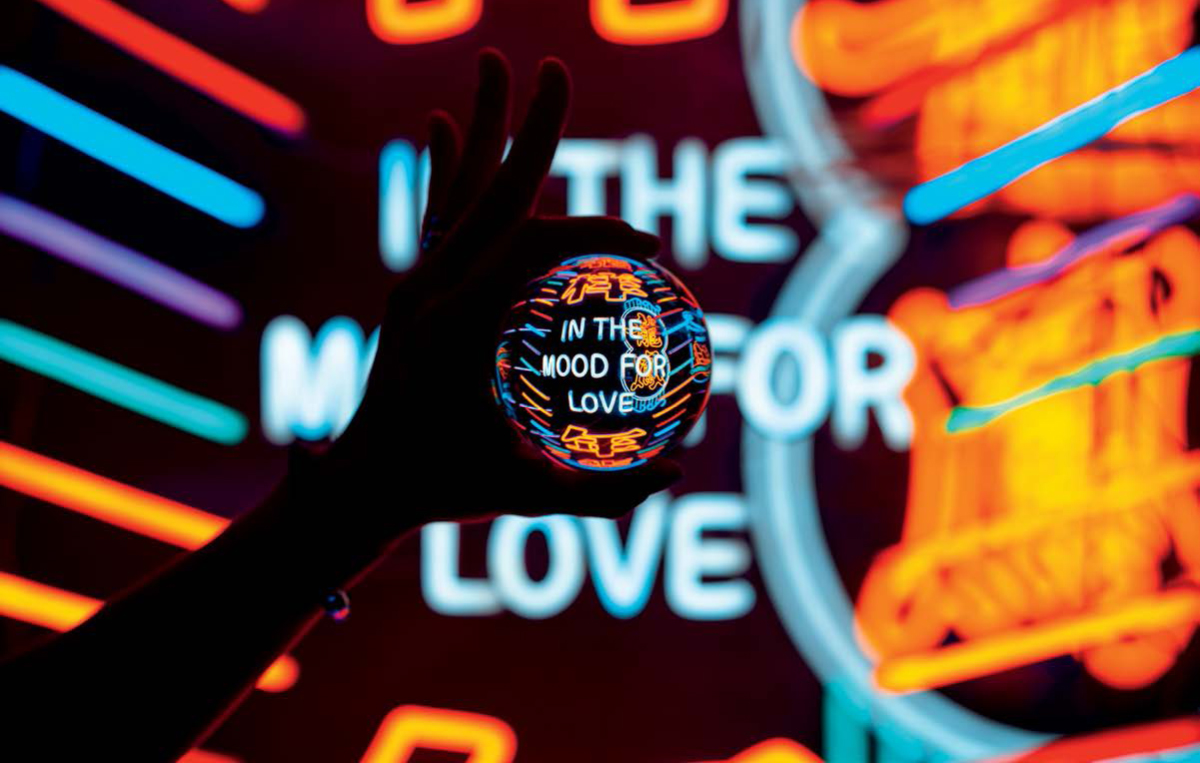
Figure 8.6
85mm | F/2.8 | 1/200s | ISO 100
Use the lensball to draw attention to text or phrases. If they have their own light source that is even better.
Word Play
Since the lensball is essentially a spherical magnifying glass, why not use it to highlight words or phrases for your photo? Placing the ball in front of neon text can help add emphasis to the message (figure 8.6). Typically, artsy neon signs have something meaningful to say, unless it is a sign for fast food. But because art is subjective, feel free to test it out and see which signs work best for your image.

Figure 8.7a
50mm | F/2.8 | 1/100s | ISO 400
Another example of how text can be the subject of a lensball photo, as it forces it to the foreground and makes it the primary thing that is in focus.
Figure 8.7b
50mm | F/2.8 | 1/100s | ISO 100
This can be a stretch, but try using the lensball to finish a phrase or sentence by having the initial text trail off into the background and then continue inversely within the ball.
Again, these are just ideas to try out if you are looking for inspiration.
Artificial Framing
Lastly, you can also resort to Photoshop when it comes to creating something interesting. To add an additional compositional element into your image, custom framing can be used to bring the viewer’s attention into the image. For example, figure 8.8 features an inverse square frame of the image to outline the lensball. Although this isn’t necessary for the photo, it does keep your attention a few seconds longer than if it wasn’t there. I did this by stacking a double horizontaland vertical-flipped image of the original photo as a layer in Photoshop, and then masking out a shape to act as a frame.

Figure 8.8
50mm | F/2.8 | 1/800s | ISO 100
This edit was created to “frame” an image within an image.

Figure 8.9
35mm | F/2.8 | 1/200s | ISO 100
Another example of using a rectangular frame in the image to match the 4:5 aspect ratio.
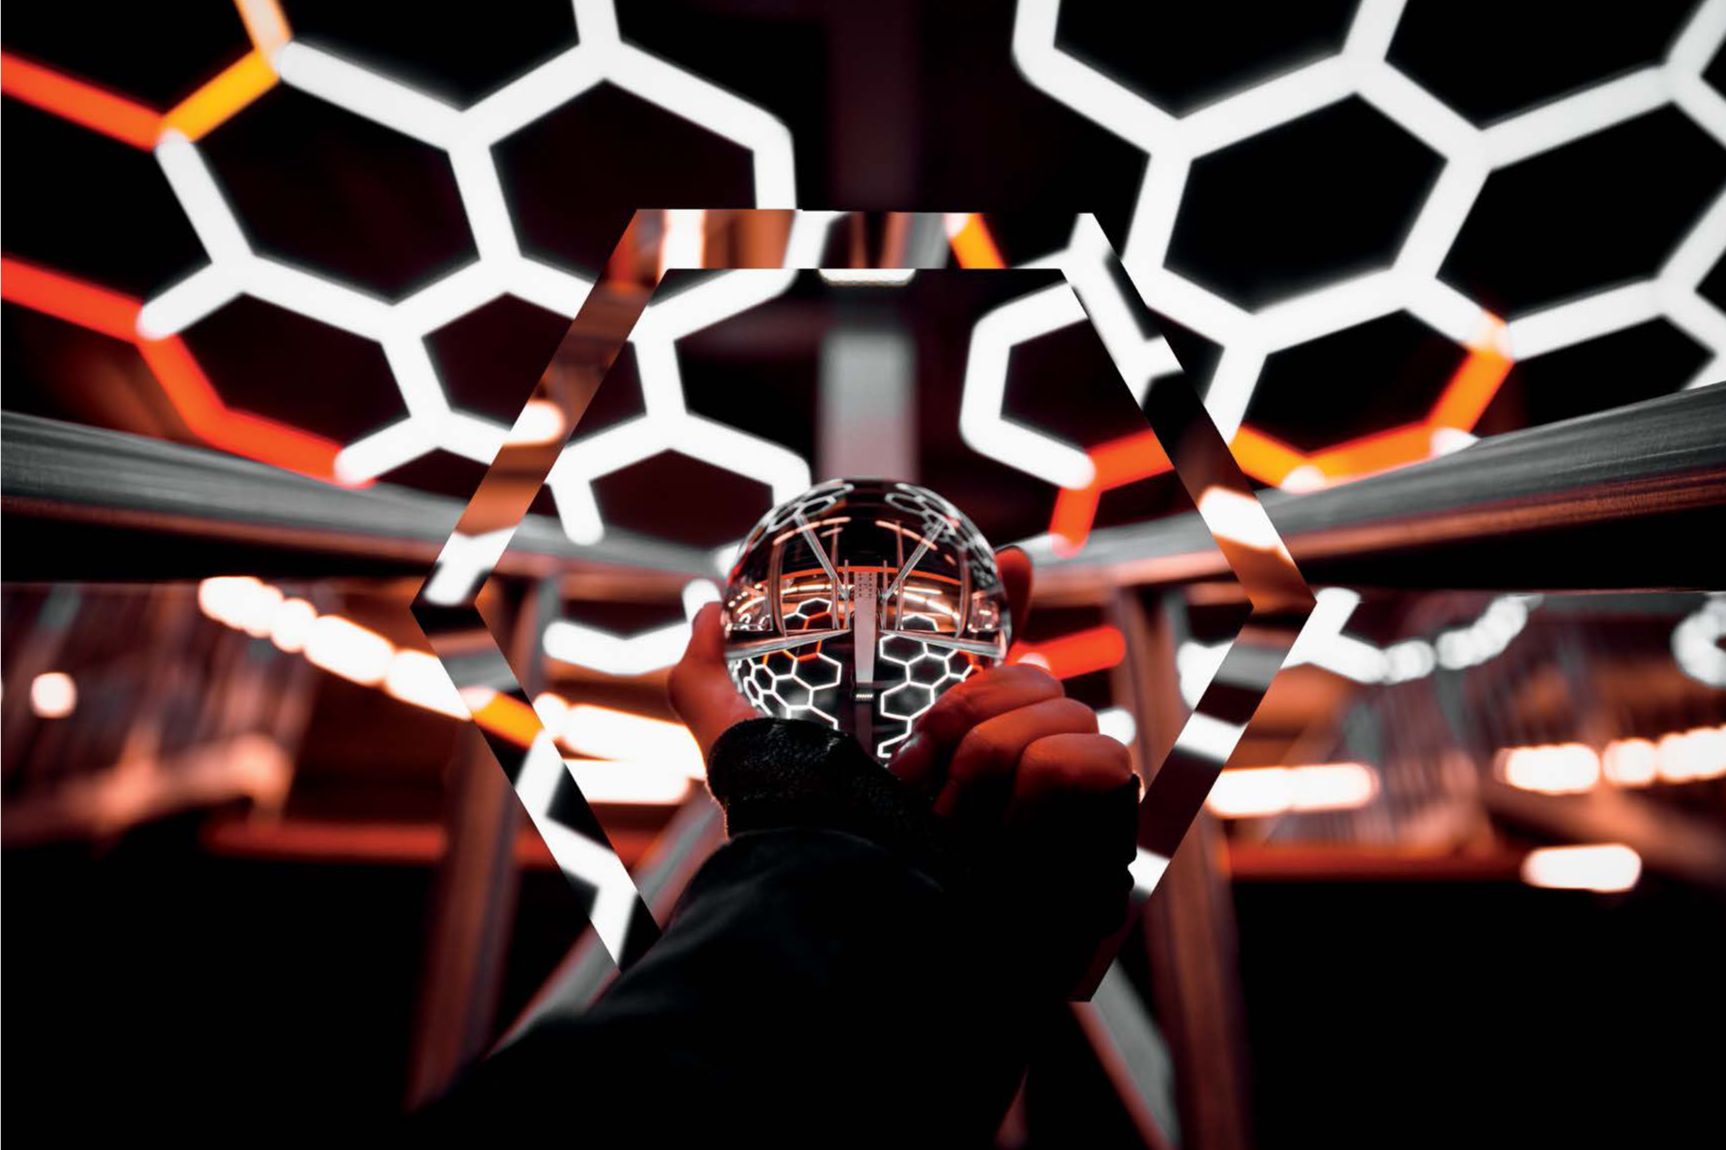
Figure 8.10
24mm | F/2.8 | 1/125s | ISO 250
Frames don’t have to be constrained to a four-sided shape. Here, I created a custom hexagonal frame to stick with the theme of the hexagonal pattern in the backdrop.
There are so many different ways to incorporate new ideas into your creative process. Find something that you think will look nice and go for it. You create for yourself, and if other people like it, that’s a plus. There are many concepts I have drawn up in the past that never left my Lightroom application, but it is because of those failures that I have learned what not to do in the future. Practice isn’t what makes perfect, but it does make you a whole lot more experienced.

Figure 8.11
50mm | F/2.8 | 1/2500s | ISO 250
Lastly, the frame itself does not even have to be a common polygon. You can take any silhouette you find that may match the theme of the photo and use it as a negative mask for your image. I used a blurred-out image as the foreground framing for the image and cut it out with an inverse mask of a leaf silhouette.