![[Chapter 5] Crafting Composition](https://imgdetail.ebookreading.net/cover/cover/202311/EB9781681985800.jpg)
[CHAPTER 5]Crafting Composition
Composition is one of the most widely discussed and subjective topics in photography. First off, we need to understand what exactly a photograph is. Whenever you take a photograph, you are essentially capturing a three-dimensional space in a two-dimensional visual. Composition helps you explain how certain subjects fit within the frame and, in better terms, tell a story of why they are there and why they are important.
Although you may have the technical knowledge necessary to properly expose an image, there are a number of different ways to compose it. You may hear other artists mention compositional principles like the rule of thirds, leading lines, or repeating patterns, but these should be treated more as guidelines than rules. It is one thing to use these tactics to make your photos stand out, but to follow them strictly can be limiting and unnecessary. Once you have a good understanding of the basics of composition, you can find ways to move around or improve upon them.
Composing images can be done in camera or during post-processing with the crop tool, but it is best to get as close as you can to your desired framing on location. In this chapter, I’ll cover some of the key elements of composition I find helpful and discuss how to incorporate them into your lensball photos.
What Is Composition and Why Is It Important?
In the simplest terms, composition is the selective arrangement of objects to guide your viewer’s eyes around an image. These photographic elements are meant to give the scene purpose or be used as a medium for storytelling. Even things like shadows and highlights can be used as lines to divide a picture or lead the viewer’s eyes toward a subject. Although the definition is fairly straightforward, it can be difficult to successfully build a strong composition within the environment you are given. There are also many different techniques you can use to achieve this, and I will do my best to break them down as easily as I can.
Rule of Thirds
The rule of thirds is probably the most frequently mentioned compositional technique. This concept involves mentally dividing your image with two horizontal and two vertical lines, creating nine individual squares within the frame (figure 5.1a). You then align the subject or items you want the viewer to notice at one of the intersections of those lines or along the lines themselves. The focus is to build your image with an off-center subject rather than positioning the subject directly in the center. This requires you, as the photographer, to play around with negative space to add interest within the image. The subjects do not have to be perfectly aligned or on the point of intersection, just close enough. For example, in figure 5.1b, the subject is positioned along the rightmost line while attention is also drawn to the birds and cirrus clouds on the top two intersections. The image is also divided by tone, with one-third being warm-toned and two-thirds being cool-toned.

Figure 5.1a
The rule of thirds is one of the most popular guides and the easiest to use for beginners.
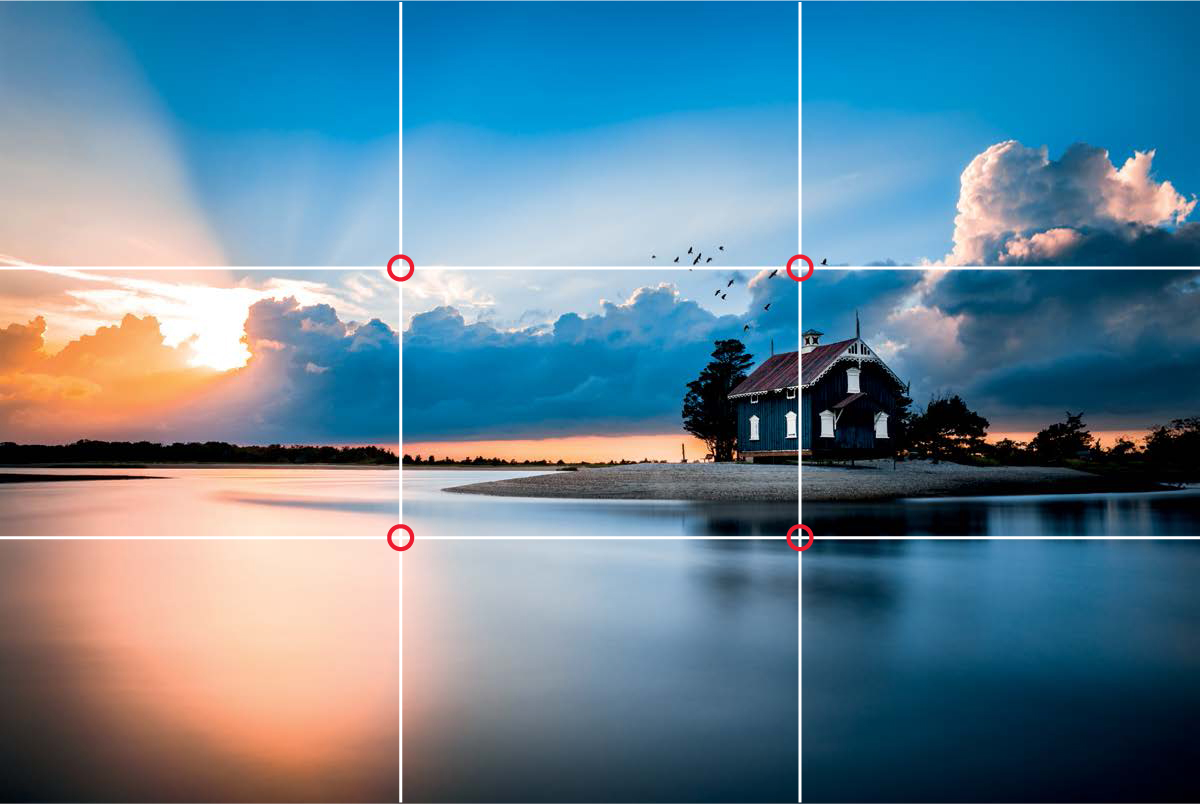
Figure 5.1b
24mm | F/2.8 | 10s | ISO 50
When using the rule of thirds, try your best to frame the shot to include items of visual interest near the lines or intersections to emphasize their impact. You do not need to have something sitting on all four points.
I typically do not use the rule of thirds for positioning the lensball in the frame. Because the image within the ball is largely affected by how offset it is from the center, I try my best to align it directly in the middle of the frame or align it with the top or bottom horizontal lines (figure 5.2a). However, this rule does come in handy when composing everything else in the scene, like the highlights, shadows, and horizon (figure 5.2b).
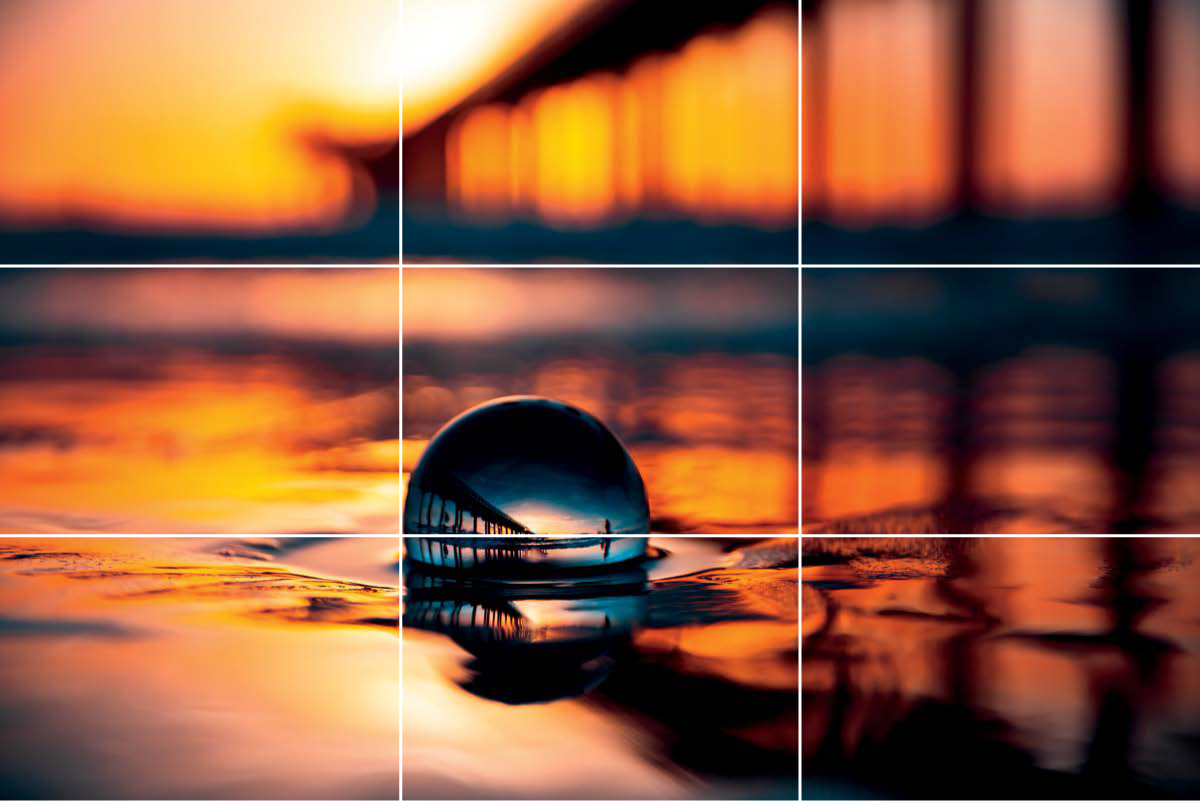
Figure 5.2a
70mm | F/2.8 | 1/2500s | ISO 100
The subject does not have to be perfectly placed on a line or intersection. The rule of thirds can be used to split highlights and shadows or positive space and negative space. Landscape horizons work well when placed along the top or bottom horizontal gridline.
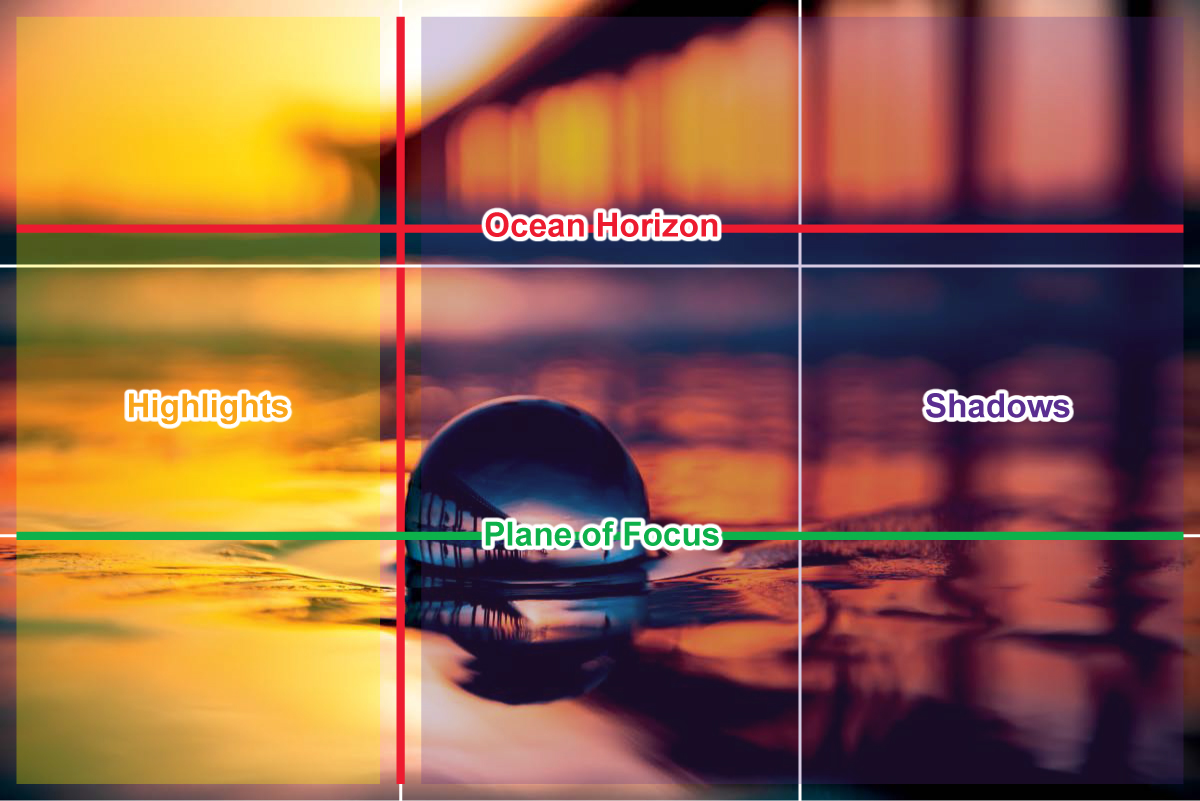
Figure 5.2b
Diagonal Framing
The diagonal method is used to draw the viewer’s attention toward the front and center of an image. Similar to the rule of thirds, you want to set up the focus along one of the four bisections; however, with this method the lines of the photo are rotated forty-five degrees and are drawn from each corner. This is one of my favorite compositional techniques for lensball photography because it focuses more within the center vertical line of an image, rather than having the subject offset, as seen in the rule of thirds. Another thing to add is that the rule of thirds works well with older, squarelike aspect ratios, such as the 4x5 or 8x10 framing styles, but it can be limiting when overlaid on top of the more modern 2x3 aspect ratios.

Figure 5.3a
The diagonal lines guide is useful for producing dynamic compositions.
Diagonal framing is great for images that contain, as you’d imagine, diagonal qualities. In figures 5.3b and 5.3c, the lensball is aligned perfectly with the intersection of the ceiling lights, where the center image of the ball is also aligned as well. The double intersection falls on the topmost bisectional point, which helps guide the audience to focus on the detail.

Figure 5.3b
24mm | F/2.8 | 1/320s | ISO 400

Figure 5.3c
This image was captured in a New York City subway station where the ceiling lights criss-crossed. The lines within the ball and behind the ball align well with the diagonal compositional method.

Figure 5.4
42mm | F/2.8 | 1/800s | ISO 100
The diagonal method can be used to guide the eyes to foreground and background elements, like the detail of the rock and the center of the sun.
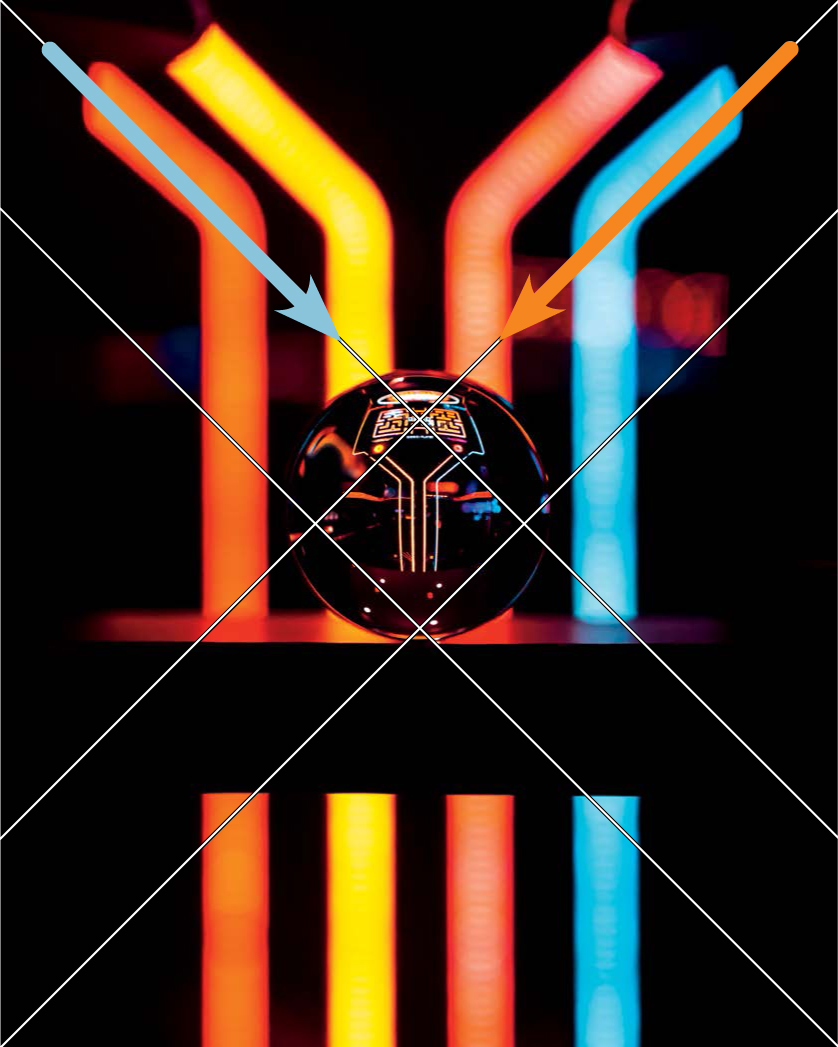
Figure 5.5
85mm | F/2.8 | 1/250s | ISO 800
Another example where the background diagonal lines help emphasize the main subject at the bisection of the top diagonals.
Golden Triangle
The golden triangle approach uses a series of four right triangles to split the image into separate parts. This theory works best with images that contain a strong corner-to-corner diagonal line. For this, you can place points of interest either within each of the separate triangles or along the lines of the triangles. This gives direction to the subject and aligns the viewer’s eyes toward the points of interest. You can also use this to implement leading lines in your photos, which we’ll discuss later in this chapter.

Figure 5.6a
The golden triangle principle utilizes four right triangles to aid image composition.

Figure 5.6b
50mm | F/2.5 | 30s | ISO 1600
In this image, the Milky Way is positioned as the dominant diagonal that stretches from the top-left corner down to the bottom-right corner. Objects of interest, such as the swing set, reside on the bottom-left line.

Figure 5.7a
35mm | F/2.8 | 1/1250s | ISO 100
Aligning intersections of the background with the corners of the triangles can help bring balance to a chaotic image.
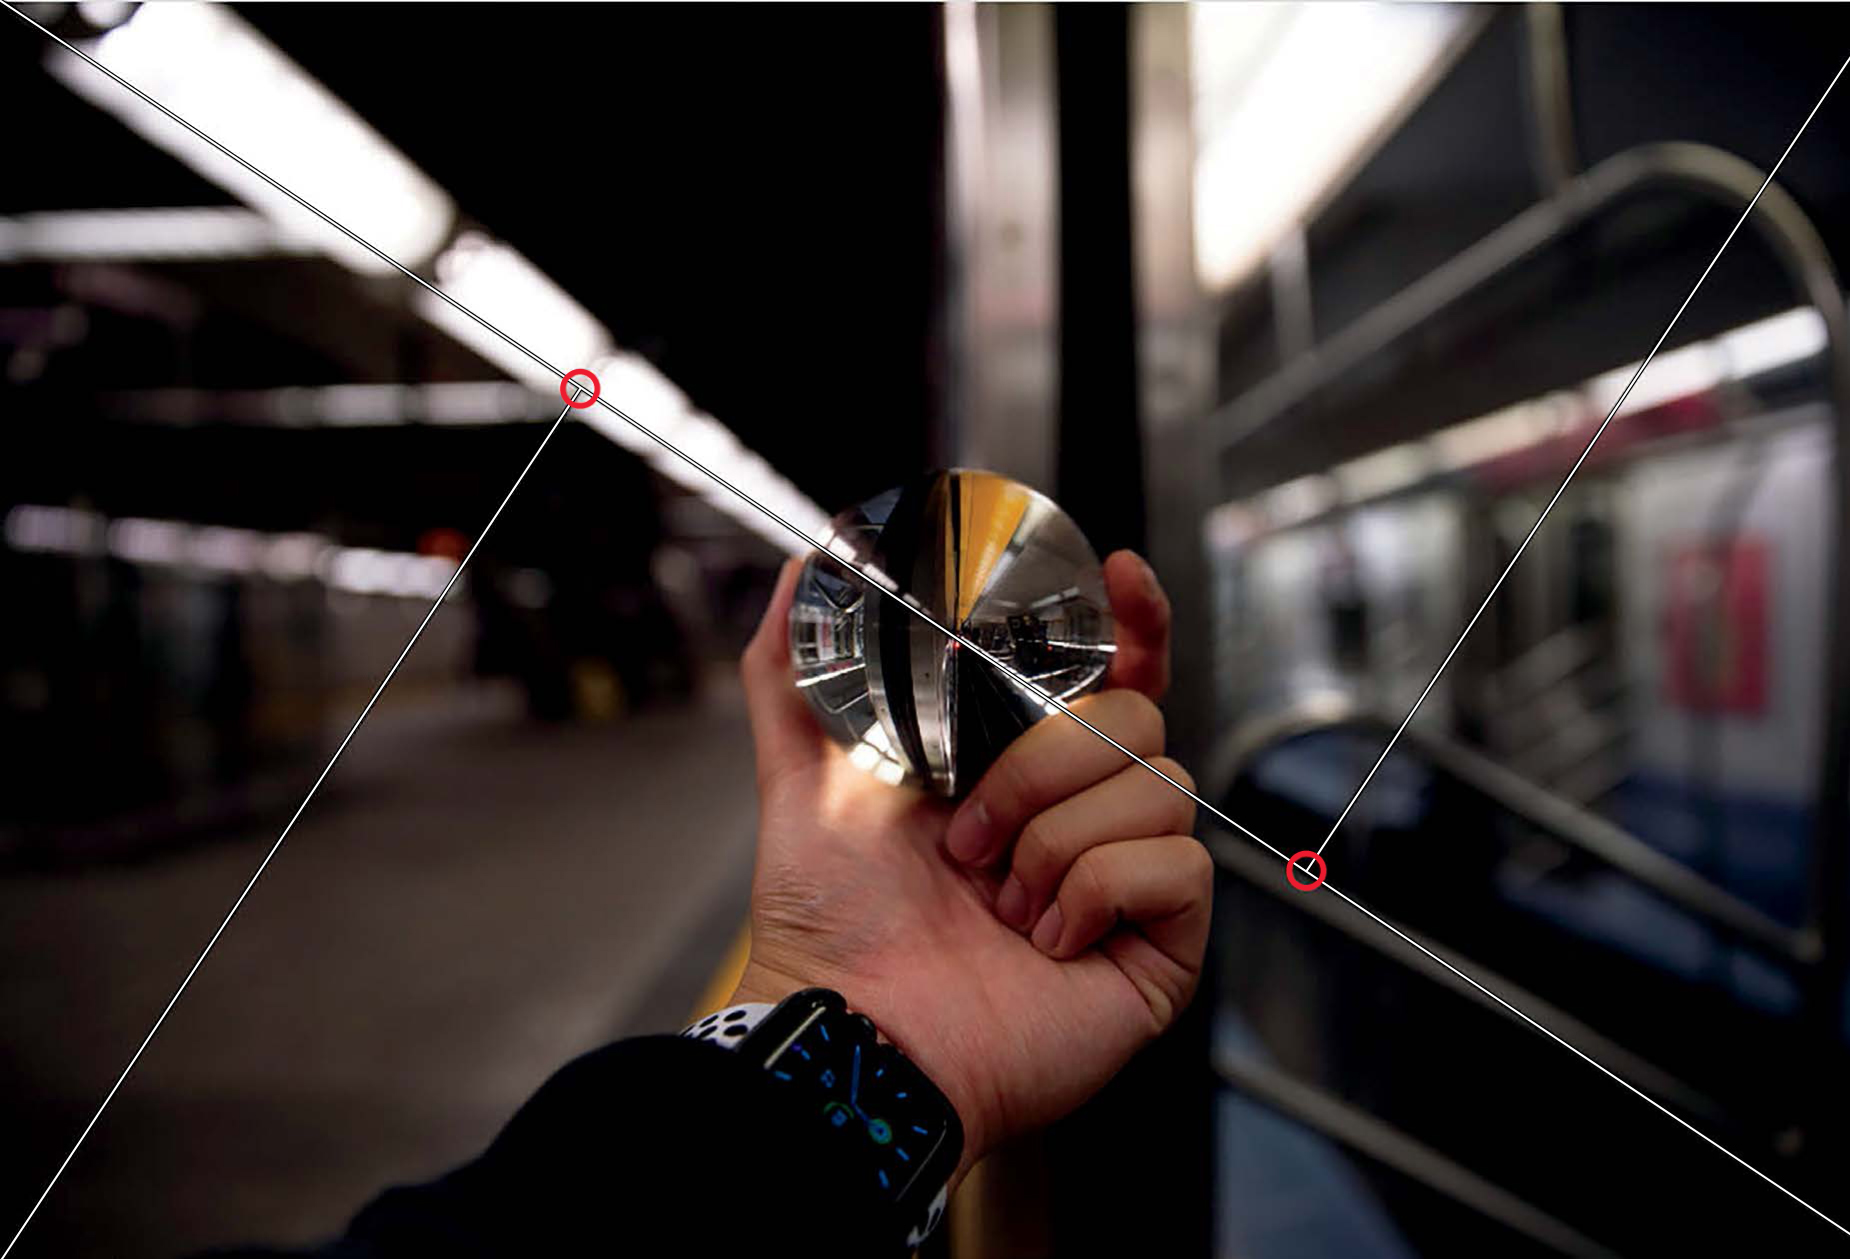
Figure 5.7b
24mm | F/2.8 | 1/250s | ISO 250

Figure 5.8
24mm | F/16 | 15s | ISO 100
For this composition, each triangle illustrates a separate scene or dominant color. The large triangle on the left is filled by the tree in the foreground, while the large triangle on the right contains the tree in the background. The top and bottom triangles have dominant blues, which adds to the overall color contrast in the photo.
Golden Spiral
The composition method known as the golden spiral is probably the most interesting of the ones discussed in this chapter, as its measurements are based on the Fibonacci Sequence, where each number is the sum of its two preceding numbers:
0, 1, 1, 2, 3, 5, 8, 13, 21, 34, and so on …
The golden spiral and the rule of thirds are very similar in that the end of the spiral typically meets with one of the four intersections (figures 5.9a and 5.9b). This, however, does not mean they are interchangeable. There are characteristics of both that make them work with unique, individual photos. The golden spiral usually fits well when there is a curved leading line from the corner of the image (figure 5.10). I don’t generally set up lensball photos according to the golden spiral, but I may notice certain photos are pleasing to the eye and find out afterward that they follow that concept.
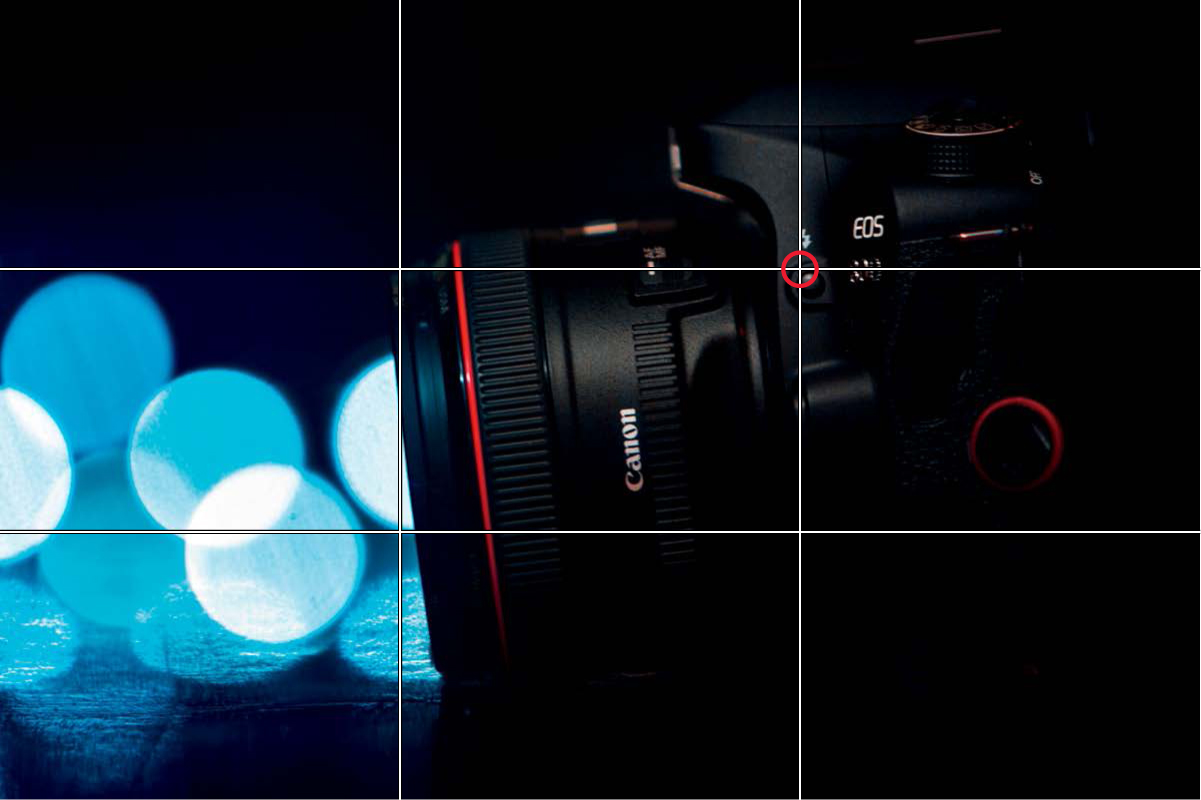
Figure 5.9a
185mm | F/2.8 | 1s | ISO 50
A photo of my Canon 70D taken halfway across the room with a 70–200mm lens. The blue lights in the background are amber fairy lights that I cooled down to blue in post-processing. I’ve applied the rule of thirds grid to the image, where the point of interest is the model number of the camera and the highlights and shadows reside in their separate zones.
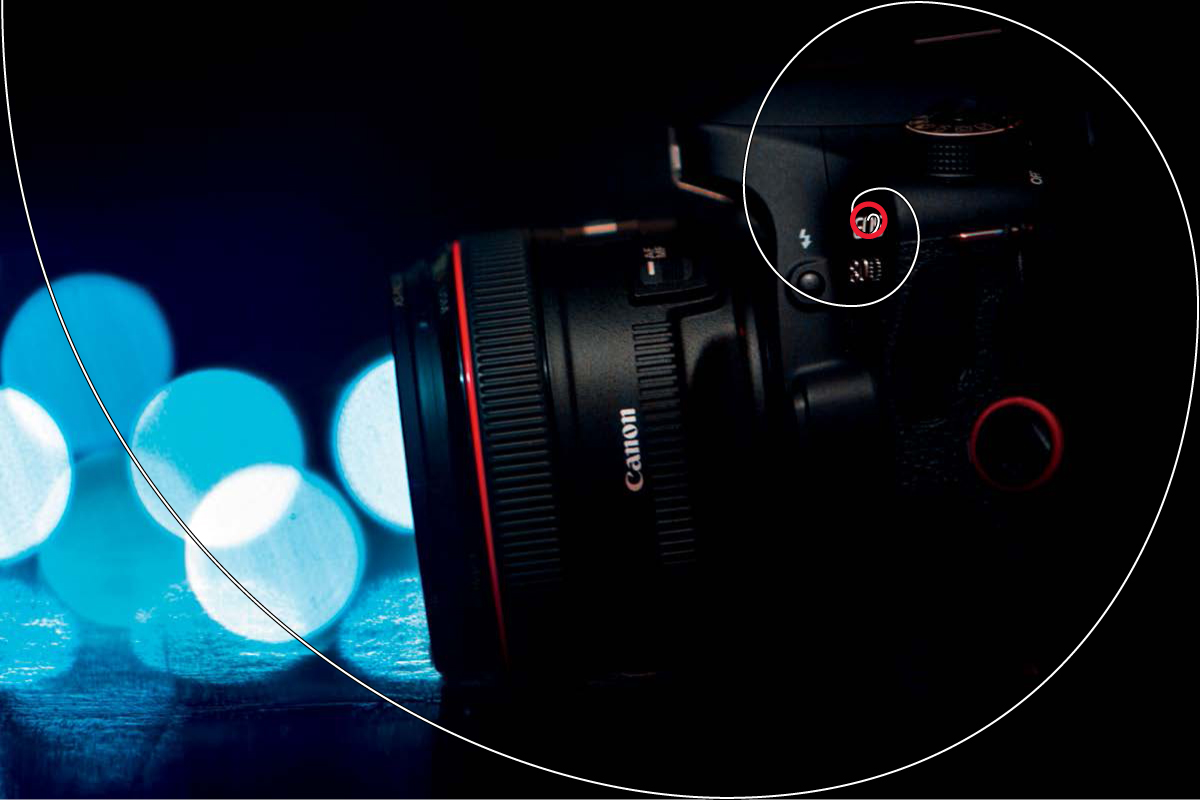
Figure 5.9b
The same image of my camera overlaid with the golden spiral to illustrate how similar the two composition methods can be.

Figure 5.10
24mm | F/16 | 15s | ISO 100
Curved leading lines such as coastlines, or in this case light bokehs, can direct the viewer through the golden spiral to the point of focus, which can be the tip of the light bulb.

Figure 5.11a
85mm | F/4.0 | 1/250s | ISO 2000
The golden spiral is overlayed onto a lensball image that was taken in front of a skee-ball machine, with the lensball held by my friend Danielle.
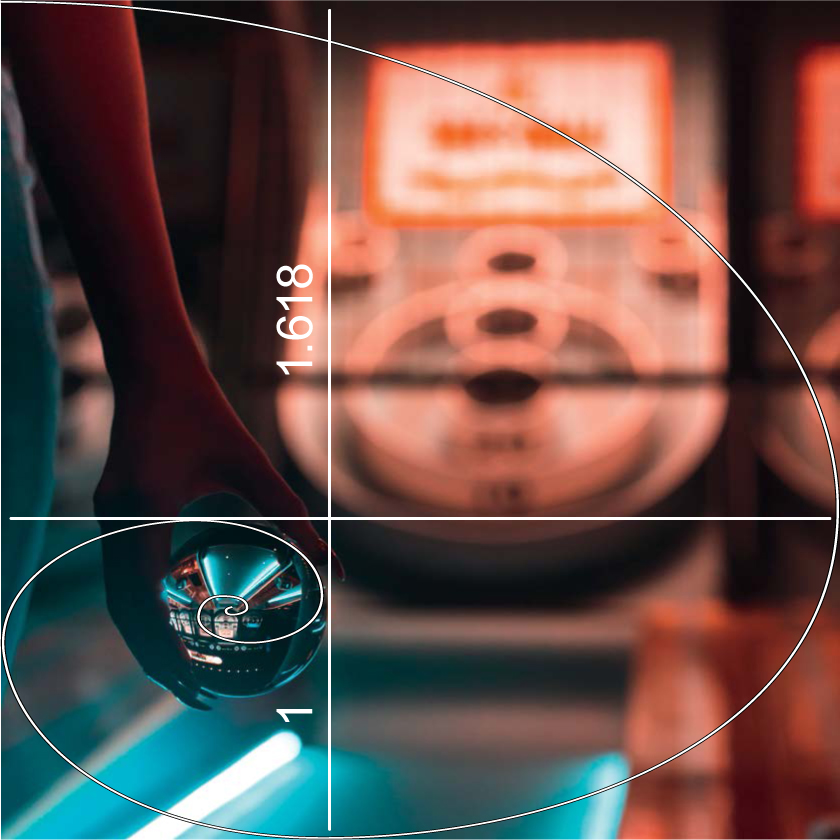
Figure 5.11b
The golden spiral, or ratio, can also be used to separate an image into two sections where the midline is skewed by a ratio of 1 to 1.618. The smaller half will have the subject still in the middle of the spiral. You can tell if you have successfully composed this by removing the larger half from the top portion and noting whether the image is still acceptable.

Figure 5.12
67mm | F/2.8 | 1/125s | ISO 100
Center composition works best with a balanced top and bottom or balanced left and right section. In this capture of another lensball on a skee-ball machine, symmetry exists on both the left and right sides of the background, as well as on the top and bottom within the lensball.
Center Composition and Symmetry
Many will argue that simply placing subjects directly in the middle of the frame may make the image boring, but center composition can still lead to a visually appealing photo if done intentionally. I tend to shoot a significant amount of my lensball photos with center composition and symmetry in mind. The ball itself is a perfectly symmetrical object, so why not put it directly in the middle. This compositional method works best when there are reflections and symmetrical balance within the framing. A lot of times you will find that things like puddles and lakes help drastically for this type of composition.
Leading Lines
Leading lines are described as lines in an image that are intentionally used to frame a subject or guide the audience toward a specific point. This is one of the strongest and most apparent compositional tools that you can use in your photographs. I use this technique in the majority of my lensball photos because it provides an obvious visual guide for the viewer. There are many different types of leading lines that can be used in photography, but for my work I focus on three: horizontal lines, diagonal lines, and converging lines.

Figure 5.13a
50mm | F/2.8 | 1/1250s | ISO 100
For this image, the lensball was held perfectly in the middle so that the horizon in the ball would line up with the horizon in the background. Any higher or lower would result in the horizon curving up or down, respectively, leaving a disconnect.

Figure 5.13b
24mm | F/22 | 76s | ISO 100
Landscape lensball photos still utilize the same compositional theories as regular landscapes. Don’t sleep on capturing different types of photos in the same location.
Horizontal Lines
Horizontal lines exist almost everywhere with oceans, bridges, and buildings. The use of these lines helps strengthen the composition and provides stability to the overall image. A great way to utilize this in your lensball photos is to align the horizontal line within the ball so that it bleeds into the horizontal line of your backdrop. This anchor is an excellent way to provide guidance for those who struggle with composition.
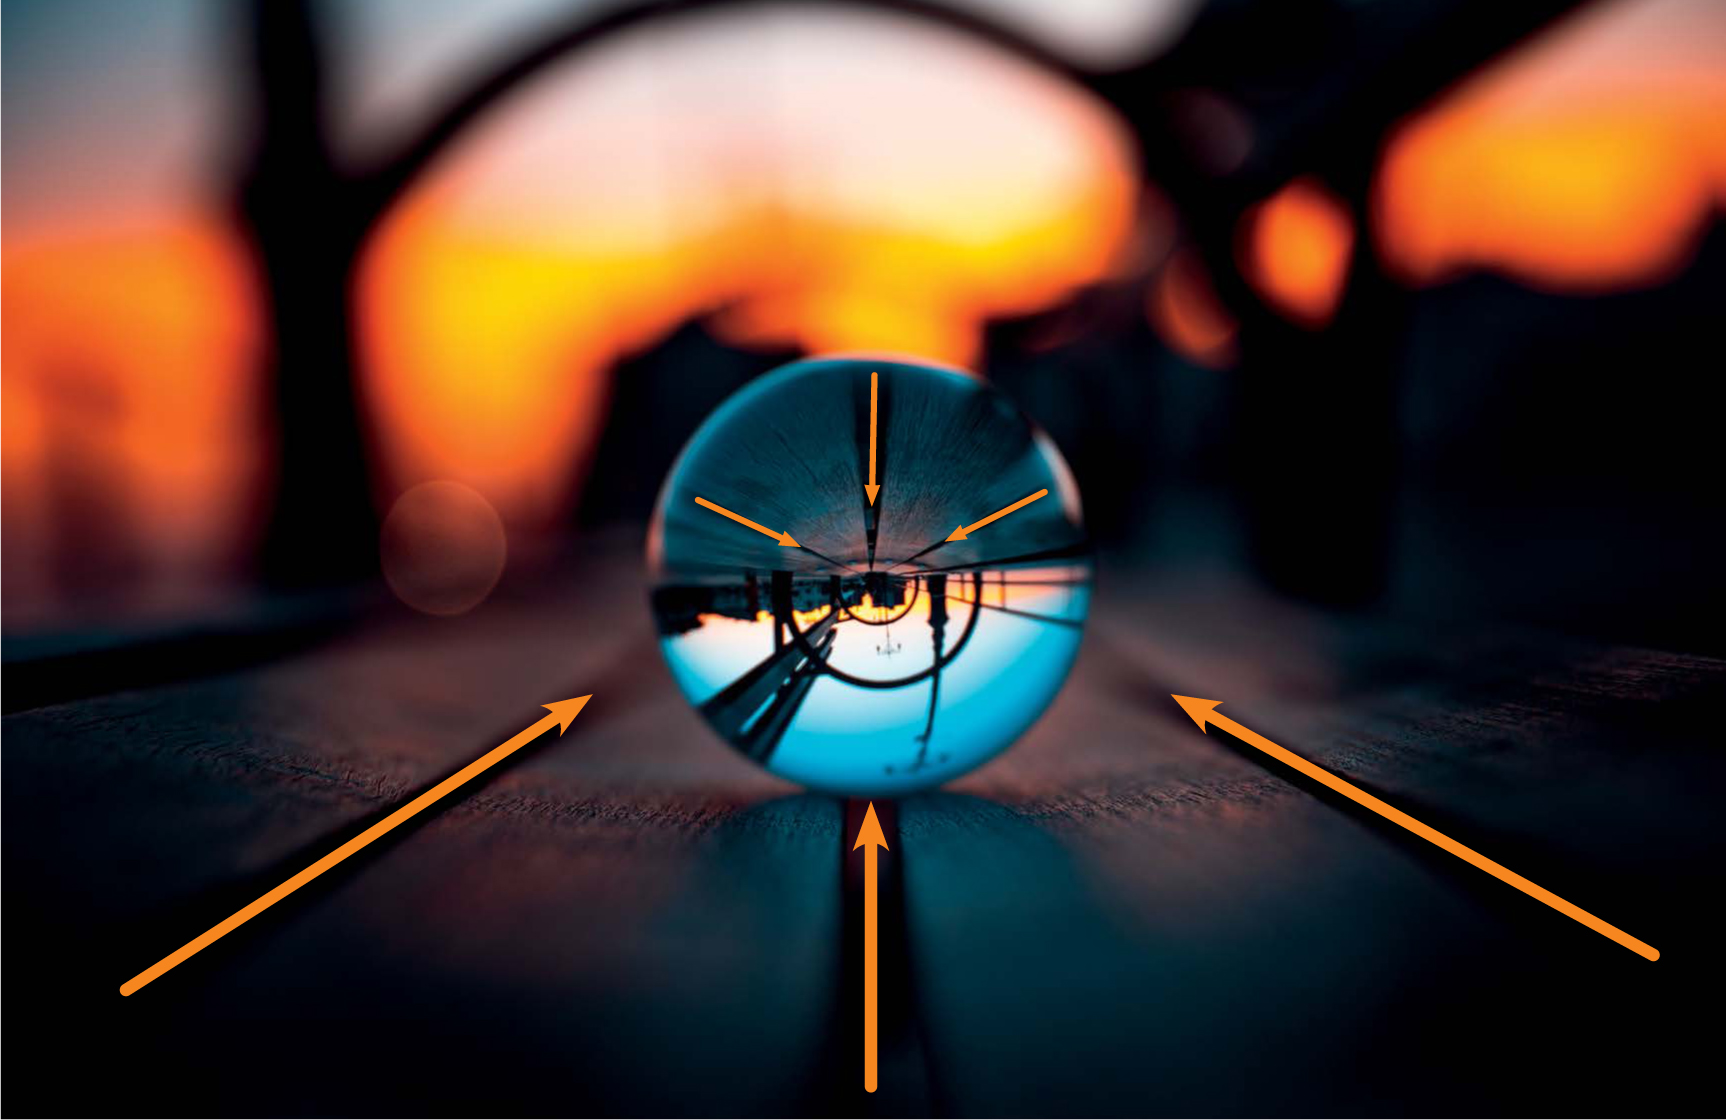
Figure 5.14
70mm | F/2.8 | 1/125s | ISO 100
This image was captured on a park bench outside of Coney Island. The gaps in between the planks of wood act as diagonal leading lines pointing in toward the image inside the lensball. The purpose of these lines is to create a feeling of depth in the two-dimensional image.
Diagonal Lines
Diagonal lines are meant to create depth for an image. Although they are somewhat unbalanced, they can help draw the viewer’s eyes into the photo. A best practice is to set the lines from one side of the image toward the subject. It is very popular to use this when trying to emphasize distance within a frame. Because our eyes naturally pan left to right, this tactic can guide the audience between foreground and background fairly effortlessly.
Converging Lines
Similar to diagonals, these lines also add depth to the image. Things like railroad tracks, stairs, and bookshelves can be useful additions when trying to bring attention to something at the intersection. Because this is such a strong compositional element, it is important to align the subject at the axis of the two converging lines when framing the shot. One unique thing about shooting through a transparent object like a lensball is that you can situate the converging lines inside the glass with the lines in the background.

Figure 5.15a
24mm | F/3.5 | 1/40s | ISO 100
Bookshelves are excellent sources of converging lines. When positioned with center composition, the leading lines of the backdrop line up with the lines in the lensball.

Figure 5.15b
35mm | F/2.8 | 1/125s | ISO 100
Similar to figure 5.15a, the converging lines bleed into the lensball, allowing it to travel deeper into the image. If this is the result you are looking to achieve, I would advise you to visit your local library.
Patterns
Unlike the previous compositional tactics, the use of patterns does not require leading lines to make your image captivating. Patterns exist almost everywhere and it is your job as a photographer to discover them. They are basically repeating elements in the background that grab the viewer’s attention if used correctly. What’s interesting about this technique is that when shooting with a lensball, you must also be conscious about how the pattern will appear within the ball. Because the lensball acts as a super-wide-angle lens, your pattern might fill the frame of your camera’s backdrop, but the image in the lensball might not wrap far enough to fill the secondary frame.

Figure 5.16
35mm | F/2.8 | 1/1000s | ISO 100
Although the repeating pattern does cover the backdrop, the lensball has some open space near the inside of the hand. This particular shot was taken on top of the Vessel in New York City.

Figure 5.17
70mm | F/2.8 | 1/160s | ISO 800
This was taken in front of an LCD screen that displayed repeating hexagonal patterns. This can also be replicated with a television or large monitor.

Figure 5.18
50mm | F/2.8 | 1/125s | ISO 400
Projectors also come in handy with displaying interesting patterns to be used as backdrops.
One of the drawbacks of shooting indoors is that most of your lensball photos will be backlit, which will leave your hand in the shadows.
As mentioned before, you must encompass both a good composition within the lensball as well as around it. My favorite practice is to shoot with a slightly telephoto lens to develop a final image that includes both a compressed and wide composition.