
Proprietary Approach
In this example, Java is used to illustrate how a direct point-to-point connection is made over a network. To accomplish this, I use an example that I have been using as a teaching technique for many years—sending an object from a client to a server and then printing some of the information contained in the object.
This basic flow of this approach is illustrated in Figure 14.1.
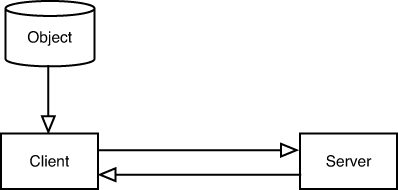
Figure 14.1. Basic client/server flow.
In this design, the client creates an object and then sends it to the server. The server creates a reference to the object to access it. The server then may update the object’s attributes and send it back to the client.
Serialized Object Code
We start by creating a simple TextMessage class that contains attributes called name and message. The class also contains a constructor as well as getters and setters. The complete TextMessage class is presented in the following code:
import java.io.*;
import java.util.*;
public class TextMessage implements Serializable {
public String name;
public String message;
// TextMessage 's Constructor.
TextMessage(String n) {
message = " ";
name= n;
}
// Objects 'getter' function.
public String getName() {
return name;
}
// Objects 'getter' function.
public String getTextMessage() {
return message;
}
// Objects 'setter' function.
public void setTextMessage(String inTextMessage) {
message = inTextMessage;
}
}
This is a pretty simple class. The constructor initializes the name attribute via a parameter and sets the message to blanks. The primary item to notice is that the class is serialized in a proprietary Java binary format.
Client Code
The client code uses the TextMessage class to create an object and start it on a journey to the server and back. The client must perform the following tasks:
• Get the user information.
• Create an object.
• Set the attributes.
• Create a socket connection.
• Create the output streams.
• Write the object.
• Close the streams.
The code for this client is presented in the following code. The comments provide most of the code commentary:
import java.io.*;
import java.net.*;
/*
* The Client for TextMessage
*/
public class Client {
public static void main(String[] arg) {
try {
String message = " ";
String name = " ";
System.out.print("Please enter name: ");
name = getString();
// Create a TextMessage object
TextMessage myTextMessage = new TextMessage(name);
System.out.print("message: ");
message = getString();
// Use the 'setter' to set the TextMessage
myTextMessage.setTextMessage(message);
// Create a socket connection
Socket socketToServer = new Socket("127.0.0.1", 11111);
// Create the ObjectOutputStream
ObjectOutputStream myOutputStream = new
ObjectOutputStream(socketToServer.getOutputStream());
// Write the myTextMessage object to the OutputStream
myOutputStream.writeObject(myTextMessage);
// Close the streams
myOutputStream.close();
} catch (Exception e) {System.out.println(e);}
}
public static String getString() throws Exception {
// open keyboard for input (call it 'stdin')
BufferedReader stdin =
new BufferedReader(new InputStreamReader(System.in), 1);
String s1 = stdin.readLine();
return (s1);
}
}
The most important points to make about this client code revolve around the network connections. In this example, the following line of code defines where the client will connect to the server:
Socket socketToServer = new Socket("127.0.0.1", 11111);
When the socket is created, the two parameters passed represent the IP address and the virtual socket the client attempts to connect to.
The IP address 127.0.0.1 is a loop-back, meaning that the client attempts to connect to a server that is local. In short, the client and server are running on the same machine. The only obvious condition is that server must be launched first.
Using this loop-back IP address is very useful when testing applications. Instead of requiring a connection to a network, the underlying logic of an application can be tested locally—which makes the initial testing much simpler. Later, more general testing can be performed with a real IP address.
Besides the IP address, the virtual port must be specified in the parameter list. In this case an arbitrary value of 11111 is chosen. The only condition with this value is that the server that the client attempts to connect to must be listening at this port.
After the client establishes valid communication with the server, and the object is sent and retrieved, the client application terminates.
The only other issue of note in this code is the method at the end of the class that performs the task of retrieving a line from the keyboard. This is the user input, akin to typing in a text message on your cell phone.
Server Code
On the other side of the wire, the server code performs the following tasks:
• Create an object reference.
• Listen to the virtual port 11111.
• Wait for a client to connect.
• Create the Input/Output streams.
• Read the TextMessage object.
• Print the message.
The code for the server is listed here:
import java.io.*;
import java.net.*;
/*
* The Server for TextMessage.
*/
public class Server {
public static void main(String[] arg) {
// create a reference for an object to come from the client.
TextMessage myTextMessage = null;
try {
// Start the Server listening to port 11111
ServerSocket myServerSocket = new ServerSocket(11111);
System.out.println("Ready
");
// Wait here until a Client attempts to connect
Socket incoming = myServerSocket.accept();
// Create an ObjectInputStream
ObjectInputStream myInputStream = new
ObjectInputStream(incoming.getInputStream());
// Read the object from the socket that has the client
myTextMessage = (TextMessage)myInputStream.readObject();
System.out.println(myTextMessage.getName() + " : "
+ myTextMessage.getTextMessage()+ "
");
// Close the streams
myInputStream.close();
} catch(Exception e) {
System.out.println(e);
}
}
}
Just as with the client, there is no loop in the code. It is fairly simple to use a loop so that the server can continuously listen to the port—but this functionality is not central to the topic here.
It is also possible for the server to update the project and send it back to the client. For example, the client could also create an input stream and read the object back from the server—just as the server can create an output stream and send the object back to the client.
Running the Proprietary Client/Server Example
To simplify matters, the client/server example is run using a basic Command Prompt so we don’t have to create a GUI or run it from an Integrated Development Environment (IDE). In the next section, we create modules that will run from within a GUI and an IDE.
The first step in the process is to launch the server. Then, from a second Command Prompt, the client is launched. The server prints out a message indicating that it is ready—and it waits. After launching, the client requests a name and a message that the user must type in.
After the client information is entered and sent, the server displays the message received from the client. Figure 14.2 shows the server session, and Figure 14.3 shows the client session. Again, both the server and the client can contain loops that will allow more than one pass. This example was kept as simple as possible to illustrate the technology.
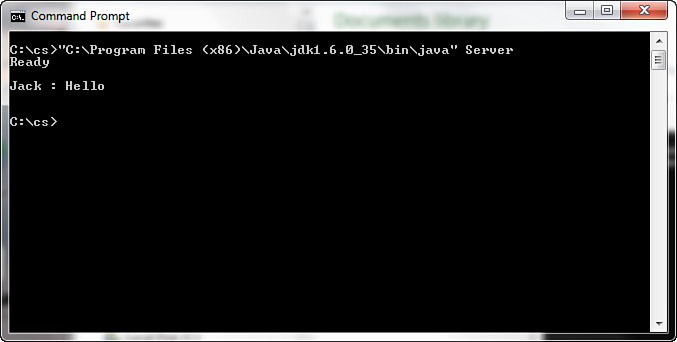
Figure 14.2. Running the server.
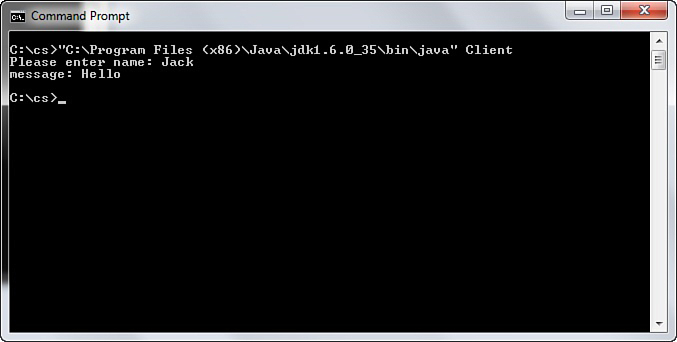
Figure 14.3. Running the client.
The simple user interface of the client requests the name of the user as well as the message that the user wants to send. In a real-world text messaging system, like a cell phone, the server would use the address entered by the user (basically the telephone number) to forward the message to a second user, not simply print it out.