
Chapter 7
Python
In this chapter
![]() An introduction to programming in the Python Editor
An introduction to programming in the Python Editor
![]() ‘Hello, World!’: Your first Python program
‘Hello, World!’: Your first Python program
![]() Programs for reading from button inputs, touch inputs, and the temperature, accelerometer, and compass sensors
Programs for reading from button inputs, touch inputs, and the temperature, accelerometer, and compass sensors
![]() Fruit Catcher: A simple game to program and play on your BBC micro:bit
Fruit Catcher: A simple game to program and play on your BBC micro:bit
THE PYTHON PROGRAMMING language, named not for the snake but for the comedy troupe Monty Python, started life in 1989 as a hobby project of developer Guido van Rossum. Since its official release in1991, Python has grown in popularity thanks to its flexibility and a beginner-friendly format free of the need for hundreds of curly braces or semicolons you find in rival languages. Instead, Python makes heavy use of whitespace—space or tab indentations—to control where blocks of code begin and end.
Technically speaking, the BBC micro:bit is not programmed in Python itself but a variant of the language designed specifically for the BBC micro:bit and other microcontroller-based development and educational boards: MicroPython. MicroPython is a version of Python created by Damien George with certain parts of the language’s standard libraries which aren’t required for microcontroller use stripped away and other libraries added to produce programs which run well on the BBC micro:bit and similar devices. The MicroPython code for the BBC micro:bit was contributed by volunteers from all over the world, led by Damien George, Nicholas Tollervey, and Carlos Pereira Atencio, in an effort to help people learn Python programming using the device.
As in Chapter 5, ‘JavaScript Blocks’, and Chapter 6, ‘JavaScript’, in this chapter you’re introduced to the Python Editor and learn to write a series of programs that make the most of the BBC micro:bit’s capabilities. Finally, you’re able to make a quick-fire game in which you’re given the task of catching ever-faster falling fruits before they hit the ground. These programs are the same between Chapter 5, Chapter 6, and Chapter 7, allowing you to easily compare and contrast the three languages to find the one that suits you best.
Introducing the Python Editor
The Python Editor is an all-in-one development environment created specifically for the BBC micro:bit’s Python language. Running entirely within the web browser of any modern computer, the Python Editor doesn’t require you to install software on your computer. All you need to do to load the Python Editor is open the web browser of an Internet-connected computer, type python.microbit.org into the address bar, and press the Enter key (see Figure 7-1).
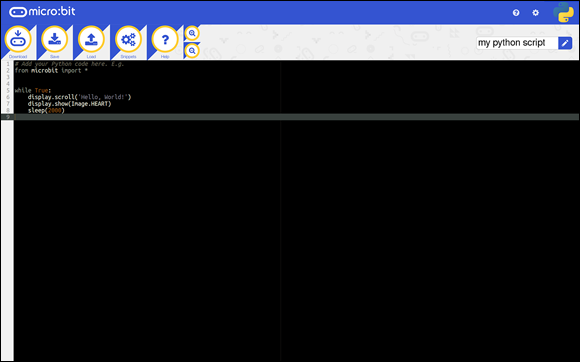
FIGURE 7-1: The Python Editor
Following are the main features of the Python Editor:
- The Download button—Located at the top left and looking like an arrow pointing down to the micro:bit logo, this button downloads your program to your computer as a hex file ready to be flashed onto your BBC micro:bit (see Chapter 3, ‘Programming the BBC Micro:bit’).
- The Save button—Located next to the Download button and looking like a larger arrow pointing downward to an external hard drive, the Save button saves a copy of your program code to your computer as a
.py - The Load button—Clicking on the Load button will allow you to browse the files stored on your computer for Python programs you have downloaded previously or written in other software. The Load button lets you load hex files from the Download button and py files from the Save button, restoring the program listing accordingly.
- The Snippets button—Looking like three cogs and located to the right of the Save button, the Snippets button gives you quick access to commonly used chunks of program code, such as functions, as a means of reducing the amount of typing you have to do.
- The Help button—Found next to the Snippets button on the top menu bar, the Help button should be your first port of call if you get stuck. Click the Help button to load a page introducing the features of the Python Editor and explaining how to use it to write your first program.
- The Zoom buttons—Smaller than the other buttons in the top menu bar, these buttons zoom in and out to make the program listing text larger or smaller. For more complex projects, zooming out allows you to see more of the project onscreen at once; if you find the program listing hard to read, zooming in makes things clearer.
- The project name—The first thing to do when you start a new project is to give it a descriptive name using the box at the right of the top menu bar. Always start by renaming a project from the default name to make it easier to find in the future.
- The program listing—Taking up the bulk of the screen and with line numbers to the left side, the program listing area contains the Python program on which you are currently working.
Program 1: ‘Hello, World!’
‘Hello, World!’ is the traditional first program for any language. It’s basic by design but offers a first glimpse of what a given language is like to program in with the bonus of a quick payoff in the form of a message proving that your program is alive and well.
Start by opening your browser and going to python.microbit.org to load the Python Editor. The Python Editor loads with a default program already typed in, as an introduction. Although this program is effectively a ‘Hello, World!’ program itself, start by deleting all the text currently in the program listing to begin with a completely blank slate. The quickest way to do this is to press Ctrl+A on the keyboard to select all the text, and then press either the Backspace or the Delete key.
‘Hello, World!’ is a simple program that requires just two lines of code. The first is required by all micro:bit Python programs, regardless of what the program is designed to do, and you use the same line in every program in this chapter. With all text deleted from the program listing and your cursor at the start of the now-blank Line 1, type the following:
from microbit import *
This is known as an import instruction; it tells Python that you will be using instructions found in the library called microbit. A Python library contains a collection of pre-written code which is made available as functions, and the microbit library’s functions revolve around using the BBC micro:bit in your program. Without this line, which tells Python to add all the instructions from the microbit library into your program ready for you to use, you wouldn’t be able to use the BBC micro:bit’s screen, sensors, input-output pins, or any other feature.
The second line of your program is the one that actually does the work of printing out the “Hello, World!” message to the BBC micro:bit’s display. With your cursor at the end of Line 1, press Enter to insert a new, blank Line 2 and type the following:
display.scroll('Hello, World!')
This line tells Python that you are using the scroll instruction from the display category of instructions and that you are passing it the message “Hello, World!” (see Figure 7-2). As the name suggests, this instruction takes the message you have written and scrolls it across the BBC micro:bit’s display for you to read.

FIGURE 7-2: The display.scroll instruction in the program listing
You may have noticed that the line of code you’ve just written uses different colours. This is known in programming as syntax highlighting and helps you see any mistakes you may have made at a glance. The instruction itself, the display.scroll portion of the code, is displayed in an off-white colour; the message that the instruction is using, 'Hello, World!', is displayed in purple.
Try deleting the last single quote from Line 2, so it reads like this:
display.scroll('Hello, World!)
Notice how the colours have changed. The last bracket, which was off-white before, is now purple, indicating that the Python Editor thinks it’s part of the string (see Figure 7-3). Without the last single quote to tell the Python Editor where the string ends, though, the program no longer works; you’ve introduced a bug into the program.

FIGURE 7-3: The Python Editor highlighting a code bug
The Python Editor’s debugging capabilities are relatively basic. The Editor’s key tool is the syntax highlighting: by looking at the colours, it’s possible to see where common errors like strings that have not been closed are in your program. Even with the error you’ve introduced onto Line 2, though, the Python Editor still downloads your program when you click the Download button. You don’t see error messages until you flash the program onto your BBC micro:bit, at which point you see any error message the compiler created scroll across the display—in this case, instead of the “Hello, World!” message you were expecting. This scrolling error message always includes a reference to the line number on which the error was found, allowing you to go back to your program, find, and fix the problem.
Put the single quote back into Line 2 so it reads like this:
display.scroll('Hello, World!')
The syntax highlighting changes the bracket back to its original colour to indicate that the bug is now fixed. Click the Download button to compile and save your program as microbit.hex, connect your BBC micro:bit to your computer via the micro-USB port, and then drag the microbit.hex file from your Downloads folder to the BBC micro:bit’s removable drive as described in Chapter 3. Once the flashing process has finished, the program begins to run and the message “Hello, World!” begins to scroll across your BBC micro:bit’s display (see Figure 7-4). Feel free to experiment at this point: change Line 2 to scroll a message of your own, such as your name or your favourite colour, and then click the Download button again to download an updated copy of your program to flash onto the BBC micro:bit and replace the original. If you haven’t deleted or moved the original microbit.hex file from your Downloads folder, the new copy is called microbit (1).hex; if you click the Download button again, the next copy is called microbit (2).hex, and so on for each time you download a new version of the program.
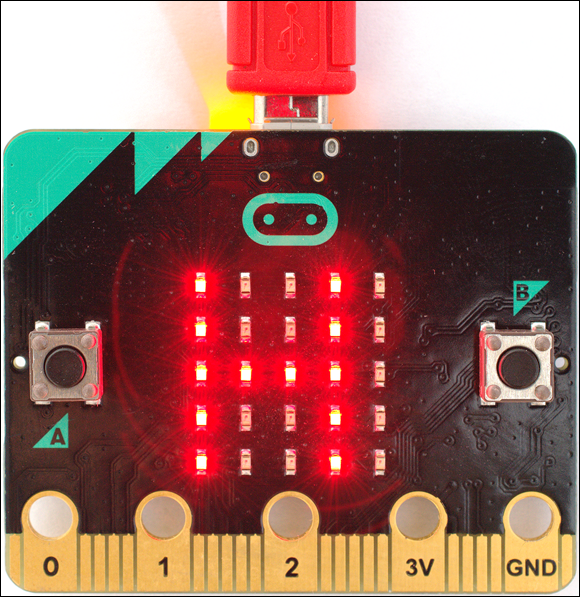
FIGURE 7-4: The BBC micro:bit displaying part of the scrolling message
When you’re happy with your program, make sure to click the Save button to save a copy of the program listing to your computer. Find this file, which will be called microbit.py, in your Downloads folder. Move it to a new location, such as your computer’s Documents folder, and give it a more descriptive name, like helloworld.py, to make it easier to find in the future.
It’s important both to save a copy of your program listing using the Save button and to move it somewhere safe with a descriptive name. The Python Editor doesn’t save any of your programs itself, meaning that if you close your web browser and come back to the Python Editor later, your program will have been erased and replaced with the default starting program. Renaming your program files, meanwhile, stops you from needing to sort through a dozen files all named microbit to find the program you need.
Whatever message you decide to scroll, you’ll notice it only scrolls once. You can make the message appear again if you reset the BBC micro:bit by pressing the Reset button on its rear, but if you don’t want to have to keep doing that, you need a method of telling the program to repeat.
Loops
Move your cursor to the end of Line 1, and then press the Enter key to move Line 2 down to Line 3 and create a new, blank Line 2. With your cursor at the start of the new Line 2, type the following:
while True:
This creates a means of having parts of your program repeat, but at the moment Python doesn’t understand which parts you actually want to repeat. To fix that, move your cursor to the start of Line 3 and press the spacebar four times to insert four spaces. When you’re finished, the line will be four spaces inward compared to Lines 1 and 2.
This is known as indentation, and it is a way to easily see how lines of code in a program nest within each other. Indentation is usually handled automatically by the Python Editor when required, but not when editing existing lines of code. In many other languages, indentation exists only to make the code easier for the programmer to read—the code could be entirely flat against the left edge of the program listing and still work perfectly—but in Python indentation is a requirement. The level of indentation on each line of code in the program listing shows Python where in the program it belongs. If Python is expecting indentations and there aren’t any, the program won’t run properly; equally, if there are indentations where there shouldn’t be, the program won’t work either.
With your code properly indented, it should now look like this:
from microbit import *
while True:
    display.scroll('Hello, World!')
Click the Download button to download your modified program. Then find it in your Downloads folder and drag it to the MICROBIT drive to flash it. When the flashing process has finished, you see the familiar “Hello, World!” message, but this time it repeats forever (see Figure 7-5)—or at least until you unplug the BBC micro:bit.

FIGURE 7-5: Looping the display.scroll message
In programming, this is known as a loop. When the program reaches the end of its instructions—in this case, when it has finished scrolling the message from the display.scroll('Hello, World!') instruction you moved to Line 3—it returns to the beginning of the loop and starts all over again. Loops in Python are conditional, which means they always loop if a test carried out at the start of the loop comes out at True. The loop you created in Line 2 has a simple test. It checks to see if True is, in fact, true. Because True is always true—which is why it’s called True—the test always succeeds, and the loop continues forever; in programming, this is known as an infinite loop.
Program 2: Button Inputs
‘Hello, World!’ demonstrated how to get an output from the BBC micro:bit via the screen, but there’s another key feature of most programs: inputs. Thankfully, the BBC micro:bit has two inputs that are ready to use: Button A and Button B, either side of the display, and now it’s time to introduce those into your program.
To ensure you don’t lose your ‘Hello, World!’ program, make sure you’ve saved it using the Save button, moved the .py file to a safe place like your Documents folder, and given it a descriptive name like helloworld.py. Once you’ve done this, you are free to delete the current program listing by pressing Ctrl+A on your keyboard to select the text and then the Delete or Backspace key to delete it, leaving you with a fresh and blank program listing.
Begin by typing the first line of any BBC micro:bit Python program, importing the microbit library:
from microbit import *
Next, begin an infinite loop—just like the one you created in ‘Hello, World!’ to make your message scroll across the screen without stopping—by typing the following on Line 2, after pressing Enter at the end of Line 1:
while True:
When you press Enter at the end of this line, you might notice that your cursor doesn’t go to the beginning of Line 3. Instead, it’s positioned in Line 3 after a four-space indentation. This is known as auto-indentation and is a time-saving feature of the Python Editor: Because you opened an infinite loop on Line 2, and Python requires that the contents of that loop are indented by four spaces, the Python Editor has automatically inserted that indentation for you.
Auto-indentation works on multiple levels. If you open another loop within the current loop, the next line is automatically indented by eight spaces: four for the initial loop and another four for the inner loop. Put a loop in the loop in the loop, and the next line is indented by 12 spaces, 4 for each level of the loop.
Although auto-indentation creates indentation for you, it’s up to you to delete the indentation when you no longer require it. The Python Editor doesn’t know when you’ve finished writing code for your loop, only that you had started; when you come to the last line of your loop, you need to manually delete the indentation from the next line using the Backspace key on your keyboard. One press of the Backspace key when your cursor is to the right of the indentation deletes one level, or four spaces. Remember that Python uses this indentation to tell which lines of code are part of a loop and which lines of code aren’t, so it’s important to get the indentation right.
Type the following on Line 3, after the four-space indentation the Python Editor created for you:
if button_a.is_pressed():
When you press Enter at the end of this line, Python auto-indents the next line by eight spaces in total: four for the original infinite loop opened on Line 2, and another four for the line you’ve just created. This line is known as a conditional, or more specifically an if statement. An if statement in Python works just like an if statement would in English: ‘if we’re out of milk, go to the shop’ tells someone to go to the shop but only if the milk has run out; if the milk hasn’t run out, there’s no need to go to the shop.
In the case of code lines you’ve just typed, the condition is simple: if button_a.is_pressed() checks to see if Button A on the BBC micro:bit is being pressed. If it is, the lines following the colon (:) at the end of Line 3 and featuring an eight-space indentation run; if it isn’t being pressed, they are ignored.
It can be difficult at first to keep track of what code runs where, but it’s here that the indentation really helps. If lines of code are lined up at the left, they’re nested together and run one after another.
At the moment, though, there are no lines of code for the if statement to run regardless of whether or not the statement is true. On Line 4, to the right of the eight-character indentation, type the following:
display.show(Image.HAPPY)
Like the display.scroll instruction you used in the ‘Hello, World!’ program earlier, this instruction comes from the display category. Rather than scrolling a string across the BBC micro:bit’s display, though, it displays an image chosen from a preprogrammed selection—in this case, a happy, smiling face. At this point, you should have four lines of code: the first two flush to the right of the program listing, the next line indented by four spaces, and the next indented by eight (see Figure 7-6).

FIGURE 7-6: The if button_a.is_pressed() code block
Click the Download button, flash the resulting file to the BBC micro:bit, and press Button A. You see your smiley face appear on the screen and stay there. If you press the BBC micro:bit’s Reset button, the smiley face disappears until you press Button A again. You’re not limited to a smiley face, either. You can choose from the built-in images by picking one of the following:
ANGRY, ARROW_N, ARROW_NE, ARROW_E, ARROW_SE, ARROW_S, ARROW_SW, ARROW_W, ARROW_NW, ASLEEP, BUTTERFLY, CHESSBOARD, CLOCK12, CLOCK11, CLOCK10, CLOCK9, CLOCK8, CLOCK7, CLOCK6, CLOCK5, CLOCK4, CLOCK3, CLOCK2, CLOCK1, CONFUSED, COW, DIAMOND, DIAMOND_SMALL, DUCK, FABULOUS, GHOST, GIRAFFE, HAPPY, HEART, HEART_SMALL, HOUSE, MEH, MUSIC_CROTCHET, MUSIC_QUAVER, MUSIC_QUAVERS, NO, PACMAN, PITCHFORK, RABBIT, ROLLERSKATE, SAD, SILLY, SKULL, SMILE, SNAKE, SQUARE, SQUARE_SMALL, STICKFIGURE, SURPRISED, SWORD, TARGET, TORTOISE, TRIANGLE, TRIANGLE_LEFT, TSHIRT, UMBRELLA, XMAS, YES.
Simply change the name after the Image. part of Line 4—remember that Python is case-sensitive, so the image name must be in all capitals as in the previous list, and keeping the full-stop character in place—to an image of your choice to modify what the program displays (see Figure 7-7).
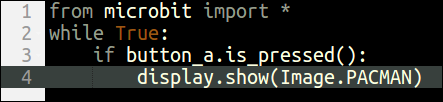
FIGURE 7-7: Choosing a different image to display
Conditional statements, like the if statement you created on Line 3, only run when their condition is true. They also only run once without looping; if you hadn’t created an infinite loop on Line 2, the if statement on Line 3 would run through its code once, and then the BBC micro:bit would stop listening for button presses.
Multiple Buttons
Being able to read a single button is great, but the BBC micro:bit has two. Thankfully, adding the second button is as simple as repeating what you’ve already done: move your cursor to the end of Line 4, using either the mouse or the arrow keys on the keyboard, and then press the Enter key to create a blank Line 5. The Python Editor assumes that you are continuing the code for the if statement you created on Line 3 and automatically indents by eight spaces; press the Backspace key on the keyboard once to delete four of these spaces, leaving four, to indicate that the line you are about to type is not part of the if statement but is part of the infinite loop you created on Line 2. With that done, type the following two lines:
    if button_b.is_pressed():
        display.show(Image.SAD)
As before, when you press the Enter key at the end of Line 5, Python automatically indents Line 6 to make it part of the second if statement. If you would like to reduce the amount of typing you need to do, you can use your mouse—or Shift and the arrow keys on your keyboard—to highlight Lines 3 and 4 inclusive, press Ctrl+C (the keyboard shortcut for Copy), and then move the cursor to Line 5—creating it by clicking on the end of Line 4 and pressing Enter if necessary—and press Ctrl+V (the keyboard shortcut for Paste), and then change A for B and HAPPY for SAD in the duplicated code. If you’re pasting code like this, however, it can confuse the auto-indentation feature of the Python Editor. You’ll find that Line 5 is indented by eight spaces when it should be indented by four. Move your cursor to the left of the word if on Line 5 and press the Backspace key once to delete the extra four spaces (see Figure 7-8). When pasting code into the Python Editor, always check that the indentation has been created correctly; remember that Python programs with incorrect indentation don’t run properly.
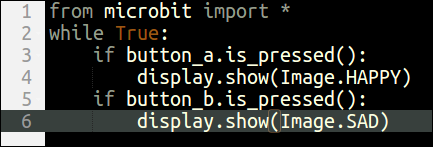
FIGURE 7-8: The finished multibutton program
Click the Download button and flash the resulting hex file onto the BBC micro:bit. Press Button A, and the happy face appears as before. Click Button B, though, and you get a sad face. Your program can read either button and run different events depending on which is pressed.
There’s a third option for reading buttons, too: reading both at the same time. By chaining two conditions into a single if statement, it’s possible to check if both buttons are pressed at the same time, allowing you to have up to three inputs from two buttons. The resulting if statement would be this:
    if button_a.is_pressed() and↩
 button_b.is_pressed():
As an experiment, try adding this third if statement to your program and picking a different image to display. When you’ve flashed the modified program to your BBC micro:bit, hold down both Button A and Button B to make the new image appear.
When you’re happy with your Button Inputs program, click the Save button to save a copy of the program listing to your computer, find it in the Downloads folder, and move it somewhere safe before giving it a more descriptive name like buttoninputs.py.
Program 3: Touch Inputs
Although its two buttons give the BBC micro:bit up to three possible inputs, that might not be enough for your needs. This is where the input-output pins, the numbered contacts on the copper strip at the bottom of the BBC micro:bit, come into play: the BBC micro:bit can detect when you touch one of them with your finger and react accordingly—a fun alternative to the physical buttons and a great way to add extra inputs to a program without the need to buy and wire up more buttons.
If you haven’t yet saved your previous program, do so now and then press Ctrl+A followed by the Delete or Backspace key on your keyboard to delete the old program listing and start afresh.
Reading a pin is a lot like reading a button. Begin with the import line so you can access the microbit library’s functions:
from microbit import *
Remember that all BBC micro:bit Python programs need this line, without which you can’t use any of the BBC micro:bit’s features, including the display and the buttons.
Variables
Type the following on Line 2 to create a new variable (see Figure 7-9).
touches = 0

FIGURE 7-9: Initialising a variable
Variables are a new concept. Like the name suggests, a variable is something that changes as the program is run. A variable can be almost anything: a number, a string of text, even the data required to draw a picture on the screen. The variable itself has two main properties: its name, and its data. In the case of the variable you’ve just created, the variable name is touches, and it has been set to store the value zero. The let instruction both creates the variable and initialises it. A variable must always be initialised before it is used, which is why the line touches = 0 is placed near the very top of the program, just under the library import line. Doing so creates a global variable, one that can be used by any other part of the program; placing the touches = 0 line elsewhere in the program creates a local variable accessible only during that part of the program—for instance, within a while True: loop.
Now that you have a variable, you need to do something with it. Press Enter at the end of Line 2 to create a new blank Line 3, and then type the following (remembering that the Python Editor automatically indents Line 4 by four spaces when you press Enter at the end of Line 3):
while True:
    if pin0.is_touched():
This if statement works in the same way as the ones you created in the Button Inputs program: it forms a conditional that only runs if the condition is true. In this case, the condition is checking whether Pin 0 is being touched. If Pin 0 is being touched, the indented code under the if statement runs; if it’s not being touched, the code doesn’t run.
The if statement needs something to do, so press Enter at the end of Line 4 to create a new blank Line 5, with the Python Editor automatically inserting an eight-space indent for you, and type the following:
touches += 1
The program is now, technically, complete (see Figure 7-10), but it’s not very useful. Each time you touch Pin 0, the touches variable increases, but there’s no way to see that it’s happening. The program needs an output, so press Enter to add a new, blank Line 6 with an automatic eight-space indent, and type the following:
display.scroll(str(touches))
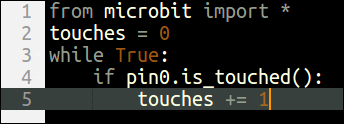
FIGURE 7-10: Modifying a variable
You’ve now created your first multiline if statement (see Figure 7-11): each time the if statement is found to be true as the program runs through its infinite loop, the lines of code inside run one at a time starting at the top and working downward until the end of the eight-space indentation is reached. By chaining lines of code like this, you can create programs as long and complex as you like.
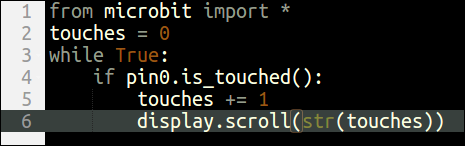
FIGURE 7-11: The finished program
The phrase display scroll str touches doesn’t make much sense in English, but if we break down Line 6, you can see what the computer sees: display represents the category of instruction while scroll is the instruction, telling the BBC micro:bit to scroll a message on the display, just like in the ‘Hello, World!’ program. This instruction expects a string, but the touches variable you created earlier contains a whole number, or an integer. An instruction that expects to work on a string gets confused if you pass it an integer—and vice versa—even though the two look identical to humans. Before the display.scroll instruction can print the contents of the touches variable to the screen, it needs to be converted into a string. That’s exactly what the str part of the instruction does: anything between its two brackets is converted into a string from whatever type it was before. Thus, when the line display.scroll(str(touches)) runs, it prints to the display whatever number is stored in the touches variable.
Click on the Download button to compile and download your program, and then flash it to the BBC micro:bit. When the program begins to run, you find that touching Pin 0 isn’t enough. The BBC micro:bit’s ability to sense physical touch works via an electrical property known as resistance, and it requires that the circuit—which is your body, in this instance—is grounded. Place the index finger of your right hand on the GND pin to the far right of the BBC micro:bit; then tap on Pin 0 with the index finger of your left hand. On the first tap, the number 1 appears; for each subsequent tap until the BBC micro:bit resets, the number increases.
This resistive touch sensing is available on Pin 0, Pin 1, and Pin 2 of the BBC micro:bit. Using the inputs available from the physical buttons—Button A, Button B, and Buttons A+B—plus the three pins, it’s possible to read and react to up to six inputs in total in your program: the three button inputs plus touch on Pin 0, Pin 1, and Pin 2.
There’s more on using the BBC micro:bit’s pins in Chapter 10, ‘Building Circuits’, Chapter 11, ‘Extending the BBC Micro:bit’, and Chapter 12, ‘The Wearable BBC Micro:bit’.
When you’ve finished prodding the BBC micro:bit’s Pin 0, remember to save your program with the Save button, move the .py file somewhere safe, and give it a memorable name like touchinputs.py.
Program 4: The Temperature Sensor
The BBC micro:bit has more inputs than simple buttons and touch-sensing pins. The most simple of these is the temperature sensor, which works exactly like a thermometer: read from the sensor and it returns a temperature, measured in degrees Celsius.
Although the temperature sensor is enough to give you a rough idea of how hot or cold your surroundings are, though, it’s not a precision instrument. It’s built into the BBC micro:bit’s processor and was originally designed for monitoring the processor’s temperature rather than environmental temperatures. If the BBC micro:bit were a desktop computer, that would be a problem: desktop computer processors run tens of degrees hotter than their surroundings even when idle, requiring large metal heatsinks and fans to keep them cool. The BBC micro:bit’s processor, though, runs close enough to the temperature of its surroundings—known as the ambient temperature—that it is typically accurate to within a degree or two.
Start your program in the traditional way: save, move, and rename your existing program if you haven’t already, and then press Ctrl+A on your keyboard followed by Delete to start with a fresh, blank program listing.
Type the import line to begin your program, followed by an infinite loop:
from microbit import *
while True:
Press Enter at the end of Line 2 to create a blank Line 3 with an automatic four-space indentation, which tells Python it will be part of the infinite loop you just created. Then type the following line of code:
display.scroll(str(temperature()))
This line represents a combination of three instructions (see Figure 7-12): display.scroll, which is used to scroll a string on the BBC micro:bit’s display as it did in the ‘Hello, World!’ and Touch Inputs programs; temperature(); and str to convert the number—or integer—output by the temperature instruction into a string the display.scroll instruction can show on the BBC micro:bit’s display. This highlights a key feature of programming in Python: rather than putting a number like 0 into the display.scroll instruction, or even a variable like touches earlier in this chapter, you can put a whole instruction in there and have it print out the instruction’s output—in this case, the reading from the BBC micro:bit’s internal temperature sensor.

FIGURE 7-12: Reading from the temperature sensor
You can now click the Download button to compile and download your program, flash it to the BBC micro:bit, and watch the temperature readings scroll across the screen.
Formatting the Output
The program is now, technically, complete, but it’s not very easy to read. The numbers scroll across the screen continuously with no hint what they’re measuring. To fix that, press Enter to add a new, blank Line 4 with an automatic four-space indentation and type in the following, making sure there’s a space between the first single quote and the word Celsius (see Figure 7-13):
display.scroll(' Celsius')
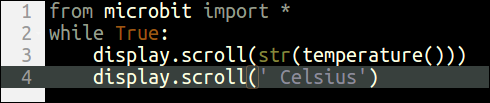
FIGURE 7-13: Formatting the program’s output
Click the Download button and flash the new, longer program to your BBC micro:bit. Watch the difference: rather than printing the temperature reading by itself, the BBC micro:bit begins by printing the temperature followed by the word Celsius with a space between the two—which is the reason for including a space when you typed ' Celsius' in Line 4.
To see the temperature sensor in action, touch a metal surface to discharge any static electricity you may be holding (see Chapter 2, ‘Getting Started with the BBC Micro:bit’). Then carefully and gently place the tip of your finger over the small black square labelled PROCESSOR on the back of the BBC micro:bit. After a few seconds, you should see the temperature reading start to rise. Remove your finger, and after a few more seconds it will drop back down again.
When you’ve finished, remember to click the Save button, move the resulting file somewhere safe, and rename it to a descriptive name like temperaturesensor.py.
Program 5: The Compass Sensor
The BBC micro:bit’s magnetic compass is one of the two sensors labelled on the back—the other being the accelerometer, detailed later in this chapter—and one of the most interesting. By reading the strength of the local magnetic field in three dimensions, it can work out the direction the BBC micro:bit is facing relative to magnetic north. This same technology is built into many smartphones and is used by mapping software to figure out which direction the user is facing.
The first step of this project should be obvious by now. Save your previous program if you haven’t already, and then press Ctrl+A followed by Delete to begin with a blank, fresh program listing before typing in the import and infinite loop lines:
    from microbit import *
while True:
When you press Enter at the end of Line 2, Python automatically indents Line 3 by four spaces to indicate that it forms part of the infinite loop. Type the following:
display.scroll('Heading %s' % compass.heading())
This line is a little dense, so it requires a bit of unpacking. The display.scroll section should be familiar. It tells Python to take a message, or string, and print it to the BBC micro:bit’s display. In the Temperature Sensor program, you used this twice in quick succession to print the temperature reading followed by a helpful Celsius message. Here it’s doing the same thing—formatting the message printed to the BBC micro:bit’s display—in a single line: the message begins with the word Heading and ends with the actual sensor reading.
The secret to this trick is surprisingly simple. It all lies in the % symbol (see Figure 7-14). This tells Python that it should insert the contents of a variable or output of an instruction into another string. In this case, the first string is the word Heading followed by a space, and the second string is the output of the compass.heading() instruction. Notice how there are two % symbols in this line: the first, %s, is inside the single quotes as part of the string and tells Python to insert a string at that position—that’s what the s of %s means, ‘string’; the second is outside the single quotes and tells Python that what follows provides the string that should be placed where the %s is. What took you two lines in the Temperature Sensor program takes only one in this program.

FIGURE 7-14: The completed program
Click the Download button to compile and download the program into a hex file, and then flash it onto the BBC micro:bit. Turn the micro:bot around, taking care not to dislodge the USB or battery cable, and you see the heading read by the compass change accordingly.
One neat feature of using the % symbol to add to strings is that you’re not limited to adding just one: '1 %s %s' % ('2', '3') results in 123, whereas '1 %s %s %s' % ('2', '3', '4') gives you 1234 and so on. You can keep adding strings using the % symbol without ever needing to write a second line of code. Try it yourself by modifying the existing program to print out the word degrees after the compass reading.
As always, when you’ve finished, remember to click the Save button, move the resulting file somewhere safe, and rename it to a descriptive name like compasssensor.py.
Program 6: The Accelerometer Sensor
The second of the two sensors labelled on the rear of the BBC micro:bit, alongside the compass, is the accelerometer. Where the compass is designed to measure magnetic fields and thus determine which direction the BBC micro:bit is facing, the accelerometer measures relative acceleration in three planes: X, Y, and Z. As well as being able to return actual sensor values, it can be used to detect different types of motion known as gestures—by far the simplest way to interact with the sensor in your programs.
The accelerometer is a powerful tool. Besides being able to detect motion, it can be used to calculate the angle at which the BBC micro:bit is positioned by tracking the force of gravity pulling the BBC micro:bit toward the centre of the Earth—even when the BBC micro:bit is sat securely on a table or held in your hand. It’s this feature of an accelerometer that a smartphone or tablet uses to detect when you’ve turned it from portrait to landscape orientation or vice versa, so that it can automatically rotate the display to match.
To begin, make sure you’ve saved, moved, and renamed your previous program. Then press Ctrl+A followed by Delete to start with a blank program listing.
Start your program by typing the following four lines of code (see Figure 7-15), remembering that the Python Editor automatically handles the indentation for you:
from microbit import *
while True:
    if accelerometer.is_gesture("shake"):
        display.show(Image.SURPRISED)

FIGURE 7-15: The is_gesture instruction
The program is now ready for testing, so click the Download button, drag the hex file to your BBC micro:bit, and wait for it to flash. When the flashing process is complete, hold your BBC micro:bit in your hand and carefully—making sure not to dislodge the micro-USB or battery cable—shake it to and fro. You see a surprised face appear on the BBC micro:bit’s display. Well, wouldn’t you be surprised?
The program works by using the accelerometer to look for one of a range of gestures, in this case the shake gesture. Shake is only one of a range of gestures the BBC micro:bit is programmed to recognise. The others follow:
- 8g—The 8g gesture triggers only when the acceleration in any given direction exceeds eight times gravity, which is pretty fast.
- 6g—The 6g gesture sits between the fast 8g and gentler 3g acceleration gestures.
- 3g—The 3g gesture works in the same way as the 8g gesture, but it triggers at a more gentle rate of acceleration.
- face up—The face up gesture triggers when the BBC micro:bit’s display is facing upward towards the user.
- face down—The opposite of face up, this gesture triggers only when the BBC micro:bit’s display is facing downward.
- freefall—The free fall gesture triggers only when the BBC micro:bit has been dropped and is rushing toward the ground. This gesture is particularly useful when building flying robots or remote-controlled rockets.
- shake—Shake is activated by vigorously shaking the BBC micro:bit to and fro—but be careful you don’t dislodge the micro-USB or battery cable or let go and send it flying across the room!
- left—This gesture is based on the angle of the BBC micro:bit and triggers when the BBC micro:bit is tilted towards the user’s left.
- right—The opposite of left, the right gesture triggers when the BBC micro:bit is tilted to the user’s right.
Delays
With a few changes, the program can become a lot more interactive. Move your cursor to the end of Line 4, if it isn’t there already, and press Enter to add a new, blank Line 5. Then type the following, remembering that the Python Editor handles the indentation for you:
display.show(Image.ASLEEP)
If you click the Download button, flash your new program version, and then shake the BBC micro:bit, you briefly see the surprised image before the asleep image takes over. If you were to continuously shake the BBC micro:bit without stopping—the ‘face’ would change from the surprised image to the asleep image and back again over and over relatively quickly. That’s not very realistic; it takes time to get back to sleep when you’ve been shaken awake!
To fix that, you’re going to need to add a delay between the two display.show instructions. A delay does exactly what its name suggests: it pauses the program for a set length of time, delaying the execution of the next instruction. Move your cursor to the end of Line 4, press Enter to add a new, blank Line 5, and type the following (see Figure 7-16):
sleep(1000)
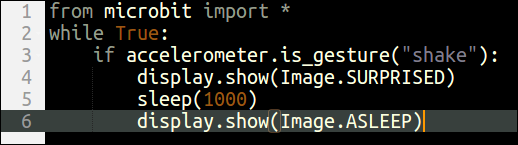
FIGURE 7-16: The completed program
Click the Download button to download your program and then flash it onto your BBC micro:bit. This time, if you shake the BBC micro:bit, you see the surprised image longer before the asleep image takes over. Increase the number in the sleep instruction, and the surprised face stays on the display longer; decrease it and the asleep face appears sooner.
The number between the brackets in the sleep instruction is a measure of how long the program should delay in milliseconds, or thousandths of a second. A value of 1000, then, is equivalent to one second; 2000 is two seconds, and 500 is half a second. Because processors like the one powering the BBC micro:bit operate so much faster than humans, performing millions of operations every second, programs frequently need delays in them to allow the human operator to catch up.
As an experiment, see if you can extend the program still further by having the BBC micro:bit start on the asleep icon rather than starting entirely blank until the first shake. Hint: code within if accelerometer.is_gesture("shake"): only runs when the BBC micro:bit is shaken, so you need to put your code outside this statement.
When you’ve finished, remember to click the Save button, move the resulting .py file out of your Downloads folder somewhere safe, and rename it to a descriptive name like accelerometersensor.py.
Reading Raw Accelerometer Data
The gesture system is by far the easiest way of working with the BBC micro:bit’s accelerometer, but it’s not the only way. You can also read the raw data into your program as numbers to handle yourself. Create a fresh project by pressing Ctrl +A followed by Delete so you have a blank program listing.
Start by typing in the following three lines of code, beginning with the library import line without which the program simply won’t run:
from microbit import *
while True:
    display.scroll('X:%s' % accelerometer.get_x())
This line is similar to the one you wrote in the Compass Sensor program. display.scroll tells the BBC micro:bit to print a string to the display, whereas the % symbol joins two strings: "X:" as a prefix followed by the output of the accelerometer.get_x() instruction.
Click the Download button and flash the resulting hex file to your BBC micro:bit. Try moving the BBC micro:bit around and watch the number change.
The X axis is only one of three axes that make up the accelerometer’s three-dimensional measurements, though. To get at the others, click on the 3 at the start of Line 3 to highlight it and press Ctrl+C to copy it. Move your cursor to the end of Line 3, press Enter to add a new, blank Line 4, and then press Ctrl+V to paste the line of code you copied and create a new, blank Line 5. Press Ctrl+V again to create another copy, and then move your cursor to the right of the indentation in Line 4 and press Backspace to delete the extra four-space indentation that the Python Editor put in by mistake.
Your program is now set up to display the accelerometer data three times, but it’s the same X axis data each time. To correct that, you need to make four changes. In Line 4 change X: to Y: and get_x to get_y, then in Line 5 change X: to Z: and get_x to get_z (see Figure 7-17).

FIGURE 7-17: The completed program
Click the Download button and flash the hex file to your BBC micro:bit. When the program has flashed, the BBC micro:bit now reads out all three of the axes one after another: the X axis, followed by the Y axis, then the Z axis before returning the X axis again. Try moving the BBC micro:bit to see how its angle and position affect the numbers—measured in microgravities—shown on the display. With the BBC micro:bit facing you, tilting it left will reduce the number reported on the X axis, while tilting it right will increase it. Tilting it so the top is closer to you will reduce the number reported on the Y axis, while tilting it so the top is further away will increase it. Finally, lifting the BBC micro:bit up will increase the number reported on the Z axis, while lowering it down will reduce it (see Figure 7-18).

FIGURE 7-18: The accelerometer’s three axes
As always, when you’ve finished, make sure you click the Save button, move the .py file somewhere safe, and rename it to something like accelerometersensordata.py so you can find it again in the future.
Program 7: The Fruit Catcher Game
The programs in this chapter have been relatively simple, doing only one thing at a time, as a means of introducing some of the base concepts you need to know when programming the BBC micro:bit in Python. This final program, though, is considerably more complex: a game which has the player—in the form of a single glowing pixel at the bottom of the display—attempt to catch ever-faster falling fruit—another pixel, starting at the top of the display and falling downwards—before it hits the bottom of the display.
The Fruit Catcher game is relatively simple, but it’s still quite a hefty program. If you’ve been working through this chapter nonstop, now might be a good time to take a break away from the screen so you can come back refreshed.
As ever, the game starts the same way as any program: saving, moving, and renaming any existing program you have loaded in the Python Editor and then pressing Ctrl+A followed by Delete to start with a fresh program listing.
The Setup
Start your program by importing the microbit library, but add a second line below it by typing the following:
from microbit import *
import random
The first line should be familiar by now, but the second is new: import random does exactly what it says, importing the library called random into the program. You use this later to inject randomness into the game to make it more interesting, but the key thing to note here is that you can have both the microbit and random libraries added at the same time. If you find you need a feature that isn’t in the microbit library, as with this game, simply add another import line at the top of the program to import the library with the function or functions you need.
Next, you’re going to need to initialise some of the variables the game needs: a variable for adjusting the speed of the game called delay, a delayCounter variable that you will use to adjust the speed of the game during play, and a variable to hold the position of the player. Type the following lines directly beneath Line 2:
delay = 10
delayCounter = 0
playerPosition = [2, 4]
The first line sets the game’s timing delay, which is multiplied by 100 milliseconds later in the program giving an initial delay of one second. This line demonstrates an important feature of variable initialisation: you can initialise a variable with whatever data you require, not just zero as in previous programs. The delay initialised in this line controls how fast the game is when it starts. If you’d like a challenge, you can make it lower, or to make the game easier, make it higher.
The second line (of the snippet you just typed) initialises the playerPosition variable, which the game uses to control where the player—represented by a dot—is drawn on the screen. Notice how this variable has two numbers, enclosed in square brackets and separated by a comma. This represents a list, which is effectively a variable which can hold more than one piece of data (or datum)—in this case, two numbers that would otherwise have had a variable each.
The numbers in the playerPosition = [2, 4] variable are important. They control exactly where the player, known as a sprite, appears on the BBC micro:bit’s display. Every pixel on the display has a location on the horizontal X axis and the vertical Y axis. Figure 7-19 demonstrates this, giving the X and Y coordinates as “X,Y” for each of the 25 onscreen pixels.
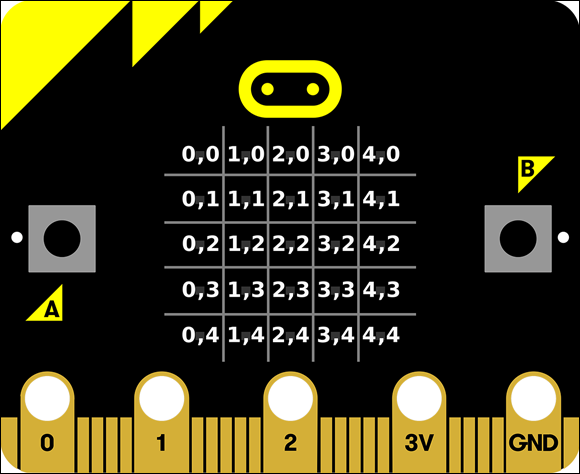
FIGURE 7-19: The BBC micro:bit Display Coordinates
By setting the playerPosition instruction to position the player sprite at position 2 on the X axis and 4 on the Y axis—coordinate 2,4 in Figure 7-19—the sprite is created in the middle column of the bottom row of the display.
Next, you need to initialise the game’s score at zero. You could, if you wanted, cheat at this point and have the game start on a score of 10, or 100, or any other number you like, but where’s the fun in that? Move your cursor to the end of Line 5, if it isn’t there already, press Enter, and type the following line of code:
score = 0
With Line 5 now in place and a starting score initialised, the setup portion of your game is complete (see Figure 7-20).
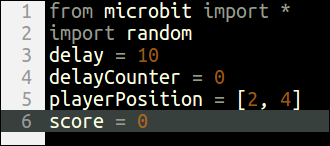
FIGURE 7-20: The finished setup portion
The Main Program Loop
The next stage of the process is to make the game. Move your cursor to the end of Line 6, if it isn’t there already, and press Enter to insert a blank Line 7 followed by Enter again to put your cursor on a blank Line 8. The game needs to take place inside a loop, so create one and insert the first instruction by typing this:
while True:
    fruitPosition = [random.randrange(0,4), 0]
If the fruit appeared in the same place every time you played the game, it wouldn’t be much of a game. Where the player sprite’s starting position was set back in Line 5, Line 9 uses the randrange instruction from the random library you imported on Line 2 to find a random starting position every time a new fruit sprite is created.
The random.randrange instruction does exactly what it says: picks a random number starting at the first number between the brackets and ending at the second number between the brackets, which in this case is zero and four. This gives 0, 1, 2, 3, and 4—five numbers in total—as the possible output of the random.randrange instruction. That range of five numbers maps perfectly to the X or Y axis of the display. That’s how it’s used here: when the game creates the fruit sprite, it positions it at the top (Y: 0) of the display but chooses a random location in that top row (X: 0 to 4, depending on what the random number generator picks).
At this point, the program should look like Figure 7-21.
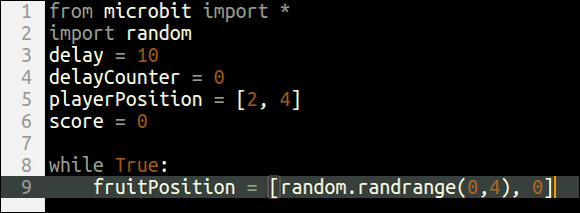
FIGURE 7-21: The beginnings of the main program
Conditional Loops
So far, you’ve only worked with a single type of loop: the infinite loop, which runs forever. A more powerful type of loop is the conditional loop, which tests for a particular condition—such as whether a variable is equal to another variable—and runs only when the condition is true. A conditional loop works a lot like an if statement, except that whereas an if statement comes to the end of its indented lines of code and finishes, a conditional loop goes back to the beginning and tests its condition again to see if it should repeat.
Move your cursor to the end of Line 9, if it isn’t there already, and then press Enter and type the following:
while fruitPosition[1] < 4:
Press Enter when you’ve typed the line above, and it leaves you on Line 11 with a new level of indentation: eight spaces instead of four, which indicates that the block of code you’re typing next sits under the new loop you just created.
This line opens a while loop, a conditional loop that only runs when the condition it is testing is true, and retrieves the fruitPosition[1] variable—the second entry, counting from zero, of the fruitPosition list created a line earlier, which holds the location on the display’s Y axis of the fruit sprite. It then takes this value, between zero for the top row of the display and four for the bottom row of the display, and checks to see if it is less than (<) four (see Figure 7-22). If, and only if, it is—which is to say that the fruit sprite hasn’t yet reached the bottom of the screen—do the lines of code within the loop run.
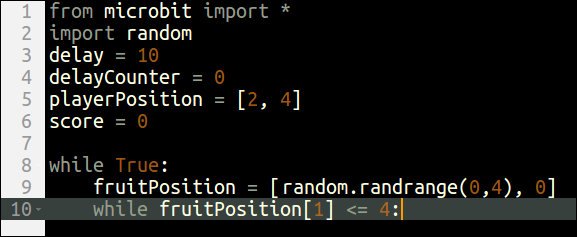
FIGURE 7-22: The conditional loop
At the moment, though, the loop doesn’t actually do anything. With your cursor on Line 11, after the eight-space indentation, type the following:
while delayCounter < delay:
This line creates another conditional loop, this time testing to see if the value of the delayCounter variable is less than the value of the delay variable. This is used to control how fast the game runs. Each time this loop runs, the delayCounter variable is incremented, or increased by one; when it reaches the value stored in the delay variable, set to 10 on Line 3, the loop finishes and the rest of the program runs.
Conditional Statements
To catch the fruit, the player needs to be able to move left and right along the bottom of the BBC micro:bit’s display. Fortunately, there’s Button A to the left of the display and Button B to the right—just what you need for controlling the player sprite. Reading these buttons and controlling the player sprite is effectively a reprise of the Button Inputs program you wrote earlier in the chapter, but with a little extra logic to help things along.
With your cursor at the end of Line 11, press Enter to create a new Line 12 with a twelve-space indentation before typing the following:
            if button_a.was_pressed() and↩
(playerPosition[0] > 0):
The conditional on this line exists to stop the player sprite leaving the left edge of the display. It first checks to see if Button A, on the left side of the display, has been pressed. Then it checks the player’s current position on the X (horizontal) axis: if it’s greater than 0, representing the left edge of the display, the player should be allowed to move further left; if not, the player is already at the leftmost edge and should not be allowed to move farther left.
You may notice that this conditional uses button_a.was_pressed() rather than button_a.is_pressed() as was used for the Button Inputs program. That makes an important distinction: button_a.is_pressed() checks that the button is being pressed only when the conditional is actually being tested; button_a.was_pressed() checks whether the button was pressed at any time prior to the last time a button_a.was_pressed() check was made. The reason for using this is explained later in this chapter.
To actually make the player sprite move, make sure your cursor is still on Line 12, press Enter to create a Line 13 with a sixteen-space indentation, and type the following:
playerPosition[0] -= 1
Now when the player presses Button A but isn’t already at the left edge of the screen, the player’s position on the X axis—stored in the first entry in the playerPosition list, while the second stores the position on the Y axis—is decreased by one (or decremented), moving the sprite one pixel to the left.
Create another conditional watching for the player pressing Button B to indicate a desire to move right by typing the following lines, making sure to delete four spaces from the automatically created 16-space indent on Line 14 by pressing Backspace once before typing this:
            if button_b.was_pressed() and↩
 (playerPosition[0] < 4):
                playerPosition[0] += 1
Remember to enter all lines with a ↩ as one line. Now the game has full control: the first statement watches for Button A being pressed, checks that the player has room to move to the left, and then moves the player sprite leftward one column. The second statement watches for Button B being pressed, checks that the player has room to move to the right, and then moves the player sprite rightward one column.
Drawing the Sprites
Previously, your interactions with the display were limited to using predrawn images or making messages scroll across. Making a game requires that you can build an image on-the-fly, though, which is achieved using the display.set_pixel instruction. With your cursor at the end of Line 15, press Enter to create a new Line 16, and then press Backspace until you have erased 4 of the 16 spaces that make up the indentation, leaving 12 spaces remaining. Then type the following:
display.clear()
            display.set_pixel(fruitPosition[0], ↩
 fruitPosition[1], 9)
            display.set_pixel(playerPosition[0], ↩
 playerPosition[1], 9)
The first line clears the BBC micro:bit’s display, ensuring that any previously drawn sprites don’t linger. The second takes the X and Y coordinates of the fruit sprite as stored in the fruitPosition array to pick a location on the screen—as shown in Figure 7-19 earlier in this chapter—then sets its brightness to 9, the maximum possible value. The third line, finally, does the same for the X and Y coordinates of the player sprite as stored in the playerPosition array, again setting that pixel of the display to maximum brightness.
At the rate the BBC micro:bit processor runs through Python instructions, a game where the fruit falls as quickly as possible would be many millions of times faster than a human could play; you’d see nothing but the ‘game over’ screen. To fix that, with your cursor at the end of Line 18, press Enter, and type the following:
            delayCounter += 1
            sleep(100)
This increments the delayCounter variable, which controls how many times this conditional loop will run, before pausing the program for 100 milliseconds. Remember that the conditional loop, opened on Line 11, compares the delayCounter variable to the delay variable initialised at 10 on Line 3, meaning that the loop runs a total of 11 times (with the delayCounter variable counting 0, 1, 2, 3, 4, 5, 6, 7, 8, 9, and finally 10), multiplying the 100 millisecond delay by 11 for a total delay of 1.1 seconds.
This may seem like a long-winded way of slowing down the program when you could just write sleep(1100) and achieve the same thing, but there’s a reason for doing it this way: when the Python program is paused by a sleep(1100) instruction, it’s not checking to see if the buttons are being pressed. If it’s not checking to see if the buttons are being pressed, the player can’t move. Without this loop, which keeps checking to see if the player wants to move even while waiting to make the fruit fall down the screen, the game would be unresponsive and not much fun to play.
This is also why the game uses button_a.was_pressed() to check when the button was pressed. During a delay, the Python program isn’t doing anything else—including checking for button presses. By using button_a.was_pressed(), the player sprite is moved even if the player pressed the button during the sleep(100) part of the program—which is more than likely, because due to the speed of its processor the game spends most of its time in a delay rather than running through its program code.
Finishing the Program
Press Enter at the end of Line 20, and then press Backspace once to delete four of the spaces the Python Editor has automatically added for indentation to make the next lines you type part of the loop opened on Line 10 rather than Line 11. This loop controls the falling of the fruit, delayed by the loop opened on Line 11 to compensate for the speed of the BBC micro:bit’s processor. Type the following two lines:
        delayCounter = 0
        fruitPosition[1] += 1
The first line resets the delayCounter variable back to zero, so the next time the game enters the delay loop opened in Line 11, it runs through from a starting count of zero rather than immediately exiting with the already-stored delayCounter value of 10.
The second line is responsible for making the fruit drop: the Y coordinate, stored in the second entry of the fruitPosition array, is incremented, moving it one pixel closer to the bottom of the screen. This represents the end of the main game loop. When this line is run, Python goes back to the start of the loop on Line 10 and checks to see if the position of the fruit has reached the bottom row of the display. If it hasn’t, the loop continues and everything starts again; if it has, the loop ends and the program moves on to Line 23—a line you now need to write.
With your cursor at the end of Line 22, press Enter followed by the Backspace key once to delete four of the spaces the Python Editor has inserted as indentation to indicate that the line you are writing is not part of the loop opened on Line 11. Then type the following:
if fruitPosition[0] == playerPosition[0]:
This line checks whether the position of the fruit sprite on the X axis, stored in the first entry of the fruitPosition array, is equal to the position of the player sprite on the same axis, stored in the first entry of the playerPosition array. If the player sprite and the fruit sprite are in the same location, the player has caught the fruit; if not, the player has missed the fruit.
If the player has caught the fruit, the player’s score needs to be increased. With your cursor at the end of Line 23, press Enter and keep the Python Editor’s automatic indentation. Then type the following:
        score += 1
        delay -= (delay / 10)
It’s the second line of code that is responsible for speeding up the game after every successful catch of the fruit. The first part of the code tells Python to take away from the delay variable whatever is found in the second part; the second part itself tells Python to calculate the current value of the delay variable divided by 10. The result: the delay variable shrinks by 10 percent each time the fruit is caught, making the game 10 percent faster each round.
This conditional handles the case of the player successfully catching the fruit, but the game needs to be able to run a different instruction if the player misses. That’s handled by adding an else case to the conditional. Press the Enter key to insert a new, blank Line 26, press Backspace to delete four spaces from the indentation, and then type the following two lines:
    else:
        display.scroll(('GAME OVER    SCORE %s' %↩
 score), loop=True)
Read as a whole, these instructions form the following sentence in plain English: ‘if the location of the fruit sprite is equal to the location of the player sprite, add one to the score and decrease the delay by 10 percent; if it is not equal, end the game and display a game over screen’.
Code in the if portion of the conditional only runs if the conditional is true; code in the else portion of the conditional only runs if the conditional is false. No matter what happens, only one of the two blocks of code will ever run; under no circumstances will the program ever run both the if and the else statements on a single run-through of the loop.
Although you’ve used the display.scroll instruction before, the loop=True section is new. This tells display.scroll that it should repeat the scrolling message once it has reached the end, which completes the game. Without loop=True, Python would display the message and then start the game again. With it, you have to restart the game yourself by pressing the BBC micro:bit’s Reset button.
Before trying out your new game, check that the program has been entered correctly by comparing it to the version found at the back of this book in Appendix C, or Figure 7-23, and making any changes necessary. Once you’re sure the program is correct, you can click the Download button, flash the hex file onto your BBC micro:bit, and start to play.
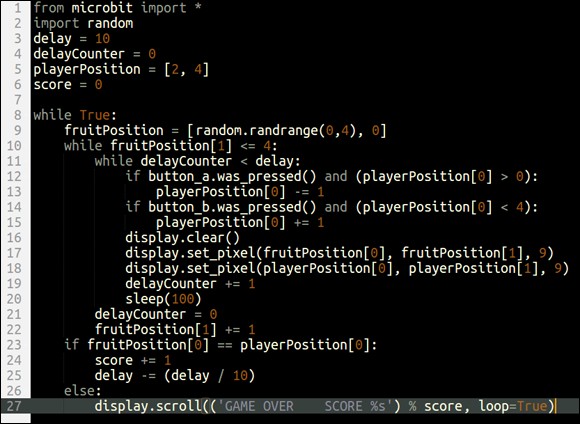
FIGURE 7-23: The finished game
Move the player sprite, at the bottom of the screen, with Button A and Button B, and try to catch the fruit sprite as it falls from the top to the bottom. Miss the fruit and it’s game over; you’ll see a GAME OVER message and your score. To restart the game, just hit the Reset button again.
To improve the game—and your programming skills—try making some modifications. Instead of controlling the player sprite with the buttons, how about using the accelerometer to watch for tilting and give the game motion control? Try adding multiple fruit which all fall down the screen at once.
Further Steps
If you skipped straight to this chapter, see how the same programs are implemented in a visual development environment in Chapter 5 or in the JavaScript Language in Chapter 6. If you’d prefer to stick with Python, you’ll find a range of sample programs, exercises, and projects on the Micro:bit Educational Foundation website at microbit.org.