
Chapter 12
The Wearable BBC micro:bit
In this chapter
![]() A look at what makes the BBC micro:bit so well suited to wearable and embedded projects
A look at what makes the BBC micro:bit so well suited to wearable and embedded projects
![]() An explanation of conductive thread
An explanation of conductive thread
![]() The Rain-Sensing Hat: A semi-practical project for you to build
The Rain-Sensing Hat: A semi-practical project for you to build
WHILE THE WORLD’S first computers were literally the size of a room—or, in some cases, several rooms—the march of technology has given us devices of greater processing power which we can fit in our pockets. As soon as electronics became small enough, people started to find ways to carry them around at all times. Pocket calculators led to digital watches, which eventually gave rise to the modern smartwatch (see Figure 12-1) and related devices like fitness trackers and location monitors.
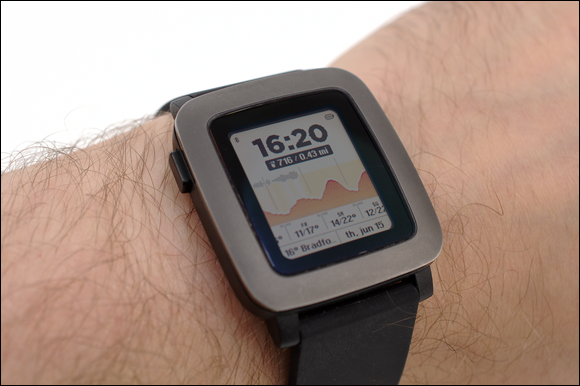
FIGURE 12-1: A smartwatch-style wearable
Although most people’s main experience of wearable electronics is for tasks like schedule notification and fitness monitoring, the technology is used in a variety of fields. Hardware is being developed which aims to monitor the wearer’s health, with tiny pill-like sensors which can be swallowed to monitor internal health, and there are even devices which can actively improve conditions such as Parkinson’s Disease.
As electronics become ever-smaller and more powerful, it’s likely that the field of wearable electronics will steadily grow—and the BBC micro:bit is a great platform to begin your own experiments in the field.
Advantages of the Wearable BBC micro:bit
The BBC micro:bit has a range of features which make it extremely well suited to wearable projects, not the least of which is its size. Measuring around half the size of a standard credit card, the BBC micro:bit is small and light enough to be integrated into clothing or worn directly on the body without causing discomfort.
Another feature of the BBC micro:bit which makes it easier to build practical wearable electronics project is its low power draw. A small laptop computer can run from its battery for around four to eight hours; a modern smartwatch can go for between one and four days between charges; a BBC micro:bit running from a pair of AA batteries (see Figure 12-2), however, can gather information from its sensors for over a month without difficulty.
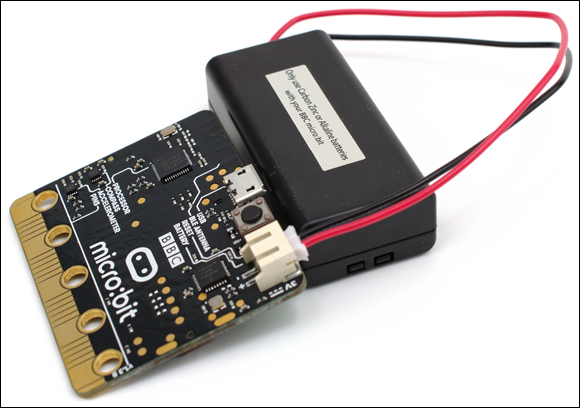
FIGURE 12-2: A BBC micro:bit running from batteries
The BBC micro:bit’s built-in display, sensors, and buttons make it an all-in-one device, too. Traditionally, a microcontroller is provided without these accessories, meaning you need to add them on yourself to build your wearable project. Naturally, the input-output pins on the BBC micro:bit mean that you can add extra hardware if your project requires it.
There’s a key extra feature that makes the BBC micro:bit particularly well suited to wearable projects, though, and it’s one not commonly seen in microcontrollers: support for conductive thread, which can be wound around the holes in the larger input-output pins to quickly make a solid electrical contact for fabric-based flexible, soft, and wearable circuits.
Conductive Thread
For a circuit to work, electricity has to be able to flow along conductors—the opposite of insulators—which are typically copper wires or copper tracks on a printed circuit board. The copper-coloured input-output pins on the BBC micro:bit are conductors, while underneath the BBC micro:bit’s surface are more copper conductors called tracks which serve to connect its components together.
Copper wire is an excellent conductor, but it has disadvantages. Chief among these is its weakness in the face of constant movement: as a wire bends backward and forward, the metal begins to weaken—a process known as metal fatigue—and eventually breaks. Once the wire has broken, it can no longer act as a conductor, and the circuit fails. The same is true of solder joints connecting wires to other components. Pressure on these solder joints can cause the solder or the copper to which it is connected to weaken and break, again causing the circuit to fail.
Put together, these issues are a real problem for wearable projects. This is where conductive thread comes in. As the name suggests, conductive thread is a sewable thread—similar to a thick cotton or woven nylon—which acts as a conductor, replacing the copper wire in circuits with a material that is flexible and soft to the touch (see Figure 12-3).
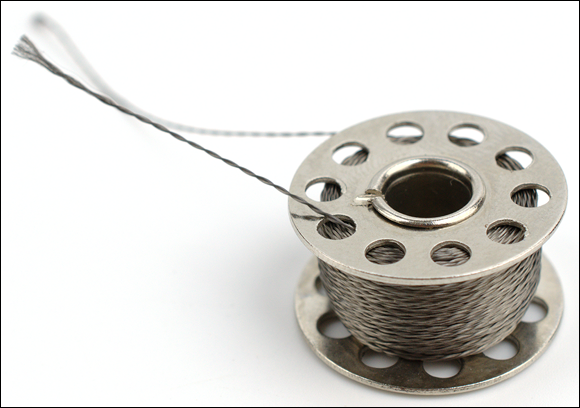
FIGURE 12-3: A spool of conductive thread
Conductive thread is typically made of extremely fine strands of steel, sometimes with silver plating, woven in the same way as cotton to make a thick and strong thread (see Figure 12-4). As a rule of thumb, the thicker the thread, the more conductive it is and the more power it can supply to components. A thin thread may provide enough power for a small LED or a button, while a thicker thread—or multiple strands of thinner thread woven together—could provide enough power for a small display or motor.

FIGURE 12-4: A length of conductive thread under a microscope
While copper wire is usually covered in plastic as an insulator, conductive thread is not. If you touch two conductive threads together, they act as a single conductor. As a result, you have to be careful when making a circuit with conductive thread. If you accidentally cross two separate sections of conductive thread, they create a short-circuit which at best prevents your project from working properly and at worst can damage components up to and including the BBC micro:bit itself.
The lack of insulator on conductive thread makes it easy to work with, however, and even allows you to build touch or moisture sensors without a single piece of extra hardware, as you’ll see later in this chapter.
Using Conductive Thread
Conductive thread is easy to work with, but you need a few extra pieces of hardware to get started. Besides the thread itself, which is sold at most hobbyist electronics shops and websites under a variety of brand names, you need the following:
- A sewing needle—When using conductive thread to add a circuit to fabric, you need a sewing needle to pull it through. Make sure to consider the size of your thread when choosing a needle. Too small a needle, and you cannot insert your conductive thread into its eye; too large a needle, and you’re accidentally pulling the end of the thread through the hole you just made.
- Fabric—A conductive thread circuit needs an insulator, just like a printed circuit board, and this is typically fabric. Usually, this is whatever you are looking to build your wearable project on; gloves, a hat, a coat, and shoes are all suitable insulators. The thicker the material, though, and the harder it is to sew. Thick leather is considerably more difficult to work with than thin cotton.
- A needle threader—Although not strictly necessary, a needle threader makes it easier to thread the needle with your conductive thread. This is particularly important when using thicker thread, which can fray at the end making it difficult to fit through the needle without help. Needle threaders are readily available from craft and fabric shops, often in a kit with needles.
- A thimble—As with the needle threader, you don’t strictly need a thimble, but if you’re working with tougher fabric or are inexperienced with sewing, it makes life a lot easier. Usually made of metal or ceramic, the thimble goes over your thumb or finger and prevents you from accidentally pricking yourself with the needle as it passes through the fabric.
- Scissors—You need to be able to cut lengths of thread to size, and for that you need a small but sharp pair of scissors. Try to keep a dedicated pair for this task. Conductive thread is made of metal and can leave blunt or dented sections in scissor blades, so having a pair you only use for cutting conductive thread stops you from having issues using them to cut anything else afterward.
If you’ve sewn with traditional cotton thread before, using conductive thread should be immediately familiar, and you can skip ahead to the practical project later in this chapter. If not, follow the guide next to get started.
Start by cutting a length of conductive thread from the spool with your scissors. Always err on the side of having excess thread left over on your length after you’ve finished, and remember that you may be sewing in zig-zag patterns, which further increases the amount of thread you use compared to the distance it covers on your fabric.
Take the opposite end of your length of thread to the one you just cut and tie a knot in it. This knot stops the thread from being pulled through the hole the needle makes as you begin sewing, so it needs to be reasonably large; try looping the thread through the knot several times over before tightening it to increase its size (see Figure 12-5).
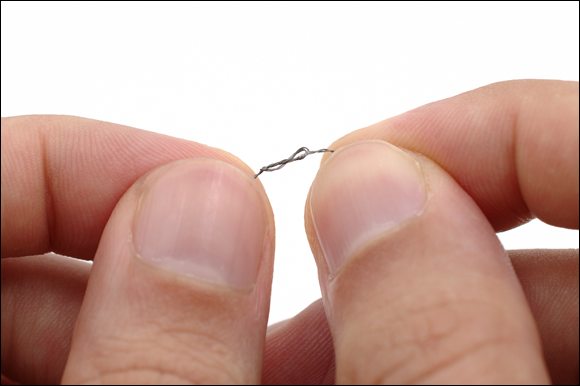
FIGURE 12-5: Knotting the conductive thread
Take the end of the conductive thread you just cut and pass it through the eye of the needle, pulling a short length through to hold (see Figure 12-6). Conductive thread frays quickly, so if you find it difficult to thread through the needle, consider making a fresh cut, folding the thread and passing the folded portion through the needle instead, or using a needle threader to make the process easier.
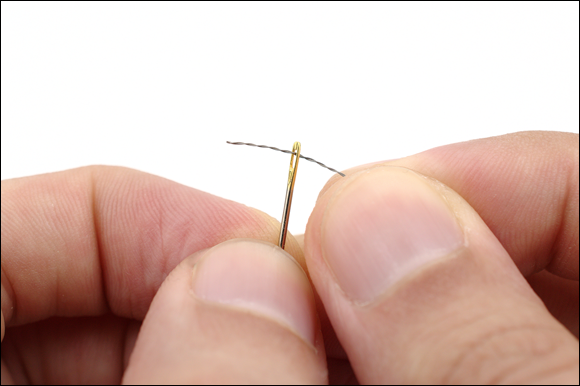
FIGURE 12-6: Threading the needle
You’re now free to begin sewing. Placing a thimble on the finger or thumb on the other side of the fabric, push the needle carefully through. When the needle is around halfway through, switch to the other side of the fabric and begin pulling until the needle is all the way through and is pulling the conductive thread through the fabric.
When gently pulling the rest of the thread through, take care not to let the thread come out of the eye of the needle. If it does, just rethread it and continue sewing. Once the knot has reached the fabric, the thread will stop; don’t pull it any harder, or you’ll pull the knot through the fabric and have to start again.
Exactly how you continue to sew depends on the fabric you’re using and whether you’re sewing to create a strong join—such as when linking two separate pieces of fabric —or simply to create a conductive path for your circuit. As a rule of thumb, the more times the needle passes through the fabric, the stronger the join. A length of thread which sits on top of the fabric and only passes through at two points is weaker than one which constantly zig-zags backward and forward.
To make a connection to one of the BBC micro:bit’s input-output pins, simply wrap a free end of thread around the pin, passing it through the hole and back again (see Figure 12-7). Make sure to wind it around a few times, to make a secure and electrically-sound connection. If you’re attaching the BBC micro:bit to the fabric at this point, you can do this by passing the needle through the fabric and the hole of the BBC micro:bit’s input-output pin, and then looping it back to the fabric at the bottom of the pin before repeating the process four or five times. This gives you a solid and secure connection.
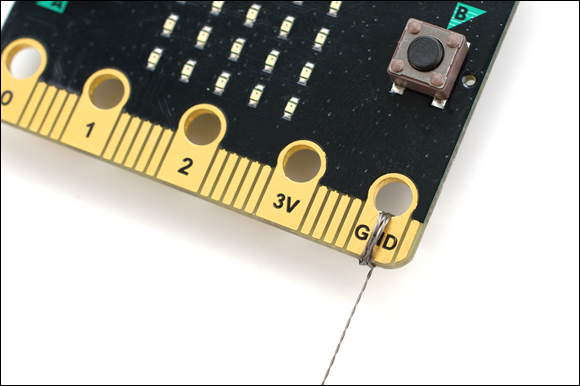
FIGURE 12-7: Connecting to the BBC micro:bit
The Rain-Sensing Hat
As a demonstration of how to build a simple wearable using the BBC micro:bit, a rain-sensing hat is a fantastic project. As an actual practical device, it’s somewhat less useful. If you’re outside and it’s raining, you know about it whether or not you’re wearing a ‘smart’ hat!
To follow this project, you need the following materials:
- A BBC micro:bit—The BBC micro:bit forms the brains of the wearable, actually detecting when the rain begins to fall, as well as providing the display that warns the wearer to seek shelter. You also need a micro-USB cable to program the BBC micro:bit from your computer.
- A battery pack—A wearable that keeps you tethered to your computer through a USB cable isn’t much of a wearable, so you need a battery pack. The one provided as part of the micro:bit Go bundle is perfect, or you can reduce the weight of the hat by opting for a third-party pack which uses smaller batteries. You also need fresh alkaline batteries, rather than part-used or rechargeable batteries.
- Conductive thread—You use the conductive thread to build a moisture sensor on the top of the hat, which the BBC micro:bit employs to trigger the warning. It also serves to fasten the BBC micro:bit to the hat, so look for thicker rather than thinner conductive thread to increase its strength.
- Sewing materials—A needle on its own is enough to build this project, but to make life easier and keep your fingers safe, consider adding a thimble, dedicated scissors, and a needle threader, as discussed earlier in this chapter.
- A baseball cap—The peak of a baseball cap makes for a great place to hang a BBC micro:bit, putting it in front of the wearer’s eyes without blocking their vision too badly. It’s probably a good idea to buy a cheap cap specifically for this project; you don’t want to end up putting holes all over your favourite!
- A ruler or measuring tape—This allows you to make measurements, ensuring your BBC micro:bit and threads are positioned in the right places.
- A fabric pencil—You use this to mark out measurements on the baseball cap. You can also try using a normal pencil or pen, although these leave a permanent mark on your hat.
If you don’t want to build the project right now, you can skip straight to the software section later in this chapter to experiment with the program. Touching the BBC micro:bit on Pin 0 while holding the GND pin is enough to simulate the rain sensor.
Building the Hat
Begin by measuring and writing down the distance between the centre of the hole of Pin 0 and the centre of the hole on the GND pin of your BBC micro:bit; it will be around 42mm (1.65"). This is the distance between the ending points of your two lengths of conductive thread, making it so that the thread can fasten the BBC micro:bit to the underside of the baseball cap’s peak.
Find the centre point of the baseball cap’s peak, and then make a small mark near the front of the peak on its underside. Measure half the distance you wrote down earlier (21mm/0.827") to the left and mark it; then do the same to the right (see Figure 12-8).
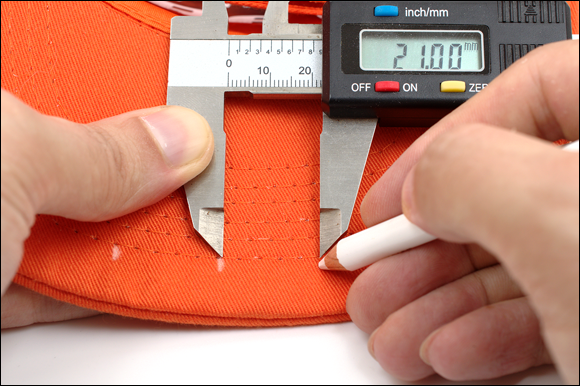
FIGURE 12-8: Marking the hat
Cut a length of conductive thread about four times longer than your original measurement—around 168mm (6.61"). Tie a knot in one end and thread the other end through the needle. Push the needle through the peak of the baseball cap from the underside where your left mark is. Pull it all the way through to the top, and then begin sewing a square-wave pattern as shown in Figure 12-9 without passing the needle fully through the peak; instead, just push the needle sideways through the fabric above the peak to secure each part of the pattern. Stop when you reach the second mark, passing your needle through so the thread is closer to the front of the peak than the mark.
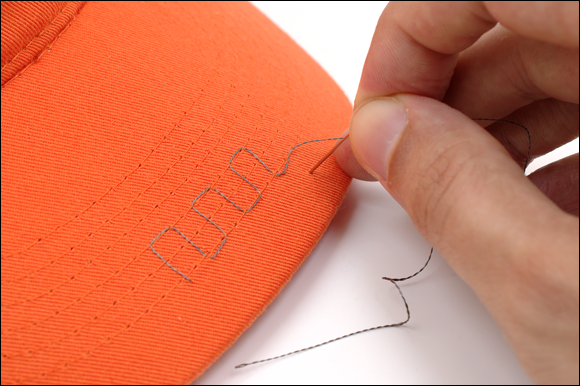
FIGURE 12-9: Sewing the square-wave pattern
Unthread your needle, leaving the rest of the thread hanging from the underside of the hat, and then cut a second length of conductive thread, knot it, and thread it through the needle. Place the needle on the right mark at the underside of the hat and begin the sewing process again, creating the same pattern but slightly above the old one (see Figure 12-10). Make sure that at no point do the two threads touch; they should be close, but not touching.
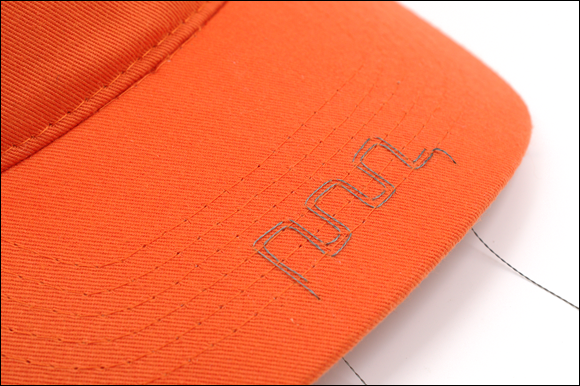
FIGURE 12-10: Sewing the second square-wave pattern
The spacing between the threads is important. Too far apart, and the rainwater isn’t conductive enough for the sensor to work; too close together, and the threads connect to each other and short the circuit, causing the sensor to trigger even when no rain is present.
When you reach the end of the pattern, pass the needle fully through the peak and pull the thread through behind it, but don’t unthread the needle just yet. Take your scissors and cut off any excess thread from the knotted ends of both conductive thread lengths, leaving them as close to flush with the peak of the baseball cap as possible.
Mounting the BBC micro:bit
The BBC micro:bit needs to be mounted to the hat, and you can use the lengths of thread hanging from the hat to do so while also making the electrical connections needed for the rain sensor. Place the BBC micro:bit upside down under the peak of the cap so that the LEDs are facing inward toward the wearer and the input-output pins are touching the peak. Holding it in place, position the BBC micro:bit so that the conductive thread you currently have threaded in the needle is touching the GND pin. Then begin sewing loops through the hole of the GND pin and the peak of the cap to hold it in place (see Figure 12-11) while taking care not to allow the thread to touch the other length of thread.
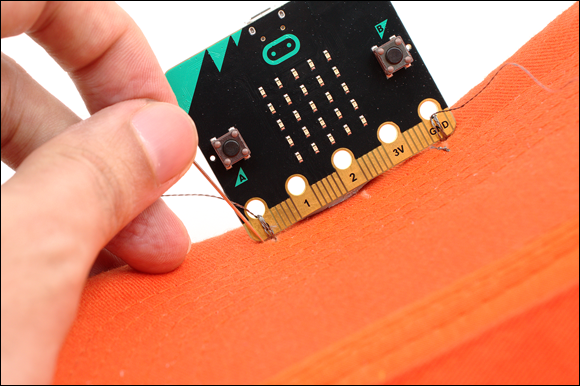
FIGURE 12-11: Securing the BBC micro:bit
When you have finished, create a final loop and pass the thread through its own loop before pulling it tight to secure it, and then unthread the needle and cut off any excess thread. Rethread the needle using the remaining length of thread, and do the same to Pin 0 on the other side of the BBC micro:bit before again securing it in place and cutting off the excess.
The Rain-Sensing Program
Start by opening your browser and going to makecode.microbit.org to load the JavaScript Blocks Editor, and then click the Editor toggle to switch to JavaScript Editor mode. Delete everything from the program listing, and then type in the following:
basic.forever(() => {
    basic.clearScreen()
    if (input.pinIsPressed(TouchPin.P0)) {
        basic.showLeds(`
            . . # # #
            . . # . #
            . . # . .
            # # # # #
            . # # # .
            `)
        basic.pause(500)
        basic.showIcon(IconNames.Chessboard)
        basic.pause(500)
    }
})
This small program is the entirety of the wearable’s logic. Line 1 places the BBC micro:bit in an infinite loop, while Line 2 clears the screen of anything it is currently displaying. Line 3 checks to see if Pin 0 has been touched, and if it has it displays an image of an umbrella on the screen, pauses for 500 milliseconds, switches to a built-in icon of a chessboard which handily doubles as rain, and pauses for another 500 milliseconds before going back to the start of the loop, clearing the screen, and checking Pin 0 again.
It may seem strange to be testing Pin 0 for having been touched, but testing for rain and testing for a touch work in the same way: they both rely on conductivity and resistance. With one of your conductive threads connected to the GND pin and the other connected to Pin 0, rain completes the circuit and acts as a ‘touch’ just the same as your finger would.
There’s a reason for the umbrella being upside down, too. With the BBC micro:bit connected to the peak of the cap by its input-output ports, it’s upside down; any picture you display on the BBC micro:bit’s display in this manner is also upside down as a result, which means you can’t use the built-in ‘umbrella’ icon. Instead, the basic.showLeds instruction is used to create a custom image, which is simply the existing umbrella icon flipped upside down—making it seem the right way up to the person wearing the hat.
Click the Download button and flash the program onto your BBC micro:bit. To test if it works, you can either touch the conductive threads on the top of your cap with your finger or sprinkle a little water on them to simulate rain. If everything’s working, the BBC micro:bit begins to alternate between the umbrella and rain images. If the images appear before you’ve pressed or wet the conductive threads, the threads are touching and creating a short; look closely to find out where, and then adjust them so they’re no longer touching each other.
Battery Power
The only thing left to do to finish your wearable is to power it. Disconnect the micro-USB cable, if it is currently connected, and then take your battery pack and insert fresh batteries, making sure to put them in the right way around. Take the JST connector on the end of the battery pack’s wires and insert it into the battery connector on the BBC micro:bit, making sure it’s the right way around. The red, positive, wire goes to where the small + symbol is on the board, and the black, negative, wire goes to the – symbol. The connector is keyed to prevent you from putting it in backward; if it doesn’t seem to be fitting properly, double-check that it’s the right way up and try again.
The wires on the battery pack are long enough that you can, if you want, leave the battery pack loose and place it under the cap itself when you’re wearing it. If you’d prefer something more permanent, you can attach it to the peak of the cap with nonconductive thread or use adhesive hook and loop fastener.
With the battery pack in place, you can wear your rain-sensing hat with pride (see Figure 12-12), knowing that you’ll always be among the first to know if the clouds burst.
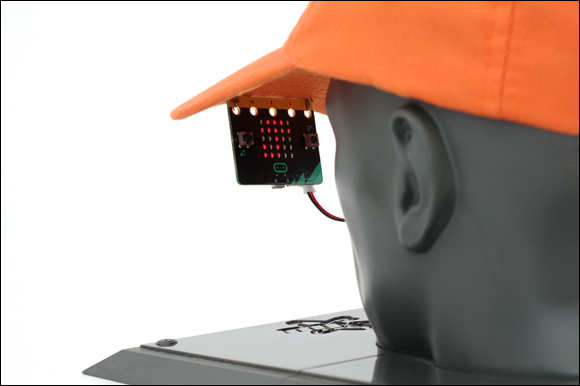
FIGURE 12-12: The finished rain-sensing hat