
Chapter 11
Extending the BBC micro:bit
In this chapter
![]() Extending the BBC micro:bit with breakout boards
Extending the BBC micro:bit with breakout boards
![]() The BBC micro:bit and robotics: off-the-shelf solutions to building a BBC micro:bit-powered robot
The BBC micro:bit and robotics: off-the-shelf solutions to building a BBC micro:bit-powered robot
![]() Other notable BBC micro:bit add-ons
Other notable BBC micro:bit add-ons
THE BBC MICRO:BIT is a powerful device in its own right, but it really comes into its own when it’s paired with hardware that expands its capabilities. From simple breakout boards which provide easy access to the 20 small pins spaced along its edge connector to kits for building your own autonomous robots, this chapter introduces some of the accessories available for building more complex projects.
Extending via Breakout Boards
The large pins on the BBC micro:bit's edge connector are enough to build small projects, but eventually you'll find yourself needing more. A breakout board provides easy access to the smaller pins on the edge connector, multiplying the amount of hardware you can add while providing access to the more advanced bus types.
The available breakout boards vary in pricing, in features, and in how they make the pins available. A selection of different boards is offered next as a representative example.
Kitronik Edge Connector Breakout Board
The Kitronik Edge Connector Breakout Board (see Figure 11-1), created in the company’s role as one of the founding partners of the BBC micro:bit project, is designed to make it easier to use with BBC micro:bit with external hardware. Every pin on the BBC micro:bit—both the large pins and the small pins—is broken out into easily-accessible 2.54mm pin headers, which you can use with 2.54mm female-to-male jumper wires to connect the BBC micro:bit to a breadboard.
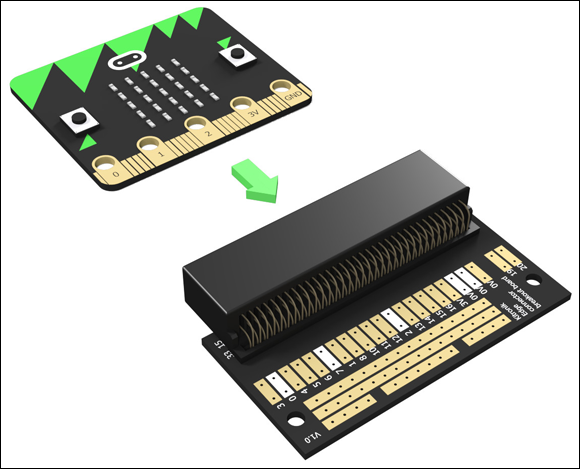
FIGURE 11-1: The Kitronik Edge Connector Breakout Board
Kitronik's design is notable for making it as simple as possible to connect hardware to the BBC micro:bit's additional pins. Every major pin from the BBC micro:bit's edge connector is broken out to two male 2.54mm pin headers so you can make more than one connection, while there's an unpopulated prototyping area at the bottom of the board which provides additional 3V and GND connections plus three linked groups for your own use.
The Edge Connector Breakout Board is available in two versions: a standard version and a prebuilt version. The standard version comes with the edge connector itself disconnected from the breakout board and the pin headers unpopulated, and it requires over a hundred solder connections before it can be used. The prebuilt version, by contrast, comes with the edge connector and most pin headers already soldered into place; only Pin 19 and Pin 20, used for the I2C bus, are left unpopulated for you to solder yourself, while the prototyping area is left bare.
You can find more information on the Kitronik Edge Connector Breakout Board at kitronik.co.uk.
ScienceScope Micro:bit Breakout Board
Designed specifically for classroom use but also well suited to home users with younger children, the Micro:bit Breakout Board from ScienceScope (see Figure 11-2) uses child-friendly 4mm banana plug connectors. These are the same connectors as you'll find on the micro:bit's large pins, meaning it's possible to take your existing banana plug cables and reuse them.
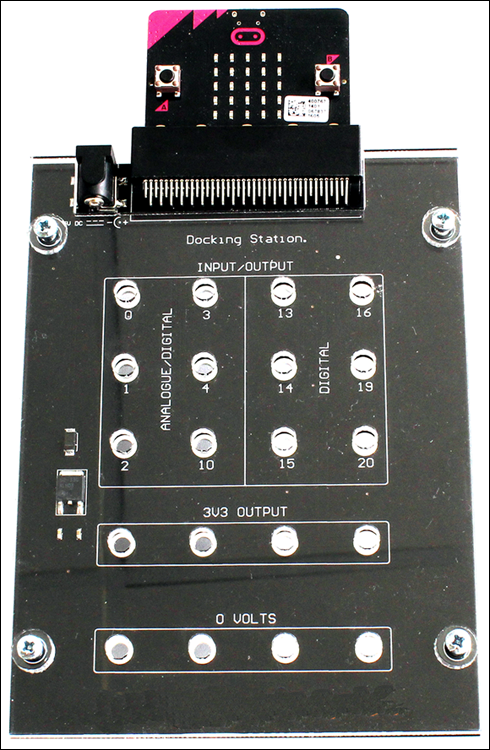
FIGURE 11-2: The ScienceScope Micro:bit Breakout Board
While some breakout boards provide access to all or most of the smaller pins on the BBC micro:bit, the ScienceScope version concentrates only on the general-purpose input-output (GPIO) pins. Besides breaking out the large Pins 0 through 2, ScienceScope's board provides easy access to the digital and analogue-to-digital Pins 3, 4, and 10, and the digital-only Pins 13, 14, 15, 16, 19, and 20.
The ScienceScope board also includes four linked outputs for 3.3V power and GND connectivity, along with a dedicated power supply input for powering the micro:bit and the power connectors. This gives the board greater scope for powering higher-current devices, such as ultra-bright LEDs, than alternatives which rely purely on the micro:bit's internal power supply.
You can find more information on the ScienceScope Micro:bit Breakout Board at sciencescope.uk.
Proto-Pic Bread:Bit
The Proto-Pic Bread:Bit breakout board (see Figure 11-3) is designed for use with a solderless breadboard, which is not included in the package. Rather than connecting wires directly to the breakout board, the Bread:Bit is inserted into a solderless breadboard and connections made through that instead. For anyone looking to build more complicated projects, this makes for a more stable build with fewer trailing wires and can even be soldered directly to stripboard to build a permanent add-on circuit from which the micro:bit can be easily removed and reconnected.
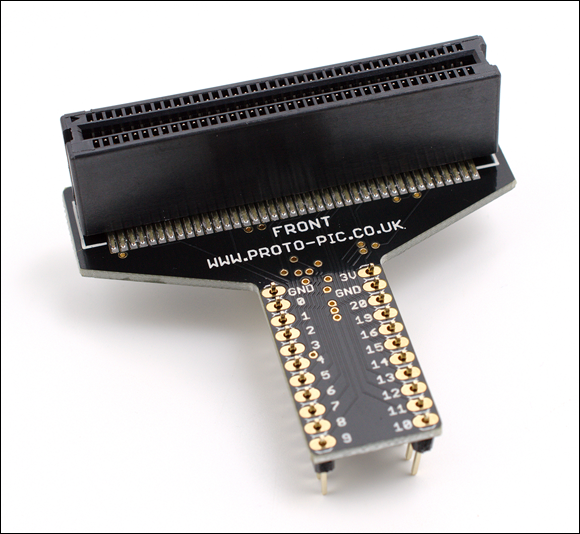
FIGURE 11-3: The Proto-Pic Bread:Bit
The Bread:Bit provides connections for all 25 of the pins on the micro:bit, making it suitable for any project. Each pin is given a single connection on the breadboard, including the 3V and GND pins. The board is provided with the edge connector soldered into place, but the 2.54mm male pin headers left off; for an extra fee, it's possible to buy a version with the pin headers already soldered into place.
You can find more information on the Proto-Pic Bread:Bit at proto-pic.co.uk.
Proto-Pic Exhi:Bit
The second prototyping board design from Proto-Pic, the Exhi:Bit (see Figure 11-4), is designed to be fully comprehensive. Where the Bread:Bit is designed to be used with an optional solderless breadboard, the Exhi:Bit comes with its own, which can be slotted into the middle of the board. For more permanent projects, the central area also includes a stripboard-like prototyping area onto which you can solder your own components.
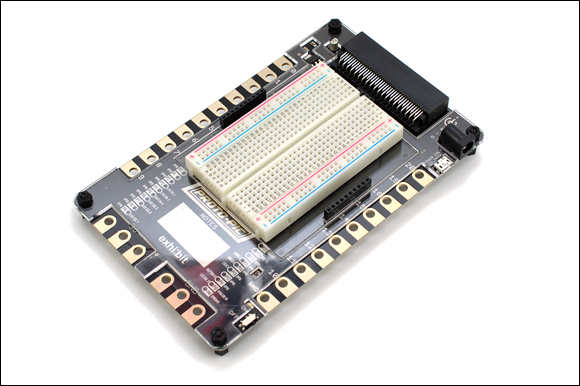
FIGURE 11-4: The Proto-Pic Exhi:Bit
The feature that makes the Exhi:Bit really stand out, though, is the presence of large pins running across three of its four sides. These are near-duplicates of the large pins found on the micro:bit itself, and compatible with both crocodile clips and 4mm banana plugs, but every pin is available rather than just the default five.
Proto-Pic has also designed a series of daughterboards which can be connected to female pin headers on the Exhi:Bit, expanding its capabilities, as well as a do-it-yourself board onto which you can easily solder your own components. There are also three note-taking areas, designed primarily for differentiating multiple units in a classroom setting, and a dedicated 5-9V power input.
You can find more information on the Proto-Pic Exhi:Bit at proto-pic.co.uk.
Robotics and the BBC micro:bit
Despite its small size, the micro:bit is a powerful tool. Its internal sensors and relatively large number of programmable pins make it ideal for robotics projects. It’s small and light enough not to weigh down whatever you build, and its low power draw means longer battery life.
You can build your own robot using off-the-shelf components, but a number of companies have begun offering robot kits. Simply pick up a kit, assemble the robot, program the micro:bit, and slot it home to complete the build.
A selection of different robot kits is offered next as a representative sample.
Kitronik Line-Following Buggy
A relatively simple two-wheeled robot, Kitronik's Line-Following Buggy (see Figure 11-5) adds a pair of extra sensors to the ones on the micro:bit itself: light-dependent resistors (LDRs). Using the LDRs and LED lights that shine underneath the buggy, the robot is capable of following a black line drawn on the floor without the need for a remote control.
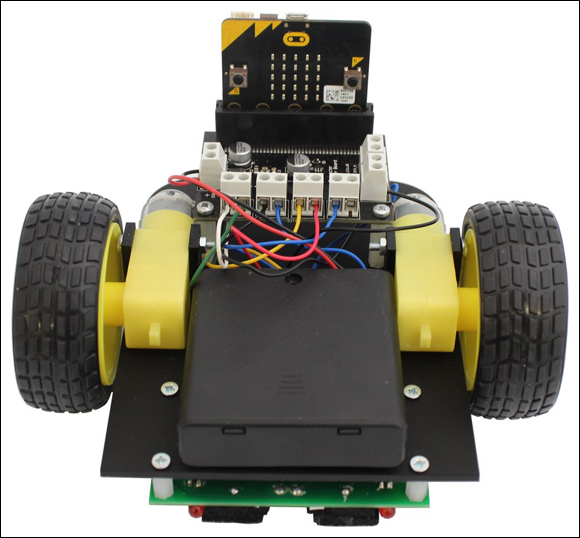
FIGURE 11-5: The Kitronik Line-Following Buggy
The kit includes everything you need to build the robot, including a motor driver board which allows the micro:bit to control the twin motors and a battery pack which holds four AA batteries to power both the motors and the micro:bit itself. Two sample programs are also provided: one which follows a line drawn on the floor, and the other which uses the micro:bit's accelerometer to spin the robot around when it bumps into obstacles.
More information on the Kitronik Line-Following Buggy kit can be found on kitronik.co.uk.
Kitronik Motor Driver Board
Provided as part of the Line-Following Buggy kit, Kitronik's Motor Driver Board (see Figure 11-6) is also sold on its own for those looking to build their own custom robotics projects. A BBC micro:bit on its own can't provide enough power to turn a motor on and off; the Motor Driver Board fixes that, providing connections to drive two small DC motors.
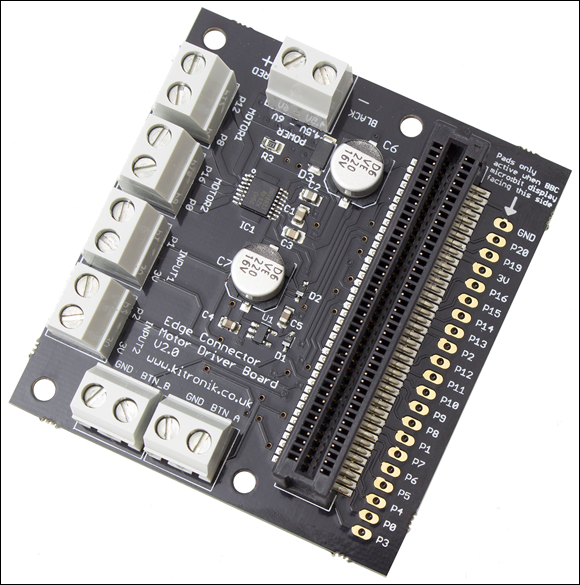
FIGURE 11-6: The Kitronik Motor Driver Board
The Motor Driver Board also includes 2.54mm pin headers for accessing the BBC micro:bit's pins—though you need to solder the pins on yourself if you want to use them—as well as screw terminal connectors for the motors, Pin 1 and Pin 2, Pin 5 and Pin 11 (equivalent to pressing Button A and Button B on BBC micro:bit itself), and a 4.5-6V power input for three or four AA batteries.
You can find more information on the Kitronik Motor Driver Board at kitronik.co.uk.
Technology Will Save Us Micro:Bot
Designed by Technology Will Save Us, one of the partner companies in the BBC micro:bit project, the Micro:Bot kits (see Figure 11-7) are primarily designed to be affordable. Rather than using a plastic or metal chassis, as with many robot kits, the body of the robot is made from the cardboard box in which the robot is shipped.

FIGURE 11-7: The Technology Will Save Us Micro:Bot
Technology Will Save Us has developed three projects around the Micro:Bot: ArtBot, RoomBot, and GolfBot. You can use a single kit to build all three—plus a few common household items, such as a pen, some tinfoil, and a kitchen sponge. ArtBot turns the Micro:Bot into a basic line-drawing turtle by poking a pen through the cardboard body; RoomBot uses tinfoil to make a collision sensor; and GolfBot adds a putting green to the front to make a golf trainer that relocates itself on a successful put.
You can find more information on the Technology Will Save Us Micro:Bot kit at techwillsaveus.com.
4tronix Bit:Bot
The principle behind the 4tronix Bit:Bot (see Figure 11-8) is simple: to provide as many features as possible on the body of a two-wheeled BBC micro:bit robot chassis. The kit includes the same features as the Kitronik Line-Following Buggy, with two geared motors and light-dependent resistors for line-following functionality, plus a range of extras: two sets of six programmable multi-colour LEDs at each side of the body, two light sensors which allow the robot to follow a light source such as a torch, and a buzzer for making simple sounds.
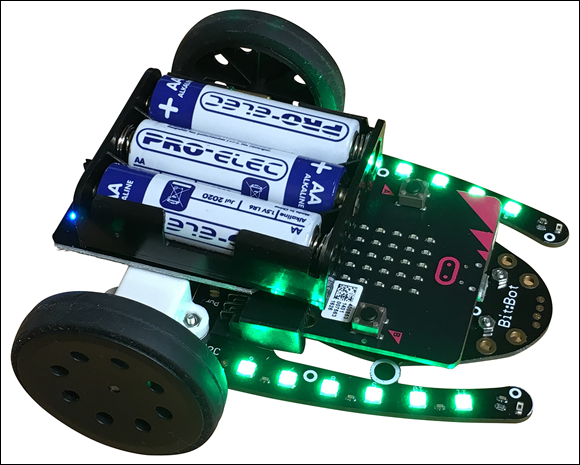
FIGURE 11-8: The 4tronix Bit:Bot
The Bit:Bot can also be expanded to add additional features. An expansion port on the main part of the body allows additional programmable LED boards to be added, while a front expansion port provides connectivity for an ultrasonic distance sensor which can measure how far away the robot is from any obstacles it may find in its path. Code snippets are available on the official website, along with sample Python programs for controlling the motors, LEDs, and sensors and making the robot act as a line follower.
You can find more information on the 4tronix Bit:Bot at 4tronix.co.uk.
BinaryBots
Designed to appeal to younger children, the BinaryBot kits (see Figure 11-9) are nothing if not colourful. The body of each robot is built from cleverly folded cardboard, onto which colourful stickers can be applied to make either a traditional-looking bipedal robot or a saucer-shaped UFO.
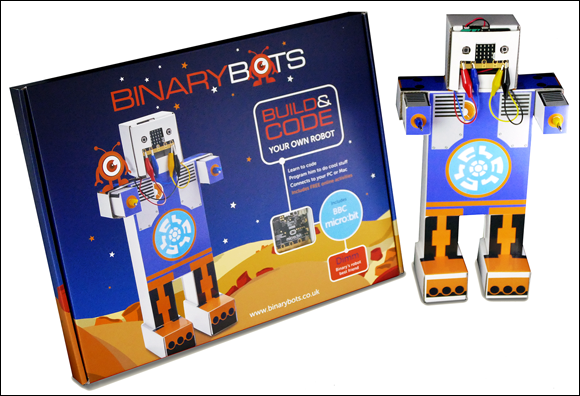
FIGURE 11-9: The BinaryBots
Unlike the other robot kits in this chapter, however, the BinaryBots aren't true robots; they can't move. Each kit includes a speaker, temperature sensor, motion sensor, light sensor, and sample programs for reading the input of each. While the BBC micro:bit can then use these devices to make noises and flash its lights, though, a lack of motors means they're entirely stationary—which in a busy household or classroom full of younger pupils may be a positive rather than a negative!
You can find more information on the BinaryBots kits at binarybots.co.uk.
Other BBC micro:bit Add-Ons
The add-ons available for the BBC micro:bit are not limited to robots and breakout boards. Developers, engineers, and students all around the world have designed their own add-ons which use the edge connector. Some of the add-ons let you play games, while others make it easier to build portable and wearable projects around the BBC micro:bit.
A selection of these is offered next as a taste of what's out there.
Kitronik Mi:Power
The Mi:Power board from Kitronik (see Figure 11-10) is designed to simplify portable and wearable projects based around the BBC micro:bit by doing away with a separate battery holder. Designed to match the footprint of the BBC micro:bit, the Mi:Power board connects via bolts and spacers to Pin 0, 3V, and GND on the BBC micro:bit and allows it to draw its power from an on-board 3V coin-cell battery—protected, thankfully, from being removed and potentially swallowed by younger children by being located on the inside of the micro:bit-Mi:Power ‘sandwich', and accessible only by undoing the three screws holding the boards together.
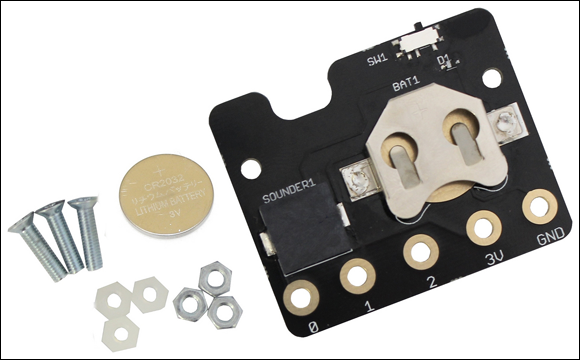
FIGURE 11-10: The Kitronik Mi:Power
Besides providing power to the BBC micro:bit, the Mi:Power board includes a buzzer connected to Pin 0 and a dedicated on-off switch that allows the BBC micro:bit and connected hardware to be powered off without having to disconnect wires. For those with access to a laser cutter, as part of a home workshop, at a school or university, or at a local hackspace or maker space, Kitronik provides files for cutting add-on accessories, including a watch mount, plant spike, lanyard attachment, belt mount, and even small robot-like character.
You can find more information on the Mi:Power at kitronik.co.uk.
Proto-Pic Micro:Pixel Board
The 5×5 LED display on the front of the BBC micro:bit is enough to display a surprising amount of information, but eventually it's possible to tire of its red light. Proto-Pic's answer to this is the Micro:Pixel board (see Figure 11-11), which plugs into the edge connector and provides a 4×8 matrix of individually-programmable full-colour LEDs—allowing you to reproduce almost any colour you can imagine.
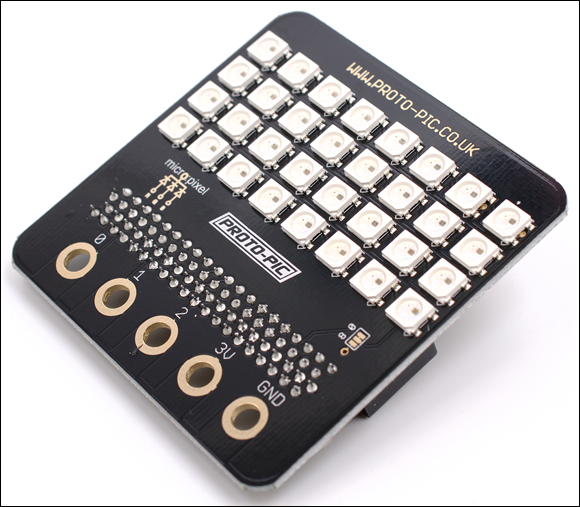
FIGURE 11-11: The Proto-Pic Micro:Pixel Board
The larger pins of the BBC micro:bit are duplicated on the edge of the Micro:Pixel board, though the smaller pins are not and Pin 0 is used to communicate with the LEDs themselves. The board also comes with a warning: the LEDs at full brightness can draw more power than the BBC micro:bit is capable of providing, making it theoretically possible to damage the BBC micro:bit by setting the LEDs too high—something to bear in mind while experimenting with the board.
You can find more information on the Micro:Pixel Board at proto-pic.co.uk.
Proto-Pic Simon:Says Board
The Proto-Pic Simon:Says board (see Figure 11-12) serves three main purposes: it's a great demonstration of how capacitive touch can turn parts of a printed circuit board into ‘buttons'; it's a re-creation of a beloved electronic game first invented by Ralph Baer, Howard Morrison, and Lenny Cope in 1978; and it can act as a four-button input with LEDs and a buzzer for your own projects.
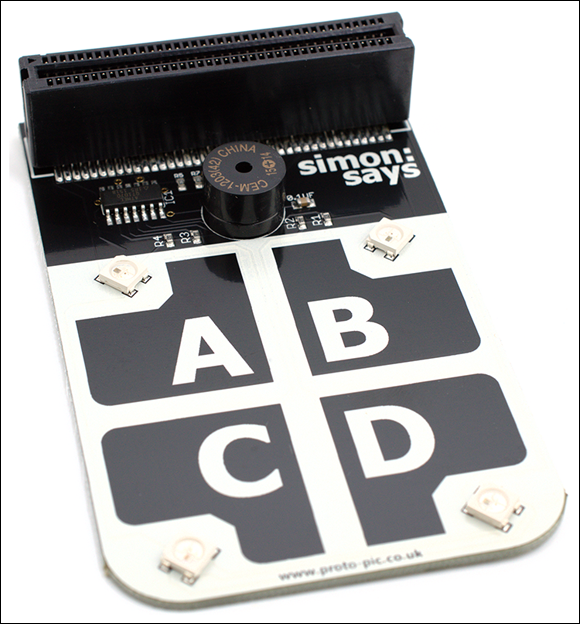
FIGURE 11-12: The Proto-Pic Simon:Says Board
Just like the original, Proto-Pic's version of Simon is primarily a game: the sample code provided lights up the LEDs and sounds the buzzer in a pattern you have to copy, getting faster and more difficult each time. When you're tired of losing to the BBC micro:bit, though, it's a surprisingly powerful expansion board in its own right, with four programmable colour LEDs, four capacitive-touch buttons, and a buzzer, all of which can be integrated into your own programs with ease.
You can find more information on the Simon:Says board at proto-pic.co.uk.
4tronix Bit:2:Pi Board
The Raspberry Pi and the BBC micro:bit are great companions, as proven in Chapter 9, ‘The BBC micro:bit and the Raspberry Pi’. The 4tronix Bit:2:Pi board (see Figure 11-13) takes things even a step further by allowing you to connect selected Raspberry Pi add-ons directly to the BBC micro:bit—including the various Hardware Attached on Top (HAT) boards available for the Pi.
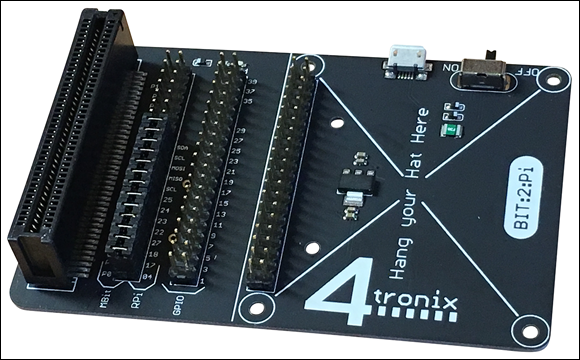
FIGURE 11-13: The 4tronix Bit:2:Pi Board
Not every Raspberry Pi add-on works with the BBC micro:bit, but many can be convinced to operate if you're willing to spend the time to write the necessary code. Examples of add-ons you can easily use with the Bit:2:Pi include those based around programmable LEDs, buttons, buzzers, and motor controllers. Those that won't work include display screens and cameras.
You can find more information on the Bit:2:Pi board, including a list of Raspberry Pi add-ons that are known to be compatible, at 4tronix.co.uk.
Kitronik Mi:Pro Protector and Mi:Power Cases
Although the BBC micro:bit is designed to be robust, if you're taking it out and about it's a good idea to protect it from accidental damage. The Kitronik Mi:Pro Protector case (see Figure 11-14) does exactly that, covering the front and back of the BBC micro:bit while still providing access to the micro-USB connector, edge connector, and buttons.
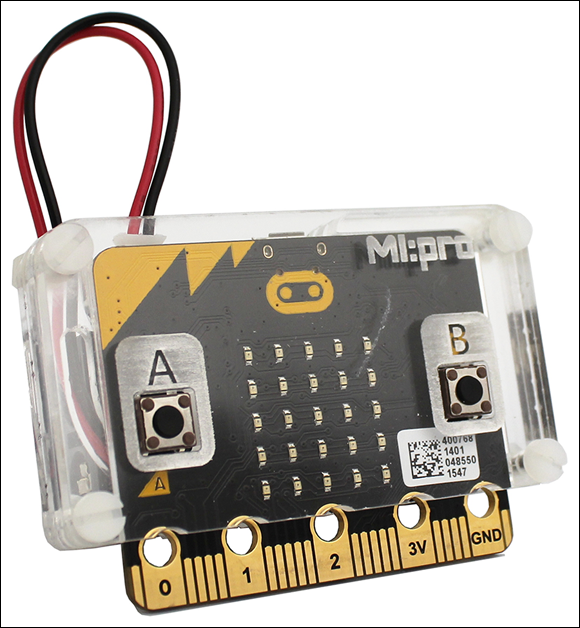
FIGURE 11-14: The Kitronik Mi:Pro Protector
For powering the BBC micro:bit on the move, an optional battery holder for two AAA batteries can be screwed to the back of the Mi:Pro Protector. Alternatively, a version for use with the Mi:Power battery board is available, with both versions being produced in clear, green, orange, and blue coloured plastic.
You can find more information on the Mi:Pro Protector and MiPower cases at kitronik.co.uk.