
Chapter 1
Meet the BBC micro:bit
In this chapter
![]() A look at what the BBC micro:bit is and how it came about
A look at what the BBC micro:bit is and how it came about
![]() A tour of the BBC micro:bit and an explanation of its major components
A tour of the BBC micro:bit and an explanation of its major components
THE BBC MICRO:BIT is an incredible device, capable of educating and entertaining in equal measure. It can form the heart of a complex robotic or home automation system, or it can simply show a smiley face when you press a button. It can help you come to grips with programming, learn about how electronics work, and even communicate wirelessly with more BBC micro:bits or other devices such as a smartphone or tablet.
You can write programs for the BBC micro:bit in a variety of programming languages, or you can use programs others have written. You can use the BBC micro:bit in the classroom, the club, the playground, or at home. You can play games, solve problems, and invent new devices, all with your BBC micro:bit.
Before all this, though, you’ll need to meet the BBC micro:bit.
A Tour of the Board
The BBC micro:bit is what is technically known as a microcontroller development board. That is, it’s a printed circuit board (PCB) which contains a microcontroller on which you can run your own programs and connect your own hardware.
The first microcontroller development boards were expensive and complicated to use. In the decades since their first introduction, they have become steadily cheaper and more accessible, until the BBC micro:bit became possible: a minimal-cost, highly-functional board designed to help teach programming, or ‘coding’, to anyone regardless of experience.
Your programming journey begins simply: learning about the BBC micro:bit itself.
The BBC micro:bit itself is a small printed circuit board with a range of components fitted. It has two sides: the front side of the BBC micro:bit includes the display and buttons, while the back side has components like the micro-USB connector and radio. Figure 1-1 shows the front side of the BBC micro:bit, and Figure 1-2 shows the back.
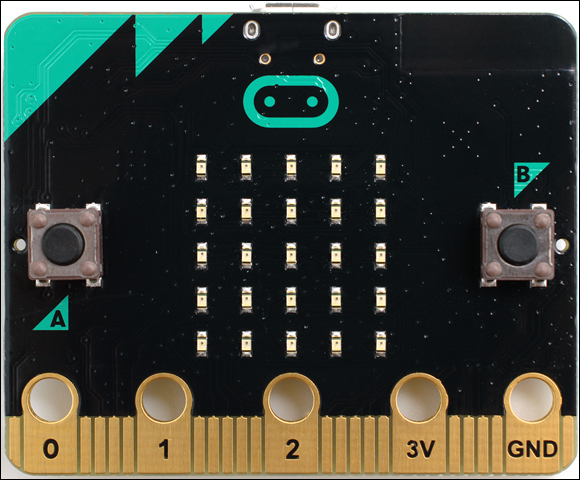
FIGURE 1-1: The front of the BBC micro:bit
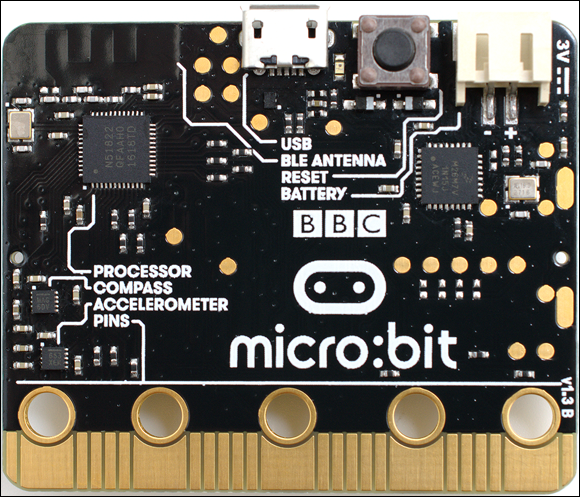
FIGURE 1-2: The back of the BBC micro:bit
The BBC micro:bit includes a layer of print known as a silkscreen layer, which labels some of the more important components. The buttons on the front side are labelled A and B so you know which is which, while the back side picks out key components like the processor and the accelerometer. These components, and others, are described in more detail in the next section.
Breaking It Down
Like any complex device, the BBC micro:bit is made up of numerous relatively simple parts. From the more obvious, like the display which dominates the front of the board, to the more subtle, like the radio which allows two or more BBC micro:bits to communicate with each other or connect to a smartphone or tablet, each component works with the others to give the BBC micro:bit its impressive flexibility.
If you’re impatient to get started with your BBC micro:bit, you can skip ahead to Chapter 2. Reading the rest of this chapter, though, will give you a good understanding of just what the BBC micro:bit can do, putting you in good stead for not only learning how it works but coming up with practical projects of your own as your skills progress.
Display
The most obvious feature of the BBC micro:bit is its display, which sits in the centre of the board’s front side (see Figure 1-3). This is the BBC micro:bit’s primary output device, a means for a program running on the BBC micro:bit to communicate with the outside world—whether that’s reading off the position of one of the BBC micro:bit’s sensors or simply displaying a smiling face.
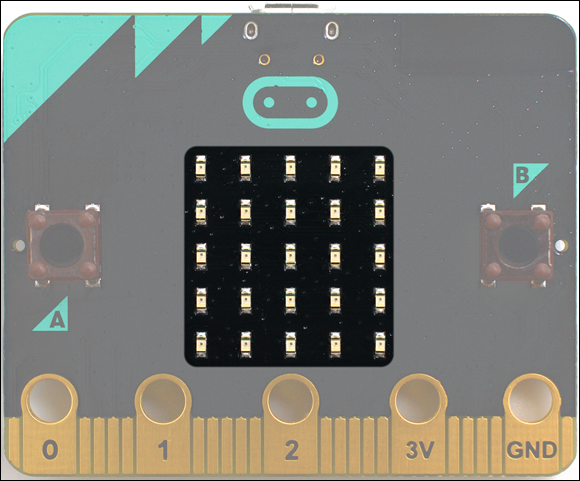
FIGURE 1-3: The BBC micro:bit’s display
The BBC micro:bit’s display serves the same purpose as the monitor on a desktop computer but is of a considerably lower resolution. Where a desktop monitor may be made up of 1,920 columns of 1,080 picture elements or pixels, the BBC micro:bit has just five columns of five picture elements for a total of 25 pixels.
Although 25 pixels may not sound like much, it’s more than enough to view useful information such as a bar graph or the elements of a simple game or to scroll messages of almost any length. You’ll learn more about using the display for these tasks and more later in the book.
From a technical perspective, the BBC micro:bit’s display is made up of a 5 × 5 light emitting diode (LED) matrix. Each LED in the matrix makes up one pixel and can display a single colour in varying brightnesses. By altering the brightness and rapidly changing the image being shown, the BBC micro:bit’s display can show animation as well as still images.
Buttons
Next to the display, the buttons are the BBC micro:bit’s second most obvious feature. The two main buttons, Button A and Button B, are positioned either side of the display at the front of the board and are labelled with their letter to avoid any confusion (see Figure 1-4). These two buttons form the BBC micro:bit’s primary input devices. Where the display allows information to be output from a program running on the BBC micro:bit, the buttons allow you to send simple inputs into the program to change the image being displayed, for example, or control a character in a game.
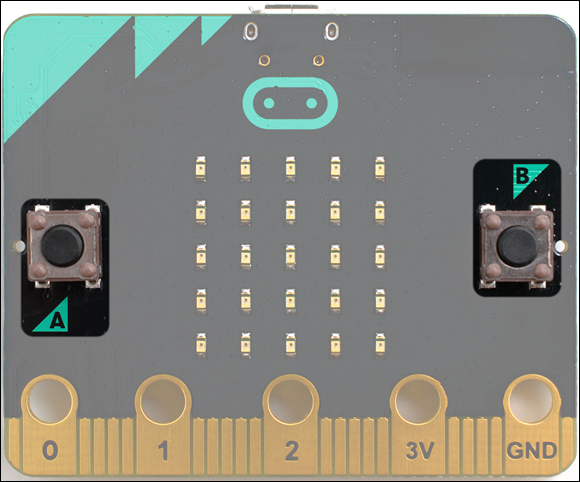
FIGURE 1-4: The BBC micro:bit’s Button A and Button B
These buttons are technically known as a momentary switch. These are different to the switches you might use to turn on a light, which are known as latching switches or toggle switches. A momentary switch stays ‘on’ only as long as you continue to push it down, while a latching switch goes from ‘off’ to ‘on’ and stays there until you push it again.
Although the buttons are permanently connected to the BBC micro:bit, they won’t do anything unless the program running on the BBC micro:bit is listening for a button input. Depending on what you’re using the BBC micro:bit for, you may want to use only one or even neither of the two buttons; alternatively, you may find you need more buttons, in which case the input-output pins will help you expand the BBC micro:bit.
In addition to Button A and Button B, there’s a third button on the back of the BBC micro:bit: the Reset button. Like the Reset button of a desktop computer, the BBC micro:bit’s Reset button acts like cutting the power. Whatever the BBC micro:bit is doing at the time will be interrupted, and the BBC micro:bit will restart and begin its stored program again from the start. The Reset button is useful when experimenting with programs that may cause the BBC micro:bit to stop responding, but be careful not to press it accidentally when you’re in the middle of something. There are other uses for the Reset button, too, which will be explained in later chapters.
Processor
The processor is often called the ‘brain’ of a computer, and the BBC micro:bit’s processor—technically known as a microcontroller—is no exception. Found on the upper-left of the rear of the BBC micro:bit and labelled on the board’s silkscreen layer, the processor is a tiny black square no bigger than your little fingernail called an integrated circuit (see Figure 1-5).
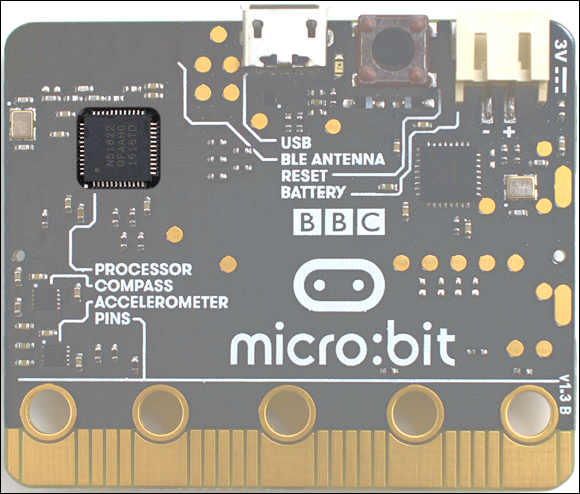
FIGURE 1-5: The BBC micro:bit’s processor
Despite its small size, this integrated circuit is surprisingly complex. It’s here that any program the BBC micro:bit is using is both stored and run. While in a desktop computer, memory, storage, and the central processing unit are all separate, the BBC micro:bit’s processor is all-in-one; this is known as a system-on-chip (SoC).
The BBC micro:bit’s processor uses a special set of instructions, known as an instruction set architecture, called the ARM Architecture. Named for the company which invented it, ARM processors are designed to offer high performance at the lowest possible power usage. The BBC micro:bit uses this to great effect: It’s possible to run the BBC micro:bit for months when using the recommended batteries.
For those interested in the technical side, the BBC micro:bit’s processor is a Nordic nRF51822, which contains a single-core ARM Cortex-M0 running at 16Mhz, with 16 KB of random access memory (RAM) and 256 KB of non-volatile memory (NVM) for program storage.
The BBC micro:bit also has a second processor, not labelled on the silkscreen and found at the upper-right of the board. When you connect the BBC micro:bit to your computer using a micro-USB cable, as described in Chapter 3, ‘Programming the BBC micro:bit’, this second processor takes over and handles communication with your computer, accepting new programs and transferring them to the main processor to run.
Radio
A major feature of the BBC micro:bit is its radio, which allows it to communicate with other BBC micro:bits or with other devices, such as a smartphone or tablet. The radio itself is a part of the BBC micro:bit’s main processor, forming a segment of the system that makes up the system-on-chip design. As a result you won’t find it labelled on the silkscreen as with other components, but instead covered under the ‘PROCESSOR’ label.
The BBC micro:bit’s radio has two main functions. The first function is to communicate with other BBC micro:bits wirelessly, allowing you to group multiple BBC micro:bits without having to string cables between them. The second function is to communicate with other devices, which it does using Bluetooth Low Energy (BLE), a low-power version of the popular Bluetooth wireless standard built into most modern smartphones and tablets.
Unlike the type of radio you might use to listen to music, there’s no external antenna for the BBC micro:bit’s radio chip. Instead, it uses a cleverly-shaped copper track built into the circuit board itself. You can find this at the upper-left on the rear of the BBC micro:bit, labelled ‘BLE ANTENNA’ (see Figure 1-6). It doesn’t look like much, but if you hold it to the light, you should be able to see a raised line tracing a series of rectangular shapes—providing, that is, the antenna isn’t covered by regulatory compliance stickers required of all radio transmitters in selected countries.
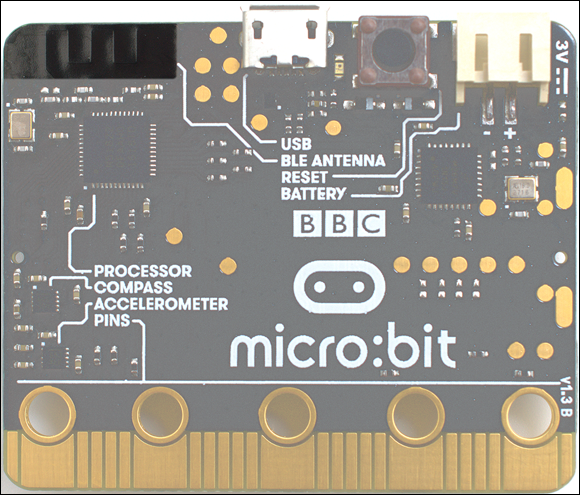
FIGURE 1-6: The BBC micro:bit’s radio antenna
Accelerometer
One of two built-in sensors, the BBC micro:bit’s accelerometer is an integrated circuit even smaller than the processor chips (see Figure 1-7). It’s so small that if it weren’t labelled on the board’s rear silkscreen, it’d be easy to overlook it. Despite its small size, this chip is extremely clever: it knows exactly how the BBC micro:bit is positioned in space at any given time.
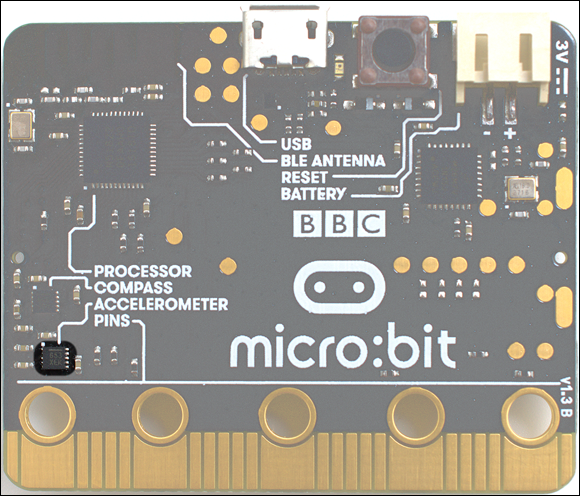
FIGURE 1-7: The BBC micro:bit’s accelerometer
When you rotate your smartphone from portrait to landscape and vice versa, it’s an accelerometer that tells the device what you’ve done and allows it to automatically rotate the screen. The BBC micro:bit’s accelerometer works in the same way: it can track the angle of the device in all three axes—sideways, backward and forward, and up and down, or X, Y, and Z—by tracking what is known as proper acceleration.
The accelerometer can be seen in action during the BBC micro:bit’s demonstration program, which is explored in Chapter 2.
Compass
The second of the BBC micro:bit’s two built-in sensors, the compass, works roughly like the navigational tool of the same name: the compass will detect magnetic north and point you in that direction. If you’re building a robot, for example, the compass is a reliable method of navigating between points. As with the accelerometer, the compass is a tiny and easily-overlooked integrated circuit on the rear of the device and is labelled on the silkscreen (see Figure 1-8).
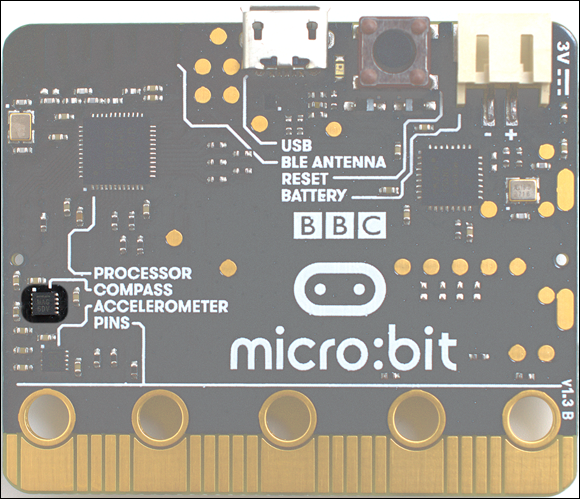
FIGURE 1-8: The BBC micro:bit’s compass
Like a traditional needle-based compass, the BBC micro:bit’s compass works by sensing magnetic fields. As a result, it has a second trick up its sleeve: the ability to detect magnetic fields other than the Earth’s natural ones. Using this chip, the BBC micro:bit can not only point the way north but can also indicate the strength of a local field’s magnetic force—and even detect metal. As it works by detecting these magnetic fields, however, this means that nearby magnets—such as those found in speakers—can affect the sensor’s accuracy when used as a compass.
Input-Output Pins
The BBC micro:bit has room for expansion in the form of input-output pins located on the bottom edge (see Figure 1-9). These aren’t literally pins but strips of copper on both sides of the BBC micro:bit’s printed circuit board; the term ‘pin’ is a technical term referring not to the connections themselves but to the ‘pin’ of the processor to which the connections are linked.
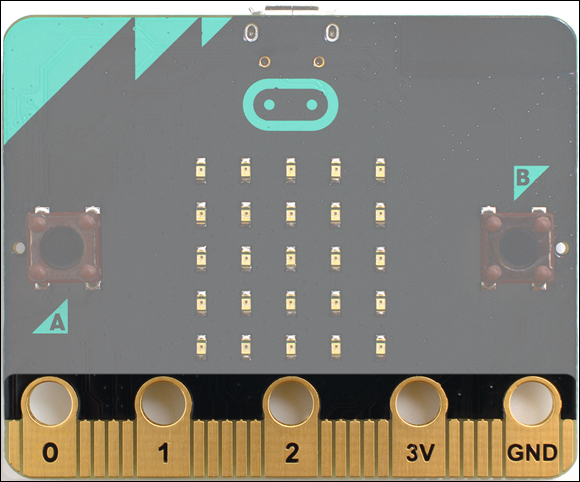
FIGURE 1-9: The BBC micro:bit’s input-output pins
The five largest pins, sometimes referred to as pads or rings in reference to their shape, are labelled on the front of the board: 0, 1, 2, 3V, and GND. The first three are the BBC micro:bit’s major input output pins themselves, while the latter two provide power and a ground connection to complete any circuit you build. Each of these pins have a small hole at the top, which allows you to quickly connect hardware to the BBC micro:bit using crocodile clip or banana plug connectors. They’re also suitable for use with conductive thread (see Chapter 12, ‘The Wearable BBC micro:bit’) and sometimes via small conductive screws, as with add-on boards (see Chapter 11, ‘Extending the BBC micro:bit’).
As the name suggests, the input-output pins can be used for either sending an input to the BBC micro:bit or taking an output from the BBC micro:bit. You could connect a temperature sensor to Pin 0, for example, while using Pin 1 to light up an LED or sound an alarm when the temperature rises above a certain level. You’ll learn more about this in Chapter 10, ‘Building Circuits’.
As well as the five large pins, the BBC micro:bit has a further 20 smaller pins. Unlike the large pins, these don’t have holes for crocodile clips or banana plugs. Instead, using these requires an edge connector, as demonstrated in Chapter 11, ‘Extending the BBC micro:bit’. Most micro:bit projects only need the three main input-output pins; the remaining pins are provided for more complicated projects.
Micro-USB Port
The BBC micro:bit’s micro-USB port can be found to the middle of the upper rear edge (see Figure 1-10) and serves two purposes: It provides power to the BBC micro:bit when you’re not using a battery pack, and it allows you to connect the BBC micro:bit to your computer to change its program and communicate data back and forth. These uses are explained in full starting in Chapter 2.
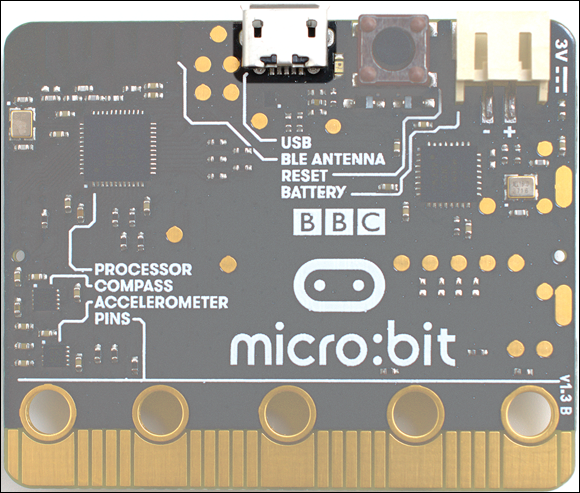
FIGURE 1-10: The BBC micro:bit’s USB port
When using the micro-USB port, it’s important to be careful and gentle. The inner connector is fragile, and if you damage it—such as by forcing a micro-USB connector in upside down or forcing a mini-USB, Lighting, or USB Type C connector into the micro-USB port—you won’t be able to connect the BBC micro:bit to your PC any more. The port should also not be used to connect the BBC micro:bit to high-speed USB chargers, special USB charging ports, or high-power USB battery packs, which can potentially damage the BBC micro:bit. More information on this can be found on the official safety advice notice at microbit.org/guide/safety-advice.
The micro-USB connector is commonly used in smartphones and tablets, and if you have a micro-USB cable for these, it should work fine for the BBC micro:bit, too. The only exception is in charging-only cables, often sold with power supplies and USB batteries, which don’t have their data connections in place. If you connect the BBC micro:bit to your PC and it doesn’t seem to be working, try a different micro-USB cable.
Battery Connector
The BBC micro:bit’s small size, built-in display and sensors, and compatibility with conductive thread make it a great choice for portable and wearable projects, but having to power it from your PC or laptop is less convenient. That’s where the battery connector comes in. This connector, on the top-right of the rear of the BBC micro:bit (see Figure 1-11), lets you connect a 3V battery pack to the BBC micro:bit and power your project on-the-go.
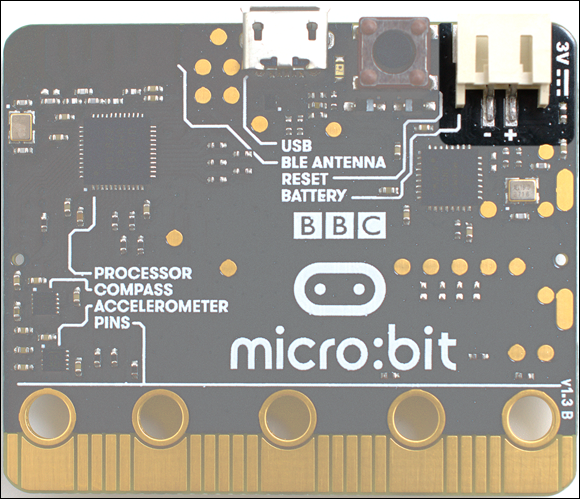
FIGURE 1-11: The BBC micro:bit’s battery connector
The connector is technically known as a JST connector. Not all batteries with a JST connector are suitable for use with the BBC micro:bit. Make sure that any battery pack you buy is listed as compatible and has been properly tested with the BBC micro:bit. These battery packs should only ever be used with standard disposable alkaline batteries. Rechargeable batteries use a lower voltage—1.2V rather than 1.5V—meaning the BBC micro:bit may not be able to get enough power and may be damaged.
A battery pack is provided with the BBC micro:bit Go bundle and with many third-party BBC micro:bit kits. If buying a battery pack separately to a BBC micro:bit, always check with the manufacturer or supplier that it is compatible; connecting a battery pack of the wrong voltage or polarity could damage your BBC micro:bit.