
Chapter 9
The BBC micro:bit and the Raspberry Pi
In this chapter
![]() An introduction to the Raspberry Pi educational microcomputer
An introduction to the Raspberry Pi educational microcomputer
![]() How to connect the BBC micro:bit to the Raspberry Pi and read from its internal sensors or add-on hardware
How to connect the BBC micro:bit to the Raspberry Pi and read from its internal sensors or add-on hardware
![]() How to use the BBC micro:bit as an external display device for the Raspberry Pi
How to use the BBC micro:bit as an external display device for the Raspberry Pi
![]() A practical example of Raspberry Pi-to-BBC micro:bit communication: a BBC micro:bit-powered Raspberry Pi CPU monitor
A practical example of Raspberry Pi-to-BBC micro:bit communication: a BBC micro:bit-powered Raspberry Pi CPU monitor
THE BBC MICRO:BIT is a powerful computing device in its own right, and there is no end of projects you can develop using only the BBC micro:bit and a few low-cost components. Pairing it up with the Raspberry Pi, however, opens a whole new world of potential for both the BBC micro:bit and the Raspberry Pi—and if you already have a Raspberry Pi and a BBC micro:bit, you don't need anything else to get started.
At its simplest, the Raspberry Pi can be used with the BBC micro:bit like any other computer. The BBC micro:bit appears as a removable drive, labelled MICROBIT, and you can write programs in the browser, download them, and drag them to the BBC micro:bit just as with a more expensive desktop or laptop. Delve a little deeper, however, and you can integrate the BBC micro:bit more fully into your Raspberry Pi programs, using it as an external display or reading from its various sensors—combining the two platforms into a powerful educational experimentation tool.
About the Raspberry Pi
Released in February 2012, the Raspberry Pi was an immediate success. Offering similar capabilities to a full-size desktop or laptop computer in a footprint no larger than a credit card, the Raspberry Pi has found a home in education and tinkerers' labs throughout the world, and it recently took its place in the history books as third best-selling computer ever.
The Raspberry Pi has a couple of major advantages over a traditional desktop computer, alongside its pocket-friendly size: it's cheap, costing no more than a single videogame or a couple of new-release films in its most expensive incarnation, and it features a 40-pin general-purpose input-output (GPIO) header for communicating with external hardware (see Figure 9-1)—much like the BBC micro:bit's 25-pin edge connector.
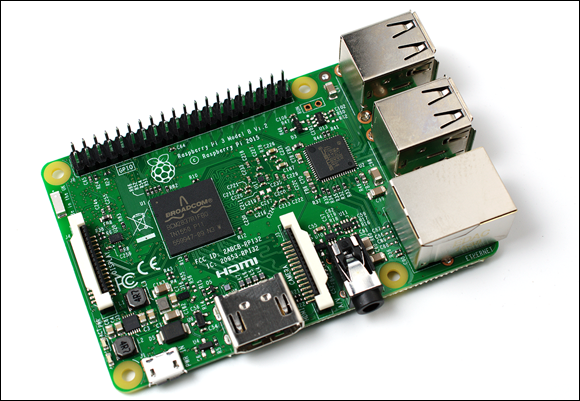
FIGURE 9-1: A Raspberry Pi 3 microcomputer
There are several models of Raspberry Pi, all of which are compatible with the BBC micro:bit. The smallest and cheapest, the Raspberry Pi Zero and wireless-equipped Raspberry Pi Zero W, require a USB On-The-Go (OTG) adaptor to connect to the BBC micro:bit's USB port; the larger models, including the compact Raspberry Pi Model A+, Raspberry Pi 2, and powerful Raspberry Pi 3, can connect with no additional hardware beyond the micro-USB cable you use with your desktop or laptop.
To continue with this chapter, set up your Raspberry Pi with the latest Raspbian operating system and power it on. If you're using a Raspberry Pi Zero, Raspberry Pi Zero W, or Raspberry Pi Model A+, you need a USB hub so you have space for your keyboard, mouse, and the BBC micro:bit's USB cable; if you're using the Raspberry Pi Model B+, Raspberry Pi 2, or Raspberry Pi 3, make sure you have one of its four USB ports free for the BBC micro:bit.
Connecting the Raspberry Pi to the BBC micro:bit
The Raspberry Pi is a fully-functional microcomputer that is capable—given enough time and resources—of doing anything its larger equivalents can do. Connecting the BBC micro:bit to the Raspberry Pi, then, is no different from connecting it to a Windows, macOS, or Linux PC, as described in Chapter 3, ‘Programming the BBC micro:bit’.
With the Raspberry Pi switched on and the Pixel desktop visible, connect a micro-USB cable to one of the Raspberry Pi's free USB ports. If you're using a model with only one port, you need to use a USB hub so you have room for the keyboard and mouse as well. Connect the other end to the BBC micro:bit's micro-USB port, and after a few seconds, a dialog box offering to open the BBC micro:bit's removable drive in the File Manager application will load (see Figure 9-2). You can click the OK button to open the drive and drag an existing hex file to it, or you can click Cancel to close the dialog without launching the file manager.
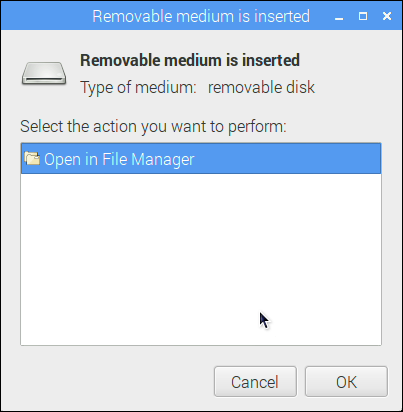
FIGURE 9-2: Pixel's removable drive prompt
If you want to simply program the BBC micro:bit using the Raspberry Pi, you can load the Chromium browser from the Raspberry Menu button at the upper left of the screen, visit microbit.org, and begin programming as described in Chapter 3. Everything works exactly as it does on your desktop or laptop, and the programs you download need only be dragged and dropped to the MICROBIT drive to flash and loaded.
An alternative to running the programming tools in your browser is to use Mu, which is designed specifically for programming the BBC micro:bit using the MicroPython language, and comes with tools to make that process easier. Mu, however, may not be installed by default, depending on the version of Raspbian you are using. To install it, make sure your Pi is connected to the Internet, open the terminal from the top menu bar or from the Accessories submenu of the Raspberry Menu icon at the top left of the screen, and type the following command:
sudo apt-get update && sudo apt-get -y install mu
This refreshes the list of available packages and installs the latest version of Mu. Once Mu is installed, you can launch Mu from the Programming submenu of the Raspberry menu at the top left of the screen (see Figure 9-3).

FIGURE 9-3: The Mu integrated development environment
Designed with the needs of beginners in mind, Mu makes it as easy as possible to write programs for the BBC micro:bit. Any code which has been written in or for the browser-based MicroPython editor works unchanged in Mu, but the menu across the top offers extra functionality not available in the browser editor: Flash and Repl.
When using Mu, clicking the Flash button after saving your program takes care of loading it onto the BBC micro:bit. Instead of having to open your file manager, find the saved program, and then drag it to the MICROBIT drive, you can simply click Flash and the program is automatically installed onto the BBC micro:bit. If you change your program and want to update the BBC micro:bit, simply click the Save button and the Flash button again; you can repeat this as many times as you like.
Clicking the Repl button opens an interactive shell, known as a Read-Eval-Print-Loop (REPL), which allows you to type MicroPython code to be run directly on the BBC micro:bit (see Figure 9-4). Instead of writing a list of instructions which the BBC micro:bit then runs one at a time, you can type a single instruction and have it immediately run on the BBC micro:bit—a time-saving way of testing out new instructions and features without having to go through the process of writing a full program, saving it, and flashing it to the BBC micro:bit.
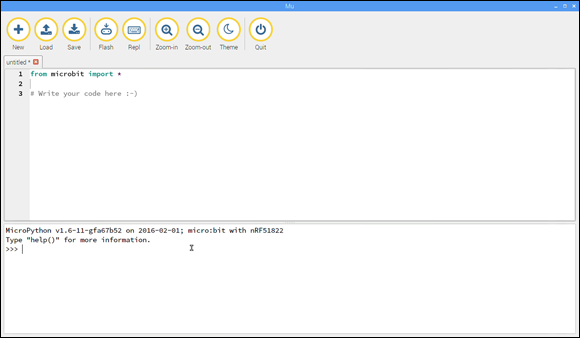
FIGURE 9-4: The Repl interactive shell in Mu
When using the Repl shell in Mu, any instruction you type is run immediately after you press the Enter key. However, the usual rules of a Python or MicroPython program apply (as discussed in Chapter 7, ‘Python’): you need to import instructions before you can use them, and if you're using loops or other nested code you need to pay attention to the indentations at the start of each line.
A simple way to test out Repl's capabilities is with the two-line ‘Hello, World!’ program from Chapter 7. Delete any program code from the main Mu window and click the Flash button to load MicroPython onto your BBC micro:bit, and then click the Repl button to load the shell and type the following two lines one after the other:
from microbit import *
display.scroll('Hello, world!')
As soon as you press the Enter key to end the second line, you see the message Hello, world!
Mu is a useful tool for micro:bit programming in MicroPython, but you can also communicate with the BBC micro:bit in another way: integrating it into programs running on the Raspberry Pi, or integrating the Raspberry Pi into programs running on the BBC micro:bit. The remainder of this chapter looks at some of the possibilities that open up when you use the two devices in harmony.
Reading from the BBC micro:bit
The BBC micro:bit has a number of features an unexpanded Raspberry Pi lacks, including the 5×5 LED display, accelerometer, magnetic compass, and analogue-to-digital (ADC) converters attached to its pins (see Chapter 10, ‘Building Circuits’, for more on these). All of these features can be used from the Raspberry Pi over the micro-USB cable, using the full version of the Python programming language.
To get started, you first need to find out the device name the BBC micro:bit is using—the name given to the device under the /dev directory in Linux. Usually, this is /dev/ttyACM0; in some cases, especially if you have other devices connected to your Raspberry Pi, the number at the end of the device name differs. To find your device name, connect the BBC micro:bit to the Raspberry Pi. If the MICROBIT drive pops up, close that window and open the terminal from the Raspberry menu at the upper left of the screen before typing the following command:
dmesg | tail -20 | grep ttyACM
If your BBC micro:bit is properly connected to your Raspberry Pi, the above command returns its device name (see Figure 9-5); if it doesn’t, check that it is properly connected and that you’re using a working micro-USB cable with both power and data pins connected. If the device name ends in a number other than 0, make sure to change the following code to match your BBC micro:bit's device name; otherwise, you can use them as they are.
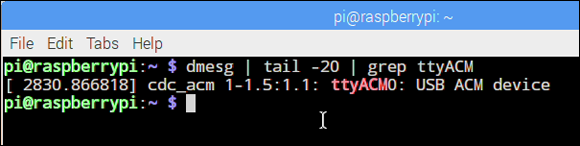
FIGURE 9-5: Discovering the BBC micro:bit's device name
This is called a serial device, and it is different from the BBC micro:bit's removable drive. Where the removable drive allows you to drag a completed program onto the BBC micro:bit for flashing (see Chapter 3), this device allows you to send and receive data from whatever program is currently running on the BBC micro:bit.
To read data from the BBC micro:bit, you need to have it running its own program and sending the results to the serial device. First you need to set up the BBC micro:bit so it's constantly taking readings from one of its sensors or pins. We'll use the accelerometer as an example, but you can easily modify the following program to read from the compass, the buttons, or any hardware connected to the BBC micro:bit's pins. Open the MicroPython editor in your browser or the Mu editor and type in the following (see Figure 9-6); in either editor, the first line is already typed in for you and is here for completeness.
from microbit import *
while True:
    x, y, z = accelerometer.get_x(),↩
  accelerometer.get_y(), accelerometer.get_z()
    print(x, y, z)
    sleep(500)
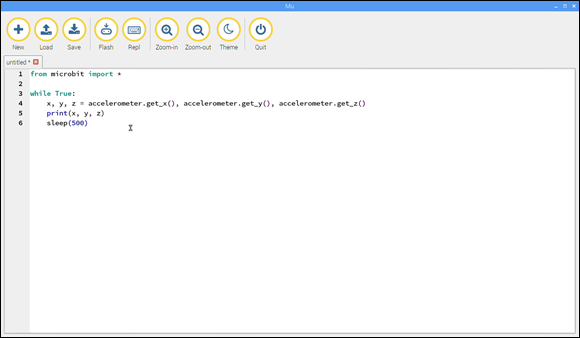
FIGURE 9-6: The accelerometer program in Mu
The accelerometer.get instruction is explained in Chapter 7, but the print instruction is new. Ordinarily, this instruction tells Python to print something—in this case the x, y, and z variables which hold the position data from the accelerometer—to the console, and if you're running Repl, that's exactly what they do. Running without Repl, though, there's no console, so the print instruction instead outputs via the BBC micro:bit's serial port. That's something we can read on the Raspberry Pi.
Flash the program onto the BBC micro:bit, either by saving it from the browser-based editor and dragging it to the MICROBIT drive or by clicking the Save button in Mu, naming the program ‘accelerometerreader.py’, and then clicking the Flash button. When the process has finished, it's ready to test. Open the terminal from the Raspberry menu at the top left of the screen and type the following:
sudo apt update && sudo apt install -y screen
This command will update the list of software available for your Raspberry Pi and then install a utility called screen. This tool, among its other features, allows you to connect to serial devices like the BBC micro:bit to send and receive data. To connect screen to your BBC micro:bit, close Mu and type the following in the terminal:
screen /dev/ttyACM0 115200
Remember to change the number at the end of the device name if necessary. This screen command opens a serial console to the BBC micro:bit, and you should start to see the terminal fill with data from the accelerometer (see Figure 9-7). Try picking up the BBC micro:bit and moving it around to change the numbers, being careful not to disconnect the micro-USB cable at either end.
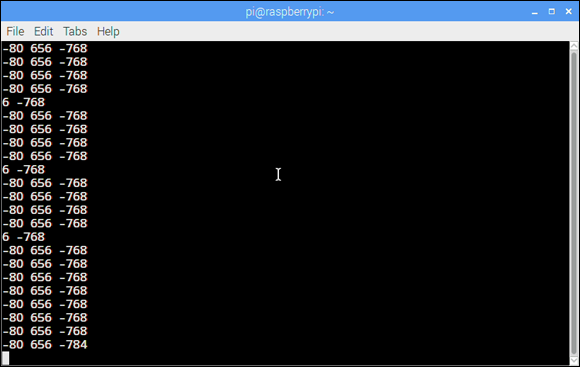
FIGURE 9-7: Reading accelerometer data via screen
You're not limited to simply displaying the data in the terminal, either. Using any programming language on the Raspberry Pi that comes with the ability to communicate with serial devices, you can receive and send data from and to the BBC micro:bit—allowing you to integrate it into your own programs.
Open the Python 2 (IDLE) editor from the Programming submenu of the Raspberry menu, click on File and then New File, and type in the following program:
import serial
ser = serial.Serial("/dev/ttyACM0", 115200, timeout=1)
ser.close()
ser.open()
while True:
    accelerometerData = ser.readline()
    print(accelerometerData)
This is about the simplest example of a Python program to read from a serial port as possible. After importing the serial library on the first line and configuring it on the second—remembering to change the BBC micro:bit's device name if necessary—the program closes the port in case any other program was using it and then opens it for its own use. The program then enters a loop, reads a single line from the BBC micro:bit's serial port, prints it to the screen, and then loops back to wait for the next line.
Click on File and then Save and save the program as ‘accelerometerprint.py’; then click Run Module from the Run menu to launch it. The Python console begins to fill with readings from the accelerometer. Try moving the BBC micro:bit around to witness the values change (see Figure 9-8).
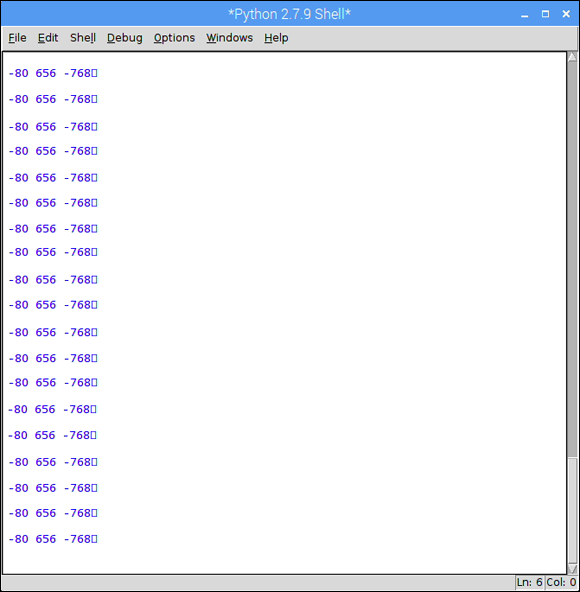
FIGURE 9-8: Reading accelerometer data via Python
Line by line, the program does the following:
import serial
This tells Python to load the serial library. You may notice that you're not importing the usual microbit library here; that's because this code is running on the Raspberry Pi rather than the BBC micro:bit, so the only library we need is to handle the communication between the BBC micro:bit and the Raspberry Pi.
ser = serial.Serial("/dev/ttyACM0", 115200, timeout=1)
This line creates an object called ser using the serial library, with three parameters. The first parameter, "/dev/ttyACM0", is the device name for the BBC micro:bit's serial connection and should be changed if you found a different name earlier in the chapter. The second parameter is the bitrate or baudrate of the serial connection, which for the BBC micro:bit should be set to 115,200 bits per second (bps). The final parameter sets a one-second time-out on reads from the serial device, so the program doesn't get stuck.
ser.close()
ser.open()
These two lines work together. The first closes the serial device in case it had been left open during an earlier run of the program while you were testing things. The second opens it, ready for communication between the BBC micro:bit and the Raspberry Pi.
while True:
As always, this line begins the infinite loop that stops the Python program from exiting as soon as it reaches the end of the instructions. The lines under this need to be indented by four spaces so that Python knows they belong inside the loop.
accelerometerData = ser.readline()
This line uses the serial library to read a single line from the BBC micro:bit, which, when it is running the program you wrote earlier in the chapter, contains data from the accelerometer. This line is stored in the variable accelerometerData for use later in the program.
print(accelerometerData)
Finally, this line prints the accelerometerData variable to the console, making it appear on-screen.
For more information on using data from the BBC micro:bit as variables in your own Python programs, please consult a general Python text, such as the user-friendly ‘Python for Beginners’, available for free at www.python.org/about/gettingstarted/.
Using the BBC micro:bit Display
The BBC micro:bit's serial port is bidirectional, meaning that it's possible not only to read from it but also to write to it. Using this, you can send data to the BBC micro:bit as well as receive data from it, allowing your Raspberry Pi to take a more active role in controlling the way the program runs.
While the above example requires a dedicated program to be running on the BBC micro:bit, constantly checking its sensor readings and printing them to the serial device, sending commands to the BBC micro:bit from the Raspberry Pi is best achieved through the Repl console.
To start, you need to flash the BBC micro:bit with the Repl console. This is a somewhat hidden feature of both the browser MicroPython editor and Mu, but it can be accessed in a simple way in both: just load up either editor but don’t type in any program code (see Figure 9-9). Click Download and drag the resulting hex file to the MICROBIT drive if using the web editor, or click Save and then Flash if you're using Mu.
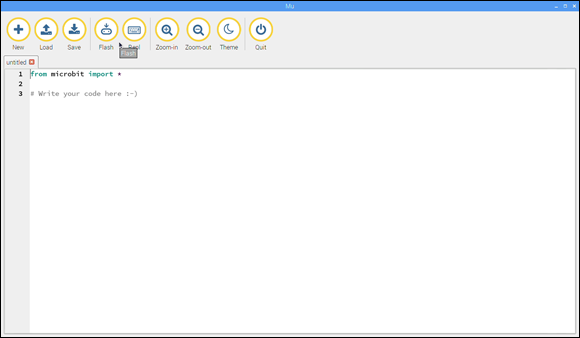
FIGURE 9-9: A blank MicroPython program in Mu
This special hex file contains the MicroPython Repl console, which is accessible using the serial device. To actually use this console to read accelerometer data, click on Python 2 (IDLE) from the Raspberry menu at the top left of your Raspberry Pi desktop, click File and then New, and then type in the following program (see Figure 9-10).
Remember to enter all lines with a ↩ as one line.
import serial, time
ser = serial.Serial("/dev/ttyACM0", 115200, timeout=1)
ser.close()
ser.open()
ser.write("from microbit import *
".encode())
while True:
    ser.write("display.scroll('Hello, world!')↩

".encode())
    time.sleep(10)
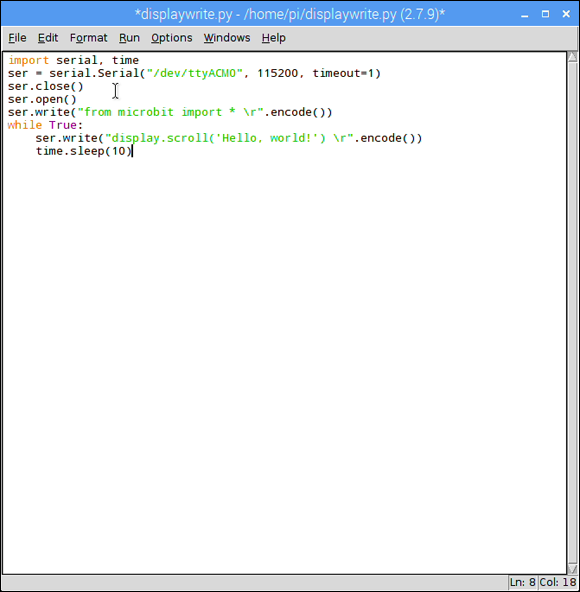
FIGURE 9-10: A display-writing program in IDLE
Click on File and then Save, and save the program as ‘displaywrite.py’. Then click Run Module from the Run menu to launch it. This program is a little different from the ones you may have written for the BBC micro:bit itself, so we'll look at it line by line.
import serial, time
This line tells Python to import the serial and time libraries, so you can send instructions to the BBC micro:bit's serial device and slow down the loop process.
ser = serial.Serial("/dev/ttyACM0", 115200, timeout=1)
As before, this creates a ser object using the serial library set to the BBC micro:bit's serial device name and bitrate.
ser.close()
ser.open()
These two instructions ensure that the port was cleanly closed if it has been used previously, then open the serial device ready for your instruction to be sent.
ser.write("from microbit import *
".encode())
When communicating with Repl, you always need to begin by importing the microbit library just the same as if you were using it directly or writing a program in one of the MicroPython editors. Using it via the serial device is no different, and this line tells the Python serial library to send the instruction from microbit import * to Repl. The final
at the end of the instruction sent to the BBC micro:bit acts like the Enter key on the keyboard, while the .encode() instruction formats the message in a way that the serial library understands.
while True:
This begins the program's infinite loop. By putting the previous instruction to import the microbit library above this line, we ensure it only runs once. There's no need to re-import the library every time the loop restarts.
    ser.write("display.scroll('Hello, world!') ↩

".encode())
Remember to enter all lines with a ↩ as one line. This line uses the ser.write instruction again, this time sending the command display.scroll('Hello, world!') to the BBC micro:bit to make what should by now be a familiar message scroll across the display. As before, the instruction sent includes the
—or carriage return—to simulate someone pressing the Enter key and telling MicroPython to execute the command.
time.sleep(10)
Finally, this line waits ten seconds before returning to the start of the loop and displaying the message all over again.
Using this basic template, you can send any instruction or list of instructions to the BBC micro:bit. For instance, replace the contents of the loop with the following to have the BBC micro:bit show a smiley face for ten seconds, a sad face for ten seconds, and then go back to the smiley face again:
    ser.write("display.show(Image.HAPPY)
".encode())
    time.sleep(10)
    ser.write("display.show(Image.SAD)
".encode())
    time.sleep(10)
Replace the contents of the loop with the following to toggle Pin 0 on for ten seconds and then off for ten seconds in a repeating pattern. Connect an LED to Pin 0 to see the effect, as described in Chapter 10.
    ser.write("pin0.write_digital(1)
".encode())
    time.sleep(10)
    ser.write("pin0.write_digital(0)
".encode())
    time.sleep(10)
Practical Example: A CPU Monitor
A good example of how the BBC micro:bit can be put to use with your Raspberry Pi is to turn its display into a graph of the Raspberry Pi's CPU load—a measure of how hard the processor is working. Sat at the desktop, you see short bars on the graph; play a game or load a big web page, and the bars shoot up as the processor gets to work.
This sample project uses the MicroPython Repl console, so if you're running a different program on your BBC micro:bit, you need to flash a copy by clicking Download on an empty MicroPython program in the web editor and dragging it to the MICROBIT drive or clicking the Save and Flash buttons in Mu.
Before writing the CPU monitoring program itself, you need to install a new Python library called psutil (process utilities). To do so, load the terminal by clicking on the Terminal icon on the top menu bar or its entry in the Accessories submenu of the Raspberry menu, and type the following command:
sudo apt-get -y install python-psutil
To write the Python program, click on the Raspberry menu, choose Programming, and click Python 2 (IDLE) from the menu. When IDLE loads, click the File menu, and then New File, and type in the following program (see Figure 9-11), remembering to continue typing on the same line whenever you see the ↩ symbol.
This program is quite dense and can be difficult to enter by hand, particularly when it comes to the line which draws the bar graph itself. Remember to keep typing when you see the ↩ symbol, only pressing Enter or Return when you get to the end of a line without the symbol. If you find you’re getting syntax errors, double-check your program against the book, paying close attention to things like the number of brackets and other symbols; alternatively, you can download a copy of the program from www.wiley.com/go/bbcmicrobituserguide.
import serial, psutil, time
gradients = 20
readingList = [0,1,2,3,4]
ser = serial.Serial("/dev/ttyACM0", 115200, timeout=1)
ser.close()
ser.open()

print "Started monitoring system statistics for↩
 micro:bit display."
ser.write("from microbit import *
".encode())
time.sleep(0.1)
ser.write("display.clear()
".encode())
time.sleep(0.1)

barGraph = [[0, 0, 0, 0, 0], [0, 0, 0, 0, 0], [0,↩
 0, 0, 0, 0], [0, 0, 0, 0, 0], [0, 0, 0, 0, 0]]

while True:
    sysLoad = psutil.cpu_percent(interval=0)
    readingList.insert(0,int(sysLoad))
    del readingList[5:]
    for x in range(5):
        for y in range(5):
            readingComparison = (y+1) * gradients
            if (readingList[x] >= readingComparison):
                barGraph[y][x] = 9
            else:
                barGraph[y][x] = 0
    ser.write("BARGRAPH = Image↩
("%s:%s:%s:%s:%s")
".encode() % ↩
(''.join(str(e) |for e in barGraph[0]), '↩
'.join(str(e) for e in barGraph[1]), '↩
'.join(str(e) for e in barGraph[2]), '↩
'.join(str(e) for e in barGraph[3]), '↩
'.join(str(e) for e in barGraph[4])))
    time.sleep(0.1)
    ser.write("display.show(BARGRAPH)
".encode())
    time.sleep(0.9)
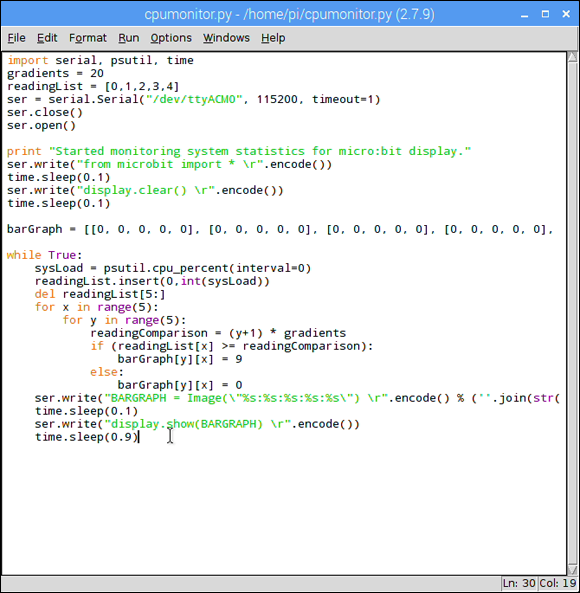
FIGURE 9-11: The CPU monitoring program in IDLE
Click the File menu, click Save, and save the program as ‘cpumonitor.py’ before clicking Run Module from the Run menu to execute it. After a second or so, you see LEDs begin to light up on the BBC micro:bit display as the program graphs your CPU load. Try loading a complex website, a game, or playing a video to see the load increase; when you go back to idling at the desktop, the load decreases accordingly (see Figure 9-12). Each LED in the vertical bars represents 20% CPU load, and if all five LEDs in a bar are lit, your Raspberry Pi is using 100% of its CPU. Each column of LEDs represents one second, with the bars scrolling sideways as they update.
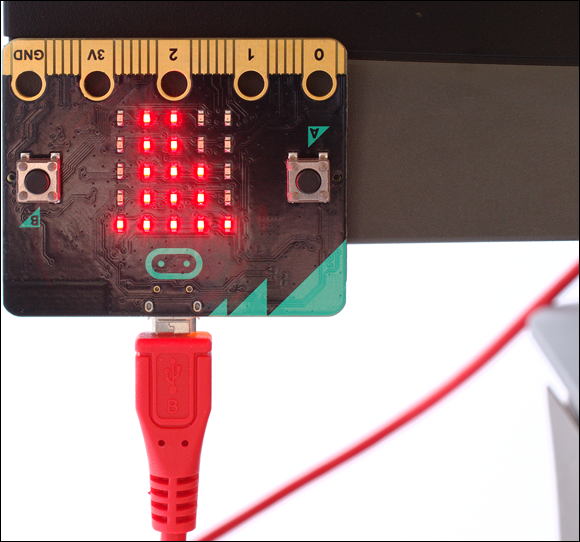
FIGURE 9-12: The BBC micro:bit graphing CPU usage
You can use the same program to graph various Raspberry Pi system resources. Try replacing the following lines:
    sysLoad = psutil.cpu_percent(interval=0)
    readingList.insert(0,int(sysLoad))
with these lines:
    sysMem = psutil.virtual_memory()
    readingList.insert(0,int(sysMem.percent))
For more information on the statistics you can graph using the psutil Python library, visit pythonhosted.org/psutil/.