
12. Integrating PayPal with Websites
As you explore how to connect to customers using social media, you may be looking for opportunities to streamline your existing ecommerce site. It stands to reason, after all, that the easier you can make final sales happen, the better your conversion rate will be.
This is where the use of PayPal tools can really come in handy. Using PayPal as an ecommerce payment tool in conjunction with a social media strategy can be a real asset to your organization.
In this chapter, then, we’ll learn how to connect various PayPal tools to your ecommerce site, either from scratch or by using third-party tools.
Choosing an Integration Path
Since there are many PayPal products out there, you’ll find more than one option to integrate PayPal into your website.
By integration, we mean inserting some sort of code into the underlying code of your existing website so that PayPal functionality will be provided. For example, some code inserts the buttons and links necessary for your customers to purchase items and access the customer’s shopping cart and checkout system. Other code links information on your site and input by your customers to functionality hosted by PayPal. Still other code generates forms to accept customer information or even checkout pages. The code that’s inserted depends on, naturally, which PayPal product you want to use.
At this point, you may be wondering what you’ve signed up for, particularly if you’re not a developer or website manager. Don’t sweat it—explaining these technical details is helpful for those who are developers, but even if you’re not a developer, it’s also useful to give you an idea of the functionality each tool will have.
HTML Integration
The first and easiest type of PayPal integration involves the use of blocks of HTML code.
HTML is the language of the Web. It underlies virtually every site on the Internet, presenting information that browsers can interpret and display in creative ways.
If you are already familiar with HTML coding, then this form of integration will be a snap. Even better, PayPal has tools that will actually generate the code you need, making it ready to insert into your site.
HTML integration is appropriate for these two PayPal products:
• Website Payments Standard. PayPal services are integrated with your website or ecommerce application via HTML code by creating payment buttons using PayPal’s button creation tool. You can create Buy Now, Add to Cart, View Cart, Subscribe, and Donate buttons that link to the proprietary PayPal Shopping Cart. You can also use HTML code to link these buttons to third-party shopping carts and checkout systems. This option is typically used by smaller businesses.
• Payflow Link. This HTML-based product provides a gateway page hosted by PayPal that acts as a go-between from your shopping cart to your merchant services account. These PayPal-hosted pages are fully customizable and can be made to match the look and feel of your website.
Using an HTML integration method is a set-and-forget type of activity. After the PayPal site generates the HTML code for the elements you need, you just insert that code into the appropriate Web pages and off you go.
The reason these HTML-based solutions are simple to implement is because all the back-end operations take place on the PayPal site. Your site doesn’t actually host the shopping cart or checkout system, so you don’t have to create shopping cart and checkout pages. Instead, clicking a Purchase or Payment button takes your customers to PayPal’s site, where all the safe transactions take place. Afterwards, customers are returned to your site (see Figure 12.1).
Figure 12.1 PayPal’s HTML-based checkout process directs customers to PayPal’s site and back again.
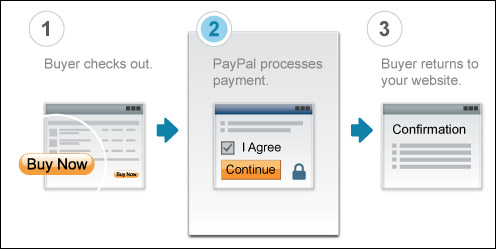
Because of the simplicity of the back-end operations in an HTML-based tool, these solutions work very well for small businesses that have fewer items to sell. Such businesspeople can easily create a page on their websites that sells a few things and add a PayPal payment button for a single item or each item on the sale page. After it’s set, PayPal will handle all subsequent orders and notify you when there’s been a purchase and by whom so you can ship the product.
The transaction can be made to look as seamless as possible for customers, so that they may not even notice the departure from your site, which they temporarily leave to complete the transaction. And even if they can tell, it should not affect your sales negatively, since PayPal is one of the most trusted sites.
But, if you have a lot of inventory for sale that isn’t static, then you’ll want to consider a better option: API integration.
API Integration
If you are a larger business or someone who has a lot of items to sell, you may not want to use HTML integration and PayPal’s hosted checkout services. In this case, you will need to use what’s known as API integration to connect your products with PayPal.
APIs link data from your website to the PayPal system. This is done in real time, thus providing a constant connection between your site and PayPal’s site. The benefit here is that when you make any changes to your online catalog, PayPal will be informed at checkout, and you won’t have to keep creating new Buy Now buttons with the new information.
![]()
As you can see in Figure 12.2, PayPal’s API-based solutions lead your customers on your website throughout the checkout process; the APIs communicate with PayPal to obtain necessary information or perform required functions.
Figure 12.2 PayPal’s API-based checkout process transfers customer and product data to PayPal and back again.

Note
![]()
API stands for Application Programming Interface, a set of rules or specifications that can access and use services from another website or application. APIs are like the glue that holds different Web applications together.
As the figure shows, PayPal still handles the payment processing, but now it sends the resulting information back to either your site or the third-party checkout system that you might be using to wrap up the process.
If are hosting your own ecommerce pages, such as a shopping cart and checkout pages, the API integration is more involved than simply inserting a few lines of HTML code into a Web page. Would that it were that simple. What has to happen now is that API functions need to be incorporated within the code or script responsible for getting information from the customer, sending that information to PayPal, calling the appropriate PayPal function, and then returning the processing information back to your website for display to the customer.
Yeah, not so simple. This is pretty much why API programming is not for the technically inexperienced. You’ll need a qualified developer to do the appropriate programming on your website. But the payoff should be worth it: seamless PayPal integration with your existing ecommerce site.
Here are the PayPal products that utilize API integration:
• Website Payments Pro. All-in-one payment solution that functions as both a merchant account and a payment gateway.
• Payflow Pro. Uses PayPal APIs to provide a payment gateway between your existing merchant credit card account and PayPal so that you can process credit card transactions online.
• Express Checkout. Used with another PayPal service (such as Website Payments Pro and Payflow Pro) and gives users with PayPal accounts a streamlined experience with fewer and shorter steps.
Advantages of API Integration
HTML integration is all well and good for smaller retailers with just a few items to sell, or a larger business with more items but an inventory that changes infrequently.
But if this is not the case for you, then adding and maintaining all those HTML-coded buttons could be a real pain to keep up. There are also good reasons for not wanting your customers to go off-site in the checkout process. As good as PayPal’s checkout system is, it’s not your site, with all of the branding and potential conversion links your site could have.
Keeping customers on-site will help make their experience on your site a seamless one, which is always a better plan.
Using PayPal’s API-based options, you or a Web developer will need to do a bit more programming, since you will have to build your own checkout pages or integrate a third-party shopping cart solution.
PayPal’s API solutions cost no more than the HTML solutions, as far as charges from PayPal go. There are still the usual transaction fees, but like HTML integration, it costs nothing to plug into PayPal’s services. The extra costs will be incurred in the resources and time it takes you to develop your own ecommerce pages, but if you are using the API services, you were likely going to pay those costs anyway. What will definitely be an extra charge is the amount of time and effort needed to integrate PayPal’s API services with your site, so you will need to take this into account.
If you’re running a large ecommerce site, then you know you will want a branded checkout solution; the risk of losing an opportunity to convert more sales may be too high by sending customers off site.
Third-Party Shopping Carts
There is one good way to minimize the effort of API integration: use a third-party shopping cart that already has a connection to PayPal built into its own APIs. This type of solution usually means that all you have to do is properly configure the cart’s settings to plug into the right PayPal account and services.
There are some drawbacks: mainly, you will be at the whim of the transaction flow already established by the shopping cart. If you have unique needs, the shopping cart might accommodate a bit of custom scripting. But you need to watch how much customization you do; if you end up customizing too much, you may break the cart or may as well have built your own solution anyway.
If the third-party cart works for you, though, it will provide a faster and easier way to integrate a seamless checkout experience into your website, complete with PayPal integration.
Implementing PayPal Integration
When you’ve decided between HTML- or homegrown API-based payment solutions, you’ll need to actually incorporate them into your site. Before beginning, let’s examine some of your options for getting this done.
Reviewing the Process
First, here’s what you and your development team will need to do for either integration process that you select:
1. For HTML-based solutions, generate the code for the buttons you want to use. For API-based solutions, obtain the code necessary to call the appropriate APIs from your website.
2. Insert the necessary code into the appropriate pages on your website.
3. Test the integration using the PayPal Sandbox testing environment (or your third-party shopping cart site).
Note
![]()
If you’ve chosen a third-party shopping cart, you’ll need to read the documentation for that product with respect to integrating PayPal.
4. After testing, update your integration configuration as needed.
5. Launch your ecommerce pages.
Getting This Done
Okay, so that doesn’t seem so bad. But who has to do all this?
Maybe it will be you. No, seriously.
Note
![]()
You can add HTML code directly inside an email or within social media content, as well. This is very simply done in PayPal, and can make purchasing an item very easy.
If you’re just adding a few payment buttons on a relatively stable shopping page, and you’re halfway familiar with HTML code, there’s no reason you can’t do this yourself.
Doing HTML integration means having the PayPal site create a snippet of HTML code and then inserting that code on your Web page where you want the payment button to appear. If you’re comfortable with doing something like this, you can do it yourself.
![]()
• Buy Now buttons
• Subscribe buttons
• Donate buttons
• Shopping Cart buttons
• Refunds
• Payment data transfer
• Instant payment notifications
• Simulated transactions
To give you an idea of how easy this would be so that you can ascertain your own comfort level, here’s what the full code generated by PayPal will essentially look like:
<form action="https://www.paypal.com/cgi-bin/webscr" method="pos t">
<input type="hidden" name="cmd" value="_s-xclick">
<input type="hidden" name="hosted_button_ id" value="value">
<input type" "image" src="https://www.paypal.com/en_US/i/btn/btn_buynowCC_lG.gif" border="0" name="submit" alt="PayPal - The safer, easier way to pay online!">
<img alt="" border="0" src="https://www.paypal.com/en_US/i/scr/pixel.gif" width="1" height="1">
</form>
If this code makes sense to you, and you know where to insert it into your Web page’s HTML, and how to get that page live on your site, then you’re good to go. Remember, PayPal generates the exact code you need to insert; you don’t need to write any of this at all.
If you do not understand HTML all that well, or if you simply don’t have the time to do it yourself, then you’ll need to pass the job off to a Web developer.
This is a task that’s pretty easy for an experienced developer and it shouldn’t take much time, so it’s something for which you can budget lightly. Don’t let someone tell you otherwise.
If you already have shopping cart and checkout pages on your site, it’s also probably not a big deal for an experienced developer to connect to PayPal using PayPal’s API. This is especially true if you find someone who is familiar with PayPal to begin with. APIs aren’t hard for pros, but they are not something you want an amateur fooling around with. They will break, or worse, leave a gaping hole in your site’s security that can be exploited later.
Finally, if you’re already using a third-party shopping cart service that offers PayPal integration, there shouldn’t be much, if any, effort on your part. For many businesses, this is probably the easiest way to go. However, if you want to build a custom API-based solution for your site, that will require a lot more development time and effort, so be prepared for that.
Finding the Best Resources
If you do decide to hire a developer to help with your PayPal integration, or you need to add a shopping cart to your site or even build an online store from scratch, PayPal can help. The PayPal Partner Directory can help you find developers to implement solutions. Best of all, these developers are already familiar with PayPal, so they will be familiar with the whole line of PayPal solutions.
Note
![]()
For more information on social media resources, please see the Appendix, “Social Media Information Resources,” in the online chapters.
The Partner Directory can be found at www.paypal.com. Go under the Business tab and click the Partners link. On the Partner Program welcome screen, you’ll see the Find a Partner button. Click the button, and PayPal will search for developers and consultants near you (see Figure 12.3).
Figure 12.3 Finding developers in the PayPal Partner Directory.

Scroll through the featured partners or filter the list by solutions offered or industries served. Click a partner link to learn more about services offered, and then contact that developer if you want.
Getting Help from PayPal
If you’re using in-house staff to implement your PayPal integration, they may need documentation, API calls, and other assistance to get the job done. All of that information—and more—is available on the X.commerce website (www.x.com), seen in Figure 12.4.
Figure 12.4 The X.commerce website.

The X.commerce site, which now houses the PayPal Developer Network, is a developer community organized by PayPal’s parent company eBay to foster and enhance ecommerce tool development.
To visit the PayPal Developer Network site, surf to www.x.com/developers/paypal (see Figure 12.5). There, you’ll want to formally register, although you can get to a lot of the available information as an unregistered guest. Once you’ve registered, you can use the site to determine the best solution for your business, generate HTML code for payment buttons and the like, download powerful developer tools, access documentation for PayPal’s various APIs, view video demos, interact with other developers and PayPal staff in online forums, and utilize many other resources.
Figure 12.5 The PayPal Developer Network home page.

The Last Word
There are three ways to integrate PayPal payment processing with your website.
First, there’s the simple way: use Web Payments Standard and the HTML code it generates to insert payment buttons on your site. The customer is then sent to PayPal’s site to complete the transaction.
Second, use one of the many third-party shopping cart products that already integrates with PayPal (using either Website Payments Standard or Website Payments Pro). This option may require a little configuration, but should not be too arduous.
Last, integrate Website Payments Pro with your new or existing ecommerce system using PayPal’s APIs. This approach sends customer information to PayPal for payment processing, but then sends the resulting information back to your website or checkout system in real time. This gives you more control over the checkout process and a seamless user experience, but requires some developer time to be sure everything is coded correctly.
In Chapter 13, “Customizing Payment Options with PayPal,” you’ll learn how to configure and manage PayPal tools when you are working with a larger ecommerce website.