
13. Customizing Payment Options with PayPal
In the previous chapter, you learned the various options you could use to integrate PayPal into your ecommerce site. Now it’s time to discover exactly how such integration will work when you have a larger site with many items to sell.
When your company does a lot of business online, you will absolutely need to have a shopping cart system for your customers. To try to duplicate this functionality using plain HTML would be enormously time-consuming. If you don’t yet have a shopping cart for your site, PayPal can provide one, at no additional charge and with little effort on your part. Otherwise, you can integrate PayPal’s payment processing into your existing shopping cart, including those provided by third-party suppliers.
How Shopping Carts Work
When you have more than one item for sale, your customers will need the option to purchase more than one item at a time, or else they will have to conduct a separate transaction for each item, and you don’t want that. (A long time ago, this was actually the norm on the Internet, and thankfully those days are long gone.)
This is the purpose behind a shopping cart: customers can gather up all their purchased items into one “cart,” which then feeds into a checkout page where customers provide shipping information and pay for their purchases, just like any brick-and-mortar store.
Checking Out
Shopping carts are really nothing new for online shoppers, but just to make sure we’re all on the same page, Figure 13.1 shows how the process works from the customer’s viewpoint, using the PayPal Shopping Cart with Website Payments Standard. The blue-banded pages are hosted on the PayPal site; the gray-banded pages appear on the merchant’s site.
Figure 13.1 The three numbered steps are the main parts of the PayPal Shopping Cart checkout process.
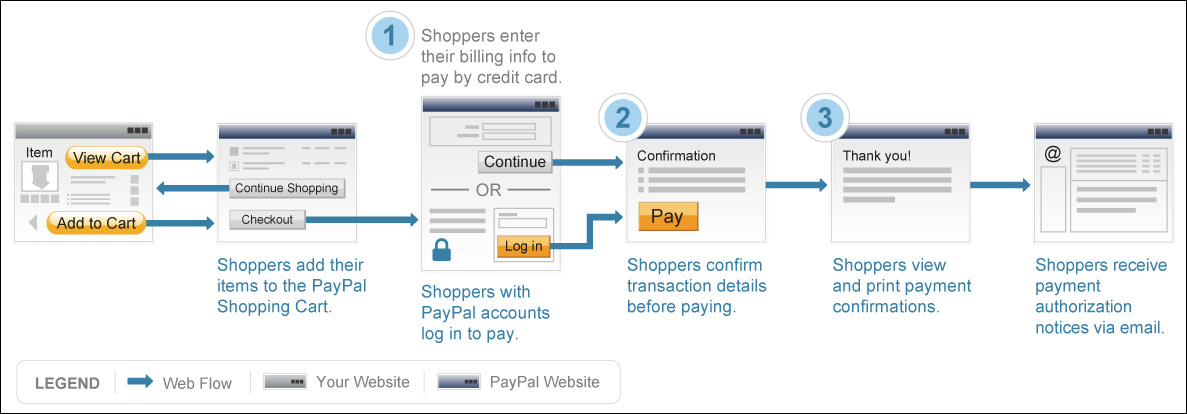
The checkout process begins when the customer clicks the Add to Cart button for a particular product. This button is actually hosted on the merchant’s website, inserted into the product Web page with HTML, and generated via code supplied by PayPal. Clicking the button adds the item to the shopping cart hosted by PayPal. Now customers can continue shopping—and add more items to the shopping cart—or go directly to the checkout page.
When the checkout button or link is clicked, the customer will be taken to the checkout page hosted by PayPal, although it can be branded by the merchant to give it a look and feel like the rest of the retailer’s site. At this point, the customer signs in and either pays with a PayPal account or enters the necessary credit or debit card information. When paying via credit or debit card, the customer also has to enter a shipping address and other relevant information. (These details are already known if the customer pays via a PayPal account.)
The shopper confirms the transaction details and then PayPal processes the payment. If the customer’s payment is approved, PayPal generates a confirmation screen and transmits information about the purchase to the merchant. The customer is then returned to the merchant’s website, and receives (from PayPal) an email confirmation of the purchase.
This is all familiar ground; indeed, we covered it in Chapter 1. But knowing what’s really going on here will help you configure PayPal in more efficient ways.
Behind the Scenes
Most shopping cart and checkout systems are built from the following components:
• Payment buttons or links that enable the customer to place individual items into the shopping cart.
• A database that stores information about the products in the customer’s shopping cart.
• Web pages that display information about shopping cart contents, and checkout pages that are used when the customer is ready to purchase the items.
• Administrative controls for the shopping cart system.
• Reports that detail shopping cart transactions.
All of these components combine to provide a unified shopping and payment experience for the customer, while allowing you to access and manage your inventory, and providing you with information that triggers the shipment of purchased products.
Of course, all of this is nothing more than an application, just like the ones that run on your computer or smartphone. The only difference is that this application can actually run on one of many locations, thanks to the Internet. It can be on your website’s server, or even a third-party’s website. PayPal’s Shopping Cart runs, naturally, on PayPal’s servers.
Because of the speed and ubiquity of most Internet connections, it won’t matter where the shopping cart application actually resides (as long as you know it’s in a secure spot), because the shopping cart can still be integrated with the rest of your website.
When a customer clicks the Buy Now or Add to Cart button, that information is transmitted to the database part of the shopping cart, which actually keeps track of the items selected. When the customer decides to check out, all items in the database are displayed on a dynamically generated checkout page that pours the information out to the page in real time.
The customer then enters appropriate payment and shipping information, the payment is processed, and the transaction is concluded—all taking place seamlessly in the shopping cart/checkout system.
The product and customer information is stored temporarily in the shopping cart database, but it’s not held there for long. The shopping cart system creates the final checkout page on the fly, based on the information stored in the database. Once the transaction is complete, the pertinent information is sent to a more permanent storage tool, usually another database, and additional actions are triggered, such as emails to the warehouse that create pick tickets so the items can be grabbed off the shelves, packed, and shipped, or a message may be sent to your accounting system noting that X items were sold a minute or two ago.
Integrating a Shopping Cart
We touched on shopping cart systems a bit back in Chapter 12, but there are some additional considerations to keep in mind.
If you’re using a third-party shopping cart, you need to be sure this application can connect to your existing storefront and inventory systems. If it can’t, that’s a deal breaker, because if the two systems can’t communicate, then you will have to bridge the data gap by entering information manually.
Getting an automated connection requires a fair degree of programming expertise; how much programming is necessary depends on the complexity of the shopping cart and the receiving mercantile servers.
For example, PayPal’s Website Payments Standard provides the fully featured PayPal Shopping Cart, all nicely hosted on PayPal. As explained in Chapter 12, all you have to do is insert HTML code for the individual product payments buttons; the checkout process itself resides on the PayPal site, so you don’t have to create new pages for checkout or other activities. The integration process is relatively easy.
If you use another shopping cart solution, however, the integration process can be more complicated. PayPal’s Website Payments Pro integrates with most third-party shopping carts, but may require additional programming to implement the necessary calls to various PayPal APIs.
That said, many third-party shopping carts come with PayPal integration built in, which makes it easier for you. Some shopping cart providers have built-in integration with Website Payments Pro; others (those that provide their own merchant credit account solutions) use the gateway approach and tie into PayPal’s Payflow Payment Gateway. Either way, integrating PayPal with such a third-party shopping cart offering is often as easy as providing your PayPal credentials to the shopping cart service and checking a few options on a sign-up form.
Do You Need a Shopping Cart Partner?
Let’s say you’re too big for an HTML-based solution like PayPal’s Website Payments Standard. This is one of those problems that’s nice to have, though you won’t think so at the time. When it comes to implementing a shopping cart on your site, you have three basic options.
• Build your own shopping cart from scratch. This is expensive and time consuming, and that’s an understatement. The advantage is that you’ll get a totally customized solution that exactly matches the look and feel of the rest of your website. The disadvantage is that your bank account might be somewhat depleted when you’re done, so be ready to sell lots of things.
Your own shopping cart also means that you can forego any monthly or usage fees that you would have to pay to a third-party checkout vendor. You’ll still have to pay a payment-processing vendor, such as PayPal, naturally.
• Use the PayPal Shopping Cart. This is the easiest solution to implement: all you have to do is generate and insert Add to Shopping Cart button codes for each SKU on your site; PayPal handles everything else. There’s no integration programming necessary, beyond placing the HTML code for your buttons on the site. It’s also free. The PayPal Shopping Cart has no setup fees and no ongoing monthly fees. (You do have to pay PayPal’s normal payment processing fees, of course.)
• Use a third-party shopping cart service. These services offer ready-to-run shopping cart/checkout systems that can be customized in look and feel to match the rest of your site, especially if your site is built upon one of the popular Content Management Systems (CMS), such as Drupal, Joomla!, or WordPress. This is a middle-of-the-road approach: the integration is less complex than if you were to build a checkout system from the ground up, but you’re still going to need a fair bit of programming to get the functionality integrated into your site.
• There are usually ongoing fees. You’ll pay a set monthly fee for the use of the shopping cart; per-transaction fees or fees based on your transaction volume; as well as the usual payment processing fees.
How do you implement each of these solutions? It depends on which choice you make.
Building It Yourself
If you want to build it yourself, you’ll need to contract with a Web development firm—ideally, the same folks building the rest of your site, since they’ll know where all the hooks are. Make sure that you’re dealing with a firm that has experience building ecommerce sites and systems.
Finding a Shopping Cart Partner
If you do decide to work with a third-party shopping cart, the PayPal Partner Directory can help you find the right vendor.
The Partner Directory can be found at www.paypal.com; under the Business tab, click the Partners link. On the Partner Program welcome screen, you’ll see the Find a Partner button. Click the button, and PayPal will search for developers and consultants near you. After you see the results, select the Shopping Cart option in the Solution Types pane on the left side of the screen. This will display a shopping-cart specific vendor (see Figure 13.2).
Figure 13.2 Finding shopping cart partners in the PayPal Partner Directory.

![]()
Scroll through the featured partners and click a partner link to learn more about services offered, and then contact that developer if you want.
Selecting the PayPal Shopping Cart
The PayPal Shopping Cart is available with Website Payments Standard. When you sign up for your PayPal account, this is the solution you want to choose. It lets your customers purchase multiple items on your site, as opposed to the Buy Now button, which is a single-item-only tool.
After you’ve signed up to PayPal, integrating the Pay Pal Shopping Cart into your site is a simple matter of generating HTML code for an Add to Cart button for each SKU on your site, and then inserting that code into each product page. (Figure 13.3 shows typical results.) You’ll also want to generate code for and insert View Cart buttons (also shown in Figure 13.3), so that your customers can check out and pay when they’re ready.
Figure 13.3 PayPal’s Add to Cart and View Cart buttons on a sample page.

Once all the buttons are generated and inserted and you take your new product pages live, your shopping cart is also live. Since all the processing occurs on PayPal’s site, your setup work is now done; any customer who makes a purchase will use the PayPal Shopping Cart.
Configuring the PayPal Shopping Cart
Implementing the PayPal Shopping Cart isn’t hard, but there are quite a few payment options you need to configure, such as tax rate, shipping charges, and so on. While you can specify some of these settings on an item- or SKU-specific basis when you create the product’s Add to Cart button, most settings (like sales tax) should be applied universally to your entire shopping cart.
You configure these universal payment settings under the Selling Online section of your profile, shown in Figure 13.4. To open these controls, log in to your PayPal account, click the My Account tab, and then click the Profile link. On the My Profile page that appears, select the My Selling Tools option in the left-hand sidebar.
Figure 13.4 The Selling Online section of your PayPal account profile.

Figuring Taxes
As an online business, you may or may not be required to charge sales tax on the items you sell; it depends largely on what kind of traditional retail presence you have and where you are shipping. Some states require sales tax, some don’t. Before you make the decision, consult a tax attorney, because you will want to be very sure before you run afoul of your state revenue office.
1. If you have to charge taxes, click the Update link next to the Sales Tax option in the Selling Online section of My Profile. The Sales Tax page will be displayed, as shown in Figure 13.5.
Figure 13.5 The Sales Tax page.
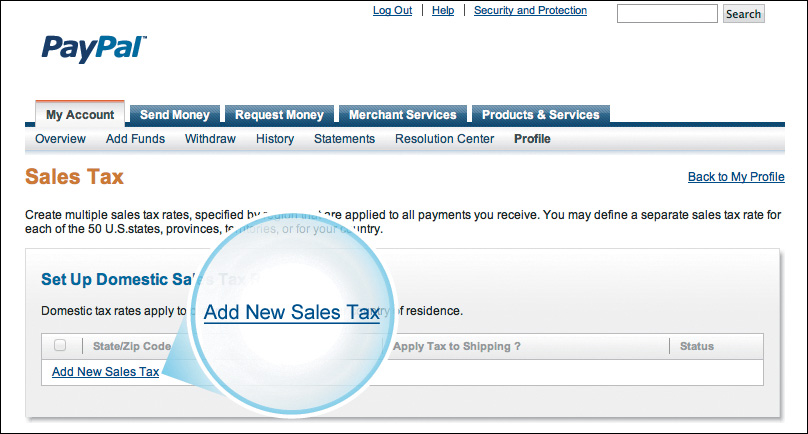
2. In the Set Up Domestic Sales Tax Rates section, click the Add New Sales Tax link. The Domestic Sales Tax page will appear (see Figure 13.6).
Figure 13.6 The Domestic Sales Tax page.
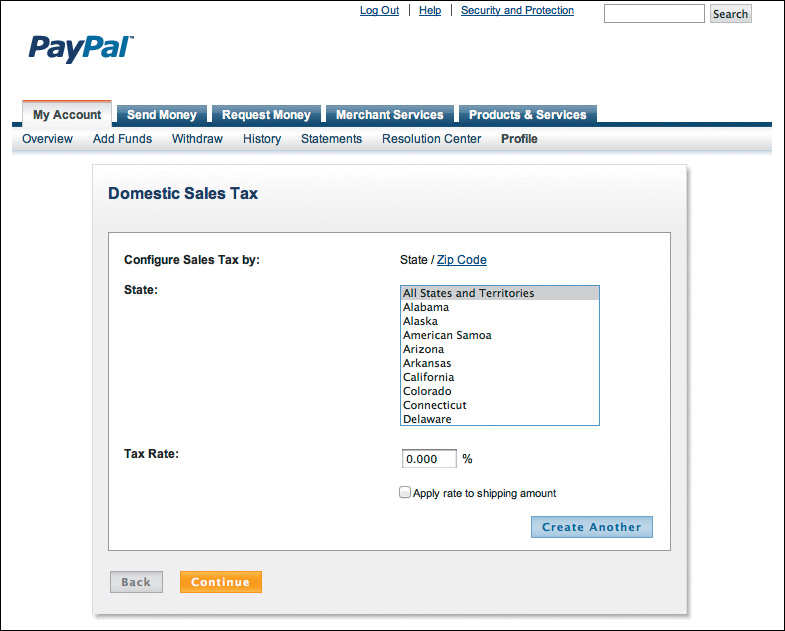
3. Select a state and enter the applicable tax rate for that state in the Tax Rate field.
4. If you need to apply sales tax for a specific city or county, click the Zip Code link and enter the ZIP code.
By default, the sales tax is applied only to the product price; if tax must be applied to the entire purchase price, including shipping, check the Apply Rate to Shipping Amount box.
In most instances, you charge sales tax only for those states in which you have a physical presence. If you have a physical presence in multiple states, you’ll have to specify tax rates for each state in which you do business. Click the Create Another button to add another state to your list. When you’re done specifying tax rates, click the Continue button.
Tip
![]()
If sales tax is different for a specific item, you can set a product-specific tax rate when you’re creating that item’s Add to Cart button. Just enter the applicable tax rate into the Tax Rate box when you create the button.
Determining Shipping and Handling Fees
You can also set universal shipping and handling fees in My Profile.
1. In the Shipping My Items section on your My Profile page, click the Update link next to the Shipping Calculations option; this displays the Shipping Calculations page, shown in Figure 13.7.
Figure 13.7 The Shipping Calculations tool.

2. Click the Start button in the Set Up Domestic Shipping Methods section. The Shipping Region page will appear (see Figure 13.8).
Figure 13.8 Set shipping regions on the Shipping Region page.

3. Click the states you ship to and click the Add button.
4. When the states you want are in the Selected States field, click Continue. The Shipping Method page will appear (see Figure 13.9).
Figure 13.9 The Shipping Method page.
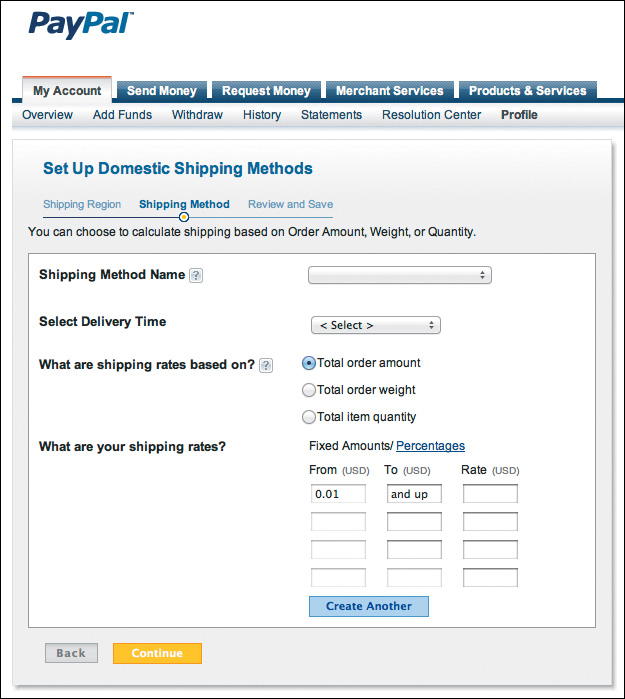
5. Select a shipping method, set your standard delivery time, specify how your rates are based (on total order amount, weight, or quantity), and then specify your shipping rates, either by dollar amount or percentage.
6. To create multiple shipping fee schedules for multiple shipping methods, click the Create Another button.
7. Click Continue. The Review and Save page will appear.
8. If what you see is correct, click the Save Shipping Methods button.
Receiving Notice of Payment
Perhaps the best message you can find in your inbox is a note saying that someone’s actually bought one of your products, and you need to ship a product right away.
When you use the PayPal Shopping Cart, you will be notified by email of any transaction PayPal handles for you. If you’ve connected PayPal to another shopping cart system, PayPal can notify the shopping cart directly and send you a notification.
Notification events include:
• Instant payments, including direct credit card payments. These payments are conducted and transmitted nearly instantaneously.
• E-check payments, which enable users to pay directly from their checking account with their account information and their status.
• Recurring payments and subscription events.
• Chargebacks, disputes, reversals, and refunds.
If you’re using a more sophisticated ecommerce system, you may be able to take advantage of PayPal’s Instant Payment Notification (IPN), which automatically notifies your ecommerce system of all PayPal events.
Note
![]()
IPN messages duplicate messages sent via email, so you’re well covered on transaction information.
IPN messages are detected and processed via a listener script or program that is integrated into your ecommerce system. (Your developer will need to write the listener scripts.) When the script receives an IPN message, it then passes that message to the appropriate process to respond to the message.
For example, an IPN message about a customer purchase can trigger order-fulfillment processes, update your customer list, and update your accounting records, all automatically. You can configure the IPN messages received by clicking the Instant Payment Notification Preferences link on your profile.
Configuring Other Options
There are several other options you can configure from the My Selling Tools area of your PayPal profile. These include the following:
• Selling Online. This section includes a variety of links to help you manage your online selling activities. Besides setting up your sales tax settings, you can manage your PayPal payment buttons; change the company name that appears on your customers’ credit card statements; configure PayPal payment pages to look more like your own site; determine which Web pages customers are directed to after they pay with PayPal; manage API credentials for integrating PayPal with your own online store or shopping cart; and create and manage your invoice templates.
• Getting Paid and Managing My Risk. This section includes a variety of links to help you manage customer payments. From here, you can manage subscriptions and other automatic payments: integrate PayPal’s instant payment notifications with your site; manage PayPal’s risk and fraud controls to automatically accept or decline certain types of payments; block payments based on specified criteria; and create a personalized message to use when faced with customer disputes.
• Shipping My Items. This section helps you configure PayPal’s shipping functionality. From here, you can edit your shipping preferences, including carriers and labels, as well as set up shipping methods and pricing for each of your customers.
You’ll also find links to additional selling tools, including encrypted payment settings, PayPal button language encoding, PayPal shops, and your seller reputation number.
Note
![]()
Your seller reputation number reflects the number of unique verified PayPal members who have paid you. The higher that number, typically the more trustworthy you are.
The three other entries on the left panel of your profile pertain to any PayPal member—they are not specific to a business that is selling through PayPal. These are:
• My Business Info. Where you edit your contact information such as an email address, phone number, and so on.
• My Money. Where you set your payment and banking information, including credit card and bank account numbers.
• My Settings. Where you will find your basic account settings such as notifications, customer ID, and so on.
Tip
![]()
Magento is an ecommerce solution offering flexibility and control over the look, content, and functionality of an online store (www.magentocommerce.com/). It’s fast to install, has a full suite of features, and is free to download. Merchants and developers who integrate Magento’s services will have automatic access to PayPal’s payment engine. You can create a Magento-hosted store, where all backend services and functionality are managed by Magento, or deploy a storefront using Magento’s rich set of tools and services.
The Last Word
For most online merchants, customers pay via an online shopping cart and checkout system. You can decide how much effort to put into your ecommerce site, and how much return you will get.
Ultimately, you should focus your efforts on making the ecommerce process as painless as possible. After establishing a good dialogue with your customers via social media, you don’t want to hurt the relationship with a poorly designed checkout system.
In Chapter 14, “Securing Your Transactions,” we’ll raise the issue your customers are really worried about when it comes to online shopping: security.