Overview
This chapter will provide you with the knowledge on how to handle nested routes in React. You will be able to optimize your code by effectively creating nested 404 pages, URL parameters, and protected routes. This chapter will equip you with more advanced tools and techniques that are required to implement special use cases of routing, such as page not found, restricted routes, and nesting.
Introduction
In the previous chapter, we have introduced React Router and saw some practical examples of how to construct simple routes. We now understand what routing is and why React Router v4 is a solid choice when it comes to defining routes, and how to use links, exact matches, and transitions.
There are situations, however, that might require you to implement additional functionalities. For example, when we navigate to a page using deep links, links that can be used navigate to a specific indexed page in our application, we may need to pass a few parameters, such as tokens or IDs. In this chapter, we will learn how to handle URL parameters and how to retrieve them via route props. We will also learn how to restrict access to routes, either by preventing navigating out of the current view to prevent losing existing form data or handling and storing navigation into the view layer if the user has no permissions or is not authenticated. This is possible with the use of Higher-Order Components (HOCs) and some business logic rules.
When we complete this chapter, we will have a complete picture of how to use advanced routing techniques. We will complete some practical exercises for each technique in detail. We will practice our knowledge by implementing a complex routing solution with navigational rules, nested components, and more.
Let's get started by looking at a few scenarios that we might encounter while implementing React Router in a React application.
React Router Special Cases
Let's look at a few special cases where we'll be using advanced routing techniques.
Passing URL Parameters between Routes
URL parameters are variables that we define in the routes and which can take a special form. We will use those parameters to handle cases where we need to pass information into the route via the URL and to create SEO-friendly links such as the following:
/recipes/stews/meat
Another example of this is as follows:
/users/theo/profile
To define URL variables, we need to prepend them with a colon (:), followed by the name of the parameter. For example, the following strings are examples of valid parameters:
:id, :username, :email, :type, :search
However, the following strings are not valid parameters:
?id, -username, &email, type, *search*
When we use parameters like this, we just need a valid link to match that route. We can access the matched parameter by name using the useParams() function that's exposed by the library. This function returns an object containing the key/value pairs of the URL parameters of the current page.
Let's look at an exercise to practice the usage of URL parameters:
Exercise 10.01: Creating URL Parameters
In this exercise, we are going to create a new react app. Then, we will create a few routes defining the paths for each. We will practice the URL parameters. Perform the following steps:
- Create a new React app:
npx create-react-app url-parameters
- Go to the src/App.js file and delete logo.svg, App.css, and clear out the contents of App.js.
- Import the required modules:
yarn add react-router-dom
- Add the imports in App.js:
import React from 'react';
import {
BrowserRouter as Router,
Link,
Route,
useParams,
useLocation,
Switch,
} from 'react-router-dom';
- Create a functional component called App:
function App()
{}
- Inside App, create the links Page1, Page2, Page3, and Page4:
App.js
13 return (
…
19 <li>
20 <Link to="/">Page1</Link>
21 </li>
22 <li>
23 <Link to="/name">Page2</Link>
24 </li>
25 <li>
26 <Link to="/path/Theo">Page3</Link>
27 </li>
The complete code of this step can be found here: https://packt.live/30W7WJU
- Use the Switch component as follows:
App.js
36 <Switch>
37 <Route exact path="/">
38 <Page1 />
39 </Route>
40 <Route path="/:id">
41 <Page2 />
42 </Route>
43 <Route path="/path/:name">
44 <Page3 />
The complete code of this step can be found here: https://packt.live/2YdQn6j
- Inside App, create separate components for each links:
function Page1() {
return <h3>Page1</h3>;
}
function Page2() {
let { id } = useParams();
return <h3>ID: {id}</h3>;
}
function Page3() {
let { name } = useParams();
return <h3>Hello { name ? `${name}` : 'stranger'}</h3>;
}
function Page4() {
let { first, last } = useParams();
return <h3>First: {first}, Last: {last}</h3>;
}
export default App;
The output is as follows:

Figure 10.1: Links created for separate pages
Let's understand what is happening in the preceding code in more detail:
- <Route exact path="/"> is an exact route, so whenever we navigate to the base page, it will render the Page1 component and there are no page parameters.
- However, when we click on the Page2 link, which has a route definition of <Route path="/:id">, it will match the name parameter, so using the useParams call will return an object with a name property set.
- We will see the Page2 component render as ID: name.
- Next, let's take a look at the Page3 link. We think this should match <Route path="/path/:name"> because it starts with the same prefix, right? Well, it turns out that it doesn't work like that. When we click on either the Page3, Page3 Missing Param, or Page4 links, we'll notice that the Page2 component renders instead. The reason why this happens is that React Router follows a top-down approach and when it matches the first route string, it does not continue looking. In our example, the route match is /:id and the actual string to match is /path/Theo, so it will match the path as the name parameter and render the Page2 component.
- To overcome this issue, we just need to use the exact modifier on the second route like this:
<Route exact path="/:id">
- This way, we instruct React Router to only render this route if it exactly matches that path.
- Next, let's check the last two links. Once we click on the second to last link, the Page2 component renders because we did not pass a parameter in the link. This will match the following path:
<Route path="/:id">
- Now, for the last link, we'll notice that it will render the Page3 component. Again, this is for the same reasons that the library chose to render the Page2 component when we didn't specify an exact match. So, we need to use the exact modifier on the second to last route like so:
<Route exact path="/path/:name">
By implementing these changes, we made all the routes navigate to the correct paths when we click on them.
URL parameters should not be confused with query parameters, which are a way to pass custom identifiers and variables in a route path. The main difference they have between query parameters is that they are key-value-based. For example, let's look at the following relative path:
/search?q=animals&c=cats
This specifies two query strings, one as q=animals and the other as c=cats.
Anything after the question mark character denotes a key-value list of query parameters, and React Router will not match them against any route.
In order to parse the query parameters from React Router, we can use the useLocation().search value, which returns the whole query string.
In our case, this would be ?q=animals&c=cats string. As you may have noticed, it's not very useful like this. Fortunately for us, we can use the URLSearchParams interface by passing that string in the constructor:
const params = new URLSearchParams(useLocation().search)
Now, we can access the value of each parameter by key:
params.get('q') // "animals"
params.get('c') // "cats"
If we have multiple keys in the same search string, we need to use the getAll() method:
const params = new URLSearchParams("?q=cats&q=dogs")
params.getAll('q') // (2) ["cats", "dogs"]
Now that we have seen how URL parameters work, we will learn how to handle missing or unknown routes.
Matching Unknown Routes with 404 Pages
So far, we know that when we have a list of routes that we need to render exclusively, we need to use the <Switch /> component so that whenever we match a location route, it will render only one component at a time.
Exercise 10.02: Creating Unknown Routes
In this exercise, we are going to create and practice the usage of unknown routes.
- Create a new App:
npx create-react-app unknown-routes
- Go to the src/App.js file and delete logo.svg, App.css, and clear out the contents of App.js.
- Import the required modules:
yarn add react-router-dom
- Add the necessary imports in App.js:
import React from 'react';
import {
BrowserRouter as Router,
Link,
Route,
useLocation,
Switch,
Redirect
} from 'react-router-dom';
- Create a functional component App:
function App() {}
- Inside App, create links to Page1, Page2, Page3, and Page4 components:
App.js
18 <ul>
19 <li>
20 <Link to="/">Page1</Link>
21 </li>
22 <li>
23 <Link to="/page2">Page2</Link>
24 </li>
25 <li>
26 <Link to="/Page3?param=123">Page3</Link>
27 </li>
28 <li>
29 <Link to="/page4">Page4</Link>
30 </li>
31 </ul>
The complete code can be found here: https://packt.live/3bzavD8
- Inside App.js, create separate functional components for each links:
function Page1() {
return <h3>Page1</h3>;
}
function Page2() {
return <h3>Page2</h3>;
}
function Page3() {
let param = new URLSearchParams(useLocation().search);
return <h3>Page3 { param ? `${param}` : ''}</h3>;
}
- Create a NoMatch component in case a page was not found:
function NoMatch() {
return <h3>404 Sorry!</h3>;
}
export default App;
We have a NoMatch component that will render in case of route not found. The following is a screenshot of the browser when this happens:

Figure 10.2: The page not found routes
In the preceding example, we define three routes with a unique page. Under the <Switch /> component, they will render individually for each unique path.
Note that we can use <Route path="*"> or <Route > for the 404 path and that it always needs to be the last in order of the defined routes. Let's see what happens if we place it somewhere in-between the routes:
<Switch>
<Route exact path="/">
<Page1 />
</Route>
<Route path="/Page2">
<Page2 />
</Route>
<Route>
<NoMatch />
</Route>
<Route path="/Page3">
<Page3 />
</Route>
</Switch>
Here, the first two pages will render correctly, but Page3 will render as NoMatch because the catch all rule precedes the Page3 path.
The catch all rule will also work when we define nested routes. For example, if a unique path to a nested route is not found, then it will match any nested catch all rules first before matching a higher-level route.
There is also another issue. When we click on the Page4 link, we can see that the page URL changes to /Page4. Sometimes, though, we want to redirect the user to a 404 path for the unknown route. In that case, we can assign a path for the 404 page and use a <Redirect /> component to navigate to that route:
<Route path="/404">
<NoMatch />
</Route>
<Redirect to="/404" />
This way is a little bit more flexible as it allows us to change the 404 page in one place if we have lots of nested routes that reference the same NoMatch component.
Speaking of nested routes, let's look at how we can use multiple hierarchies of routes within a component.
Rendering Nested Routes
There a lot of real-world use cases where we must render multiple components on each page. What's even more complicated is that many of those components may not change when we navigate from one route to another. These components can be nested within each other to form complex hierarchies. For example, we have the following routes:
/user/theo/profile
/user/theo/settings
Instead of defining two routes for /user/:name/profile and /user/:name/settings, we just define one for /user/:name and inside the matching component, we define more for profile, settings, or anything else.
Another example can be seen in the following illustration:

Figure 10.3: Web page
Here, we have a Sidebar, a Header, a Tab Holder with tabs, and a content area to display a widget. This could be a dashboard in a traditional web application. For some routes, for example, the initial login page, we wouldn't need to render the Sidebar or Header components, but for the main dashboard view and subsequent view, we always need them to render on those positions.
In addition, depending on the current tab component we click, a different Widget will be displayed, whether this is a map component or a Graph view. In that case, we only need to highlight the active tab and the selected Widget. We should be able to reconstruct this view based on a unique URL path, for example:
/dashboard/widgets/Widget1
The following is an alternative:
/dashboard/widgets/Widget2
To achieve this with React Router, since the routes are React components themselves, we can use them as the children of existing routes. Once a route is a child of another route, it will match itself when the parent route is matched.
Using nested routes is the recommended approach for reusing components between pages, preventing unnecessary re-renders and allowing code-splitting to work more effectively. The aim of this is to understand how to define and create nested routes in React Router.
Now, let's look at a practical exercise of how to define nested routes based on the dashboard mockup that we have.
Exercise 10.03: Creating Nested Routes
In this exercise, we are going to create nested routes. Perform the following steps to complete this exercise:
- Create a new create -react- app:
npx create-react-app nested-routes
- Go to the src/App.js file and delete logo.svg and App.css and clear out the contents of App.js.
- Import the required modules:
yarn add react-router-dom
- Add the following top-level routes. The Home component should render a basic string.
- Add links to the Home and Dashboard components:
import React from 'react';
import {
BrowserRouter as Router,
Switch,
Route,
Link,
useParams,
useRouteMatch
} from "react-router-dom";
function App() {
return (
<div className="App">
<Router>
<div className="navbar">
<Link to="/">Home</Link>
<Link to="/dashboard">Dashboard</Link>
</div>
<Switch>
<Route exact path="/">
<Home />
</Route>
<Route path="/dashboard">
<Dashboard />
</Route>
</Switch>
</Router>
</div>
);
}
The Dashboard component should render two parts: a sidebar and a main content area.
- Create a sidebar element:
<div className="sidebar">
Sidebar
</div>
- Create a main content area. This area should have also a Route component, like so:
<Switch>
<Route exact path={path}>
<h3>Please select a widget.</h3>
</Route>
<Route path={`${path}/:widgetName`}>
<Widget />
</Route>
</Switch>
- Define the Widget component as follows:
function Widget() {
let { widgetName } = useParams();
return (
<div>
<h3>Widget: {widgetName}</h3>
</div>
);
}
- Add a link for widgets:
<Link to={`${url}/map`}>Map</Link>
- Add the following CSS so that you have a basic style for the page. An example CSS file is included in the source code that accompanies this chapter (https://packt.live/2y5B714).
The complete code is as follows:
App.js
1 import React from 'react';
2 import {
3 BrowserRouter as Router,
4 Switch,
5 Route,
6 Link,
7 useParams,
8 useRouteMatch
9 } from "react-router-dom";
10 import './App.css';
11
12 function App() {
13 return (
14 <div className="App">
15 <Router>
16 <div className="navbar">
17 <Link to="/">Home</Link>
The complete code can be found at: https://packt.live/3bpNZwA
- We imported an App.css file that contains common styles for the widgets and the dashboard elements. The code for this style is listed in the project repository files: https://packt.live/2y5B714.
The output is as follows:

Figure 10.4: Final output
The preceding page will initially render the home page. When we click on the Dashboard link, we will see a sidebar component and some tab links for each widget. Then, when we click on each widget, the respective widget parameter name is passed to the Widget component. The following is a screenshot of that page:

Figure 10.5: Widget map
Here, we use the useRouteMatch hook, which will attempt to match the current URL in the same way that a <Route> can, though it will not render anything.
By using the useRouteMatch hook, we can extract the current path and the base URL from the returning match object and use it to define new routes.
React Router does not limit how many nested routes we can have. As long as the path uniquely matches the route component, we can have deeply nested trees. This is really useful when we need to expose deep links in our application where we need to have a unique link that will reconstruct a tree of components.
Now that we have seen how nested routes work, we will continue by looking at protected routes.
Protecting Routes
When we implement business requirements, often, we are asked to enforce conditional rules in regard to navigating to or from specific states. For example, when we have a form where the user has filled some fields in and then clicks on a navigational link to another page, we would like to tell the user that they will lose their current form data if they do. Additionally, we will come across cases where we want to prevent the user from navigating to certain pages until a condition is fulfilled; for example, the user needs to be logged in first to prevent unauthenticated page visits.
In general, we would like to control inbound and outbound transitions of the routes under certain conditions. Using React Router, there are a couple of ways we can do this. Let's explore the two different cases.
Preventing OutBound Transitions
Preventing a user from navigating away from a page should be done in special cases as it may harm the UX if this is done inappropriately. For example, when a user is in a hurry and tries to click to another page and we present a prompt, then we need to be absolutely sure that this is crucial. Ideally, in those cases, we should not expose any links that navigate away from the current state.
That being said, React Router offers a <Prompt> component, which works by simply showing a native browser prompt dialog with a custom message. Here is an example:
<Prompt
when={isFormDirty}
message="You will lose your form data. Are you sure?"
/>
When your application enters a state where isFormDirty is true, this should prevent the user from navigating away.
Exercise 10.04: Protected Routes
In this exercise, we are going to look at the usage of protected routes.
- Create a new App:
npx create-react-app protected-routes
- Go to the src/App.js file and delete logo.svg, App.css, and clear out the contents of App.js.
- Import the App.css file we used in Chapter 8, Introduction to Formik.
- Import the required modules:
- Import the necessary modules:
import React from 'react';
import { Formik, Form, Field } from 'formik';
import { Prompt, Link, Switch, Route, BrowserRouter as Router, Redirect } from 'react-router-dom';
import './App.css';
- Create validation functions for email and name:
function validateEmail(value) {
let error;
if (!value) {
error = 'Email is Required';
}
return error;
}
function validateName(value) {
let error;
if (!value) {
error = 'Name is Required';
}
return error;
}
- Inside the App component, create link to the Feed component
function App() {
return (
<div className="App">
<Router>
<ul>
<li>
<Link to="/">Form</Link>
</li>
<li>
<Link to="/Feed">Feed</Link>
</li>
<li>
<Link to="/Dashboard">Dashboard</Link>
</li>
</ul>
- Create the Switch component:
<Switch>
<Route path="/" exact children={<SignupForm/>} />
<Route path="/feed" children={<div>Feed</div>} />
</Switch>
</Router>
</div>
);
}
- Create the Formik component:
App.js
57 export const SignupForm = () => (
58 <div>
59 <h1>Signup</h1>
60 <Formik
61 initialValues={{
62 username: '',
63 email: '',
64 }}
65 onSubmit={values => {
66 // same shape as initial values
67 console.log(values);
68 }}
69 >
The complete code is available at: https://packt.live/2AvyS8d
The output will be as follows:
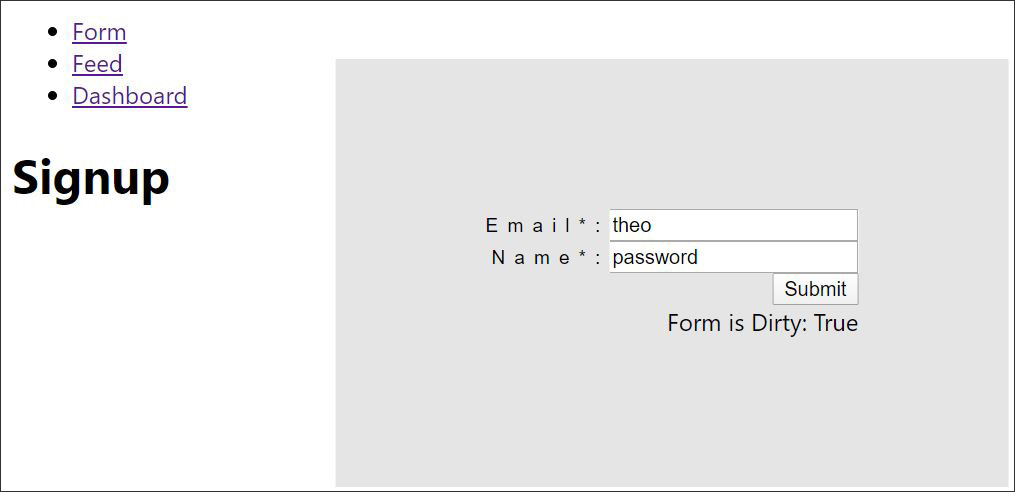
Figure 10.6: The localhost feed
Here, we have a typical Formik component with a few validations for email and name.
- First, we've used the dirty property, which we passed from the render function. This becomes true when we edit a field in the form. We also added a visual indication for this value.
- When the dirty value is true, the <Prompt> element is activated, but it will not show the prompt just yet. We need to navigate to another page for this to happen. So, if we click on the Feed link, we will be presented with some dialog to ensure we wish to proceed:

Figure 10.7: The localhost feed
There is also another way you can trigger the dialog message: by using the history package and any router type other than the StaticRouter. A StaticRouter is a router type that never changes location and is used mainly for testing.
We need to define a history object by passing a getUserConfirmation property that is a function with a message and a callback parameter. Then, inside this function, we can use a custom dialog or prompt, before calling the callback function. We also need to import a history object that lets us manage the history stack, navigate, and persist state between sessions. It is included with React Router upon installation.
Here is an example:
import {createBrowserHistory as createHistory} from 'history';
const history = createHistory({
getUserConfirmation(message, callback) {
const allowTransition = window.confirm(message);
callback(allowTransition);
}
});
<Router history={history}>
…
<Prompt
message={location =>
`Are you sure you want to go to ${location.pathname}? You will lose all your data!`
}
/>
Notice that we need to remove when condition from the <Prompt> component, otherwise the getUserConfirmation function will not trigger when we navigate elsewhere. In general, this way is more suitable for generic transition rules since the getUserConfirmation function will be called on every navigation event.
Now, let's learn how to prevent inbound transitions.
Preventing Inbound Transitions
We can prevent inbound transitions by using protected routes. In other words, we can prevent the route from rendering if a condition is false. The easiest way we can do that is by using a Higher-Order Component (HOC) where we check the condition there. For clarity, an HOC is a function that takes a component and returns a new component, often by adding extra functionality.
For example, we can have the following <IsAuthenticatedRoute> component:
<IsAuthenticatedRoute exact path="/Dashboard" component={<div>Dashboard</div>} />
Here, we have the following code:
import {Route, Redirect} from 'react-router-dom';
const authService = {
isAuthenticated: function () {
return false;
}
};
const IsAuthenticatedRoute = ({ component: Component, ...rest }) => (
<Route {...rest} render={(props) => (
authService.isAuthenticated() === true
? <Component {...props} />
: <Redirect to={{
pathname: '/',
state: { from: props.location }
}} />
)} />
);
Notice the usage of the condition inside the <IsAuthenticatedRoute> component. As long as authService returns false, the Component is not rendered. Instead, we render a Redirect component that navigates us back to the home screen.
The route also needs to be registered beforehand. What we mean by that is although this is a HOC, it's still a valid React Router Route, so we need to register it inside a <Routes> component.
When the route matches, the render props function will be called to check this with the authentication service. This way, any operation involving checking the authentication status is idempotent and it will perform the same computation each time it is called.
Now that we have a good grasp of some of the advanced React Router features, we can tackle a more complex activity.
Activity 10.01: Creating Authentication Using Routing Techniques
The aim of this activity is to get you to develop a list of routes that utilize what we have learned in this chapter. We will create a Login page that navigates to an Enter your Security Token page before authenticating and navigating to the main Dashboard page. We will have a specific set of requirements that we need to comply with. Our desired outcome will be a complete and smooth flow experience between pages, as shown in the following diagram:
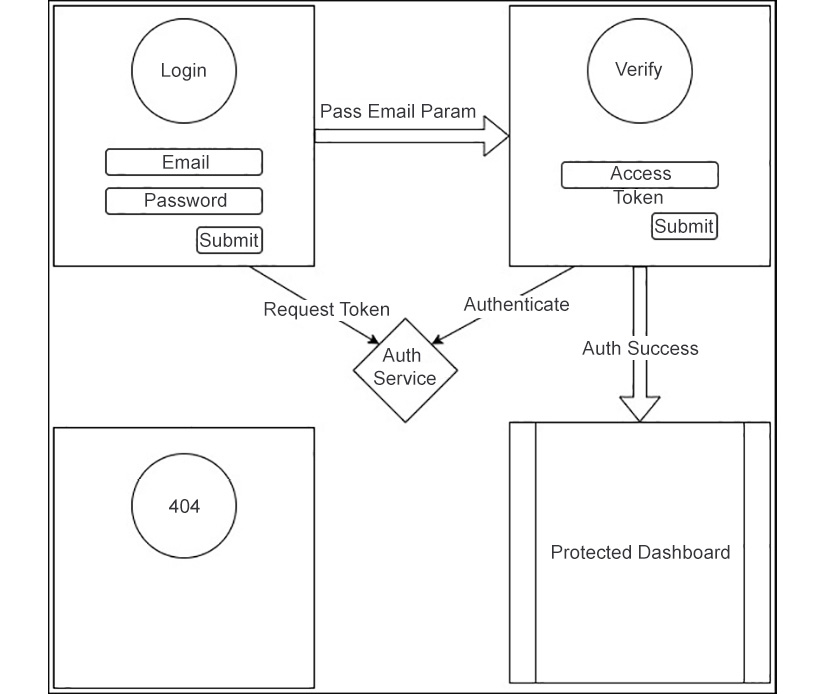
Figure 10.8: The flow diagram of the app
The following steps will help you complete the activity:
- Create a 404 page that will handle unknown routes.
- Create a Login page that is a React form with two fields, email and password. When we click on submit, the following events can occur:
- Use the Auth Service to request an authentication token to our email box. For the purposes of this example, we can just hardcode some known list of codes.
- Use the Auth Service to verify that the user password is correct using some hardcoded values for emails. If not, then do nothing.
- If the password matches, then the page will immediately navigate to the Verify Token page, passing the email as a parameter.
- Create a Verify Token page. This page needs to accept an email parameter and if that is missing, then it must redirect the user back to the login screen. This page also contains a form with one field, which is the Access token that was requested in the previous page. When we click on the Submit button, the following events happen:
- We use the access token and email to the AuthService to verify that the user credentials are correct. Use the hardcoded tokens as an example. If the authentication succeeds, then make use of a temporary cookie or session storage or a variable to define that the user is isAuthenticated.
- When the user is authenticated, then navigate to the main Dashboard page.
- Create a Dashboard page that is only accessible when the user is authenticated. That is, when we deep link into that page and the user is not authenticated, then we redirect them back to the Login page.
The Dashboard page should be the same as the one we defined in the nested routes section of this article, with the addition of the Unknown Widget Route. That is, when we request an unknown widget, we need to show a message for that missing widget.
The final output should look like this:
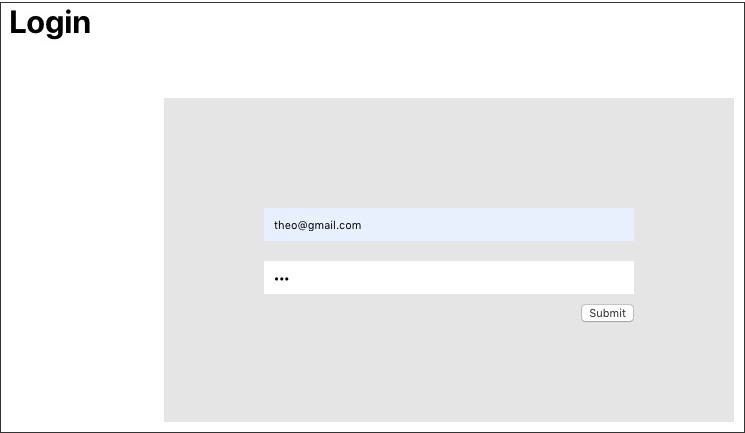
Figure 10.9: The final output of the app
Note
The solution of this activity can be found on page 679
Summary
This concludes our exploration of this chapter. First, we learned quite a few things about how we can define 404 routes for unknown pages. We continued our journey by learning how to pass query and URL parameters and understood their inner differences.
We also spent some of our time understanding nested routes and created a simple dashboard page with inner routes for widgets. Then, we looked at how to prevent transitions from or out of the page by using protected routes and prompts.
We spent the majority of our time on this chapter's activity, where we had to design and implement a complex navigational flow from the Login to Verify pages and to the main Authorized Dashboard page. During that time, we had the chance to utilize most of the concepts that we learned about in this chapter and apply them in practice. In the next chapter, we will learn all about React Hooks, which are a new and modern way of reusing stateful logic between components.