
This chapter will introduce you to the various ways to fetch data by making API requests in React. You will do some hands-on exercises on fetching data from servers using RESTful APIs, the Fetch API, and Axios. We will compare these three with various parameters and we will see how Axios is better than the rest. By the end of this chapter, you will have a good understanding of why the Axios API is preferred when we make API requests in React.
Introduction
Most modern apps receive data from servers and dynamically update the content. For example, a weather application will make requests to receive today's weather data from its servers. With React apps, it is also essential to communicate with servers in order to get the requested data to display content dynamically based on the user's interaction with the app.
In the previous chapters, we have seen how two components communicate with each other in React using render props and hooks. In this chapter, we will look at multiple ways to communicate with the outside world using APIs in React.
We will discuss the commonly used RESTful API, usually described as a web service that implements REST architecture (a convention for building HTTP requests with HTTP methods). After initiating a server request using the REST API, we will test the server by making API requests with Postman, including GET, POST, PUT, PATCH and DELETE requests. After you understand all the essential parts of making API requests, we will write a simple app to receive data from a server.
We will also discuss different ways of requesting data from servers dynamically in React, including XMLHttpRequest and the Fetch API. We are also going to learn about a third-party library called Axios that helps you to fetch data from servers in a better way than the native Fetch API.
Before beginning our discussion on the various APIs in React, let's first look at the basics of making HTTP requests to interact with the server.
RESTful API
When we develop any application with React or JavaScript, we almost always need to request data from a server to dynamically update content inside our application. For example, any social media platform, such as Twitter, Facebook, LinkedIn, Instagram, or YouTube, updates some parts of their content on the page by requesting data from their servers. The content on those platforms is never static.
To request data from a server, there are several web services you can use, such as SOAP, WSDL, and REST. In this chapter, we are going to focus on the popular web service REST (or RESTful). We are going to talk about what a RESTful API is and how it works and will look into a few practical examples.
REST stands for Representational State Transfer, and it is an architectural style of web architecture with six constraints that allows us to request data via the HTTP protocol using, for instance, GET and POST. When something is RESTful, it means it follows the REST constraints, and you can think of RESTful as the adjective of REST. Therefore, a RESTful API can be defined as an API that uses the HTTP protocol to request using GET, POST, and DELETE.
When the client needs to talk to the server to receive or save data, these requests happen using the HTTP protocol, which exposes services from the server, and then the client can directly call the services by sending HTTP requests. This is where REST comes into play.
Note
There is another popular API-based declarative query language called GraphQL. GraphQL is a syntax for querying APIs by allowing clients to specify what data it needs, and it can aggregate data from multiple places easily. To find out more, please check out its documentation page with JavaScript at https://graphql.org/code/#javascript.
Five Common HTTP Methods
In the following section, we will look at five common HTTP methods that you must provide when you request data through a RESTful API. The following table summarizes the five common HTTP methods – CRUD (Create, Read, Update, Delete):
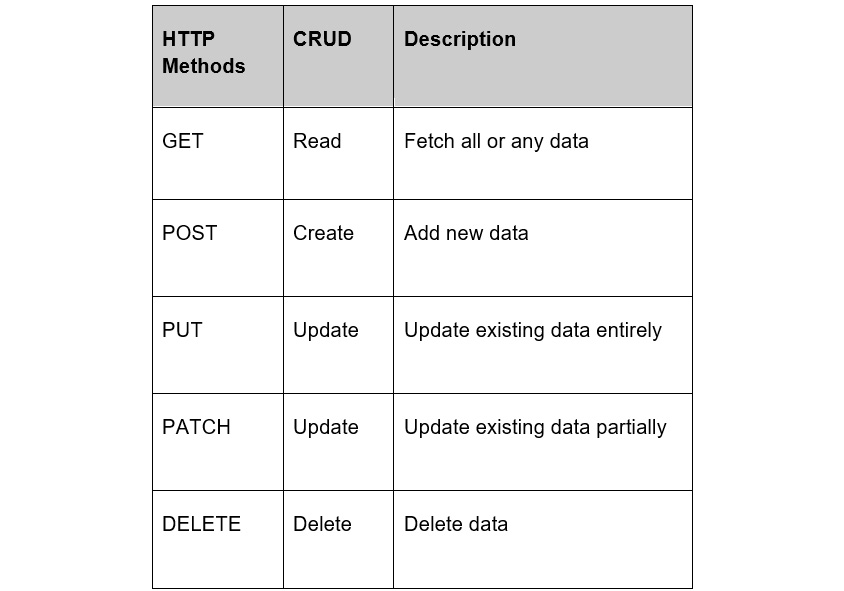
Figure 14.1: Header table
A lot of developers get confused with the PUT and PATCH HTTP methods, so let's take a closer look at them.
PUT versus PATCH
Both PUT and PATCH update existing data but PUT entirely updates the existing data whereas PATCH partially updates the existing data. To better explain, let's have a look at an example.
Let's say we have this JSON data:
{
"name": "Ryan",
"age": "29",
"city": "Sydney",
"fav_language": "React"
}
When we PUT the new data:
{
"age": "30"
}
The outcome will only have the age and nothing else:
{
"age": "30"
}
Now, if we apply this update with the PATCH method, the result will still contain other details but will only update age:
{
"name": "Ryan",
"age": "30",
"city": "Sydney",
"Fav_language": "React"
}
Thus, as we can see from the example, the PUT method overwrites the entire content and the PATCH method only updates the specified property.
Therefore, wherever we want to make minor modifications to a resource, we use PATCH, whereas PUT is used when we want to completely rewrite the data in a resource.
Now, when you make a network request, you must have often noticed the status messages that get displayed on the web page when a request is completed. Let's take a look at the various types of HTTP status codes and messages that get returned.
HTTP Status Codes
REST APIs respond to a request with a status code to inform developers of the status of the request. There are 40 standard status codes, but the following table shows you the 7 most common status codes you will see with REST APIs:
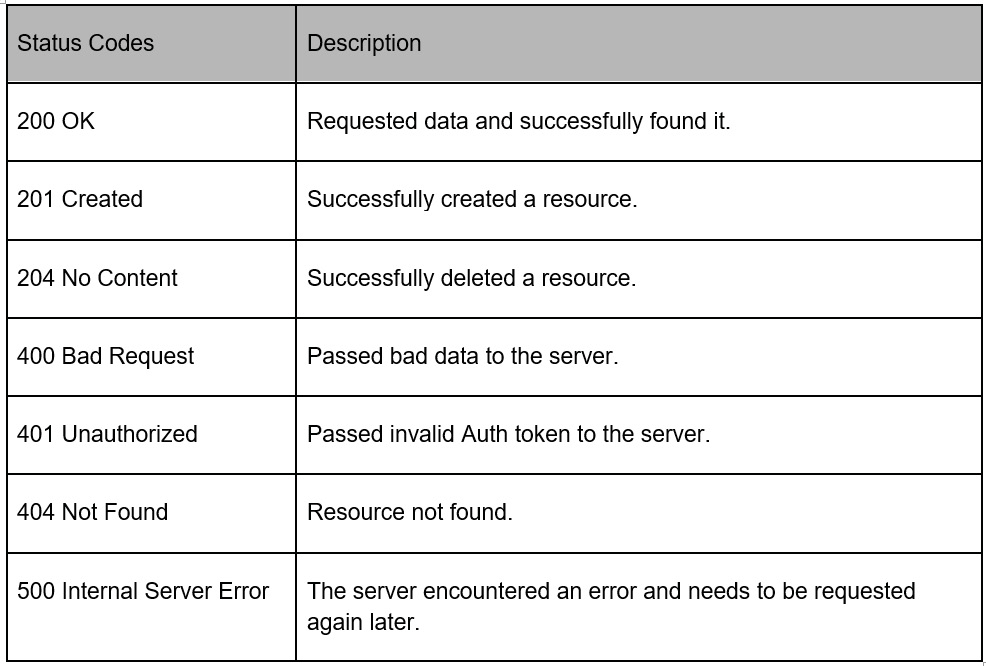
Figure 14.2: HTTP status codes
You must have seen 404 quite often when there is a failure in retrieving the requested data. This simply means the resource was not found at the defined web address. For example, when an Axios GET request successfully fetches data, the status code shown on the console is 200, which means the data was successfully retrieved.
Accept Header and Content-Type Header
When we request data from a server, we include HTTP headers in a REST request to tell the server the format of data the client is expecting. Among many headers, Accept and Content-Type are the two main headers for formatting the data properly, and we will look closer look at these two headers.
The difference between the Content-Type and Accept is:
- Accept is used by HTTP clients when requesting data from a server and tells the server what data format the client is expecting.
- The server will send back the response including the Content-Type header telling the client what format the response is returned with.
To look at the details of headers, open the DevTools (by pressing F12), go to the Network tab, and refresh the page to request the data. Let's write the following code in the Console:
const xhr = new XMLHttpRequest();
// assign json
xhr.responseType = 'json';
// initialize the request
xhr.open('GET', 'https://jsonplaceholder.typicode.com/posts/1');
// send request to the server
xhr.send();
We will see something like this on the screen:
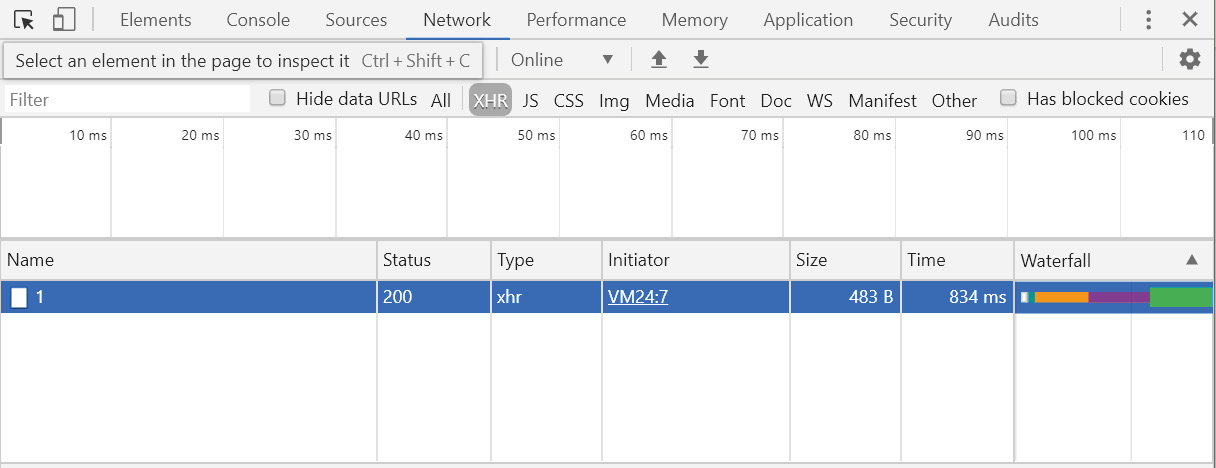
Figure 14.3: Checking network in Chrome DevTools
When you click XHR and 1 in the Name panel, you will see the Headers tab. Clicking on it gives you all the header details you have included with your request.
Under Response Headers, you will see the content-type header. Here, you should get
application/json; charset=utf-8
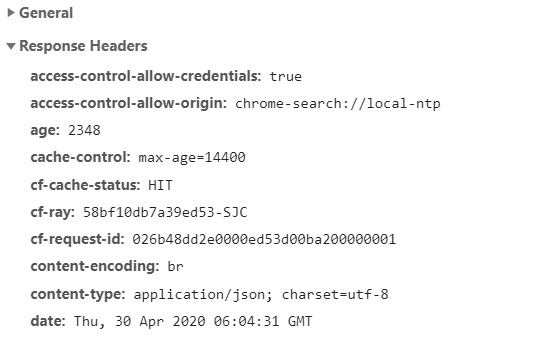
Figure 14.4: Content-type header
Under the Request Headers, there will be Accept header with */* which is any MIME type as we can see in the following figure:

Figure 14.5: Accept header
From Figure 14.5, we can see that the client is giving the server a hint that the client is expecting the response in the format of */* and if the server cannot handle the format, it'll return anything it can respond with. However, it is up to the server to handle it. In Figure 14.4, the content-type header has returned with application/json. When the content-type header is included in the request to the server and when the server handles it correctly, the response should come back with the content-type the client had asked for.
Giving the server a hint about the data format gives it a chance to properly handle the data format and return the response in the expected format.
With all this knowledge, let's dive right into the different ways of requesting data from the server.
Different Ways of Requesting Data
In most applications, it is very common to request data from a server and display it on a web page dynamically. In modern web applications, clients such as browsers request data from a server and only load content partially on the page. That prevents reloading the entire page to display the new data or content and provide a better user experience. For example, Tumblr is a social networking website with a huge database running in the backend. However, when we fetch data, there isn't a lot of loading time involved. The reason for this is the partial loading of the content. As the user scrolls down a Tumblr page, the content is loaded dynamically. Let's look at the following diagram:

Figure 14.6: Requesting data for partial update on the browser
We can see in the previous diagram that only partial data is being loaded onto the web page. The different methods used to fetch data from a server are:
- XMLHttpRequest
- Fetch API
- Axios API
Throughout the next section, we are going to learn about the different ways to request data and decide which one we are going to use.
XMLHttpRequest
XMLHttpRequest is used to fetch data in the form of not only XML but also JSON, HTML, and plain text. XMLHttpRequest is made using an XMLHttpRequest (XHR) object. An XMLHttpRequest object allows us to transfer data between a web browser and a web server.
In this section, we will look at the basics of requesting and receiving data from a server using XMLHttpRequest.
Note
XMLHttpRequest (XHR) was created by Microsoft in the late 1990s.
Let's see how to initiate XMLHttpRequest:
- The first step is to create an instance of XMLHttpRequest object:
const xhr = new XMLHttpRequest();
- Then, to specify the type of data contained in the response, we can use the responseType property. The supported values are an empty string, arraybuffer, blob, document, JSON, and plaintext.
To use JSON, add the property to the instance and assign the value:
xhr.responseType = 'json';
- Once we have created the instance of the XHR object, we need to set the connection to a server by using the open() method. The open() method requires two mandatory parameters, which are a method such as GET, POST, PUT, or DELETE, and the URL to send the request to:
xhr.open('POST', 'https://yourdomain.com/api/posts/new');
If you need to set any HTTP headers, call the setRequestHeader method with the header and value. The setRequestHeader method must be called after open() but before send():
xhr.setRequestHeader('Content-Type', 'application/json');
- It's time to send a request. To send a request, we need to use the send() method with the body of the data:
xhr.send(JSON.stringify({
title: 'this is a title',
body: 'this is body'
}));
When sending data to a server, the format of the data should be a string. The JSON.stringify() method converts a JavaScript object to a string.
- To get the data, we can call the load event through the standard addEventListner() API to XMLHttpRequest. We use the load event because the event is waiting for all the resources on the page is finished loading before it gets fired:
xhr.addEventListener('load', res => {
console.log(res);
});
If we put all the code in one place, it should look like this:
const xhr = new XMLHttpRequest();
//
xhr.open('POST', 'https://yourdomain.com/api/posts/new');
xhr.setRequestHeader('Content-Type', 'application/json');
xhr.send(JSON.stringify({
title: 'this is a title',
body: 'this is body'
}));
xhr.addEventListener('load', () => {
console.log(xhr);
});
The response depends on what the server returns, but in JSON format, it would look like this:
{
id: 12,
title: 'this is title'
}
Now that we have seen an example implementation of an XMLHttpRequest, let's do an exercise to see how to use XMLHttpRequest to fetch data from a server.
Exercise 14.01: Requesting Data Using XMLHttpRequest
In this exercise, we are going to use XMLHttpRequest to request data from JSONPlaceholder, http://jsonplaceholder.typicode.com/, a dummy URL to test the data. This allows us to use a fake online REST API to test requesting data with all the HTTP methods. We are particularly going to request the details of a post that has the ID number 1.
The endpoint URL we are going to request is https://jsonplaceholder.typicode.com/posts/1.
- Open the DevTools in your browser in the Console panel
- Instantiate XMLHttpRequest() using the new keyword:
const xhr = new XMLHttpRequest();
The new keyword is used to instantiate an object.
- As we want to receive the data in JSON format, we will add the responseType property and assign json:
const xhr = new XMLHttpRequest();
// assign json
xhr.responseType = 'json';
- Initialize the request with the open() method. The first argument we want to set is GET HTTP method, and the second argument is the endpoint URL we are going to request data from:
const xhr = new XMLHttpRequest();
// assign json
xhr.responseType = 'json';
// initialize the request
xhr.open('GET', 'https://jsonplaceholder.typicode.com/posts/1');
- Send the request to the server:
const xhr = new XMLHttpRequest();
// assign json
xhr.responseType = 'json';
// initialize the request
xhr.open('GET', 'https://jsonplaceholder.typicode.com/posts/1');
// send request to the server
xhr.send();
- Let's receive the data with the load event. To get the data, we can access the response property from the result:
const xhr = new XMLHttpRequest();
// assign json
xhr.responseType = 'json';
// initialize the request
xhr.open('GET', 'https://jsonplaceholder.typicode.com/posts/1');
// send request to the server
xhr.send();
// receive data
xhr.addEventListener('load', () => {
console.log(xhr.response);
});
- Open up the DevTools in your browser and in the Console panel, enter the code. Let's execute the code in the browser. In a few moments, you will receive the data back from the server as follows:

Figure 14.7: Receiving data using XMLHttpRequest on Chrome DevTools
As you can see, we received the userId, id, and title from the dummy REST API URL. Also, it is to be noted that sending simple data requires going through many steps with XMLHttpRequest. In the next section, we will discuss how to send the same data with the Fetch API and compare it with XMLHttpRequest.
Fetch API
The Fetch API, introduced in 2015, is a promise-based API (more on promise-based APIs in Chapter 15, Promise API and async/await.) that allows us to send requests to a server, quite similar to what XMLHttpRequest does, but there's a bit of a difference, as we'll see in a moment.
Let's write the same request we did with XMLHttpRequest in the last section with the Fetch API and then compare the two APIs to find out the benefits of the Fetch API compared to XMLHttpRequest.
To send data to a server, we need to call the fetch() function, which is available in the global window scope, so it is accessible from anywhere in your JavaScript code. In the fetch() function, we are going to specify the URL to send the data to and some optional information, such as the method, the body of data, and the headers, like so:
fetch('https://yourdomain.com/api/posts/new', {
method: 'POST',
body: JSON.stringify({
title: 'this is a title',
body: 'this is body',
Header: {
'Content-Type': 'application/json'
}
})
});
To get the response sent back from the server, we can make use of promises. We will discuss promises in more detail in Chapter 15, Promise API and async/await, but simply put, promises are used to tell you three states based on the asynchronous communication or actions with the server:
- Fulfilled: The action succeeded.
- Rejected: The action failed.
- Pending: The action is pending; it's not fulfilled or rejected yet.
When the action is either fulfilled with a value or rejected with an error, the promise's then() method is called. So, when we call the then() method for the first time, it will return a response object. The response object has several methods, and one of them is json(). In order to convert the response to JSON format, we need to call the json() method and call then() method again. In the second then() method, we will get the response as a JavaScript object. Let's add the then() method to the preceding fetch() function:
fetch('https://yourdomain.com/api/posts/new', {
method: 'POST',
body: JSON.stringify({
title: 'this is a title',
body: 'this is body',
Header: {
'Content-Type': 'application/json'
}
})
}).then(function(res) {
return res.json();
}).then(function(data) {
console.log(data);
});
Let's go through an exercise now to see the Fetch API in action.
Exercise 14.02: Requesting Data Using the Fetch API
In this exercise, we are going to make use of the Fetch API to request the same data as we did in Exercise 14.01, Requesting Data using XMLHttpRequest with JSONPlaceholder (http://jsonplaceholder.typicode.com/). To do so, let's go through the following steps:
- Open up the DevTools in your browser and go to the Console panel.
- Add the URL as the first parameter to request data from the endpoint using the Fetch API. As this is a simple GET request, we don't need to add any additional parameters:
fetch('https://jsonplaceholder.typicode.com/posts/1')
- Call the then() function twice to receive the data to get the response and to get the data in the JavaScript object format. Put together, the code should look like this:
fetch('https://jsonplaceholder.typicode.com/posts/1')
.then(function(res) {
return res.json();
}).then(function(data) {
console.log(data);
});
- Run it and see the result received from the server. It is dependent on your internet speed, but when you receive data from the server it'll look like Figure 14.5; the data contains body, id, title, and userId:

Figure 14.8: Receiving data using the Fetch API on Chrome DevTools
We have now seen how to request data from a server using XMLHttpRequest and the Fetch API. A notable difference between them is that the Fetch API, being promise-based, makes your code much more manageable and maintainable than XMLHttpRequest. Lastly, we are going to look at another method of performing HTTP requests called Axios.
Axios
Axios (https://packt.live/2WtWceQ) is a popular JavaScript library that is a promise-based HTTP client. It has many features, including transforming request and response data and canceling requests. We will use this API with React in order to fetch data from the server.
As Axios is a third-party library, we need to install it first. Once it's installed, we will be ready to make a request to a server. Let's look at a basic example using POST:
axios({
method: 'POST', // it could be any other HTTP methods such as GET or DELETE
url: 'https://yourdomain.com/api/posts/new',
headers: {'Content-Type': 'application/json'},
data: {
title: 'this is a title',
body: 'this is body',
}
});
In the preceding code, we are requesting the server to accept the data (title and body) and store it in the server. Axios also provides shortcut so that we can condense the preceding code like so:
axios.post('https://yourdomain.com/api/posts/new', {
title: 'this is a title',
body: 'this is body',
}, {
headers: { 'Content-Type': 'application/json' }
});
Once the HTTP request is made, a response will be returned from the server containing information such as data, status, statusText, headers, config, and request. Among them, what we really want to get is the data, which contains the response provided by the server.
Note
To find out more details on each piece of information, please refer to the Axios documentation page, https://packt.live/3iPsQA4.
To receive the data, we can use the then() method:
axios.post('https://yourdomain.com/api/posts/new', {
title: 'this is a title',
body: 'this is body',
}, {
headers: { 'Content-Type': 'application/json'}
})
.then(function(res) {
console.log(res);
});
The then() method returns the data, specifically the title and the body of the response. Let's look at the following exercise to learn how to request data using Axios.
Exercise 14.03: Requesting Data Using Axios
In this exercise, we are going to use Axios to request data from a server. The endpoint URL we are going to use is https://jsonplaceholder.typicode.com/posts/1, the same as in the Fetch API exercise. As we need to include the Axios library, for this exercise, we are going to use CodePen, which provides a development environment for the frontend work:
- Go to https://codepen.io/ and create a new Pen.
- Add the Axios library. To include the library, click the Settings button at the top and select the JavaScript menu in the pop-up window. In the JavaScript section, type axios in the search field. Click on Axios and the axios library will be automatically included. Click the Save & Close button:
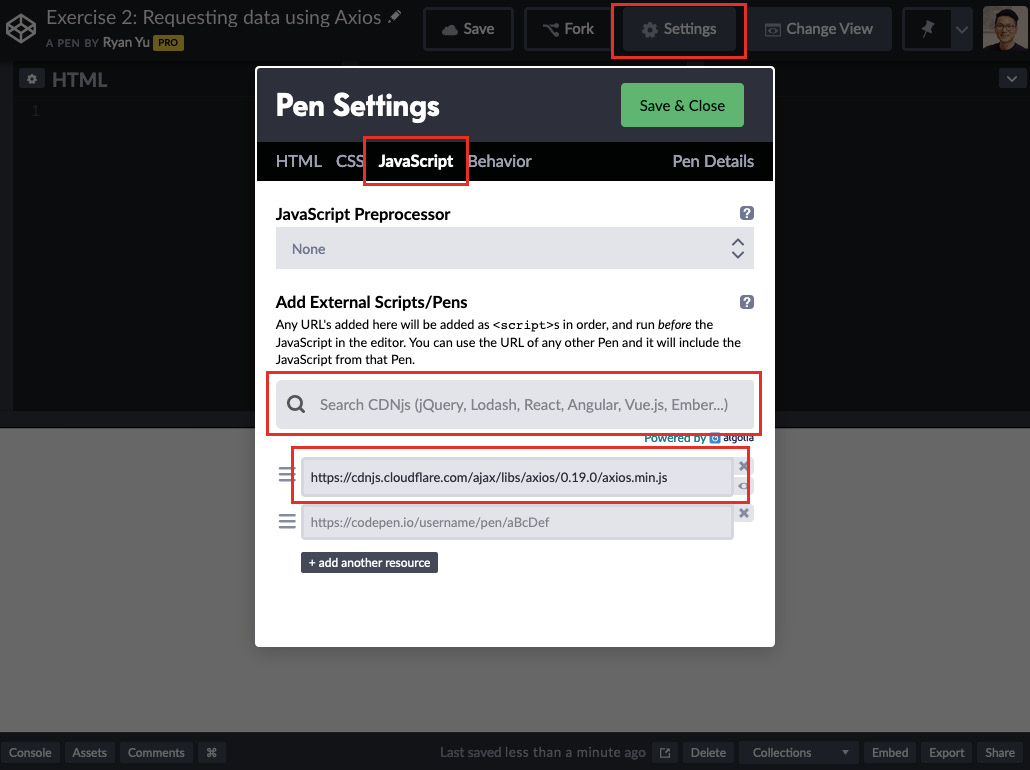
Figure 14.9: Adding the Axios library
CodePen allows us to add HTML, CSS, and JavaScript. For this exercise, we are only going to add JavaScript with Axios.
- In a JavaScript editor, write the code to request the data from the endpoint using Axios:
axios.get('https://jsonplaceholder.typicode.com/posts/1')
.then(function(res) {
console.log(res);
});
- Open up the DevTools in your browser and see if you are receiving data such as data, status, and headers:
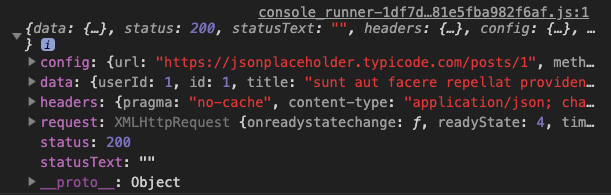
Figure 14.10: Receiving data using Axios
- Call res.data as we want to get the data rather than any other information, and it will give us the data directly containing body, id, title, and userId:
axios.get('https://jsonplaceholder.typicode.com/posts/1')
.then(function(res) {
console.log(res.data);
});
The output is as follows:
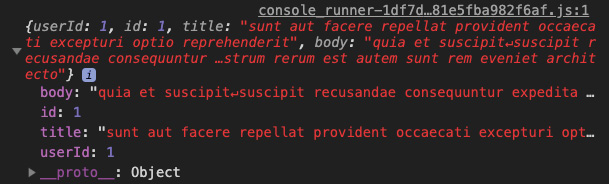
Figure 14.11: Receiving only data
Now that we have discussed three different ways to request data from a server, XMLHttpRequest, the Fetch API, and Axios, let's compare them. We will see that Axios is preferable to the other APIs.
Comparison of XMLHttpRequest, the Fetch API, and Axios
In the previous sections, we have learned how to fetch data from a server in several ways, XMLHttpRequest, the Fetch API, and Axios. In this section, we are going to compare the differences between the three main methods based on the following factors:
- Ease of syntax
- Supporting promises
- Browser support
We will discuss which method we want to use:
- Ease of syntax: When we compare the syntax in the previous section, the Fetch API and Axios provide much easier syntax than XMLHttpRequest. The syntax of Fetch and Axios is cleaner and simpler to understand and also ensures fewer lines of boilerplate code.
- Supporting promises: The Fetch API and Axios provide promises. We are going to talk about promises in more depth in Chapter 15, Promise API and async/await, but briefly, they allow you to chain functions, which helps us avoid callback hell.
Callback hell is an anti-pattern that consists of multiple nested callbacks. With XMLHttpRequest, if we wanted to request data based on the previous request, it would end up looking like this:
const postXHR = new XMLHttpRequest();
postXHR.open('GET', 'https://yourdomain.com/api/post/1');
postXHR.send();
postXHR.onload = function() {
const postInfo = this.response;
const authorXHR = new XMLHttpRequest();
authorXHR.open('GET', `https://yourdomain.com/api/autor/${postInfo.authorId}`);
authorXHR.send();
authorXHR.onload = function() {
const authorInfo = this.response;
const countryXHR = new XMLHttpRequest();
countryXHR.open('GET', `https://yourdomain.com/api/country/${authorInfo.countryCode}`);
countryXHR.send();
countryXHR.onload = function() {
const countryInfo = this.response;
console.log('Country:', countryInfo.name);
}
}
}
As you can see, it is quite hard to read, and if any errors occur, it is hard to debug as we cannot pinpoint which callback the error is coming from.
With the Fetch API and Axios being promise-based, we can avoid callback hell. The preceding code can be updated as follows with promises:
fetch('https://yourdomain.com/api/post/1')
.then(res => res.json())
.then(getPostInfo)
.catch(err => console.log(err));
function getPostInfo(res) {
fetch(`https://yourdomain.com/api/autor/${res}`)
.then(res => res.json())
.then(getAuthorInfo)
.catch(err => console.log(err));
}
function getAuthorInfo(res) {
fetch(`https://yourdomain.com/api/country/${res}`)
.then(res => res.json())
.then(getCountryInfo)
.catch(err => console.log(err));
}
function getCountryInfo(res) {
const countryInfo = this.response;
console.log('Country:', countryInfo.name);
}
By chaining functions with promises, the syntax is more intuitive, and it is much easier to debug.
- Browser support: Both XMLHttpRequest and the Fetch API have browser-native features. That means we do not need to install any third-party libraries to use them. As you can in the following figure (https://caniuse.com/#feat=xhr2), XHR was supported by most browsers in 2019:
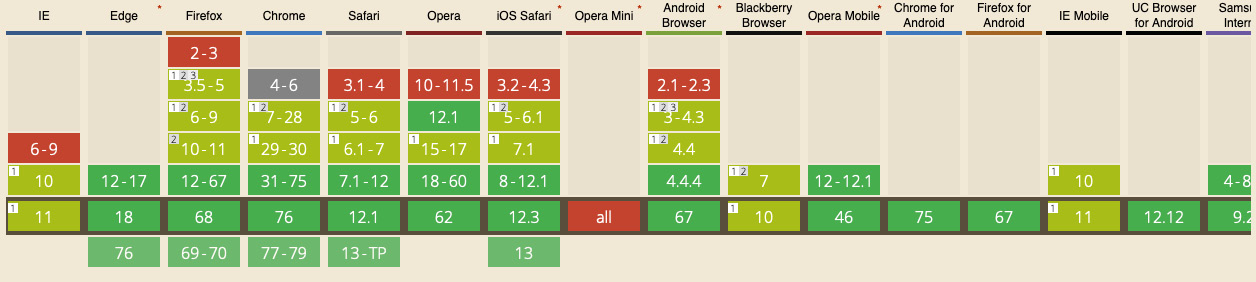
Figure 14.12: Browser support for XMLHttpRequest
The Fetch API is also supported by most browsers, except some old browsers such as IE, Blackberry, and Opera Mini.

Figure 14.13: Browser support for the Fetch API
Unlike XMLHttpRequest and Fetch, Axios is a JavaScript library. Therefore, to use Axios, we need to install it, as mentioned earlier. The browser support Axios provides is quite good as it is supported by all the major browsers, including IE 11.
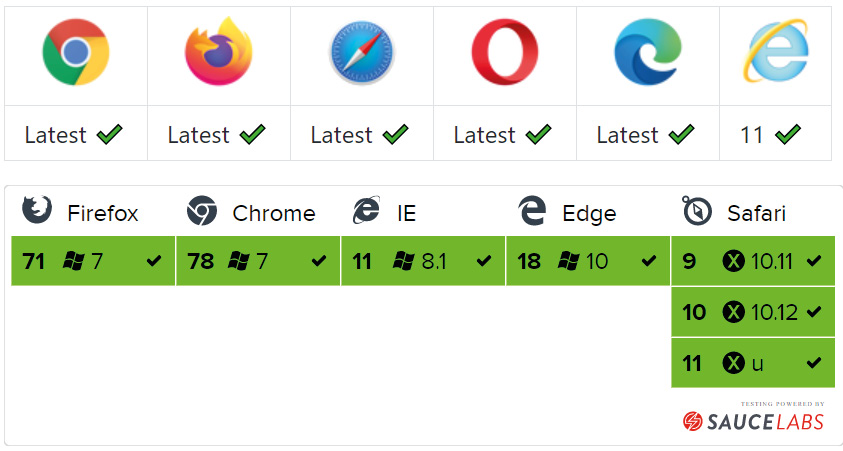
Figure 14.14: Browser support for Axios
We have compared XMLHttpRequest, Fetch, and Axios, and of the three, Axios provides the most benefits when carrying out HTTP requests.
Apart from the three main features that we have discussed, other helpful features include:
- Better response handling
- Better error handling
- Allowing many requests at once
- Supporting canceling requests
- Client-side support for protecting malicious exploitation of a website
Among those benefits Axios has to offer, let's further compare Axios and Fetch based on the response handling and error handling functionalities.
Axios versus the Fetch API
When we compare the Fetch API and Axios, they look quite alike. However, let's discuss the features mentioned previously to see how Axios does better than the Fetch API.
Better Response Handling
In Exercise 14.01, Requesting Data Using XMLHttpRequest, when we received data from the server with Fetch, we had to go through two steps. The first step involved passing the response of the HTTP request to the json() method, and the second step allowed us to receive the data object:
fetch('https://jsonplaceholder.typicode.com/posts/1')
.then(function(res) {
return res.json();
}).then(function(data) {
console.log(data);
});
However, as we practiced in Exercise 14.02, Requesting Data Using the Fetch API, Axios automatically converts the response to JSON data, which is simpler to process:
axios.get('https://jsonplaceholder.typicode.com/posts/1')
.then(function(res) {
console.log(res);
});
Thus, it can be concluded that Axios does response handling more effectively than the Fetch API.
Better Error Handling
When you request data from a server, it is important to catch any errors so that we know where we went wrong. To catch an error with the Fetch API, we use the catch() method. As an example, let's request data from an incorrect URL and add console.log both in the second then() method and the catch() method:
fetch('https://jsonplaceholder.typicode.com/this-is-wrong-url')
.then(function(res) {
return res.json();
}).then(function(data) {
console.log('Received data:', data);
}).catch(function(err) {
console.log('Error:', err);
});
Now, can you guess what message will be printed? As the URL does not exist, the server will return a 404 error. You may have guessed that since this is an error, it must be caught and the error message will get displayed. Let's see what we get:

Figure 14.15: Catching error with the Fetch API
As you can see, even if the server returned a 404 error, we have received the data with an empty object.
Now, let's see how Axios handles this error:
axios.get('https://jsonplaceholder.typicode.com/this-is-wrong-url')
.then(function(res) {
console.log('Received data:', data);
}).catch(function(err) {
console.log('Error:', err);
});
Again, guess if we will receive the 404error message with Axios as shown in the following screenshot:

Figure 14.16: Catching an error with Axios
As you can see from the preceding figure, the error message with the status code is displayed. Along with that, the line numbers where the error occurred are also shown, which is exactly what we want.
Requesting data from an incorrect endpoint URL is a mistake that developers often make, and not returning the proper error status and message makes code harder to debug. Therefore, we recommend using Axios along with React to request data from a server.
We now have a better idea of how to request data from a server and we have tested some APIs. However, to test the APIs, we had to write some JavaScript and execute the JavaScript in the browser DevTools or CodePen, where we had to include third-party libraries such as Axios. This is a bit of a hassle when we only quickly want to verify the response sent from the server. In this section, we are going to look at a tool called Postman, an interactive and automatic standalone tool for testing APIs, and learn how to easily test and manage RESTful APIs.
Testing APIs with Postman
Postman has a simple user interface that allows us to easily test APIs by sending HTTP requests. For example, checking whether we are receiving the correct data from the endpoint with the GET method takes only three steps without writing any JavaScript code:
- Adding the endpoint
- Choosing the HTTP method
- Clicking the Send button
To install Postman, go to the download page, https://www.getpostman.com/downloads/, and follow the instructions.
Note
Postman is available on Mac, Windows, and Linux. At the time of writing this book, the stable version of Postman is 7.5.0.
Once installed, launch Postman and you will see the interface shown here:
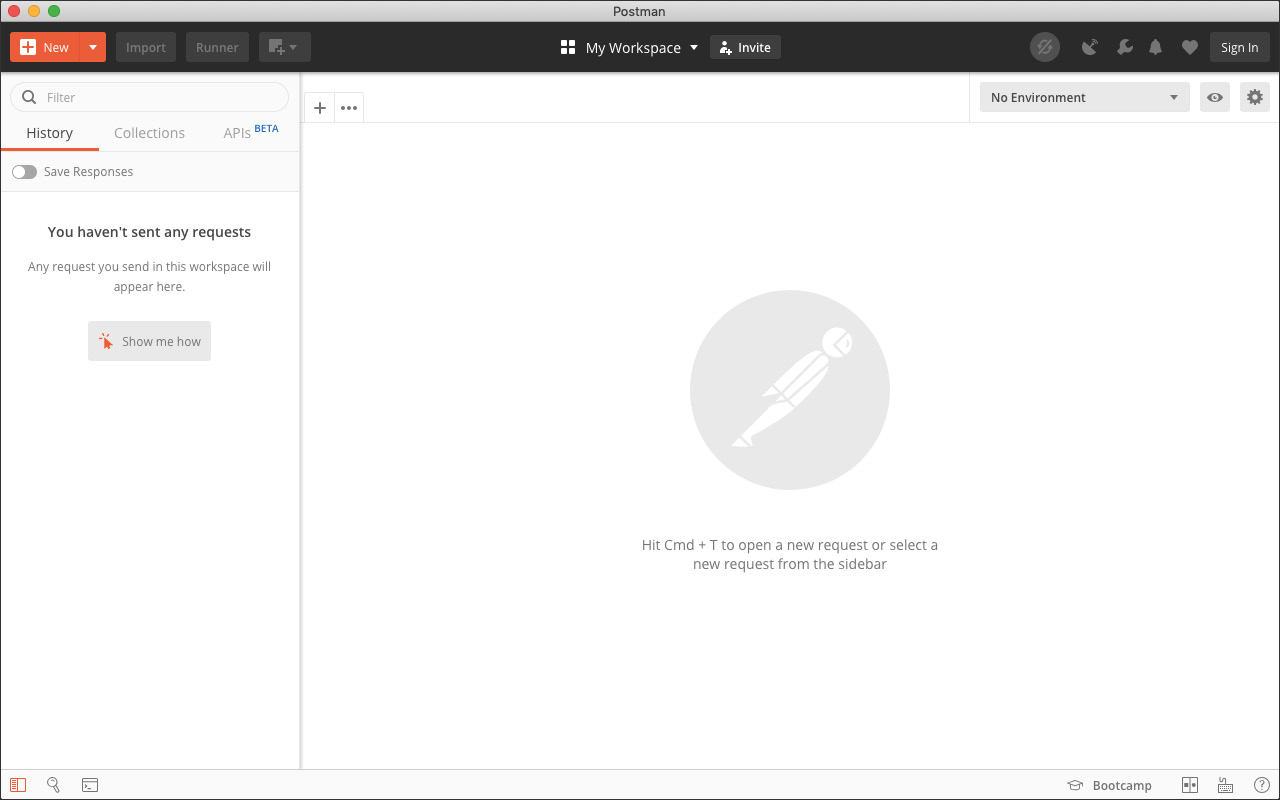
Figure 14.17: User interface of Postman
Now let's make the same requests we have done in the previous sections using Postman. In the following exercise, we are going to practice all of the HTTP methods we have learned previously in the Five Common HTTP Methods section, GET, POST, PUT, PATCH, and DELETE. For the APIs, we are going to follow the routes in JSONPlaceholder, http://jsonplaceholder.typicode.com/.
Exercise 14.04: GET and POST Requests with Postman
In this exercise, firstly, we are going to make a request to receive data using the GET method, and then we'll use the POST request with Postman. Let's see how:
- After you install Postman, click the New button in the top-left corner of the interface and click Request in the pop-up window.
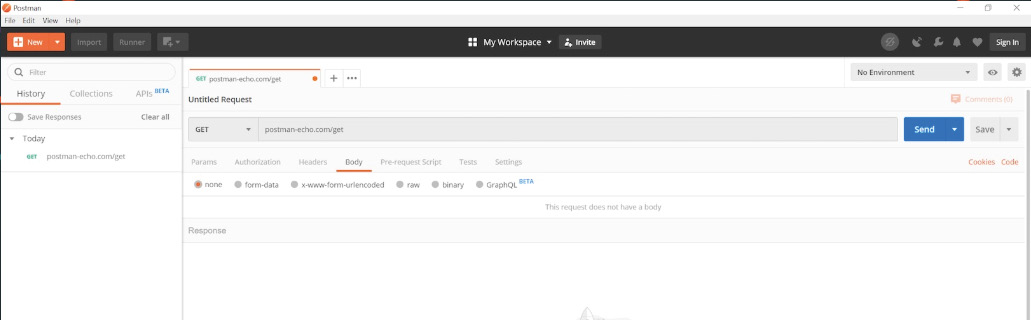
Figure 14.18: Postman UI
- Give GET method as the Request name.
- Choose a Collection. A collection in Postman is like a folder where you can organize your requests and easily share them with others. If you have no collections yet, click the Create Collection link and make one. Then click the Save button.
- Add our first request. The GET method should already be selected, but if not, select GET in the drop-down menu.
- In the input field with the placeholder saying Enter request URL, add http://jsonplaceholder.typicode.com/posts and click the Send button. You should successfully receive the 200 OK status with the data from the server as shown here:
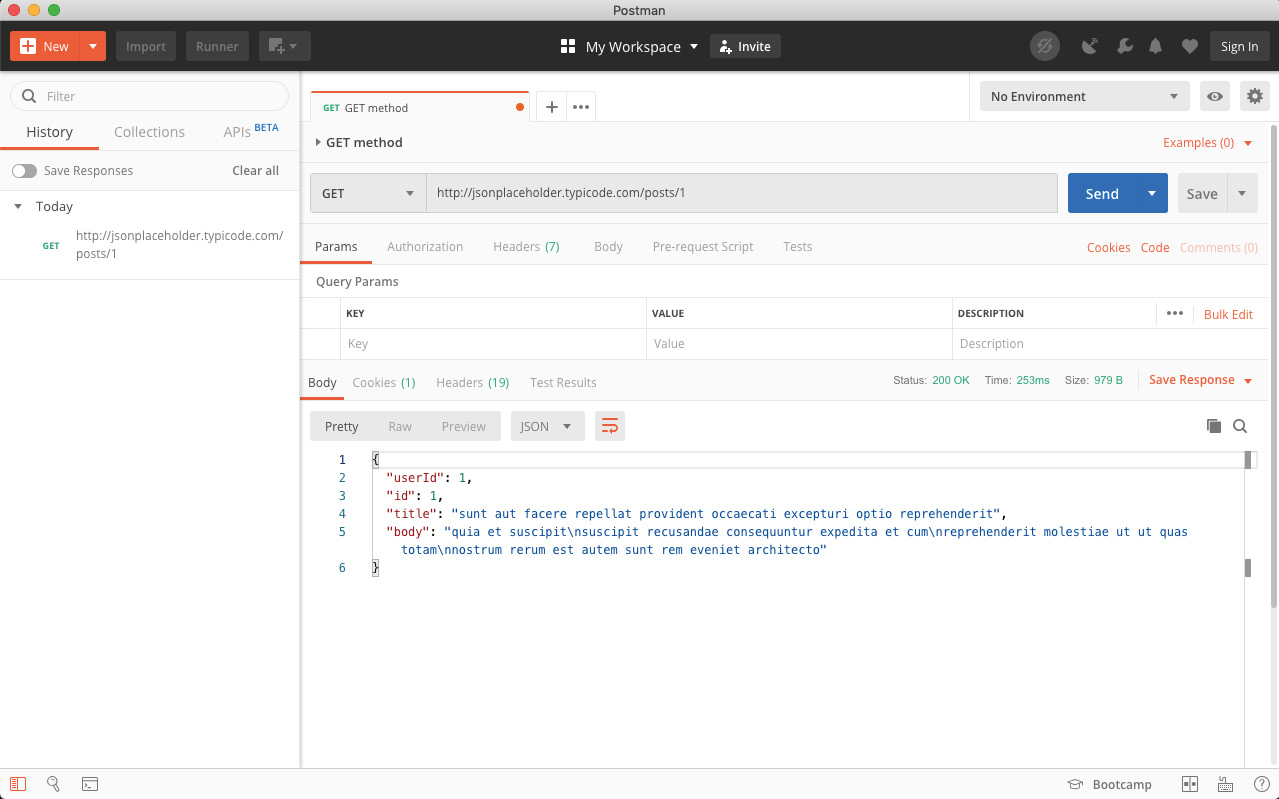
Figure 14.19: Received 200 OK status and data from the server
If you specify the wrong endpoint, it will return with a 404 Not Found status and an empty object:

Figure 14.20: 404 Not Found status
- Click the New button in the top-left corner again and click Request in the pop-up window.
- Add POST method as a Request name and choose a collection.
For the HTTP method, choose POST and add the endpoint, https://jsonplaceholder.typicode.com/posts. Let's say we want to add the title and body as user ID: 1 for the new post. In that case, we need to include the data as shown in the following code in the body of the request. So, click the Body tab, choose raw, select JSON (application/json), and add the following data in the textarea field:
{
"title": "this is the title of the new post",
"body": "this is the body of the new post",
"userId": 1
}
The output is as follows:

Figure 14.21: Adding the data
- We also need to tell the server that the format of the data returned should be JSON.
So, including the Content-Type with application/json by selecting JSON (application/json) from step 7 will automatically add the content-type to the header. You can see this in the Headers tab:

Figure 14.22: Content-Type added
- Click the Send button, and you will receive a 201 Created status with the newly created data, along with the ID.

Figure 14.23: Received 201 Created status and data
We will now go ahead and test the other HTTP methods with Postman.
Exercise 14.05: PUT, PATCH, and DELETE Requests with Postman
In this exercise, we will use the PUT, PATCH, and DELETE requests and test them with Postman:
- Click the New button in the top-left corner of the interface and click Request in the pop-up window.
- Select the PUT method. We are going to make changes to post ID: 1, so add the endpoint, https://jsonplaceholder.typicode.com/posts/1.
- Click body and add the new data that we want to update.
- Select raw and choose JSON (application/json), which will automatically add the content-type for us. In the textarea, add the following data:
{
"title": "this is updated title"
}
- Click the Send button, and you will receive a 200 OK status with the updated data. However, you will notice that the returned data only contains two details, title and id, as shown in the following snippet. This is because, as mentioned in the PUT versus PATCH section, the PUT method will override the entire data matching with post id 1. To partially update the data, we need to use PATCH.
{
"title": "this is updated title",
"id": 1
}
- Create a new request and choose the PATCH method this time with the https://jsonplaceholder.typicode.com/posts/2 endpoint and add the same details as before.
- Click the Send button, and you should receive a 200 OK status with the entire data, but only the title updated.
- Create a new request and select the DELETE method with the https://jsonplaceholder.typicode.com/posts/1 endpoint.
- As we are not updating any details, we don't need to include any headers or body. Click the Send button.
- You will receive a 200 OK status with an empty object, which indicates that the data has successfully been deleted.
Let's look at the following output:
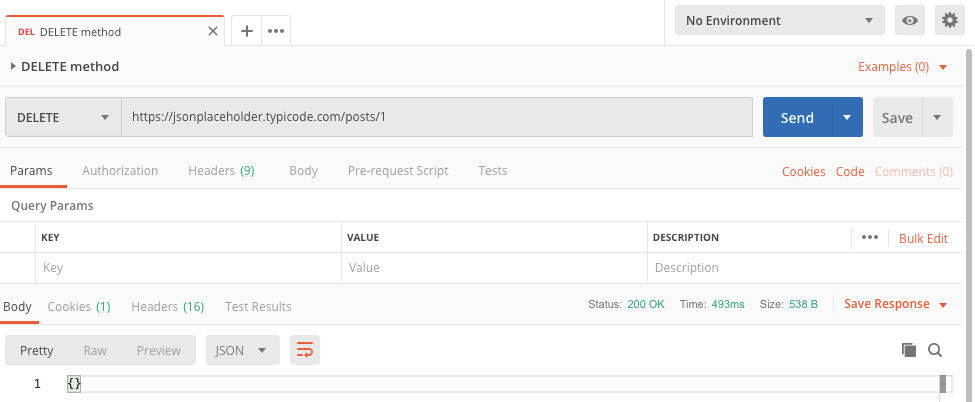
Figure 14.24: Received 200 OK when the data was successfully deleted
Note
The POST, PUT, PATCH, and DELETE requests did not actually update the data from the JSONPlaceholder server; however, JSONPlaceholder returned the correct status as if the data had been updated.
Now that we know the basics of fetching data and the various APIs used to do it in React, let's see how to create API requests in React.
Making API Requests in React
In the previous sections, we learned the different ways of requesting data. Also, we discussed the benefits of using Axios over other methods, such as XMLHttpRequest and Fetch API.
In this section, based on what we have learned so far, we will make API requests with React. For the exercises, we are going to use NASA Open APIs (https://api.nasa.gov/) to search NASA images. In this chapter, we are only going to focus on how to receive data back from the NASA server using React.
React Boilerplate and Axios
To get started, let's install create-react-app first and then use Axios to make API requests. Remember that it is not React's job to make API requests to the server. React is for helping us to display content on the screen and it is Axios, a layer underneath, that makes requests and receives data back from the server.

Figure 14.25: Requesting data with Axios in React
We will go through an exercise to integrate Axios with React boilerplate.
Exercise 14.06: Installing React Boilerplate and Axios
In this exercise, we will integrate Axios with the React boilerplate. We will install the NASA API and we will request data from this API using React. Let's see how:
- Open the terminal and type in the command:
npx create-react-app search-nasa-images
This should install all the necessary dependencies automatically for you.
- Type in the cd search-nasa-images command to navigate to the search-nasa-images folder where we had just installed create-react-app.
- Type in the yarn add axios command to install Axios onto the boilerplate.
- Open the boilerplate in your preferred text editor.
- Select all the files in the src folder and remove them all. We are going to create our own files.
- Create a new file called index.js in the src folder and add the following code:
import React from 'react';
import ReactDOM from 'react-dom';
import App from './App';
ReactDOM.render(<App />, document.querySelector('#root'));
- In the same directory, create another file called App.js and add the following code:
import React from 'react';
import './App.css';
const App = () => {
return (
<div className="o-container">
<h1>Search NASA images</h1>
</div>
);
};
export default App;
- Create another file called App.css in src folder and add the following CSS code:
.o-container {
margin: 50px auto;
max-width: 700px;
}
h1 {
text-align: center;
}
- Run the app by typing yarn start in the Terminal. In your browser, go to http://localhost:3000/ and you should see the heading Search NASA images on the screen:

Figure 14.26: The output of the boilerplate
We have now prepared the boilerplate and are ready to fetch data from NASA. Before we fetch data, let's take a look at what the endpoint looks like.
Testing the NASA API with Postman
NASA provides a lot of APIs, and what we are going to use is in the section is the NASA Image and Video Library API. According to the documentation page, "the images API contains 4 endpoints", the four URLs where clients of a specific service can gain access. That means we are going to use the GET method and the base URL will be https://images-api.nasa.gov followed by the first endpoint from the table (as you'll be able to see in the following exercise), /search?q={q}. For example, to search for europe, the endpoint we are going to request from will be https://images-api.nasa.gov/search?q=europa.
Let's check whether the endpoint properly returns any data through the following exercise.
Exercise 14.07: Testing the Endpoint with Postman
In this exercise, we will test the NASA API using the Postman tool. Let's see how we do that:
- Open up Postman and create a new request called NASA image search.
- Leave the GET method as it is and add the URL https://images-api.nasa.gov/search.
Make sure we do not add the q parameter at the end of the URL.
- In the Params tab, add q as the Key and europa as the Value.
- Click the Send button, and it will return the response with 200 OK status and the data.

Figure 14.27: Requested and received data
- If you scroll down the result, you will see the items array, and each array contains href, links, and data. In the links, you will see href, and clicking on the link will show you the image. That means in React, we are going to access the image by following collection.items[#].links.href.
€

Figure 14.28: Finding the image
We have successfully tested and confirmed that the endpoint for searching images in the NASA images API app is working fine. It's time to add it to our React app.
Fetching Data with React
In this section, we are going to use Axios inside React and fetch data from the endpoint we have tested with Postman.
Exercise 14.08: Creating a Controlled Component to Fetch Data
In this exercise, we will first need to update a functional component to a class-based component as we will need to initialize the state of the component. Then we will create a controlled search form component. We will then create an Axios request in order to fetch images using the NASA API. Perform the following steps:
- Update the current functional App (used in the previous exercise) component to the class-based component. The code should now look like this:
import React, { Component } from 'react';
import './App.css';
class App extends Component {
render() {
return (
<div className="o-container">
<h1>Search NASA images</h1>
</div>
);
}
};
export default App;
- Let's add a form with a class name, c-search, under <h1> in the render function. The form contains two children elements, <input> and <button>. With the form element, the code should look like this:
import React, { Component } from 'react';
import './App.css';
class App extends Component {
render() {
return (
<div className="o-container">
<h1>Search NASA images</h1>
<form className="c-search">
<input
type="search"
name="image-search"
className="c-search__input" />
<button>Search images</button>
</form>
</div>
);
}
};
export default App;
- In App.css, add the following CSS code:
.c-search {
display: flex;
margin: 0 auto;
width: 50%;
}
.c-search__input {
display: block;
flex-grow: 1;
margin-right: 10px;
}
- When you refresh the page on your browser, you should see the screen with the form underneath the heading as shown in the following screenshot:

Figure 14.29: Heading and form
- To create the controlled component, we are going to create a state and update the state when we type text in the search input field. Initialize the term state in the constructor() method. Add an onChange event in the search field with a function that will update the term state with the value of the search field. Finally, add the value from the term state. The updated code should look like this:
App.js
6 class App extends Component {
7 constructor(props) {
8 super(props);
10 this.state = {
11 term: ''
12 };
13 }
…
30 return (
31 <div className="o-container">
32 <h1>Search NASA images</h1>
34 <form className="c-search">
35 <input
36 type="search"
37 name="image-search"
38 className="c-search__input"
39 value={this.state.term}
40 onChange={e => this.setState({ term: e.target.value })} />
The complete code can be found here: https://packt.live/2YXyLMK
- Add the console.log(this.state.term) right above the return() method to see if we are getting the updated value from the search field when we type in the search field. Open the DevTools and make sure you are getting the updated term state in the Console. When you confirmed getting the updated term state, remove the console.log.
We are now getting the search term and storing it in the term state. Next, we will get the value from the term state when we submit the form and make a request with the search term stored in the state.
- It's time to make a request with the search term. To make a request, we are going to use Axios. Let's import Axios:
import axios from 'axios';
- As we are going to request data when submitting the form, we are going to add an onSubmit event to the <form> element and reference to a function called onSearchSubmit. Make sure to bind this keyword to the function call:
<form className="c-search" onSubmit={this.onSearchSubmit.bind(this)}>
- Create the onSearchSubmit function under the constructor() method and receive an event as an argument. With the event, we are going to call the preventDefault() method. The preventDefault() method will prevent the browser from refreshing the page as it normally would do when submitting the form. It is important to prevent the default action, otherwise our React app will lose all the data stored in the state and will restart from the initial state:
onSearchSubmit = (event) => {
event.preventDefault();
};
- Under the preventDefault() method, we are going to request data using Axios. As we are going to use the GET method, we will add the Axios get method. For the first argument, we will add the base URL for the endpoint, which is https://images-api.nasa.gov/search, and for the second argument, we will add params as follows:
axios.get('https://images-api.nasa.gov/search', {
params: { q: this.state.term }
})
We are now going to receive the data in Promise with the then() method.
- Inside the then() method, print the response:
.then(res => {
console.log(res);
});
The entire code should look like this:
App.js
1 import React, { Component } from 'react';
2 import axios from 'axios';
3
4 import './App.css';
5
6 class App extends Component {
7 constructor(props) {
8 super(props);
9
10 this.state = {
11 term: ''
12 };
13 }
14
15 onSearchSubmit = (event) => {
16 event.preventDefault();
17
18 axios
19 .get('https://images-api.nasa.gov/search', {
20 params: { q: this.state.term }
21 })
22 .then(res => {
23 console.log(res);
24 });
25 };
The complete code can be found here: https://packt.live/2zB5DQQ
- Add europa in the search field and click the Search images button. Open the DevTools, and in the Console panel, in a few moments, you will receive data from the server:

Figure 14.30 Receiving data from the server
As we can see, on the right-hand side of the screenshot the list of URLs of the images is displayed.
With all this knowledge, let's get started with the activity.
Activity 14.01: Building an App to Request Data from Unsplash
The aim of this activity is to build an app that makes API requests to Unsplash and get two kinds of data, one for a random photo URL and the other for statistics such as the total downloads, views, and likes of the photo.
Unsplash is a place for sharing high-definition photos under the Unsplash license, https://unsplash.com/license. Unsplash also provides free APIs allowing us to request data from their large, open collection of high-quality photos.
The optional steps are showing you how to display the random photo covering the entire page and its statistics on the screen. The complete app with the optional steps should look similar to this:

Figure 14.31: The output of the activity with the optional steps
The following steps will help you complete the activity:
- To make API requests, you need to create a developer account. Register at https://unsplash.com/join and create a new app to get the Access Key.
- To get the random photo, check out this documentation page to get the endpoint: https://unsplash.com/documentation#get-a-random-photo
- To get the photo's statistics, check out this documentation page to see how you can create the endpoint: https://unsplash.com/documentation#get-a-photos-statistics
- To authenticate requests, check out this documentation page to see what details you need to pass: https://unsplash.com/documentation#public-actions
- Lastly, you can only make 50 requests per hour in demo mode. Please keep that in mind.
Note
The solution of this activity can be found on page 715
Summary
This chapter covered how to fetch data by making API requests in three different ways, XMLHttpRequest, the Fetch API, and Axios. Throughout this chapter, we practiced making requests to JSONPlaceholder and learned several different HTTP methods. Also, we learned how to get the images from NASA Open APIs in React. At the end of the chapter, the activity showed you how to make requests to Unsplash to display a random photo and statistics.
We compared three different ways, XMLHttpRequest, Fetch API, and Axios, to request data and discussed why we should use Axios over the other two ways.
We learned what a RESTful API is and what the five common HTTP methods are. Furthermore, we talked about the differences between the Accept and Content-Type header, followed by how to test APIs with Postman.
After that, we learned how to make API requests in React by making requests to NASA Open APIs and searched NASA images by submitting a search term.
With this essential understanding of how to create a search field and make a request to the server, in the activity, we practiced searching images from Unsplash. To request data, we also learned how to authenticate by sending the right details through headers. Finally, we received data with promises using the then() method. In the next chapter, we are going to discuss the differences between promises and async/await and how to use them in the appropriate places. We will take a deep dive into the Promise API and async/await methods.