CHAPTER 9
Oxygen-Acetylene Torch
The oxygen-acetylene (oxy-acetylene) torch is arguably one of the most versatile metalworking tools in existence. With no other tool can you weld, cut, bend, and more—all without electricity. As you learned earlier in this book, oxy-acetylene welding and electrical welding were developed around the same time during the 1800s. The speed and focused heat of electrical welding made it more useful in industry, and not many more advancements were made to oxy-acetylene welding after World War I. However, oxy-acetylene torch work never died out. For one thing, the setup was still the most efficient way to cut through steel, something that wouldn’t be achieved with electrical power until the middle of the twentieth century. Using the same welding setup, one can weld a variety of metals, such as different steel alloys, brass, bronze, aluminum, and more, by changing the filler material. Also, anywhere welding was needed where there wasn’t access to electricity (rural areas), the oxy-acetylene torch was the only way to go.
One reason I am starting out with the oxy-acetylene torch is that it gives you a chance to watch how steel responds to heat at a slower speed than with electrical welding. With metal–inert gas (MIG) welding, milliseconds after the trigger is pulled the steel has already become a liquid, and the welding process has begun. You would need super-high-speed cameras to see this process in detail. When using the oxy-acetylene torch to weld or cut steel, you first need to bring an area of steel up to its melting temperature. This alone takes from 10 to 30 seconds, and during that time, you are able to watch the steel gradually change from a dull gray to a molten yellow-white pool. Only when you see the pool of molten steel is your material ready to be welded or cut. Figure 9.1 shows a cut underway.

FIGURE 9.1 Oxy-acetylene cutting in process.
Today, the main reason to use a torch setup is its versatility and cost. If you wanted to outfit a shop to weld, cut, and heat different metals, you’d be looking at spending tens of thousands of dollars. For less than $300 (plus gases), you can buy a torch kit that will do all that. Maybe it’s the Luddite in me, but I think that there is something rewarding about slowing down and enjoying the process that reduces welding to an easy-to-understand process. Also, I really like fire.
Whether you are cutting, welding, or heating steel to bend, the basic principles behind the oxy-acetylene torch are the same. Pressurized gas is let out of each gas cylinder and into a pressure regulator. These regulators not only restrict the flow of gas to a controllable rate known as pound-force per square inch (lbf/in2) but also tell you the pressure of the gas in each cylinder.
When you open the regulators, gas will start to flow through the hoses until it reaches another restriction. The hoses should be connected to the torch head with all valves closed to prevent a gas leak. If when you open the regulator you hear a constant hiss, close the valve and check all knobs on the torch and for leaks along the hose.
For each application of your torch, you will adjust the regulators to a different pressure. Recommended pressure settings will be given in the practice sessions of this chapter. When this pressure reaches the torch head, you must allow it to enter the torch and continue through the tip. There you have another adjustment. Each of the knobs on the torch controls the flow of oxygen or acetylene to the tip of the torch. If you were to burn acetylene alone, it would burn at around 4,000°F and create a lot of soot, and as you learned earlier, oxygen is not flammable by itself. It’s the mixing of these two gases that creates a flame that is over 6,000°F hot, more than hot enough to melt steel.
Before you are ready to weld, cut, or heat steel, you must carefully calibrate the hose pressure and each of the control knobs on the torch to the proper setting for your torch tip and material. This takes some practice, especially when you are wearing insulated gloves, so be patient. The pressure at the regulator is really not how much gas pressure you want at the tip of the torch but rather slightly more than that so that you are never “starved” for gas at the end of the torch. If you were to let the full amount of gas escape from the torch tip, the pressure most likely would extinguish the flame. (This is not the case for torch cutting, when you actually do want the full blast of oxygen to blow the molten steel out of the way.)
By replacing the torch head and tips, you can drastically change the function of the oxy-acetylene setup. For welding, the torch head has an oxygen mixing valve, an acetylene mixing valve, and a single hole at the end of the welding tip where the flame is formed. For the rosebud, again you have these two mixing valves, but now you have a series of small holes at the end of a much larger tip. For cutting, you still have the same two mixing knobs at the base of the torch, but now you also have an oxygen blast knob and blast trigger along with a series of holes at the end of the tip. In the middle of this series of holes is the oxygen blast hole that allows the full flow of oxygen when the trigger is depressed.
Up next is a review of all these parts, and you’ll learn more about the specifics of how each functions, as well as the proper settings and accessories for each.
Parts and Accessories
Torch and Tank Setup
Figure 9.2 shows the torch and tank setup.
FIGURE 9.2 Torch and tank setup parts and accessories.
Parts Detail
Figure 9.3 shows the parts in detail.

FIGURE 9.3 Parts detail.
Torch Detail
Figure 9.4 shows the details of the torch head.
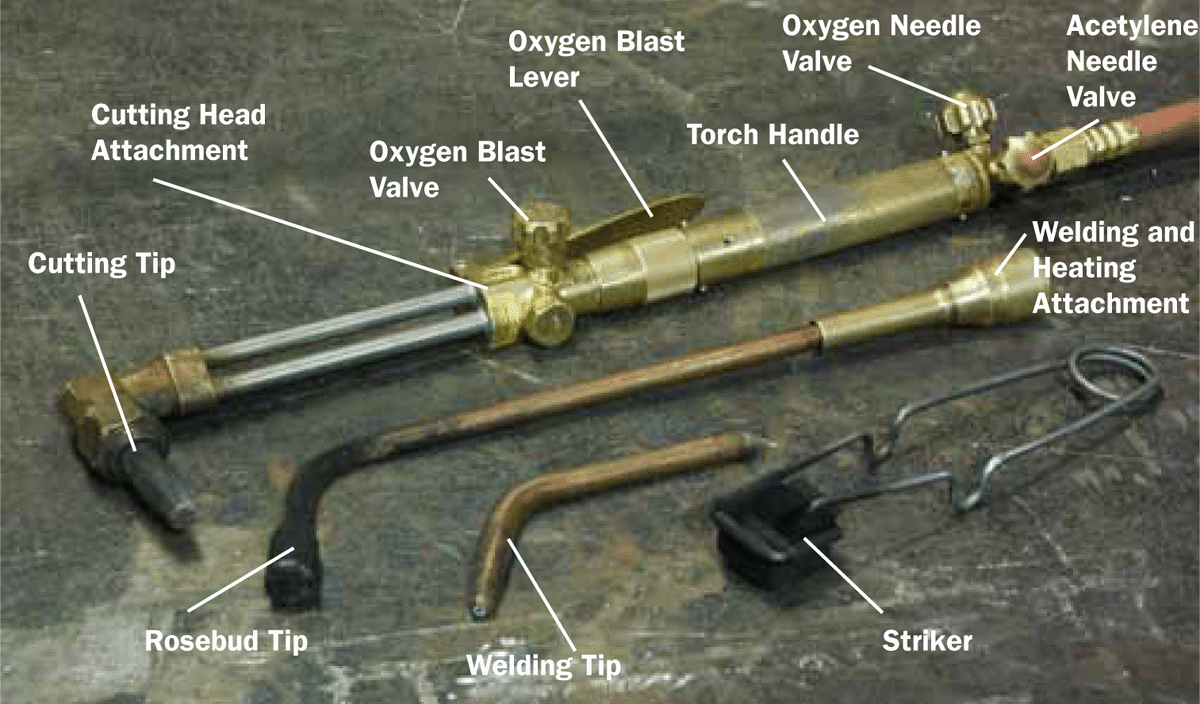
FIGURE 9.4 Torch-head details.
Safety
• Tighten all brass fittings just to slightly oversnug using the apparatus wrench.
• Never use acetylene gas at over 15 lb/in2.
• Always inspect your equipment before use. Discard damaged equipment and hoses.
• Only use a sparker to light the torch.
• Before opening a gas valve, make sure that the regulator is closed by turning the valve counterclockwise until it turns freely. Both the working gauge and the cylinder gauge should read zero.
• Make sure to use the proper regulator for the gas cylinder (acetylene should be red past 15 lb/in2).
• Stand to the side of the regulator when opening gas cylinders.
• Open the gas valves slowly.
• Never use the torch around flammable materials such as oil or gasoline.
• Don’t use either gas to clean off tools or clothing.
• Always keep your torch pointed away from your body and others.
• Consider the area just below your workpiece because sparks will fall there when you are torch cutting. Do not leave hoses or flammable objects in this area.
• Put up a welding screen if you are working in a shared shop.
CAUTION: Never light a torch with a cigarette lighter or gas lighter. The heat from the torch flame can cause the lighter to explode. Always use a sparker.
Personal Protective Equipment
• Always wear properly shaded safety goggles or a face shield (shade no. 4).
• Insulated welding gloves should be worn at all times.
• Wear heavy nonflammable (leather) boots.
• Wear heavy, uncuffed pants.
• Wear long sleeves.
• Synthetic materials should never be worn.
• If desired, wear a leather apron to protect your clothing.
Torch Cutting
Oxy-acetylene cutting uses a flame of over 6,000°F to heat up an area of steel and then, with a high-pressure continuous flow of oxygen, blast the molten pool through the steel (Figure 9.5). During this process, the oxygen plays a triple role. First, it mixes with the acetylene flame, which then burns at a much higher temperature. In not too long, a molten pool of metal forms on the surface of the steel where the flame has been in contact. When the blast trigger is depressed, a stream of oxygen flows from the center hole on the cutting tip. This stream not only physically forces the molten steel through the material but also creates an oxygen-rich environment that oxidizes the surrounding steel. This steel oxide melts at a lower temperature, so even material that wasn’t in direct contact with the flame now can melt rapidly and be blown away by the oxygen blast. This is a cycle that continues as long as a small “pool” of molten steel is kept just ahead of the torch. For this reason, a travel rate, in inches per minute, should be followed when cutting through materials of varying thicknesses.
FIGURE 9.5 Torch with cutting head.
NOTE: It’s the oxidation of steel that allows the oxy-acetylene torch to cut through steel. For this reason, you can’t cut nonferrous metals such as aluminum, stainless steel, or bronze with an oxy-acetylene torch.
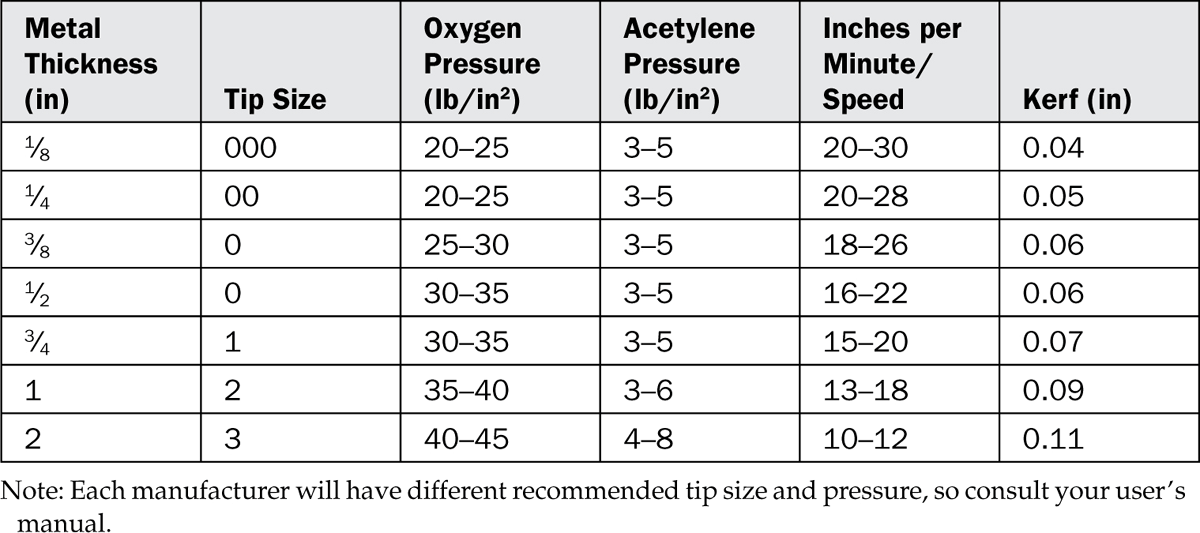
Oxy-acetylene cutting is probably one of the most popular uses for the setup today. In construction, demolition, and even computer-controlled fabrication, cutting torches of various sizes are used quite frequently. Tips are available for the cutting attachment from 000 to 6,000 being the smallest. With these tips, you can safely cut steel from ⅛ in thick all the way up to 4 in with the same torch head! Table 9.1 presents a cutting reference that provides tips and the recommended pressures. A good rule of thumb is to use a gas ratio of roughly 5:1, oxygen to acetylene.
TABLE 9.1 Example Torch Cutting Settings Table
Operation
Now I’m going to walk you through proper torch setup, flame lighting, cutting, and shutdown procedures. These steps should be followed every time you prepare to make a cut. I recommend reading this section in its entirety before trying to follow along with it or the practice sessions.
Setting Up Your Work Area and Gas Cylinders
1. Make sure that your workspace is clean of any flammable materials and that you are wearing all required personal protective equipment (see the preceding list).
2. Parts to be cut should be on your cutting table and free of coatings or contaminants. Use a heavy piece of steel or a clamp to secure your workpiece if it does not sit stably (Figure 9.6).

FIGURE 9.6 Work in place and cutting area prepared.
3. Inspect the tanks and gas lines for damage and possible leaks.
4. Make sure that the oxygen and acetylene needle valves on the torch handle are closed, the regulator turns counterclockwise freely, and both gas cylinders are fully closed.
5. If the cutting attachment is not already secured to the torch handle, attach it now securely.
6. Select the proper tip using Table 9.1, and secure it to the end of the cutting attachment using the brass nut.
7. With your torch set up properly and all valves closed, you want to find your working position before you go ahead and introduce gas.
a. Position your torch tip perpendicular to the work material with your body braced against part of the table. Make sure that your feet and hoses aren’t directly under the work material.
b. If you are right-handed, hold the torch in your right hand, and use your left hand to brace the torch just in front of the oxygen burst handle. Bracing the torch with one hand will help you to keep it steady during the cut. Figure 9.7 presents an example.

FIGURE 9.7 My braced working position.
c. Practice moving the torch along the full range of motion required for your cut, or plan on repositioning yourself to make a longer cut. When you find a comfortable position, you can move on to introducing gas.
8. Slowly open the oxygen cylinder valve two to three full turns. If you hear a leak, close it and check your equipment. Do not open the valve all the way because it could become jammed open.
9. Check the cylinder pressure gauge on the regulator. It should have a reading between 0 and as much as 3,000 lb/in2, as in Figure 9.8. It is okay to use an oxygen tank until it runs out of gas.
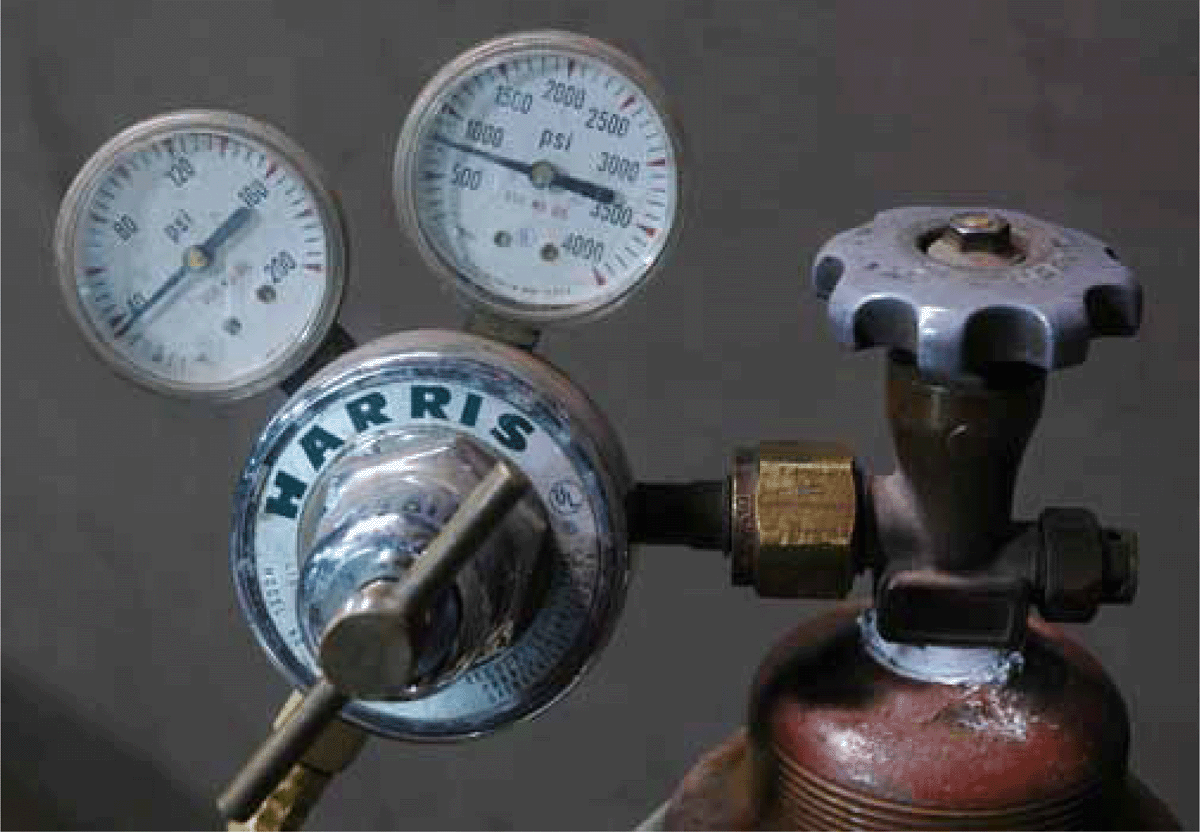
FIGURE 9.8 Oxygen cylinder reading.
10. Before you introduce oxygen into the hose by turning the regulator clockwise, open the needle valve on the torch slightly, and then ease the regulator valve open. Use the operator’s manual to determine what pressure setting is correct for your material. You may need to tap on the regulator dial to get an accurate reading. When the correct pressure is reached, close the needle valve on the torch.
11. You are now ready to open the acetylene cylinder. Turn the handle (or use the apparatus wrench shown in Figure 9.9) very slowly and only a half to one full turn to open the tank. If you are using an apparatus wrench, leave it on the tank for easy shutoff.

FIGURE 9.9 Acetylene cylinder with apparatus wrench.
12. Check the tank pressure gauge. It should have a reading between 0 and 250 lb/in2 (Figure 9.10). If your acetylene reading is 50 lb/in2 or less, replace the tank with a new one or inform your shop supervisor.

FIGURE 9.10 Acetylene pressure reading.
13. Just as with oxygen, before you adjust the acetylene regulator to introduce gas into the hose, you need to slightly open the needle valve on the torch. Introduce acetylene by turning the valve slowly clockwise. Use the operator’s manual to determine the correct pressure setting for your material. You may need to tap on the regulator dial to get an accurate reading. When the correct pressure is reached, close the needle valve on the torch.
CAUTION: Never adjust the acetylene gas to over 15 lb/in2.
CAUTION: Acetylene gas is scented like rotten eggs. If you ever smell this when working with a torch, shut the tank off immediately, and check your tools or contact a shop supervisor.
Lighting and Mixing the Flame
Now you have your gases set properly at the tanks and pressure leading all the way to the torch handle through the hose. The next steps illustrate how to light the flame.
1. To light the flame, you need to start with the flammable gas acetylene. Gently open the acetylene needle valve about one-eighth turn or until you hear a very quiet hiss of gas escaping. If the gas ever sounds like a roar, close the valve and try again. Too much acetylene gas when lighting could cause burns on your lighting hand.
2. Point your torch tip away from you but perpendicular to your line of sight. Make sure that it’s not directed toward any other materials, and hold the handle perpendicular to the ground.
3. With a small stream of acetylene coming out of the tip of the torch, use a gloved hand and a striker to create sparks at the tip. You may need to squeeze the sparker a few times to get the hang of it.
4. The flame should ignite with a quiet poof and not a loud whoosh. If you get a whoosh, you probably started off with too much acetylene.
NOTE: The black soot that is created from the acetylene flame is normal and will go away once you add oxygen.
5. Now you want to adjust the needle valve and watch the flame at the tip of the torch.
6. Add more gas by turning the valve counterclockwise until the flame reaches the torch manufacturer’s recommendation. For most torches, this will be just before the base of the flame separates from the tip or when you hear a rustling sound from the flame.
7. Sometimes you’ll add too much acetylene, and the flame will be blown out. If this happens, close the needle valve all the way, and start over from step 1.
8. With the acetylene flame adjusted properly, now you want to introduce oxygen. Gently turn the oxygen needle valve counterclockwise until you start to see the flame turning blue. If you open the oxygen too much at first, it could blow the flame out. If this occurs, shut off both the oxygen and acetylene needle valves, and start over at step 1. When oxygen is first introduced, the flame should start to have distinct sections like those illustrated in Figure 9.11.
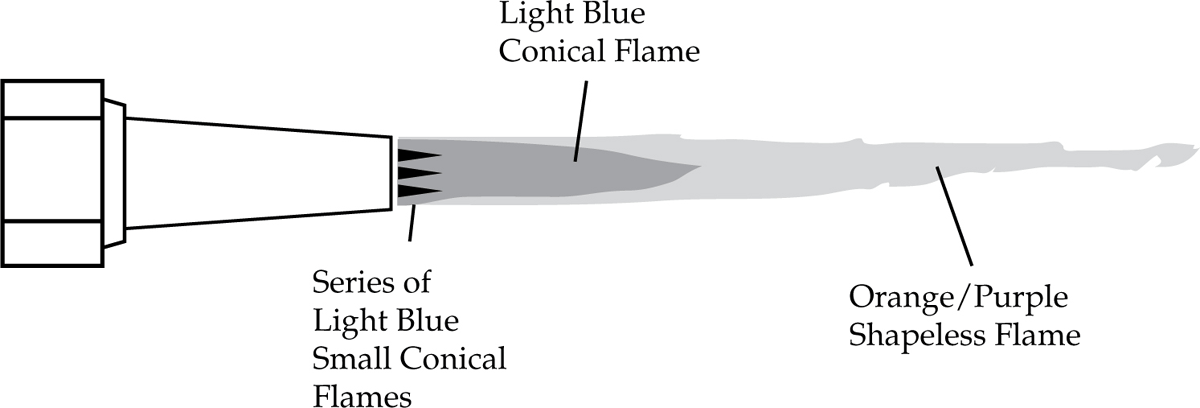
FIGURE 9.11 Parts of a torch flame.
9. With some oxygen introduced to the acetylene flame, it will start to appear blue. Continue to add oxygen until you can see three distinct flame areas—one longer transparent flame, roughly a foot long; a smaller, brighter blue cone that extends inside the transparent flame; and a small series of cones around the tip. You want to mix a neutral flame for the best results when cutting. (Double-check the manufacturer’s recommended setup.)
a. When you can clearly see the longer, less-defined flame and the inner cone, you have a carburizing flame, which contains too much acetylene and not enough oxygen. This will result in the transfer of carbon to the steel.
b. As soon as oxygen is increased and the inner cone recedes inside the smaller set of cones at the tip, the flame is neutral.
c. If too much oxygen is added, the result is an oxidizing flame that can result in the formation of undesirable oxides (Figure 9.12).
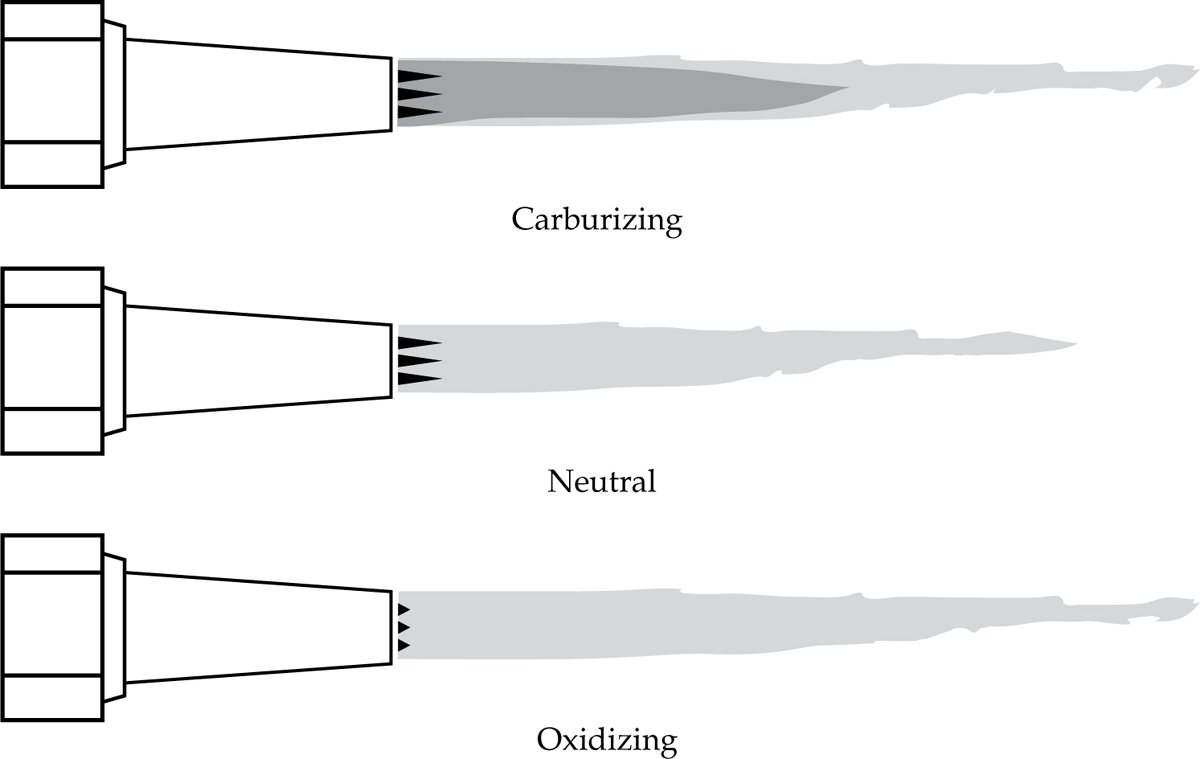
FIGURE 9.12 Carburizing flame, neutral flame, and oxidizing flame.
10. The last adjustment you need to make is to open the oxygen-blast needle valve. Open this valve about two full turns counterclockwise to allow the full flow of oxygen when the lever is pressed. No oxygen will flow until the blast lever is pressed.
11. Once the blast valve is open and a neutral flame is achieved, you should check to see if the flame changes when the oxygen blast is introduced by pressing the handle on the torch. Be sure to push the handle all the way, and the flame should make a loud hissing sound.
12. When the handle is pressed, look at the small cones near the tip of the flame. If part of the middle flame appears around them, increase the oxygen slightly until it goes away.
13. Now you are ready to cut!
Making a Cut
1. Return to the position you practiced in earlier, making sure to keep the hoses out of the way of the flame and where sparks will fall.
2. Move the end of the cutting tip to where you want to start the cut, and hold it ⅛ to ![]() in away from the surface. You can start a cut anywhere on the surface of steel, but starting at an edge is easiest for beginners. Figure 9.13 shows me starting a cut on the edge.
in away from the surface. You can start a cut anywhere on the surface of steel, but starting at an edge is easiest for beginners. Figure 9.13 shows me starting a cut on the edge.

FIGURE 9.13 Starting at the edge.
3. Note the flames that redirect around the cutting tip. These spread out a few inches away from the torch, so keep your hands and arms away from this area.
4. You should be able to hold the tip steadily in the same location while the workpiece heats up. If you have trouble doing this, try repositioning your body to find a more secure brace. Moving the torch around too much during this phase will greatly increase the amount of time needed to bring the steel up to temperature.
5. Watch the surface of the steel just below the small series of cones. This will change from a dull gray to a dark red to orange and finally to yellow. When the surface color reaches yellow, some very small pools of molten steel will appear just below each cone. When the steel has reached this point, it is ready to cut.
a. If the oxygen-blast handle is pushed before the steel has reached a melting temperature, nothing will happen. The oxygen burst will just blow the heat around the surface of the steel, and it will never come up to temperature.
b. When the first sign of a molten pool is seen on the surface, this is the ideal time to start the cut. This helps to eliminate excess heat buildup around the cut area.
c. If more heat is applied than necessary, the material may start to melt and drip down, even without the addition of oxygen, creating a not so attractive cut.
6. At the first sign of these pools, push the trigger all the way in. It’s all or nothing with the oxygen burst. Anything less than the full flow will cause the blast to make an improper cut.
7. When the cut begins, a shower of sparks will appear below the material, as in Figure 9.14 (aren’t you glad your feet aren’t under there now?).
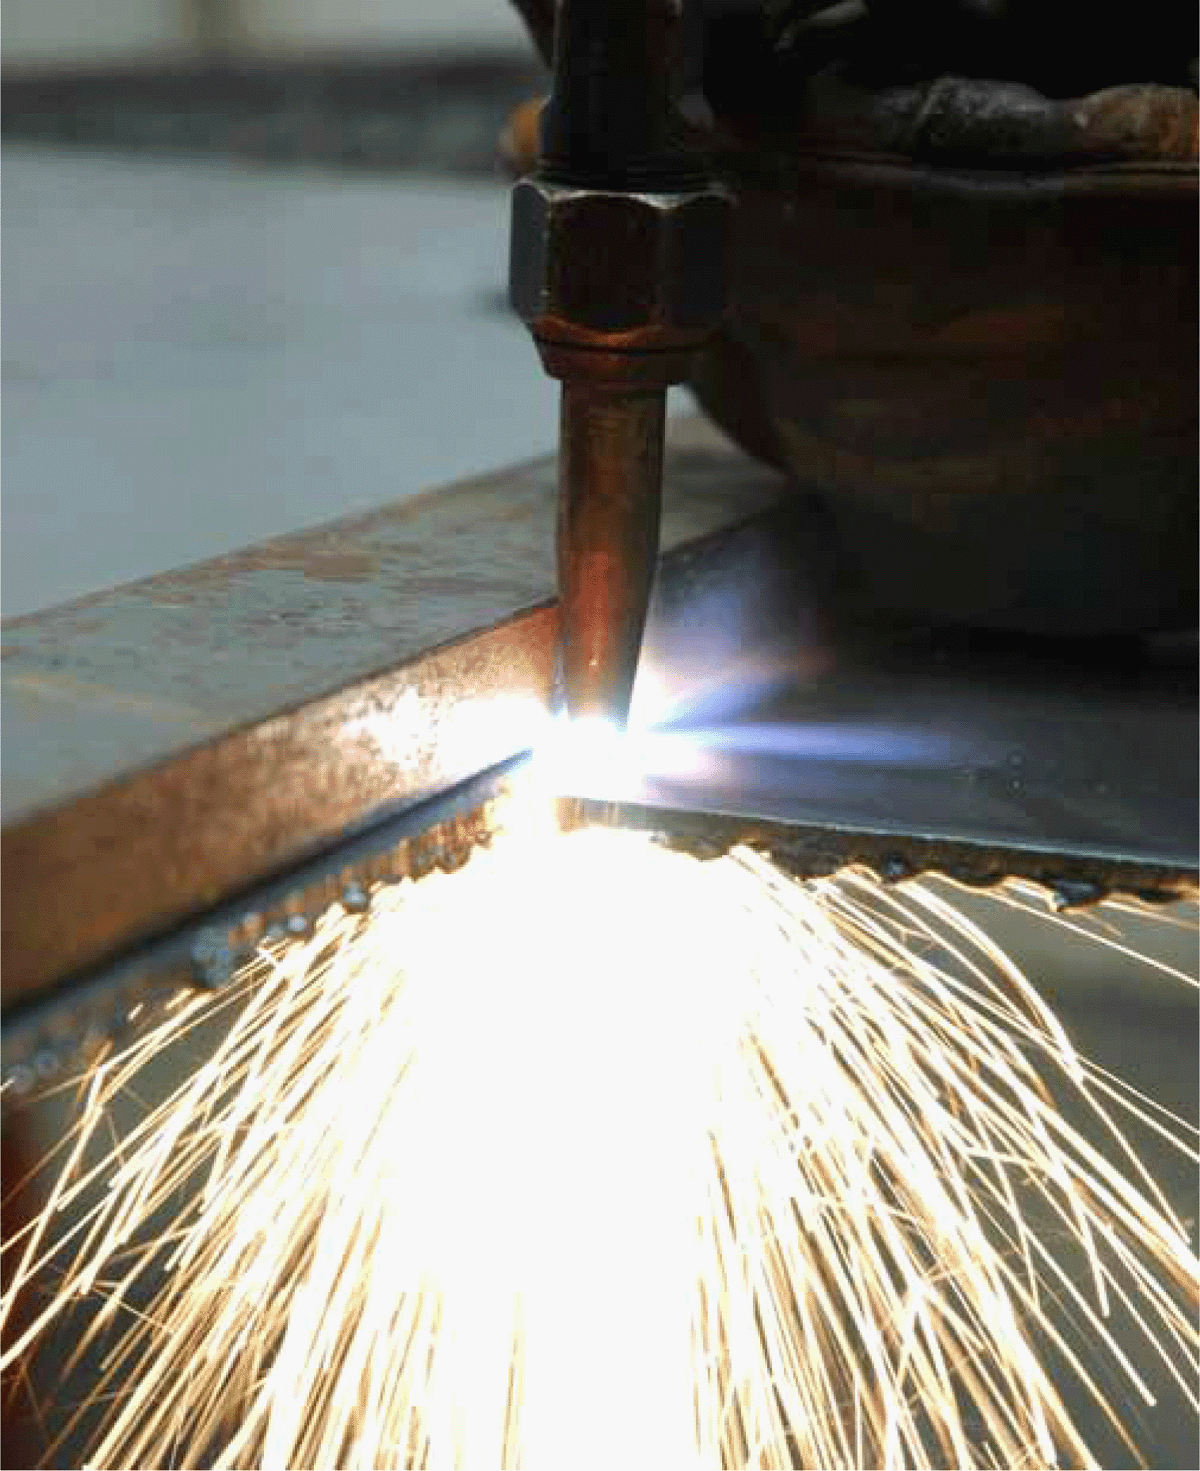
FIGURE 9.14 Cut underway.
8. To continue a successful cut, you must keep the trigger pressed all the way, maintain a steady distance from the surface, and travel at the recommended speed (refer to Table 9.1 for suggested travel speeds). As long as you do these three things, you will have a nice clean cut. Of course, this is a lot to keep in mind for your first few cuts, so listed below are some common problems that newcomers face and how to solve them.
a. Traveling too fast and/or jerky movement. A steady speed at the recommended rate is critical for a clean and successful cut. Moving too fast or making jerky movements will break the cycle that keeps the cutting process going, and the pool will be lost. If this happens, release the oxygen-blast handle, and reheat the last area that was cut until a pool forms, and then restart the cut. Consider bracing yourself more securely.
b. Touching the surface of the material. When the torch tip makes contact with the surface of the steel, a backfire usually occurs. A backfire may blow the flame out and will cause a loud pop. If this happens, close the needle valves on the torch, and relight the torch starting at “Lighting and Mixing the Flame” above. If there was a backfire but the torch didn’t go out, you can continue your cut. Make sure that you are braced sufficiently to keep the torch steady.
c. Drifting away from the surface of the material. When the torch tip rises more than ¼ in away from the surface of the steel, the flame has a hard time keeping the steel hot enough to keep the cycle going. If the pool is lost in this way, release the oxygen-blast handle and reheat the last area that was cut until a pool forms, and then restart the cut. Make sure that you can clearly see the distance between the torch tip and the steel.
d. Moving too slowly. Some newcomers are a little timid when it comes to controlling a 6,000°F flame and end up moving very slowly. Chances are that you may continue to cut even when moving too slowly, but you’ll end up with a really large kerf and a deformed workpiece. Try slowly increasing your speed until you reach the limit of how fast you can cut through the material. Then back off that slightly, and you’ll be in good shape!
e. Backfire. As mentioned earlier, touching the surface of the steel can cause a backfire, but so can a bit of slag or hot metal if it interrupts the flame. Sometimes this will cause the flame to automatically relight, which is okay, and the cut can be continued. If the torch has repeated backfires, you should close both needle valves and have a professional inspect the torch tip and seals.
9. As you continue along the cut line, remember that when you are finished, the cut piece will fall to the floor if not supported by the cutting table. If you want to let it fall, keep your feet and hoses clear.
10. When the cut is completed, release the oxygen-burst trigger and prepare to shut down the torch.
Shutting Down a Torch
After a cut is completed, you need to learn the correct procedure for turning off the torch and shutting down the gases. If you are shutting the torch off while you reposition your work but are not leaving the torch area, you can leave the gases set to the proper pressure. If you plan to leave the work area, even if you will come back to the torch later, shut the gases down properly to avoid accidents.
1. With the oxygen trigger released, the first thing you should do when turning off the torch is to close the oxygen needle valve by turning it clockwise. Be careful not to overtighten the brass knob.
2. At this point, the acetylene flame will still be burning, so the next step is to quickly but gently close the acetylene needle valve.
3. Close the oxygen-blast needle valve last.
4. Now no more gas should be escaping from the torch, and the torch handle is shut down properly but ready to use again shortly.
NOTE: Opinions differ on whether oxygen or acetylene should be turned off first. Personally, I think it’s best to let the lack of fuel pressure extinguish the flame with no chance of it blowing back into an open fuel line. Turning off the fuel gas first will result in a loud pop as the flame is extinguished, which I think should be avoided.
Shutting Down the Gases
With the flame extinguished and no gases escaping from the torch handle, now you can shut down the gas tanks and bleed the lines. For this, you start with the fuel gas to decrease the chance of a leak. Always be sure to follow these instructions so as to leave the tool in working order for the next person and avoid a buildup of acetylene gas that could cause an explosion.
1. Close the valve on the acetylene gas cylinder all the way. Be careful not to overtighten it.
2. Open the acetylene needle valve on the torch handle, and watch both pressure gauges on the regulator return to zero.
3. Close the acetylene needle valve on the torch handle.
4. Close the acetylene regulator by turning it counterclockwise until it moves freely.
5. Close the valve on the oxygen cylinder.
6. Open the oxygen needle valve on the torch handle and watch both pressure gauges on the regulator return to zero.
7. Close the oxygen needle valve.
8. Close the oxygen regulator by turning it counterclockwise until it moves freely.
9. Close the oxygen-blast knob on the torch, and double-check that all knobs and regulators are closed.
10. Gently coil the hoses around the cart handle or hose rest, and rest the torch handle in the tray.
Cutting Practice
Practice 1: Cutting Sheet Metal
To practice, you’ll cut out some pieces from a 10-gauge sheet. Place the sheet on your cutting table or with the end to be cut hanging fully off your normal work area if no cutting table is available. Set your gas pressure and torch tip for cutting 10-gauge steel.
1. First, mark your cut line on the surface of the steel using soapstone. Try cutting out 6-in squares that you can use later for welding practice.
2. Find a position that is comfortable, and practice moving along the cut line.
3. When ready, light the torch and mix your flame.
4. When you achieve a neutral flame, get in position with the tip of your torch ⅛ in off the material and directly above the edge.
5. Do not use the blast trigger yet, but wait and look for the molten pools to form.
6. When the steel below the torch looks glossy, pull the blast trigger all the way.
7. Continue to hold the trigger as you move along the cut line at a comfortable rate. You’ll know that you’re going too fast if the cutting process stops or sparks shoot up and now down through the material. Too slow and you’ll have excess slag on the bottom.
8. Complete the cut, and shut down the torch.
9. After the cuts are complete, the material may be held together by some slag on the underside, as in Figure 9.15. If the cuts were successful, you can give each piece a solid tap to break it free or twist it off along the cut line.

FIGURE 9.15 Nonseparated material.
NOTE: Practice makes perfect, so repeat this process as many times as you like, cutting different shapes and directions and heavier-gauge steel.
Practice 2: Cutting Thick Stock
Grab a piece of ¾-in solid round stock for the next practice cut. Set your pressure and cutting tip accordingly.
1. Support your stock so that an inch or so hangs off the end of your table. Put a mark where you intend to make the cut at about an inch.
2. Find a good position to make the cut where you can clearly see that the torch flame will heat your stock.
3. Light and adjust your flame properly, and bring the torch to about 1⁄8 in from the leading edge of your cut, as in Figure 9.16. Gently angle the torch toward your material to reduce heating time.
4. It will take quite a bit longer to bring the surface up to temperature with this material, so be patient. Holding the torch steady and angled toward the surface will help to speed things up.
5. When a pool is formed (it should be easier to see on stock like this than on sheet metal), turn the torch perpendicular to the ground, keeping the flame and cones in contact with the pool, and fully depress the blast trigger.
6. The cut should begin immediately, so keep the torch steady and move along the surface of the stock. As you go, maintain the 1⁄8-in distance from the surface even though it is curved.
7. Continue until the cut is complete, and be sure that the falling piece of steel doesn’t touch your clothing or the gas hoses.
8. Turn off the torch when the cut is complete.

FIGURE 9.16 Angled tip for round stock.
Torch Welding
Oxy-acetylene torch welding uses the mixture of oxygen gas and acetylene gas to make a superheated flame that burns at around 6,000°F, much like the flame we mixed for torch cutting. The process uses a torch handle that differs from the cutting attachment in two main ways: (1) there is no trigger to introduce an oxygen blast, and (2) the end of the tip has only one exit hole. Without the need for an oxygen blast, we use a much different ratio when adjusting gas pressures at the regulators.
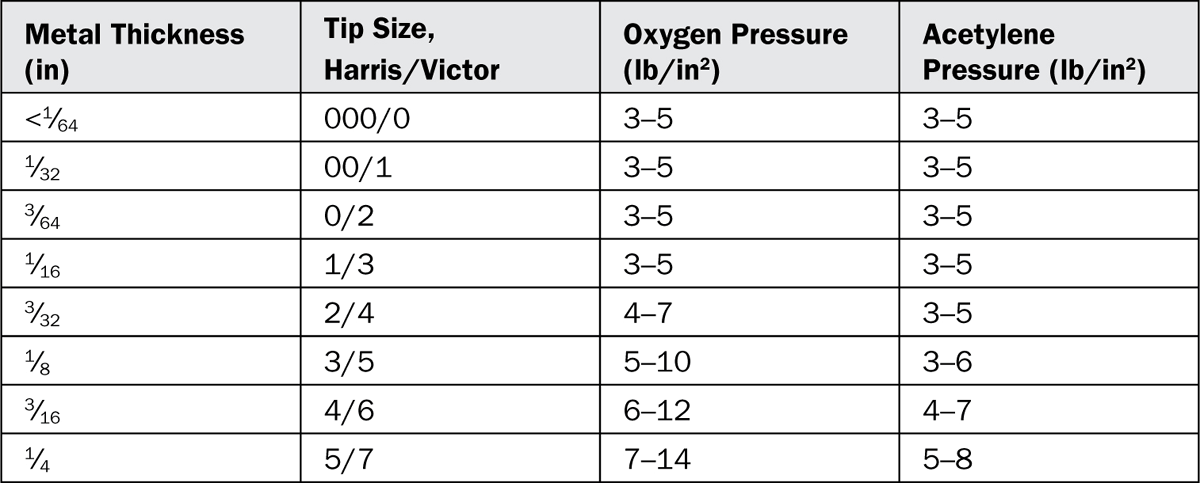
A number of different-sized tips are available, and you determine the one to use based on the thickness of the steel to be welded. Table 9.2 shows the tip sizes recommended for metal thicknesses from ![]() to ¼ in. Two leading brands of torch handles and parts are Victor and Harris. They use different numbering techniques for their tips, so in the second column of the table you can see both side by side. Also in this table you’ll notice the pressure recommendations for the corresponding material. The golden ratio here is more like 1:1, with a slightly lower acetylene pressure for thicker materials. Again, since you’re not using a burst of oxygen, you do not need very high pressure for the oxygen. Refer to your torch manual for specific settings and instructions on how to change torch tips.
to ¼ in. Two leading brands of torch handles and parts are Victor and Harris. They use different numbering techniques for their tips, so in the second column of the table you can see both side by side. Also in this table you’ll notice the pressure recommendations for the corresponding material. The golden ratio here is more like 1:1, with a slightly lower acetylene pressure for thicker materials. Again, since you’re not using a burst of oxygen, you do not need very high pressure for the oxygen. Refer to your torch manual for specific settings and instructions on how to change torch tips.
TABLE 9.2 An Example Torch Welding Tip Chart
Filler
Filler is an essential part of most welding operations, and torch welding is no different. To fill in your weld areas, use filler rods that are fed by hand. The rods come in a variety of diameters commonly between ![]() and ⅛ in. They should be copper-coated to prevent oxidation and may be around 36 in long. When I torch weld, I typically cut these rods in half to make them more usable, but you will generate a few extra inches of wasted rod this way.
and ⅛ in. They should be copper-coated to prevent oxidation and may be around 36 in long. When I torch weld, I typically cut these rods in half to make them more usable, but you will generate a few extra inches of wasted rod this way.
When selecting a filler rod, it should not be thicker than the base material to be welded. For most of the material in this book, ![]() - to
- to ![]() -in rod will work great. When purchasing torch welding rods, you also can use most tungsten–inert gas (TIG) welding rods for mild steel.
-in rod will work great. When purchasing torch welding rods, you also can use most tungsten–inert gas (TIG) welding rods for mild steel.
NOTE: You actually can torch weld without using filler rods. To do so, you need to “weave” the molten pools of steel together between the two base materials. It’s a little tricky but a fun trick to practice.
Flux
Another anomaly: Flux isn’t actually required for torch welding when you use a well-balanced neutral flame. With too much or too little oxygen, though, the weld can suffer. I typically use a brush-on all-purpose flux such as Stay-Clean Paste Flux just to play it safe. Brush this flux in between the two pieces to be welded to promote a clean weld pool and filler flow.
Operation
The procedure for setting up a torch for welding is much like it is for cutting, with key differences in recommended gas pressures and needle-valve adjustment.
Setting Up Your Work Area and Gas Cylinders
1. Make sure that your workspace is clean of any flammable materials and that you are wearing all the required personal protective equipment (see earlier list).
2. Parts to be welded should be on your cutting or welding table and free of coatings or contaminants. Use clamps or magnets to hold your pieces together securely and in the proper orientation, as shown in Figure 9.17.

FIGURE 9.17 Work in position for welding.
3. Inspect the tanks and gas lines for damage and possible leaks.
4. Make sure that the oxygen and acetylene needle valves on the torch handle are closed, the regulator turns counterclockwise freely, and both gas cylinders are fully closed.
5. If the welding attachment is not already on the torch handle, attach it now securely.
6. Select the proper tip using Table 9.2, and secure it to the end of the welding attachment using the brass nut.
7. With your torch set up properly and all valves closed, you want to find your working position before you go ahead and introduce the gas. Because torch welding takes significantly longer than MIG welding, some welders prefer to sit while working. If you are right-handed, hold the torch in your right hand, and use your left hand to hold the filler rod. Brace your right hand or elbow against the table so that you can hold the tip steadily near your weld area, as shown in Figure 9.18.
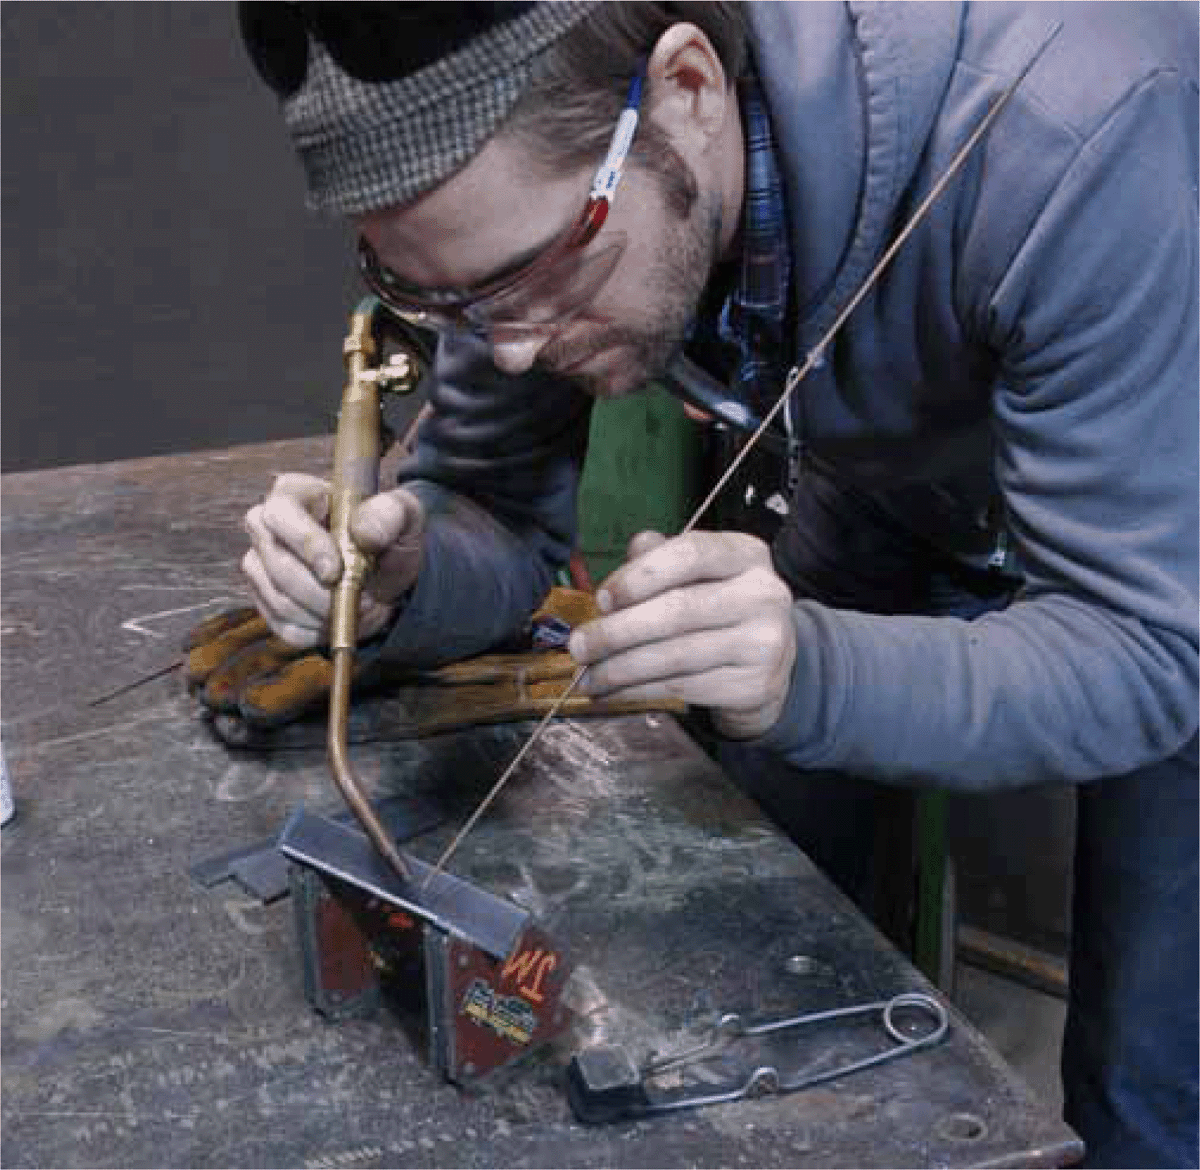
FIGURE 9.18 My braced working position.
8. Slowly open the oxygen cylinder valve two to three full turns. If you hear a leak, close the valve and check your equipment. Do not open the valve all the way because it could become jammed.
9. Check the cylinder pressure gauge on the regulator. It should have a reading between 0 and as much as 3,000 lb/in2. It’s okay to use an oxygen tank until it runs out of gas.
10. Before you introduce oxygen into the hose by turning the regulator clockwise, open the needle valve on the torch slightly, and then ease the regulator valve open. Use the operator’s manual to determine the correct pressure setting for your material. You may need to tap on the regulator dial to get an accurate reading. When the correct pressure is reached, close the needle valve on the torch.
11. You are now ready to open the acetylene cylinder. Turn the handle (or use the apparatus wrench) very slowly and only one-half to one full turn to open the tank. If you use an apparatus wrench, leave it on the tank for easy shutoff.
NOTE: Open the fuel gas last to lessen the risk of explosion or fire.
12. Check the tank pressure gauge. It should have a reading between 0 and 250 lb/in2. If your acetylene reading is 50 lb/in2 or less, replace the tank with a new one, or inform your shop supervisor.
13. Just as with oxygen, before you adjust the acetylene regulator to introduce gas into the hose, you need to slightly open the needle valve on the torch. Introduce acetylene by turning the valve slowly clockwise. Use the operator’s manual to determine the correct pressure setting for your material. You may need to tap on the regulator dial to get an accurate reading. When the correct pressure is reached, close the needle valve on the torch.
Lighting and Mixing the Flame
Now you have your gases set properly at the tanks and pressure leading all the way to the torch handle through the hose. Before lighting the flame, make sure that your filler rods are within reach. The next steps show how to light the flame.
1. To light the flame, you need to start with the flammable gas, acetylene. Gently open the acetylene needle valve about one-eighth turn or until you hear a very quiet hiss of gas escaping. If the gas ever sounds like a roar, close the valve and try again. Too much acetylene gas when lighting could result in burns on your lighting hand.
2. Point the torch tip away from you but perpendicular to your line of sight. Make sure that it’s not directed toward any other materials, and hold the handle perpendicular to the ground.
3. With a small stream of acetylene coming out of the tip of the torch, use a gloved hand and a striker to create sparks at the tip. You may need to squeeze the sparker a few times to get the hang of it.
4. The flame should ignite with a quiet poof and not a loud whoosh. If you get a whoosh, you probably started off with too much acetylene.
NOTE: The black soot that is created from the acetylene flame is normal and will go away once you add oxygen.
5. Now you must adjust the needle valve and watch the flame at the tip of the torch.
6. Add more gas by turning the valve counterclockwise until the flame reaches the torch manufacturer’s recommendation. For most torches, this will be just before the base of the flame becomes separated from the tip or when you hear a rustling sound from the flame. Figure 9.19 shows what this should look like.

FIGURE 9.19 Holding the torch with an acetylene flame.
7. Sometimes you’ll add too much acetylene, and the flame will be blown out. If this happens, close the needle valve all the way, and start over from step 1.
8. With the acetylene flame adjusted properly, now you want to introduce the oxygen. Gently turn the oxygen needle valve counterclockwise until you start to see the flame turning blue. The flame will appear similar to the cutting flame but without the series of small cones; rather, there will be one small cone in the middle of the welding tip. If you open the oxygen too much at first, it could blow the flame out. If this occurs, shut off both the oxygen and acetylene needle valves, and start over at step 1.
9. With some oxygen introduced to the acetylene flame, it will now appear blue. Continue to add oxygen until you can see three distinct flame areas—one longer transparent flame, roughly a foot long; a smaller, brighter blue cone that extends inside the transparent area; and a small cone around the tip. You want to mix a neutral flame (see below) for the best results when welding. (Double-check the manufacturer’s recommended setup.) Figure 9.20 shows carburizing, neutral, and oxidizing flames for a welding tip.

FIGURE 9.20 Carburizing flame, neutral flame, and oxidizing flame.
a. When you can clearly see the longer, less defined flame and the inner cone, you have a carburizing flame, which contains too much acetylene and not enough oxygen. This will result in the transfer of carbon to the steel.
b. As soon as the oxygen is increased and the middle cone recedes inside the smallest cone at the tip, the flame is neutral.
c. If too much oxygen is added, the result is an oxidizing flame, which can result in the formation of undesirable oxides.
10. With a proper flame mixed, you are now ready to efficiently heat your material and create a weld!
Making a Weld
1. Return to the position you practiced earlier, making sure to keep the hoses out of the way of the flame and hot material.
2. Move the welding flame to where you want to weld, about ¼ to ⅜ in away from the surface, as shown in Figure 9.21.
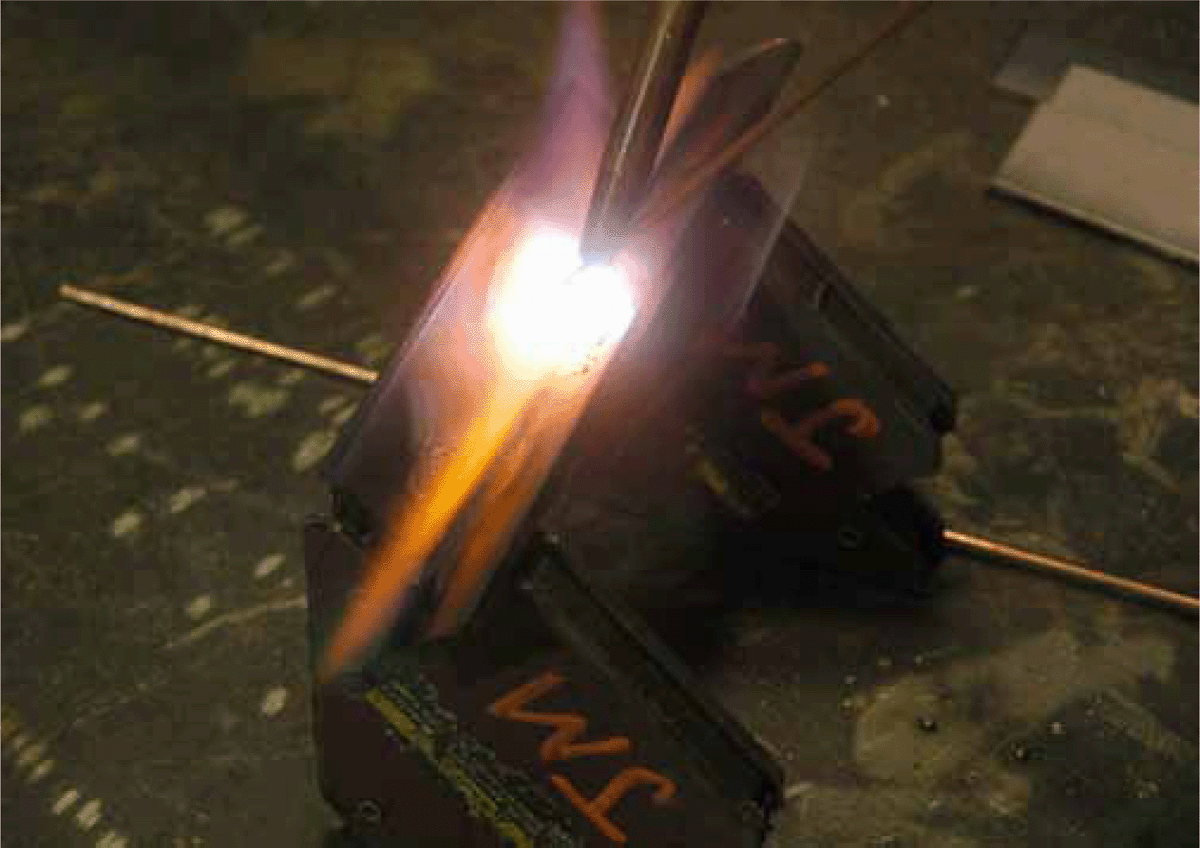
FIGURE 9.21 Starting to weld.
3. You should be able to hold the tip steadily in the same location while making a gentle circular motion as the work area heats up. If you have trouble doing this, try repositioning your body to find a more secure brace. Moving the torch around too much during this phase will greatly increase the amount of time needed to bring the steel up to temperature.
4. The steel will change from dull gray to a dark red to orange and finally to yellow. When the surface reaches yellow, there should soon appear a small shiny pool of molten steel. Keep circling the torch around this pool, and get ready to add filler.
5. To create the weld, move the torch in a small circular motion to mix the molten steel and/or add the filler rod slowly. When the filler rod is brought in front of the flame, it should melt quickly and be added to the weld pool. For your first torch welds, plenty of extra “swirling” will be needed to join the material.
6. To continue a successful weld, you must maintain a small molten pool on each surface. If you move too fast, the steel will not be hot enough to melt fully, and if you move too slowly, the steel will melt and drip away, leaving you with significantly less material.
7. As you continue along the weld seam, remember that the area around the weld will be very hot to the touch some distance away from the torch.
8. When the weld is complete, pull the torch away from the weld area, and rest the filler rod on the table. Prepare to close the needle valves to extinguish the flame. Your welded piece should look something like the one in Figure 9.22.
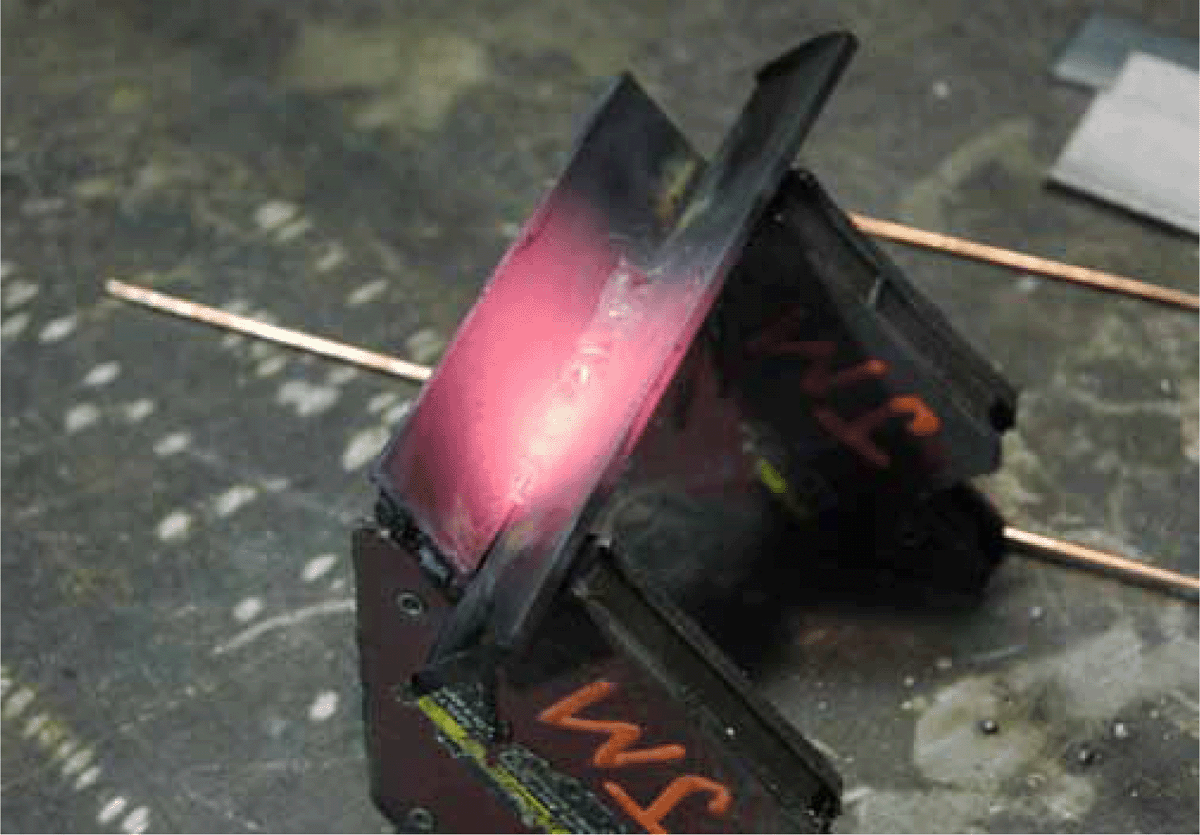
FIGURE 9.22 Torch-welded steel.
Shutting Down the Torch
The steps for shutting down the torch when welding are nearly identical to those when you use the torch for cutting. If you are shutting the torch off while you reposition your work but are not leaving the work area, you can leave the gases set to the proper pressure. If you plan to leave the work area, even if you plan to come back to the torch later, shut the gases down properly to avoid accidents.
1. The first thing you should do when turning off the torch is to close the oxygen needle valve by turning it clockwise. Be careful not to overtighten the brass knob.
2. At this point, the acetylene flame will still be burning, so the next step is to quickly but gently close the acetylene needle valve.
3. Now no more gas should be escaping from the torch, and the torch handle is shut down properly but ready to use again shortly.
Shutting Down the Gases
With the flame extinguished and no gases escaping from the torch handle, you can now shut down the gas tanks and bleed the lines. For this, you start with the fuel gas to decrease the chance of a leak. Always be sure to follow these instructions so as to leave the tool in working order for the next person and avoid a buildup of acetylene gas that could cause an explosion.
1. Close the valve on the acetylene gas cylinder all the way. Be careful not to overtighten it.
2. Open the acetylene needle valve on the torch handle, and watch as both pressure gauges on the regulator return to zero.
3. Close the acetylene needle valve on the torch handle.
4. Close the acetylene regulator by turning it counterclockwise until it moves freely.
5. Close the valve on the oxygen cylinder.
6. Open the oxygen needle valve on the torch handle, and watch as both pressure gauges on the regulator return to zero.
7. Close the oxygen needle valve.
8. Close the oxygen regulator by turning it counterclockwise until it moves freely.
9. Gently coil the hoses around the cart handle or hose rest, and rest the torch handle in the tray.
Welding Practice
To practice welding, set up some of the sheet metal squares you cut out in the earlier torch-cutting session. Clean off any slag built up along the seam using a slag hammer. Use layout magnets if needed to hold the pieces together. Practice making welds along the seams using the correct torch pressure and tip size.
1. Find a well-braced position, and practice moving the torch tip along the weld seam.
2. Light the torch and adjust the gas to achieve a neutral flame.
3. Bring the flame into the corner created by your two pieces of sheet metal, and start moving it slowly back and forth over the corner, about ¼ in in total width.
4. When a molten pool forms, dip the filler rod with your other hand about ⅙ in away from the surface but between the pool and the flame. Within a second or two, the filler rod should start to melt and combine with the molten base material.
5. Continue your way down the weld seam, repeating this technique.
Torch Bending
The last attachment for the oxygen acetylene torch I will cover is a heating tip called a rosebud. It’s named after the rosebud-shaped flame it puts out, and it is used for rapidly heating large areas of steel. The rosebud tip attaches to the torch handle just like a welding tip, but the head is much larger, as can be seen in Figure 9.23. With the increased head comes a need for much more fuel and higher heat output. In this book, you’ll use the rosebud to heat and bend steel, but it also can be used to heat up large areas for finishing techniques.
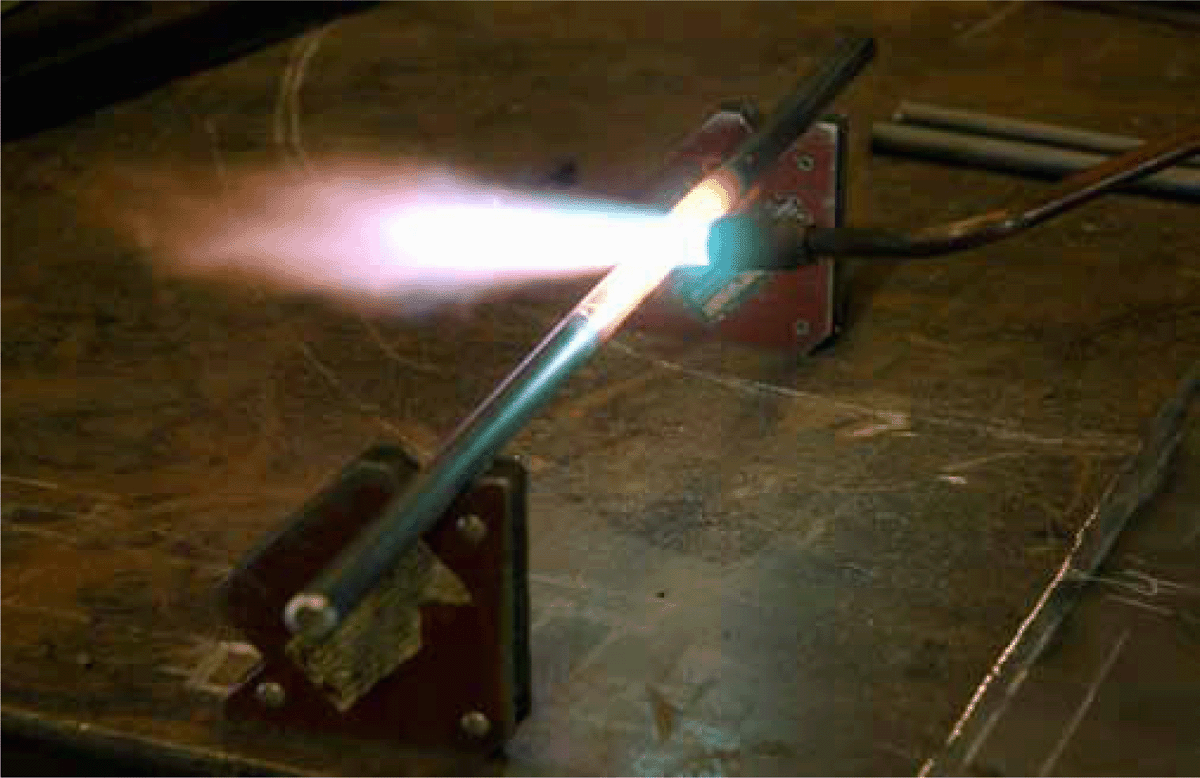
FIGURE 9.23 Rosebud tip in use.
NOTE: Some rosebud tips require more acetylene gas than small-volume hobbyist tanks can produce. If you’re limited by the size of your acetylene tank, keep in mind that you can use the cutting tip as a small version of the rosebud if you don’t use the blast trigger.
When heating steel to bend, you don’t want to bring the surface up to its melting temperature. Rather, you want to heat the material all the way through as much as possible. In this way, when you begin to bend, the steel bends evenly and consistently. The size of the rosebud tip helps to distribute that heat evenly with its large area. It is possible to burn the surface using a rosebud tip if you keep it in one place too long on the surface.
For most rosebud tips, a pressure of 10 lb/in2 of both oxygen and acetylene is recommended. Refer to the manual that came with your torch for the exact setting.
Your working position for the rosebud is not as critical as it is for cutting or welding. The rosebud still can heat efficiently within about an inch of the surface, which makes it more forgiving. Since the goal is to heat up an area, any movement away from the marked area just means that the heat will extend a little farther away.
After heating and bending, it’s a good idea to remove the mill scale that flakes off the surface of your steel (Figure 9.24). This will give the steel a more attractive finish and keep the debris from getting in your eyes.
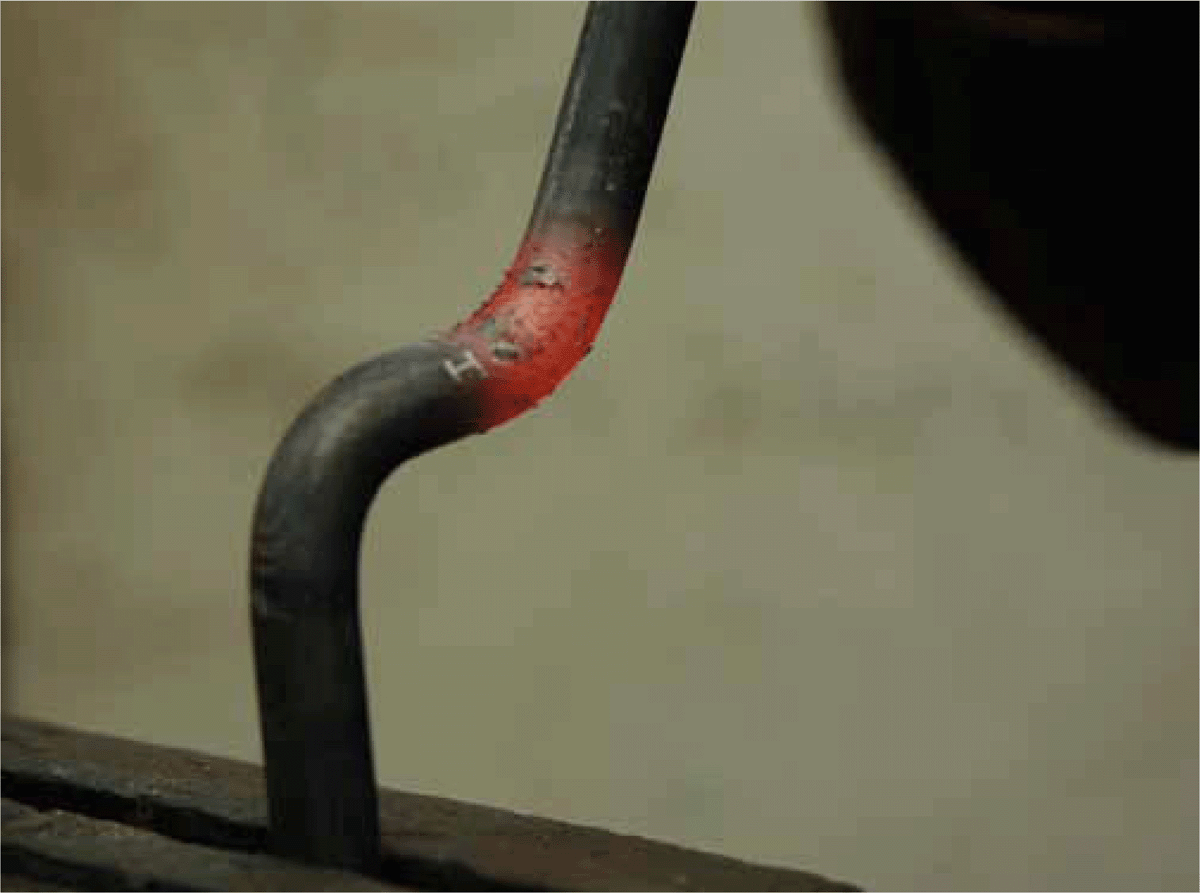
FIGURE 9.24 Mill scale on heated steel.
Heating up steel to bend it is a great way to be able to bend thicker stock by hand. Keep in mind that multiple bends in the same location will drastically weaken the steel structure, so try to keep your bends to one heat, one bend.
TIP: The rosebud tip creates a much louder flame, and the pops that may occur are much louder than those heard during cutting or welding. For this reason, it’s a good idea to wear hearing protection when starting off with the rosebud.
Operation
The procedure for setting up a rosebud torch tip is similar to that for setting up a welding tip. A lot of it may sound like repetition, but there are a few differences to keep in mind.
Setting Up the Work Area and Gas Cylinders
1. Make sure that your workspace is clean of any flammable materials and that you are wearing all the required personal protective equipment (see earlier list).
2. Parts to be bent should be clamped securely in a vice or supported on your worktable close to where the bending will take place.
3. Inspect the tanks and gas lines for damage and possible leaks.
4. Make sure that the oxygen and acetylene needle valves on the torch handle are closed, the regulator turns counterclockwise freely, and both gas cylinders are fully closed.
5. If the rosebud is not already attached to the torch handle, attach it now securely.
6. Slowly open the oxygen cylinder valve two to three full turns. If you hear a leak, close the valve and check your equipment. Do not open the valve all the way because it could become jammed.
7. Check the cylinder pressure gauge on the regulator. It should have a reading between 0 and as much as 3,000 lb/in2. It is okay to use an oxygen tank until it runs out of gas.
8. Before you introduce oxygen into the hose by turning the regulator valve clockwise, open the needle valve on the torch slightly, and then ease the regulator valve open. Use the operator’s manual to determine the correct pressure setting for your material. You may need to tap on the regulator dial to get an accurate reading. When the correct pressure is reached, close the needle valve on the torch.
9. You are now ready to open the acetylene cylinder. Turn the handle (or use the apparatus wrench) very slowly and only one-half to one full turn to open the tank. If you use an apparatus wrench, leave it on the tank for easy shutoff.
10. Check the tank pressure gauge. It should have a reading between 0 and 250 lb/in2. If the acetylene reading is 50 lb/in2 or less, replace the tank with a new one or inform your shop supervisor.
11. Just as with the oxygen, before you adjust the acetylene regulator to introduce gas into the hose, you need to slightly open the needle valve on the torch. Introduce acetylene by turning the valve slowly clockwise. Use the operator’s manual to determine the correct pressure setting for your material. You may need to tap on the regulator dial to get an accurate reading. When the correct pressure is reached, close the needle valve on the torch.
Lighting and Mixing the Flame
To light the flame, you need to start with the flammable gas, acetylene. Gently open the acetylene needle valve about one-eighth turn or until you hear a very quiet hiss of gas escaping. If the gas ever sounds like a roar, close the valve and try again. Too much acetylene gas during lighting could result in burns on your lighting hand.
1. Point the rosebud tip away from you, and squeeze the striker to create sparks at the tip. The flame should ignite with a whoosh.
2. Open the acetylene needle valve nearly all the way. The flame will be loud!
3. Turn the oxygen needle valve counterclockwise until you see the flame begin to turn blue.
4. Continue to add oxygen until you can see three distinct flame areas—one longer transparent flame, roughly a foot long; a medium-sized, brighter blue cone that extends inside the transparent flame; and a small series of cones around the tip. You want to mix a neutral flame for the best results when heating, just as you did with the cutting and welding tips. (Double-check the manufacturer’s recommended setup.)
5. With a proper flame mixed, you are ready to efficiently heat your material.
Heating
1. Move the rosebud tip to where you want to heat, and keep the tip about ¼ to 1 in away from the surface, making a gentle circular motion. For solid stock or tube, move up and down along the length of the material you want to heat slowly. I find that the rosebud works best when heating 8 in or less of material. For anything larger, a forge is the way to go.
2. Move the flame around the material, including the back if you are heating material over ¼ in thick.
3. Gradually, you will see the material go from gray, to red, to orange, and then to yellow. If you heat it too long, it may turn white and start burning.
4. When the material is yellow, it is ready to bend.
5. Quickly shut off the oxygen and then the fuel gas, and rest the torch on the table.
6. Grab your work wearing insulated gloves, and perform the bend.
CAUTION: Your workpiece will be heated up a good distance away from the working area (up to 10 in or so). Use extreme caution when handling recently heated material.
7. When your bend is complete, wire brush the mill scale off, and leave the workpiece on the floor out of reach of the hoses or your shoes.
Shutting Down the Torch and Gases
For instructions on shutting off your torch and gases, refer to the earlier welding section.
Bending Practice
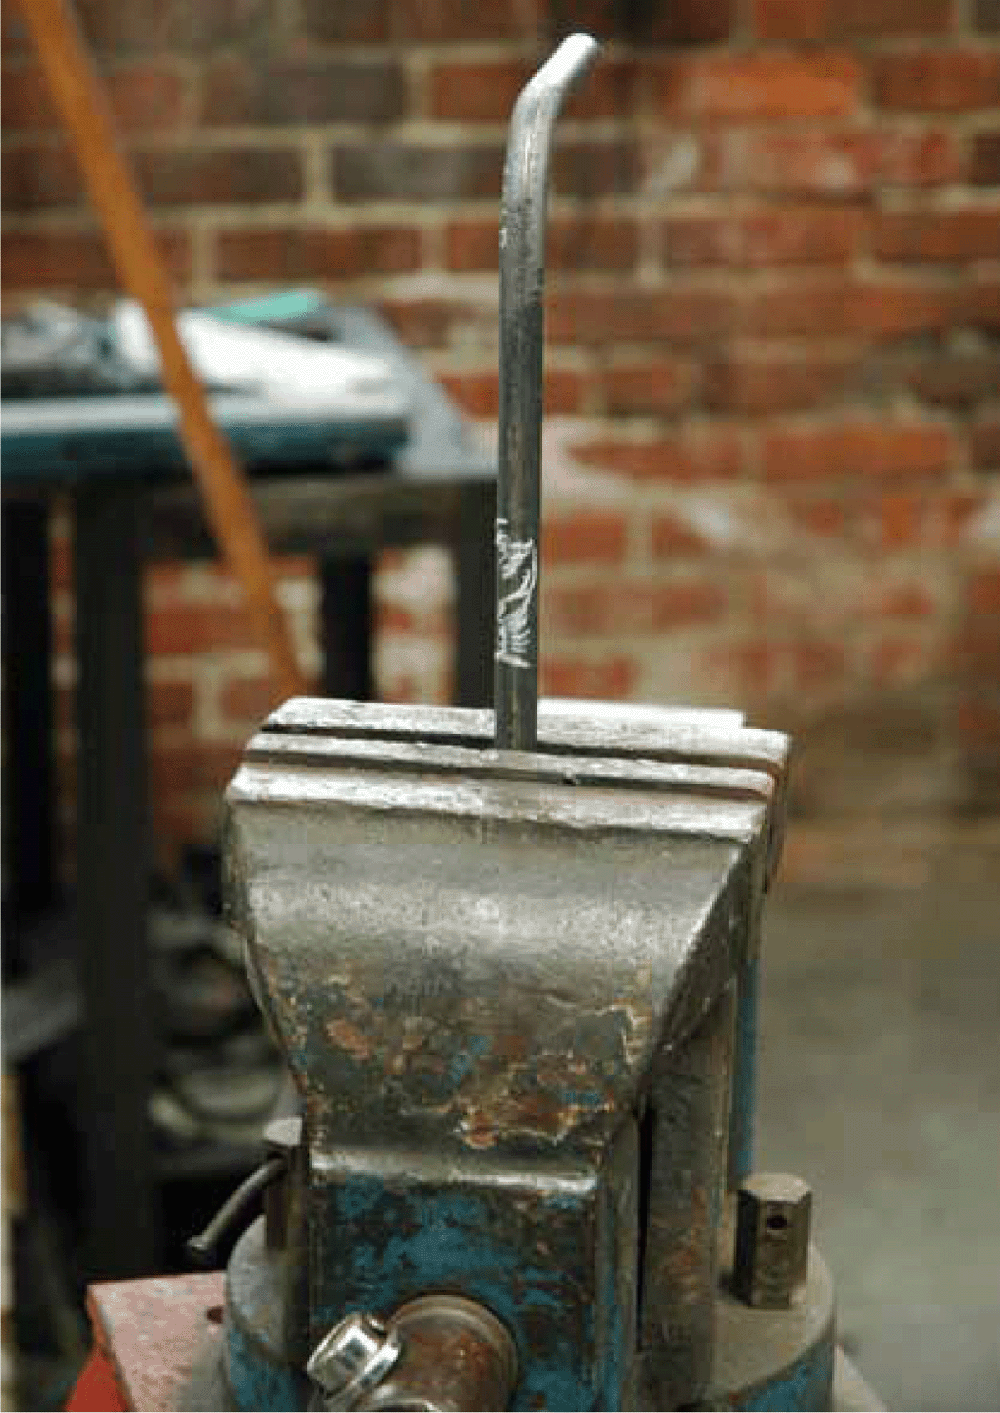
For practice, you are going to bend a length of ½-in round stock in a vice. For comparison, I will also bend it using no heat so that you can see the advantage offered by the rosebud.
1. Start with a 20-in-long section of ½-in round stock.
2. Clamp it vertically in the vice (or, if necessary, horizontally over a sturdy worktable).
3. Make a mark where you want the bend to happen. Put this mark above the jaws of the vice because they will act as a heat sink and absorb some of the heat. Figure 9.25 shows the clamped work with the bend area marked.
FIGURE 9.25 Workpiece clamped and marked with soapstone.
4. Light and adjust your torch following the earlier instructions.
5. Bring the torch close to the surface of the material, and move it up and down over the marked area. Rotate the torch slightly around the material so as to be sure to heat it up all the way through.
6. When the material is a solid orange or yellow, shut off the torch quickly and prepare to bend.
7. If you have over 10 in left above the bend area, you may use your glove to make the bend, and if not, use a piece of hollow pipe that fits over the stock. Figure 9.26 shows me easily bending stock using gloves.
FIGURE 9.26 Bend in progress.
8. Bend the material perpendicular to the jaws of the vice until you achieve the desired angle. If necessary, gently nudge it back slightly to fine-tune the bend.
9. Place the workpiece under your work area, and shut down the torch and gases properly.
10. Figure 9.27 shows the hot bend you just made next to a cold-bent corner where I used a long length of pipe to bend the material by hand. Notice the greater diameter of the cold-bent corner.
FIGURE 9.27 Hot- and cold-bent corners.


