
CHAPTER 11
Metal–Inert Gas (MIG) Welder
Now onto the bread and butter of this book. My guess is that 99 percent of readers will skip ahead directly to this chapter to start making welds. That’s fine, but I think the information leading up to this chapter is pivotal in understanding what it takes to form a sound weld. Most important, though, getting a project to the point where it’s ready to weld takes quite a bit of preparation. From cutting material down, cleaning the surface, and chamfering corners, as you learned earlier in the book, there are quite a few tools you need to be comfortable with. As you’ll see in the projects in Part 2 of this book, welding makes up a small percentage of the work performed to complete a welding project. With that said, let’s get welding!
Parts
Figure 11.1 shows the parts of a MIG welder.

FIGURE 11.1 MIG welder. (Photo courtesy of Miller Electric Mfg. Co.)
Power Source and Transformer
Inside a MIG welder is a transformer that converts household or shop electrical alternating-current (ac) voltage into direct current (dc) and bumps the amperage way up. The electric arc that jumps between the workpiece and the positive electrode is hot enough to melt steel in milliseconds.
CAUTION: Be careful of any electrical connections while the welder is turned on.
On/Off Switch
A switch on the front of the MIG welder will start the electrical transformer and ready the machine for welding. Usually there is a short cycle after the machine is switched on or off, and it is ready to be used.
Voltage and Wire-Feed Settings
Two knobs on the front of the MIG welder allow for control of welding voltage (heat) and wire-feed speed. You will need to adjust these two controls to match the thickness of the steel you want to weld. You can find suggested settings for these on the weld chart that accompanies your machine.
Negative, or Grounding, Clamp
Connected to the negative terminal of the transformer is a thick-gauge wire with a steel clamp attached to the end. This clamp is responsible for negatively charging your work when you are welding so that a complete circuit if formed. Remember, to complete the circuit, the clamp does not need to be clamped directly to your work but can be clamped to a conductive work surface nearby. If the clamp is attached to an area of steel with paint or corrosion, the electric charge will be greatly inhibited, resulting in a poor weld.
Welding Lead and Gun
Exiting through the front of the MIG welder is the welding lead, which runs into the MIG gun. Inside this lead is a coiled sleeve through which the positively charged filler material runs, a tube carrying shielding gas, and wiring for the trigger. The welding lead is very fragile and should be kept coiled gently when not in use and never allowed to kink. When working, do not let pieces of steel or tools fall onto the welding lead because they could cause damage.
Shielding Gas and Regulator
The tank of shielding gas should be securely attached to the body of the welder and be fitted with a pressure regulator. Just as with oxygen and acetylene tanks, the regulator controls the high-pressure gas from the tank and lets you work with a consistent supply.
Weld Chart
Some MIG welders have a weld chart located on the front of the welder that gives suggested settings for different material thicknesses and setups. If there is no weld chart on the front, check the side panel or the manual that accompanied the machine.
MIG Gun
Figure 11.2 shows the parts of a MIG gun.

FIGURE 11.2 Typical MIG gun. (Photo courtesy of Miller Electric Mfg. Co.)
Gun
The gun is connected to the MIG welder by the welding lead and consists of a number of parts you’ll learn about shortly. Once the adjustments are made on the body of the MIG welder, the only control you have over the machine is using the on/off trigger located on the gun.
Trigger
The trigger is usually located near where the gun and welding lead meet. Since your hand is on the trigger at all times while welding, it is kept a distance away from the end of the gun, where heat builds up. Your trigger should be a simple on/off switch, and most don’t have any sort of safety mechanism. With the welder off, pulling the trigger does nothing. With the welder on, pulling the trigger tells the computer inside the welder to do three things: start the flow of gas, push welding wire through the lead, and begin to run an electric current through the welding lead and negative clamp. However, remember that for a circuit to be completed, the welding wire must be close to the negatively charged workpiece or table. Thus, if you pull the trigger with the tip away from the work area, you can clearly hear gas escaping through the gun and should start to see welding wire pass out of the gun tip.
Gas Nozzle
The copper-colored shield at the end of the gun is the gas nozzle. Its purpose is to direct the flow of shielding gas toward the weld area. The reason gas nozzles are copper and not, say, steel is so that weld spatter doesn’t stick permanently to them. A little weld spatter will stick to the tip, so as you weld, you’ll have to occasionally clean the tip to keep the flow of gas free. Gas nozzles should last quite a long time if kept clean.
Gas Diffuser
The gas diffuser helps the shielding gas flow evenly out of the gas nozzle and to the weld area. With the gas nozzle in place, you won’t be able to see the diffuser, and it threads directly into the gun handle. It is replaceable, but under normal operating conditions, it is not a consumable item.
Contact Tip
The contact tip is more or less hidden inside of the gas nozzle, connected to the end of the gas diffuser. It is a consumable item that directs the filler material to the weld area. If you weld with the contact tip too close to the weld area, the tip will start to deform and restrict filler movement. The diameter of the small hole inside the contact tip must match the diameter of the weld wire.
Electrode/Filler
A small piece of wire, just a fraction of an inch in diameter, may be visible extending out of the gas nozzle. This is the filler, and when charged, it also becomes the electrode. The length of filler wire extending beyond the contact tip is called stick-out, and for MIG welding with solid wire, it usually should be around ¼ to ⅜ in. Common sizes for solid wire are 0.024, 0.030, and 0.035 in. For all-purpose welding, 0.030-in wire is a great choice because it can weld sheet metal as thin as 22 gauge and also complete nearly ½-in structural welds. No, we’re not welding with copper wire—that copper color is just a coating that protects the steel filler wire from corroding and rusting together.
Gas Line
An invisible part of the welding lead and gun, the gas line runs inside the MIG welder and connects through the rear to the gas regulator.
Inside a MIG Welder
Figure 11.3 shows the inside of a MIG welder.

FIGURE 11.3 View of the inside of a MIG welder body. (Photo courtesy of Miller Electric Mfg. Co.)
Spool of Welding Wire
Most welders will have a door that swings open on the side for access to the spool of welding wire and the feed rollers.
Feed Rollers
The feed-roller mechanism found inside the welder pulls wire from the spool and pushes it along the housing inside the gun lead. These rollers are adjustable depending on the size of weld wire in use. Refer to your MIG welder’s manual for more information on adjusting these rollers.
Electrical Connections
You’ll notice a few large-gauge wires and terminal ends inside the welder. More than likely the ends of these wires will be covered to reduce the chance of accidently touching the terminals. The positive wire should be fastened to the feed rollers to give the filler wire its charge.
So how do all these parts work together? When the MIG welder is on and you pull the trigger, three things happen simultaneously: the positive electrode and negative clamp become charged, the feed rollers push welding wire through the lead and out through the contact tip, and shielding gas starts to flow from the tank through the lead and out the gas nozzle. The parts at the end of the gun are copper for a few reasons. MIG welding creates some spatter, and these copper parts keep the molten steel from sticking permanently. If you have a length of weld wire in front of you, you may be wondering why it is also copper-colored and not steel (we’re not welding copper after all). Because steel rusts rather quickly, if a spool of uncoated steel wire sat out for very long, it would soon develop rust, which would inhibit the flow of electricity and could keep the wire from unwinding. This copper deoxidizing coating keeps it from rusting and also aids in the transfer of electricity. The coating burns up immediately because copper melts at a lower temperature than steel.
MIG Welder Consumables
When you start setting up your welder, there are two consumable items you need to choose well before you get in the shop and weld: the shielding gas and the filler wire.
Shielding Gas
Shielding gas for MIG welders is most commonly a carbon dioxide (CO2) and argon (Ar) mix. Gases are available in varying percentages from welding suppliers, and for the level of welding you are going to be doing in this book, I am not going to focus on specifics. A welding gas mixture I use most commonly in my studio is a 25 percent argon–75 percent CO2 mixture. This mixture is affordable, helps to stabilize the welding arc, and aids penetration. For a more stable arc with deeper penetration, 100 percent argon could be used, but it is significantly more expensive. Gas flow is set by the regulator attached at the tank, but notice that the units on welding regulators are not in pounds per square foot but rather in cubic feet per hour (ft3/h or cfh). The rate chosen is dictated by the size of the opening on your gas nozzle. Check your manual or weld chart for specific figures, but a good place to start is in the 25 to 30 ft3/h range. Too little gas and impurities may find their way into your weld area, but too much gas can cause turbulence, which also allows impurities into the weld.
Filler Wire and Contact Tip
You learned earlier that solid welding wire is available in different diameters from 0.023 to 0.035 in. Table 11.1 shows that to achieve a structural weld, thicker-gauge wire may be required. For sculptural purposes, 0.030-in wire can make great welds up to ½ in (possibly using two or three passes along the same seam) with the right settings and a good chamfer/bevel.
TABLE 11.1 Single-Pass Wire Thickness Recommendations

The contact tip, as you learned earlier, must match the diameter of wire used so that it accurately feeds the wire to the weld area. A contact tip that is too small won’t let the wire through, and one that is too large will wear out prematurely as the wire arcs with the inside of the tip.
Another option for welding wire is either solid wire or flux-cored wire. Flux-core wire will allow you to weld without a separate shielding gas and works well outside. It also is required for some structural applications.
MIG Welder Adjustments
Once you have the correct gas and wire setup, there are two adjustments that must be made on the MIG machine. These adjustments are made to match the material you are welding and control the amount of heat and filler material added to the weld.
Wire Speed/Feed
One of the controls on the front of your welder is used to adjust the rate at which filler wire is fed through the gun. This control will be labeled either “Wire Speed” or “Wire Feed” or have an icon that looks like a straight length of wire between two circles. Generally, the thicker the material, the more filler you need to use. I mentioned earlier that spatter can be a problem with MIG welding. This is frequently a result of using too high of a rate of filler material in relationship to the weld voltage. Figure 11.4 gives you an idea of the different wire speeds and the wire thickness/material thickness that corresponds with each.
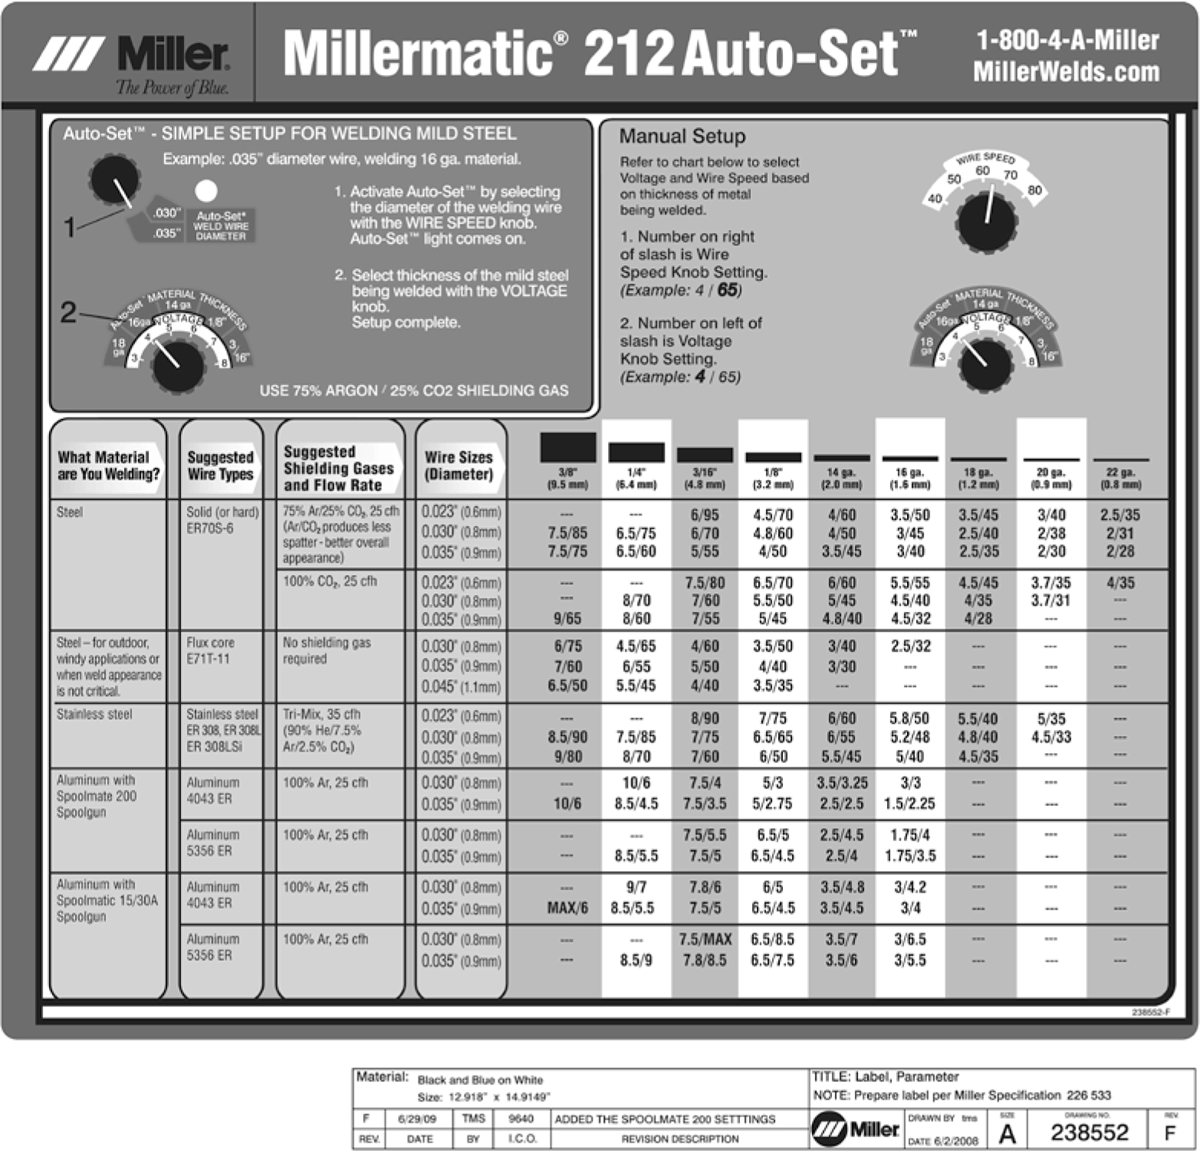
FIGURE 11.4 Miller 212 weld chart. (Photo courtesy of Miller Electric Mfg. Co.)
Voltage
The other knob on the front of your MIG welder controls the output voltage. Different welder brands have their own ways of labeling the range of voltage, but the knobs perform the same task. Even though the labeling may change, you can still see that there are a number of voltage steps from high to low. Lower voltage gives you less heat and weld penetration, whereas higher voltage has much more heat, higher penetration, and is used for thicker materials. Refer to Figure 11.4 to see how voltage corresponds with material thickness.
How to Use Figure 11.4
Reading the figure from left to right, you start with the “What Material Are You Welding?” column broken up into a few rows: “Steel,” “Stainless Steel,” and “Aluminum.” For our purposes, you can stick with the first “Steel” row from now on. Moving right, you see a column for “Suggested Wire Types” with rows for “Solid” and “Flux Core.” Since you’re using solid wire, you can move to the right to “Suggested Shielding Gases and Flow.” The gases listed here are a 75 percent argon mix, 100 percent CO2, and a row for flux-core wire. Move to the right from the gas you are using—in my case, it’s 75 percent argon. The next column, “Wire Sizes,” is broken up into rows for 0.023-, 0.030-, and 0.035-in wire. Move to the right from 0.030-in solid wire, and you have a number of columns in this row with pairs of numbers such as 6/70 and 4/50. These pairings correspond to a voltage and wire-feed setting that you will make on the front of the machine. As long as your welding material, wire type and size, and gas do not change, you can always go back to this row to find your suggested weld settings. The last column of importance is the material thickness, and it shows a number of profiles that mirror the thickness of material to weld. For example, if you are planning on welding 14-gauge material, move to the right to the 14-gauge column, and read down at the intersection of the selected 0.030-in row. The magic numbers here are 4/50. On a Miller welder, the numeric voltage range is from 15 or so, and the wire feed is from 0 to 100. It is physically impossible to set the welder to a voltage of 50 and a wire speed of 4, so you know that the numbers must correspond in order of voltage first and wire speed second. Turning to the front of the machine, you can dial these settings in with the machine on or off.
NOTE: Make sure to click the voltage dial in fully to avoid shorts in the circuitry.
The weld chart is an extremely useful tool for new welders to dial in proper settings. Once the machine is set up properly, everything else falls to the person making the welds to keep a steady distance from the weld area, move at the right speed, and stop and start the welding process at the right time using the gun trigger.
You Are in Control
Up to this point, you’ve looked exclusively at how MIG welding equipment and its settings affect your welds. You’ve learned how the welder creates a weld, but how do you do it? If you assume that the welder is set properly, then what control over the situation do you have? As it turns out, a lot! The distance from the electrode to the base metal, the speed at which you move, the angle of the gun, the pattern of motion (or weave), and the steadiness of your hand all greatly affect weld quality. Even with the best equipment and perfect settings, in the hands of an inexperienced welder, a poor weld can still be created.
Thankfully, the following rules will help you to create consistent and strong welds. Remember that you must follow all these rules to start and maintain a quality weld. If you break any one of them during your weld, the results will be apparent.
Distance from Weld Area (Stick-Out)
You’ve already learned the term stick-out, so it shouldn’t come as a complete surprise that you need to consider how far your electrode is from the weld area and at what distance you hold the gun from your material. Different weld applications require the weld gun to be held at various distances from the surface, but for the purposes of this book, you can assume that a stick-out of ½ to ⅜ in is ideal. You may notice that when you are welding at a lower voltage, your distance from the weld area has less room for error. Also, depending on the type of weld you’re making, say a tee joint or an inside-corner weld, it may be more difficult to keep the gas nozzle at the proper distance. For your first few weld beads, I suggest that you start with butt joints or lap welds on a flat surface.
As you weld, if your distance grows too far from the weld area, you’ll start to notice the weld arc sputter and pop, making it extremely difficult to see and creating a very poor weld. As soon as you hear the weld arc pop, move the gun closer to the weld area, and you should be able to continue the weld. One of the biggest challenges for new welders is remembering to keep the gun in close.
TIP: When starting out on some practice welds, keep your gun nearly stationary, and focus exclusively on the distance between the MIG gun and the weld area. Move slowly across the material surface while maintaining the proper distance.
Of course, just as the gun can be too far from the weld area, it also can be too close. When you’re too close to the weld, your view will be blocked by the gas nozzle, and you won’t be able to make an accurate weld. Also, with some welding time, the contact tip and gas nozzle can deform owing to heat buildup. One-eighth of an inch is about as close as you’ll ever want the contact tip from the weld area.
TIP: When you finish a weld and release the trigger, take a look at the end of your MIG gun. The amount of welding wire extending past the contact tip shows exactly how much stick-out you were using when you finished the last weld.
To help gauge the distance between the contact tip and weld area, welders always view their MIG gun from the side while welding, as shown in Figure 11.5. The protection offered by the welding helmet will help you to get in close without fear of heat or sparks. Practice finding a position for each weld where you can comfortably hold the gun and position your face off to one side but within 8 to 12 in of the weld area.

FIGURE 11.5 A welder watching the weld area.
Speed
The speed at which you move the weld gun is another major factor in determining weld quality. Moving at the proper speed will allow the base metal to heat up enough to melt thoroughly but won’t add so much heat that it distorts or burns through. Just as when you learned about stick-out, if you travel too fast, the weld wire will pop as it touches the surface, and no weld pool will be formed. The best way to tell if you have the right travel speed is to get feedback from the weld as you go and inspect the bead afterwards. If as you weld (of course, keeping proper distance from the surface) you can move along a line and keep a continuous arc, you know that your speed is somewhere between too slow and just right. If instead you get popping, you know that you are moving too fast. Adjust your speed to be slow enough so as not to pop, thereby creating a successful weld pool. When you stop your weld, take a look at the height and width of the weld bead and area affected by the heat. Figure 11.6 shows two weld beads, the top of each is made at a slow speed, and as they go down the speed was increased. Notice the height of the weld in relationship to its width and the total amount of weld volume.
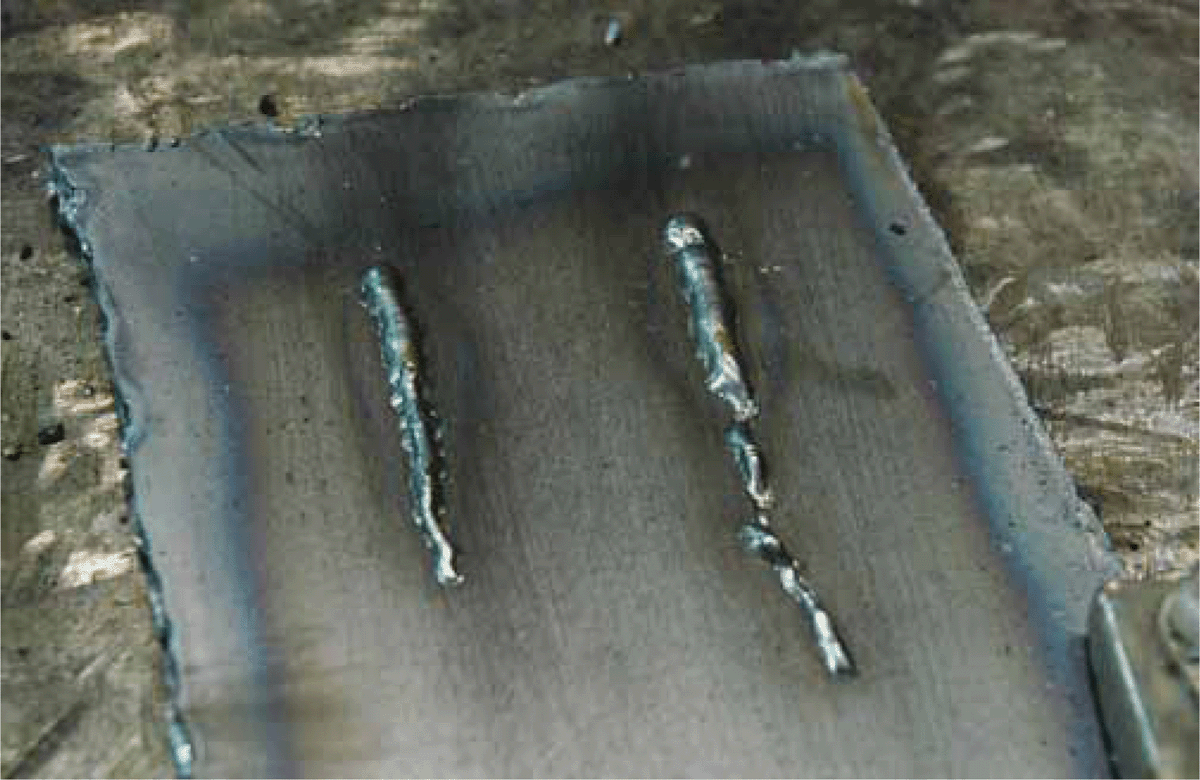
FIGURE 11.6 How travel speed affects the weld bead.
If you take a look at the back of the material, you’ll notice that where the speed was too slow, more heat penetrated the steel. This is illustrated in Figure 11.7, and you can tell which area is affected by heat because it will turn a blue to gold color. While heat is our friend when welding, too much heat can unfavorably distort the steel.
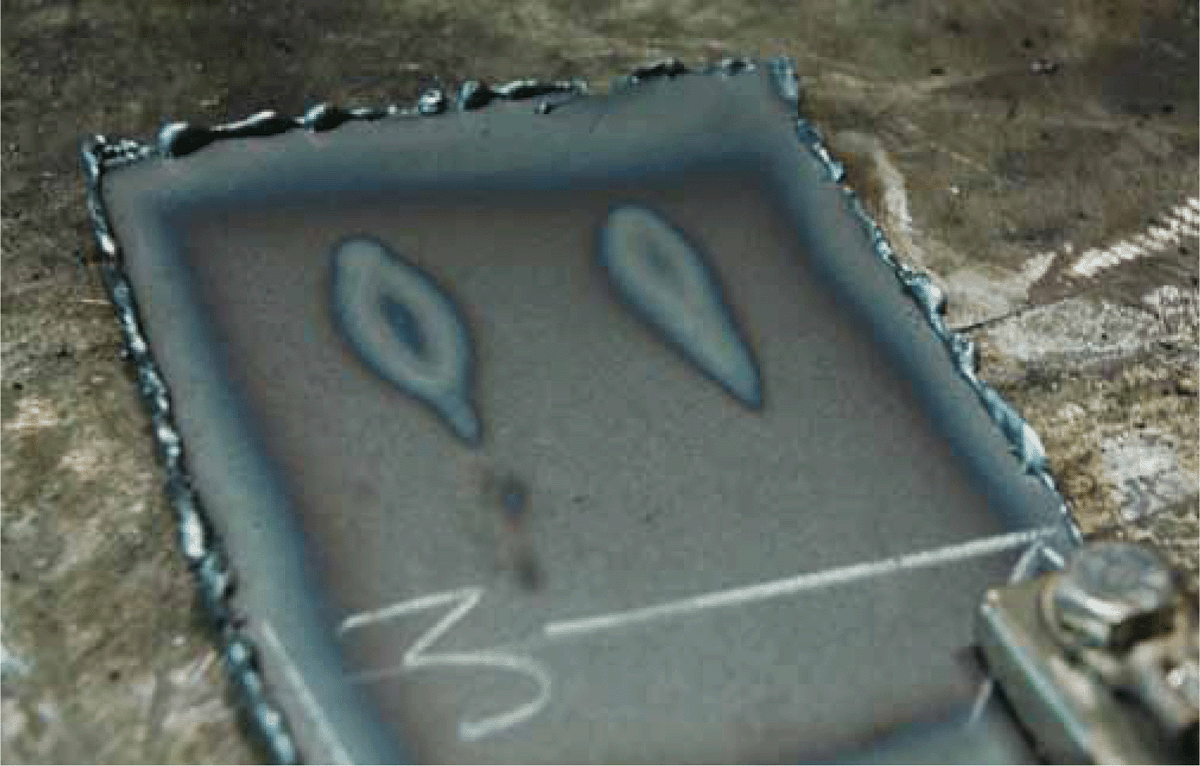
FIGURE 11.7 Heat penetration on the back of a weld.
Angle
The angle of your MIG gun to the surface, or surfaces, you are welding also is something that will greatly affect your weld. For welding on a flat surface, you want to keep the gun angle perpendicular to the steel. This directs all your heat and shielding gas directly into the weld area. If you are welding a tee or a corner weld, hold the gun at a 45-degree angle between the two surfaces to evenly direct the heat toward each surface. If you are welding a lap joint, hold the gun at a 60-degree angle from the surface to evenly share the heat between both materials. Figure 11.8 provides example of this.
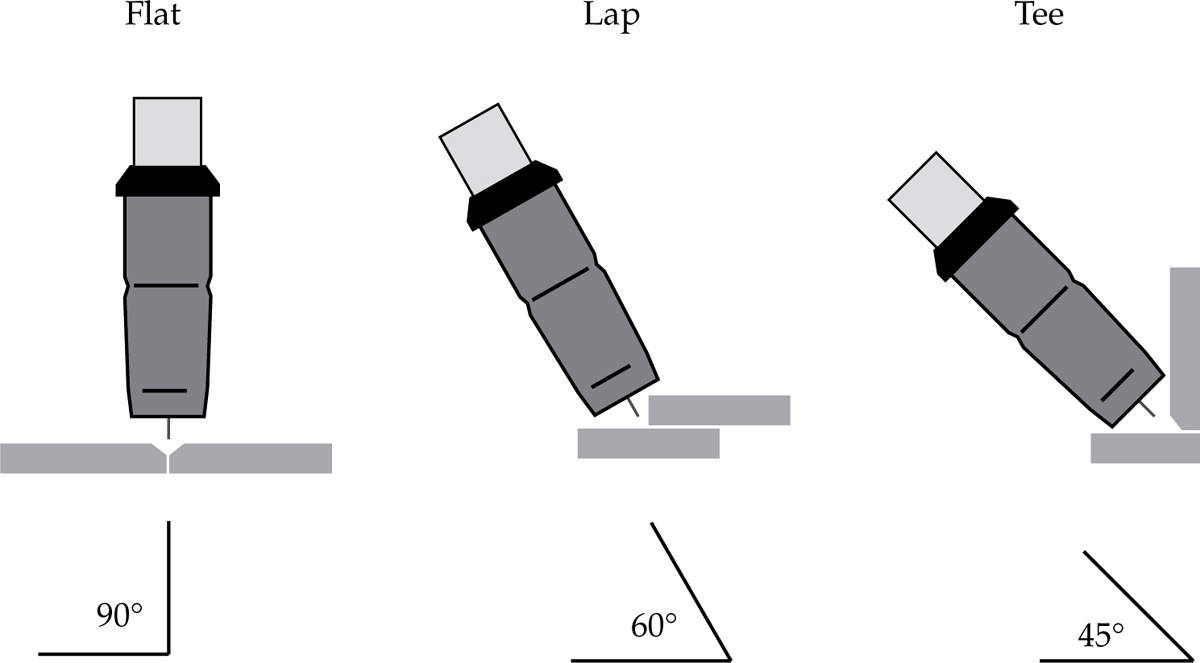
FIGURE 11.8 Angle of gun for a fat weld, lap weld, and tee weld.
Another angle to consider is the angle of your gun relative to the direction of travel. Holding the gun 10 to 15 degrees out of perpendicular from your travel direction can give you a couple of different results. This is also known as pushing or pulling your weld pool. The key difference is how much penetration the weld area has, so the effects of pushing or pulling are much more noticeable when using higher voltage. For sculptural welding, you can use whatever feels more comfortable. I typically switch between both depending on what is most convenient, but more than anything, weld in a fairly straight or perpendicular orientation.
Push
Pushing your weld means that the angle of your gun points in the direction of travel. Pushing generally yields lower penetration because the arc is formed slightly on top of the last bit of weld bead created owing to the filler wire traveling over the preformed bead. However, pushing the weld toward you can give you an increased amount of visibility over the weld area.
Pull
Pulling your weld means that the direction of the gun angles away from the direction of travel. This can give you increased penetration because the bead is forming on the rear of the molten pool. Both pushing and pulling are shown in Figure 11.9.

FIGURE 11.9 Pushing and pulling a weld.
Straight
Holding the gun perpendicular to the direction of travel does not give you a pushing or pulling effect. One advantage is that you can more easily change direction, and you’ll have good visibility on either side of the MIG gun.
Pattern of Motion or Weave
In order to join two pieces of steel successfully, each piece must be heated to the point of melting. For this to happen, the MIG gun needs to be moved back and forth from each piece, creating one shared molten pool and weld area. There are many different types of weaving motions people use for MIG welding; some of them include zigzags, crescent shapes, and various cursive letters. The total width of motion should be about as wide as the weld pool to maximize weld efficiency, so imagine that for joining ¼-in-thick plate the small arcs are only about ¼ in wide. Whichever technique you choose to use, imagine it as “stitching” along a weld seam. Graphic examples of some of these weave patterns, with arrows indicating direction of motion, are shown in Figure 11.10.

FIGURE 11.10 Welding motions: zigzag, triangle, and crescent.
Steadiness
Linking all the rules together is your own steadiness. Any wavering in your motion, whether its height, speed, or an abrupt jerk, will break the arc. To help keep the MIG gun steady, find a position where your arm is braced against the table or your workpiece that also allows you enough range of motion to complete the weld. Just as with torch welding and cutting, before you begin the process, find a comfortable position that puts your face near the action and prevents any sudden movements. Using your nonfavored hand to steady the MIG gun is an important trick in making a steady weld. Figure 11.11 shows a welder properly braced and ready to start welding.

FIGURE 11.11 Braced position.
Weld Vision
When all the preceding rules come together, you’ll be creating a continuous arc. To get an accurate weld, you need this arc to cast enough light around the weld area so that you can see where to travel. Any arc popping that happens causes the arc light to flicker off and on, making it much more difficult to judge your distance from the surface, direction, and speed of travel. Getting accustomed to the dark welding environment is one of the biggest hurdles new welders face (as if sparks and plasma weren’t enough of a shock). I always have first-time welders start welding on a flat surface and move only when the arc is constant enough to light the way. Anytime a pop occurs, the welder must hold his or her position until the arc steadies, never releasing the trigger. When a steady arc is achieved, the welder may continue on.
TIP: Use soapstone to mark your intended weld line. Since it burns away clean, it won’t affect your weld, and the light color will help you keep on track even when looking through a dark shade.
Weld Orientation
Although for hobbyist projects of our scale it is usually possible to weld with the weld area facing up, you will definitely find times when it makes more sense to weld in other positions. One of the great things about MIG welding is that it allows you to weld in any orientation.
Flat
Most commonly, you’ll be welding in the flat position. Here the weld area is facing up, and your MIG gun is facing down (or angled slightly depending on the material or travel direction). The weld is supported by the parent material directly below it, as shown in Figure 11.12.
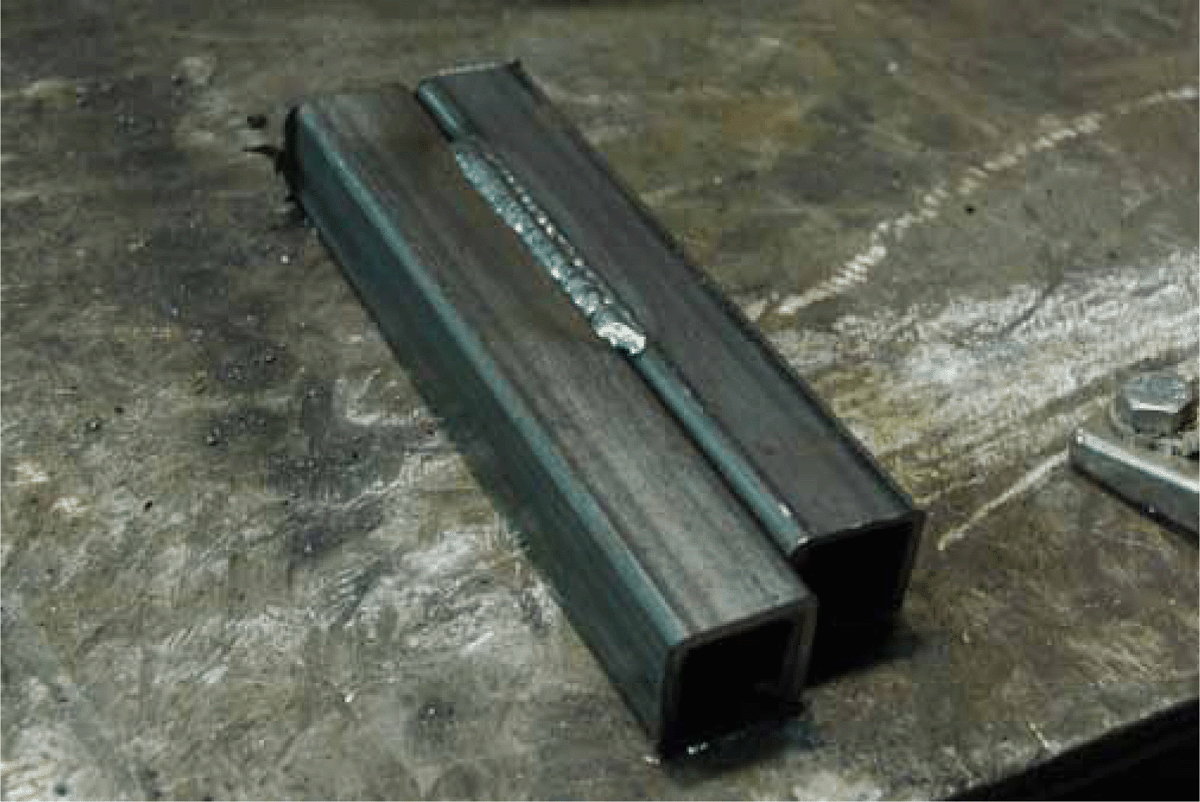
FIGURE 11.12 Flat-position weld.
Horizontal
In horizontal-position welding, the parent material is in a vertical position, but the weld seam is horizontal, as shown in Figure 11.13. Here the weld area and bead are mostly unsupported by gravity. To weld horizontally, point the gun up slightly around 10 degrees to avoid the gravitational pull on your weld pool.

FIGURE 11.13 Horizontal-position weld.
Vertical
Welding a seam that is oriented vertically is vertical-position welding. It can be the most challenging of the welding positions because you are working against gravity and your own weld bead. Welding down requires the welder to increase the travel speed slightly to keep the weld arc just ahead of the weld pool. It is relatively easy because gravity helps to pull the weld pool down as you go. However, because you have to weld slightly faster, getting enough penetration for the materials you are welding is a big problem with the down technique. A vertical-position weld can be seen in Figure 11.14.

FIGURE 11.14 Vertical-position weld.
The other option, welding up, can be more useful for thicker materials where deeper penetration is necessary. When welding up, it is not necessary to speed up, but the angle of the MIG gun should be pointed up about 10 degrees. It may be harder to pull off an attractive bead using this technique, but with some practice, you will be able to find the right balance.
For both vertical welding techniques, it may be helpful to reduce the voltage slightly to avoid burning away excess material.
Overhead
In overhead welding, there is no material below the weld area for support (the opposite of the flat position). It is much like flat-position welding, but the travel speed must be adjusted so that no material is lost along the weld seam. If too much time is spent in one area, it is likely that molten steel will drip away, resulting in a loss of material. When doing an overhead weld, make sure to light the weld area properly, and watch out for dripping steel.
Safety
• Welding produces extreme heat of over 10,000°F. Do not handle recently welded material without gloves, and keep all skin covered at all times.
• Welding produces extreme ultraviolet (UV) light that is more intense than the sun. Never look directly at a welding arc, even from a distance. Always wear a welding mask of the proper shade, and keep all skin covered at all times.
• Welding produces sparks that can travel great distances. Keep your welding area free from combustible materials.
• The electricity required for welding is enough to stop a full-grown adult’s heart. For this reason, use caution when plugging in and unplugging a welder and when the welder’s side panel is open. Never weld in wet conditions or near standing water.
• Always inspect your equipment before use, including the welding lead, wire spool, and gas regulator. Replace damaged equipment if necessary.
• Always weld in a well-lit environment. As well as improving your chances of creating a good weld, this may help you to avoid causing bodily harm from bumping into material or tripping.
• Know your tools. If you have any questions about the MIG welder, gas setup, or anything, refer to the tool’s user’s manual or ask the shop technician.
Personal Protective Equipment
• Always wear a welding mask (shade nos. 9 to 14).
• Under your welding mask, wear clear safety glasses.
• When welding for extended periods, wear an N95 or N99 dust mask.
• A welding cap or bandana worn under your welding mask is recommended.
• Insulated welding gloves should be worn at all times.
• Wear heavy, nonflammable boots, uncuffed pants, and long sleeves.
• Protect your neck by wearing a wool scarf or collared shirt.
• Wear clothing made of natural fibers (cotton or wool) or leather, never synthetics.
• A welding jacket worn over long sleeves is recommended.
• Surround your work area with welding screens to minimize spark travel and to prevent flashing bystanders.
Operation
Before you start welding, let’s go over how to set up the welder, find a comfortable position, and properly shut the welder down.
Setting Up Your Work Area and Welder
Work Area
1. Make sure that your workspace is clean of any flammable materials and that you are wearing all the required personal protective equipment (see earlier list).
2. Parts to be welded should be on your worktable and free of coatings or contaminants. Any chamfers or bevels should already be added.
3. Inspect your welding lead and regulator for damage and your filler-wire supply.
4. Make sure that the regulator turns counterclockwise freely and that the gas cylinder knob is fully closed.
5. You should have all personal protective equipment on or located nearby.
6. Layout magnets, wire cutters, and any other hand tools you will use should be on the table.
7. If necessary, clean the tip of the gas nozzle and/or replace the contact tip.
8. Gently uncoil the welder lead and negative clamp from the machine.
9. Clamp to your worktable or work, and return the MIG gun to the machine with the lead gently coiled on the ground near your work area.
Gas
1. Turn the MIG welder on. (If it is unplugged, plug it in now.)
2. Turn the wire-feed speed to 0 and the voltage setting all the way down. This is to help you preserve filler wire and prevent accidental arcing.
3. Slowly open the gas cylinder valve two to three full turns. If you hear a leak, close it and check your equipment. Do not open the valve all the way because it could become jammed.
4. As soon as the cylinder valve is open, a reading should appear on the tank pressure gauge while the line flow-rate gauge remains stationary. It is okay to use an argon-CO2 tank until it runs out of gas, but there will be unsatisfactory flow toward the end.
5. With gas in the tank, you now want to adjust the line flow rate to the desired setting, most likely 25 ft3/min. To get an accurate reading, you’ll need to begin the flow of gas through the line, so with one hand pull the trigger on the MIG gun and with the other turn the flow-rate knob clockwise to increase flow. Be mindful of where your filler is going so as not to accidently arc on something.
NOTE: Two types of flowmeters are common, a regulator and a meter style (Figure 11.15).
6. When the flow rate reaches the desired amount, release the trigger, and trim the feed wire back to the proper stick-out (¼ in in most cases).
7. Rest the MIG gun on the welder.
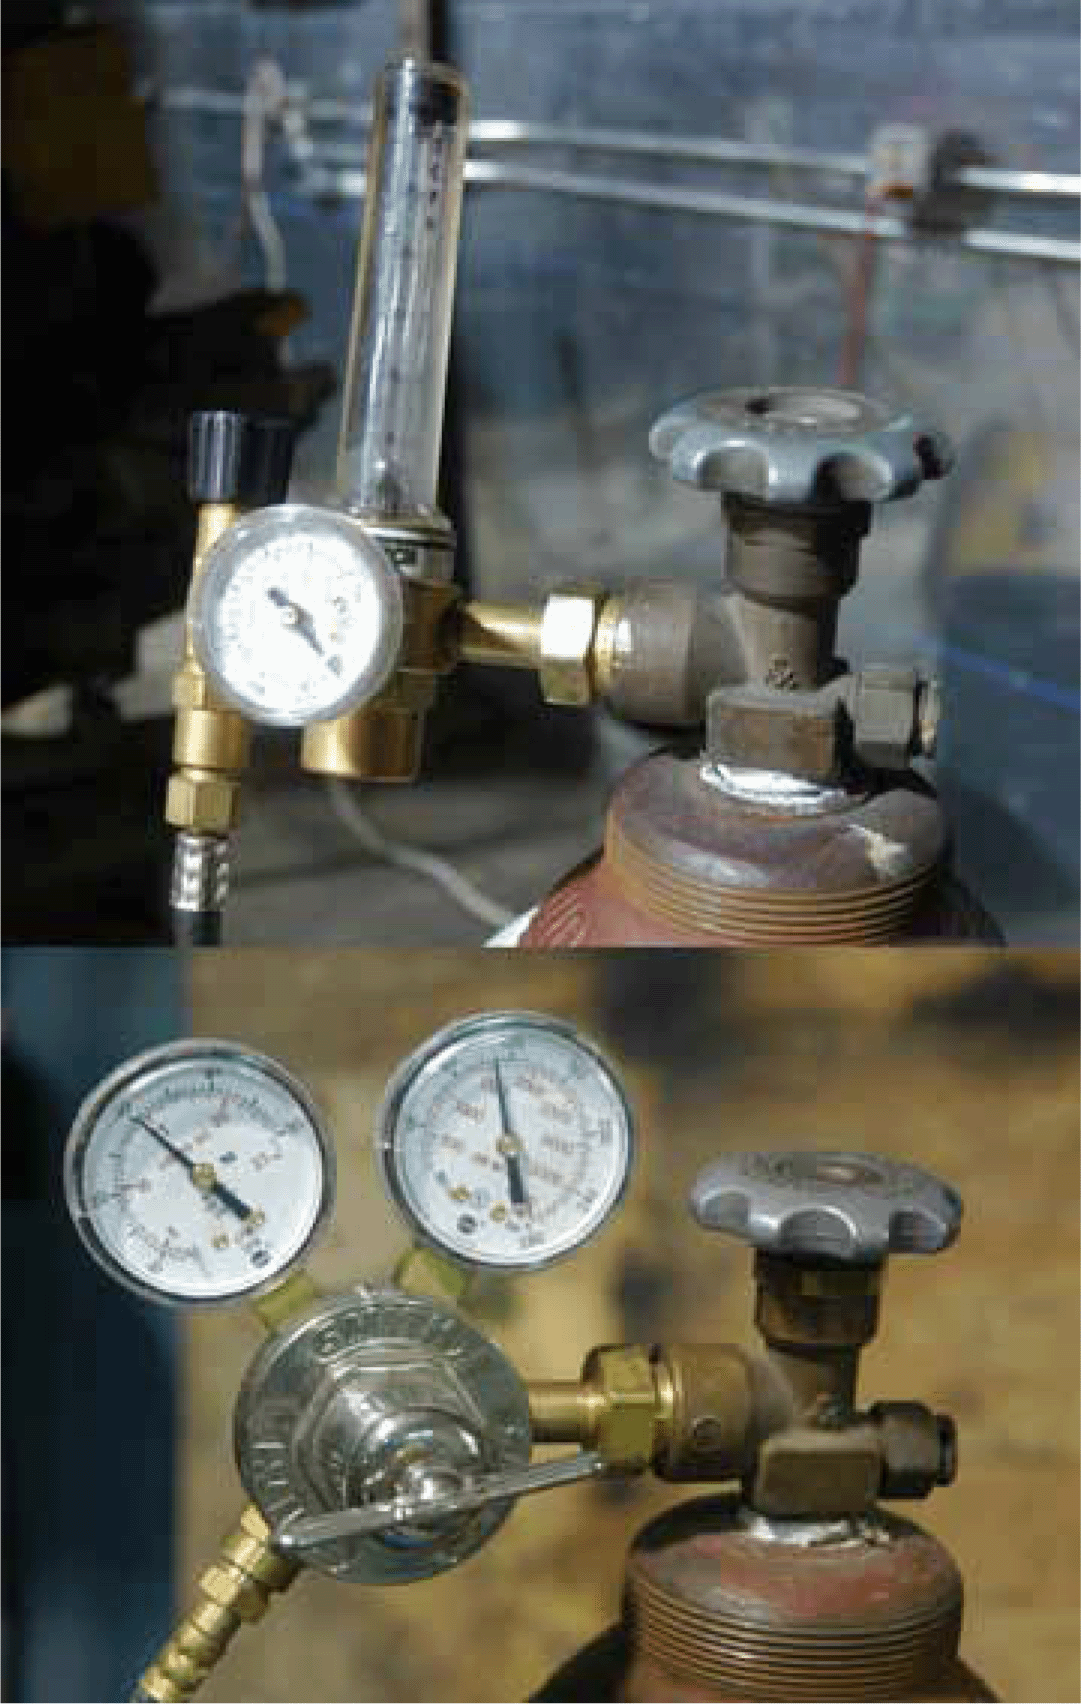
FIGURE 11.15 Flowmeters.
Weld Settings
1. Using the weld settings chart that accompanies your welder, find the recommended settings for the material under the “MIG Welder Adjustments” section earlier in this chapter. Turn each knob until the proper setting is established, and remember to make sure that the voltage dial is not between settings.
2. As mentioned earlier under “Weld Orientation,” consider whether you need to reduce the recommended voltage setting at this time, and make that change.
Get Comfortable
The last thing you need to do before pulling the trigger and starting to weld is to find a good position. The proper position will depend a lot on whether you are making flat, horizontal, or vertical welds and whether or not your work can be clamped to the worktable or needs to rest on the ground. For now, I’ll assume that you can perform the weld with your material sitting flat on the worktable. The things you are looking for in this position are a well-braced MIG gun, the ability to travel along the weld seam, having your welding mask about 10 in away from the weld area, and no parts of your body too close to the weld area besides your gloves.
You can stand or sit when welding, but I find that standing allows me to move more freely along the weld seam and slide my elbows on the worktable if needed. Also, when you are seated, your lap provides a great landing zone for sparks. It doesn’t take long for a spark to burn through cotton or wool if it sits directly on top for long. For this reason, I suggest standing for most welding.
At this point, your work area is ready, the gas flow rate is dialed in, the welder settings match your material thickness for good penetration, and you’ve found a stable position where you can complete your weld. You are ready to weld! As long as the variables don’t change—material thickness and weld orientation—you can continue to weld until you need a break or run out of consumables (i.e., wire or gas). As you work, you can make changes to the voltage and wire feed as needed, all on the fly, although it is usually recommended that you change these when the trigger is not depressed.
When taking a break, it is up to you how far you take the shutdown process. If you need to take a short break to use a grinder or other hand tool, I’d suggest leaving the welder as is for that time (5 to 10 minutes). If you need to take a phone call or do some other more in-depth work that will take longer than 10 minutes, go ahead and shut the machine down by using the on/off switch, but you may leave the gas flow set and gas tank open. For time spent away from the welder longer than half an hour, I would suggest fully shutting down the machine and gas.
Shutting Off the Welder and Gas
1. When you’ve completed your last weld, rest the MIG gun in its cradle or draped over the MIG machine.
2. Remove the negative clamp from your work, and gently coil its wire lead around the MIG welder handle.
3. Turn the wire-feed and voltage settings all the way down.
4. Turn the tank valve knob clockwise until it stops to fully close the gas tank.
5. With the welder still on, pull the trigger on the gun until the flow-rate gauge goes to zero. Remember to watch where the wire goes; you don’t want it to touch the negative clamp. You can leave this length of weld wire extending past your normal stick-out or trim it off.
6. Gently coil the gun lead around the handle of the MIG welder, and turn the MIG machine off using the on/off switch.
Practice
When learning to weld, practice really does make perfect. Below we’ll go through a number of different welding practice scenarios to help bring your skill and comfort levels up.
Flat-Position Bead Making
For this practice session, cut a piece of sheet metal that is about a foot on each side or larger using the torch or plasma cutter. Clamp it directly to the worktable using the negative clamp. Your goal is to practice starting and stopping your welder and making straight and decorative beads that are consistent in quality. For this session, you’ll use 10-gauge sheet steel.
Practice 1: Small Circles
1. Clamp the sheet metal directly to the worktable using the negative clamp.
2. Find your preferred welding position that allows you to hold the gun nearly perpendicular to the material and view where the wire will come into contact with the surface, as shown in Figure 11.16.
3. When you’re ready, hold the trigger on the MIG gun. Do not move the gun at first. When the arc is formed, move the arc very slowly in a ⅛-in-diameter circle.
4. Hold the trigger down for about 3 or 4 seconds while you make the circle, and carefully watch the weld area. Take note of the distance your gas nozzle is from the surface and the sound the welder makes.
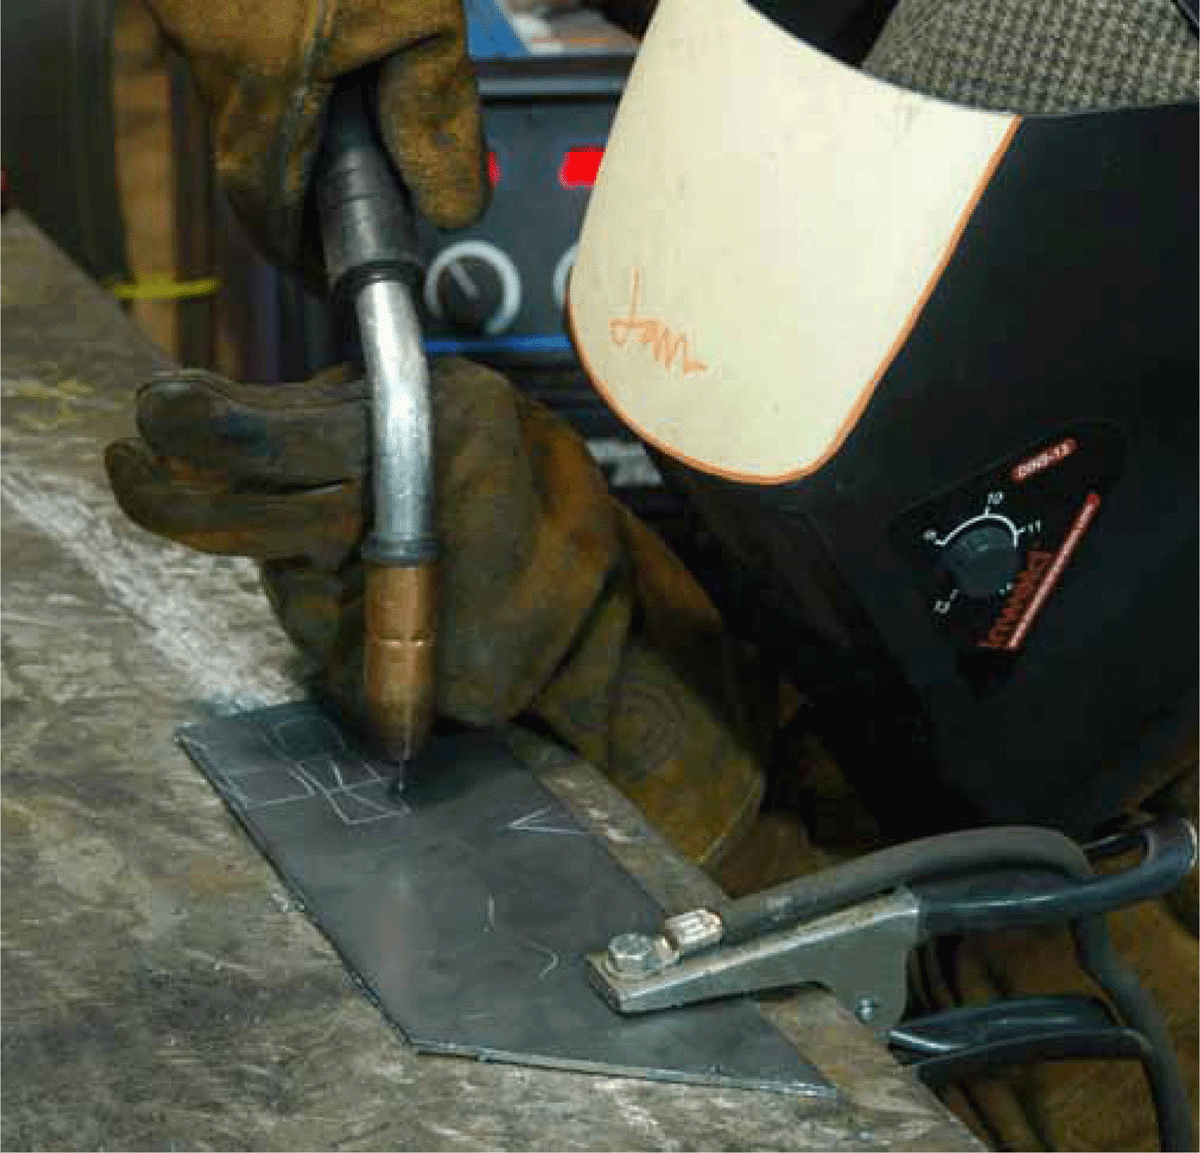
FIGURE 11.16 Getting into position.
TIP: If you’re unsuccessful at creating a constant arc, double-check your welder settings and stick-out. If these both are correct, another possible culprit is a bad electrical connection. Wire brush or grind a bit of the mill scale off from the spot where you placed the negative clamp, and try again.
5. The best way to think of this sound is that of sizzling bacon.
a. If you hear a more distinct popping noise, this suggests that the welder settings are incorrect (voltage or wire speed too low), the gun is too far from the weld area, or there is a poor flow of electricity.
b. If the sound is more of a hiss, this may mean that the voltage is turned up too high.
6. When you are ready to stop the weld process, just release the trigger and pull the gun back from the weld area. If the wire-speed settings are set properly, the weld wire should not stick to the weld pool but rather leave you with a perfect amount of stick-out for the next weld.
7. Repeat this exercise a few more times, focusing on the sound, a slow rate of travel, and watching the weld area.
TIP: If you’re having a hard time with visibility here, try slanting your sheet metal on magnets at a 45-degree angle and putting the negative clamp directly on your work.
Practice 2: Mandatory Mistakes, Part 1
Here you are going to repeat the last exercise but try to make a bad arc.
1. Start by getting into position to make another small circular weld.
2. Pull the trigger to get a nice arc going.
3. With a good arc, slowly pull the gun away from the surface of the metal. Watch this distance carefully.
4. Quickly, you should start to get a lot of popping, stray pieces of welding wire, and extremely poor lighting conditions.
5. To get a good weld again, slowly push the welding gun back to the proper distance, and the welding process should continue much more smoothly.
6. Repeat this a few times to experience the sound of a poor weld and to get used to bringing the gun back to the right distance if faced with this problem in the future.
Practice 3: Stringer Bead
In your earlier welds, you didn’t move too far away from the weld pool because I wanted to focus on maintaining a proper distance from the surface. For this exercise, you will now make a weld bead along a straight line, called a stringer bead, to get a feel for the rate of travel. At this point, you don’t need to worry about pushing or pulling the bead or making zigzags, just how to make a weld bead along a line. Don’t worry about getting to the finish line here; just go nice and slow and keep a steady arc.
1. Start by drawing a 2-in line on the surface of the steel with soapstone.
2. Position yourself just like in the preceding practice with the gun perpendicular to the steel.
3. Pull the trigger, and when the arc is created, move very slowly and steadily along the line. If popping occurs, it is most likely due to one of two things—either your rate of travel is too fast or you have drifted away from the surface.
4. Continue along the line, trying to maintain a steady arc the whole time. At the end of the line, release the trigger and inspect your bead. Figure 11.17 shows a bead I made going extra slow and steady.
5. Practice with more lines, varying the distance of each up to about 5 in.
6. Practice angling your MIG gun up to 10 degrees along the direction of travel to try pulling and pushing techniques.

FIGURE 11.17 Slow and steady bead.
Practice 4: Mandatory Mistakes, Part 2
Again, you are going to create a bad bead intentionally. This time you’ll maintain a constant height but vary your speed.
1. Draw a 3-in line on the sheet metal.
2. Using what you’ve learned, start your welding process on this line, and move slowly along it.
3. After a nice arc is going, speed up your rate of travel until you get more popping and an inconsistent arc.
4. Slow back down until an even arc is created again, and release the trigger.
5. Does your weld arc look something like the one on the left in Figure 11.18? Notice how the bead is intermittent during the fast section. Clearly, there wasn’t enough heat during the making of this bead to create a strong bond.
6. Your ideal welding speed is somewhere between the fast section of this weld and the slow speed at which you started in step 1 of Practice 3.
7. Experiment with your own rate of speed by drawing more lines and following along them at different rates. The bead on the right in Figure 11.18 is straight and has a great height-to-width profile.
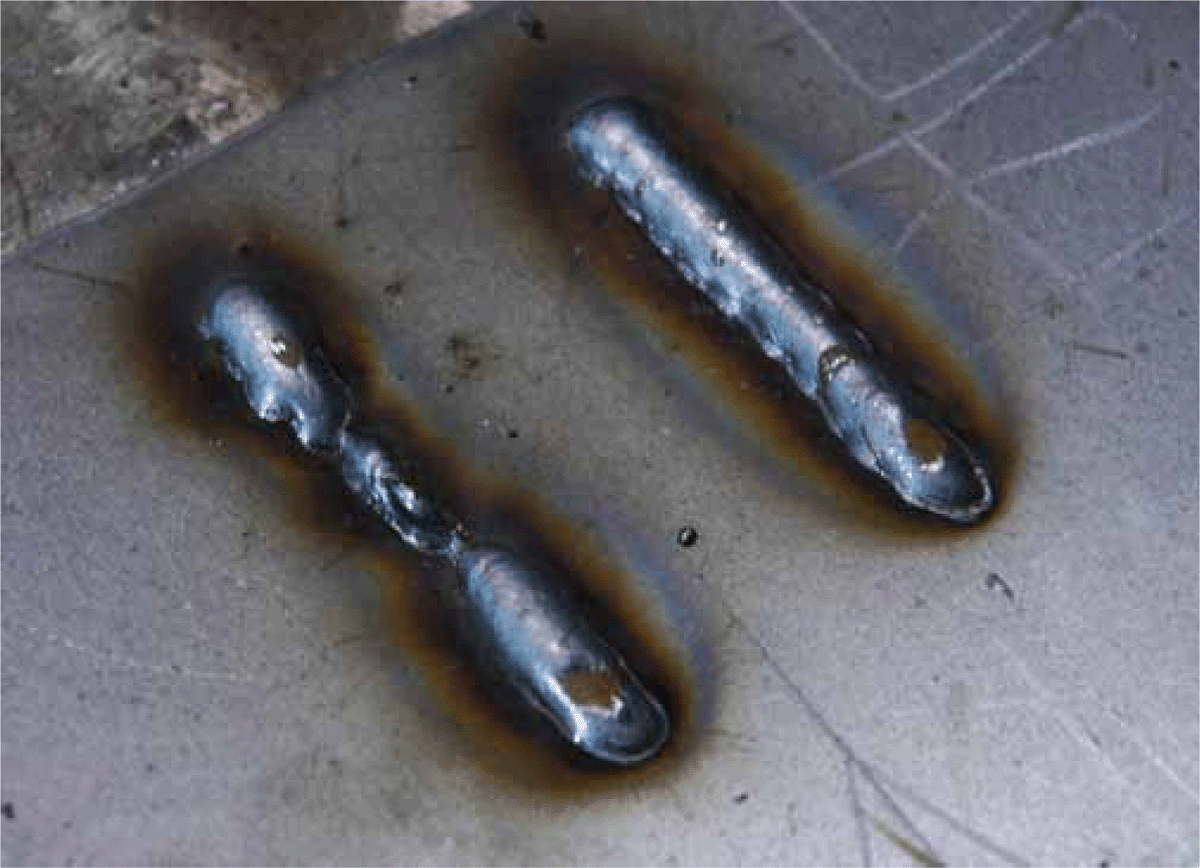
FIGURE 11.18 A slow-fast-slow bead on the left with a good bead on the right.
Repeat these exercises until you are comfortable enough with the heat, sparks, and darkness that you can focus solely on the factors that affect the quality of your weld bead.
TIP: Make changes to the voltage and wire-speed settings between practices so that you can start to identify the sound and feeling of a properly set up welder.
Flat-Position Weaving
Now that you are able to maintain a good height and speed of your MIG gun, you need to take your skills to the next level and learn how to join pieces of steel. To do so, you need to learn how to make a weave bead—thereby heating up pieces on either side of your weld seam. Earlier in this chapter you learned about three weave types—zigzag, crescent-shaped, and triangular. Practice each in the following steps to find out which one feels best and gives an even bead.
For this practice session, cut a bunch of 4- to 6-in lengths of flat stock, and grind a small bevel on each of the long edges to help you get a good joint. You’ll need clamps or magnets to hold your work together when you weld it, so make sure to have yours handy.
Practice 1: Weaving
1. Arrange two pieces of flat stock with their long edges butting up together as close as possible. Clamp them to the worktable, or hold them together with magnets.
2. To help with visibility, draw along the weld seam with soapstone.
3. First, you want to secure your material together using a weld technique known as a tack weld.
4. Get in position to make a weld, and make a ⅛-in-long bead that starts on one piece of flat stock and moves perpendicularly over the weld seam and onto the other piece of flat stock. Repeat this at the other end of the flat stock, as shown in Figure 11.19.
5. With your material tacked, you now want to stich it together using a weave pattern. As mentioned earlier, the weave pattern only needs to be about as wide as the chamfer you are welding.
6. Stitch three or more pieces of flat stock together (tacking each beforehand), as shown in Figure 11.20.
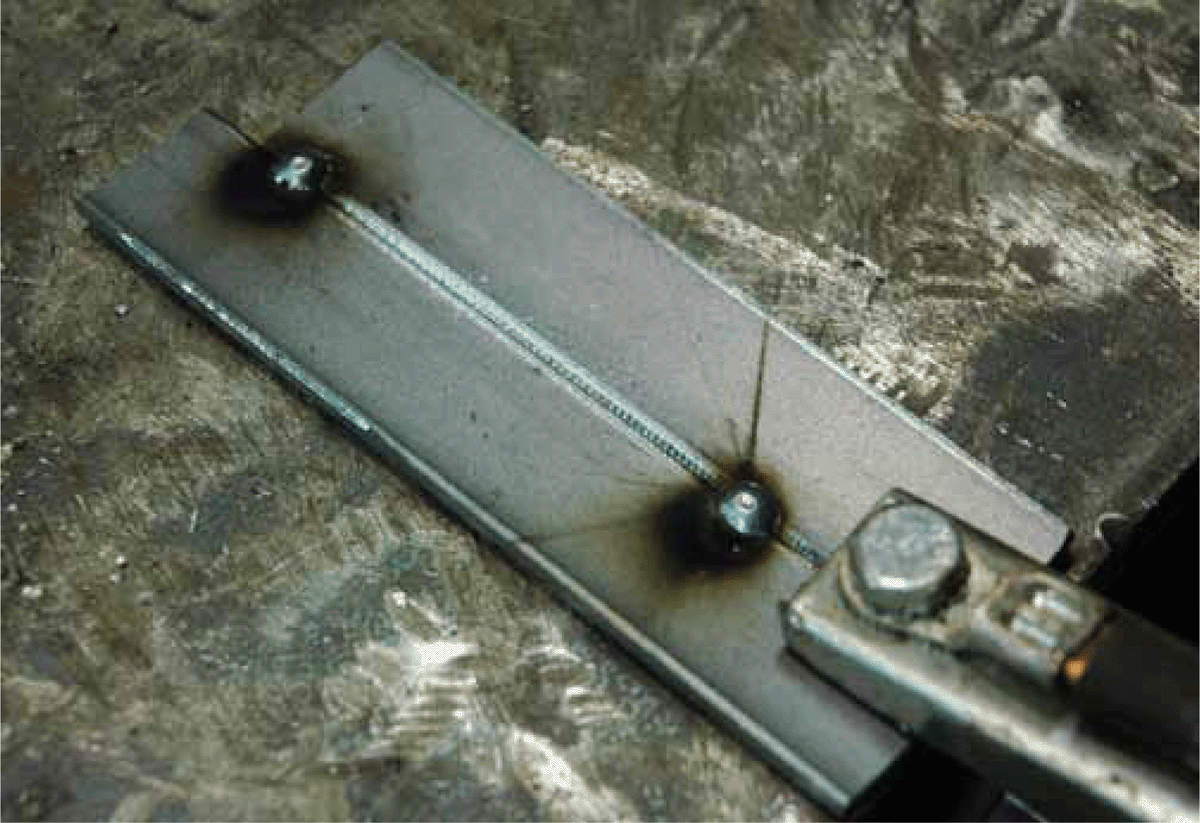
FIGURE 11.19 Tack welds.
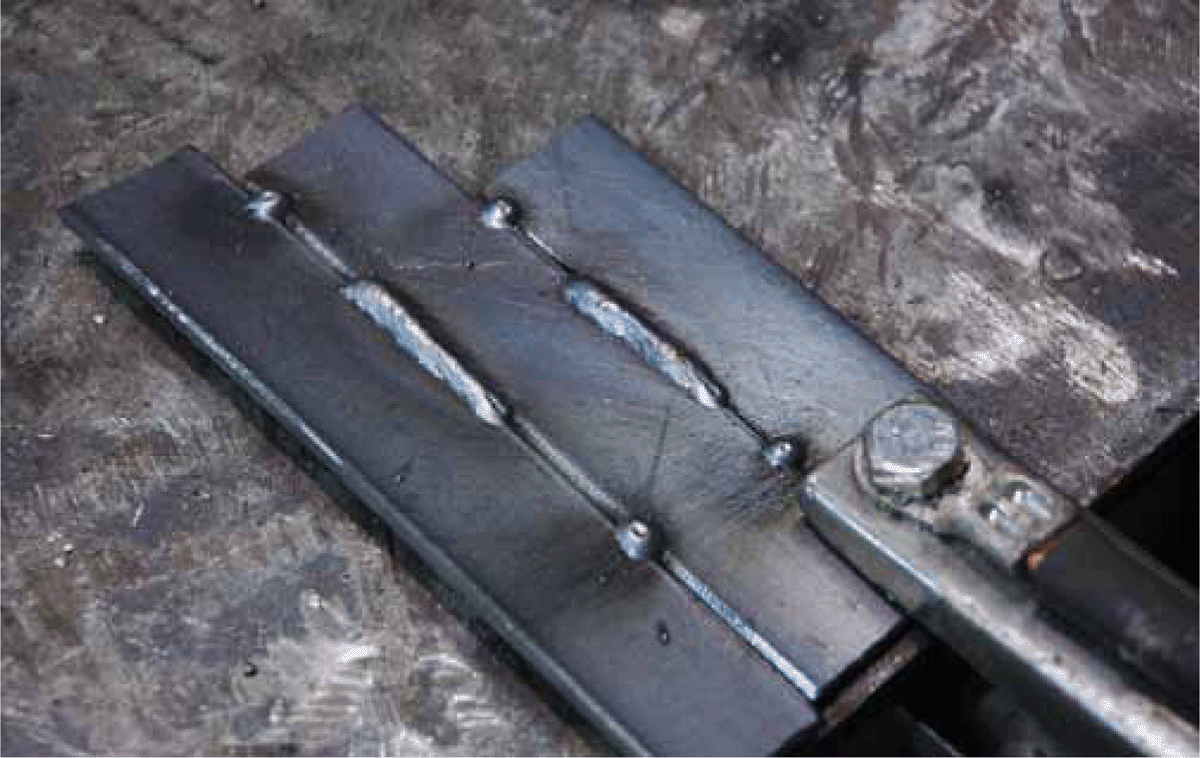
FIGURE 11.20 Tacking and stitching practice.
Flat-Position Tee Joint
Welding a tee joint is in many ways the same as welding a butt joint, except now you want to hold your gun at approximately 45 degrees from the corner along the weld seam rather than perpendicular to the surface. Another difference is that with the added height of the material, it is more challenging to get in close to the weld seam.
Using magnets, place two pieces of flat stock in the corners with their seams lined up as closely as possible. The magnets can be rotated so that you can access the seam from a variety of angles. For the first attempt, let’s turn the magnets so that you can access the seam from directly above, as in Figure 11.21.
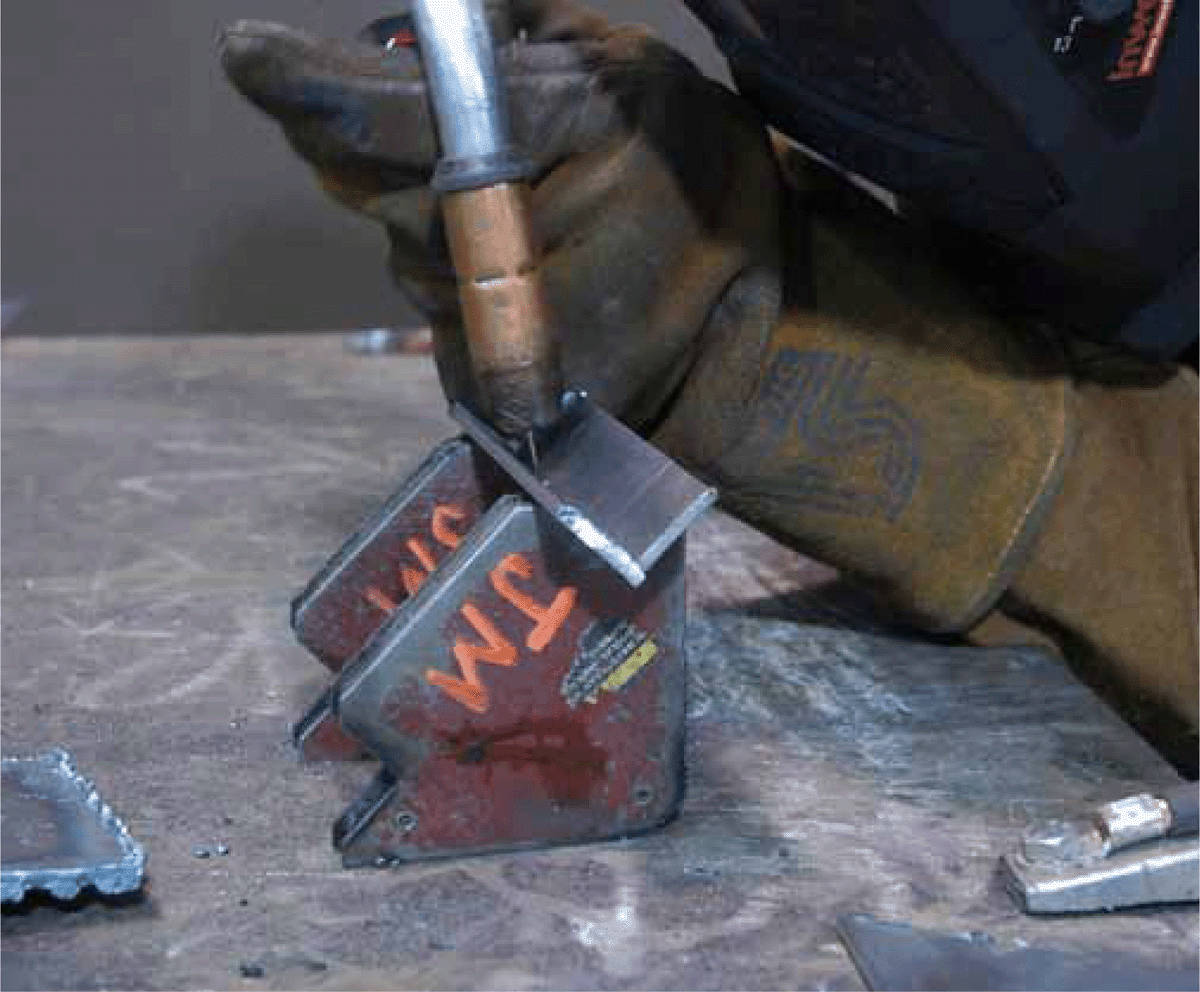
FIGURE 11.21 Magnets holding the workpieces.
Practice 1: Tee Joint
1. Position yourself in such a way that you can see into the V-groove created by the flat stock, and hold the MIG gun steady.
2. Tack either end as in the preceding practice, and then run a full bead down the seam using the weave pattern of your choice.
NOTE: The shiny brown pools you will see on your MIG weld bead are bits of the copper coating and other impurities collecting on the surface. Take a wire brush or sandpaper to these spots to clean them off.
Making a Tee Corner
One connection you’ll make a lot of if you are making furniture or frameworks is a corner joint using tubing or solid stock. For this exercise, you are going to use tack welds and tee welds to weld a piece of tubing perpendicular to a section of sheet metal. For this you’ll need layout magnets and some sort of square tool, such as a carpenter’s speed square or right angle.
Practice 1: Tee Corner
1. Clamp your sheet metal directly to the worktable.
2. Using a layout instrument, set a short length of tubing perpendicularly near the middle of your sheet metal, as shown in Figure 11.22, and check for plumb.
3. If it is square, put a solid tack in one of the corners. After this cools, check for plumb again. Given the rapid heating and cooling, the weld may have pulled the work out of square, as shown in Figure 11.23.
4. Before you put in another tack, you need to remedy this. Bend the piece of tubing back to square with your hand or using a hammer. If your tack was made properly, it shouldn’t break, but if it didn’t penetrate either of the materials sufficiently, the tubing most likely will pop off. If it does break, just start back at step 3.
5. With your tubing realigned, go ahead and make another tack opposite the first one.
6. After this tack cools off, your piece should be held perfectly plumb, as in Figure 11.24, and you can start stitch welding around the seam until you have a solid connection.

FIGURE 11.22 Perpendicular tubing.

FIGURE 11.23 Not square anymore.

FIGURE 11.24 Perpendicular again and tacked in place.
These basic skills will take you a long way in sculptural and artistic welding. But how do you know if your weld quality is acceptable? Without having your work x-rayed, there are three good ways to judge your welds: (1) try to break them, (2) cut one apart, or (3) visually inspect the weld bead.
Breaking a Weld
Clamp any of your practice welds into a vice or directly on the table, and try your best to break the connection. Use leverage if needed, but really give it everything you’ve got. If your welds don’t break even when the material around it deforms, you’ve got a great weld. Figure 11.25 shows my using leverage to break a weld and the resulting weld failure. Most commonly, one side of your weld will tear off the base material. What this suggests is that not enough time (or heat) was used on this side of the seam. To remedy this, go back and focus on making a slower, slightly exaggerated stitching motion along the weld seam until you get a bead that doesn’t break.

FIGURE 11.25 Bending and breaking a weld.
Cutting Your Weld
For this, chamfer and weld a couple of ¼-in pieces of flat stock using tee and butt welds. Cut each one apart to inspect for voids or cracks. Figure 11.26 shows a tee weld with a very small void right at the weld root, and Figure 11.27 shows a void-free double-bevel weld. For structural purposes, many welds are x-rayed to look for imperfections and voids because they are often smaller than we can see with the naked eye.

FIGURE 11.26 Tee cross section with two small voids.

FIGURE 11.27 Double-bevel tee weld without any visual voids.
Visual Inspection
Below is a list of some common problems that lead to poor welds as well as how to identify them and what to do to fix them. When troubleshooting this kind of thing, you may want to use a stringer (straight) weld bead to rule out any effect your own weave pattern may have on the weld quality. Figure 11.28 shows an example of each common weld problem.
• Poor gas flow. (2) This is an easy problem to identify because your weld will look like Swiss cheese or the surface of the moon. This bead is characterized by the large holes and uneven consistency. To fix this weld, just make sure that you have a full tank of the right gas and that nothing is preventing it from reaching your weld area, such as a closed regulator, a damaged welding lead, a clogged nozzle, or wind.
• Too little heat (3). When too little heat is used, the weld area doesn’t get the penetration it needs, and the weld bead will sit high on top of the material. Also, there may be inconsistencies with the bead because it is harder to maintain an arc when the voltage is too low. To fix this problem, turn the voltage higher on your welder.
• Too much heat (4). When welding at a voltage that is higher than what you need for your material, you will start to deform the material more than desired. Along either side of the weld you will notice small pits or cavities, and the weld bead itself may lie very flat or even burn through the material. To fix this, just turn down the voltage slightly.
• Too little wire (5). Welding with too little wire will give you a similar bead to when you weld with too little heat. You should notice a very small weld bead without much spatter that is slightly more consistent than when too little heat is used. Turn up the wire feed to fix this problem.
• Too much wire (6). When using more than the recommended amount of wire, you may notice a bead that is larger than needed, and extra spatter is produced. Usually the bead will build up rather than out because the heat isn’t enough to let the excess wire penetrate the base material. To fix this, turn the wire-feed knob to a lower setting.
• Travel speed too slow (7). Hopefully, this weld bead looks like your first beads from this chapter. A fat, wide bead with excess heat buildup around the weld area is how you identify a weld bead that was made too slowly. Increase your travel speed as you get more comfortable until you can form a desirable bead.
• Travel speed too fast (8). When traveling too quickly, you are left with a short, inconsistent bead that has very poor penetration. Remember, for beginner welders, start slow and gradually increase your travel speed when you have a good handle on gun height and keeping steady. Frequently, with new welders, the rate of speed can vary quite a bit owing to small jerky motions that deviate from the direction of travel. Practice, practice, practice!

FIGURE 11.28 Example weld problems.