
Apple changed the music industry forever when it introduced the iTunes Store with its “fair play” technology, which preserves the rights of the artists who make their music available for legal download. It was revolutionary, and more importantly, it worked. Now more than six million songs are available for legal download from the iTunes Store. I sometimes call it the ITS for short, because writing out “iTunes Store” each time gets really old really fast. Not just for me, mind you, but for you—the reader. That’s why acronyms exist. People get tired of reading, writing, and even saying long names. For example, my full legal name (as it appears on my birth certificate) is: Stephen Charles Oscar Theodore Thaddeus Kevin Edward Lawrence Bradley Young. After painstakingly writing it out that way for more than 26 years, I finally came up with the acronym SCOTT KELBY instead, which is much easier to write, and best of all, its meaning is pretty obvious to your average person (kind of like IBM or UPS). For the next three years, I always wrote the acronym in all caps, but once I realized that most people knew what it stood for (like ASAP or NFL), I then dropped the cap on everything but the first letter of each word, making it just Scott Kelby. Now, about the name of this chapter—it’s actually a band’s name, Proof of Purchase, and (as of the writing of this book) you can find two of their songs on the ITS. I listened to the 30-second preview of their song “Fallacy,” and it scared the livin’ crap out of me. Don’t ever listen to that preview with the light outs. It’s way too Eerie, Creepy, and Scary. It’s ECS.
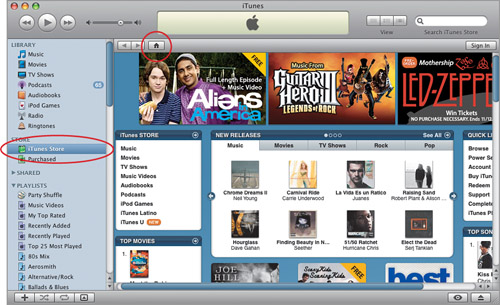
You can visit the iTunes store by clicking on iTunes Store (under the Store listing on the left side of the iTunes window, shown circled here in red). The iTunes Store is a lot like a website, in that there’s a homepage, and then you click links to visit other pages (in fact, you can’t access the iTunes Store unless you have an Internet connection, so it’s kind of like iTunes is a Web browser for the store). There are three columns in the homepage, and you access the main areas of the Store (Music, Movies, TV Shows, etc.) by clicking on the links at the top of the left column. You can always get back to this homepage by clicking on the little Home button that appears near the top-left corner of the iTunes main window. If you want to navigate back to the previous page, just press the Back button (to the left of the Home button). In fact, if you ever get lost, you’ll see little tabs that show the path that got you where you currently are. These little tabs are clickable, so you can use those to get back to a previous screen.
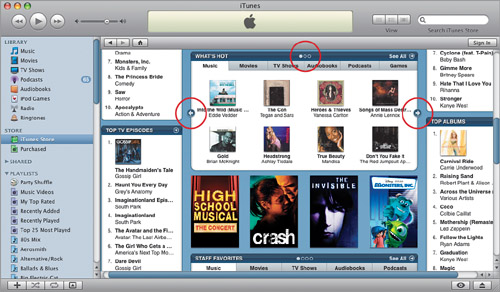
In the center column of the iTunes Store homepage there are special areas for new releases and iTunes Store exclusives, what’s hot, staff favorites, freebies, and indies. Although only a few titles are currently visible, there are actually more. To see the other titles, just click the blue circular arrow buttons that appear on the left and right side of each area (they’re circled above). So, how many times do you need to click to see everything? Here’s how to tell: In the title bar of each of these areas are little round navigation dots. If you see three dots, there are three screens of info. You can also click on any dot to jump directly to a panel of titles (so if you wanted to jump to the third set, you’d click on the third little circle). To get back to the original homepage set, click on the first circle again. See, it’s the little things, isn’t it?
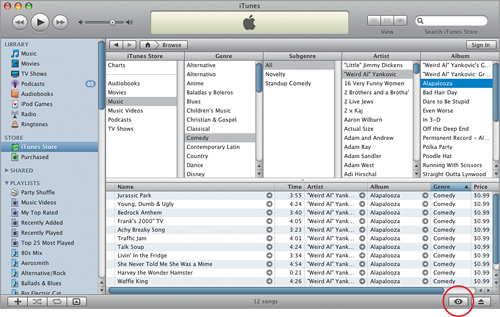
Genre browsing really works well in the iTunes Store because Apple assigned a genre to every song in the Store. So, if you want to browse through all the Comedy tracks, just click on the Browse button in the bottom-right corner, and in the iTunes Store list on the left, click on Music, then click on Comedy in the Genre list, and then in the Subgenre list, click on All. All the comedians that have downloadable tracks will then appear in the Artist list (in the top center), and if you click on an artist, all of his or her albums appear along the top-right side. Click on an album, and those tracks will appear in the main window. Warning: If you try this a few times in the iTunes Store, you’ll most likely love it, and then you’ll start using genre browsing in your own Library, even though you thought you didn’t like browsing. Hey, I’m just sayin’.
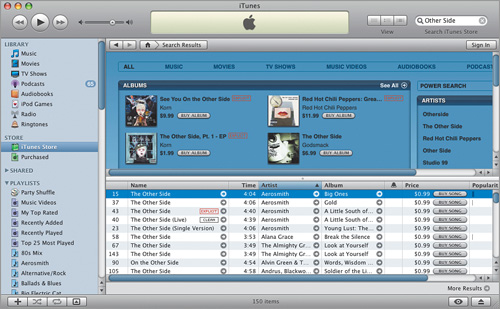
When you get the results of a search, they’re listed in order of their relevance to the song name (or artist, etc.) you entered. However, that doesn’t mean the song you want is on top—quite the contrary—so I usually wind up re-sorting these results by something else to help find the song I’m looking for. For example, I’m searching for the song “The Other Side” (the Aerosmith version), but when I type “Other Side” in the Search field, there are 150 results, and the one at the top of the list (sorted by Relevance) is “Otherside” by Red Hot Chili Peppers. So what’s the quickest way for me to find the Aerosmith version? Click on the Artist column, which re-sorts these results alphabetically by author, sending Red Hot Chili Peppers toward the bottom of the list, and Aerosmith closer to the top (since it sorts by the first name, I just have to scroll through the A’s, but it’ll still be faster and easier to find them).
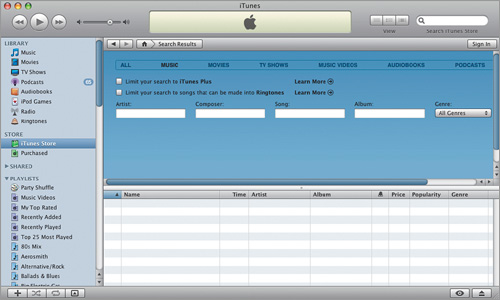
If the regular iTunes Store Search doesn’t do the trick for you (maybe you’re looking for some really obscure song and just aren’t finding it, but you figure it’s probably there somewhere—maybe you don’t have the correct spelling of the artist’s name, or something like that), you can try a Power Search, which lets you really refine your criteria. To do a Power Search, go to the iTunes Store homepage and click Power Search under Quick Links on the top-right side of the screen. A more detailed search area will appear across the top of your main window. Now you can search in multiple areas (like searching by Artist, Composer, Song, Album, and/or Genre) all at once. Hey, it’s worth a try.
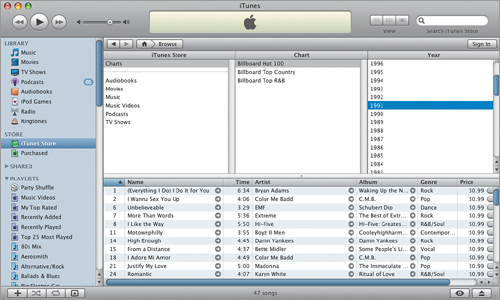
Remember all those great songs from the year you graduated high school? Neither do I. Well, I remember them if I hear them or see their names, but off the top of my head, I can only name a handful. That’s why it’s so cool that the iTunes Store has Billboard magazine’s Hot 100 charts dating back to 1946, so all you have to do is find the one for the year you graduated from school, and 100 songs that sound really bad today will be listed (hey, don’t laugh, when I graduated, the No. 1 song was “Shadow Dancing” by Andy Gibb). You can view Billboard’s Hot 100 charts (and buy the songs listed on them) by starting at the iTunes Store homepage and clicking on the Browse button at the bottom-right of the iTunes window. In the Genre section, click on Charts; in the Chart section, click on Billboard Hot 100; and then in the Year section, click on the year you graduated. (I’m not telling you what year I graduated, but it could’ve been 1991. Hey, it could’ve been—if I had been a really, really, really bad student.) Warning: When you click on your year, you’ll see a list of songs that will immediately elicit a verbal: “Oh, no way that song was No. 1.”
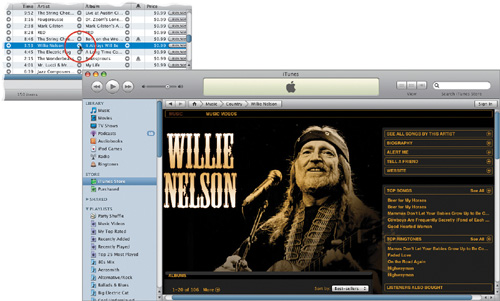
If you see an artist you’d like to see more of (let’s say you’re searching for songs, and you happen to see a Willie Nelson song in the results—hey, Willie rocks), just click on the little gray circle with an arrow inside it right after the artist’s name. Clicking on this takes you directly to a page where you’ll find all of the artist’s songs available in the iTunes Store. Some artists even have a “feature page” that will appear when you click on the little arrow; then you not only get the big fancy photo of the artist(s), but if you look around on this page you’re also likely to find a Biography link, and sometimes a link to the artist’s website or iTunes exclusives. Click on the Biography link and get some background info on the artist. Hey, it saves you a trip to the artist’s website. Try this once, and you’ll use it again and again.
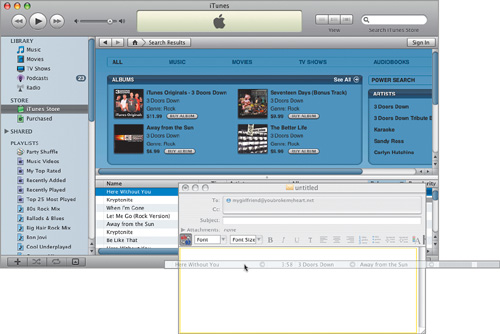
If you’ve just uncovered the coolest song in the iTunes Store, you can send a friend directly to that song. Just open your email program (while you still have the iTunes Store visible), and click-and-drag the song’s album cover (or the song title, either will work) over into your opened email message. The song’s iTunes Store URL will be pasted into your email, just like a regular Web link. All your friend has to do is click on that link, and she’ll be taken right there. This is a great feature to use when your girlfriend/boyfriend breaks up with you. You can send her links to a bunch of “broken-hearted” breakup songs, like “Here Without You” by 3 Doors Down or “What Happened To Us?” by Hoobastank or the most obvious “The Breakup Song” by Greg Kihn—but I’m not sure that song will have the desired effect (the song name is good, but the message is weak if you’re trying to get some broken-hearted sympathy).
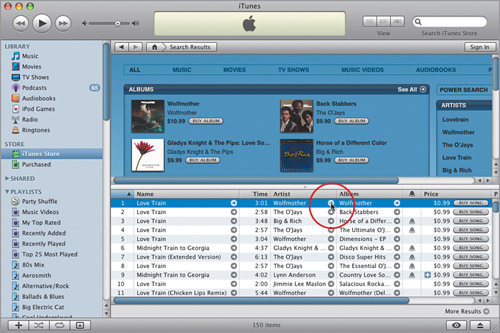
Okay, you’re checking out some music on the iTunes Store and you come across a song you really like (let’s say it’s “Love Train” by Wolfmother), and you say to yourself, “Ya know, I really like that song. I wonder—do I already have it?” Well, wonder no more, because here’s a very slick and very fast way to find out—hold the Option key (PC: Ctrl key) and click on the little gray arrow to the right of the artist’s name in the iTunes Store. This jumps you out of the iTunes Store and directly to a list of the Wolfmother songs in your Music Library, so you can see if you’ve got it. Seriously, how cool is that—it leaves the iTunes Store and shows you which Wolfmother songs you’ve already got in your Music Library. I just think that’s so cool (try it once and you’ll see what I mean).

Most of the songs available in the iTunes Store are protected using digital rights management (called DRM for short), which is a limited form of digital copy protection, and by limited I mean it lets you make copies to your iPod and up to five other “authorized” machines (machines you authorize), but that’s about it. This DRM is embedded into the songs, and it basically stops people from sharing these songs with their friends, or posting them for free download online, and by having it in place, it makes sure the artists get royalties from songs bought from the iTunes Store. The fact that Apple did this (include DRM in the songs it sells from the iTunes Store) is why so many record labels make their music available on iTunes, and that’s part of the reason why the iTunes Store is far and away the most successful online music store in the world. So, by default, when you buy a song in the regular iTunes Store, you know it’s protected with DRM. Just so ya know.
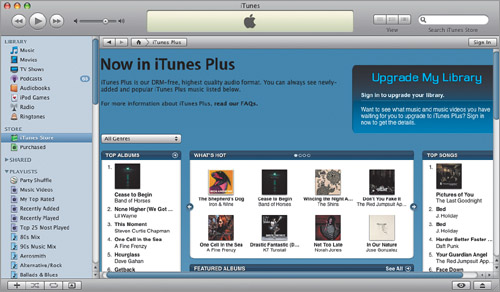
Although since its beginning, all songs in the iTunes Store have been DRM-protected, in early 2007, Apple broke the mold by introducing unprotected music downloads with no restrictions on how you use the songs for your personal use (or which MP3 player you can play them on). These unrestricted songs are in a separate area called iTunes Plus, and you’re getting the highest quality audio ever offered by Apple. To find them, click on the iTunes Plus link in the Quick Links section at the top of the right column on the iTunes Store homepage. Note: Not every song is available as an iTunes Plus unrestricted song, as only certain record companies agreed to offer their music without DRM, but the selection is growing and I imagine more and more record companies will start making their music available this way.
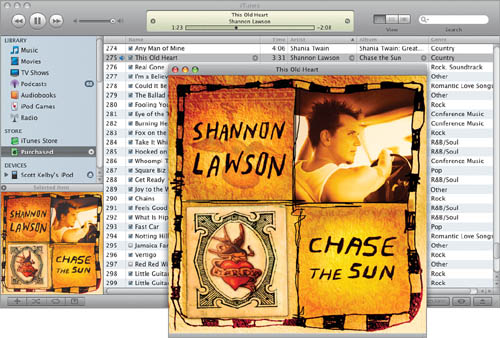
If you buy songs from the iTunes Store, there’s a little bonus: not only does it download the album art (so you can see it in the left-hand corner of the iTunes interface when you click the Show Artwork button—it’s the fourth button from the left), but if you click directly on the album art, a separate floating window will appear with a huge version of the cover. Well, technically you could get either a huge or a medium version, depending on how long it’s been since you downloaded the song from the iTunes Store, because the super-huge, almost-full-screen covers are a newer feature. Either way, it’s fairly cool to see the covers at a much larger size.
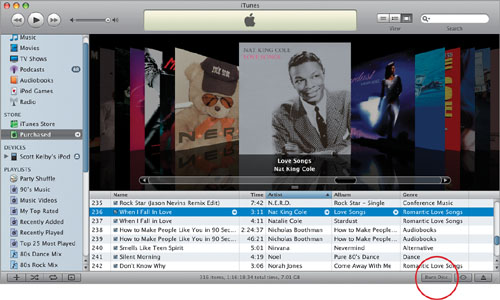
In the back of your mind you’re probably thinking, “Hey, if my hard drive ever totally dies, I’m covered, because Apple keeps a history of all my iTunes purchases, and if that mega-crash day ever comes, I’ll just drop Apple an email and they’ll let me download all the purchased songs again, right?” Nope. If your hard drive dies, all of your purchased songs go right to the grave with it. Apple will not let you download them again without paying for them. That’s why it’s SO important to back up your purchased music. To do this, first click on Purchased in the Source list (on the left side of the iTunes window) to select it. Then click on the Burn Disc button in the bottom right-hand corner of the iTunes window. Insert a blank disc (when iTunes tells you to), then start-a-burnin’. Keep poppin’ in new discs until all those songs are backed up to CD. Now, will Apple ever change its mind about this, since serious hard disk crashes are nearly an inevitability? Probably one day, but it hasn’t happened yet, and until it does, you’re not “covered.” If you don’t back up, one day you’re almost certain to lose your entire iTunes Store investment. So...back it up now (step away from the book and start backing up).

If you can’t think of any songs to buy and you need a little inspiration, go to the iTunes Store home-page, and on the left side of the main window, click on Music, then scroll down and click on Celebrity Playlists. Apple has asked a number of celebrities to create and publish their own playlists, and often their suggestions for songs are very good. You can sort the listing by date added (to get the most recent celebrity playlists) or alphabetically by name using the pop-up menu in the top-right corner of the iTunes Store window. Once you find a musician or celebrity that interests you, just click on that person’s photo to see his picks and, most importantly, a note on why he picked ’em. Best of all, because his picks are sold in the iTunes Store, you can hear a 30-second preview of each suggestion. This may sound a little corny, but if you give it a try, I think you’ll be quite surprised at some of the cool music your favorite celebrities and bands are listening to.
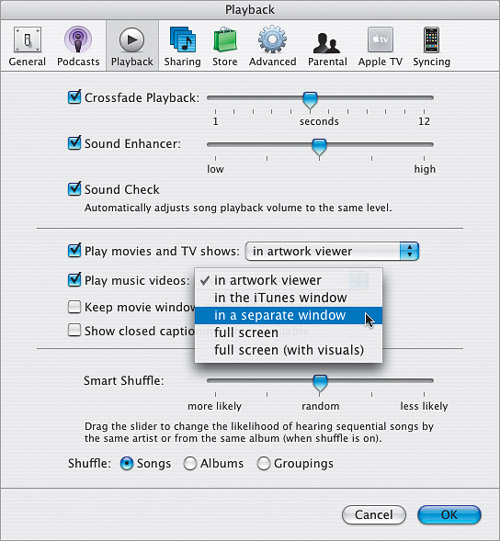
As I’m sure you know, the iTunes Store offers music videos, TV shows, movies, and movie trailers, but what you might not realize is that you have some control over how large these videos will appear onscreen within iTunes (in other words, it doesn’t just have to appear in the tiny Artwork viewer). To choose how you want your video served up, just go to the iTunes Preferences (under the iTunes menu on a Mac; under the Edit menu on a Windows PC), and click on the Playback icon. Near the middle of the Playback preferences, you’ll find a pop-up menu that lets you choose your preferred playback size for movies and TV shows, and a separate preference setting for the size music videos will be displayed. You can choose to play videos in the main iTunes window, in a separate window (which basically shows the video in a floating, resizable QuickTime player window), or in full-screen mode (with or without visuals), which can be a bit dicey depending on the quality of the video you’re watching and the size of your screen. Just choose your desired playback size from the pop-up menus (shown above) and click OK.

Okay, so you bought your 12-year-old son an iPod for Christmas, and you gave him an iTunes gift certificate so he could buy some music and videos from the iTunes Store. Here’s the thing—there’s nothing to stop him from downloading explicit audio and video podcasts, music with lyrics so nasty they’d make Snoop Dogg blush, and even R-rated movies. So, what’s to keep your child from getting his hands on all this naughty stuff? You are. Well, you using the parental controls built into iTunes, which are designed to let you decide to keep naughty stuff out of your kid’s iPod. You do this in the iTunes Preferences (press Command-, [comma] on the Mac, or Ctrl-, on the PC to bring up the Preferences dialog) by clicking on the Parental icon at the top-right side of the dialog to bring up the parental controls (shown above). Here you can choose to restrict entire sources of content (like podcasts, radio, etc.), or to restrict music downloads in the iTunes Store based on the Explicit rating tagged to adult content, or to restrict TV shows and movies based on their ratings. Once you make your choices (this is important), click on the Lock icon (as shown) to lock and password protect these changes, or your 12-year-old will quickly disable those restrictions (never underestimate a 12-year-old boy on a computer). Now click OK, and you gain some modicum of peace of mind.
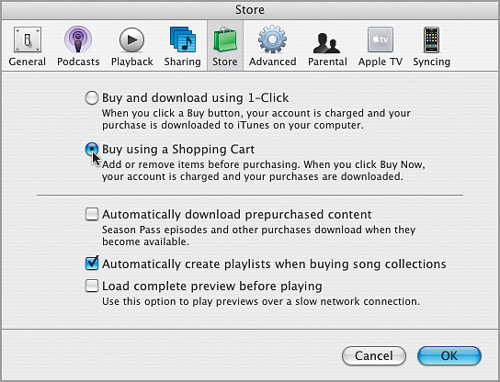
With songs being only 99¢, they just seem so cheap that it’s easy to buy songs—until the Visa bill comes and you’re shocked at how many 99¢ charges there are. Rather than just blindly buying songs one at a time, turn on the iTunes Store’s Shopping Cart feature. Go to the iTunes Preferences (under the iTunes menu on the Mac; under the Edit menu on a Windows PC). Just click on the Store icon at the top of the dialog, and then choose Buy Using a Shopping Cart. This changes the Buy Song button to Add Song. Now when you click the Add Song button, songs will wind up listed on your Shopping Cart page at checkout time. None of these songs is downloaded or charged to your account until you actually press the Buy Now button at the bottom of your Shopping Cart page. To go back to your freewheeling, spend-like-a-drunken-sailor ways, return to the Store Preferences and check Buy and Download Using 1-Click.
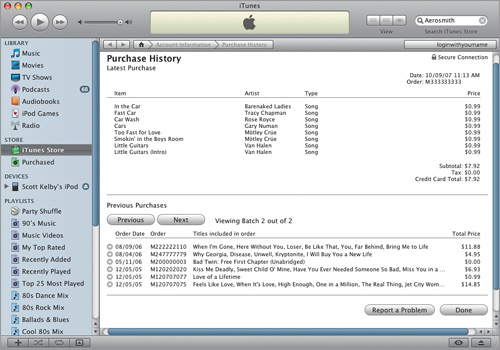
Although Apple knows exactly how much money you’ve been spending recently at the iTunes Store, you might want to know yourself (so you can prepare items that will need to be pawned). To find out how much you’ve spent, just click on the Account button (the one that shows your email address) in the upper right-hand corner of the iTunes Store. (If you’re not already logged in, it’ll ask you for your username and password.) On your Account Information page, you’ll find a button called Purchase History. Click it and get ready to freak out as all the purchases, and their costs, are listed one after another. When you’ve wiped away your tears, press the Done button, because “you’re done.”
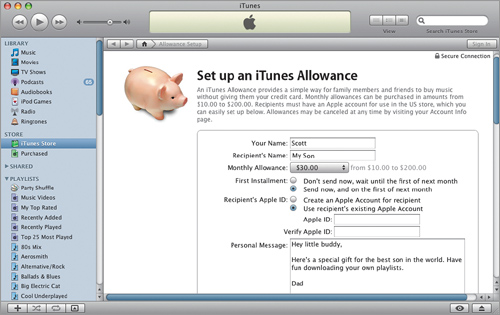
Want a high-tech way to spoil your kids? How about giving them an iTunes Store download allowance? It’s scarily convenient, because once you choose how much they get each month, it’s all automated from there: The iTunes Store credits their account each month and charges your credit card—it’s downright eerie. Now, although I’m poking some fun at it here, when you think about it, this is much safer than giving them your (or their own) credit card, because you determine exactly how much they can spend. Here’s how to set your kids up: From the iTunes Store homepage, in the list of Quick Links on the right side, click on Buy iTunes Gifts. On this page, click on the Set Up Allowance Now link. This brings up the Allowance setup page, where you can give your child an allowance of up to $200 a month. (By the way, if you choose $200, your next call should be to a therapist.) Once you’ve entered your information, click Continue. When your child signs into his account, Apple will deliver the “good news.” How personal and folksy.
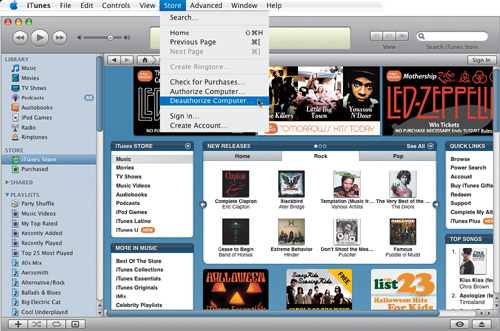
Most songs you download from the iTunes Store can be copied to just five computers (thanks to a built-in digital rights protection scheme called “Fair Play”), so theoretically, you could buy a song on your desktop machine, then authorize your laptop as your second machine, and then authorize your computer at work as your third, and you’d still have two computers left to authorize (plus you can copy songs to as many of your iPods as you’d like—fair enough). You can also buy more songs from these five machines and charge them to your account. But that also means if you sell your computer or give it to someone else (maybe someone else within your company will wind up using your old machine), you definitely want to “deauthorize” it, or they may be able to buy songs too—and charge them to you. To deauthorize your computer, go under the Store menu in iTunes and choose Deauthorize Computer. When the dialog appears, click OK and the computer you’re currently using will be deactivated. Note: Just erasing and reformatting a hard drive will not deauthorize a computer—you have to deauthorize it manually, as shown here.
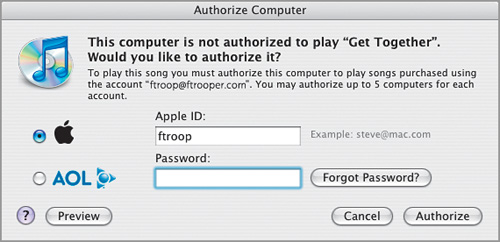
If you’re on a network (at work, at home, at school, etc.), you can share your playlists with other people on the network. That’s right; they can play your songs in your playlists from right within their copy of iTunes. The only downside is that they won’t get to hear songs you bought from the iTunes Store—when those purchased songs appear in a playlist, iTunes skips over them automatically (to, once again, protect the copyrights of the music you bought). If you want someone on your network to be able to hear your iTunes Store music, you’ll have to “authorize” his computer. Just go to his computer, log in with your iTunes Store username (email address) and password, then go under the Advanced menu and choose Authorize Computer. (Note: This computer becomes one of the five that you’re allowed to authorize under your iTunes Store account.)

If you’re on a local network, chances are you’ve got a direct and pretty speedy connection to that network. If that’s the case, you can speed things up even more by tweaking an iTunes preference that will accelerate the loading of both the iTunes Store previews, and of shared playlists across your network. What you’re doing is just shrinking the iTunes Streaming Buffer Size, meaning it buffers a smaller amount of info before it begins playing, so you see previews faster and hear shared songs faster. If that all sounds confusing, it should. So, does it really matter what kind of magic goes into making iTunes run faster? No? Then great, do this: Go to iTunes Preferences (found under the iTunes menu on a Mac; the Edit menu on a Windows PC), then click on the Advanced icon and choose General. From the pop-up menu for Streaming Buffer Size, choose Small, and now things will move faster. See, that was fairly painless, eh, Bunky?
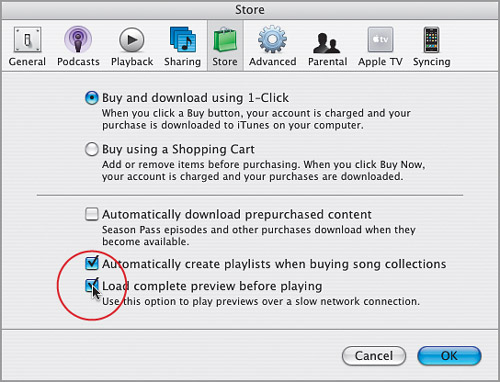
If you have a slow-speed (dial-up) connection to the Internet, you’re probably suffering a frustrating version of one of the coolest iTunes Store features—the ability to hear a 30-second preview of any song. The problem is that these previews stream, and because of the slow speed of your dial-up connection, those audio streams often skip, are choppy, and sometimes are out-and-out painful to listen to. But it doesn’t have to be that way. Just buy a high-speed connection! (Kidding.) Actually, there’s something you can do—stop the streaming. That’s right, there’s a preference that stops the streaming audio and instead loads the entire music preview before it plays. That way, there’s no chopping, no skipping—just clean, pure previews, baby! Here’s how to turn it on: Go to the iTunes Preferences (on a Mac, it’s under the iTunes menu; on a Windows PC, it’s under the Edit menu) and when the dialog appears, click on the Store icon. Then turn on the checkbox labeled Load Complete Preview Before Playing. That’s it—it’ll take a little extra time while the preview is downloading, but once it does, it’ll sound perfect. Note: Turn on this option only if you’re using a telephone line dial-up connection. If you have a cable modem, T1, or DSL connection, you should leave this turned off.
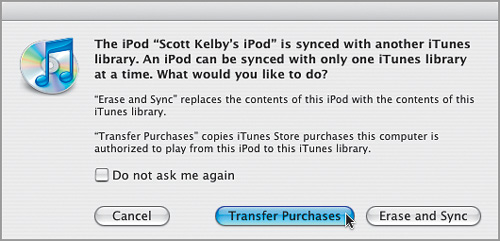
If you want to transfer music or videos that you’ve purchased in the iTunes Store to another computer, the fastest and easiest way is to move them using your iPod. Here’s how it’s done: Apple allows you to authorize up to five computers to play your purchased video and music contents from the iTunes Store. To move this purchased music from one authorized computer to another, you use your iPod (by the way, it just moves your music and videos purchased from the iTunes Store, not any music you imported from CDs or any other way). Once your purchased music (and videos) has been downloaded onto your iPod, just plug your iPod into another one of your authorized computers and a dialog will appear asking you if you want to transfer your purchased videos and music to this other authorized computer. If for some reason that dialog doesn’t appear, just go under the File menu, choose Transfer Purchases from iPod, and it does the rest. By the way, if you’re not sure how to authorize a computer to play your purchased music and videos, read the tip below.

When you buy songs or videos from the iTunes Store, they download in the order you purchased them. However, if you’re on a serious buying spree, there’s an option you’ll want to know about that lets you download multiple purchases simultaneously, instead of one-by-one in order. To get to this option, you have to be downloading a song, because the checkbox that turns this option on is actually found in the downloading window itself. Once a song is downloading, click on Downloads under Stores in the far-left side of the iTunes window, and you’ll see this option near the bottom of that window.
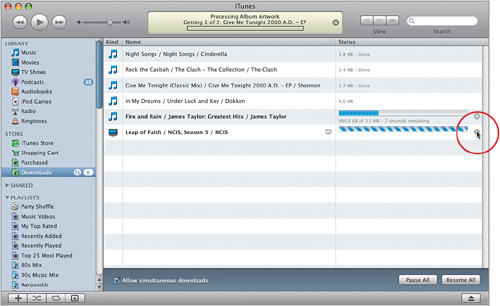
iTunes lets you manage your downloads, so if you’re downloading a bunch of songs (maybe a whole album) or a movie, you can pause your download and start again later, when it’s more convenient. This is incredibly helpful if you started downloading something, and then you have to leave before the downloading is done. No sweat—you can just pick up later, right where you left off. This download manager only appears when you’re downloading music, videos, or games from the iTunes Store so you won’t see it in your Source list until you’re actually downloading. When you are downloading from the Store, the Downloads link will appear in your Store section directly below Purchased. Click on it, and it displays a list of the items you’re currently downloading. It can download up to three simultaneous items, but if you’ve got more than that lined up to download, you can drag the queued-up downloads into the order you want them downloaded (so that way, if you can’t wait to download Fergie’s new song, you can move it up higher in the queue). If you want to pause a download in progress, just click the little Pause button that appears to the right of the status bar. To resume that download, click the circular button that now appears in its place. To pause all your downloads, click the Pause All button in the bottom-right corner of the main window. To resume all your downloads at once, click the Resume All button. Once all your music (and/or videos) are downloaded, this Downloads link will disappear.
When you buy a song from the iTunes Store, it comes with album art automatically, but if you didn’t get a song there (let’s say you imported songs from an audio CD), and you wanted the accompanying album art, you used to have to go searching around the Web to hopefully find the cover art, and then manually drag it into iTunes. It was kind of a pain. Of course today, we laugh at how they used to get album art “in the old days,” because in most cases iTunes will automatically go online, find the album art, and load it right in there for us. So, unless iTunes simply can’t find the art, you’re set. However, every once in a while—it happens. Maybe you didn’t enter the proper song name, or you misspelled a song title, or you just like music so obscure that even iTunes, with the iTunes Store’s vast database of album art, doesn’t recognize your musical brilliance (see how I threw you a bone there?), then you’ll have to do it “the old fashioned way” which is detailed earlier in this chapter.
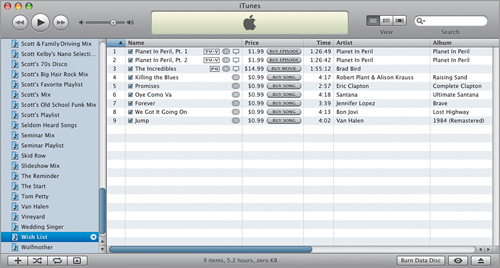
If you’ve found some music, TV shows, or movies you’d like to buy, but you’re a little strapped for cash right now, you can create an iTunes Store wish list. Theoretically, this is stuff you want to buy one day, but ideally you’d have a friend or relative buy it for you, right? (You moocher.) Here’s how to set up yours: Just create a new playlist (click on the Create a Playlist button in the bottom-left corner of iTunes), and when your new playlist appears in the Source list, name it “Wish List.” Then, when you’re browsing in the iTunes Store and you run across a song, TV show, or movie you’d like to add to your wish list, just click-and-drag that item into your Wish List playlist. This brings the direct link (including the 30-second preview) from the iTunes Store into your wish list. That makes it easy when you finally do decide to pony up the money for one of those items. However, buying a song doesn’t remove it from your wish list—you have to manually go and delete it (and remember, that doesn’t remove it from your main Library, just from that playlist). (Note: You can only drag items to a playlist from an iTunes Store individual preview list. If you want to add an entire album of music, a movie, or TV show season, you’ll need to create a Wish List folder on your Desktop. Then you can drag the album art, or movie or TV show poster, to this folder.)