

Before we get started, I just want you to know that I’m fully aware that: (a) the real name of the song by The DiVinyls is “I Touch Myself” and not “iTouch Myself,” but it just seemed so obvious a tie-in that I had to do it; and (b) I know that the title is a little naughty, but as any book publisher will tell you, working naughty things into your book is really what ultimately sells the book. It’s not the step-by-step instructions or helpful tips that make your life easier. As my editor says, “That stuff is for suckers.” In fact, oftentimes I’ll submit a chapter, and my editor will call me (we’ll call him “Ted” because that’s his real name), and Ted will say something along the lines of “Do you want this book to sell? Then you’d better ’sex it up’ a bit.” So I go back to those chapters and I try to insert what I believe to be totally innocent words, but for which people with naughty minds (not you) apparently insert their own meanings. Now, because you’re not one of these people, you totally won’t get how these words could possibly be misconstrued as “dirty,” but rest assured, “those” people will find a way. Here’s a perfect example: melons. See, it’s just a fruit commonly sold at every grocery store, but “those” people assign some sort of twisted meaning to it. Pickle. See, another innocent grocery store item (much like sausage or wiener), but Ted insists I put these in, including the occasional lurid poultry reference, like thighs and breasts (I don’t know about you, but I’m getting hungry). I’m sorry you had to be exposed to this seamy underbelly of publishing, but I thought you’d rather hear it from me, instead of picking it up on the streets.
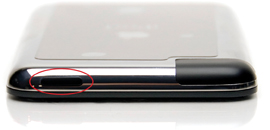
Turning on your iPod touch is easy: just press-and-hold the Sleep/Wake button located on the top of the iPod touch. The Apple logo will appear for a few moments, and then you’ll see the Home screen. If you want to put your iPod touch to sleep (which is a great way to conserve battery life when you’re not actively using any of its functions), you just press the Sleep/Wake button on the top once. When you put it to sleep, you’ll hear a little click sound and your screen will go black. While your iPod touch is in this sleep mode, the buttons on the touch screen are deactivated, so if you toss it in your pocket (or purse) it won’t accidentally come on and start playing a song, or a video, or doing anything that would run down the battery. To wake your iPod touch from sleep, you can either press that Sleep/Wake button again or press the Home button on the bottom center (just below the touchscreen). When it wakes, the screen is still locked (just in case you awakened it accidentally). To unlock the screen, just press your finger on the gray arrow button onscreen, slide it to the right, and the Home screen appears.

If you want to turn your iPod touch completely off, just press-and-hold the Sleep/Wake button on the top of the iPod touch for a few seconds until the red Slide to Power Off button appears. To shut down, take your finger, press lightly on that red button, and just slide it to the right. Your screen will turn black and you’ll see a small round status icon for just a moment, then your iPod touch will power off. If you somehow got to this “power down” screen by accident, just tap the Cancel button.

The Home screen is your main screen and the launching point for all of your iPod touch’s features. In fact, this screen is so important that the only other “hard” button (besides the Sleep/Wake button on top) is the Home button, which is that round indented button just below the touchscreen on the face of your iPod touch. Anytime you press that button, it takes you to the Home screen. Once you’re at the Home screen, the buttons at the top are for using the different applications that come with your iPod (like the Safari Web browser, access to YouTube videos, a calendar), and there’s a Settings button to access your iPod’s preferences. The standard iPod features (for playing music, videos, photos, or downloading music wirelessly from the iTunes Store) are those four buttons along the bottom of the Home screen. To use any one of these iPod features, just tap your finger once on the button. For example, if you wanted to look for some music, you’d just tap once on the Music button to enter the music section of your iPod touch.
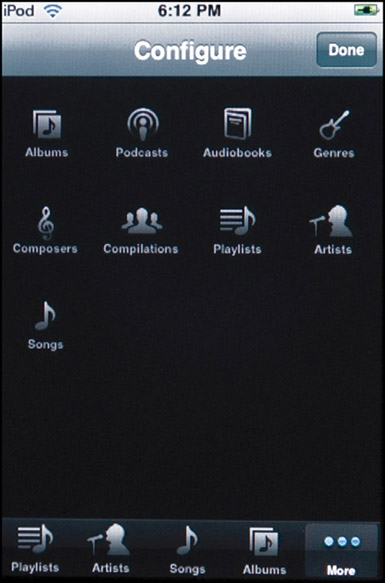
At the bottom of the main iPod touch Music screen is a navigation bar that, by default, gives you one-tap access to your Playlists, Artists, Songs, Albums, and there’s a More button to take you to all the other music areas within your iPod. You can customize this little navigation bar so your favorite areas are there (for example, let’s say you rarely view your music by artist, but you do watch a lot of podcasts—you could replace Artists with Podcasts, so you’re just one click away from your list of podcasts. To do that, tap once on the More button, then when the More screen appears, tap the dark blue Edit button in the top-left corner of the touchscreen. This lists all the one-tap buttons available to you. Press-and-hold the Podcasts button to select it, slide that button directly down right onto the Artists button, and then remove your finger, and your Artists button is replaced with your Podcasts button. You’re basically dragging-and-dropping. (You can also reorder these icons the same way.) That’s how easy it is to customize your iPod’s navigation bar.
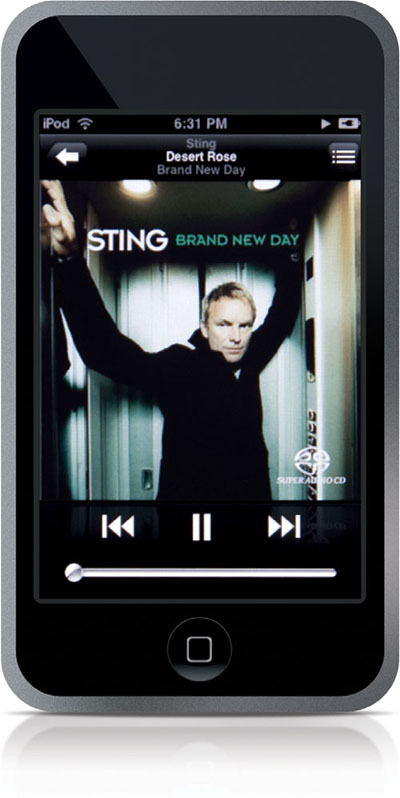
To play a song, from the Home screen, tap on Music, then tap on Songs on the bottom navigation bar. Scroll to the song you want (by “flicking” upward on the touchscreen), simply tap the song’s name, and it displays the cover art full screen (as shown above) and starts playing the song. A set of controls will appear near the bottom of the cover art, with a Rewind button (two left-facing arrows), Play/Pause button (the triangle or double lines) and a Fast-Forward button (two right-facing arrows). There’s also a volume slider (at the bottom of the screen) that lets you control the volume—just press the little volume knob and slide it with your finger (slide to the right to increase the volume, left to lower the volume). To fast forward, press-and-hold the Fast-Forward button, and it will soon start to fast forward through your song. To jump to the next song in the list, just tap the Fast-Forward button once instead (the Rewind button works the same way: press-and-hold to rewind, or tap it once to play the current song again).
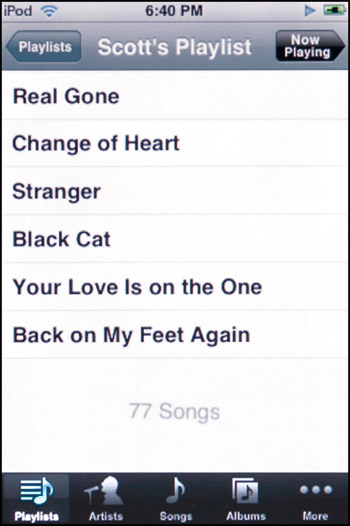
To find out how many songs are on your iPod touch, press the Home button, then tap on the Settings button. In the Settings screen, tap on General, then tap on About, and it will list the total number of songs, videos, and photos that are on your iPod, and the amount of space still available (unused space left for adding more songs, videos, and photos) is listed there as well. If you want to see how many songs are in a particular playlist, tap on that playlist, and then scroll down to the bottom of the list of songs, where it will display how many songs are in that playlist (as shown above). However, if you have less than 20 songs in your playlist, then I guess your iPod figures there’s so few you can just count’em yourself, because it doesn’t display the number. Not until you actually get 20 songs does it start displaying the number of songs in that playlist.

Once a song is playing, you can scrub through the song (drag the playhead forward or backward in a song) by tapping on the center of the screen, and a little scrubby slider will appear near the top of the screen. Use your finger to drag the little playhead forward or backward (this is a great tool if you’re trying to figure out the words to a song. As soon as a lyric goes by, you can scrub back just a little bit and hear it again, and repeat that as many times as you’d like until you realize it’s saying “’scuse me while I kiss the sky” instead of “’scuse me while I kiss this guy”). Besides scrubbing, there are two other important controls that appear on either side of this scrubby slider: (1) On the left of the slider is the Repeat button. If you tap on it once, it turns blue (to let you know repeat is turned on), and it will repeat your current playlist of songs. If you tap the Repeat button again, a tiny “1” now appears on the button, letting you know that it will now repeat just the current song again and again until you turn it off. And, (2) on the right side is the Shuffle button. Tap once to turn it on, and it shuffles the songs currently chosen (playing them in a random order). Tap it again to turn Shuffle off. Tap the center of the screen to hide the scrubby slider and the Repeat and Shuffle buttons. By the way, while you’re playing a song, after just a few seconds your iPod’s screen goes to sleep to help save battery life. To reawaken your iPod, just press the indented Home button, and then slide the unlock slider bar to the right.
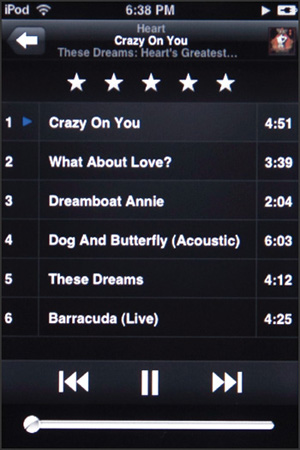
When you play a song in iTunes, the album cover art appears full screen, and if you want to see other songs you’ve downloaded from that same album, all you have to do is tap on the little icon in the top-right corner of the title bar (to the right of the song’s name), and a list of other songs on your iPod from that same album will now appear, including each song’s length and the star rating of the currently selected song (as seen above). To play one of those other songs, just tap on it. To see another album’s songs, tap the Fast-Forward button, and each time you tap it, a new album of songs appears (if you only see one song listed, you have only downloaded one song from that album). To return to the normal Cover Art view, just tap on a blank area of the screen twice (do a double-tap). To return to the regular Songs list, tap the Back arrow button in the top-left corner of the screen.
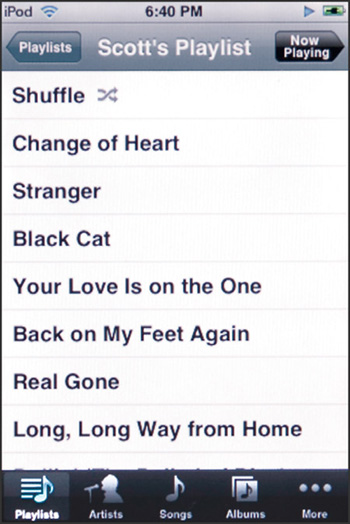
The playlists you create in iTunes are copied over to your iPod touch when you sync, and to see them (and hear them) on your iPod, tap on the Music icon (from the Home screen), then tap once on Playlists in the navigation bar at the bottom of the screen. This brings up your list of playlists (by default, iTunes copies all your playlists from your computer’s copy of iTunes onto your iPod, but you can set things up so only certain playlists are copied over—see “Turning Off iPod Auto-Updating” in Chapter 4 for how to set that up). When you see a playlist you’d like to hear, tap once on it, then the songs in that playlist are displayed. Tap on any song in that list and it starts playing. The rest of the songs that follow in that playlist will now play in order.
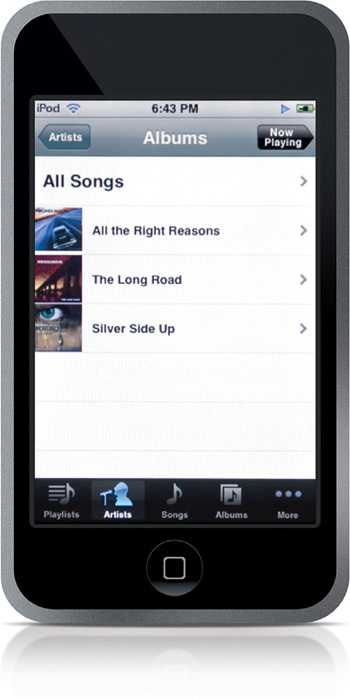
I have a number of playlists on my iPod that are dedicated to just one artist (for example, I have a James Taylor playlist of just my favorite JT songs, so when I’m in a mellow mood, I can hear just those songs). However, if you don’t have a playlist for your favorite artists, that shouldn’t stop you. In the main Music screen, in the bottom navigation bar, tap on Artists and a list of all the artists you have in your iPod appears. Scroll to the artist you’d like to hear (for example, let’s say you want to hear all the Nickelback songs on your iPod), tap on Nickelback and you’ll see a list of albums represented by the Nickelback songs you’ve downloaded. If you just want to hear all your Nickelback songs, regardless of which album they’re on, tap on All Songs at the top of the list, and it does the rest. If you’d only prefer to hear one song from a particular album, then just tap on one of those albums in the list to see a listing of all the songs you’ve downloaded from that particular album. Then tap on the song you want to hear from that list, and it plays. You can also shuffle the songs on any album (so you don’t hear them in the same order every time, like with a CD or traditional vinyl record album—at least, so I hear).
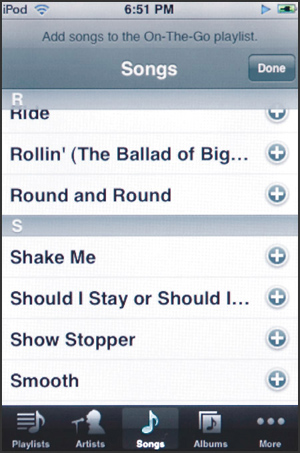
Creating an “On-The-Go” playlist (a playlist you create right on your iPod) is much different on an iPod touch than it is on any other iPod—it’s a much more visual experience. From the Home screen, start by tapping once on the Music button, then tap on Playlists, and at the top of the list of playlists, you’ll see On-The-Go. Tap on On-The-Go once, and a list of all the songs on your iPod touch will appear. To the right of each song will be a + (plus sign) button (as seen above), which you tap to add that song to your On-The-Go playlist. When you’re done, tap the Done button in the upper-right corner. From now on, when you tap on On-The-Go in the Playlists list, it will display a list of the songs in your On-The-Go playlist. To add more songs to this list, tap the Edit button in the top-right corner, then tap the + (plus sign) button in the top left, and that list of all your songs (with the plus sign beside them) will appear again—just tap the + (plus sign) button beside any songs you want to add (if a song has the plus sign beside it grayed out, it means that song is already in your On-The-Go playlist), then tap the Done button.

The iPod touch has the same Cover Flow feature that iTunes itself has, where you can visually scroll through your entire music collection by cover art. To do this, just turn your iPod touch sideways (so the screen is horizontal), and it automatically enters the Cover Flow view. To move through the covers, just swipe your finger horizontally across the screen and the covers flow by in the direction you’re “flicking.” To stop the flowing, stop swiping. To view the songs on a particular album, just tap on it and the cover flips over to show you the songs you’ve downloaded from that album. Tap on any song to play it (when it’s done, if there are other songs on that album, it’ll play those, too). To return to the Cover Flow view, just tap twice in an open area. (Note: Your music doesn’t stop playing—the view just changes back to Cover Flow.)

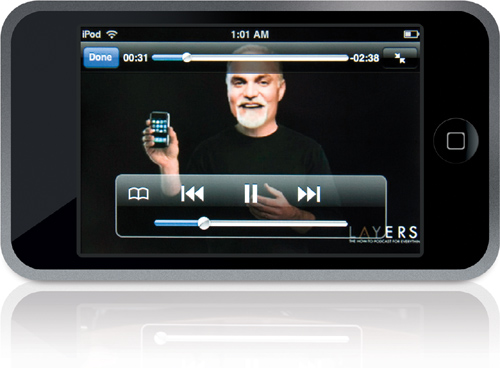
If you’ve downloaded any video podcasts (or TV shows or movies, for that matter), you can watch any one of them by starting at the Home screen (you can return to the Home screen any time by pressing the round indented Home button that appears just below the touchscreen). Then tap once on Videos, and the main video screen will appear, and all the videos on your iPod touch will appear organized into categories by type (TV Shows, Movies, Podcasts, and Music Videos). To watch a video, scroll down and find it in the list, then tap on it and it begins playing. Videos play horizontally, so you’ll want to turn your iPod touch sideways when watching videos. Once your video is playing, to see the controls for pausing, fast forwarding, rewinding, and volume, just tap anywhere on the screen and the controls will appear near the bottom of the screen. A scrubber bar also appears across the top of the screen—just press-and-hold your finger on the knob, and drag to the right to scrub forward in your video or drag left to scrub backward.
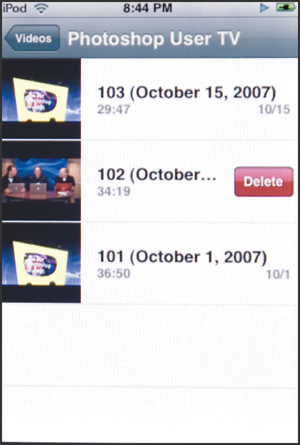
Your iPod touch is the only iPod that lets you actually delete something (in this case, a video) from right within the iPod itself (normally, you can only delete songs, videos, or photos within Apple’s iTunes application). To delete a video, find the video on your iPod’s video list, then take your finger, press it on the right side of the video listing, and drag your finger back to the left. This reveals a red Delete button on the right side of the listing. Tap that button to delete the video and make more room for stuff like downloaded songs from the Wi-Fi iTunes Music Store.
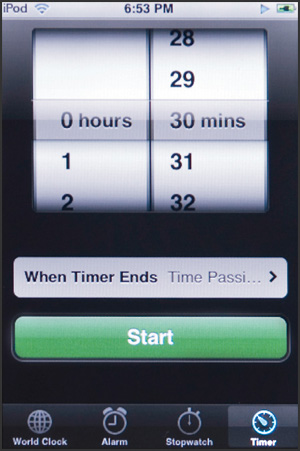
The iPod touch has a great sleep timer feature, which shuts down your iPod after a specific amount of time has passed. Here’s how it works: Start at the Home screen, then tap on Clock. When the Clock main screen appears, tap on Timer in the bottom navigation bar. When the Timer screen appears (shown above), choose how long you want your iPod to play music before it puts itself to sleep by swiping your finger up and down to move the number wheels. Once you’ve set the amount of time (let’s say 30 minutes, for example), then tap on the phrase “When Timer Ends” and a list of choices appears. Tap once on Sleep iPod, then tap the blue Set button in the top-right corner of the screen. Now tap the large green Start button, and 30 minutes later your music will gently fade out and your iPod will put itself to sleep (just like a sleep timer on an alarm clock radio).
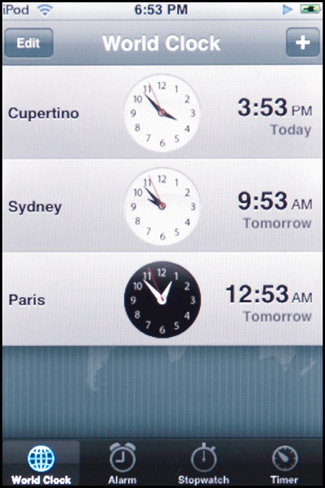
There are three other clock features on the iPod touch. First, tap on World Clock (which lets you display the time in different time zones). To delete the default city, tap the Edit button in the top-left corner, then tap the red – (minus sign) button that appears before the city’s name. This reveals a red Delete button to the right of the clock. Tap it once to delete that city/time zone. To add new cities, tap the + (plus sign) button in the top-right corner. This brings up the iPod touch’s keyboard, where you can type in the city whose time zone you want to display. As you start typing the first few letters, it starts listing cities that start with those letters, so finding cities is quick and easy. When you find one you want (for example, Sydney, Australia), tap on it, and the clock is created. If the face of the clock is white, it’s daytime in that city. If it’s black, it’s night. Now tap the Alarm button at the bottom of the screen. To set an alarm, press the + (plus sign) button in the top-right corner, and a list of options appears, where you choose to repeat it one day a week or every day. You can choose the alarm sound (tap the Sound field), whether you want a snooze option, and what you want to name your alarm. Below that, you choose the time in the same way you chose the sleep timer time on the previous page. If you tap Save, it adds an alarm to your list (you can create multiple alarms). Lastly, there’s a Stopwatch feature that is incredibly simple—tap the green Start button to start timing, tap the red Stop button to stop it, tap the gray button for a Lap, and do I really have to tell you what the Reset button does?
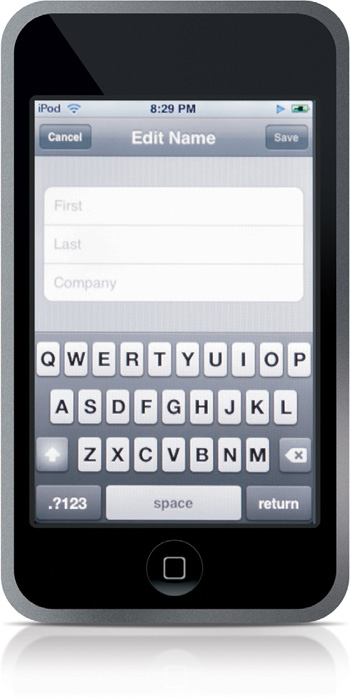
Anytime you need to type something on your iPod touch, a keyboard automatically appears onscreen. If the keys look kind of small, that’s only because they are. Luckily, Apple has some features that make using the keyboard a lot easier. As you type onscreen, a large version of the letter you just typed pops up in front of your fingers so you can see instantly if you hit the right letter. I can tell you from experience that the more you use this keyboard, the easier it gets, so if you wind up misspelling just about every word when you first start—don’t sweat it—in just a couple of days you’ll be misspelling only every third to fourth word. There’s also a pretty clever “auto-complete” function. Although it will suggest a word while you’re typing it, go ahead and finish the word (especially if you’ve spelled it wrong) and it will replace your misspelled word with the correct word (95% of the time). You do have to get used to typing a word, seeing that you’ve misspelled it, and continuing to type. If you do that—you’ll be amazed at how quickly you’ll be able to type using this keyboard.

When you’re thinking of surfing the Web, you first need to be thinking, “Where can I find a wireless connection?” That’s because, unlike Apple’s iPhone (which uses AT&T’s EDGE wireless network, so you can jump on the Web anywhere), the iPod touch needs to access a Wi-Fi network (like the public high-speed wireless hotspots at places like Starbucks, McDonalds, many hotel lobbies, etc., or you can jump on your office or home wireless connection) to connect to the Internet. When you tap on the Safari Web browser on the Home screen, your iPod touch immediately searches for an Internet connection, and if it sees a wireless network, it offers you the opportunity to try to access it. If it’s a private, password-protected network, you’ll see a padlock icon beside the network’s name. If you don’t know the password, you’re not getting on. If it’s an Open network (open to the public), then you won’t see the padlock icon, and you can just tap on the network and you’re connected.

Once you’ve got a wireless connection, you use the Safari Web browser to visit webpages. There’s a field at the top of Safari where you enter the Web address (URL) of the site you want to visit, so tap once on that field and the keyboard appears at the bottom of the screen. Type in the Web address of the site you want to visit, then press the blue Go button in the bottom-right corner. Once the webpage appears, you can get a wider, larger view by turning your iPod touch sideways. If you tap twice on any part of the webpage, it zooms in and has that area fill your screen. To zoom back out, tap twice on the screen again. You use your finger to scroll up/down and side-to-side on the page. To use a link you see on a webpage, just tap on it. To save the page as a bookmark, scroll up to the top of the page and tap the + (plus sign) button to the left of the address field. To reload the page, tap the circle button to the right of the address field. To erase the existing address (so you can type in a new one), tap on the little gray X on the far right side of the address field. To go to a previously viewed page, tap the Left Arrow button at the bottom of the screen.
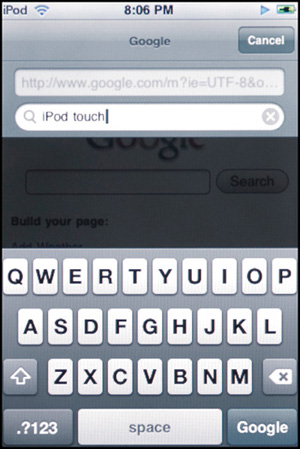
You don’t have to go to Google.com to do a Web search, because it’s built right into the Safari browser. In Safari, just tap on the URL address field, and you’ll notice that two fields actually appear: the address field, and just below it a Google search field. So, if you know the URL you want, use the top field. If you don’t, type in the search term in the second field. If you change your mind, tap the Cancel button up top.
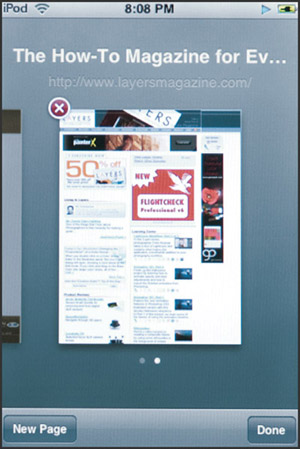
If you’re on one webpage and you tap a link to visit another page, that page might be set up to open in a separate window (which is no problem—a new window will open to display that page). So now, you have multiple webpages open in Safari, and to see the various pages you have open, tap once on the little Pages button in the bottom-right corner. This shrinks the current page down to a smaller thumbnail size, and now you can scroll through the thumbnails of any open pages by swiping your finger left and right. To close one of these pages, just tap the red X in the upper-left corner of the thumbnail.
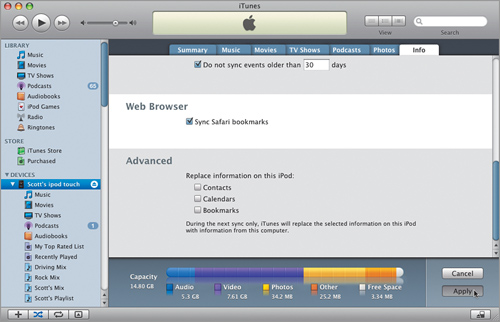
You can have the bookmarks on your computer automatically copied over to your Safari Web browser on your iPod touch, but you have to turn this feature on. First, connect your iPod touch to your computer for syncing, and then when it appears in iTunes, click on the Info tab in the main iTunes window, and scroll down until you see Web Browser. This is pretty easy because there’s only one option here—Sync (your Web browser) Bookmarks. Turn on that checkbox, and bookmarks from your computer’s Safari Web browser (on a Mac) or from Microsoft Internet Explorer (on a PC) will be copied right into your Safari Web browser on your iPod touch.
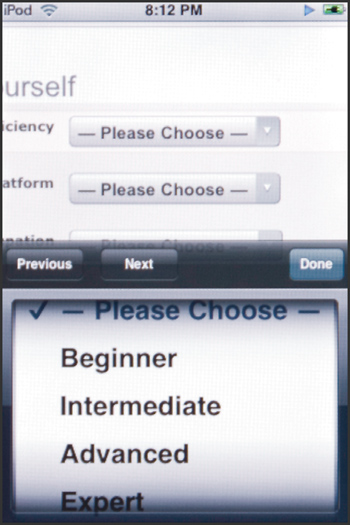
If you have to enter a password to enter a website, or if you wind up buying something from a site, you’re going to have to provide your name, address, payment info, etc., in an online form, and luckily Safari lets you do that in a surprisingly easy way. If it’s just a text field you need to complete, then you simply tap on the field, and the keyboard appears so you can enter your info. Easy enough, but what do you do when you come across a pop-up menu (like one for the month and year your credit card expires)? When that happens, just tap on the pop-up menu and a special Safari window appears with the menu choices in a “flick wheel,” where you can flick the wheel up or down with your finger until the choice you want appears with a checkmark beside it, then tap the Done button.

It’s not a fancy calculator, but it’s simple and the buttons and readout are quite large (it makes you feel like you’re using a regular handheld calculator). To get to the Calculator, start at the Home screen and tap on Calculator. The Calculator then appears, and you use it like any other calculator—by tapping on the keys.

If you have Wi-Fi Internet access, you can watch videos from the online video sharing site YouTube.com, right from your iPod touch. It doesn’t actually download the videos onto your iPod touch—you search for videos you want to watch, and then you watch them on your iPod touch just like would watch YouTube.com videos on your computer. However, you can bookmark your favorite videos and get right to them. Start at the Home screen and tap on YouTube. Then tap on Search (at the bottom of the screen) to bring up a search field. Tap on the search field to bring up the keyboard, type in your search term, then tap the Search button to search YouTube’s vast video library. The results appear in a list below the search field. To watch one of these videos, just tap on it, then turn your iPod touch sideways (videos always play in this wide mode).
Once you’ve found a video you want to watch, just tap on it. A set of video controls will appear onscreen for pausing the video, jumping to the next video, replaying your video, and there’s a slider for adjusting the volume (drag it to the right to make the video louder, to the left to make it quieter). To hide these controls, tap the screen once. To bring them back anytime, just touch the screen. To bookmark a video you like (so you can jump right to it next time), tap on the Bookmark button at the left side of the video controls. Also, at the bottom of the YouTube screen are buttons that take you directly to the featured videos of the day, YouTube’s most viewed videos, your bookmarked videos, and if you tap the More button, you’ll see a new set of menus that let you jump to YouTube’s Most Recent videos, see their Top Rated videos, and the bottom button lets you see a History (list) of the YouTube videos you’ve already watched.
Because of its Wi-Fi capabilities, you can log into the Wi-Fi version of the iTunes Store to buy and download songs wirelessly straight from Apple right into your iPod touch, and the cool thing is: anything you buy wirelessly like this is automatically uploaded from your iPod touch to your computer the next time you sync. Here’s how it works: From the Home Screen, tap on the purple iTunes button in the bottom-right corner of the screen. This takes you to a special Wi-Fi version of the iTunes Store (provided, of course, that you have an active Wi-Fi Internet connection, but you knew that, right?).
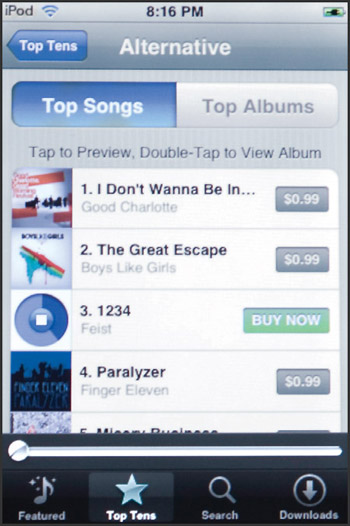
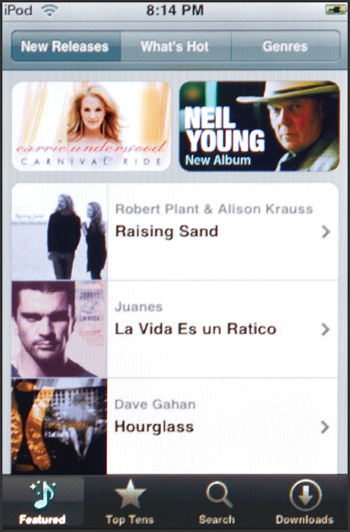
When you enter the Wi-Fi iTunes Music Store, there are four Store navigation buttons along the bottom of the screen. Tapping Featured takes you to iTunes’ currently featured songs, but it also adds three new buttons to the top of the screen for direct links to New Releases, What’s Hot, and a very handy listing by Genres. The second button is iTunes’ Top Tens (Top 10) lists (in various categories), then the third button is Search, and tapping on it brings up a search field, and if you tap in that field, the keyboard appears so you can type in the name of the song, artist, movie, etc., you want to search the Store for. The final button, Downloads, displays the songs you’ve downloaded from the Wi-Fi Store. To hear a 30-second preview of any song, just tap on it. The price for each song is listed to the right of the song title, and if you tap on the price, it changes into a green Buy Now button. It will prompt you for your iTunes password (to make sure someone else isn’t making buying decisions for you), and when the download starts, you can tap the Downloads button to see the download’s progress. Once the song is fully downloaded, if you tap the Downloads button, the screen will be empty, but up in the top-right corner you’ll see a button called Purchased and if you tap on it, you’ll find it’s just a shortcut to your Purchased Songs playlist, but the good news is—your downloaded song will be in that playlist automatically.
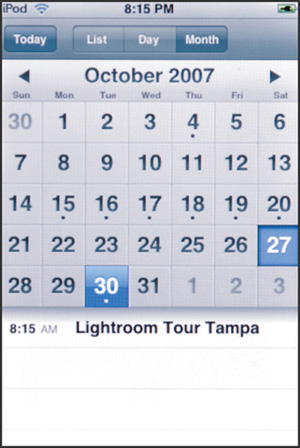
Your iPod touch has a built-in calendar program and, depending on which calendar program you’re using on your computer, you can import your calendar directly into your iPod touch. You can sync calendar info from either Apple’s iCal or Microsoft Entourage on the Macintosh (to sync with Entourage, your calendar info must be synced with .Mac first), or if you use Windows, you can sync your calendar from Microsoft Outlook. When you connect your iPod touch to your computer for syncing, it will upload your calendar information automatically once you’ve turned on the Sync Calendars checkbox on the iPod Preferences Info tab. To see your imported calendar info, start at the Home screen and tap the Calendar button. You can view your calendar as one long scrolling list, or in a more traditional calendar view. To view by day, tap the Day button at the top of the screen, or tap the Month button to view the entire month (as shown here). In the Month view, if you see a small dot appearing below the date, that means you have an event scheduled for some time that day. To see the event, tap once directly on that day and that day’s events will appear below the calendar. If you tap the Day view, it shows you the entire day by time, starting at 12:00 a.m. In Day view, you can navigate to other nearby dates by tapping the Left or Right Arrow buttons near the top of the screen. Anytime you want to jump to today’s calendar, just tap the Today button in the top-left corner of the screen.
If you’re a Macintosh user, there are three applications that let you sync directly from your computer to your iPod touch, and they are: (1) your Mac’s Address Book application, (2) Microsoft Entourage (your Entourage Address Book must be synced with .Mac first), or (3) Yahoo! Address Book. If your contacts are in any of those three, when you sync with your computer, it launches iTunes and syncs the contacts on your computer with your iPod touch. Pretty simple stuff.
If you’re a Windows user, it works pretty much the same way, but the three contact managers it supports direct importing from are: (1) Yahoo! Address Book, (2) Windows Address Book, and (3) Microsoft Outlook.
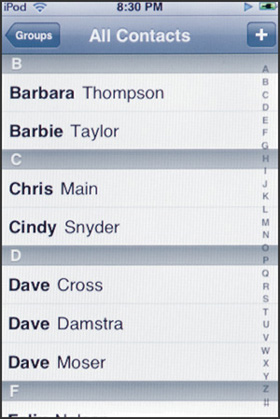
Once your contacts are in your iPod touch, to see them, start at the Home screen and tap on Contacts. This brings up a list of your contacts, and you can scroll through them using your finger on the touchscreen to flick the list upward or downward. To see the info for a contact, just tap on the name. To create a new contact, tap the + (plus sign) button in the top-right corner of the screen. This brings up a screen where you can tap on various fields, and from the keyboard that appears, type in the contact information. When you sync with your computer again, any contacts you added in your iPod touch will be copied over to your computer.
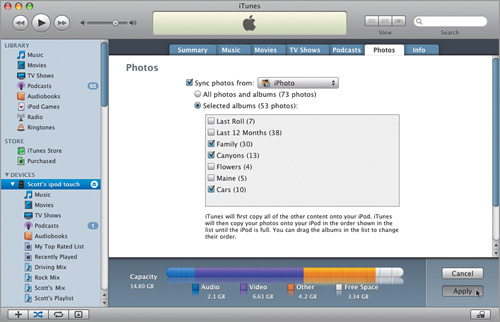
Just like with an iPod classic or iPod nano, if you use Apple’s iPhoto application on a Mac, or Adobe Photoshop Elements on a PC, you can have your photo albums from those applications brought over onto your iPod touch. To do that, connect your iPod touch to your computer, then in iTunes click on the Photos tab. At the top, turn on the Sync Photos From checkbox, then if you’re on a Mac, choose iPhoto. (Note: If you don’t use iPhoto, you can just put your photos into a folder, and subfolders inside that if you like, and then choose the folder of photos, instead of iPhoto.) If you’re on a PC, turn on that same checkbox, but from the Sync Photos From pop-up menu, choose Adobe Photoshop Elements.
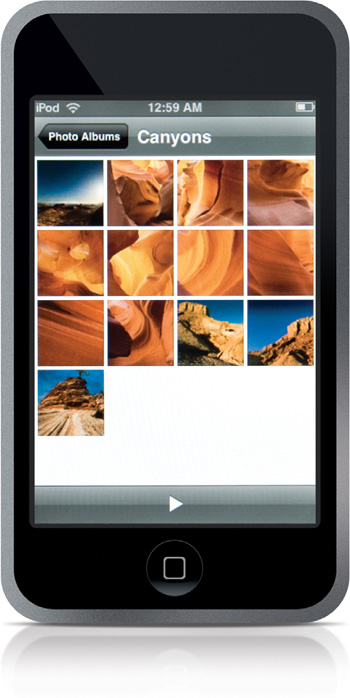
Once you’ve imported photos into your iPod touch, to see them, start at the Home screen, then tap on Photos. This brings up the Photo Albums screen and at the top is Photo Library (which is a one-tap link to all the photos you’ve imported, all lumped together), and then a list of any separate photo albums you created, like family photos, vacation photos, etc., using Apple’s iPhoto application (for Mac) or Photoshop Album or Photoshop Elements on the PC. To see thumbnails of the photos in a particular album, tap on that album. To see any photo full-screen sized, just tap on it. Once your photo is full screen, you can see other photos in that album at that size by swiping your finger on the screen in the direction you want to scroll. If your photo bounces like it’s hitting a wall, you’ve reached the end of that album, so swipe back in the other direction. To get a better view of wide photos (photos in landscape orientation), turn your iPod touch sideways.
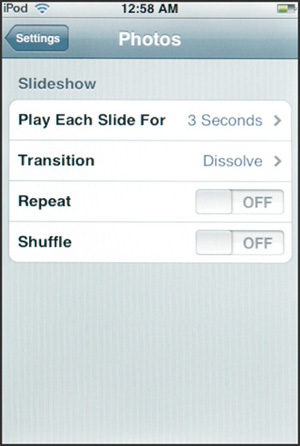
Start at the Home screen, then tap on Photos to bring up the Photo Albums screen. To see any photo album as a slide show, just tap on the album, then when the thumbnails appear, at the bottom of the window is a Play button. Tap on it to start the slide show. To stop your slide show, just tap the screen once, then tap the name of your album that appears in the top-left corner of the screen. The iPod touch slide shows come complete with smooth built-in dissolve transitions between each photo, but if you want to choose a different type of dissolve, or change the length of time each photo appears onscreen, then start at the Home screen and tap on Settings. When the Settings screen appears, tap on Photos, which brings up a list of options for your slide show. To change any setting, just tap on it. You can also turn on Repeat to loop your slide show, or Shuffle to play your slides in a random order. When you’re done, tap the Settings button in the upper-left corner.

There really isn’t a slide show feature that lets you include music (at least at this point), so we’re going to do a workaround (it’s a little clunky, but it works). Start at the Home screen, and then tap on the orange Music button. In the Music screen, tap on Songs at the bottom, and scroll to the song you want as background music for your slide show. Tap on the song and the music starts playing. Now, press the Home button to return to the Home screen, tap on the Photos button, then tap on the album you want to see as a slide show. Tap the Play button that appears at the bottom of the album’s thumbnails screen, and there you have it—your slide show playing with background music playing behind it.
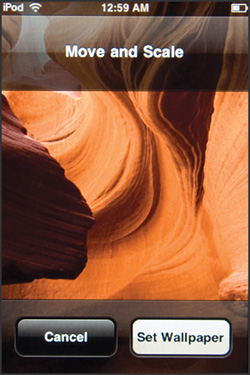
Each time your wake your iPod touch from sleep (and believe me, it will be asleep a lot), you’re greeted with an unlock screen. By default, this unlock screen uses a NASA photo of the earth taken from space. (I guess I didn’t really have to mention that it was taken from space. I mean, where else could a photo of the entire earth be taken from?) However, you can choose any one of your photos for this wake-up background wallpaper instead. To do that, start at the Home screen, tap on Photos, then tap on Photo Library and scroll through your photos until you find the one you want to use as your wallpaper. Tap on it to see it full screen. Now, tap once on the little icon in the bottom-left corner, and a button appears on the lower right for Set Wallpaper. Tap that button, and that photo becomes your new “wake-up” wallpaper.