

Okay, I admit the title for this chapter, a chapter on using video (TV shows, movies, and music videos) on your iPod, is just too obvious. But this song, lame as it was (is), has an important place in pop music history, for it was in fact this song that was the first video ever played on MTV. That’s right, when MTV first aired, they aired the music video for the Buggles’ “Video Killed the Radio Star.” Now, if you’ve never heard this song, it’s worth downloading from the iTunes Store and listening to (once) in iTunes. However, I don’t recommend listening to it while driving (if you have your iPod connected to your car audio system), because it will subconsciously make you want to drive your car straight into the nearest stationary object. But, besides being a catchy-sounding name for this chapter, how does this song title relate to what’s in this chapter? Well, it actually relates to a real-life story. I was producing a radio podcast (along with my cohorts, Dave Cross and Matt Kloskowski) called “Photoshop Radio” and each week we would share Photoshop tips along with some of the lamest attempts at humor ever recorded digitally. However, when video podcasting came along, and Apple made iPods with video playback capabilities, we killed the radio show and started Photoshop®User TV. So, in effect, video killed our radio podcast. Now, I know what you want to ask, “Okay, that makes sense, but how does your real-life story relate to this chapter?” Actually, I was hoping you wouldn’t ask that.
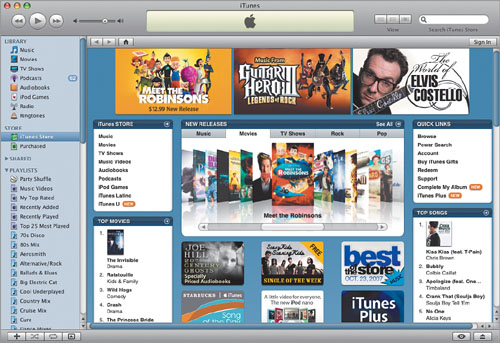
The iTunes Store sells three different kinds of video—full-length movies, TV shows, and music videos (plus there are a number of network TV shows you can download from the iTunes store absolutely free). Buying video from the iTunes store is covered in the next few pages, but you can also download free video podcasts, which are video programs created by everyone from individuals, to independent production companies, to big networks like ESPN and HBO. Lastly, you can import your own videos (home movies, free videos you download from the Web, etc.) into iTunes and then copy those onto your iPod. To import one of these types of videos, just drag the video clip into the iTunes main window and it will import automatically. If for some strange reason that doesn’t work, then just go under the iTunes File menu and choose Import. On the next page, we’ll look at downloading videos from the iTunes Store.
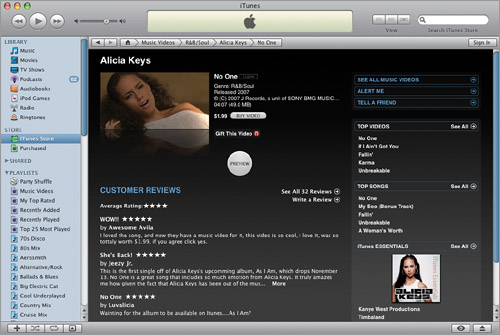
We’ll start with music videos. To view the current selection (new music videos are added frequently), click on the iTunes Store link under Store on the left side of the iTunes window. Under iTunes STORE (on the top-left side of the main iTunes Store page), click on Music Videos. This takes you to the main page for music videos. In the center is cover art for the most popular music videos right now, and you can scroll through the selections using the scrubber bar below the covers. If you see a cover for a video you’re interested in, just click on it to go to that video’s page (in the example shown above, I clicked on Alicia Keys’ cover to jump to the page for her music video of the hit song “No One”). Once on a video’s page, you can either: (a) watch a 30-second preview clip of the video by clicking on either the round Preview button or on the cover art (shown in the window above), or (b) buy the video, which then downloads into your iTunes, and then onto your iPod when you sync it to your computer. And that’s how you get videos onto your iPod—you buy them (they’re $1.99 each) from the iTunes Store, they download onto your computer, then when you plug in your iPod, it updates your iPod with your newly purchased videos. If you decide you want to go back and search for a different video instead, click the Back button at the top-left corner of the main window.
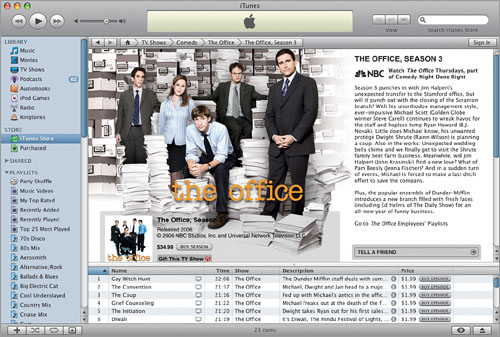
TV shows are available from the iTunes Store, as well, and you get to them pretty much the same way—you start by clicking on the iTunes Store link on the left side of the iTunes window, but then you click on the TV Shows link on the top-left side of the iTunes Store homepage. Like the music videos, it takes you to a main TV shows page, where you can choose from different genres (listed on the left side of the window). You can also view shows by network, view the list of top-downloaded shows, or just scroll down the page to see all sorts of different lists. With TV shows, you can buy an individual episode from the current season for $1.99 (as long as it has already aired on its network—they don’t appear here until they have), and it downloads onto your computer, and then onto your iPod the next time you sync to your computer.
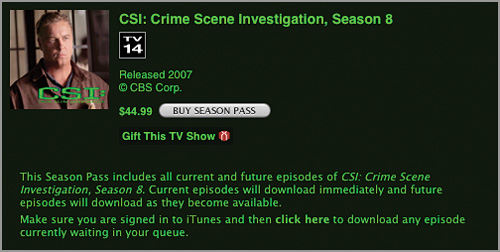
If you want to download the entire current season of a show, then you’ll probably want to buy a Season Pass (they vary in price, usually between $23.99 and $44.99). The advantages are: (a) you don’t have to worry about falling behind—once an episode airs it will automatically be added to your Download queue so you can download each episode when you’re ready to watch it; (b) it’s convenient, because there’s only one button to push, and you get every new episode of the season; and perhaps most importantly, (c) in some cases, it will save you money. For example, let’s look at the CBS drama CSI: Crime Scene Investigation. A typical TV season runs between 20 and 25 shows. Let’s go on the high end (CSI is usually closer to 25), and say there are 25 shows this season. Well, the Season Pass for CSI is $44.99, but if you bought them individually at $1.99 an episode, you’d spend $49.75. You’re saving around $5 with the Season Pass. Not bad. Of course, the price (and amount of savings) varies from show to show, but it’s pretty easy to do the math and see if you’ll save money with a Season Pass. As I pointed out, though, that’s not the only reason to buy a Season Pass. To buy a Season Pass, just click on the show you want to buy, and when you get to its page within the iTunes Store, click on the Buy Season Pass button. Some shows don’t have a regular season, like E!’s The Soup or some specialized news shows, and those shows use a Multi-Pass instead, where you get a set number of shows for one price. Lastly, if a season is over, you can buy all the episodes by clicking the Buy Season button.
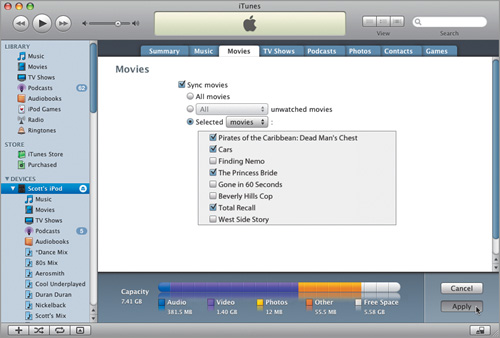
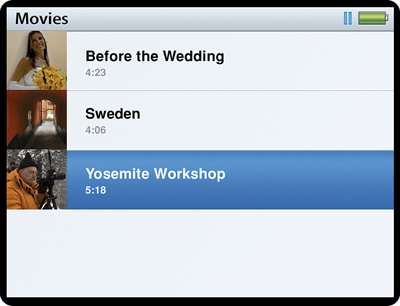
By default, all your movies, TV shows, and podcasts will automatically be transferred to your iPod when you sync your iPod with your computer. That’s fine if you bought a 160-GB iPod, but if you have a smaller capacity iPod (and video files are pretty huge), you might have to be pickier about which videos make it over to your iPod. To do that, connect your iPod to your computer, then click on the Movies tab (near the top of your main window). To choose exactly which movies make it onto your iPod (and which don’t), click on the radio button for Selected movies, and from the list of movies that appear below it, only turn on the checkbox beside the movies you want copied onto your iPod, then click the Apply button in the bottom-right corner of the iTunes window. Now do the same thing for both the TV Shows tab and Podcasts tab.

Any videos you buy from the iTunes Store, or video podcasts you download from the iTunes Store, are already in the right format to play on your iPod. If you import other videos into iTunes (like home movies or free videos you’ve downloaded from the Web), chances are they’ll play within iTunes with no problem, as iTunes supports all the same video formats that Apple’s QuickTime video format does. So, what’s the problem? The problem is your iPod doesn’t support all those same formats. So, if you import a video into iTunes, when you sync your iPod, you’ll get an error message along the lines of “This video cannot be played on your iPod.” Don’t sweat it—you just need to have iTunes convert that video to a video file format your iPod does support. You do that in iTunes by first clicking on the video in question, then going under the Advanced menu (up top) and choosing Convert Selection for iPod. That’s it—it converts the video to a format your iPod supports, and now all you have to do is sync again, and the video is copied onto your iPod. See, that was easier than it sounds.
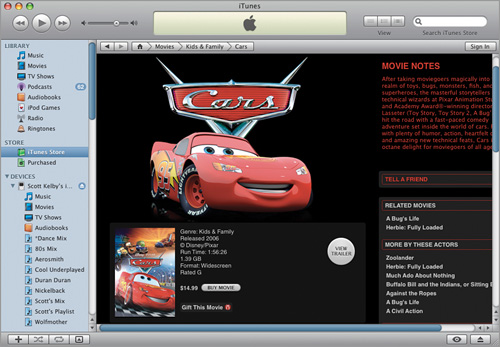
Downloading movies into your iPod is as easy as downloading TV shows and music videos, but there are a few important differences. First click on the iTunes Store link in the Source list. On the Store’s homepage, click on the Movies link in the top-left list of links to get to the main movie page. When you find a movie you’re interested in, simply click on it to go to its page within the iTunes Store (the page for the comedy Cars is shown above). Besides the title and MPAA rating (PG, PG-13, R, etc.), these pages also include abbreviated lists of movie credits and offer a short plot summary. You can also click the round View Trailer button (or click on the movie poster) to view the full movie trailer right in the iTunes window. If you decide you want to buy the movie, click the Buy Movie button (movies are generally priced from $9.99 to $14.99). Now, here’s the thing: movies have pretty huge file sizes, ranging anywhere from about 700+ MB to nearly 2 GB. So, you can plan on having them download for quite a while, even with a high-speed broadband Internet connection, but here’s the good news: after they’ve been downloading for five minutes or so, you can actually start watching the movie, right there in iTunes, while it downloads the rest of the movie.

When you buy videos (TV shows, movies, etc.) from the iTunes Store, it downloads those videos onto your computer and into iTunes so you can access them easily (and copy them onto your iPod). However, another great feature is that you can actually watch these videos right from within iTunes itself. For example, let’s say you downloaded an episode of the hit ABC show Desperate Housewives, and you’d like to watch it right now on your computer. All you have to do is click on TV Shows, under Library on the left side of the iTunes window, and a list of all the shows you’ve downloaded will appear. In that list, you’ll see the episode of Desperate Housewives. Double-click on that listing and the show will begin to play in the tiny window in the lower-left corner of the iTunes window where you’d normally see album art. Now, if it seems kinda puny (and it will), then click directly on that tiny window and a much larger floating video window will appear (as shown above). If you move your cursor anywhere over this video window, a set of onscreen controls will appear near the bottom of the window with controls for pausing/playing the video, rewinding, fast forwarding, scrubbing through the video, and controlling the volume. On the far-right side of the onscreen controller are two diagonal arrows pointing outward. That’s actually a button—click on it and your video then plays full screen. To return to the smaller floating video window, either press the Esc key on your keyboard, or move your cursor over the video and when the onscreen controller reappears, you can click on the same Full Screen button again (but now it looks like two inward-facing arrows).
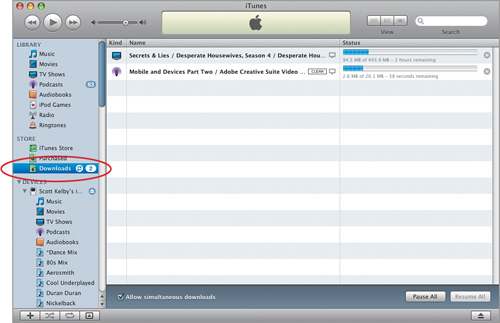
When you buy a video from the iTunes Store, it starts downloading immediately, and a new link called Downloads is added to the Source list in the Store section, just below the link to your purchased items. Click on this link, and you’ll see a list of all your downloads in progress (you can have up to three items downloading at once, and beyond that, other items will be listed there as waiting in the queue). Here’s the cool thing: you can choose which order your items will be downloaded in by dragging them into the order you want, just like you’d drag items in a regular playlist. If you need to stop the downloading process and resume it later, just click the little Pause button that appears to the right of the status bar. To resume your download, click the circular button that now appears in its place. To resume all your downloads at once, click the Resume All button that appears in the bottom-right corner of the main window. By the way, once all your videos are downloaded, this Downloads link goes away.
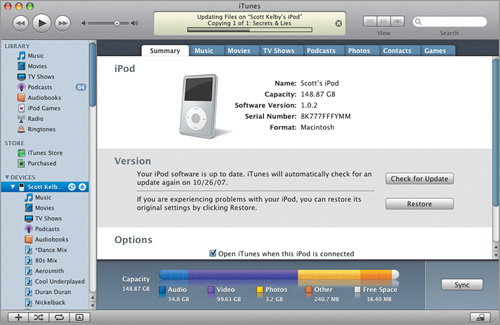
Okay, so you’ve downloaded some movies, TV shows, and music videos, but now you want to get them onto your iPod so you can take the show on the road (get it? Show on the road? Come on, this stuff is gold!). Here’s all you have to do: connect your iPod to your computer, iTunes will launch (if it’s not already open), and it will automatically update your iPod with your newly downloaded videos. It’s as easy as that. Connect it and it does the rest.
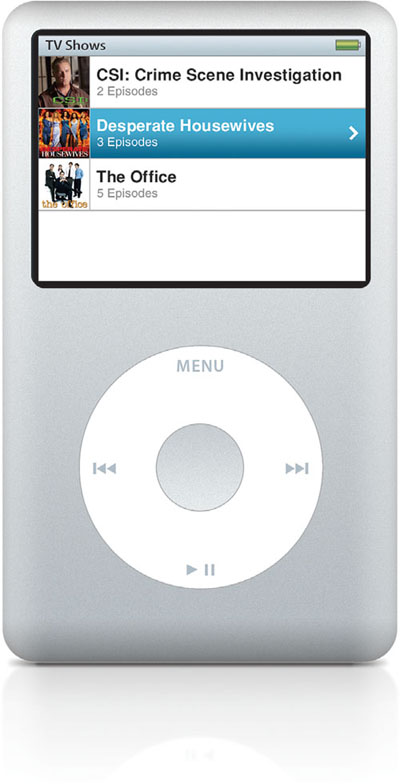
Once you’ve downloaded some videos and plugged your iPod into your computer (so the videos are downloaded onto your iPod), you can now watch them on the iPod’s built-in color screen. From the main menu, scroll down and click on Videos. This brings up the main Videos menu with a list of the different kinds of videos you can play (Movies, TV Shows, or Music Videos). Scroll down to the type of video you want to watch. In this case, we’ll watch that episode of Desperate Housewives we downloaded earlier, so scroll down to TV Shows and press the Select button. This brings up a list of the TV shows you’ve downloaded. Scroll down to the show you want to watch, press the Select button, and all the episodes of the show that you’ve downloaded will appear. Scroll to the episode you want to watch, press the Select button, and the show starts. So basically, once you’re in the TV Shows menu, just find the show you want, find the episode you want, select it, and it plays. To pause the show, press the Play/Pause button on the Click Wheel. To resume it, press the Play/Pause button again. Movies and music videos work pretty much the same way—scroll to either Movies or Music Videos in the main Videos menu, find the movie title (or musical artist) you want, press the Select button, and it plays.

When you’re playing videos, the controls on the iPod work in much the same way as when you’re playing music. For example, to pause a video, press the Play/Pause button on the Click Wheel. To resume it, press the Play/Pause button again. If you click the Next/Fast-Forward button once, it jumps to the next video in your list, and clicking the Previous/Rewind button once jumps back to the beginning of the current video. If, instead of just clicking, you press-and-hold the Next/Fast-Forward button, it fast forwards through your video, and if you press-and-hold the Previous/Rewind button...well, you get the idea. Pressing the Menu button sends you back to the list of videos you were last in. To control the volume of your video, glide your finger clockwise around the Click Wheel to increase the volume, or counterclockwise to lower it (as soon as you start gliding your finger, a volume bar appears onscreen).
Besides the videos you buy online from the iTunes Store, you can watch other types of videos (like your home movies, for example, saved in QuickTime format), as long as they’re in either MPEG-4 or H.264 format (luckily, these are two very popular formats for digital video). You just open iTunes, find those videos on your hard disk, then drag-and-drop them into the iTunes window, and they will be imported into iTunes. You’ll find these newly imported videos by clicking on the Movies link in the iTunes Source list on the left side of the iTunes window. To play one of these movies in iTunes, just double-click on it in the list. To move these movies to your iPod, just connect your iPod to your computer, they’ll be downloaded to your iPod, and you can find them in your Movies menu.
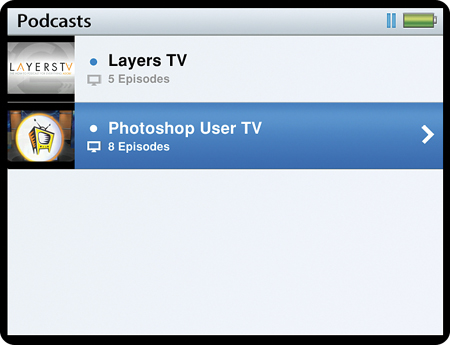
Your iPod treats video podcasts differently than movies, TV shows, and music videos in that video podcasts don’t show up under the Videos menu—instead they have their own separate heading in the main menu. So, to see a video podcast, start at the main menu and choose Podcasts. This brings up a list of the different podcasts you’ve downloaded, and if you click on a podcast and see a tiny TV screen icon to the left of an episode’s name, that lets you know it’s a video podcast (at this point in time, the majority of podcasts are still audio podcasts, but video podcasts are growing in popularity by leaps and bounds, and more and more are released each day).
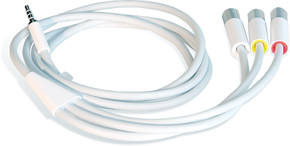
Want to watch the videos on your iPod on a much bigger screen (like your TV screen)? It’s pretty darn simple, but it does require a Universal Dock (for newer iPods) and the Apple iPod AV Cable (available from Apple.com or your local Apple Store for $19), which connects your iPod to your TV. It’s simple to use—connect the single plug to your universal Dock (for newer iPods) or your iPod’s headphone jack (for fifth-generation or earlier iPods), then plug the two video and one audio cables into the AV jacks on your TV. One last thing: Go to your iPod’s Videos menu, scroll down to Settings, and press the Select button. When the Video Settings menu appears, choose TV Out and press the Select button to change the setting from Off to On. Now when you play your video file on your iPod, it will play on your television as well, at full size. And because the videos in the iTunes Store are all now optimized for 640x480 resolution (the standard resolution for full-frame TV), the video looks great (nearly DVD quality).
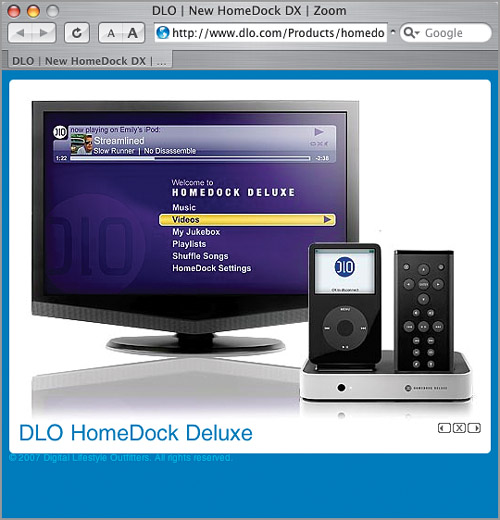
Apple’s iPod AV Cable will certainly let you connect your iPod to your TV so you can watch videos on your television, but if you really want to do it up right, then you should check out Digital Lifestyle Outfitters’ DLO HomeDock Deluxe. You just pop your iPod into this dock, connect the dock to your TV, then pick up the wireless remote that comes with it, and watch your videos, movies, and even video podcasts from the comfort of your easy chair (by the way, I’m not exactly sure what an “easy chair” is, but I’m pretty sure I don’t have one). Of course, it also plays your music, as well, but one of the things I love about it is the built-in onscreen menus that let you choose just what you want to watch (or hear). I have one of these in my home, and I just love it. It’s around $150 (DLO.com). You’ll totally dig it (how do you like that 1970’s lingo? I like to think of it as “retro throwback speak” in hopes that it will make a verbal resurgence).
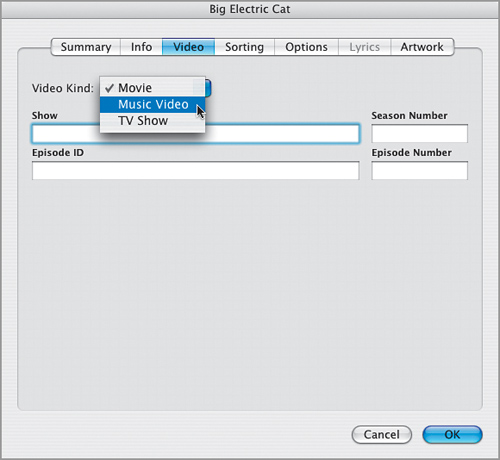
If you’ve downloaded some music videos from the Web (or, worse yet, you created your own homemade music video), you can drag-and-drop these MP4 videos into iTunes, but here’s the thing—they won’t show up under Music Videos. iTunes will see them as movies (after all, they are in the MP4 movie format), so it will put them in your Movies Library, right beside Pirates of the Caribbean: The Curse of the Black Pearl and Gone in 60 Seconds. However, it doesn’t have to be that way. Once the video is imported, go to the Movies Library, find your imported music video, click on it, then press Command-I (PC: Ctrl-I) to bring up the clip’s Get Info dialog (shown above). When it appears, click on the Video tab, and in the Video Kind pop-up menu, choose Music Video, then click OK. This will reclassify it as a music video, and now it will appear where it belongs—under your Music Video playlist and in your Music Library.
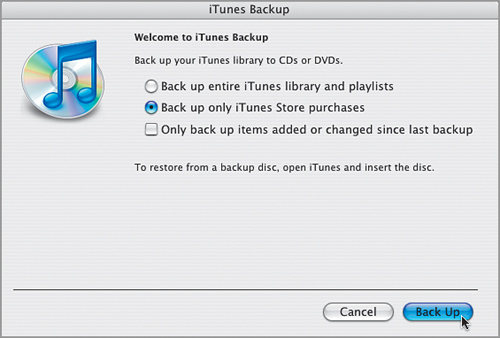
Okay, that headline is a little misleading, because although you can back up your downloaded videos to DVD, you’re only allowed (due to digital rights management issues) to burn your backup to a data DVD (a DVD that stores computer files), and not a standard DVD that plays in your television’s DVD player. This is a key part of the copyright protection scheme that makes all this legal online downloading possible, so it’s worth understanding and supporting. So, to back up your purchased movies and videos to a data DVD (provided, of course, that your computer has a DVD burner), just go under the File menu and choose Back Up to Disc. When the iTunes Backup dialog appears, you can choose exactly what you want to back up, and then click the Back Up button. It’s going to ask you to insert a blank DVD, so go ahead (hey, why not) and it does all the dirty work for you. That’s pretty much it. By the way, if you’re moving these movies to another computer, or the unthinkable happens (your hard drive crashes, which is actually not unthinkable—it’s more like inevitable), you just pop that DVD in, and iTunes will ask you if you want to restore the videos that are on that disc. Pretty well designed.
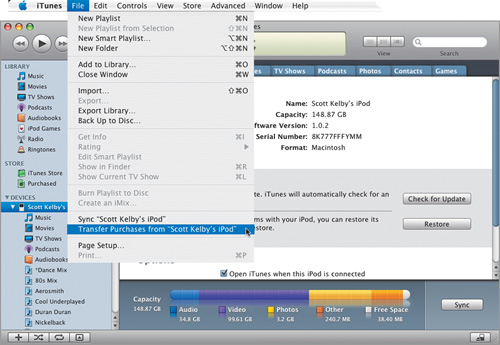
If you want to move movies and other videos from one computer to another, you can go the “Burn the Backup DVD” route shown on the previous page, but that’s really for long-term backing up of your purchases. If you just want to transfer the videos you bought to another of your authorized computers (you’re allowed to authorize up to five computers to play your purchased video and music contents from the iTunes Store), there’s an easier way—just download the movies right from your iPod. Here’s how it works: First, connect your iPod to the other computer you’ve authorized to play your music and videos. A dialog will appear asking you if you want to transfer your purchased videos and music to this other authorized computer (by the way, if it doesn’t ask you, you can still have it do this by going under the File menu and choosing Transfer Purchases from Scott Kelby’s iPod. Of course, yours won’t say “Scott Kelby’s iPod,” unless your name is indeed Scott Kelby, in which case, I salute you). When you click OK, it takes over the task from there and copies your purchased videos and music onto your computer. Couldn’t be easier or faster.
As you might imagine, playing a movie for 2+ hours is going to put some serious drain on your battery life, because the thing that eats up the most battery power is that gloriously bright full-color screen. So, if you’re watching a 3-hour movie, and want to make sure you make it to the end of the movie without having to recharge (like when you’re on a commercial flight), then simply press the center Select button three times to bring up the Brightness slider. When the Brightness slider appears, glide your finger counterclockwise around the Click Wheel to lower the brightness and extend your battery life (the darker you go—the longer your battery will last). Note: If you’re not watching a video and want to change the Brightness settings, go under the iPod’s Settings menu (from the main menu) to change the brightness.

If you go to the iTunes Store, and you know the name of the TV show or movie you’re looking for, you can save yourself a lot of wasted time digging through the various menus until you find the video you’re after if you just use the Search field at the top-right corner of the iTunes window. For example, if you’re trying to find the TV show Lost, just go to the iTunes Store, and once it comes up, go right to the Search field and enter “Lost.” It will instantly bring up every song, podcast, album, and video with “Lost” as a part of the title. Just glance in the TV Shows section and you’ll find it right there—just one click away.
This isn’t exactly an iPod thing, it’s more of an iTunes thing, but since the two are so closely associated, I didn’t think you’d mind my mentioning that Apple makes a very clever device called Apple TV, which lets you wirelessly broadcast the music, videos, TV shows, and movies on your iPod directly to your television set. You just connect your Apple TV to your television set (the 40-GB Apple TV is $299; the 160-GB model is $399. By the way, get the 160-GB model) and follow the onscreen instructions (it’s simple). Once your Apple TV is up and running, its icon will appear in your Devices list (on the left side of the iTunes window), and iTunes it will automatically sync your music and movies to your Apple TV, just like it syncs with your iPod. Apple did a really brilliant job with the design and setup of the Apple TV, and once you have it, you’ll wonder how you got along without it.