

Okay, just so you know—you’re NOT supposed to read this chapter. This chapter is only for people who don’t really care about learning how to use their iPod, how to use iTunes, or really enjoy the entire process of “ripping, mixing, and burning” (as Apple once called it). This chapter is for very shallow people who simply just want to play a song, just one song, right now. These people have the delayed gratification quotient of a gerbil, so they wouldn’t care about “the right way” or “the best way”—they just want to play a song right now, no matter what. That’s why I named this chapter after the Four Tops hit “I Can’t Help Myself.” Now, when you see that song mentioned, it’s usually followed by “Sugar Pie, Honey Bunch” in parentheses, so you go, “Oh, that song,” because there’s been about 20 songs named “I Can’t Help Myself.” I went with the Four Tops version ’cause I’m about “a-hundred,” and all the songs I know were written before you were born. But I don’t care—you shouldn’t be here. You should start at Chapter 2 (as I clearly stated in the book’s introduction), and you darn well know it, so if you’re here, you get what you get—old cliché song titles from a cranky old man. Now seriously, folks, I mean it—go to Chapter 2 and do this right. It’s not too late to start putting your life together and that begins with making good decisions. For example, cut your hair. How are you going to get a decent job with that hair? And take down those hippie beads, and enough with the peace signs, and all that “flower power” stuff....
WARNING: Remember, read this first chapter only if you just bought your first iPod, and you’re so excited about it that you just want to load a song and play it right this minute. Otherwise, skip to Chapter 2 and start there. Now, is what you would have learned in this short chapter the recommended procedure? Nope. Ideally you’d charge your iPod while working in iTunes (the free downloadable software that lets you organize and transfer music to your iPod). You’d import songs from CDs, download songs from the iTunes Store, and then create your own custom playlists (honestly, as you’ll find out, this organizing and sorting stage is a lot of the fun of having an iPod). Then, once everything was organized in separate playlists and ready to go, during the three hours it takes to charge your iPod, you’d transfer the songs to it, and then you’d begin playing around with all the cool stuff on your iPod. But if you’re reading this chapter, you can’t wait three hours. You want to hear a song on your iPod right now (but there isn’t one there yet; you have to put one there). Well, this chapter will show you how to download a song into your iPod so you can walk around listening to your song. Luckily, no one else will know you’re listening to just one song, and you’ll look approximately as cool as if you had actually done things “the right way.” Will loading one song and listening to it now hurt anything? Nope. So why not do it? My point exactly—let’s get to it.
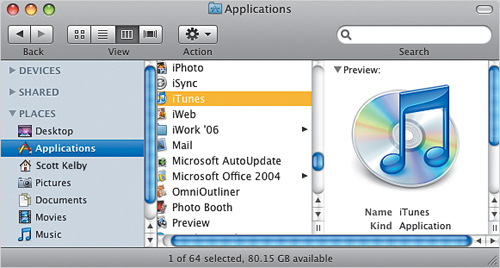
Because in this chapter we’re doing the whole “play-one-song-right-now” thing, you can probably skip charging your iPod at this point, because iPods usually ship with enough battery charge to let you turn them on and play a few songs. The problem is: iPods don’t ship with songs already on them (well, technically there was one iPod that did—the Special Edition U2 iPod from a few years back that came with a catalog of all of U2’s songs already on it—but my guess is you don’t have that iPod). Anyway, to get songs from your computer into your iPod, you use Apple’s free iTunes software (for Mac or PC). If you’ve got a Mac, you’re in luck because iTunes comes preinstalled on every Mac built in the past five or six years (just look in your Mac’s Dock, and if the iTunes icon isn’t there [it’s a CD with musical notes on it], then you’ll find it in your Mac’s Applications folder). If for some reason you deleted it, you can download the latest version for free at Apple.com/itunes. If you have a PC, no worries, you can download iTunes free from the same place: Apple.com/itunes. So skip the charging for now, and instead launch iTunes (or if you don’t have it yet, go download and install iTunes), and now you’re ready to move on to picking your first song.
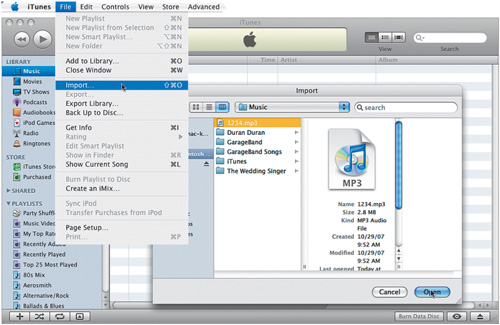
Okay, so you’ve installed iTunes—now what? Well, your song can come from three places: (1) you already have a song on your computer; (2) you can import a song from a music CD; or (3) you can buy a song from the iTunes music store (which we cover in detail later in the book). For now (just for now, where we’re trying to play a single song as quickly as possible), we’ll just cover options (1) and (2). We’ll start with (1): If you have an MP3 song already on your computer’s hard disk, then go under the iTunes File menu and choose Import, then navigate to where that MP3 is on your hard disk and click the Choose or Open button. The song will now import into iTunes, and you’ll see it appear in your list of songs. Or should I say, your list of “song”? Easy enough. But what if you don’t have a song on your computer? Well, that’s covered on the next page.
If you don’t have an MP3 song anywhere on your computer, then grab a music CD and put it into your computer’s CD-ROM drive. The songs on your CD will appear within iTunes (they may appear as Track 1, Track 2, etc., but if you’re connected to the Internet when you do this, it will probably pull the track names down for you automatically—more on this later in the book). A dialog will also appear asking if you would like to import the CD. For now, just click No. So, which song do you choose? If the track names got imported from the Internet, this is pretty easy—just choose a song you don’t mind hearing over, and over, and over again. If the track names didn’t get downloaded (and you see just Track 1, Track 2, and so on listed, then you can double-click directly on any track to hear that song. That way, you can hear each song, which will help you find the song you want to import. Now, you see all those little checkboxes that appear to the left of the song titles? Every song with that little box checked will be imported into iTunes, but you only want one song, right? So, press-and-hold the Command key (on a Mac) or the Ctrl key (on a PC), and click once directly on that little checkbox that appears to the left of your desired song’s name. This “unchecks” all the songs (so nothing’s getting imported). Now, click on the box in front of just that one song you want imported (as shown above), then click the Import CD button in the bottom-right corner of the iTunes window, and that song will be imported into iTunes. You’re almost there.
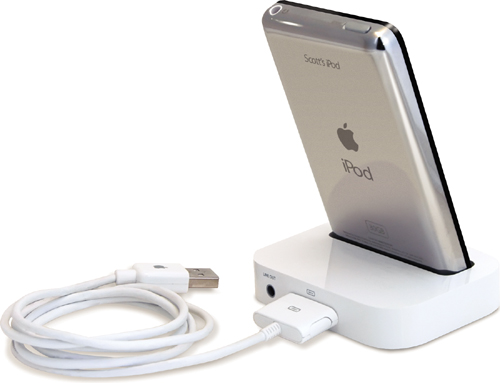
At this point, you have a song imported into iTunes (either from your hard disk or from a music CD), and you’re ready to copy that song you see in iTunes over onto your iPod. To do this, connect your iPod to your computer using the USB connector cable that came with your iPod (thankfully all iPods come with this connector). The smaller end plugs into any USB port on your computer, and the wider, flatter end connects to the bottom of your iPod. (Note: If your iPod came with an iPod Dock, which is a little stand that holds your iPod upright while it’s connected to your computer, then the flat, wide end of the cable connects to the back of the Dock instead, as shown above). Just doing this—connecting this USB cable between your iPod and your computer—will launch iTunes (if it’s not already open) and transfer the song to your iPod automatically (this process is called “syncing,” because now iTunes and your iPod both have the same stuff. They’re in sync). That’s it—the song is on your iPod. It’s almost time to jam.
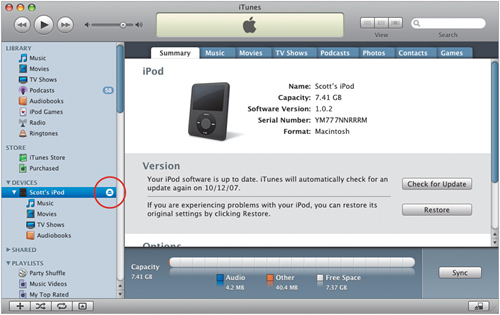
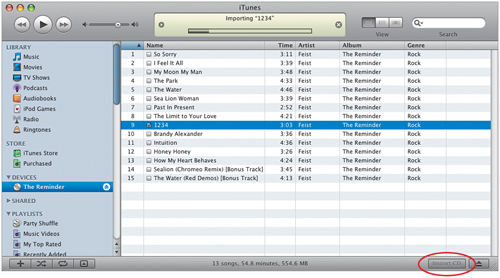
While the syncing process is under way, your iPod will say something along the lines of “Synchronizing: Do Not Disconnect,” so...just sit tight until the syncing process is done. When the syncing process is complete, for just a few moments you’ll first see “Ejecting: You May Now Disconnect” onscreen and then you’ll see the iPod’s main menu screen appear. Also, you can look at the status of the syncing process at the top center of the iTunes window. When the sync process is done, it will read, “iPod sync is complete,” and your song will now be in your iPod. Once the syncing is complete, go ahead and eject your iPod from your computer by clicking on the little Eject icon that appears to the right of the iPod’s name in the Devices list on the left side of the iTunes window (shown circled above).
Note: If you have an older iPod (like the original iPod nano, or an older iPod, etc.), it will display the main menu when the syncing process is done, too, but it also may instead display a large checkmark and the words “OK to Disconnect” on your iPod’s LCD display. When either one of these messages appears on your iPod’s display, you can unplug the cable from your iPod and your computer, because your song is “in there.”

To hear your song, you’ll need to connect the headphones (called “earbuds”), which come included with your iPod. You plug these earbuds into the headphone input on the top of your iPod or the bottom of your iPod nano (as shown here). Just plug ’em in, then put the earbuds in your ears (I probably didn’t have to include that whole “put ’em in your ears part,” right?).
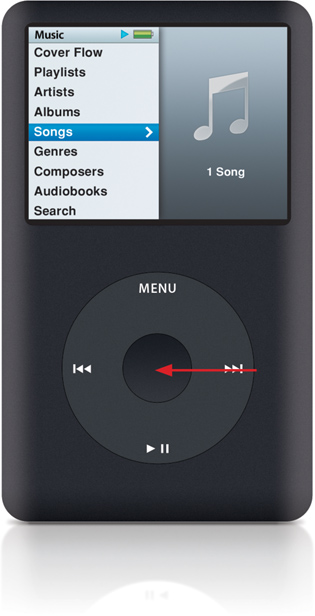
By the time you unplug your iPod from your computer, find your earbuds, and plug them in, it’s quite possible that your iPod will have gone to sleep (to save battery life, which is important at this point since you really haven’t yet charged the battery). To wake it, press the button in the center of your iPod (you can actually press any button, but since that one’s the biggest, it makes an easier target). When you start, you’ll be at the main menu, so to find your song, gently slide your finger in a clockwise rotation around the center wheel (called the Click Wheel) on the front of your iPod. You’ll see the highlight bar move over the various items in your main menu as you glide your finger. Stop on Music (Music should have been highlighted when the main menu came up), press the center Select button, and when the Music menu appears, glide your finger along the Click Wheel until you have Songs highlighted, and press the Select button again. Now you’ll see it—your song. Press the Select button in the center of the Click Wheel or the Play/Pause button below it, and glorious audio will pour through your earbuds like music playing through headphones (you didn’t expect that metaphor, now did you?).
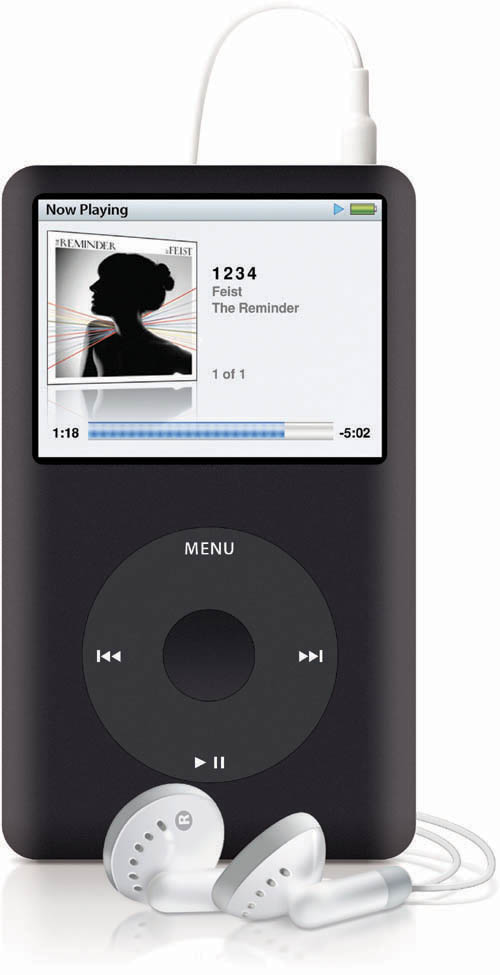
To stop your song from playing, press the Play/Pause button again. To continue the song, press that same button one more time (you play and stop using the same button. Okay, technically, you’re not stopping the song, you’re “pausing” the song, but you get the idea). Want to jump to the end of the song? Press-and-hold the Next/Fast-Forward button (the button on the right side). Want to hear the whole song again from the beginning? Press the Previous/Rewind button as the song ends. It’s a vicious circle.

That’s it. You imported a song into iTunes, you copied that song over onto your iPod, and you played that song (probably multiple times) through your earbuds. Life is good. You’ve just literally scratched the surface of what the whole iPod experience is all about, and that’s what the rest of this book is all about—showing you all the cool things you can do that make the iPod the amazing music player, video player, photo viewer, game player, cool thingy, etc., that has changed the music world forever. Now that you’ve gotten that “I’ve-just-got-to-play-a-song-now” thing out of your system, it’s time to “do it up right.” So turn the page and let’s get to it.