

I originally had the idea that I would name the previous chapter “The Outside” because it would cover everything you do on the outside of your iPod (like charging the iPod, connecting it to your computer, and using all of the buttons that appear on the outside of your iPod. Makes sense, right?). Then, I would follow up by calling this chapter “The Inside,” because we’d touch on all the stuff that appears onscreen—so basically the stuff that controls the inside of your iPod. It seemed like a brilliant plan, until I realized that the idea absolutely stinks. That’s because when people looked through the book’s Table of Contents, what would chapter subtitles like “Inside” and “Outside” mean to them? Nothing. Couple that with a chapter title like “The Outsiders” (for the 1960s band), and then it would look like this: “Chapter 2: The Outsiders: Outside.” See, it just stinks. Now, if it said “The Outsiders,” and then it said, “How to Work the Stuff on the Outside of Your iPod,” that certainly would help. Okay, could you please just close your eyes for a moment while I talk to my editor? (Dear Editor: Is it too late to change the previous chapter’s name to “The Outsiders”? It’s not? Great!) Okay, now open your eyes. Hey, good news! We’re going to go with “The Outsiders” for that chapter name after all. But for this chapter, on what happens on the inside—I’m stuck. How about “Pod’s Theme” by Lesion? Easy enough—let’s go with that (am I saying this stuff out loud?).

The iPod has a main menu that is kind of the starting place for making your way around the different areas of your iPod. You’ll wind up using this main menu a lot, and that’s why you’ll want to customize it so the features you use most are right there at the top level (reducing your need to dig down through different menus). Here’s how to customize yours: Start at the main menu and, using the Click Wheel, scroll down to Settings. Press the center Select button, then scroll down to Main Menu and press Select again to see a list of menu items. You can choose which ones you want to appear in your main menu by toggling them on or off using the center Select button (items with a checkmark beside them will appear in the main menu).
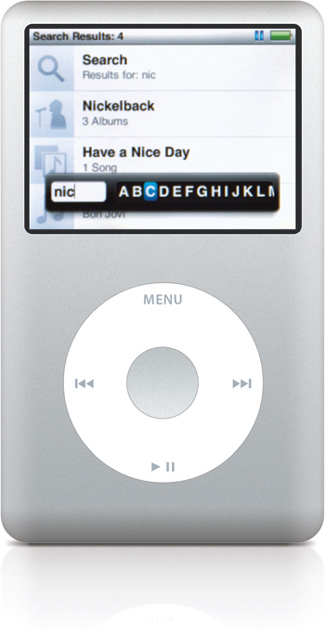
The iPod has a Search feature to help find just the song (or artist) you’re looking for fast. Hold down the Menu button to jump to the main menu; click on Music, then scroll down and click on Search. When the Search menu appears, you’ll see the alphabet near the bottom of the window. Scroll to the first letter of the song, or album name, or artist’s name, then click the center Select button and it instantly starts searching and gives you results live as you enter each subsequent letter. For example, if you’re looking for Nickelback, as soon as you select N, it instantly (and I mean instantly) lists every song, or album, or artist on your iPod that begins with N. When you move over to I and press the Select button, now it’s every song, or album, or artist that begins with “Ni.” By the time you press C, you’ve narrowed your search down pretty well (on my iPod, it lists Nickelback, and then “Have a Nice Day” by Bon Jovi, because “Nice” contains “Nic”). If you choose a wrong letter, you can use the Previous/Rewind button to delete it, and if you need to put a space between words, press the Next/Fast-Forward button. When you’re done searching, press the Menu button, and the search bar goes away, and your search results appear in the window. Now you can just click on the song, or album, or artist you want. The whole process is much faster than it sounds. Try it once, and you’ll use it again and again, as there’s really no faster way to get right to the song you want.
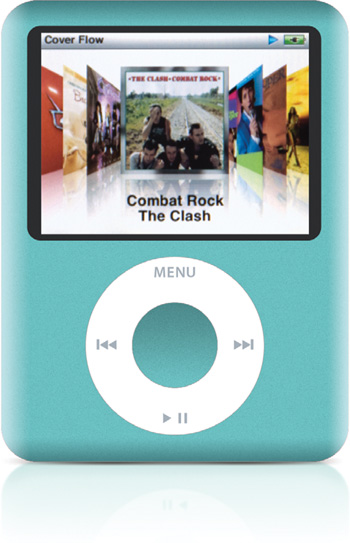
If you’re a visual person, you might prefer to search for songs using Cover Flow, which displays the album cover art of the songs on your iPod (as shown above). That way you flip through covers and when you see the album cover for the song you want, you just click the center Select button and it displays the songs from that album! Start at the main menu, select Music, and then click on Cover Flow. Now you can scroll through your entire library by sliding your finger around the Click Wheel, and just stop when you see the album you want. It’s probably not as fast as searching by name, but it’s way more fun.
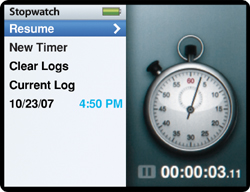
Your iPod comes with a stopwatch feature, complete with a lap timer. This is great for timing your workouts, or if you’re a runner, or...there’s probably another good reason to have it on there, but danged if I can think of one. Did I mention it’s good for timing workouts? Wait, wait...how about timing eggs (to music)? Anyway, here’s how it works: Hold down the Menu button to jump to the main menu, then scroll down and click on Extras. Now scroll down to Stopwatch and click on it. To start the stopwatch, just press the center Select button. To stop it, press the Play/Pause button and a screen of options will appear (shown above), where you can choose to restart the timer, clear the log of laps (each time you start and stop the stopwatch, the iPod automatically logs it—to see the full list in detail, with stats, click on Current Log), or create an entirely new timer. One thing I think is particularly cool is that although it gives you a digital readout of the time, the analog stopwatch graphic moves in real time. It serves no other real function than being cool to look at, but hey—what’s wrong with that?
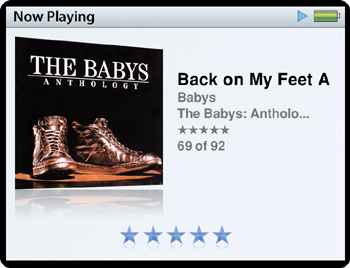
Even though you probably have a lot of songs on your iPod, they’re not all “your favorite song.” Obviously, you like some better than others, and choosing which ones you like best (rating them from one to five stars) can be very helpful in making sure you hear your favorites more often. That’s because once you’ve rated your songs, you can sort them so that your favorites (five stars) play first, then your next favorites (four stars), and so on. (Better yet, you can create a Smart Playlist where iTunes automatically compiles just your four- and five-star songs—more on that in Chapter 11!) You can rate your songs in iTunes, or right from your iPod while they’re playing. Just press the center Select button twice and the stars-rating window will appear. Scroll the Click Wheel clockwise to add stars, and counterclockwise to take them away.
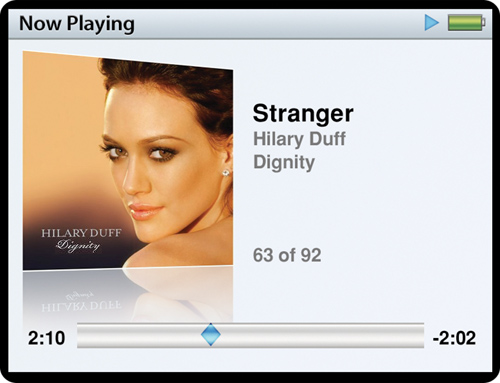
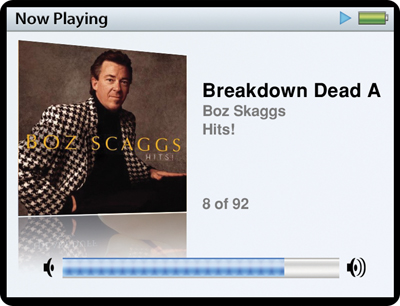
Apple borrowed the concept of “scrubbing” from the world of digital video editing, and what it lets you do is quickly jump ahead (or back) to any point in the song while the song is playing. To scrub (while a song is playing), press the Select button once then slide your finger clockwise around the Click Wheel to scrub forward, counterclockwise to scrub backward. A progress bar appears onscreen to give you a visual cue as to where you are in the song (closer to the end, closer to the beginning, in the middle, etc.). When you remove your finger from the Click Wheel—the song starts playing from that point.
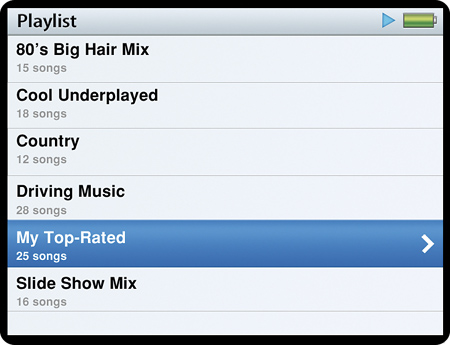
To hear the songs in any one of your playlists, press the Menu button a few times until the main menu appears, use the Click Wheel to scroll to Music, then press the center Select button. Now choose Playlists to see a list of all your playlists. When you find the playlist you want, press the center Select button (but you’re not done yet). This displays all the songs in the playlist you selected, but which song do you want to start with? Scroll down to the song you want to hear and press the center Select button again (or the Play/Pause button—either one will do it). Your song will begin playing, and when it’s done, the next song in that playlist will play, and so on.
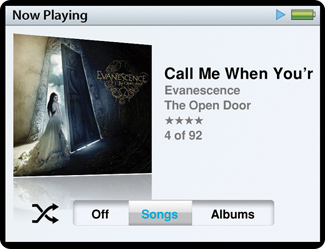
Once you choose a playlist and start playing a song, the songs will play in the same order you had them when they were in iTunes (so if you had them sorted by name, songs that start with the letter “a” would play first, then songs that start with “b” and so on, etc.). After a while, you’ll hear a song and you’ll already know what the next song is going to be. That’s why you might want to turn on the iPod’s Shuffle feature, which plays your songs in a totally random order (you can either shuffle all the songs in your Music library, or just songs in your current playlist). To shuffle all the songs in your entire library, hold down the Menu button to jump to the main menu, then scroll down and click on Shuffle Songs to turn this feature on. If you’re in a playlist, playing a song, and you decide you want to shuffle that playlist, press the center Select button three times in a row and a shuffle control bar will appear at the bottom of the song window (as seen above). You can use the Click Wheel to choose Songs (which shuffles by song title), Albums (to shuffle by album), or Off.
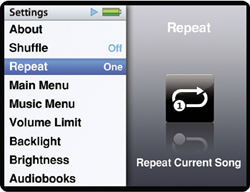
If you’re really hung up on a song (like “Girlfriend” from Avril Lavigne, which must be heard hundreds of times in succession to really appreciate it), hold down the Menu button to jump to the main menu, scroll down and click on Settings. Now scroll down and click on Repeat to repeat only the current song (the little graphic on the right side of the screen will say “Repeat Current Song”). Press the center button again to repeat the current playlist (the graphic will say “Repeat Current Playlist”), and a third time to turn the Repeat feature off (the graphic then reads, “Play Current Playlist Once,” which is a complex way of saying “Off”).
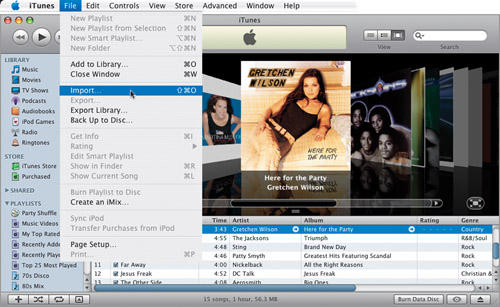
If you already have songs on your computer, but they’re not yet in iTunes, here’s how to import them: Launch iTunes, then go under the File menu and choose Import. When the Import dialog opens, navigate your way to the folder of songs on your hard disk, then select the songs you want to import and click the Choose or Open button to import those songs into iTunes. Easy stuff.
If you’re wondering how you can actually fit thousands of songs on something as small as an iPod, it all comes down to this—compression. The songs you download onto your iPod are either in MP3 format (which is a music compression technique that makes the file size of your songs fairly small, while maintaining nearly CD quality) or AAC format, which is the format used by the iTunes store that features higher-quality sound and very small file sizes. (Note: There are two AAC formats: the protected AAC M4P, which is encrypted to prevent music piracy; and the unprotected AAC M4A, which is typical of imported audio CD files.)

If you’re wondering how many more songs or videos you can fit on your iPod, here’s a quick way to find out: From the main menu, scroll down and click on Settings. Then, on the Settings menu, click on About to see a horizontal bar graph of your iPod’s available memory. If you want to see exactly how many songs and videos are on your iPod, then click the Select button again. To help you in your calculations, you can figure an MP3 song takes up about 4 MB of space (an AAC-encoded song, like ones downloaded from the iTunes Store, takes up a little less). Adding 125 songs takes up only around half of 1 GB, so if you see your Free amount is 12 GB, you can load a few thousand more songs and still have plenty of room. Video, however, eats up loads of space, with a typical music video gobbling up 25 MB. Believe it or not, that’s really not bad, because a TV show eats up around 450 MB, and a full-length movie can take up anywhere from 750 MB to over 2 GB. So, if you’re a movie freak, I hope you bought an 80-GB or larger model.
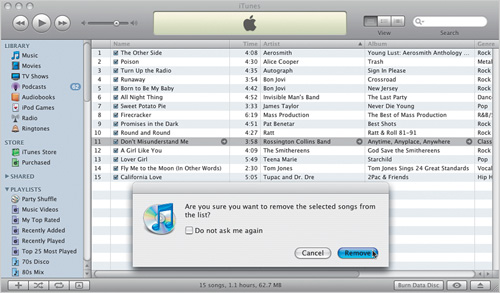
If a song you really hate winds up sneaking its way onto your iPod (this sometimes happens to a song you liked at one time, but after a few dozen plays, it really starts to get on your nerves), you can delete it from your iPod. The easiest way is to just delete the song from your playlist in iTunes, then plug in your iPod to your computer. When the iPod syncs, the offending song is gone!
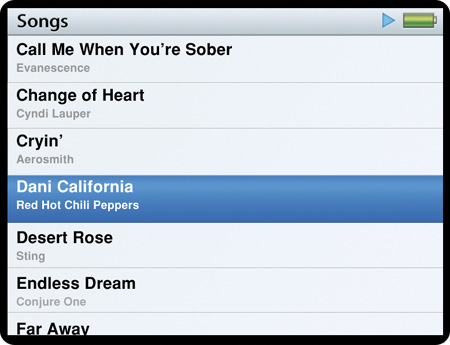
Although we normally create playlists on the computer within iTunes, you do have the ability to create one custom playlist from right within your iPod. It’s called an “On-The-Go” playlist and to add a song to your On-The-Go playlist, just press-and-hold the center Select button until the song title (shown above) blinks three times (it only takes a few moments). That’s it—it’s added to your On-The-Go playlist (you can also add an entire album, or even the contents of a playlist, the same way). When you’ve added enough songs to your On-The-Go playlist, you can get to it at the bottom of the Playlists menu. When you click on the On-The-Go playlist, at the top you’ll see a listing for Save Playlist. Click on this if you decide that you want to turn this On-The-Go playlist into a regular playlist. This clears your On-The-Go Playlist, so you can create a new fresh one whenever you’re in the mood. If you just want to clear the list and start over, choose Clear Playlist.
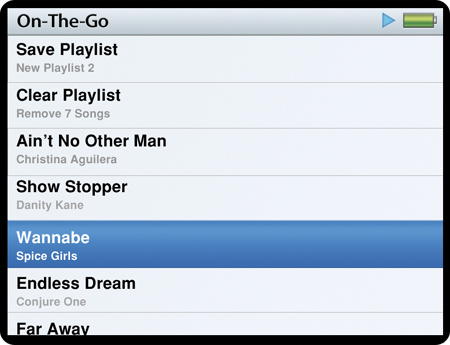
Have you ever added a song to your On-The-Go playlist and thought, “Ya know, I’m not sure I want that song on there?” For example, if accidentally, in a moment of confusion and uncertainty, you somehow added a Spice Girls song to your On-The-Go playlist (I’ll tell ya what I want [what I really, really want]. I want that song off my playlist). Luckily, deleting that song from your On-The-Go playlist is as easy as accidentally adding it was. Just find that song in your On-The-Go playlist and click-and-hold the Select button until the song flashes three times. That’s your cue that the Spice Girls are gone.
To turn your iPod up, glide your finger lightly clockwise around the Click Wheel, and to lower the volume (yeah, right), rotate your finger around the Wheel counterclockwise. The moment you start sliding either way, a Volume Bar will appear so you can see how loud (or soft) your volume setting is, and this bar grows longer/shorter as you increase/decrease the volume.
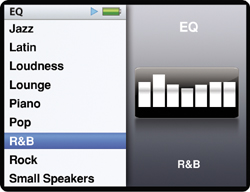
You’re about to uncover a feature of your iPod that can make your music sound so much better, you’ll never turn this feature off again (and sadly, it’s off by default). Your iPod has a built-in sound equalizer that can change the audio output of your iPod so it sounds best for the type of music you listen to—and best of all, all you have to do is choose from a list of built-in presets. Here’s how it works: Hold down the Menu button to jump to the main menu, use the Click Wheel to scroll down to Settings, and press the center Select button. Scroll down to EQ and press the Select button again. You’ll see a list of preset EQs for various musical genres (e.g., R&B, Hip Hop, Jazz, Spoken Word, Acoustic, Classical, etc., plus special EQ settings that boost the bass, boost the vocals, or reduce the treble). Just scroll down to the type of music you listen to, click the Select button, then go back and listen to your music again. You will be absolutely amazed at how much richer, fuller, and just flat-out better your music will sound.

Has this ever happened to you—you’re walking down the street listening to your iPod, and a song comes on that’s so loud you have to rip the earbuds out of your ears just to keep from blacking out? Thought so. That’s because the recorded volume of songs can vary greatly from song to song. Luckily, there’s a feature called Sound Check that can come to your rescue. Sound Check automatically balances the volume between songs so you don’t suddenly get your ears blasted right off your head. However, this ear-saving feature is turned off by default—you have to go turn it on. Here’s how: Hold down the Menu button to jump to the main menu, scroll down and click on Settings, then scroll down to Sound Check. It’s turned off by default (the graphic on the right side of the screen will read “Use Original Volume Level”). So click the center Select button once to turn it on, and the graphic on the right side will now read “Normalize Volume Across All Songs,” which will bring peace and balance to your life (ah, if it were only that easy).
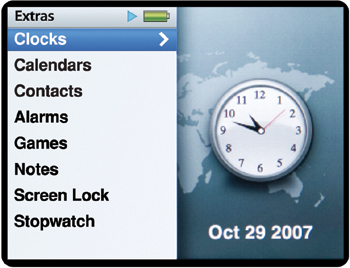
Besides playing music, being your individual PDA, and perhaps even running slide shows, your iPod can also function as a clock—and it can even display the current time while you’re playing songs. To see the current date and time, start by holding down the Menu button, which takes you to the main menu. Then click on Extras, and scroll to Clocks (it’s at the top of the list of extras). This displays an analog clock with the current time, and it displays the date below the clock (as shown above). Once you’ve set your time (under Settings, under Date & Time), you can have your iPod display the current time while you’re playing a song. To do that, start at the main menu and click on Settings. Scroll down and click on Date & Time, and when the Date & Time list of options appears, click on Time in Title to turn this feature On. Now the current time will appear up in the left-hand side of your Title Bar when playing a song.
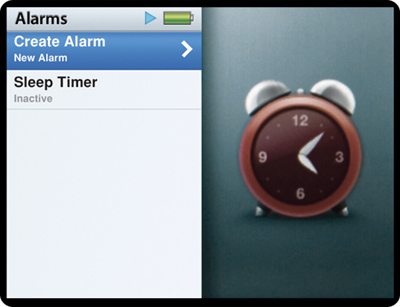
Want to make sure you get to traffic court on time? Use your iPod’s alarm function. Start at the main menu, scroll down to Extras, then click on Alarms. In the Alarms menu, click on Create Alarm (as shown here) and now your iPod’s alarm will sound—you just don’t know when. Luckily, there’s a list of alarm options where you can choose the date and time you want this alarm to go off, whether you want it to repeat (to go off every day at that same time, which is ideal for habitual flaunters of traffic law), and you even get to choose the sound your iPod will wake you with (either an audible beep or a playlist of songs, but if you choose the playlist option, you’ll need to connect your iPod to an external set of speakers, so you can actually hear your wake-up playlist. Of course, you could sleep with your headphones on, but I don’t recommend it—they could come off while you’re sleeping and before you know it, you’re in contempt of court). You can also assign a label to your alarm to help you see at a glance which alarm you’ve set is for what, and you can also delete an existing alarm here, as well. Okay, your alarm is set. At the time you specified, your iPod will “alarm you.”
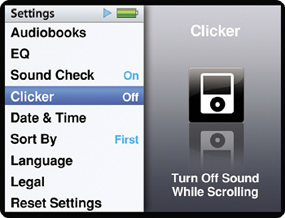
While you’re scrolling around through the menus, your iPod makes an audible “click” sound. This is basically audio feedback so you know “things are happening” as you’re scrolling around. This clicking sound drives some people mad (you know who you are), and they want it turned off. Plus, there are instances in which you don’t want anyone to hear those clicks, lest they realize that you’re playing with your iPod when you should be watching the console at the nuclear power plant. So, if you’d prefer “the silence of the Pod,” you can stop the scrolling click sound by starting at the main menu, then scrolling down to Settings, and clicking on Clicker to turn the scrolling sound off. Press the center Select button again to turn it back on.
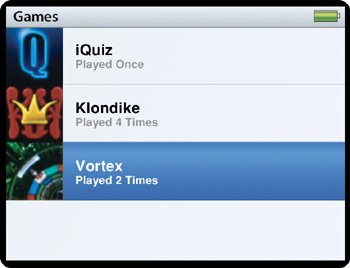
Okay, while it’s not exactly a PlayStation 3, your iPod does come with some decent little games already installed. To get to these little gems, start at the main menu, scroll down to Extras, and then press the Select button. In the Extras menu, scroll down to Games and press the Select button to reveal the built-in games. These include iQuiz, Klondike (Solitaire), and Vortex. Press the center Select button to choose a game—and watch the hours just fly by. Of course, you can buy much better games from the iTunes Store (including classic arcade games like Pac-Man); see the next page for the full scoop.

As I mentioned on the previous page, iPods come with some built-in games, and for lack of a better term, we’ll say they’re “cute” (there is a better term, I’m just not going to say it). But thankfully, Apple has introduced some pretty cool “real” downloadable iPod video games (some were commissioned by Apple, and some are existing games retooled for the iPod), available from the iTunes Store for $4.99 each. To buy these games, go the iTunes Store and click on the iPod Games link in the list of Store links on the upper-left side of the Store window. A couple of important things to note: You can’t play these games within iTunes—they only play on your iPod, and once you download one (or more), they get copied over to your iPod the next time you sync. Once a game is on your iPod, you can play it by going to the main menu, then going under Extras, looking under Games, and you’ll find it there (you use the Click Wheel as your game controller).

The next time you’re taking a trip, you might want to consider taking along a few audiobooks. Not only is the iPod designed to play audiobooks, but the iTunes Store also sells them. (The iPod also supports audiobooks downloaded from Audible.com.) To buy an audiobook, go to the iTunes Store, then click the Audiobooks link on the left side. If you find a title you like and download it, when you sync your iPod you’ll find your audiobook by starting at the main menu, choosing Music, and pressing the center Select button. Then scroll all the way down to the bottom, where you’ll find Audiobooks. Also, in case you were wondering, when you stop listening to an audiobook, your iPod notes the spot where you stopped, so when you go back to it at a later date, it picks up right where you left off (kind of like a digital bookmark). Better yet, this feature also works in iTunes—even when you sync it with your iPod, they update each other, keeping track of where you left off.
If you want to give your iPod a new name, first connect your iPod to your computer. Let’s say, for example, that you want to change the name of your iPod to “Scott Kelby’s iPod.” (Hey, don’t laugh. That’s what I named mine and I really like it.) Then double-click directly on its name in the Devices list (on the left of the iTunes window) and its name field will highlight, ready for you to type in a new name (it’s spelled “S-c-o-t-t”). Press the Return (PC: Enter) key on your keyboard to make the renaming complete.
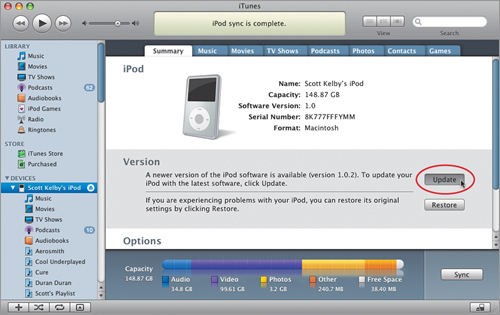
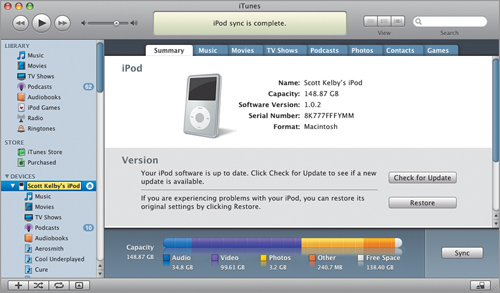
Apple updates the iPod software on a very regular basis, adding enhancements, little tweaks, etc., so it’s good to make sure your iPod stays up-to-date. This is especially true if you have a number of different iPods. To see if your iPod software is up-to-date, and to install the latest iPod software if it isn’t, just connect your iPod to your computer, then in iTunes click on your iPod in the Source list on the left side of the iTunes window. This brings up the iPod Preferences in the main window. From the Summary page, you can tell if your iPod software isn’t up-to-date (as seen in the Summary page above). You can click the Update button (as shown) and it will update your iPod with the latest version of the software.