

So, does this chapter win the award for “Most Obvious Chapter Title” or what? It’s almost too obvious a name for a chapter about working with photos on your iPod, but I used it anyway, because besides being too obvious, it’s also too perfect. By the way (Warning: Quick iPod history lesson coming), there was a time when iPods only played music. In fact, for a while there was only one model of iPod that even supported the viewing of photos. It was called (are you ready for this) the “iPod photo.” Its name was almost as obvious as the name of this chapter. Now, why does all this matter? It matters plenty, because although book editors don’t read the introductions of books anymore, they do read these chapter intros. These people are really picky, and insist on seeing things in these chapter intros like long words and punctuation. They also like it if I can work in a French word or two, because then they get to use their French dictionary and apparently they get some kind of kickback or bonus when that happens. Plus, they love to casually mention it in front of other editors: “I was working on Scott’s book today, and I would have been done sooner, but I had to keep loading the French dictionary.” The other editors all look at each other and go, “Oooooh. French!” So basically, I do it for them. They have so little, so if I toss in a long word here (like ostensively), and a French phrase there (like Mon oreille est un bouton de porte), then they’ll let lots of other stuff slip by. Like this intro, for example.

If you’re a Mac user, the easiest way to get your photos from your Mac onto your iPod is to use Apple’s iPhoto application (which has come preinstalled on every Mac for about as long as I can remember). If you’re already using iPhoto for storing your images, you can just plug your iPod into your computer for syncing, and any photos you’ve imported into iPhoto will automatically be copied onto your iPod (if you’re not using iPhoto yet, you’ll find it in your Mac’s Applications folder). Launch iPhoto and then drag any photos on your computer right into iPhoto’s main window to import them. Once they’re imported, you can create individual albums (kind of like playlists, but for photos instead of music), which are supported by your iPod. By default, it wants to import all your photos and albums, but if you prefer to have just specific albums of photos copied over to your iPod, first connect your iPod to your computer, then in iTunes, click on the Photos tab. Next, under Sync Photos From, click on the Selected Albums radio button, and in the list below, turn on the checkbox beside each album you want copied onto your iPod. Now press the Apply button in the bottom-right corner. The first time you do this, you might want to get comfy, ‘cause this could take a while. Luckily, you only have to do this once. From then on, it’ll just import any new photos you add to, or delete any photos you remove from, iPhoto (if you imported all photos) or the albums you specified.

If you don’t want to use Apple’s iPhoto for getting your photos over to your iPod (or for some reason you don’t have iPhoto), you can just put your photos in a folder. (Note: If you create subfolders inside that main folder, they’ll be imported into your iPod as separate albums, as if you were using iPhoto. Cool, eh?) Once your photos are in a folder, connect your iPod to your computer, then when it appears in iTunes, click on the Photos tab. At the top, there’s a pop-up menu for Sync Photos From, and from that menu, select Choose Folder. A standard Open dialog will appear, so navigate to your folder of images and click the Open button. Now, just click the Apply button in the bottom-right corner of the iTunes window and your images in that folder (and in any subfolders you created within it) will be uploaded to your iPod.

If you’re using a PC, the easiest way to get your photos onto your iPod is to use either Adobe Photoshop Album Starter Edition (free from Adobe at www.adobe.com/products/photoshopalbum/starter.html) or Photoshop Elements (for around $100), which has a very robust photo organizer built right in, as well as amazing image-editing controls. When your photos are organized in either Album or Elements, the next step is to connect your iPod to your computer. Then, once your iPod appears in the Source list on the left side, click on the Photos tab. When the Photos dialog appears, turn on the Sync Photos From checkbox, and from the pop-up menu, choose Photoshop Album Starter (or Photoshop Elements, if you’re using that). Just below that menu, you can choose whether you want to import every single photo you have (in an album) or just specific images (or albums). If you choose the All Photos and Albums route, once you click Sync or Apply, you can take a lunch break because it could easily take an hour or more to import all your photos. Luckily, you only have to do this once. From then on, it’ll just import any new photos you add, or delete any photos you remove.

If you’re using a PC and you don’t have either Adobe Photoshop Elements or Adobe Photoshop Album for getting your photos over to your iPod, you can just put your photos inside a folder within your My Pictures folder (Note: If you create subfolders inside your new folder, they’ll be imported into your iPod as separate collections, as if you were using Elements or Album). When your photos are in a folder, connect your iPod to your computer, then once it appears in iTunes, click on the Photos tab in the main window. At the top, there’s a pop-up menu for Sync Photos From, and from that menu, select Choose Folder. A standard Browse for Folder dialog will appear, so first navigate to your My Pictures folder, then find the folder with your photos, click on it to select it, then click the OK button. Now just click the Apply button in the bottom-right corner of the iTunes window and your images in that folder (and in any subfolders you created within it) will be uploaded to your iPod.
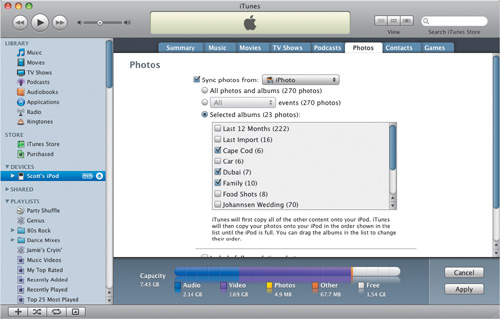
By default, when you connect your iPod to your computer, it wants to import every single photo you have in your iPhoto library (or on your PC, your Photoshop Album Starter Edition or Photoshop Elements collection, or any subfolders within your My Pictures folder). This can take, well...it seems like forever, but it’s probably only an hour or so. You can speed up this process by importing only the specific albums you want imported. That way, only your favorite photos are copied onto your iPod, and not every photo you have. To do this, connect your iPod to your computer, launch iTunes, and click on the Photos tab in the iPod Preferences window. Then click on the Selected Albums (or Selected Folders, depending on your Sync Photos From choice) radio button. In the area below, turn on the checkbox beside each album you want imported. Now, only those albums will be imported, saving you lots of time (and space on your iPod).
iTip: Create Separate Folders
You don’t have to use Photoshop Album or Photoshop Elements to create separate collections of your photos. Just create separate folders inside your My Pictures folder. Name each folder with the name you want for a collection, and then drag the photos you want to appear in each collection into the corresponding folder. Then when you import photos from your My Pictures folder, any folders inside the My Pictures folder will import as separate collections that you can access from the Photos menu on your iPod.

Once you’ve copied your photos over onto your iPod, viewing them is easy. From the main menu, scroll down to Photos, then press the Select button. Any albums of photos you’ve imported will then appear in a list. To see the photos in a particular album, scroll to that album, then press the Select button again and tiny thumbnails of the photos in that album will appear. The first thumbnail will have a yellow highlight around it. To see that photo, just press the Select button again and that photo will now appear full-screen size. To get back to the thumbnails again, press the Menu button, and now you can use the Click Wheel to scroll to a different thumbnail, and click on it to see it full screen. To see the next photo at full-screen size, press the Next/ Fast-Forward button. To see the previous photo, press the Previous/Rewind button. To scroll quickly through your images at full-screen size, just glide around the Click Wheel clockwise (to move quickly forward) or counterclockwise (to move quickly back to the beginning of that album).

To see a slide show of your photos, start at the main menu, scroll down and click on Photos, then click on the photo album you want to see as a slide show, and press the Play/Pause button. To pause a running slide show, press the Play/Pause button (to restart it, just press Play/Pause again). To quit the slide show and return to your list of albums, press the Menu button. Also, if you’re scrolling through your thumbnails, you can start a slide show from any thumbnail by just pressing the Play/Pause button, and your slide show will start with that photo.
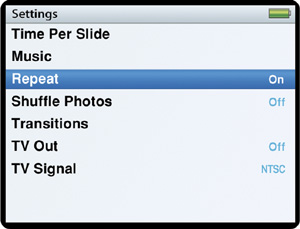
Your iPod gives you a surprisingly robust amount of control over how (and where) your slide show is displayed. To find these controls, start at the main menu, scroll down and click on Photos, then scroll down and click on Settings for a list of slide show options. We’ll cover adding music and setting the duration of each slide on the next two pages, but there are other options here worth mentioning. For example, you can scroll down to Repeat and press the Select button to have your slide show loop back to the beginning and start over when it’s done, or click Shuffle Photos to have the photos appear in a random order. The Transitions preference lets you choose what happens between slides to reveal the next slide (personally, I like the Dissolve effect, but you can choose any one you’d like (the default setting is Random). If you want a “cut” (one slide replaces the other with no transition between), choose None. If you want to show your slide show on TV (you’re using Apple’s Composite or Component AV Cable to connect your iPod to your television), once you’ve connected your iPod to your TV’s video and audio jacks, scroll down to TV Out, press the Select button, and set it to On or Ask. Now press Menu to jump back to your list of albums, click on the one you want to see as a slide show, then press the Play/Pause button.
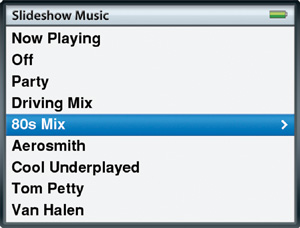
If there’s one thing a slide show definitely needs, it’s a music track playing behind it. You can add music in one of two ways—you can assign a song in iPhoto, then that song plays automatically when you play that slide show on your iPod. If you’d prefer to choose your background music “on the fly,” go to the iPod’s main menu, click on Photos, click on Settings, then click on Music, and select which playlist you’d like to play during the slide show. Now you can start your slide show.v

By default, each slide will remain on your iPod screen for 3 seconds. If you’d like each photo to remain onscreen longer (or shorter, for that matter), just start at the main menu, click on Photos, click on Settings, then click on Time Per Slide and choose from the list of times.
iTip: Turn Off Auto-Launch
If you’re using your iPod to store files or backups, having iTunes launch each time you connect your iPod can be incredibly irritating. What’s worse is if you’re connecting your iPod as a hard drive to another computer, iTunes will automatically sync with that computer. Luckily, you can turn off this “auto iTunes launch” by connecting your iPod to your computer, and from the Summary page in the iPod Preferences window, turn off the checkbox for the Open iTunes When This iPod Is Connected option and click Apply. That’s it—no more auto-launch.

Want to really “tune up” the crowd at your next business presentation? Instead of lugging your laptop to the conference room and hooking up a projector, just bring along your iPod and Apple’s Composite or Component AV Cable (older iPods can use the Apple AV Cable), and you can just connect your iPod directly to the projector. Instead of showing photos, show a slide presentation of your album and use the iPod’s Next/Fast-Forward button to advance to the next “slide.” Of course, you can even have music behind your slide presentation. If you really want to take things up a notch, get the Apple (iPod) Remote, so you can stand at the front of the room and control your iPod (advancing it through your presentation slides), while it sits quietly back there by the projector.

To see your slide show on TV, use the Apple Composite or Component AV Cable to connect your iPod to the inputs on your TV. (Note: Older iPods can use the Apple AV Cable.) Put the thin, single plug into the headphone jack on the top of your iPod, then insert the audio and video connectors into the input jacks on your TV. (Note: If you’re a freak for high-quality image display, you can use an S-video connector with any model iPod to connect to your TV instead. To use S-video, you’ll have to place your iPod into its Dock, then attach an S-video cable to the S-video output on the back of the Dock, and connect the other end to your TV’s S-video input.) Once connected, from the main menu, click on Photos, then scroll down and click on Settings. Scroll to TV Out and click the Select button until it changes to Ask. Now, scroll to the photo album you want to display as a slide show, then press the center Select button, scroll to the photo you want to start with, and press the center Select button again. Once your full-screen image appears, press the Select button, which brings up the screen shown above, and you can use the Click Wheel to slide the blue button to On, which sets your iPod to display on a TV. (On the new fourth-generation iPod nano, press Yes.) Now press the center Select button to begin your “big-screen” experience. (Note: If you connect your iPod Dock via the S-video cable, you also need to connect the line out to your TV or stereo speakers via an audio cable. The included TV cables only work from the headphone jack on top of the iPod.)
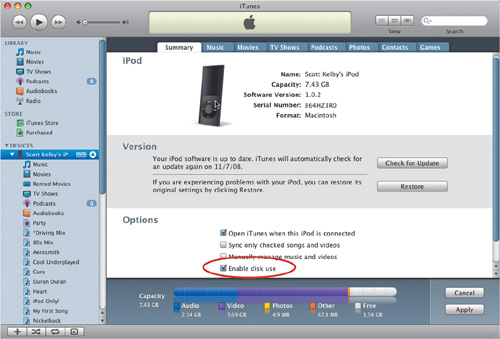
If you’ve backed up a bunch of photos (or other files) onto your iPod, and now you want to transfer them to another computer so you can edit them, sort them, and if you like, transfer them from that computer back to your iPod, here’s how to do just that: Connect your iPod to your computer, then go to iTunes. When iTunes launches, you’ll see your iPod listed in the Source list on the left side of the iTunes window. In the iPod Preferences window, in the Options section, turn on the checkbox for Enable Disk Use. Once you do this, the iPod will appear on your computer as a mounted disk (like a hard disk or USB device). Go to your computer’s desktop, double-click on the now-visible iPod, and you’ll see the folder with your stored photos (don’t disturb the folder named Photos). Now you can select these photos and drag them onto your computer.