
Now, I know what you’re thinking: “How does Motley Crue’s ‘Home Sweet Home’ tie into a chapter about the basic, most essential things you need to know about iTunes?” First, many of you will be using iTunes at home. (Unless of course, you’re like my employees, who use iTunes all day long in lieu of working productively. In fact, when I’m roaming the halls, I’m not sure which I see more on their monitors—iTunes, eBay, Amazon.com, or CNN. Once I even saw someone with Photoshop open, but thankfully it was just because they were color-correcting an album cover they were going to use in iTunes. Whew—that was a close one!) Anyway, since some of you will be using iTunes at home, especially when you first get your iPod, I thought there was some loose thread I could use to connect your using your iPod there with the word “home” in “Home Sweet Home.” Hey, it’s fairly “loose” I know, but my backup plan was to use the song “Essential” by The Gravy, from their album “Lollipolyp.” I didn’t have a problem with the “polyp” part of it (as icky as that is), but if the chapter title was “Essential” and the subtitle was “iTunes Essentials,” you’d think I took the easy way out, and you deserve more than that. You deserve a title that is so loosely related to the actual topic of the chapter that it takes more than 300 words to explain why I chose it. See, just when you think you’ve got me figured out, I zig when you thought I’d zag (I have no idea what that means). Quick, turn the page before I think of something else to write here.
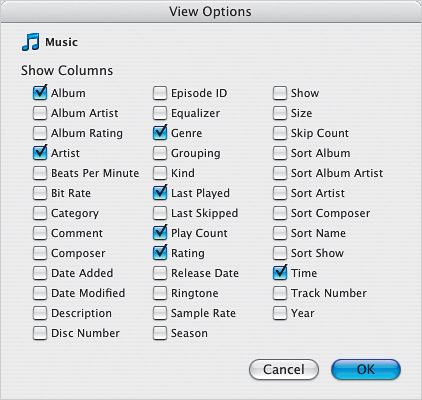
In the iTunes main window (where you see your songs), there are separate columns that display the song title, the artist, the album name, and a host of other information. Some of it you probably will care about (like the song name, artist, time, etc.), and some of it you probably won’t need to see. Ever. Stuff like a song’s Beats Per Minute (although this column is helpful to DJs). Luckily, you can customize your columns and choose which ones are visible (and which ones are hidden), which makes for very clean, easy-to-read playlists, because they display just the info you care about seeing. Here’s how to customize yours: Press Command-J (PC: Ctrl-J) on your keyboard to bring up the iTunes View Options dialog. Select which columns you’d like to be visible by turning on (or off) the checkboxes next to the column names. When you’re done, click OK and only the checked columns will appear in your main window.
iTip: Making Hidden Columns Visible
If at any time you decide you want a hidden column to be visible, just Control-click (PC: Right-click) directly on one of the column headers. This brings up a contextual menu of column choices. Just choose the column you want to see (hidden ones will be the ones without a checkmark), and that column will now be visible. To hide any column, you do the same trick, but uncheck the column you wish to hide.
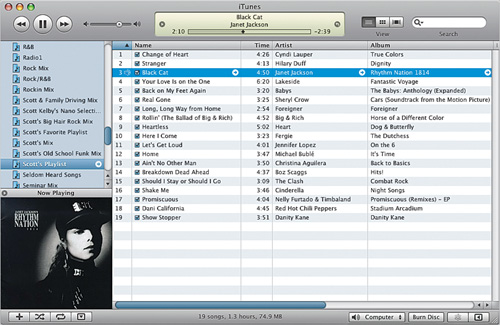
iTunes’ status display (that rectangular panel at the top center of the iTunes window) shows you the name of the current song, the artist, how much of the song has already played (the elapsed time)—in minutes and seconds, as well as in a progress bar—and how much time is left until the song has finished playing (the remaining time). If you’d like the name of the album the song came from, click directly on the artist’s name (the artist’s name and the album name scroll continuously under the static song name). Want the total time of the song? Click on the Remaining Time (on the right side of the progress bar).
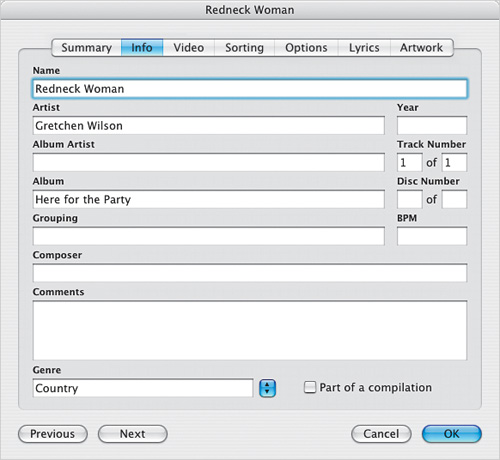
If you want to change, update, or add any information to a song, just Control-click (PC: Right-click) on the song, and from the contextual menu that appears, choose Get Info. When the dialog appears, click on the Info tab and you’ll see a number of fields where you can edit or add information about the song. This is the same information that will appear in the status display (in the top center of the iTunes window) when a song is playing, but you can also include additional information, like the year it was recorded, your own personal comments, and the song’s composer. When you’re done, just click the OK button.
iTip: Playing a Song
There are really four different ways to play a song within iTunes, so you should try them all to find out which one best suits your personal style. Here they are: (1) find the song you want to play and just double-click on it; (2) click on the song you want to play and then press the Spacebar on your keyboard; (3) click on the song you want to hear, then click on the Play button in the upper left-hand corner of the iTunes window; or (4) click on the song you want to play and choose Play from the Controls menu.
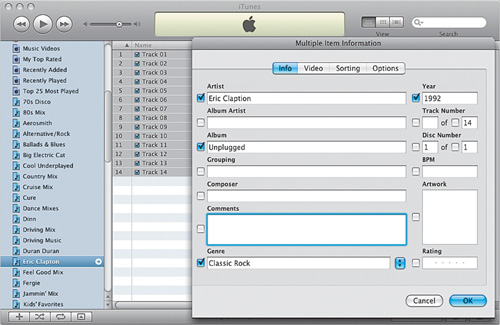
You know by now how to edit a song’s info (using the Get Info dialog), but what if you want to edit a bunch of songs at once (for example, let’s say you imported 14 songs from an album, and you want to add the album name to each of the 14 songs)? You do that by Command-clicking (PC: Ctrl-clicking) on the songs you want to edit (in this case, all 14 songs you just imported), and then Control-clicking (PC: Right-clicking) on any one of those 14 songs, and choosing Get Info. Rather than the standard Get Info dialog, a Multiple Item Information dialog will appear instead. (Well, the first time you do this, you’ll get a warning dialog that says: “Are you sure you want to edit information for multiple items?” Just click Yes.) Now the information you enter in this dialog will be applied to all the selected songs. When you’re done, just click OK.
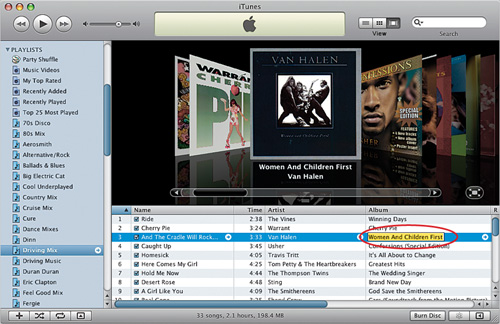
If you want to change just one bit of info on a song (for example, let’s say you had the song “And the Cradle Will Rock” by Van Halen listed as coming from their album Diver Down when everyone who’s anyone knows that song actually came from the album Women and Children First), here’s the good news: you don’t have to bring up the whole Get Info dialog for just this one little change. Instead, just click on the song, and then click once directly on the album’s current name to highlight the Album field. Now, just type in the new name over the old name, then press the Return (PC: Enter) key to lock in your change. It probably goes without saying, but I’m going to say it anyway—this also works for editing other fields, like Name, Artist, etc.
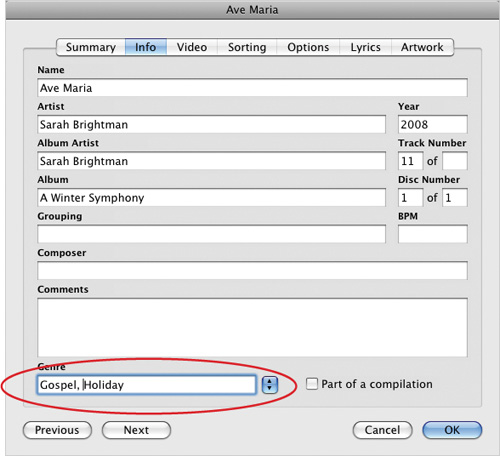
Although iTunes comes with a preset list of popular genres, there are some it just doesn’t include (like Salsa, Thrash, or New Wave), and you can probably come up with a dozen or so yourself. That’s why iTunes lets you create your own custom genres (like Death Metal or Opera). To create your own custom genre, Control-click (PC: Right-click) on any song, and then choose Get Info from the contextual menu that appears. When the Get Info dialog appears, click on the Info tab, and then just type the name you want for your “new” genre in the Genre field (how about Broadway Musicals or Gospel?) and click OK. If you want to create a genre that encompasses a number of different styles, just put a comma after each name (like Metal, Jazz, Punk, Choral). Assigning these “multiple genres” to a song will cause the song to appear in multiple categories when searching or browsing. For example, you might want the Sarah Brightman song “Ave Maria” to have multiple genres, so it appears when you search for either Gospel or Holiday. When browsing, it would appear in a new genre labeled “Gospel, Holiday.”
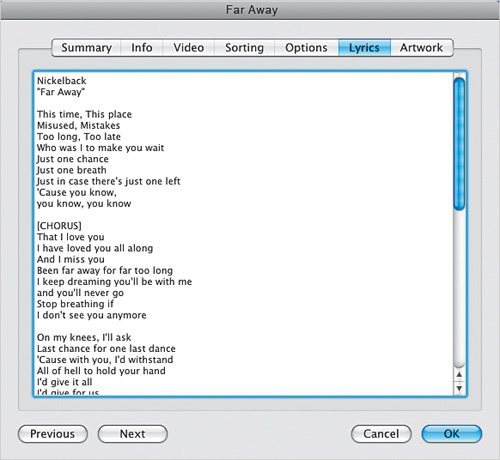
If you have an iPod nano (or any newer iPod), and you’re really bad at remembering the words to songs, then “hang on—help is on its way” (sorry about that lame Little River Band reference). Here’s the deal: in iTunes 5, Apple added the ability to embed lyrics into your songs (just like you embed the genre, the rating, album art, etc.) and best of all, these lyrics can be viewed on your iPod nano or newer iPod. Here’s how to set it up: In iTunes, select the song you want to add lyrics for, go under the File menu and choose Get Info. When the Get Info dialog appears, click on the Lyrics tab, and type in the words. Simple enough. Now, if you don’t know the words, you can fire up your Web browser, then go to one of the many (and by many, I mean about a-bazillion) lyrics websites. (By the way, the Lyrics field in iTunes supports copying-and-pasting. I’m just sayin’.) Now, once a song is playing on your iPod nano, you can view these lyrics by just pressing the center Select button a few times until the lyrics appear onscreen.
iTip: Formats without Lyrics
As luck would have it, there are two file formats that you can’t add lyrics to: QuickTime files and WAV files. So, what do you do? Convert it to a format that does support lyrics. Click on the file, go under the iTunes Advanced menu, and choose Create AAC Version. Bam. That’s it.
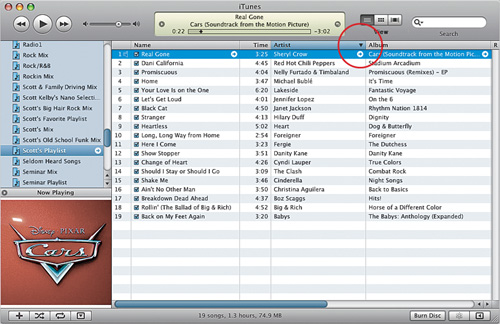
By default, iTunes columns are sorted in either alphabetical order or numerically (from the lowest number to the highest). You can determine how iTunes is sorting by looking for the column that has the little arrow in its right-hand corner. If the arrow is facing upward, the column is sorted from A to Z (alphabetically) or from lowest number to highest (numerically). However, if you’d prefer to have it sort backwards (so you’d hear Sheryl Crow’s “Real Gone” before you’d hear “Ain’t No Other Man” by Christina Aguilera), just click once on the Artist column header. This reverses the alphabetical order (you’ll now see the little arrow in the Artist column pointing downward), putting “Real Gone” at the top of the playlist (or if you click on a numerical column, like Time, then your longest song would be first, followed by your next longest, etc., until your shortest song appeared at the bottom). Also, if you click on the Rating column, your 5-star songs will appear at the top of the iTunes window, and if you click again, they’ll appear at the bottom of the iTunes window.
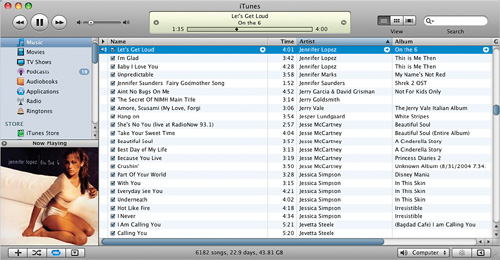
When you play a song, a tiny speaker icon appears to the right of the track number to let you know that song is playing. However, while that song is playing, you can go and do other things (like sorting another playlist, changing song names, etc.). So, although you may be playing the song “Let’s Get Loud” by Jennifer Lopez, that song won’t be highlighted because you’re working in an entirely different playlist. Then, how do you find the song that’s currently playing? Just press Command-L (PC: Ctrl-L), which instantly jumps you to the song that’s currently playing, even if it’s in a different playlist.
iTip: Repeating Your Music
If you can’t get enough of a particular song (or a particular playlist for that matter), you can have iTunes automatically repeat it by clicking on the Repeat Playlist/Song button (it’s the third button from the left in the bottom-left corner of the iTunes window). If you click once on this button, iTunes will repeat your entire current playlist. Click again and it will replay the current song over and over and over again (toddlers love this feature). To stop the repeating, click the button again.
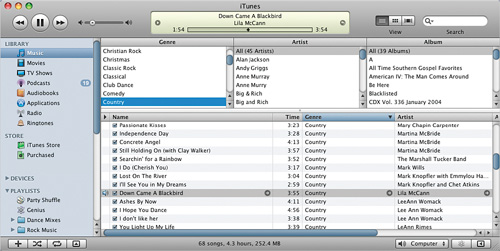
Let’s say you want to hear nothing but country songs today, but you don’t have a Country playlist. Or maybe you just want to hear all your Aerosmith songs but didn’t make an Aerosmith playlist either. Then you should try iTunes’ Browse feature, which (with a couple of clicks) lets you have a playlist of your favorite artist, or genre, or album. Here’s how: In the Library section on the left side of iTunes, click on Music, then press Command-B (PC: Ctrl-B) or View>Show Browser. This gives you three main categories to browse by: Genre, Artist, and Album. In the Genre list, click on Country and all your Country songs will instantly appear (well, at least all the songs you tagged with Country as the genre). Just double-click the first song in the list and it begins playing that list. It’s that fast and easy. (Note: To turn off the Browse feature, press Command-B [PC: Ctrl-B] again.)
Once you have a couple hundred (or more) songs in your Music Library, finding one particular song can start to become time-consuming. When you have a few thousand, it’s needle-in-the-haystack time. That’s why iTunes has a Search field in the upper right-hand corner of the iTunes window (it’s the field with the Magnifying Glass icon in it). While in the Music Library, just begin typing the name of the song, album, or artist, and as you start typing, iTunes will immediately start searching. As soon as it finds a match (even if you haven’t finished typing), it’ll display the matches in the main window. To clear the search results and return to the full playlist, just click on the little gray circle with an X in it (on the right side of the Search field). One more thing: if you click on the Music Library before you start your search, it searches all the music you have in iTunes. If you want to search within just a particular playlist, click on that playlist first, then start your search—now it only searches in that particular playlist.
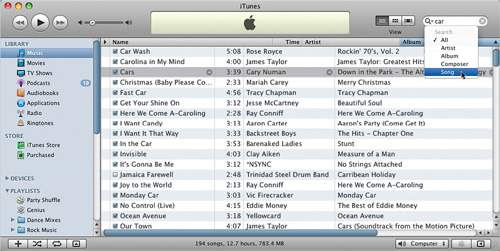
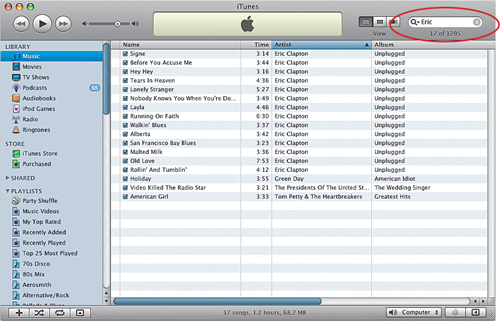
Let’s say that you want to find the song “Cars” by Gary Numan, so you type “car” up in the Search field (makes sense, right?). In the iTunes on my computer, this brings up 27 results—everything from the song “Car Wash” to songs from the Cars soundtrack, because it brings up any song in your Music Library that contains the word “car,” from the song “Carolina in My Mind” to the band Yellowcard. But you can narrow your search right off the bat by using the Search pop-up menu (which is actually that little Magnifying Glass icon—it’s more than just an icon, it’s a pop-up menu). So, click-and-hold on that little Magnifying Glass icon, and from the pop-up menu that appears, choose Song. Now it only searches the names of songs in your Music Library, and not the album or artist. This greatly narrows your search, and gets you to the the songs you want much faster. By the way, when you’re done searching, just press the gray X in the right side of the Search field.

As you may know by now, iTunes keeps a count of each time you play a particular song, but if at any time you’d like to wipe that play count clean (for example, if you’re having friends over and you don’t want them to see that you’ve played “Lover Girl” by Teena Marie 87 times), just Control-click (PC: Right-click) on the song and from the contextual menu that appears, choose Reset Play Count. iTunes will reset your play count to zero. Your secret will now be safe forever, and your friends will think you’re cool once again. (Note: Although you’ve cleared the Play Count field, the Last Played field will still show—obviously—the last time you played the song, so there’s still a chance that might give your secret away....)
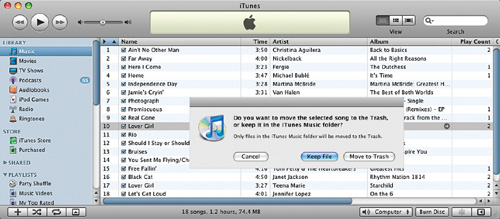
If you’ve had enough of a song and you just want it out of iTunes (and out of your life), just click on the song and press the Delete (PC: Backspace) key on your keyboard. You can also delete a song by Control-clicking (PC: Right-clicking) on a song and choosing Delete from the contextual menu. From the first dialog that appears, choose Remove, then choose Move to Trash (PC: Recycle Bin) from the next dialog. If the song is in a playlist, iTunes will remove the song from just that playlist. If you click on a song in your Music Library, then iTunes removes the file altogether and puts it in the Trash (on a Mac) or the Recycle Bin (on a PC). Don’t freak out—you’ll get a warning dialog before it does either, so you don’t have to worry about hitting the wrong key and losing your favorite “Lover Girl” by Teena Marie.
iTip: Deleting Multiple Songs
To delete multiple songs at once, just Command-click (PC: Ctrl-click) on all the songs you want to delete, then press the Delete (PC: Backspace) key on your keyboard. If you want to select a whole group of contiguous songs, just click on the first song in the group you want to delete, then hold the Shift key, scroll down to the last song, and click on it. All the songs between where you clicked will be highlighted. To delete them all with one keystroke, just press the Delete (PC: Backspace) key. (Note: Remember, if you’re deleting from your iTunes Library, this is a permanent action; if you’re deleting within a playlist, the song remains in your Music Library.)
If you ever need to see a graphic display of the audio frequencies in your song (it’s helpful when you’re recording so you don’t record at too high a volume, which causes distortion), go up to the status display (in the top center of the iTunes window) and on the far-left side of the display, click on the dark-gray circular button with the right-facing arrow. When you do this, two digital VU (volume unit) meters will appear where the song info usually appears, giving you a visualization of the music frequencies (just in case you care). Click on that arrow button again to bring back the song title.
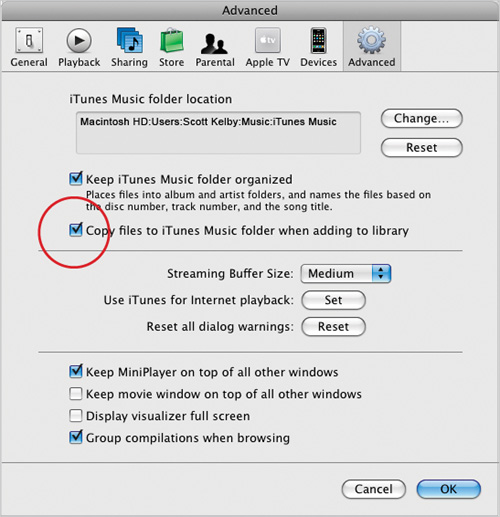
If you have an MP3 song on your hard disk and you double-click on it, iTunes opens it and plays the song. It also creates an invisible shortcut (or alias) to that song from that folder on your hard disk. There’s nothing wrong with this, but what you’ll eventually have are folders scattered all over your hard disk with music in them. Well, you can make things much more organized than that (which makes backing up your music much easier) by having iTunes copy each song that it plays into the iTunes Music folder. That way, all of your music is in one place. To turn on this feature, go to the iTunes Preferences (on a Mac, it’s under the iTunes menu; on a Windows PC, it’s under the Edit menu), click on the Advanced icon. In the Advanced dialog, turn on the checkbox for Copy Files to iTunes Music Folder When Adding to Library. Now you can click OK, with the peace of mind that can only come from bringing order and harmony to your music world.
iTip: Consolidating Your Music
If you’ve already got music scattered all over your hard disk, it’s not too late—you can have iTunes go to all those folders and copy all the songs listed in your Music Library into the iTunes Music folder on your hard disk in just one click. Go under the File menu and choose Consolidate Library. It wouldn’t hurt if you played the song “Come Together” by The Beatles while you’re doing this.

When you import songs from a CD, it usually works like this: you import the songs; you find them in your iTunes Library; and then you drag these imported songs into a playlist. Want to skip a step? When you import a CD, select the songs on the CD (by Shift-clicking on the first and last song in the CD’s folder on your hard disk), and drag them right into that new playlist. When they import, of course, they’ll be in your Music Library, but they’ll also be in your desired playlist. Hey, if it saves time, I’m all for it.
iTip: Adding MP3 Songs
If you have MP3 songs already on your hard disk that you want to add to your iTunes Music Library, it’s easy: Just go under the File menu and choose Add to Library. This brings up a standard Open dialog, so you can navigate to where the songs are on your hard disk, then click the Choose button to add them. Of course, there’s an even easier way—just open the folder that has your MP3 songs, drag-and-drop them right into iTunes, and they’ll be imported. It doesn’t get much easier than that.
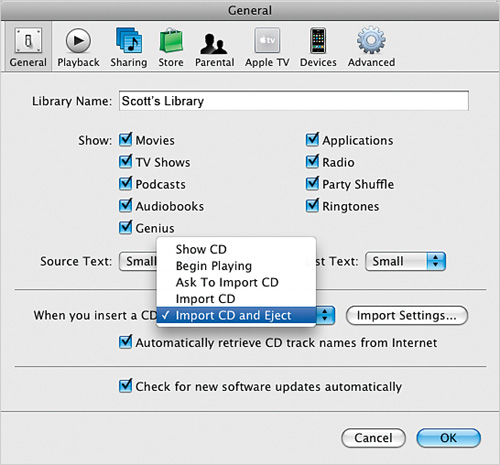
If you’ve decided to import your entire collection of CDs into iTunes (and I whole heartedly recommend that), then you’re going to want to have as much automation as possible, so you don’t go totally brain-dead during the process. Here’s why: When you insert a CD, it doesn’t import the tracks. Instead, it just shows you what’s on the CD, which is great if you only want to hear what’s on the CD. But if you’re cataloguing your entire collection, this is the last thing you want it to do. Instead, imagine how much time it would save if you just inserted a CD and iTunes automatically imported all the songs, then spit the CD out, ready for you to insert the next disc? It can do just that—you just have to tell it to. Go to the iTunes Preferences (found under the iTunes menu on a Mac; the Edit menu on a Windows PC), click on the General icon, then from the When You Insert a CD pop-up menu, choose Import CD and Eject, and click OK. That’s it—you just turned your computer into an automatic CD-importing machine, which enables you to pay your little brother to sit there and swap the ejected CDs for a few hours while you go to a concert. See, this is what life’s all about.

If you’re importing songs from a CD, and you have a continuous Internet connection, iTunes automatically finds the names (and other background info) for all the songs you’re importing. Here’s what actually happens: When you import, iTunes will go to the Web and search within the massive Gracenote CDDB Internet Audio Database for the info on the CD you’re importing. If it finds the information, iTunes will automatically download that information into each song’s info panel, naming the songs (artists, album names, etc.) as it goes (pretty cool, eh?). If you don’t have a continuous Internet connection, just add all of your songs to your iTunes Music Library or playlists, connect to the Internet, then under the Advanced menu, choose Get CD Track Names.

When you import music from CDs, by default iTunes converts your songs into AAC format (which is great in that it compresses the size of your song files while maintaining CD-quality sound). But if you need to import smaller-sized files (and you don’t mind a decrease in sound quality), you can choose to import songs as MP3s. Just go into iTunes’ Preferences (under the iTunes menu on a Mac; the Edit menu on a Windows PC), click on the General icon, and then click on the Import Settings button. From the Import Using pop-up menu in the Import Settings dialog, choose MP3 Encoder (or any other file format you’d like). Now when you import CD songs, they’ll be in the format you want. (By the way, all songs from the regular iTunes Store are protected AAC encoded, meaning the file can’t be “shared,” while most CD-imported files are unprotected AAC encoded, meaning the files can be shared.)
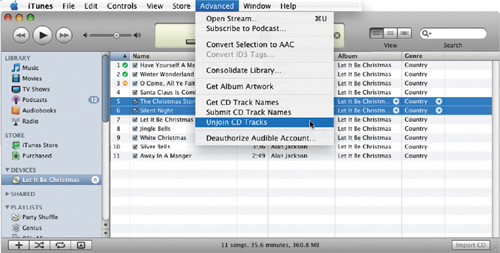
Sometimes when you import a song from a CD, if the song has a lengthy introduction, it can get separated from the song. For example, look at Van Halen’s “Little Guitars.” It starts with a legendary guitar solo from Eddie Van Halen that actually has its own name (“Little Guitars [Intro]”), but if you hear this song on classic rock radio stations, the two are played as one song, the intro goes right into the song. It’s really one song, and when you import it from the CD, there’s a decent chance iTunes will import it as one song, but if iTunes thinks these are two separate songs, there will be a gap of a few seconds between songs. If that happens, no sweat—just Command-click (PC: Ctrl-click) on the two songs before they’re imported and then go under the Advanced menu and choose Join CD Tracks. Now, they’ll import as one song, with no gap in between (you’ll know that they’re linked because a tiny bracket icon will appear next to the two songs’ names). By the way, if you ever want to really mess with rock history, you can select both songs, go under the Advanced menu, and choose Unjoin CD Tracks. (Note: This whole joining thing can only happen before the CD tracks are imported into iTunes—not after.)
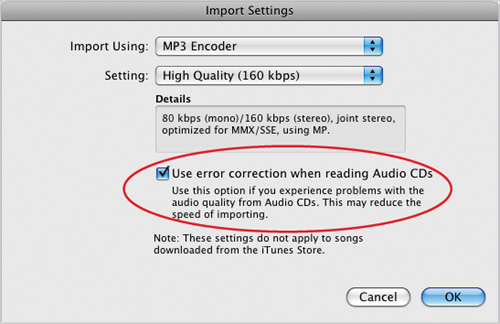
If your little sister has been using one of your prized CDs as a Frisbee, you’re probably going to find that out when you play the CD in iTunes. It’s going to have its share of scratches, junk, and other nasty stuff, which makes importing these tracks nearly out of the question—unless you know about this somewhat weird and obscure preference setting. To find it, go into the iTunes Preferences (found under the iTunes menu on a Mac; the Edit menu on a Windows PC), click on the General icon, and then click on the Import Settings button. Now turn on the checkbox for Use Error Correction When Reading Audio CDs. iTunes will then do its darnedest to correct a disc’s trauma while importing, salvaging as much as it can. It doesn’t work 100% of the time, but when it does, it’s worth its weight in Starbucks coffee.
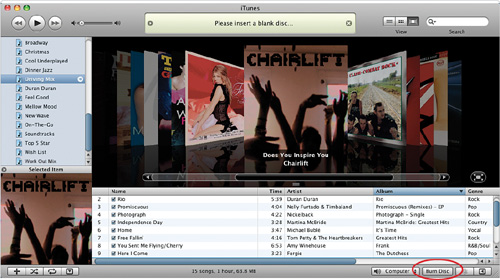
Burning a CD is a breeze, but there are a couple of things you should know before you do it, just so it’s even breezier (if that’s even a word). First, you can only burn playlists (not your Music Library), so click on a playlist in the Source list that you want to burn (also, don’t insert a blank CD yet—wait until it asks you to). So now that you’ve selected a playlist, take a quick look down at the bottom center of the iTunes window to make sure you don’t have more than 1.2 hours of music in your playlist (that’s pretty much the amount of time you can fit onto an audio CD these days). If you have too many songs, delete some songs until you have less than 1.2 hours. Now click on the Burn Disc button (it’s in the bottom right-hand corner of the iTunes window) and after choosing your burn settings (see next page), click Burn. The top-center status display will prompt you: Please Insert a Blank Disc (that’s your cue). Once you insert a blank CD, iTunes will begin burning the songs in your playlist onto your blank CD. (Note: Now’s your chance to abort burning the CD, if you so desire, by clicking on the X in the status display, although the formerly blank CD will no longer be usable.) Assuming all goes well, iTunes will spit your new music CD out of your CD drive.
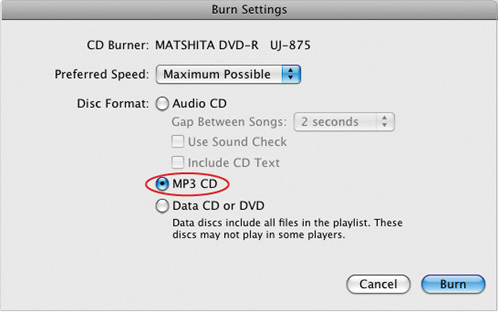
If you want to fit the maximum number of songs on your CDs, you might want to try burning an MP3 CD rather than an audio CD (provided of course that your CD player can read MP3 CDs—many new CD players can, but not all). Because the MP3 format uses a high rate of compression, you’ll be able to fit many more songs on a CD in MP3 format, but to do that, you’ll need to set that preference in the Burn Settings dialog. So, after you select Burn Disc, click on the Burn Settings button. Under the Disc Format section, click on MP3 CD and then click OK. That’s all there is to it—now you just have to hope that your CD player supports MP3 CDs. (Note: This doesn’t work for iTunes Store songs or songs in AAC format.)
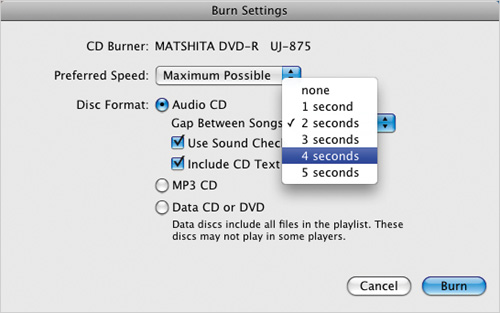
So your CDs don’t sound like one long, unending song, iTunes adds a 2-second pause (or gap) between songs by default. Besides being sorely needed from a listening perspective, the gap also helps your CD player recognize individual tracks. Although 2 seconds is the default setting, you can change the length of the gap so it’s longer, shorter, or you can eliminate the gap altogether (which you might want to do if you’re listening to an audiobook or the recording of a speech). To do that, select the playlist you want to burn and click Burn Disc. Choose your desired length (in seconds) from the Gap Between Songs pop-up menu, and then click OK. That length now becomes the gap setting for your burned CDs.

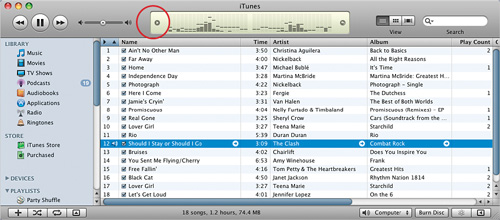
Another helpful thing Apple added in iTunes 7 was the ability to “live scrub” through a song. This may not sound like a big deal, until you realize how it was done before. For example, let’s take the song “Bawitdaba” by Kid Rock. It has this crazy long intro thing with weird sounds, and well...I just want to get to the song. Before iTunes 7, you could grab the scrubber bar at the top of the iTunes window and drag it to the right to jump past that part, but while you dragged, it was totally silent, so when you let go of the scrubber bar, you were just guessing if you were in the right spot or not. So, it was kind of a hit-or-miss proposition. But in iTunes 7, Apple changed that scrubber bar to be live, so you can hear the music (in fast-forward speed) as you scrub. You can hear when the annoying (I mean, “inspired”) intro is finished, so you can stop right where that 1-minute-plus long intro ends. Ahhhhh, that’s better. (Come on, everybody sing with me, “Bawitdaba da bang da dang diggy diggy, diggy said the boogy said up jump the boogy!”).
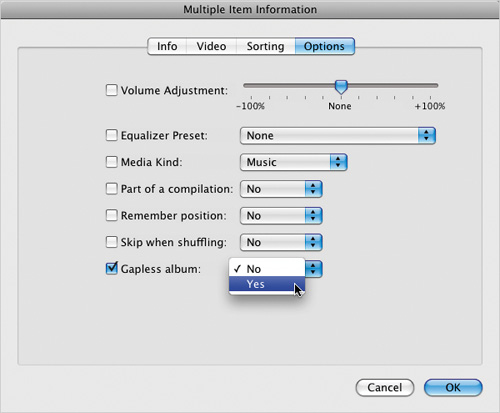
At last, you can set up iTunes so live albums played in iTunes, or on your iPod, will play as one performance—without the gaps (short pauses) between songs that have been a part of every previous version of iTunes. But it’s not just for live albums, it’s also for classical albums, and Pink Floyd albums, and Brian Wilson’s “Smile,” which will finally sound like one contiguous thing!!!!! What a glorious day this is in our otherwise featureless and banal lives (sorry, I got carried away). Anyway, this is called “gapless playback” and here’s how to invoke its majestic power and authoritative dominion (sorry—again—carried away). In iTunes, select all the songs that you want to have gapless playback (so, for example, you’d hold the Command key on a Mac [or the Ctrl key on a PC] and click on all the songs from a live album or classical album), then press Command-I (PC: Ctrl-I) to bring up the Multiple Item Information dialog (this lets you change the settings for a number of songs at once, and this only appears when you’ve first selected more than one song). Choose the Options tab at the top-right of the dialog and you’ll see a checkbox for Gapless Album (at the bottom of the dialog). Just click on that checkbox, choose Yes from the pop-up menu, and click OK. That’s it—the gaps are gone.
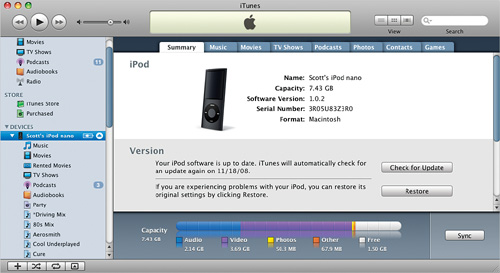
Want to know how much room you have left on your iPod for music and video podcasts, and photos, etc., while it’s connected to your computer? Then just click on it in the iTunes Source list and you’ll be taken to the iPod Preferences Summary window that not only displays a large icon of your iPod, but it gives you all the inside info on your iPod, including how much space is available, and how much of that space is taken up by music, videos, and photos, via a bar graph at the bottom of the window. That way, you know at a glance right where you stand.
iTip: Personalized Color
Want an idea of how smart the Preferences window is? Take a look at the drawing of your iPod. Did you notice the drawing matches the color of your iPod? That’s right, if you’ve got a red iPod nano, a drawing of a red iPod nano is what you see in the Preferences Summary window. They could have put a generic iPod drawing there, but putting a drawing of the same exact color that you own is a totally Apple thing to do. Just another reason why the iPod is what it is.