Hey, it’s not easy finding a song with the word “playlist” in it. Or a movie. Or a TV show. So, after doing some searching, I got as close as I was going to get with the song “Imaginary Player” by Jay-Z. Now, in the iTunes Store, there are two different versions of this song—one with the Explicit lyrics warning and one with the Clean label. Normally, I just go with the Clean version, because I’m a wholesome, family man myself. (However, one time I actually got “burned” when downloading the Clean version of a song. It was the song “1985” by Bowling for Soup. My wife heard the song on Radio Disney, told me about it, and when I found it on the iTunes Store, it had both Explicit and Clean versions, so of course I downloaded the Clean version for my son’s playlist on my iPod. However, Apple’s definition of Clean is obviously different than Radio Disney’s. For example, on the Radio Disney version of the song, the second verse goes: “She was gonna be an actress. She was gonna be a star. She was gonna shake it, on the hood of Whitesnake’s car.” The “shake it” part’s a little suggestive, but it’s certainly not explicit. However, in the Clean version I downloaded, instead it says: “She was gonna shake her ass, on the hood of Whitesnake’s car.” Unsuspecting, I played it in front of my son, only once mind you, but of course he’s memorized that line verbatim. Kids!) Anyway, this chapter isn’t about the explicit version of either Jay-Z’s or Bowling for Soup’s song, but if it were, I’d probably sell a lot more books.
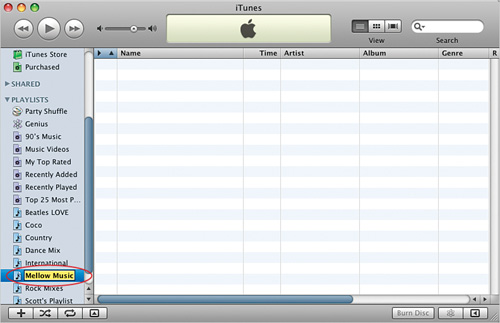
Playlists are like your own custom collections of songs (like you might have a playlist of mellow music, or driving music, or big-hair bands of the ’80s, etc.). Creating playlists takes just two steps. The first is to click the Create a Playlist button at the bottom left-hand corner of the iTunes window. Your new playlist will appear in the Source list along the left side of the iTunes window, and the name field for your playlist will already be highlighted so you can name it. Type in a name and press Return (PC: Enter) to lock it in. Now, in the Source list, click on Music under Library so you can see all your songs in the iTunes window, then simply drag-and-drop songs from your Music Library into your new playlist’s icon. To see the songs in your playlist (or to play your playlist), just click on the playlist in the Source list.
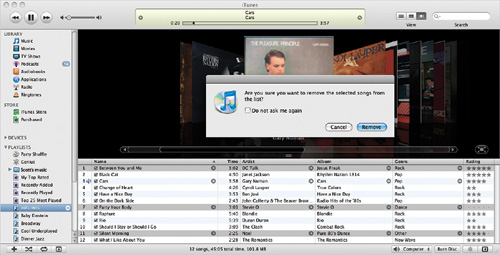
If a playlist includes a song that just plain shouldn’t be there (for example, if “Silent Morning” by Noel winds up on your 80s Rock Mix playlist), you can remove it fast by clicking on it and pressing the Delete (PC: Backspace) key on your keyboard. Now, what if a song like “Between You and Me” or “Party Your Body” somehow wound up on that playlist as well? You can remove multiple bad songs by Command-clicking (PC: Ctrl-clicking) on them and then pressing Delete (or you can Control-click [PC: Right-click] on any of those selected songs and choose Delete from the contextual menu that appears), instantly wiping their innate lameness from your playlist. (Note: This won’t remove the songs from your iTunes Music Library; it will only remove them from the playlist.)
iTip: Temporarily Skipping Songs
If you’ve got a song in one of your playlists that you don’t want to delete, but you don’t want to hear it right now, you can just temporarily skip over it by turning off the checkbox that appears directly before the song’s name (only checked songs will be played when playing a playlist). If you later decide you want to hear that song in the playlist, just turn on the checkbox beside it.
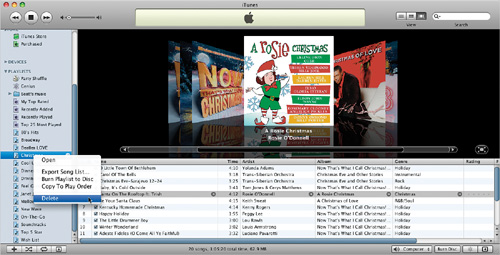
If you’ve created a playlist, and you just don’t want it anymore (let’s say you created a Christmas playlist and now it’s February), just Control-click (PC: Right-click) on the playlist in the Source list on the left-hand side of the iTunes window and choose Delete from the contextual menu. That’s it—it’s gone. Or even better: just click on the playlist to select it in the Source list and press the Delete (PC: Backspace) key. Note: Only the playlist is gone—it doesn’t remove the songs from your main iTunes Music Library.
Throughout this book, when we talk about creating a regular playlist, we generally talk about dragging-and-dropping songs from your Music Library into your playlist, but there’s another quick way to create a custom playlist. Just Command-click (PC: Ctrl-click) on all the songs in your Music Library that you want in your playlist, and then go under the File menu and choose New Playlist from Selection (or press Command-Shift-N [PC: Ctrl-Shift-N]). All the selected songs will be gathered into a new playlist, and it will appear in the Source list with its name field already highlighted, so all you have to do is type in your new playlist’s name and press Return (PC: Enter).
iTip: Opening in a Separate Window
When you click on a playlist, that playlist appears in the main iTunes window, replacing whatever was visible before (like perhaps your Music Library). However, if you’d like a playlist to open in its own separate floating window (leaving your original window still open and untouched), instead of clicking on your playlist, just double-click on its icon or to the right of its name in the Source list.

If you’d like a printed list of one (or more) of your playlists and their contents (hey, don’t laugh—this is handy if your hard drive has a major crash and you haven’t backed up in a while...or ever), iTunes can make one for you. First, in the Source list on the left side of the iTunes window, Control-click (PC: Right-click) on the playlist that you want to print and from the pop-up menu that appears, choose Export Song List. A Save dialog will appear, so choose where you want to save the file on your hard disk, then click Save. iTunes exports your playlist as a tab-delimited text file, which you can open with a spreadsheet or database program, such as Microsoft Excel, FileMaker Pro, etc., and then print out the file.
If you realize that you have two similar playlists (like one called Big Hair Bands and one called 80s Rock Mix), you can combine them into one playlist (which you could name 80s Big Hair Bands) by simply clicking-and-dragging one playlist into another playlist, right within the Source list. Now, it’s important to note that dragging the Big Hair Bands playlist into the 80s Rock Mix playlist creates a combined playlist (copying one playlist into another, which by the way will cause any duplicate songs that were in both lists to appear twice, so you may want to delete the duplicates). Luckily, iTunes doesn’t erase the Big Hair Bands playlist. It’s still there—with all its Bon Jovi “rockness.”
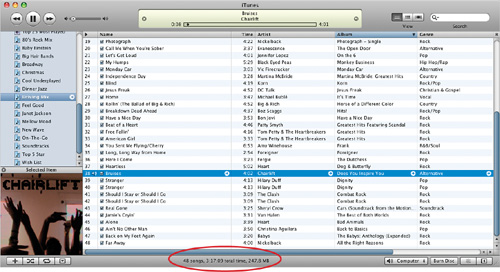
Want to know how long (in days, hours, minutes, etc.) one of your playlists is (or for that matter, how long it would take to play your entire Music Library)? Click on any playlist (or your Music Library), and then look at the bottom center of your iTunes window. You’ll see how many songs are in your selected playlist, and how long it would take you to play them all. If you actually click on the time, you can toggle between a generic hour timeframe or see it spelled out for you in hours, minutes, and seconds.
iTip: Estimate Size Before Burning
Be sure to make note of the playlist’s total size. This really comes in handy when burning playlists to CDs, because this little nugget of info will save you a ton of frustration by allowing you to estimate the total size of your files before you even begin the burning process. (Note: Keep in mind that the total size listed is for your compressed files, not the uncompressed AIF files that’ll automatically be burned onto the audio CD; hence the word estimate.)
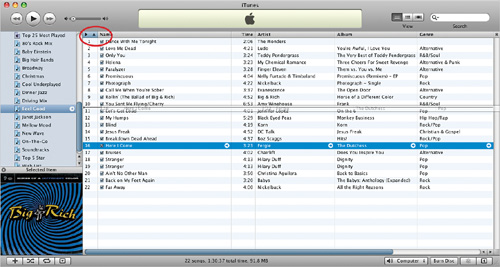
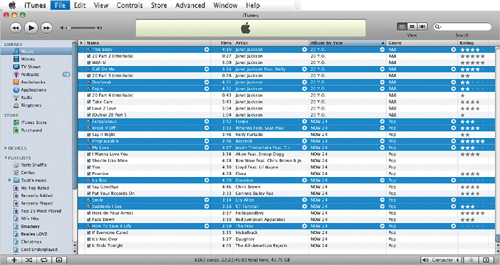
There are a number of different ways to have iTunes automatically sort the songs in one of your playlists (e.g., alphabetically by Name or Artist, by Genre, Rating, etc.), but what if you want to arrange the songs manually so they’re in your order? You can do this by simply dragging the songs into the order you want, but this “drag-and-drop” arranging can only be done within playlists, not in your main Music Library. Also, to sort the songs manually like this, you have to click in the very first column header from the left to make it the active column (it’s called the Track Number column, but its name doesn’t appear); otherwise, if one of the other columns (like Artist) is highlighted, the songs will already be auto-sorted by artist, right? Right! So click in the far-left column, and then you can begin sorting. Oh yeah, one last thing—if you have the Shuffle option turned on (the second button from the left at the bottom-left corner of the iTunes window), it won’t let you manually sort. So if you’re in a playlist, and you’ve got the first column highlighted, and you still can’t sort, it’s probably because Shuffle is turned on. Turn it off by clicking on the Shuffle button, and you’re in business.
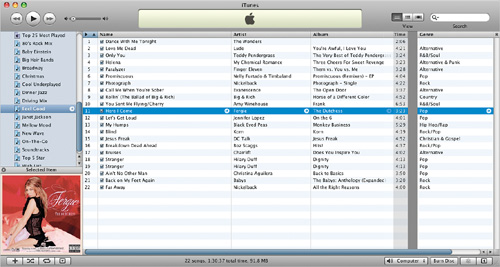
If you’re not happy with the default order of the columns (for example, if you’d prefer that the Artist column was the third column, right after the Name column), you can make it happen. Just click-and-hold the Artist column’s header and drag it to the left, until it appears right after the Name column (you’ll see a “ghost” image of your column as you move it, so it’s pretty simple to move it where you want it). Now that you know how it’s done, you can arrange the columns in any order you want (except for the Track Number and Name columns—those are stuck there permanently, but besides those two, you can arrange your columns any way you want).
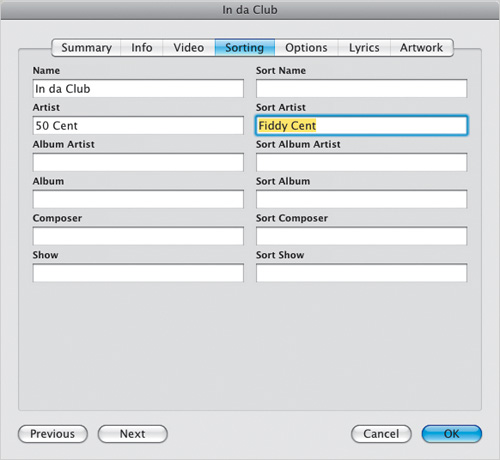
If you don’t like the way iTunes sorts your songs, you can give them a hidden custom name or artist name, just for sorting purposes (the name will appear the same to you, but it will now be sorted the way you want). For example, if you sort your playlists by Artist, and you have a song by 50 Cent (It’s “In da Club,” isn’t it? I knew it!), it will wind up at the bottom of your list. This is a problem if you go looking for it under “F” for “Fiddy Cent” (at least that’s where I’d look). So, to create a hidden sorting name, you click on the file and press Command-I (PC: Ctrl-I), and when the Info window appears, click on the Sorting tab. It’s split into two sides: the left side is what you see in iTunes (the real artist, real name, etc.) and the right side is what iTunes will actually use when sorting. So, in the right side Artist field, you’d type in “Fiddy Cent” and click OK. Now 50 Cent will appear sorted under “F.” Pretty slick little feature, eh?
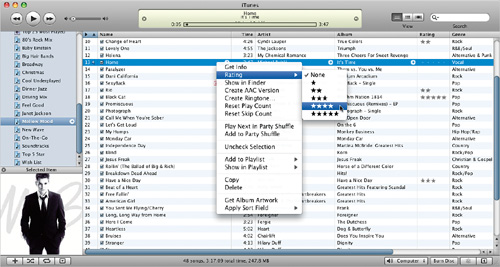
Even though you probably like all the songs you’ve imported into iTunes (or you wouldn’t have imported them, right?), there are some songs in your Music Library that you like better than others. In fact, there are probably some of your all-time favorites, some you like pretty well, and some you just like okay. Well, you can—and should—give each song a rating (using a one- to five-star rating system). One reason to rate songs is that once you’ve given songs a high rating (four to five stars), iTunes automatically adds your top-rated songs into a default Smart Playlist named My Top Rated (depending on your version of iTunes). So anytime you want to hear just your favorite songs, there’s already a playlist (that updates live) ready for you. Plus, you can sort your songs using the Rating column (by just clicking on it), and you can create your own custom Smart Playlists based on your ratings (see next page). To rate a song, just click directly on the song, then click in the left-hand side of the Rating column (found in the main iTunes window) and drag to the right. As you drag, stars will highlight, so click until you see the first star and drag to the right until the fifth star is “lit.” To “unlight” a star, drag back to the left. You can also rate by Control-clicking (PC: Right-clicking) on a song, and then choosing your rating from the contextual menu. Note: If you’re on a Mac, you can even rate the song that’s playing from the Mac’s Dock by clicking-and-holding on the iTunes Dock icon and choosing your rating from there; on a Windows PC, Right-click the iTunes icon in the Navigation Area on the Taskbar and choose Rating.
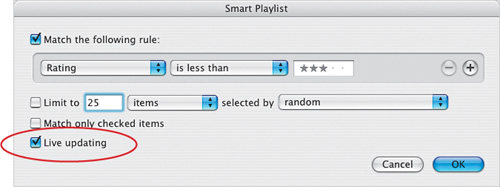
Now that you’ve rated your songs, here’s how to create a Smart Playlist using those ratings: Since iTunes automatically creates a Smart Playlist of your top-rated songs, why not create a playlist of your 25 lowest-rated songs (just for the sheer variety of it)? To do that, choose New Smart Playlist from the iTunes File menu, and in the dialog that appears, from the first pop-up menu choose Rating; from the second menu choose Is Less Than; and click in the third field to choose three stars, then click OK. That’s it—you have a new Smart Playlist of nothing but your lowest-rated songs. Oh, ensure the Live Updating checkbox is turned on (it should be on by default), and as you rate new songs with a one- or two-star rating, they’ll be added to this Smart Playlist automatically.
iTip: Smart Playlist Updating
Since iTunes tracks so much information about your songs and about your song-playing habits (it knows which songs you’ve played the most, the rankings of those songs, etc.), iTunes can make Smart Playlists based on these stats or based on your own personal preferences. What’s cool is that Smart Playlists feature live updating, so if you make a change (like playing a song, changing the rating of a song, or playing a song a bunch), these Smart Playlists update automatically. But the real power comes when you create your own Smart Playlists, which also can update automatically if you’d like. Once you make your own—even once—the power of Smart Playlists will become clear, my young apprentice.
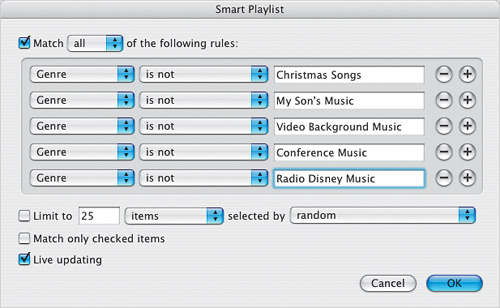
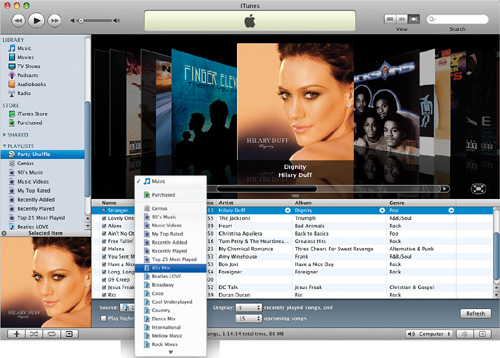
Once you’ve assigned custom genres to your iTunes songs, you can make some wicked Smart Playlists. For example, I wanted to create a “car mix” that would be the equivalent of a radio station that played nothing but my songs, in random order, with no commercials. But I didn’t want it to include my son’s songs (I let him have a playlist on my iPod), or any Christmas songs, or any songs I use in video editing, or...well, you get the idea. So I made a Smart Playlist by holding the Option key (PC: Alt key), then clicking on the Create a Playlist button in the bottom left-hand corner of the iTunes window. This brings up the Smart Playlist dialog. At the top, under Match the Following Rule, I chose Genre from the first pop-up menu. From the second menu, I chose Is Not, then in the text field I entered the genre I didn’t want (“Christmas Songs”). I then clicked on the + (plus sign) button to the right of the field to add another rule. I chose the same pop-up menus, and in the field I entered “My Son’s Music.” I did it again for “Video Background Music,” “Conference Music,” and “Radio Disney Music.” Then I finally ensured Live Updating was turned on, and when I clicked OK, my “Car Mix” Smart Playlist was created, without any of the songs I didn’t want. Now when I add a new song (that’s labeled with any other genre than the ones I blocked), it’s automatically added to my Car Mix Smart Playlist.

If you have thousands of songs on your iPod (or even hundreds for that matter), there are probably tunes on there that you haven’t listened to much. Want a great idea for a Smart Playlist? Have iTunes create one made up of songs you haven’t played recently (or at all). Start by holding the Option key (PC: Alt key) and clicking on the Create a Playlist button in the bottom-left corner of the iTunes window. When the Smart Playlist dialog appears, under Match the Following Rule, from the first pop-up menu choose Play Count. From the second menu, choose Is Less Than, and then in the blank field type “3” (or however many times you’d like, but keep it a low number). Make sure Live Updating is turned on, then click OK. A new Smart Playlist will be created of your least-played songs, and as you hear these songs more than three times (or however many times you specified), they’ll automatically drop off the Smart Playlist thanks to the Live Updating option. You could also do a variation on this by choosing Last Played in the first field, choosing Is Before in the second field, then in the text field entering a date from a few months back. When you click OK, iTunes will create a Smart Playlist made up of songs you haven’t heard in months.
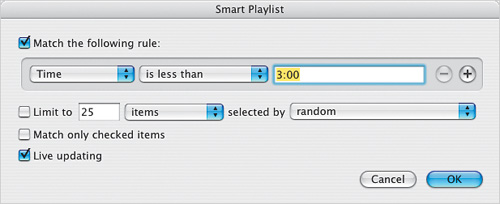
If you only live 10 minutes from your job (lucky you), you probably don’t want to listen to one long song all the way to work, right? So why not create a Smart Playlist of just short songs? Here’s how: Option-click (PC: Alt-click) on the Create a Playlist button to create a Smart Playlist. When the dialog appears, from the first pop-up menu choose Time; from the second pop-up menu choose Is Less Than; and in the text field enter “3:00.” Now, when you play this Smart Playlist on your iPod on the way to work, you’ll hear around three full songs, and you’ll be at least one-third of the way through the fourth.
iTip: Songs You Heard a Week Ago
Want another Smart Playlist idea? How about this one—want to hear the same songs you heard exactly one week ago? Well, when you create your Smart Playlist, in the first pop-up menu, choose Last Played; in the second menu choose Is; and in the text field enter the date exactly one week ago today. A new Smart Playlist will be created with just the songs you heard exactly seven days ago. By the way, you might as well name this Smart Playlist “Déjà Vu.” Hey, it’s just an idea.
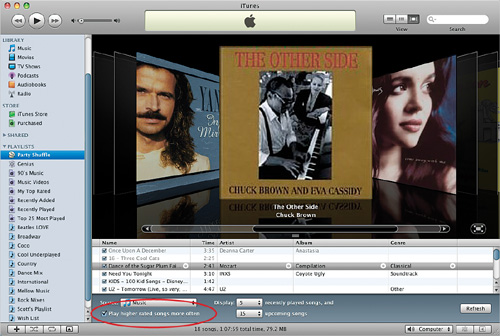
Another cool iTunes feature Apple added back in 2004 is the Party Shuffle. Rather than just choosing random songs (as the regular Shuffle command does), Party Shuffle is more likely to play songs that you’ve ranked highly or that you play often, so basically it plays more of your favorite songs than a standard random shuffle would. In fact, you can pretty much force Party Shuffle to favor your highly rated songs by clicking on Party Shuffle in the Source list on the left side of the iTunes window. When the Party Shuffle options appear at the bottom of the iTunes window, choose Play Higher Rated Songs More Often. But your “party control” doesn’t end there. Other differences between Party Shuffle and a regular shuffle include: you can see what’s already been played; you can see what’s coming up next; and you have lots of control over it. You can choose to skip a song, delete it, move it higher in the playlist, etc., using the controls at the bottom of the iTunes window. So, Party Shuffle compiles the songs into a list, but as “party DJ,” you really have the final say as to what gets played and when.
This is a great way to save time when you’re making a Party Shuffle: base the new shuffle on a pre-existing playlist. For example, instead of the default of having Party Shuffle just pull random songs from your Music Library, have it pull from just a particular playlist. So let’s say that you’re having a theme party (like disco night); you can have Party Shuffle be the DJ by pulling random songs from your Disco playlist. Here’s how it’s done: When you click on Party Shuffle, the shuffled songs appear in the main window, but if you look at the bottom of the window (where the Party Shuffle controls now appear), you’ll see a Source pop-up menu (which by default is set to Music). Choose the playlist you want to base your Party Shuffle on from this list, and you’re set.
iTip: Rating an Album
Besides just rating individual songs, you can also assign ratings to albums by going under the View menu, choosing View Options, then turning on the checkbox for Album Rating, which adds a new Album Rating column to your iTunes window. If you use this column to rate an album, any songs you have that were on that album will now all share that same rating. If you rate your songs individually, it will automatically calculate an average rating based on the individual songs you did rate.
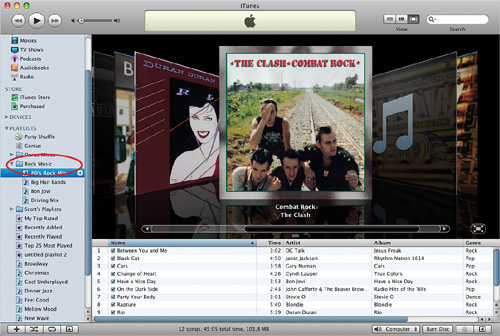
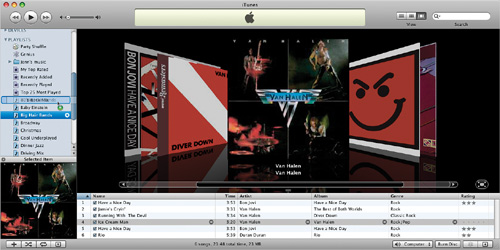
It’s fairly easy to get sucked into “playlist mania” and before you know it you have 1,600 playlists—one for every mood, every occasion, every genre, every band, for every possible road trip, for...(well, you get the idea). You know you’ve got a problem when it takes you 11 minutes to scroll through your Source list. Anyway, if you need to bring some sanity to your playlist collection, in iTunes (version 5 and higher) you can add Play-list Folders in the Source list to organize all your playlists with a common theme in one place. For example, you could have a Folder named “Parties” and inside that you could store all the playlists you use at parties (your Rave mix, Burning Man mix, impromptu Vegas hotel room party mix, Diddy party mix, limo party mix, etc.). That way, they’re all tucked away in just one folder. If you want to see them all individually again, just expand the folder (as shown above). To create a Playlist Folder, just go under the File menu and choose New Folder. The new folder will appear in the Source list, so you can easily drag-and-drop related playlists right into this folder.
iTip: Playing a Folder
Once you’ve put multiple playlists into one folder, you can then “play the folder” and it will just play the playlists in that folder. So, you could put all your rock playlists in one folder, and play them all at once by just choosing that folder. And in case you were wondering—yes, you can have subfolders (a folder within a folder).
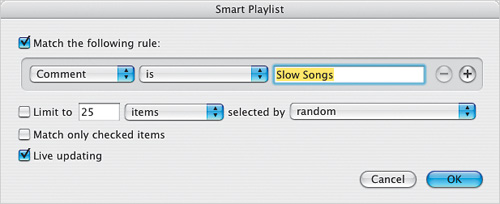
Let’s say you’re going to be the DJ at a party next week using your iPod. Obviously, you’re going to need a lot of dance songs, but you’re also going to need a playlist of slow songs. Using a Smart Playlist, you can gather all the slow songs you need pretty quickly. Just go through your Music Library and Command-click (PC: Ctrl-click) on every slow song you think you might want to use. Once you’ve gotten all the slow songs selected, press Command-I (PC: Ctrl-I) to bring up the Multiple Item Information dialog. In the Comments field, type in the words “Slow Songs” and click OK to add that comment to each selected song. Now, go under the File menu and choose New Smart Playlist. When the Smart Playlist dialog appears, from the first pop-up menu choose Comment; in the second menu choose Is; and in the text field enter “Slow Songs.” Click OK and all the slow songs will be in their own playlist. Now do the same for all your dance songs—add the comment “Dance Songs” to each one, then make a Dance Songs Smart Playlist the same way.
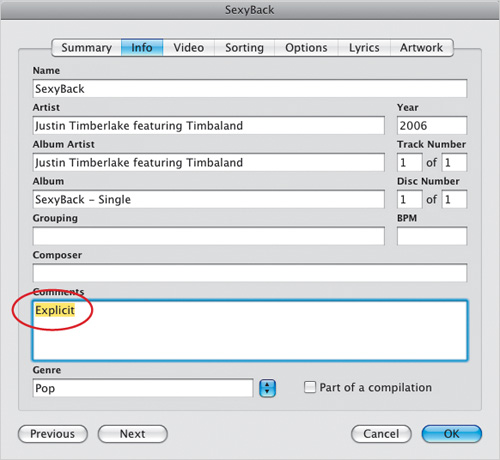
If you have a playlist that holds a lot of current music, you can almost bet that some songs are going to have explicit lyrics (Apple warns which iTunes Store songs have explicit lyrics by putting the word “Explicit” in red beside the song’s name). For example, there are explicit lyrics on songs from recent albums by well-known artists like Korn, Motley Crue, Eminem, Nelly, and Justin Timberlake, and if some of these artists are your favorites, then it’s likely you’ve downloaded some songs with explicit lyrics. Now, although you might enjoy these lyrics (sicko), you might not want these explicit songs blaring from your car stereo when your 7-year-old is in the backseat. The solution? A Smart Playlist of your favorite songs that automatically excludes any songs with explicit lyrics. The first step is “tagging” your songs with a keyword when you download them. When you download an explicit song, immediately click on the song, press Command-I (PC: Ctrl-I) and in the Get Info dialog, click on the Info tab. In the Comments field, type the word “Explicit,” and then click OK. Now go under the File menu and choose New Smart Playlist. When the dialog appears, from the first pop-up menu choose Playlist; in the second menu choose Is; and in the third menu choose the playlist with all your favorite songs (including the ones with explicit lyrics). Then click the + (plus sign) button to add another line of criteria. In the first pop-up menu choose Comments; in the second menu choose Does Not Contain; and in the text field type “Explicit.” Now click OK to create a new playlist with all your favorite songs, except the ones with explicit lyrics.

Okay, you want a list of nothing but your favorite songs from the 1980s. Here’s what you do: Go under the File menu and choose New Smart Playlist. When the dialog appears, in the first pop-up menu choose Year; in the second pop-up menu choose Is in the Range; and in the two fields to the right enter “1980” and “1989.” Then click the + (plus sign) button to add another line of criteria. From the first pop-up menu choose Rating; in the second pop-up menu choose Is Greater Than; in the star field choose three stars; and then click OK. Now you’ve got a playlist of just the songs in your iTunes Music Library published during the ’80s, but since they have a four-star or higher rating, it’s just your highest-rated (favorite) songs. Not bad, eh?
iTip: A Playlist of Your New Music
Want to hear a playlist of just your latest music? It’s Smart Playlist time—go under the File menu and choose New Smart Playlist. When the dialog appears, from the first pop-up menu choose Date Added; from the second choose Is In The Last; in the text field enter “30”; choose Days in the fourth pop-up menu; and click OK. A new Smart Playlist will appear with only your new songs. If you want to tweak it even more (so this new list is made up of only your highest-rated new songs), click the + (plus sign) button to add another line of criteria, and then from the first pop-up menu choose Rating; in the second menu choose Is Greater Than; in the star field choose four stars; and then click OK.
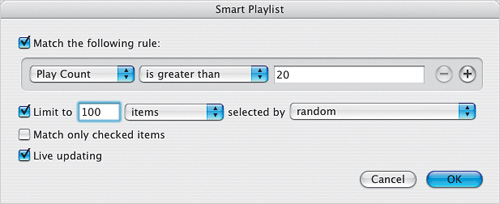
Here’s a great way to put together a real list of your favorite songs (which may even include songs you didn’t know were your real favorites). Go under the File menu and choose New Smart Playlist. When the dialog appears, from the first pop-up menu choose Play Count; from the second menu choose Is Greater Than; and in the text field enter “20.” Then turn on the Limit To checkbox, enter “100,” and choose Items. Now click OK and a new Smart Playlist will appear with only your most frequently played songs—your real top 100.
iTip: Making a Smart Playlist Regular
Have you fallen in love with the current content of one of your Smart Playlists? Then have iTunes make a regular playlist from your Smart Playlist (that way, it doesn’t auto-update anymore). Here’s how: Just click-and-drag your Smart Playlist up to the word “Playlists.” The entire Playlists area will highlight and when you release your mouse button, a new regular playlist will be created with the contents of your Smart Playlist.
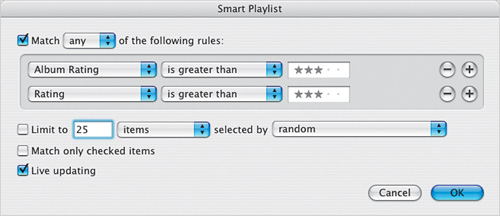
I mentioned earlier in this chapter (in an iTip on the bottom of a page) that you can turn on a feature that displays the average rating for an album (or lets you rate entire albums at once if you like). Well, you can use this feature to create a pretty slick Smart Playlist of just your top-rated songs from albums with an average rating of four stars or higher. This is slicker than it sounds, and here’s why: entire albums that have lots of high-rated songs will be added to your Smart Playlist (because there are enough high-rated songs on that album to give it a four-star or higher average rating), but if, like most albums, there are only a few good songs on the albums, then for those albums, only those high-rated songs will be added, and not the ones you always skip over anyway. Go under the File menu and choose New Smart Playlist. When the dialog appears, from the first pop-up menu choose Album Rating; from the second pop-up menu choose Is Greater Than; and in the Rating field choose three stars. Then click the + (plus sign) button to add another line of criteria. From the first pop-up menu choose Rating; from the second pop-up menu choose Is Greater Than; and in the Rating field choose three stars. Here’s the key thing: from the Match pop-up menu at the top of the dialog, choose Any, then click OK to create a playlist of the best songs on all your albums (and nuthin’ else).
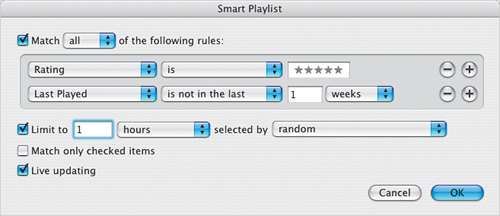
Here’s how to create a one-hour-long playlist of the best songs you haven’t heard in the past week, and best of all it’s constantly, and automatically, updated. Go under the File menu and choose New Smart Playlist. When the dialog appears, from the first pop-up menu choose Rating; from the second pop-up menu choose Is; and in the Rating field choose five Stars. Add another line of criteria, then from the first pop-up menu choose Last Played; from the second pop-up menu choose Is Not in the Last; in the text field enter “1” and choose Weeks from the pop-up menu. Then turn on the Limit To checkbox, enter “1” in the text field, and from the pop-up menu choose Hours. Then make sure the Selected By pop-up menu is set to Random. Click OK and now you’ll only hear your very best songs that you haven’t heard in the last week.
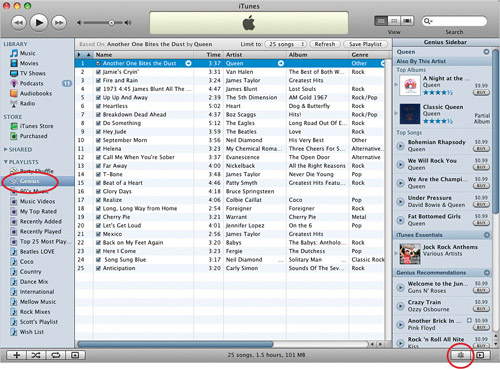
Starting with iTunes 8, Apple added a “Genius” playlist feature. This feature is optional and off by default. If it’s the first time you’re using the Genius feature, just click on Genius under Playlists and then click on the Start Genius button in the dialog that appears. Now follow the instructions for setting up your Genius playlist. When you’re finished, you’ll see a Start Genius icon at the bottom right-hand corner of the iTunes main menu. Click on it to turn the Genius feature on and iTunes will anonymously send the information about your songs or playlists to the iTunes Store (the “Cloud”) to compare with others who have similar tastes in music. The results will then be sent back to your iTunes application.
Now when you select a song in your library, you can click the Start Genius icon and see a list of songs in your Genius Sidebar. The top of the list will contain Also By This Artist songs that you may be interested in purchasing and below that, you’ll see Genius Recommendations on similar songs that you may like too. For other ways to use the Genius Playlist, see the next page.
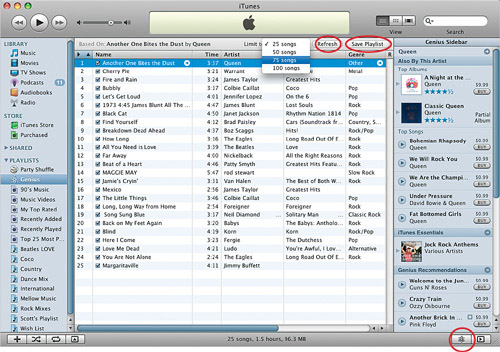
So, now you have your Genius Sidebar listings for “Another One Bites the Dust” by Queen, what can you do with this information? Well, first off, you could buy another song or album by Queen (if so inclined) just by clicking the Buy button.
Or you can change the number of songs in the list by changing the Limit To button at the top of the menu to 50, 75, or even 100 songs! You can even create a playlist of those songs by clicking (you guessed it) the Save Playlist button. Or use the Refresh button to clear the Genius Sidebar and choose another song instead to get new recommendations.
Lastly, to Show or Hide the Genius Sidebar, just click the right-facing arrow beside the Genius icon at the bottom-right of the window (or you can go to the View menu and choose Show or Hide Genius Bar).