
I’m not really thrilled about having the word “stuff” in the subtitle of this chapter, but since there really isn’t an all-encompassing word that describes all the buttons, sliders, wheels, and inputs on the outside of your iPod, the word “stuff” works as well as any. Okay, what about the title “The Outsiders”? Well, that’s a tribute to the 1960s band of the same name, who had a huge hit with the song “Time Won’t Let Me,” which has been licensed for use in numerous commercials. Considering that this chapter is about how to use all the “stuff” on the outside of your iPod, it’s not all that bad a name. Now, how did I come up with that name? It’s brilliant, really, but to understand how it came about (and to be there for the actual moment when it all came together), you’ll have to read the introduction for Chapter 3. That’s right, you have to read another chapter intro, even though by now you’ve probably realized that these chapter intros have less to do with what’s in the actual chapter, and more to do with how late at night it is when I write these intros, and how many glasses of wine I had before writing them. Okay, the last line is made up to make me sound like a sophisticated writer who sips wine, smokes fine cigars, and types by the light of a roaring fire. It’s a very romantic version of the truth, which is more like this: It’s 9:14 on a Saturday night, I’m sitting at the kitchen table with a half-eaten delivery pizza from Westshore Pizza and an empty can of Caffeine-Free Diet Coke. See, I should’ve stuck with the wine story.
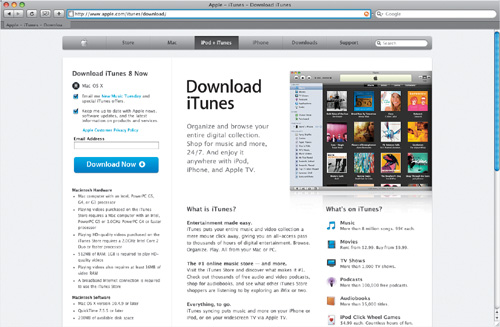
The software that copies your songs, movies, TV shows, podcasts, and photos from your computer to your iPod is Apple’s iTunes (for Windows PCs and Macintosh computers). iTunes comes preinstalled on every Mac built since 2001 (if you can’t find it, look in your Mac’s Applications folder), and the Windows PC version is a free download from Apple .com/iTunes. But don’t just think of iTunes as an “uploader” because it does so much more than that—it’s your central entertainment hub, letting you organize and play all your music and videos right from your computer. In fact, a lot of the fun of this whole process is doing just that—organizing your music into playlists of your favorite bands, or favorite styles, or watching full-screen video on your home computer, or shopping for music and videos online at the iTunes Store (it’s the world’s most popular online music store). So, a decent chunk of this book is dedicated to teaching you the ins and outs of iTunes, because it’s where you’ll spend a lot of your time. iTunes has an awful lot of really dedicated (okay, fanatical) fans because it’s some of the coolest, most fun software Apple’s ever made, and although it’s very easy to learn and use, it’s surprisingly powerful. This is basically how the process works: you import music and video files into iTunes (or download them from the iTunes Store), and then when you connect your iPod to your computer, iTunes launches and whatever music and videos you have in iTunes gets copied automatically over to your iPod. It sounds pretty simple, and it is, so let’s get started.
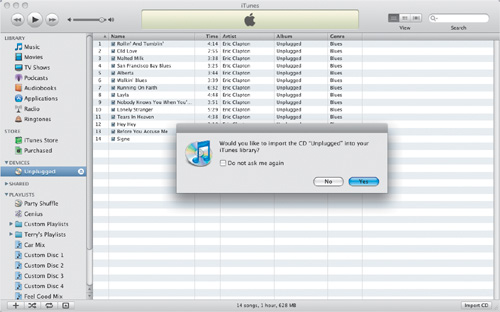
Importing songs into iTunes directly from music CDs is easy: Just launch Apple’s iTunes software, then put a music CD into your computer’s CD-ROM drive. The songs on your music CD will appear listed within the iTunes main window (if this is a commercially produced CD, and you’re connected to the Internet, iTunes will automatically add the song titles for you. If it’s not a commercial CD—maybe this is a mix CD you created, or a CD of a friend’s band—your songs will appear with the generic names “Track 1,” “Track 2,” and so on). Either way, a dialog will appear asking, “Would you like to import the CD [name of CD] into your iTunes library?” If you click the Yes button, it copies all the songs on your CD onto your computer, and into iTunes. That’s all there is to it. If you don’t want all the songs imported, you can choose which ones to import by turning off the checkbox that appears to the left of each song (only songs with a checkmark get imported). By the way, if you only want one song imported, press-and-hold the Command (PC: Ctrl) key and click once on the checkbox beside the song you want. This unchecks all the songs. Now, click again on the checkbox beside the song you want to import.

If you already have songs on your computer, getting them imported into iTunes is a breeze. The fastest way is to just launch iTunes, and then literally drag-and-drop the songs from your computer right into the main iTunes window, and they’ll be imported automatically. Another way is to go under the iTunes File menu (in the menu bar up top), and choose Add to Library (PC: Add File or Folder to Library), or use the keyboard shortcut Command-O (PC: Ctrl-O). This brings up a standard Open dialog, where you can navigate to the location of the song or video you want to import into iTunes. When you find the music or video file on your computer, click on it, then click the Open button and iTunes brings it on in. If you’re connected to the Internet while you’re doing this, iTunes will go and find the album art for the songs you’ve imported. It’s that easy.
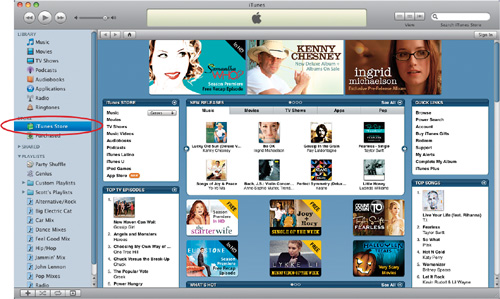
The iTunes Store is the groundbreaking, history-making online store that started it all, and it’s so well designed that it really makes shopping for music, movies, TV shows, podcasts, games, and videos an awful lot of fun. To get to the iTunes Store, launch the iTunes software, then click on the iTunes Store link on the left side of the iTunes window (shown circled in red above). Note: This is an online store, so you have to have an Internet connection to access the store. There are so many cool features in the iTunes Store that I’ve got an entire chapter just on the iTunes Store (it’s Chapter 10), but in short, here’s how it works: You browse around the store looking for your favorite songs, movies, etc., and when you find one you want, you click the Buy button. You’ll have to set up an account with the Store (it takes just a moment—and a credit card, of course), but then your download will begin and your song, movie, music video—whatever—will appear in your iTunes Library. The next time you connect your iPod, whatever you bought at the iTunes Store gets copied over onto your iPod (if you have this preference set), but you have the option of listening to (or watching) your downloads on your iPod or on your computer right within iTunes itself (of course, if you have an iPod shuffle, which has no screen, you can only watch videos you download within iTunes. I guess you knew that, right?).
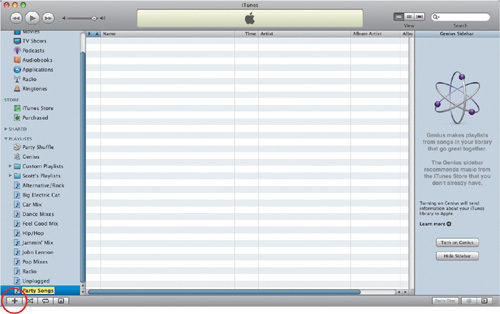
Once your music is imported into your iTunes Music Library, it’s just kind of in one big bucket—it’s not sorted or categorized. That’s why there are playlists. You make playlists to bring some sort of organization to your music collection. For example, you might want to create a playlist of just your favorite rock songs, or just ‘70s disco, or just alternative, or classical, or a playlist of just a particular artist, or you might create a playlist of sad songs, or slow songs, or a mix for a party you’re throwing, or just romantic songs, or just your kid’s favorite songs (you get the idea). Creating playlists is simple: You start by clicking the Create a Playlist button at the bottom-left corner of the iTunes window (it looks like a plus sign). This adds an empty playlist to your list of playlists on the left side of the iTunes window, and the name is already highlighted so you can type in a name for your new playlist, then press the Return (PC: Enter) key on your keyboard. To add songs to this new playlist, under Library (top left), click on Music, and then scroll through your collection. When you see a song you’d like in your playlist, drag-and-drop that song title right onto your new playlist in the Source list, and it’s added to that playlist. Keep adding songs until you’re done. Then, to play just the songs in that playlist, click on it, then double-click the first song, and the songs will play in order.
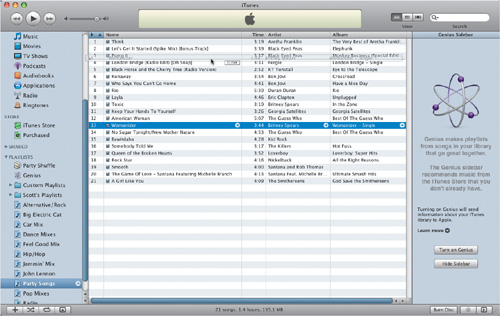
When you look at a playlist you’ve created, you’ll notice that, by default, the songs in your playlist appear in the order that you dragged-and-dropped them into your playlist. Luckily, you can put your songs in any order you like by simply dragging them into the position you want. For example, if you want the fourth song to be the first song, just click-and-drag that song to the top of the playlist. As you drag a song up or down the list, you’ll see a thin black line appear between tracks, showing you where your song will appear if you were to release the mouse button at that moment. When you do release the mouse button, the song moves to the position where the thin black line appears (this may sound a bit confusing, but if you try it once, you’ll see what I mean). Note: If you double-click on a song in a playlist, it starts playing that playlist starting with that song. So, if you double-click on the first song, it plays all the songs in that playlist in order. If you double-click on the eighth song, it starts there instead and plays the rest of the songs in order until it reaches the end of the playlist (unless you have Repeat Playlist turned on. For more on playlists, see Chapter 11).

When you’ve got your songs arranged in iTunes just the way you want them (you’ve created playlists, put your songs in order, etc., like it shows in Chapter 11), it’s time to get those songs onto your iPod. It sounds complicated, but it couldn’t be easier. Using the USB 2 cable that came with your iPod, just connect the cable to your iPod, the other end to your computer, and it’ll do the rest. The transfer is automatic—your computer will automatically launch iTunes and download your songs, playlists and all. (Watch the top of your iTunes window and when the transfer of songs is complete, you’ll see the message, “iPod sync is complete.”) If you have an iPod Dock, just sit the iPod in its Dock, connect the USB 2 cable to your computer, then sit back and relax. Now you can click the little Eject button (to the right of your iPod in the iTunes Source list) to eject your iPod, and you’re ready to take your show on the road (so to speak).
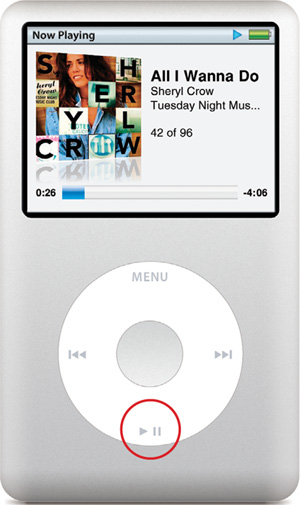
As silly as this may seem (how to turn it on and off), I can’t tell you how many people get tripped up by this because there isn’t an “On/Off” button. So, how do you turn it on? Press any button on the front of your iPod, and it will spring to life (so in essence, every button is the “On” button). But it’s not that way for turning the iPod off. To turn it off, press-and-hold the Play/Pause button for a couple of seconds and it will turn off. Some people get in the habit of turning the iPod on and off using the same button—they always press Play/Pause to turn it on, and they hold Play/Pause to turn it off. We call these people “sprenger” (which is the German word for “sprinkler”). I don’t know why.
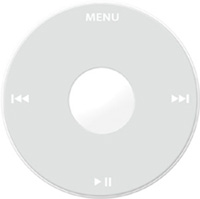
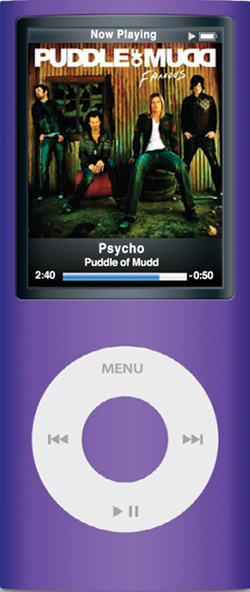
All the iPods (except the iPod touch) are controlled using the round Click Wheel on the front of the iPod. There are five buttons on the wheel for iPods that have a screen—a Play/Pause button at the bottom, a Menu button at the top, a Previous/Rewind button on the left side, a Next/Fast-Forward button on the right side, and a Select button in the center. (Note: The iPod shuffle’s wheel is different—see below.) You scroll up and down your iPod’s menus by gliding your finger lightly around this wheel (like you’re tracing a circle) in either a clockwise or counterclockwise motion. When you find something you want, you press the Select button in the center. Pretty easy stuff.
The iPod shuffle also has five buttons, but since there’s no screen, they’re slightly different: the center button is the Play/Pause button, and the left and right buttons rewind and fast forward like the standard iPods, but the top button (a plus sign) increases the volume and the bottom button (a minus sign) lowers the volume. There is no Menu button because there’s no screen on an iPod shuffle. It adds to the mystery of it all. (You can think of that last sentence as marketing copy.)
The Click Wheel is really more like a touch pad with a built-in rocker switch (okay, that makes it sound more complicated than it is). Here’s how it works: you touch it lightly with your thumb or finger and gently slide your finger around the wheel in either a clockwise or counterclockwise direction. So, if you’re at the top of a menu and you want to move down the menu, press your finger lightly anywhere on the Click Wheel and start sliding your finger around it clockwise. To move in the other direction (up the menu), just slide your finger around the Click Wheel in the opposite direction (counterclockwise). Once you get to a song you want to hear, you can either press the Play/Pause button at the bottom of the Click Wheel or just press the Select button in the center—either way, your song will play (hey, that rhymes).
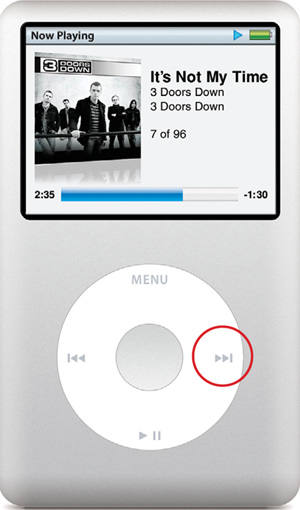
If you want to skip ahead in the current song, press-and-hold the Next/Fast-Forward button. The key word there is “hold” because if you just press the button once, the iPod will jump to the next song—you have to press-and-hold the button. Rewinding works the same way (but of course, press-and-hold the Previous/Rewind button instead).
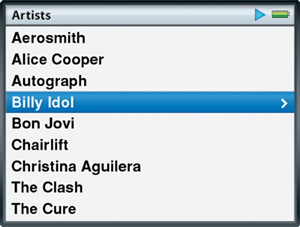
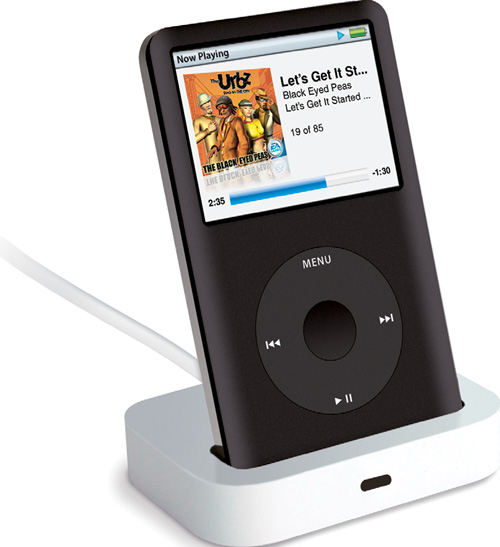
If you’re not sure exactly which song you want to hear, then you’ll love the iPod’s Music feature. Start at the main menu and click on Music using the center Select button. Now you get to choose how you want to browse: by Playlists, by Artists, by Albums, by Songs, by Genres, etc. For example, if you choose Artists, you’ll see a list of all the artists on your iPod (as shown above). See an artist or group you like? Just click on their name, then click All Songs (if you have songs from multiple albums), and you’ll see a list of all of their songs that reside on your iPod. It’s kind of like a playlist of only their songs—just press the Play/Pause button to hear them all. You can also browse by Genres (like all Jazz songs or all Alternative songs), which makes it easy to start playing the kind of music you’re in the mood for, rather than having to pick songs one by one. Try browsing this way sometime. It rocks (an unintentional pun that should’ve been intentional).
If, at any time, you need to jump back to the previous screen, just press the Menu button at the top of the Click Wheel. Press-and-hold the Menu button and it takes you straight to the main menu.
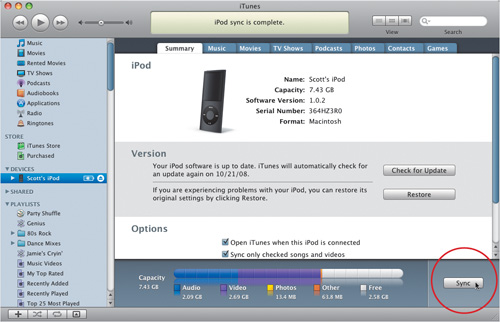
If you’ve added new songs to iTunes (maybe you bought some songs from the iTunes Store or imported songs from a new CD), you’re going to want to get these new songs onto your iPod. To do that, connect your iPod to your computer (using the Dock or the supplied USB 2 cable), and iTunes will launch and automatically update your iPod with the new songs (if you have that preference set). However, if your iPod was already connected to your computer when you bought a new song (or imported songs from a CD), you have to request an update by either: (a) going under iTunes’ File menu and choosing Sync “Your iPod’s Name,” or (b) clicking on your iPod in the Source list on the left side of the iTunes window, then clicking the Sync button (as shown above).
When you’re done listening to your iPod for a while, you can put it to sleep two ways: (1) pause your music by pressing the Play/Pause button, and after a minute or two of being paused, your iPod will go to sleep to save battery life, or (2) press-and-hold the Play/Pause button for a few seconds and it will go to sleep (your screen will turn black). Your iPod remembers where you were in a song when it went to sleep, so when you wake it later, it picks right back up where you left off. Unless you leave your iPod asleep for 36 hours or more, in which case it falls into a deep sleep. You still wake it the same way (by pushing any button), but when you do, it’s kind of cranky and wants coffee (sorry, I couldn’t resist). Actually, after being in deep sleep, it starts up again from scratch (with the Apple splash screen and all), which takes longer than its normal nearly instantaneous waking because it has to go through a little startup routine.
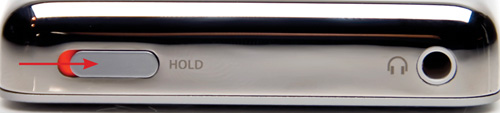
After you put your iPod to sleep, before you just go tossing it into your pocket, purse, backpack, computer bag, etc., I recommend sliding the Hold button (found on the top of the iPod) to the “on” position (so the orange part is visible). This locks the buttons on the Click Wheel, so something doesn’t accidentally bump into it and turn your iPod on, needlessly draining the battery. If you’re really low on battery life, try using the buttons as little as possible (they drain the battery, too), but the biggest battery-drainer of them all is the screen’s backlit color screen, so if you’re low on battery life, limit your time scrolling around through different menus, and you’ll save battery life.
Backlight on
What do you do if you’re in a dark, smoky London club on Playlist Night, but it’s too dark in there to see your playlists (after all, it’s not just dark—it’s dark and smoky)? Here’s what to do: just press anywhere on the Click Wheel and your iPod’s Backlight will come on, illuminating your screen like a beacon in the night.
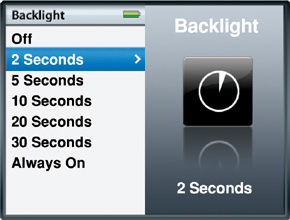
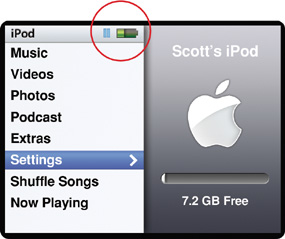
If you really want to stretch your iPod’s battery life between charges, this is the first place to stop. If you can get away with turning the Backlight timer feature off altogether, other “Podders” will envy your longevity. If you can’t go “Backlight free,” try setting it so it just comes on for two seconds (as shown here), and you’ll conserve quite a lot of battery power. You find this control by going to the main menu, scrolling down to Settings, and pressing the center Select button. When the list of settings comes up, click on Backlight. (On the new iPod nano, under Settings, you’ll scroll down and click on General, then click on Backlight.) This brings up a screen with choices for how long your backlight will stay on—from two seconds (probably too short to be practical) to Always On (ideal for people who don’t roam more than a few feet from their battery charger). Just find the setting that seems right for you and click on it to set your new Backlight timer.
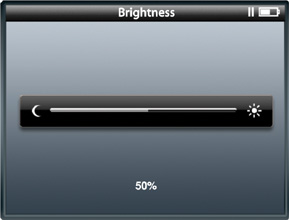
The ability to change the brightness of your screen serves a major purpose—extending your battery life. That glorious full-color screen draws a lot of battery power, and if you don’t need the screen at its full brightness (for example, you’re on a flight at night and the cabin lights are dimmed), you can lower the brightness by quite a bit, and extend your battery life. To control the brightness, go to the main menu and choose Settings. Then scroll down to Brightness and press the Select button. (On the fourth-generation iPod nano, under Settings, you’ll scroll down and choose General, then click on Brightness.) There you’ll find the Brightness slider. The default brightness is 50%, so it ships from the factory at about half of its maximum brightness. You adjust the brightness level the same way you do volume—you scroll the Click Wheel to the right to make it brighter or to the left to make it less bright (and save even more battery life).
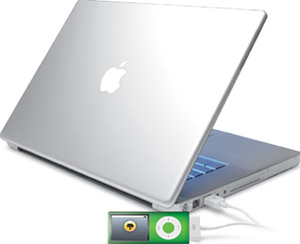
When you get an iPod, the first thing you need to do is charge the battery. Luckily, each iPod includes a USB 2 cable that lets you charge it by plugging it into your computer. Here’s how: Take the cable and insert the thin flat side into the slot at the bottom of your iPod. Then connect the other end of the cable to the USB port on your computer. That’s it—your iPod is charging and you’ll either see a big battery charging indicator icon or the Connected...Eject Before Disconnecting screen in the iPod’s LCD display. If you need to disconnect, first eject your iPod by clicking on the little Eject icon that appears to the right of your iPod’s name in the Devices list in iTunes. Then you can safely unplug your iPod without damaging any music or video files on your iPod.
Perhaps the most convenient way to charge your iPod is to use an Apple Dock—you just sit your iPod in the Dock (as shown above), and it syncs your iPod and charges it. There are three advantages to the Dock: (1) it’s easier—because you don’t have to connect the USB cable to the bottom of your iPod each time; (2) it puts your iPod upright (so you can see the screen, rather than just having it lying flat); and (3) you can use an Apple wireless remote to control your iPod while it’s in the Dock. Once you have your Dock, you just plug the flat end of the included USB 2 cable into the Dock (that’s the end you would normally plug into the iPod itself), then plug the other end into the USB 2 port on your computer, and you’re set! (Note: If you have an iPod nano, it comes with a special white plastic adapter that drops into the standard dock slot so it will hold your nano upright, too.)
Is it time to charge your battery? Just take a quick peek in the upper right-hand corner of the iPod’s screen and you’ll see a little battery indicator. If it’s solid, you’re in good shape. If it’s half-full, then you’re an optimist. (Get it? Half-full? Ah, forget it.) Actually it means it’s got half of a full charge. If the battery indicator is clear, it means it’s time to recharge your iPod battery by plugging it into your computer, or putting your iPod in the Apple Dock (provided you have one, of course).
iTip: Battery Charge Is “Use It or Lose It”
There’s a weird thing about iPods. If you don’t use them for a time, the battery charge slowly drains. For example, if you’ve fully charged your iPod for a trip that’s coming up in four or five days, chances are when you get on the plane, put on your headphones, and sit back to enjoy your air jams, the battery will be dead. This is a classic case of “use it or lose it.” The drain is likely caused by the iPod’s internal clock that ticks even while the iPod is off. Also, there’s no power to USB ports while a computer is sleeping, so if your computer goes to sleep with your iPod connected, your iPod will stop charging and go to sleep, too.
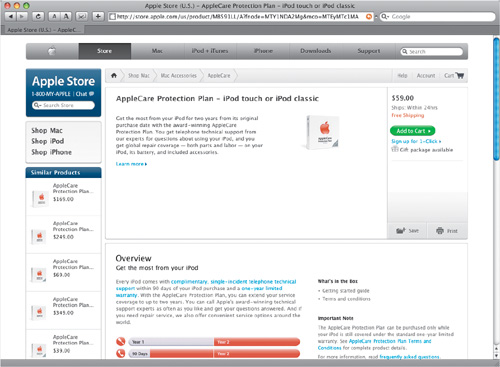
Eventually your iPod’s battery will reach the point of no return (it won’t hold a charge any longer), and you’ll have to get the battery replaced. Well, I have good news and bad news. The good news: even with lots of use, your iPod’s battery will last for quite a while. The bad news: this isn’t one of those “drive-down-to-Wal-Mart-and-buy-a-new-battery-for-$4.99” situations. iPod batteries aren’t cheap (as of the printing of this book, Apple charges $59, plus shipping, for a new iPod replacement battery), and they should be replaced by a qualified technician (like a tech at the Apple Store in the mall). If you can’t spring for the full $59 battery from Apple and the technician’s fee for replacing it, you’ve got a few options. One is to go to PDASmart.com. They’ll provide and install a new iPod battery for you for $45 to $65 (plus shipping), depending on the generation. Not bad. There’s also iPodResQ.com, where for around $54, they’ll give you a new iPod battery, do the install, and ship your iPod back to you within 24 hours (the shipping’s included). Considering the cost, this is why it’s a good idea to get AppleCare for your new iPod for around $59 ($39 for the nano or shuffle), which would cover a battery replacement if you needed one.
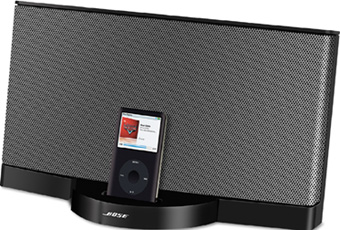
Although iPods were born to be used with headphones, today there are a lot of speaker systems custom designed for iPods. In my opinion, the three hottest external speaker systems are the Bose SoundDock Series II Digital Music System, $300; the JBL On Stage II, $110; Apple’s iPod Hi-Fi system, $349; and (Terry’s favorite) Sony ICF-C1iP Dock with Clock, $100 (you can buy these at the Apple.com Store). All three have a built-in cradle (it’s like a Dock) that your iPod sits in while playing, and all automatically charge your iPod at the same time. Only one bad thing—although all work with regular iPods or the iPod nano, only Apple’s Hi-Fi officially supports the iPod photo. However, I’ve read that the Bose SoundDock comes with different-sized Dock adapters, and that the largest one does accommodate the iPod photo, but I haven’t tested it myself, so....
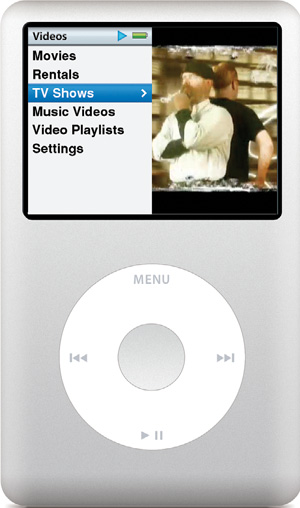
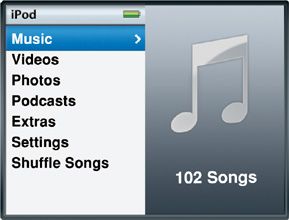
If you have one of the newer iPods, iPod nanos, or an iPod touch, you can play TV shows, movies, and music videos, which you can buy and download from the iTunes Store. Then, when you sync your iPod with iTunes on your computer, any videos you’ve purchased from the Store will be downloaded onto your iPod (if you have that preference set). To play these videos, go to the main menu and click on Videos. In the Videos menu (shown above), scroll down to the type of video you want to play and click the center Select button. For example, if you click on TV Shows, any TV shows you’ve downloaded will be listed here. To play a particular show, scroll down to it, then press the center Select button to see a list of episodes. When you find the episode you’re looking for, press the center Select button again (or just press the Play/Pause button).
iTip: Create Video Playlists
Just like playlists for music, you can create playlists for videos, as well, with collections of your favorite TV shows, movies, or music videos. For example, you could create a video playlist of Black Eyed Peas videos, or videos of dance music, or classic rock videos, or... well, you get the idea.