8. The Other Applications
I’ve covered the iPod touch’s major areas: Mail, Safari, Music, Videos, Photos, Calendar, YouTube, the iTunes Store, and the App Store. It’s time to turn to the smaller applications, which by default occupy the bulk of the iPod’s Home screen: Stocks, Maps, Weather, Voice Memos, Notes, Clock, and Calculator.
If you’ve used Mac OS X, many of these applications are familiar to you, as most of them are offered in that operating system as widgets—small applications that perform limited tasks. On the iPod touch, they’re considered to be full-blown applications, even though they’re largely single-purpose programs. They work this way.
Stocks
The Stocks application has a lot in common with the Mac OS X Stocks widget. Like that widget, the application displays your chosen stocks and market indexes (Dow Jones Industrial Average and NASDAQ, for example) in the top part of the screen and performance statistics below. Next to each index or stock ticker symbol, you’ll see the almost-current share price (results are delayed by 20 minutes), such as AAPL 188.05, followed by the day’s gain or loss as represented by a green (gain) or red (loss) icon.
By default, the application represents gains and losses in points—+3.89, for example. To see the company’s market cap—168.5B, for example—tap one of these red or green icons. You can toggle to a percentage view by tapping an icon again. Tap once more to return to point view.
![]() You must be connected to the Internet via a Wi-Fi connection for the results to appear.
You must be connected to the Internet via a Wi-Fi connection for the results to appear.
To view statistics for a particular index or stock, just tap its name. A graph at the bottom of the screen charts that index’s or stock’s performance over 1 day, 1 week, 1 month, 3 months, 6 months, 1 year, or 2 years. To choose a time period, just tap the appropriate icon (such as 1d for 1 day or 6m for 6 months).
If you flip the iPod to landscape orientation, you see this graph enlarged. No, this feature isn’t for the benefit of people with poor eyesight. Tap and hold this graph, and an orange line appears that tells you the stock price at the time. (The date appears at the top of the screen.) Tap with two fingers, and the iPod tells you the change in points and percentage between one finger and another. So, for example, you might select Apple’s stock in 6-month view, place your left index finger on June 1, 2009, and put your right index finger on October 8, 2009 (Figure 8.1). You see that the stock rose 49.2 points, or 35.82 percent.
Figure 8.1 Stocks application.

Return the iPod to portrait orientation and swipe a graph to the left, and you’ll see news headlines related to the company. (This window scrolls down if there are enough headlines to merit scrolling.) Tap a headline, and Safari launches and displays the story. Swipe once more to the left, and you’ll see a table of statistics related to the company, including such things as the day’s opening and closing prices and trading volume.
For more detailed information on an index or stock, tap its name to highlight it and then tap the tiny Y! (for Yahoo) icon in the bottom-left corner of the screen. Doing so launches Safari and whisks you to a Yahoo oneSearch page with links related to that item. There, you’ll find links to a Yahoo Finance page devoted to the index or stock, with related news, products, full and mobile Web pages, and Web images.
If you tap the i (Information) icon in the bottom-right corner of the display, the screen flips to reveal the indexes and stocks that appear on the application’s front page. Click the plus (+) icon in the top-left corner and use the iPod’s keyboard to add a ticker symbol or company name. In the case of a company name, the iPod will search for matches. If you type Apple and tap Search, for example, you’ll get a list that includes not only Apple, Inc., but also Nicholas Applegate International and Appleseed Fund. Tap the search result you want, and it will be added to the bottom of the list. You can reorder the list by dragging an entry up or down in the list by its reorder bar to the right of the entry. To remove items, just tap the red minus (–) icon next to the item’s name and then tap the resulting Delete icon.
The Information screen also includes three icons: %, Price, and Mkt Cap. Tap one to determine the default display of gains and losses in the main Stocks screen.
This screen also offers a not-so-obvious icon. To have Safari take you to the Yahoo Finance page, simply tap Yahoo! Finance at the bottom of the screen.
Maps
This application is a version of Google Maps made for the iPod touch and iPhone, and I’ve found it to be one of the iPod’s most useful tools—provided that your iPod is connected to a Wi-Fi network. Without such a network, Maps isn’t nearly so useful.
When you are connected to a Wi-Fi network, however, you can use Maps to search for interesting locations (including businesses, residences, parks, and landmarks) near where you are or anywhere else in the world. It’s the showcase application for the iPod’s Location service, which uses Wi-Fi hotspot triangulation technology to pinpoint your iPod’s location. You can use it to get driving directions between here and there, and in some cases, you can check traffic conditions along your route.
The Maps application has two major components: Search and Directions. Each is available from the main Maps screen.
Searching and exploring
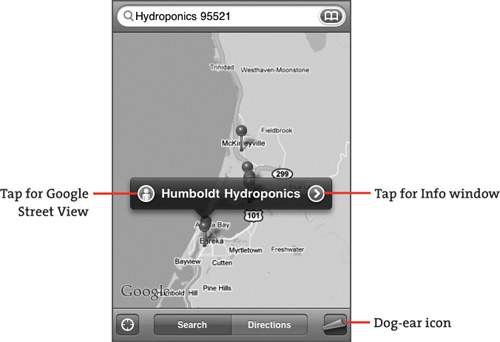
At the top of the Maps screen, you see a Search field (Figure 8.2). Tap it, and up pops the iPod’s keyboard. With that keyboard, you can enter any of a variety of search queries, including contacts in your iPod’s address book (Joe Blow), a business name (Apple, Inc.), a town name (Springfield), a more-specific town name (Springfield, MO), a street or highway name (Route 66), a specific street name in a particular town (Broadway, Springfield, MO), or a thing (Beer).
Figure 8.2 Maps’ search feature and the results in the map below.
You can help Maps find its way by entering a more specific search, such as Main St., Springfield, MO 65802 or Beer 95521. In short, the more specific you are in your query, the more accurate Maps will be.
Search views
You can display Maps’ search results in four views:
• Map, which is a graphical illustration of the area
• Satellite, which is a photo captured by an orbiting satellite
• Hybrid, which is a satellite view with the names of roads overlaid
• List, which is a . . . well, list of all the locations pinpointed on the current map
These options are available when you tap the dog-eared-page icon in the bottom-right corner of the iPod’s screen (refer to Figure 8.2 in the preceding section). I cover the other options in this screen shortly.
In Map, Satellite, and Hybrid views, search results are denoted by red pushpins that drop onto the map. Tap one of these pins, and the name of the item appears in a description marker. Again, this name can be the name of a contact’s address, business, town, or highway.
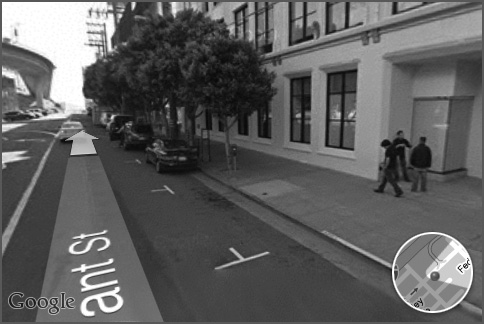
On the left side of many of these description markers is a round orange icon with a figure of a person inside. Tap this icon, and you see a Google Street View of the location—a series of 360-degree photographs of the area presented in landscape orientation. You can drag your finger around to “look around.” To move up or down the street, tap the arrow that overlays the street (Figure 8.3). To return to an overhead view, tap the circle in the bottom-right corner of the map.
Figure 8.3 Google Street View.
The right side of the description marker bears a blue > icon. Tap this icon to go to the location’s Info screen.
Info screens
Info screens present any useful information that Maps can obtain about an item, including phone number, email, address, and home-page URL (Figure 8.4). The email and URL links are live, meaning that when you tap an email address, Mail opens and addresses a message to that contact, and when you tap a URL, Safari opens and displays that Web site.
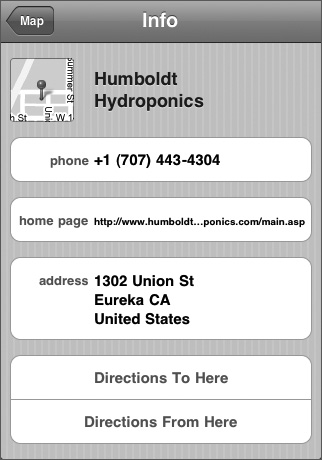
At the bottom of each Info screen, you’ll see five labeled buttons: Directions To Here, Directions From Here, Add to Contacts, Share Location, and Add to Bookmarks. (You may have to scroll the screen to see all these buttons.) They work this way:
• Directions To Here. Tap this button to display Maps’ Driving Directions interface (which I explain shortly), with the item’s address in the End field.
• Directions From Here. This feature works similarly. The difference is that the item’s address appears in the Driving Directions Start field.
• Add to Contacts. This button produces a sheet that bears three buttons: Create New Contact, Add to Existing Contact, and Cancel. Tap the first button, and a New Contact screen appears with the information from the Info screen filled in. You’re welcome to add any other information you like, using the standard contact-field tools.
As for the Add to Existing Contact button, say that your buddy Brabanzio has just started putting in his 8 hours at the local pickle works. You can use Maps to locate said works, tap this icon, and add its information to his contact information.
• Share Location. If you’ve found the perfect sushi joint and want to tell your friends, tap this button. An unaddressed email message pops up. The message’s Subject heading includes the name of the location, and the message body contains a link that, when clicked by a recipient, launches a browser and opens Google Maps to that location.
• Add to Bookmarks. You can bookmark locations in Maps. Tapping this icon brings up the Add Bookmark screen, where you can rename the bookmark, if you like. When you’re done, tap Save, and that location is available from Maps’ Bookmarks screen (which, again, I get to shortly).
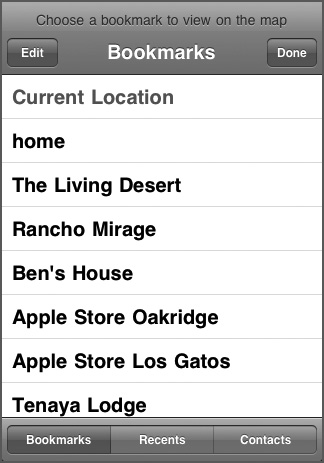
Bookmarks
The Search field includes a very helpful Bookmarks button. Tap this button to bring up a list of all the locations you’ve bookmarked, as well as recent search terms and your list of contacts (Figure 8.5).
To remove, rename, or reorder select bookmarks, tap the Edit button. In the resulting screen, you can tap the now-expected red minus icon to produce the Delete icon, which you tap to remove the bookmark. You can also tap the bookmark to show the Edit Bookmark screen, where you can edit the bookmark’s name. Finally, you can reorder bookmarks by dragging the right side of a bookmark up or down in the list.
Figure 8.5 Maps’ Bookmarks screen.
Recents
Tap the Recents button at the bottom of the Bookmarks screen, and you’ll see a list of the previous 20 searches done on your iPod. As you conduct a new search, the last search in this list is deleted. These queries are categorized by Search (pizza), Start and End (home to Bob’s house), Location (Grand Rapids), and Contact (Ebenezer Scrooge). Tap one of these entries, and you see its location—or, in the case of driving directions, locations—on the map.
Contacts
It’s swell that your Aunt Vilma sent you a change-of-address card, but where the heck is Fort Dodge, Iowa? Tap the Contacts icon at the bottom of the Bookmarks screen, find Aunt Vilma’s name in the long list of contacts, tap her name, and then tap the street address of her new cabin down by the river. Maps will pin her palace in next to no time.
Other dog-ear options
In addition to having access to the Map, Satellite, Hybrid, and List views when you tap the dog-ear icon, you have the two options shown in Figure 8.6:
Figure 8.6 The dog-ear screen.
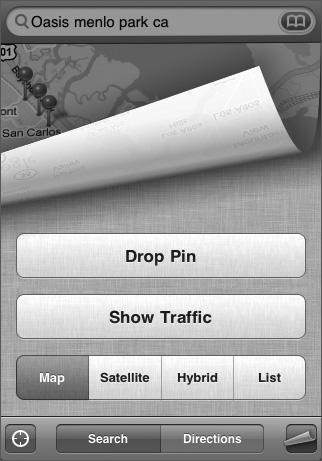
• Drop Pin. The first option allows you to drop your own pin on the map. Tap Drop Pin; the dog-ear flips down, and a purple pin appears on the map currently displayed onscreen. Above the pin is a box that tells you to Drag To Move Pin. Follow this advice by dragging the pin where you want it. The address of whatever’s under the pin will appear in a gray bubble. Tap the > icon, and you’re taken to the Dropped Pin’s Info screen. In addition to the options offered in a regular Info screen, this screen includes a Remove Pin button for doing just that.
![]() Why would you want to bookmark a movable pin? I often do this when I’m out and about and need to enter a couple of temporary locations. I may drop a pin, tap the blue icon, tap the Add to Bookmarks button, and then call the pin Where I Parked the Car. Then I’m at liberty to drop another pin during that same journey to mark a different important stop. Later, when I need to retrieve my car, I hope that I’m within range of a Wi-Fi network that broadcasts its location and can call up the appropriate bookmark.
Why would you want to bookmark a movable pin? I often do this when I’m out and about and need to enter a couple of temporary locations. I may drop a pin, tap the blue icon, tap the Add to Bookmarks button, and then call the pin Where I Parked the Car. Then I’m at liberty to drop another pin during that same journey to mark a different important stop. Later, when I need to retrieve my car, I hope that I’m within range of a Wi-Fi network that broadcasts its location and can call up the appropriate bookmark.
• Show Traffic. If the area you’re viewing in Maps supports the Traffic feature (not all areas do), tap the Show Traffic button to see colored lines that indicate how congested the roads are. Green denotes good traffic flow, yellow is somewhat congested, and red is stop-and-go traffic (or sometimes just stop). Yellow and red areas on the map throb so that they’re more noticeable. If the service isn’t supported in the area you’re looking at, the Info screen will read Traffic Unavailable in This Area.
![]() Be sure to zoom in on the map when you see yellow and red traffic warnings. The warning may apply to only one direction of traffic—with luck, the direction you’re not traveling in. A zoomed-in view will tell you what you’re up against.
Be sure to zoom in on the map when you see yellow and red traffic warnings. The warning may apply to only one direction of traffic—with luck, the direction you’re not traveling in. A zoomed-in view will tell you what you’re up against.
Getting directions
Maps’ Directions component is useful too. Feed it the locations where you’d like to start and where you’d like to end up, and it provides a reasonable route for getting there, like so:
1. Tap Directions at the bottom of the Maps screen.
Empty Start and End fields appear at the top of the screen.
2. Tap the Start field.
If you’ve used the iPod’s Location feature to tell it where you are, the Start field automatically displays Current Location in blue letters. You’re welcome to use that location as the start point. If you prefer to use a different start point, simply tap the field again and then tap the X icon at the right end of the field to clear it.
3. Using the iPod’s keyboard, type the location where you want to begin your journey.
This location can be something as generic as a zip code or as specific as your home address. Alternatively, you can tap the Bookmarks icon and then tap a bookmark in the resulting screen; its location will appear in the Start field.
4. Tap the End field.
Same idea—type a location or choose a bookmark (Figure 8.7).
Figure 8.7 Entering start and end points for driving directions.
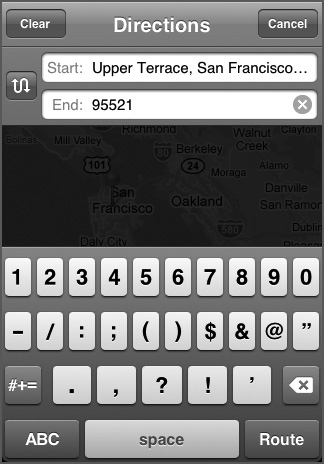
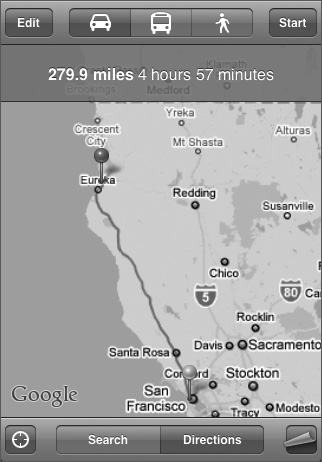
5. Tap the blue Route button in the bottom-right corner.
Maps will present an overview map of your route. At the top of the screen are three transportation icons representing driving, public transportation, and walking routes. The Driving icon (the default) displays the length of the journey and how long it should take to drive—279.9 miles 4 hours 57 minutes, for example (Figure 8.8).
The Public Transportation icon is likely to display different information from the Driving icon. It tells you when the next mode of transportation (which could be a bus, subway, train, or combination) is going to leave and when it’s likely to arrive.
![]() The Public Transportation route is intended for local travel. If you set Arcata, California, as your departure point and Parsons, Kansas, as the destination, the iPod will say Transit directions could not be found between these locations.
The Public Transportation route is intended for local travel. If you set Arcata, California, as your departure point and Parsons, Kansas, as the destination, the iPod will say Transit directions could not be found between these locations.
Tap the Walking button, and you see the most reasonable route you can make on foot (meaning no freeways), the distance, and the time it should take to get where you’re going.
The Map, Satellite, and Hybrid buttons on the dog-ear page do exactly what you’d expect, but List’s functionality changes when you’re using the Directions feature.
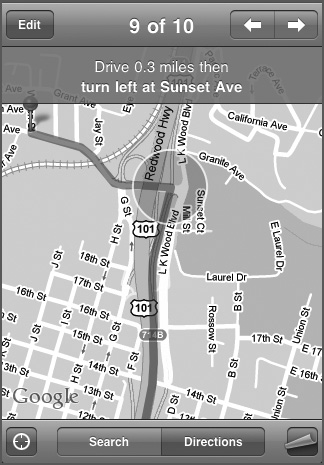
Tap List, and the twists and turns of your route are laid out in numbered steps—for example, 1 Drive 0.4 miles then turn right at Old Codger Road. 2 Drive 2.6 miles then merge onto CA-94 W toward Tokyo. Tap a step, and Maps displays that portion of your trip on a map, circling the important twist or turn outlined in the step as well as displaying the written driving directions for that step at the top of the screen.
To view the next turn in your trip, just tap the right-arrow icon at the top of the screen. To return to the map overview of your trip, tap the dog-ear icon; tap List; and then tap the Route Overview entry at the top of the Directions screen.
![]() When you return to List view, a purple circle surrounds the step in the list that corresponds to the portion of the trip you just viewed. If the fourth part of the trip was to turn left on Dankhippie Road, for example, a purple circle appears around the number 4.
When you return to List view, a purple circle surrounds the step in the list that corresponds to the portion of the trip you just viewed. If the fourth part of the trip was to turn left on Dankhippie Road, for example, a purple circle appears around the number 4.
If you like this turn-by-turn graphic overview of your route, you can skip the List icon altogether. Just tap the Start icon in the top-right corner of the route overview screen. The first step of your journey will be shown in all its graphic glory, along with the accompanying text at the top of the screen. Tap the right-arrow icon to proceed to the next step (Figure 8.9). Should you want to edit your route—change the start or end point—just tap the Edit button in the top-left corner of the display. The Start and End fields appear, along with the iPod’s keyboard.
At this point, you can return to your journey by tapping the Cancel button in the top-right corner or plot a new journey by tapping Clear.
![]() If you lose your Wi-Fi connection en route (which is likely), the iPod won’t be able to track your location until you latch onto another Wi-Fi hotspot that provides location information. (Simply driving by one may be enough to update your location in Maps.) Fortunately, the direction information remains on the iPod; you can still follow the steps of your journey in List view, for example.
If you lose your Wi-Fi connection en route (which is likely), the iPod won’t be able to track your location until you latch onto another Wi-Fi hotspot that provides location information. (Simply driving by one may be enough to update your location in Maps.) Fortunately, the direction information remains on the iPod; you can still follow the steps of your journey in List view, for example.
Location, Location, Location
I know—you’ve been staring at that small ![]() icon in the bottom-left corner of the Maps screen, wondering what on earth it’s for. Allow me to reward your patience by telling you that this is the Location icon. Tap it, and the iPod attempts to pinpoint the iPod’s whereabouts.
icon in the bottom-left corner of the Maps screen, wondering what on earth it’s for. Allow me to reward your patience by telling you that this is the Location icon. Tap it, and the iPod attempts to pinpoint the iPod’s whereabouts.
How Location works
The iPod touch can find itself via Wi-Fi networks. Some of these networks have registered their locations through Skyhook Wireless. When your iPod detects one of these locations, it can glean a pretty good idea of where it is. It will be even more accurate if it detects more than one registered network.
![]() You can register your own wireless router with Skyhook. Just go to http://skyhookwireless.com/howitworks/submit_ap.php, and follow the directions to register your router’s location. It takes about a month for registered routers to broadcast their locations to devices like the iPod.
You can register your own wireless router with Skyhook. Just go to http://skyhookwireless.com/howitworks/submit_ap.php, and follow the directions to register your router’s location. It takes about a month for registered routers to broadcast their locations to devices like the iPod.
Using Location
To pinpoint (as much as possible) your location in Maps, tap the Location icon. If the Location Services option is off in the General Settings screen, Maps will tell you to turn it on via a window that includes a Settings and Cancel button. Tap Settings to go the Settings screen, where you can turn Location Services on.
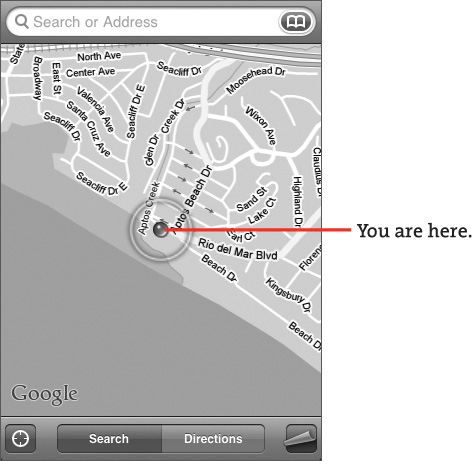
The iPod will attempt to establish your location based on the information provided by the Wi-Fi networks around you to produce a map with a blue target that indicates where the iPod believes you are.
If the iPod finds you, first a broad blue area appears, followed by a smaller target with a throbbing blue dot haunting the middle of the target (Figure 8.10). Move around, and the dot moves with you.
Weather
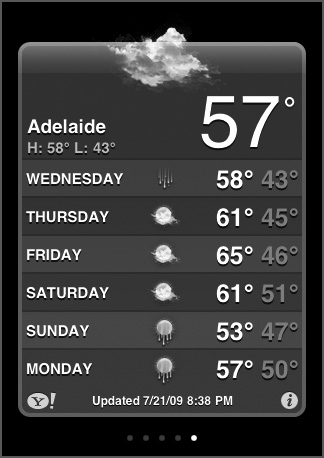
Weather is another iPod application that owes more than a tip of the hat to a Mac OS X widget. Though the layout of the iPod’s Weather application is vertical rather than horizontal, it contains the same information as its namesake widget: a 6-day forecast (including the current day); current temperature in Fahrenheit or Celsius (selectable from the application’s Information screen); each day’s projected highs and lows; and icons that represent the current or projected weather conditions, such as sun, clouds, snow, or rain (Figure 8.11 on the following page).
To move from one location screen to the next, simply swipe your finger horizontally across the screen. Alternatively, just tap to the right or left of the small white dots that appear at the bottom of the screen. (These dots indicate how many locations you have saved.)
Tap the i icon in the bottom-right corner of the Weather screen, and the screen flips around to display all the locations you’ve saved. To add a new one, tap the plus icon; use the iPod’s keyboard to enter a location (again, a zip code is a handy shortcut); and tap Search. To remove a location, tap it; tap the red minus icon; and then tap Delete. To switch from Fahrenheit to Celsius, tap the appropriate icon at the bottom of the screen. To reorder locations, just drag them up or down in the list.
Figure 8.11 Weather application.
Voice Memos
Voice Memos is an application introduced with the iPod touch 3.0 software and compatible with the 2G iPod touch (sorry, 1G iPod touch owners). And yes, it’s for recording audio. That audio can be recorded with a headset microphone plugged into the iPod’s headphone port. To record and play back a memo, follow these steps:
1. Launch Voice Memos, and start talking—but don’t record yet.
Keep an eye on the VU meter at the bottom of the screen. If you see the needle move, the iPod can “hear” you. This needle isn’t very accurate, though, so don’t try to push it up near the red. If it gets anywhere near the –10 mark, you’re loud enough.
2. Tap the red Record icon in the bottom-left corner of the screen, and start talking for real.
A red bar appears at the top of the screen, indicating that the iPod is recording (Figure 8.12).
Figure 8.12 Voice Memos application at work.

3. Pause, if you like, by tapping Record again.
To resume, tap Record one more time.
4. Stop recording.
Tap the silver button on the right side of the VU meter, and your recording is saved.
5. Tap the List button in the bottom-right corner of the screen to play your memo.
A Voice Memos screen appears, listing all the voice memos you’ve recorded. To play one, just tap it (and tap it again to pause). The timeline at the bottom of the screen displays the progress of the playback. You can tap and drag the playhead to move forward or backward in the memo.
The two buttons at the bottom of the screen—Share and Delete—are the means for doing those things. Tap Share, and a pane floats up with Email Voice Memo and Cancel buttons in it. Tap Email Voice Memo, and up pops an unaddressed email message containing the memo as an attachment.
7. Trim it.
Tap the blue > button on the right side of a memo, and the memo’s Info screen appears. Here, you can trim the memo by tapping the Trim Memo button. When you do, a pane appears that includes a yellow trim bar. To trim the memo, drag the sides of the trim bar to cut off the beginning and/or end of the memo. You can hear what’s left by tapping the Play button next to the bar.
To throw out the stuff you’ve trimmed, tap Trim Voice Memo. This action is permanent, so be careful.
This Info window also contains a Share button, which saves you the trouble of backing up a screen to email the memo to someone.
8. Label it.
Tap the name of your memo—5:15 PM 00:17, for example—and a Label screen comes into view. Tap a label that best categorizes your memo—Podcast, Lecture, or Idea, for example—and your memo is labeled. (You can also enter a custom label by tapping Custom at the bottom of the screen and typing a label name in the succeeding screen.) That label name replaces the time/date name in the Voice Memos screen.
When you sync your iPod to your computer, the voice memos you’ve recorded are transferred to your iTunes Library. Regrettably, the label names you’ve applied don’t transfer as well. These memos retain their date and time titles.
Notes
Notes is the iPod’s simple text editor—and by simple, I mean downright rudimentary. Tap Notes in the iPod’s Home screen and then tap the plus icon in the top-right corner of the resulting Notes screen to create a new note. When you do, the iPod’s familiar keyboard appears. Start typing your new novel (OK, novelette). If you make a mistake, use the usual text-editing tricks to repair your work.
Each individual Notes screen has four icons at the bottom. The left-arrow and right-arrow icons do exactly what you’d expect: move to the previous or next note. Tap the Mail icon, and a new, unaddressed email message opens in Mail, with the note’s text appearing in the message body. Tap the Trash icon, and you’ll be offered the option to Delete Note or Cancel.
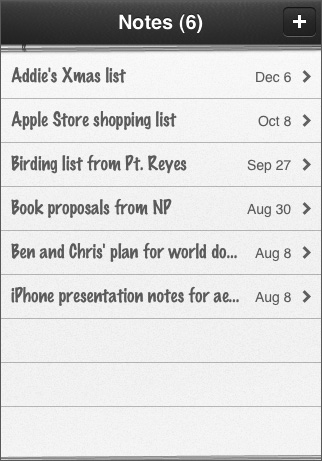
To view a list of all your notes (Figure 8.13), tap the Notes icon in the top-left corner of the screen. Each note is titled with up to the first 30 characters of the note. (If you entered a return character after the first line, only the text in that first line appears as the note’s title.) Next to each note is the date of its creation (or time, if it was created that day). Time and date information also appears at the top of each note.
Figure 8.13 Notes application.
With the iPod 3.0 software, now you can sync notes to your computer. If you’ve enabled the Sync Notes option in the Info tab in iTunes, your notes will be copied to your computer, appearing in Apple’s Mail application on a Mac and in Microsoft Outlook on a Windows PC.
Clock
More than just a simple timepiece, the iPod’s Clock application includes four components—World Clock, Alarm, Stopwatch, and Timer—that are available as icons arrayed across the bottom of the application’s screen. Here’s what they do.
World Clock
Just as its name implies, World Clock allows you to track time in multiple locations. Clocks are presented in both analog and digital form (Figure 8.14). On analog clocks, day is indicated by a white clock and night by a black one.
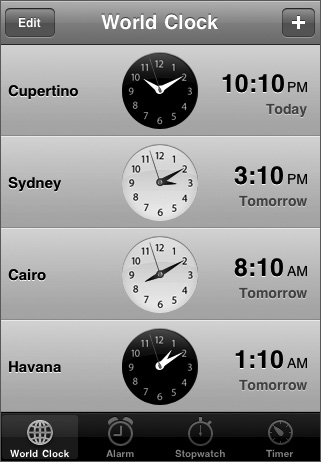
To add a new clock to the list, just tap the plus icon in the top-right corner of the screen. In the Search field of the resulting keyboard screen, enter the name of a reasonably significant city or a country. The iPod includes a database of such cities and offers suggestions as you type.
You can remove or reorder these clocks. Tap Edit and use the red minus icon to delete a clock. To reposition a clock, tap its right side and drag it up or down in the list.
Alarm
Your iPod touch can get you out of bed in the morning or remind you of important events. Just tap Alarm at the bottom of the screen and then tap the plus icon to add an alarm.
In the Add Alarm screen, you’ll find a Repeat entry, which lets you order an alarm to repeat each week on a particular day; a Sound entry, where you assign one of the iPod’s 25 alarm tones to your alarm; an On/Off Snooze entry, which tells the iPod to give you 10 more minutes of shuteye when you click the Home button; and a Label entry that lets you assign a message to an alarm (Get Up, Meeting This Morning, or Take That Big Purple Pill, for example).
To create a new alarm, just flick the hour, minute, and AM/PM wheels to set a time for the alarm. Tap Save to save the alarm. When you save at least one alarm and switch that alarm on, a small clock icon appears in the iPod’s status bar.
![]() You can create an alarm only for the current 24-hour period. If you’d like an alarm to go off at a time later than that, use the Calendar application to create a new event, and attach an alert to that event.
You can create an alarm only for the current 24-hour period. If you’d like an alarm to go off at a time later than that, use the Calendar application to create a new event, and attach an alert to that event.
Stopwatch
Similar to the click-wheel iPods’ Stopwatch feature, the iPod’s Stopwatch includes a timer that displays hours, seconds, and tenths of seconds. Tap Start, and the timer begins to run. Tap Stop, and the timer pauses. Tap Start again, and the timer takes up where it left off. Tap Reset, and the timer resets to 00:00.0.
While the timer runs, you can tap Lap, and a lap time will be recorded in the list below. Subsequent taps of Lap add more lap times to the list. When you tap Lap, the counter resets to 0.
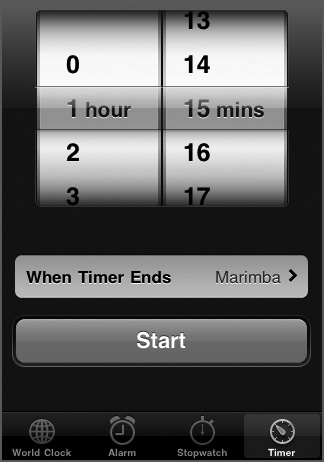
Timer
The iPod’s Clock application includes a timer that will tick down from as little as 1 minute to as much as 23 hours and 59 minutes. To work the timer, just use the hour and minute wheels to select the amount of time you’d like the timer to run; then tap Start (Figure 8.15). (Alternatively, you can tap a number on the wheel, and the wheel advances to the “go” position.) The timer displays a countdown in hours, minutes, and seconds, and the label on the Start button changes to Cancel. Tap Cancel to stop the countdown.
The iPod offers two actions when the timer ends: Either it plays one of its alarm tones (and displays a Timer Done dialog box), or it activates the iPod’s Sleep iPod feature. The latter option isn’t as odd as it first sounds. Many people like to listen to soothing music or ambient sounds as they drift off to sleep. The Sleep iPod option allows them to do just that without playing the iPod all night (and needlessly running down the battery).
Figure 8.15 Time keeps on tickin’, tickin’, tickin’ into the future. . . .
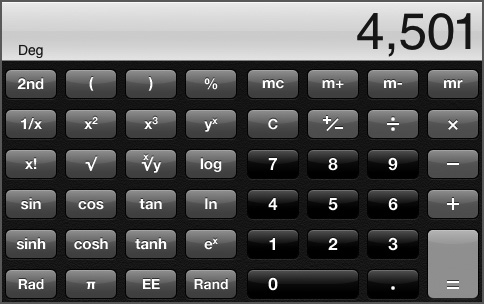
Calculator
Unless you’ve stubbornly clung to your grandfather’s abacus, you’ve used an electronic calculator like this before. Similar to the dime-a-dozen calculators you can find on your computer or at the local Bean Counters “R” Us, the iPod’s Calculator application performs addition, subtraction, division, and multiplication operations up to nine places when you hold the iPod in portrait orientation. When you choose an operation (addition or subtraction, for example), Calculator highlights the appropriate symbol by circling it.
In addition to the 0–9 digits and the divide, multiply, add, subtract, and equal keys, you find these keys:
• mc (for memory clear). This key clears out any number stored in the calculator’s memory.
• m+. Tap m+ to add the displayed number to the number in memory. If no number is in memory, tapping m+ stores the displayed number in memory.
• m–. Tap m– to subtract the displayed number from the memorized number.
• mr. Tap mr, and the displayed number replaces the currently memorized number. A white ring appears around this key if a number is in memory.
• C. Tap C to clear the total.
Ah, but wait—there’s more. Flip the iPod to landscape orientation, and you get a full-featured scientific calculator (Figure 8.16). When you rotate the iPod, any number stored in the calculator remains, so you can move quickly from simple to complex calculations and back again without losing your work.
Figure 8.16 The Calculator application’s scientific calculator.