
1. Meet the iPod touch
In the early summer of 2007, Apple released a little something called the iPhone. Maybe you’ve heard of it. With the iPhone came the promise of an iPod that could be controlled not by a wheel or series of buttons, but the touch of a finger. A few months later, the iPod touch delivered on that promise. A year after that, an updated second-generation (2G) version with a volume switch and an internal speaker appeared. Fast-forward one more year, and there appeared a new iPod touch, similar to the previous year’s 2G iPod touch but with a faster processor and graphics chip.
The iPod touch is sort of a hybrid between a regular iPod and the iPhone. Like the iPhone, the iPod touch bears a touchscreen display that you control by tapping, flicking, pinching, and dragging objects on its screen. (See Chapter 2 for more information on controlling your touch.) It also includes wireless networking circuitry (Wi-Fi). It has the same media capabilities as the iPhone, letting you play music and videos, view slideshows, and watch YouTube videos streamed across the Web. And just as you can with an iPhone, you can purchase music and third-party applications directly from the iPod touch via the device’s version of Apple’s iTunes Store and App Store, respectively.
The touch also includes all the iPhone’s non-phone-related applications: Safari, Calendar, Mail, Contacts, YouTube, Stocks, Maps, Weather, Clock, Calculator, Voice Memos, and Notes. Because you can’t make a call with the iPod touch, there’s no need for the iPhone’s SMS application (which is called Messages) or any of the phone features.
As this book goes to press, the iPod touch comes in capacities of 8 GB, 32 GB, and 64 GB, priced at $199, $299, and $399, respectively. The 8 GB model is actually the original 2G iPod touch. The 32 GB and 64 GB iPod touches are the new design that includes the faster processor and graphics chip.
Apple claims that the 8 GB touch will hold up to 1,750 4-minute songs encoded in AAC format at 128 Kbps. (I explain all this encoding stuff in Chapter 3.) The 32 GB model can hold up to 7,000 audio tracks encoded the same way. And you’ll smush 14,000 songs onto a 64 GB touch. A 2-hour movie purchased from the iTunes Store consumes around 1.3 GB, and an hourlong TV show (really, around 43 minutes when the commercials have been stripped out) eats up close to 500 MB. Given the girth of these videos, it’s clear that you’re not going to pack the entire Pink Panther oeuvre plus four seasons of Lost onto your lower-capacity iPod touch.
Like all iPods, the touch is powered by a rechargeable lithium-ion polymer battery. Apple suggests that the iPod touch can play music continuously for up to 30 hours and video for up to 6 hours. Your actual mileage will vary, however, depending on whether you have Wi-Fi switched on or off. (Wi-Fi consumes a fair amount of battery power even when it’s supposedly doing nothing.)
Great iPod, Pocket Computer, Portable Game Player
The descriptive words above—Great iPod, Pocket Computer, Portable Game Player—are exactly the terms Apple uses to describe the iPod touch. How does it live up to those descriptions?
• Great iPod? Yes. Indeed, I consider a slim, pocketable device that provides a unique touchscreen interface for browsing your music collection by album cover and a beautifully bright 3.5-inch display on which you can view pictures, TV shows, music videos, video podcasts, and movies in a widescreen way to be pretty darned great. Thanks to the inclusion of the iTunes Store on the iPod touch, you can even purchase music and video and download it directly to the iPod over a Wi-Fi connection.
• Great pocket computer? Yes. When the iPhone was first released, pundits (me among them) debated whether it was a phone or a computer that just happened to make calls. With the iPod touch, you needn’t split hairs. It’s clearly a small computer that also happens to be a perfectly wonderful media player. Right out of the box, the touch lets you surf the Web, send and receive email, plot a course with the Maps application, check stocks and weather, view YouTube videos, and compose notes.
Should the built-in applications not be enough, there’s always the App Store. Need a wireless remote control for your iTunes Library or Apple TV? Apple’s free Remote application for the iPod touch and iPhone provides it. Want to learn about all the restaurants within a 10-mile radius? You can get apps for that too. Care to send an instant message to a friend? Just turn to one of the instant-messaging clients available from the App Store. Need to send a quick tweet or update your Facebook page? Yes, there are apps for that. The possibilities are nearly endless, as the App Store’s more than 75,000 apps (as I write this chapter) attest.
• Great portable game player? Increasingly so. Apple is pushing hard in many directions to make the iPod touch the portable gaming system to own. It’s doing this not only by spreading the word to its customers, but also by reaching out to developers such as Electronic Arts, Ubisoft, id Software, and Gameloft to make great games available for the iPod touch and iPhone. In the first months of the App Store’s existence, a lot of iPod touch and iPhone games were released, and a lot of them weren’t very good. Given the number of apps at the App Store, there will always be a large number of mediocre games. What’s new is that now there’s a solid selection of truly outstanding games.
• And more? Yes. Add to all those features the iPod touch’s unique multitouch screen, which lets you use natural finger motions and virtual onscreen controls to manage your iPod; a sensor that detects the iPod’s vertical or horizontal orientation and rotates its images accordingly; and built-in Wi-Fi and Bluetooth capability, and you’ve got a fairly formidable hunk of technology in your pocket.
Oh, and did I mention that the iPod touch works with both Windows PCs and Macs? Or that the computer application that handles the handshake between your computer and the iPod touch is one you’re already familiar with? Yes, that would be the same iTunes you now use to load your old iPod with music, podcasts, games, movies, and TV shows.
In this inaugural chapter, I look at the items that come in the iPod touch box, as well as the physical features and controls that make up this three-in-one wonder.
Boxed In
The clear box holds more than the iPod touch. Within, you’ll find these goodies.
iPod touch
Well, of course. You didn’t lay out $200, $300, or $400 with the dream of getting an electric shaver, did you? There, clipped to its plastic tray, is your iPod.
Earphones
Your iPod comes with a set of earphones that you place inside—rather than over—your ears. Earphones of this style are known as earbuds. Which set of earphones you receive depends on the iPod touch model you purchase.
If you purchased an 8 GB model (the previous year’s 2G iPod touch), you get Apple’s standard earbuds—the kind you’d get with an iPod classic. If you purchased a 32 GB or 64 GB iPod touch, you’ll find in the box the same earphones that ship with today’s iPhone. What distinguishes the latter earphones is the small gray plastic controller embedded in the right earbud’s cord (Figure 1.1). This controller includes a microphone for recording voice memos and issuing voice commands, as well as three buttons: Volume Up, Volume Down, and a Center button for controlling audio and video playback.
Figure 1.1 The ipod touch’s headset controller.
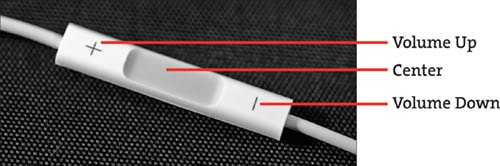
Here are some uses for this controller:
• To adjust the volume of the headset, press the Volume Up button to increase volume or the Volume Down button to turn things down. These volume buttons aren’t of the press-and-hold variety; volume goes up or down only when you press and release the button. To increase volume by two increments, press the top button twice in succession.
• While listening to music or watching a video, press the Center button once to pause playback.
• Press it twice to move to the next track when listening to music.
• Press it three times in succession to move to the previous track when listening to music.
• Press the switch twice in rapid succession while you’re watching a video, and if the video has chapter markers, you’ll skip to the next chapter. (If the video has no chapters, nothing happens.) If you press three times in rapid succession while watching a video with chapters, you move back to the beginning of the currently playing chapter. Stop playback with a single click and press the switch three times quickly, and you go back to the previous chapter.
• Press and hold the Center button for a couple of seconds to call up the Voice Control screen. This feature lets you control the iPod touch’s music functions with your voice. (I discuss all that is Voice Control in Chapter 3.)
Documentation
Beneath the plastic tray are three hunks of paper: a Getting Started guide; a safety information guide, which you may be able to read if you wear 6x reading glasses; and a sheet that bears two white Apple stickers, appropriate for placing anywhere you want to let your Apple flag fly.
Dock connector-to-USB cable
You string this cable between the Dock-connector port on the bottom of the iPod or a Dock (if you have one) and either the USB power adapter or a USB port on your computer. When it’s connected to a computer, this cable acts as both data and power link between the iPod and computer. Without it, you can’t sync media and information from the computer to the iPod, as the iPod—Wi-Fi wonder though it may be—syncs only via the cable.
On the Face of It
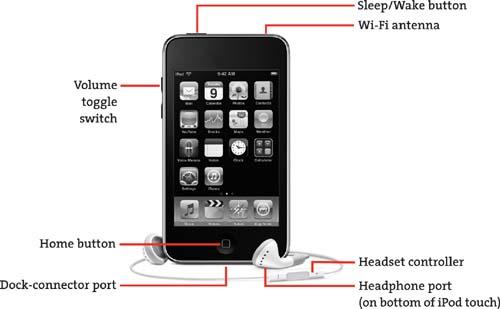
Thanks to its touchscreen display, the iPod sports very few buttons and switches. Those that it does possess, however, are important (Figure 1.2).
Figure 1.2 The iPod touch provides exactly the buttons, switches, and ports you need without cluttering its elegant design.
COURTESY OF APPLE, INC.
Up front
After removing the iPod touch from its tray and flipping it in your hand a time or two, you’ll come to a remarkable realization: The thing apparently has but one button! No Play, Rewind, Fast Forward, Blend, Mix, Grill—just an indented round button at the bottom of the display. This button is the Home button, and as its name implies, it takes you to the iPod’s Home screen nearly every time you click it once.
(OK, I’ll end the suspense: You also use the Home button to wake up your sleeping iPod. When you do, you don’t go home; rather, after unlocking the iPod, you see the last screen that was visible when the iPod dozed off. Also, when you’re already looking at the first screen of the Home screen and you click this button, you’re taken to the Spotlight screen, where you can search for items on your iPod.)
Click it quickly twice in succession, however, and its behavior changes, depending on how you’ve set up the Home button—a topic that I examine more closely in Chapter 2.
On top
Look a little more carefully, and you discover a few more mechanical controls and ports. On the top edge of the iPod touch is a tiny black button. Apple describes this thing as the Sleep/Wake button, which you also use to turn the iPod on and off.
To lock the iPod, press this button. (To unlock the iPod, click the Home button and slide your finger where you see the words Slide to Unlock.) To switch the iPod off, press and hold the Sleep/Wake button for a few seconds until a red slider, labeled Slide to Power Off, appears onscreen. Drag the slider to the right to switch off the iPod (or tap Cancel to belay that order). “Drag?” you ask. Yes, the gesture is exactly what it sounds like. Place your finger on the arrow button and slide it to the right. (I describe all these maneuvers in the “Full Gestures” section later in this chapter.)
To turn the iPod on after shutting it off, press and hold the Sleep/Wake button until you see the Apple logo on the display.
Down below
Smack-dab in the middle of the iPod touch’s bottom edge is the familiar-to-iPod-owners Dock-connector port. This port is a proprietary 30-pin connector used for syncing the iPod and attaching such accessories as power adapters, FM transmitters, and speaker systems.
To the right of the Dock-connector port is the headphone port, which accommodates the iPod’s white headset plug.
To the left
The original iPod touch had no physical volume buttons. If you wanted to adjust its volume, you had to do so using the touchscreen. Enough people complained about the inability to adjust the touch’s volume from within a pocket (a nice idea when you’re rocking out in arctic breezes) that with the 2G iPod touch, Apple placed volume controls on the iPod. You find these controls along the left side of the iPod in the form of a Volume rocker switch. Press it up to increase the volume; press it down to decrease the volume.
The back
Other than the Apple logo, the iPod name, the iPod’s capacity, and some really tiny print, the only thing you’ll find on the back of the iPod is the black plastic that marks its Wi-Fi antenna. If you’re a fan of funhouse mirrors, feel free to check your look in the iPod’s polished chrome case.
![]() And by the only thing, I do mean that you won’t find a lever, switch, or button to open the iPod for the purpose of replacing its battery. Like other iPods and the iPhone, the iPod touch doesn’t offer a user-replaceable battery. When your iPod’s battery gives up the ghost, you must have it serviced. See Chapter 9 for more on the iPod’s battery.
And by the only thing, I do mean that you won’t find a lever, switch, or button to open the iPod for the purpose of replacing its battery. Like other iPods and the iPhone, the iPod touch doesn’t offer a user-replaceable battery. When your iPod’s battery gives up the ghost, you must have it serviced. See Chapter 9 for more on the iPod’s battery.
When operating your iPod, you’ll see a variety of small icons in its status bar. Here’s what they mean:
Applications
As I write these words, Apple bundles 19 applications with today’s iPod touch. You access these applications from the iPod’s Home screen, which you can summon easily by clicking the Home button on the face of the iPod.
The Docked Four
At the bottom of the iPod touch is a Dock housing four applications that Apple thinks important enough to highlight by placing them in this prominent position.
Music
![]() Well, this device is an iPod, after all, so the Music app deserves this kind of attention. This app is what you use to play music, audio podcasts, and audiobooks. I cover this application extensively in Chapter 3.
Well, this device is an iPod, after all, so the Music app deserves this kind of attention. This app is what you use to play music, audio podcasts, and audiobooks. I cover this application extensively in Chapter 3.
Videos
![]() The iPod touch wouldn’t be much of a media player if it didn’t play videos. This application takes on that chore, playing movies, TV shows, music videos, video podcasts, and other compatible videos that you sync to the device. I describe this area in Chapter 3 as well.
The iPod touch wouldn’t be much of a media player if it didn’t play videos. This application takes on that chore, playing movies, TV shows, music videos, video podcasts, and other compatible videos that you sync to the device. I describe this area in Chapter 3 as well.
Safari
![]() Safari is Apple’s Web browser. Just like the iPhone, the iPod touch carries a real live Web browser rather than a “baby browser” that grudgingly allows you to view only a small portion of the material a Web page offers. When you pull up a Web page in the iPod’s Safari, it looks and behaves like a real Web page. Chapter 6 is devoted to Safari.
Safari is Apple’s Web browser. Just like the iPhone, the iPod touch carries a real live Web browser rather than a “baby browser” that grudgingly allows you to view only a small portion of the material a Web page offers. When you pull up a Web page in the iPod’s Safari, it looks and behaves like a real Web page. Chapter 6 is devoted to Safari.
The App Store
![]() As I mention earlier in this chapter, the applications you place on your iPod touch can make it a far more powerful and entertaining device. Although you can obtain these applications via iTunes, you can also download them directly over Wi-Fi from your iPod touch. The App Store is the means for doing that. I write about this store as well as the iTunes Store in Chapter 4.
As I mention earlier in this chapter, the applications you place on your iPod touch can make it a far more powerful and entertaining device. Although you can obtain these applications via iTunes, you can also download them directly over Wi-Fi from your iPod touch. The App Store is the means for doing that. I write about this store as well as the iTunes Store in Chapter 4.
The Other 13 (plus 2)
The built-in applications don’t stop with the Docked Four. The iPod touch includes other applications that handle things like email, photos, calendars, stocks, and weather.
![]() This application is the iPod touch’s email client. As with the email client on your computer, you use the iPod’s Mail app to compose and send messages, as well as to read and manage received email. I look at Mail in Chapter 5.
This application is the iPod touch’s email client. As with the email client on your computer, you use the iPod’s Mail app to compose and send messages, as well as to read and manage received email. I look at Mail in Chapter 5.
Calendar
![]() When you sync your iPod touch, you can transfer calendar events and alarms from Apple’s iCal and from Microsoft’s Entourage and Outlook. If you have a MobileMe or Microsoft Exchange account, you can sync the calendar information from these services automatically over the air. These transferred and synced items appear in the iPod’s Calendar application. You can also add events directly to the iPod by using the iPod’s keyboard and then sync those events with your computer or a MobileMe or Exchange server. I discuss Calendar in more detail in Chapter 5.
When you sync your iPod touch, you can transfer calendar events and alarms from Apple’s iCal and from Microsoft’s Entourage and Outlook. If you have a MobileMe or Microsoft Exchange account, you can sync the calendar information from these services automatically over the air. These transferred and synced items appear in the iPod’s Calendar application. You can also add events directly to the iPod by using the iPod’s keyboard and then sync those events with your computer or a MobileMe or Exchange server. I discuss Calendar in more detail in Chapter 5.
Photos
![]() Tap the Photos icon, and you see a collection of all the images you’ve captured with the iPod’s built-in screen-capture feature, as well as those photos that you’ve synced to your iPod via iTunes. Chapter 7 offers more details on the iPod’s photo capabilities.
Tap the Photos icon, and you see a collection of all the images you’ve captured with the iPod’s built-in screen-capture feature, as well as those photos that you’ve synced to your iPod via iTunes. Chapter 7 offers more details on the iPod’s photo capabilities.
Contacts
![]() The iPod touch can hold all the contacts in your computer’s address-book application. Additionally, you can create contacts of your own, as well as automatically sync contacts from MobileMe or an Exchange server. Look for more about Contacts in Chapter 5.
The iPod touch can hold all the contacts in your computer’s address-book application. Additionally, you can create contacts of your own, as well as automatically sync contacts from MobileMe or an Exchange server. Look for more about Contacts in Chapter 5.
YouTube
![]() With this application, you can view streamed YouTube videos on your iPod. YouTube, being a visual-based application, is examined in Chapter 7.
With this application, you can view streamed YouTube videos on your iPod. YouTube, being a visual-based application, is examined in Chapter 7.
Stocks
![]() Similar to the Stocks widget in Apple’s Mac OS X, the iPod’s Stocks application lets you track your favorite stocks in near real time. All widgety things are detailed in Chapter 8.
Similar to the Stocks widget in Apple’s Mac OS X, the iPod’s Stocks application lets you track your favorite stocks in near real time. All widgety things are detailed in Chapter 8.
Maps
![]() Lost? A street map is just a tap away. Based on Google Maps, this application quickly provides not only maps, but also current driving conditions, satellite views, and the locations of businesses within each map. Chapter 8 covers the Maps app.
Lost? A street map is just a tap away. Based on Google Maps, this application quickly provides not only maps, but also current driving conditions, satellite views, and the locations of businesses within each map. Chapter 8 covers the Maps app.
Weather
![]() Much like another Mac OS X widget, the Weather application displays current conditions, as well as the six-day forecasts for locations of your choosing. Like I said, Chapter 8 is great.
Much like another Mac OS X widget, the Weather application displays current conditions, as well as the six-day forecasts for locations of your choosing. Like I said, Chapter 8 is great.
Voice Memos
![]() Voice Memos allows you to record audio through the microphone planted in the iPod’s headset or from a compatible third-party mic. You just know that I’m going to discuss it in Chapter 8.
Voice Memos allows you to record audio through the microphone planted in the iPod’s headset or from a compatible third-party mic. You just know that I’m going to discuss it in Chapter 8.
Notes
![]() Notes is the iPod touch’s tiny text editor. Use the iPod’s virtual keyboard to create lists, jot down reminders, compose haiku, or remind yourself to look in Chapter 8 for more details.
Notes is the iPod touch’s tiny text editor. Use the iPod’s virtual keyboard to create lists, jot down reminders, compose haiku, or remind yourself to look in Chapter 8 for more details.
Clock
![]() Find the time anywhere in the world, as well as create clocks of favorite locations. You also use the Clock application to create alarms and to invoke the stopwatch and countdown timer. Yeah, see Chapter 8 for this one too.
Find the time anywhere in the world, as well as create clocks of favorite locations. You also use the Clock application to create alarms and to invoke the stopwatch and countdown timer. Yeah, see Chapter 8 for this one too.
Calculator
![]() Still can’t figure out an appropriate tip without using your fingers? Pull up the iPod’s Calculator to perform common math operations (and, with the Scientific Calculator view that appears when you turn the iPod to a horizontal position, not-so-common math operations too). You’re not going to make me write it again, are you? Sigh. OK, Chapter 8.
Still can’t figure out an appropriate tip without using your fingers? Pull up the iPod’s Calculator to perform common math operations (and, with the Scientific Calculator view that appears when you turn the iPod to a horizontal position, not-so-common math operations too). You’re not going to make me write it again, are you? Sigh. OK, Chapter 8.
iTunes
![]() The final application in the Home screen, iTunes, is the iPod touch’s version of the iTunes Store. With this small but powerful app and a Wi-Fi broadband connection, you can download music, movies, TV shows, music videos, audiobooks, and iTunes U content. I look at the iTunes app along with the other stores in Chapter 4.
The final application in the Home screen, iTunes, is the iPod touch’s version of the iTunes Store. With this small but powerful app and a Wi-Fi broadband connection, you can download music, movies, TV shows, music videos, audiobooks, and iTunes U content. I look at the iTunes app along with the other stores in Chapter 4.
Settings
![]() Settings is one of the “Plus 2” applications in this list. Though Settings technically isn’t an application, a tap of the Settings icon produces a preferences window for configuring such features as Wi-Fi, data fetching, sounds, brightness, wallpaper, general settings (including date and time, autolock, password lock, network, Bluetooth, and keyboard), mail, Safari, music, video, and photos. Some third-party applications plant their settings in this screen as well. Though I discuss Settings with regard to specific applications throughout this little tome, I provide the big picture in Chapter 2.
Settings is one of the “Plus 2” applications in this list. Though Settings technically isn’t an application, a tap of the Settings icon produces a preferences window for configuring such features as Wi-Fi, data fetching, sounds, brightness, wallpaper, general settings (including date and time, autolock, password lock, network, Bluetooth, and keyboard), mail, Safari, music, video, and photos. Some third-party applications plant their settings in this screen as well. Though I discuss Settings with regard to specific applications throughout this little tome, I provide the big picture in Chapter 2.
Nike + iPod
![]() You’ve dutifully counted all the icons on your iPod touch’s Home screen, and you’ve come up with 18. Ah, but have you gone to the Settings screen, tapped Nike + iPod, and toggled this feature on? If you have, you’ve been reading ahead. Shame on you! This app is the other “Plus 2” application. I talk about Nike + iPod in Chapter 2.
You’ve dutifully counted all the icons on your iPod touch’s Home screen, and you’ve come up with 18. Ah, but have you gone to the Settings screen, tapped Nike + iPod, and toggled this feature on? If you have, you’ve been reading ahead. Shame on you! This app is the other “Plus 2” application. I talk about Nike + iPod in Chapter 2.
Full Gestures
The iPod’s screen is deliberately touchy: Touching it is how you control the device. This section covers the gestures you use to navigate and control your iPod.
Tap
You’re going to see the word tap a lot in this book. When you want to initiate an action—launch an application, control the iPod’s media-playback features, flip a object around, or move to the next screen—this gesture is the one you’ll likely use. If you’ve turned on the iPod’s VoiceOver accessibility features—a feature that helps the visually and aurally impaired use the device—a single tap selects an item. I cover accessibility in Chapter 2.
Tap and hold
You use the tap-and-hold gesture when editing text—either to bring up the magnifying-glass icon to help insert a cursor or to initiate the process for cutting, copying, and pasting text. The iPod touch 3.0 software introduced cut, copy, and paste to the iPod, allowing you to work more readily with text or Web-site content. See “Text Entry and Editing” later in this chapter for more on cut, copy, and paste.
Double tap
Sometimes, just one tap won’t do. Double-tapping often enlarges or contracts an image—zooms in on a photo or Web-page column, for example, or returns it to its normal size after you’ve enlarged it. Other times, it can make items return to the previous view.
When the VoiceOver feature is on, a double tap acts like a single tap ordinarily does. With VoiceOver engaged, one tap tells you what you’re touching, and a double tap launches the application or item you want to use.
If you engage the Zoom feature—another accessibility option—a double tap with three fingers zooms the display.
Flick
If you want to scroll up or down a long list rapidly on your iPod, zip through a selection of album covers in the iPod’s Cover Flow view (a view that allows you to browse your music and podcast collection by album cover/artwork), or flip from one photo to another, you use the flick gesture. As you flick faster, the iPod attempts to match your action by scrolling or zipping more rapidly. Slower flicks produce less motion on the display.
To stop the motion initiated by a flick, just place your finger on the display. Motion stops instantly.
Two-finger flick
With the iPod touch 3.0 software, Apple expanded the iPod’s gestures to accept multifinger touches. If you download Apple’s Remote app from the App Store (Remote is a wonderful application for controlling iTunes remotely on your computer or on Apple TV), you’ll find that when you’re controlling an Apple TV device, a two-finger flick to the left causes a video playing on Apple TV to back up 10 seconds. I expect that we’ll see more of this gesture as the iPod touch matures.
Three-finger flick
As far as I know, the three-finger flick is used only when VoiceOver is on. In that situation, this gesture is used for scrolling.
Drag
For finer control, drag your finger across the display. Use this motion to scroll in a controlled way down a list or email message, or to reposition an enlarged image or Web page. You also drag the iPod’s volume slider and playhead when you’re in the Music or Videos area.
Three-finger drag
This multifinger gesture works only with the Zoom accessibility feature. When Zoom is on, a three-finger drag moves the screen so that you can see the parts hidden by the zoom.
Rotor
Rotor is another special gesture reserved for when VoiceOver is turned on. You place two fingers on the iPod’s screen and turn them as though you’re turning a dial. I’ll talk more about this gesture when I discuss accessibility in Chapter 2.
Stretch/pinch
To expand an image, such as a photo or Web page, place your thumb and index finger together on the iPod’s display and then stretch them apart. To make an image smaller, start with your thumb and finger apart and then pinch them together.
Touch and drag
You use this gesture when you want to change the positions of icons. Tap and hold icons on the Home screen, for example, and they start wiggling, indicating that they can be moved. Touch and drag one of them to move it to a different place, or touch and drag it to the edge of the screen to move it to another Home-screen page. In the Music app’s More area, you’ll find the option to swap out icons along the bottom of the display by touching and dragging new icons into place. You also touch and drag entries in the On-The-Go playlist to change their positions in the list.
Text Entry and Editing
Taps, pinches, and drags help you navigate the iPod, but they won’t compose email messages for you, correct spelling mistakes, or delete ill-considered complaints. The iPod’s keyboard and a well-placed finger will do these jobs.
Touch typing
The iPod’s virtual keyboard largely matches the configuration of your computer’s keyboard. You’ll find an alphabetic layout when you open most applications (Figure 1.3).
Figure 1.3 The iPod touch’s keyboard.
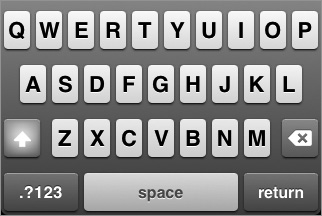
To capitalize characters, tap the up-arrow key (the iPod’s Shift key). To view numbers and most punctuation, tap the .?123 key. To see less-used characters (including £, ¥, and €), choose the numbers layout by tapping the .?123 key and then tapping the # + = key. The Space, Return, and Delete keys do exactly what you’d expect. You can produce alternative characters, such as those with accents or umlauts, by tapping and holding the most appropriate character and then waiting for a pop-up menu of characters to appear. Tap and hold the letter E, for example, and you get a menu that includes such characters as è, é, ê, and ë.
To make typing easier, the keyboard’s layout changes depending on the application you’re using. In Mail, for example, the bottom row holds the @ symbol along with a period (.). Tap and hold that period key, and a pop-up menu displays .net, .edu, .org, and .com; append these extensions simply by sliding your finger over the one you want and then pulling your finger away. While you’re working in Safari, the default layout shows period (.), slash (/), and .com keys along the bottom. Tap and hold the .com key to see a pop-up menu that also includes .net, .edu, and .org.
In the bad old days before the iPod touch 3.0 software, only Safari allowed you to type in landscape orientation—providing you a keyboard that offered more space between keys. Now all of Apple’s applications that support text input offer landscape orientation. Just turn the iPod on its side, and the screen swivels and displays the broader keyboard.
![]() When you type a character, its magnified image appears as you touch it. If you tap the wrong character, leave your finger where it is and slide it to the character you want; the character won’t be “typed” until you let go of it.
When you type a character, its magnified image appears as you touch it. If you tap the wrong character, leave your finger where it is and slide it to the character you want; the character won’t be “typed” until you let go of it.
Editing text
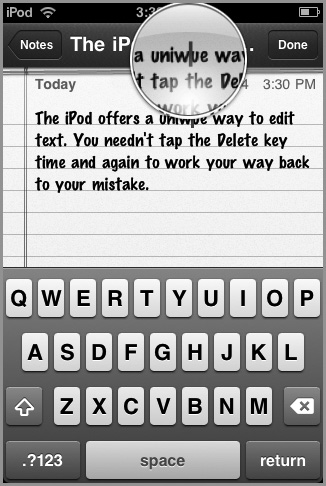
The iPod offers a unique way to edit text. You needn’t tap the Delete key time and again to work your way back to your mistake. Instead, tap and hold the line of text you want to edit. When you do, a magnifying glass appears (Figure 1.4), showing a close-up view of the area under your finger. Inside this magnified view is a blinking cursor. Drag the cursor to where you want to make your correction—after the word or letter you want to correct—and then press the Delete key to remove the text. In most cases, you can also tap between words to insert the cursor there.
Figure 1.4 Tap and hold to magnify your mistakes.
Cut, Copy, and Paste
Let the heavenly trumpets blare: Cut, copy, and paste are now possible with the iPod touch! What’s more, they’re easy to do.
Editing text
To select text for cutting or pasting in editable text—such as an email message or note—tap where you want to insert a cursor and then tap the cursor that you just inserted. A balloon appears that includes the words Select, Select All, and (if you’ve already copied something) Paste. To select the word closest to the cursor, tap Select. To select everything on the page, tap Select All.
When you do either of these things, the balloon changes to display the words Cut, Copy, and Paste; the text is highlighted in blue; and blue handles appear at the beginning and end of the text (Figure 1.5 on the following page).
Figure 1.5 With a couple of taps, you can cut, copy, and paste on your iPod touch.
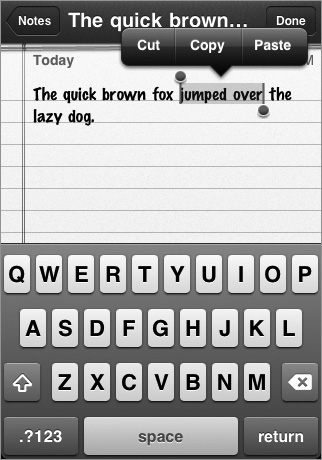
To alter the size of the selection, just drag the handles. When you’ve selected what you want, tap Cut to make the selected text disappear and add it to the iPod’s clipboard (a virtual holding area for storing cut and copied items), Copy to leave the text where it is but also place a copy of it on the clipboard, or Paste to replace the selected text with whatever is currently on the clipboard.
To paste material on the clipboard, just tap somewhere to place the insertion cursor, tap that cursor, and select Paste in the balloon.
If you want to copy jumped over from the phrase The quick brown fox jumped over the lazy dog in the Notes application, for example, you do this:
1. Tap next to the j in jumped to insert the cursor.
2. Tap the cursor to select jumped and produce the Select, Select All, Paste balloon.
3. Tap Select, and drag the blue handle at the end of jumped to the end of the word over.
4. With jumped over now selected, tap Copy.
Now, to insert the phrase jumped over into an email message, do this:
1. Return to the Home screen by clicking the Home button.
2. Tap the Mail application, and create a new email message.
3. Tap to place the cursor in the message.
4. Tap that cursor to produce the Select, Select All, Paste balloon.
5. Tap Paste to insert jumped over at the cursor location.
Copying Safari text
You can copy (though not cut) content from Safari as well, even though that text is not editable. Launch Safari, and tap the text you’d like to copy. The magnifying-glass icon appears, and you can choose a selection point. Then, just as you do with text in an email or text message, you can expand the selection and copy it.
![]() If you’d like to copy an entire block of text—a column of text on a Web site, for example—just tap the edge of that block, away from any specific text. Everything in the block is automatically selected, and a Copy balloon appears.
If you’d like to copy an entire block of text—a column of text on a Web site, for example—just tap the edge of that block, away from any specific text. Everything in the block is automatically selected, and a Copy balloon appears.
Once more, here’s a real-world example:
You’re in a wedding band and preparing for the next client’s trip down the aisle. The bride and groom have requested Nirvana’s “Smells Like Teen Spirit.” The band leader launches Safari, uses Google to search for Smells Like Teen Spirit lyrics, and taps one of the many links that produce those lyrics.
On the resulting Web page, she discovers that the lyrics are contained within a block. She taps one of the edges of the block to highlight all the text in the block and then taps Copy to copy it.
Next, she clicks the Home button, taps Mail, creates a new email message, taps in the body of the message to insert the cursor, taps the cursor, and taps Paste in the balloon that appears. The lyrics are pasted into the message. Finally, she addresses the message to the band’s singer and sends it.
Copying Safari images
You can also copy images in Safari. To do that, just tap and hold an image. A screen pops up from the bottom of the display, listing either three or five options.
If the image acts as a hyperlink (meaning that when you tap the image, you’re taken to a Web page linked to that image), you’ll see five buttons: Open, Open in New Page, Save Image, Copy, and Cancel (Figure 1.6). Above these buttons is the destination address (or URL).
Figure 1.6 Tap and hold a linked image in Safari, and you see these options.
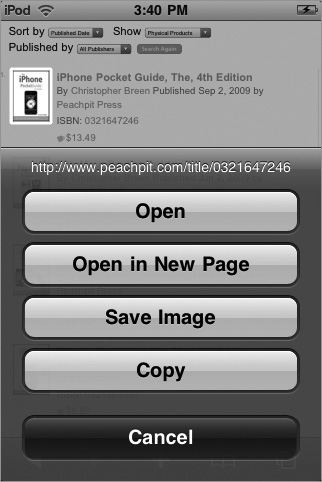
• Open takes you to the Web page that’s linked to the image.
• Open in New Page saves the current page and opens a new browser page in Safari. (I cover this multiple-page Safari stuff in Chapter 6.)
• Save Image places a copy of the image in the Photos application.
• Copy places on the clipboard a copy of the URL that’s linked to the image.
• Cancel does exactly what it suggests.
If the image isn’t linked to anything but is simply a picture, when you tap it, you see the Save Image, Copy, and Cancel buttons:
• Save Image places a copy of the image in the Photos application.
• Copy copies the image to the clipboard, thus providing you the opportunity to paste it into an email message.
• Cancel does … you know.
![]() Cut, copy, and paste aren’t limited to Notes, Safari, and Mail. You can copy and paste numbers that appear in the Calculator application’s results field, for example. Also, because the cut, copy, and paste features are available to anyone who creates iPod touch/iPhone applications, you’ll find them used in a variety of apps that you can purchase from the App Store.
Cut, copy, and paste aren’t limited to Notes, Safari, and Mail. You can copy and paste numbers that appear in the Calculator application’s results field, for example. Also, because the cut, copy, and paste features are available to anyone who creates iPod touch/iPhone applications, you’ll find them used in a variety of apps that you can purchase from the App Store.