
5. Mail, Contacts, and Calendar
Can’t figure out how to copy your notes and screen shots from your iPod to a computer that’s not synced with your iPod or how to receive documents that you can view on your iPod? Or is your life so tied to email that you can’t stand to be away from your computer for more than a couple of hours? If so, you and the iPod’s Mail application are about to become best friends.
Speaking of friends, little good it is to have the desire to email your friends from your iPod only to discover that you can’t recall their addresses. Fortunately, you needn’t possess an infallible memory for this kind of information when you can store it all in the Contacts application.
It’s unlikely that you’ll keep those friends if you routinely stand them up because you’ve forgotten the time and place to meet them. This needn’t happen either. The iPod includes a Calendar application that lets you sync your schedule with your Mac or Windows PC, as well as create calendar events on the go. In this chapter, I explain the ins and outs of all three applications.
Using Mail
Mail is a real email client, much like the one you use on your computer. With it, you can send and receive email messages, as well as send and receive a limited variety of email attachments. You can receive and play such audio attachments as MP3, AAC, WAV, and AIFF. You can view received JPEG graphics files, text, and HTML; Microsoft Word, Excel, and PowerPoint documents; iWork Pages, Keynote, and Numbers files; and Adobe PDF documents. Regrettably, you can’t edit any of the files you receive; they’re read-only.
Mail is limited in some other ways:
• Unlike all modern computer-based email clients, the iPod touch has no spam filter and no feature for managing mailing lists.
• You can’t flag messages or apply rules that allow Mail to sort or copy certain messages (those from a particular sender, for example) into specific mailboxes.
• Speaking of mailboxes, you can’t create new mailboxes on the iPod, either. Instead, you must create them on your computer or on the Web, and you can do so only with IMAP accounts; they’ll appear in Mail after you sync the mail accounts on your computer with the iPod.
The iPod is capable of sending and receiving email over a Wi-Fi connection only. Unlike the iPhone, the iPod touch doesn’t support the EDGE and 3G wireless networking protocols offered by mobile phone carriers.
Now that you know what Mail can and can’t do, you’re ready to look at how to use it.
Creating an account
When you first synced your iPod to your computer, you were asked whether you wanted to synchronize your email accounts to the device. If you chose to do so, your iPod is nearly ready to send and receive messages. All you may have to do now is enter a password for your email account in the Mail, Contacts, Calendars setting.
But I’m getting ahead of myself. Rather than start in the middle, with a nearly configured account, I’ll start at the beginning so that you can follow the iPod’s account-setup procedure from start to finish. In the next few pages, I examine how to configure Exchange, Web-based (MobileMe, Gmail, Yahoo, and AOL), and IMAP and POP accounts.
Configuring an Exchange account
Let me take care of corporate readers first by outlining the steps necessary to create an Exchange account:
1. Tap the Settings icon in the iPod’s Home screen and then tap Mail, Contacts, Calendars.
2. Tap Add Account, and in the resulting screen, tap Microsoft Exchange.
3. In the Exchange screen that appears, enter your email address, user name, password, and a description along the lines of Company Email.
Your IT department or manager should be able to provide this info.
4. Tap Next.
The iPod attempts to connect to the Exchange server.
If the connection is successful, you’re pretty well set. If it isn’t, another Exchange screen will ask for the same information you provided before, as well as the server address. Again, the Exchange server administrator should be able to give you this information. The address in question here is the address of the front-end server—the one that greets your iPod when it attempts to connect to the company server.
When this information is configured properly, the iPod attempts to log on to the server via a Secure Sockets Layer (SSL) connection. If it can’t do so, it tries a nonsecure connection.
If SSL isn’t configured correctly, you can change those settings by tapping the name of your Exchange account in the Mail, Contacts, Calendars screen; tapping Account Info; and flipping the SSL slider to On or Off, depending on how it should be configured.
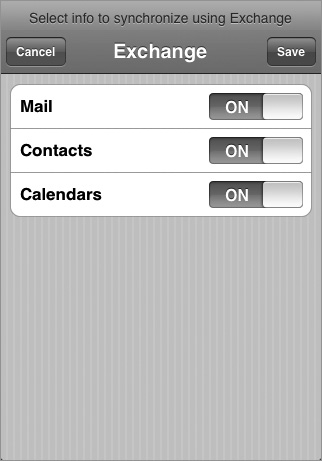
5. When you’re prompted to choose the kinds of data—Mail, Contacts, and Calendars—that you want to synchronize between your iPod and the Exchange server (Figure 5.1), flick the switch for those data types to On, and then tap Save.
Figure 5.1 Choose the kind of data you want to sync with the Exchange server.
By default, the iPod synchronizes just 3 days’ worth of email. If you need to store more email on your iPod, select your Exchange account in the Mail, Contacts, Calendars screen; tap Mail Days to Sync; and choose a new number of days’ worth of email to synchronize. Your options are No Limit, 1 Day, 3 Days, 1 Week, 2 Weeks, and 1 Month.
![]() When you create an Exchange account on your iPod and choose to sync contacts and calendars, any existing contacts and calendars information on the iPod will be wiped out, replaced by contacts and events from the Exchange server. Additionally, you can’t synchronize this kind of data via iTunes with your computer. You can synchronize data between your iPod and personal computer if you have a MobileMe account, however.
When you create an Exchange account on your iPod and choose to sync contacts and calendars, any existing contacts and calendars information on the iPod will be wiped out, replaced by contacts and events from the Exchange server. Additionally, you can’t synchronize this kind of data via iTunes with your computer. You can synchronize data between your iPod and personal computer if you have a MobileMe account, however.
Configuring MobileMe, Gmail, Yahoo, and AOL accounts
The iPod’s designers made configuring one of these accounts really easy. Just follow these steps:
1. Tap the Settings icon in the iPod’s Home screen and then tap Mail, Contacts, Calendars.
2. Tap Add Account, and choose MobileMe, Gmail, Yahoo Mail, or AOL.
3. In the screen that appears, enter your name, the email address for this account, your account’s password, and a descriptive name for the account—My Mighty MobileMe Account, for example.
4. Tap Save.
Unlike its practice with other kinds of accounts, the iPod doesn’t demand settings for incoming and outgoing mail servers. It’s intimately familiar with these services and does all that configuration for you. But you’re welcome to muck with these more-arcane settings after you create the account, if you like (and I tell you how in the “Configuring further” section later in this chapter).
Configuring POP and IMAP accounts
If you’re like a lot of people and have an email account through a “regular” Internet service provider (ISP) that provides email via a DSL or cable broadband connection, you’ll configure your iPod this way:
1. Tap the Settings icon in the iPod’s Home screen and then tap Mail, Contacts, Calendars.
2. Tap Add Account.
3. Tap Other.
I ask you to tap Other because this option lets you set up email accounts for ISPs other than those listed above the Other entry. In the resulting screen, you have the option to add mail accounts (as well as server-based contacts and calendars, which I’ll deal with later).
4. Tap Add Mail Account.
In the resulting New Account screen, enter the information for setting up a POP or IMAP account.
5. Tap Name, and enter your real name (as opposed to your user name).
6. Tap Address, and enter your email address (such as [email protected]).
7. Tap Password, and enter the account’s password.
8. Tap Description, and enter a description of your account.
I often use the name of my account for this entry—Macworld, for example.
9. Tap Save to save your settings.
The iPod looks up the account settings you’ve entered. If you’ve set up an account for a common email carrier—Cox or BellSouth, for example—it checks your account and configures the server settings for you.
If the iPod can’t configure your account, or if the ISP offers IMAP and POP accounts and doesn’t know which kind you have, the New Account screen displays new options.
10. Choose IMAP or POP.
At the top of the screen, you see IMAP and POP buttons. Tap the button for the kind of account you have.
11. Enter the host name in the Incoming Mail Server area.
This information, provided by your ISP, is in the format mail.examplemail.com.
12. Tap User Name, and enter the name that precedes the at (@) symbol in your email address.
If the address is [email protected], for example, type bruno.
13. Tap Password, and enter the password for your email account.
![]() Type the password very carefully. With the 2.0 and later software, password fields are a bit better about showing you what you’ve typed rather than displaying just black dots. When you enter a password character, the password field briefly displays the character you just typed—4 or W, for example. But the characters don’t remain onscreen long, and you may miss them. Check your work before you lift your finger off the keyboard.
Type the password very carefully. With the 2.0 and later software, password fields are a bit better about showing you what you’ve typed rather than displaying just black dots. When you enter a password character, the password field briefly displays the character you just typed—4 or W, for example. But the characters don’t remain onscreen long, and you may miss them. Check your work before you lift your finger off the keyboard.
14. Below Outgoing Mail Server, tap Host Name; then enter the appropriate text—which, once again, will be provided by your ISP, typically in the format smtp.examplemail.com.
15. Enter your user name and password again, if required.
If these fields aren’t filled in for you, copy this information from the Incoming Mail Server area and paste it in here.
16. When you’ve double-checked to make sure everything’s correct, tap Save in the top-right corner of the screen.
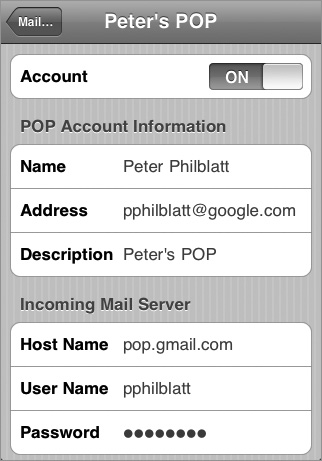
The configured account (Figure 5.2) appears in the list of accounts in the Mail Settings screen.
Figure 5.2 Configured email POP account.
Configuring further
Most people can stop right here and get on with mucking with Mail, but your email account may require a little extra tweaking for it to work. Here’s how to do just that:
1. Tap Settings in the Home screen; then tap Mail, Contacts, Calendars.
2. Tap your account name.
3. If you’d like that account to appear in Mail’s Accounts list, be sure that the Account slider is set to On.
![]() Why turn it off? Perhaps you’ve got a load of messages sitting on the server that you’d rather not download with your iPod. Download those messages with your computer, delete them from the server, and then enable the account on your iPod.
Why turn it off? Perhaps you’ve got a load of messages sitting on the server that you’d rather not download with your iPod. Download those messages with your computer, delete them from the server, and then enable the account on your iPod.
4. Verify that the information in the account’s settings fields is correct; if not, tap the field you want to edit and start typing.
5. Tap the SMTP button to configure the outgoing server for your email account (see the nearby sidebar “Out and About” for more details).
6. Tap the Advanced button at the bottom of the screen, and in the resulting Advanced screen for POP accounts (Figure 5.3 on the following page), choose the options you want.
Figure 5.3 A POP account's Advanced settings.
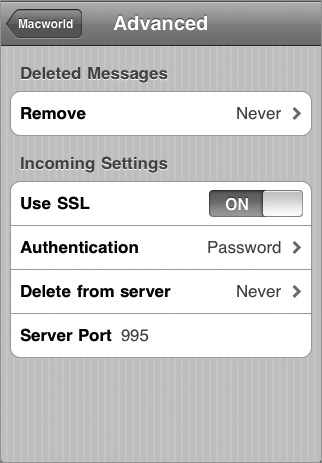
Use these settings to specify
• The interval the iPod will wait before it removes deleted messages from its Trash. Options are Never, After One Day, After One Week, and After One Month
• Whether your account will use SSL protection to transmit and receive email
• The kind of authentication your account requires (MD5 Challenge-Response, NTLM, HTTP MD5 Digest, or Password)
• When you want email to be deleted from the server (options include Never, Seven Days, and When Removed from Inbox)
• The incoming server port for your account
This information is individual enough that I’ll leave it to your IT or ISP representative to tell you how to configure these options. Worth noting, however, is that you may be able to suss out these settings by looking at how the email client on your computer is configured.
For IMAP accounts, you have some different options in the Advanced screen. You can choose which mailboxes will hold drafts, sent email, and deleted messages. You can choose when to remove deleted messages (Never, After One Day, After One Week, or After One Month). You can turn SSL on or off if the account isn’t with Yahoo Mail, which doesn’t offer an SSL option. You can choose the same authentication schemes as your POP-using sisters and brothers. You can enter an IMAP path prefix—a path name required by some IMAP servers so that they can show folders properly. And you can change the incoming server port.
Understanding Mail, Contacts, Calendars behavior
Before I leave the Mail, Contacts, Calendar screen, I should examine the options that tell the Mail, Contacts, and Calendars applications how to behave (Figure 5.4).
View the bottom part of the screen, and you find these options below the Mail heading:
Figure 5.4 Additional Mail settings.
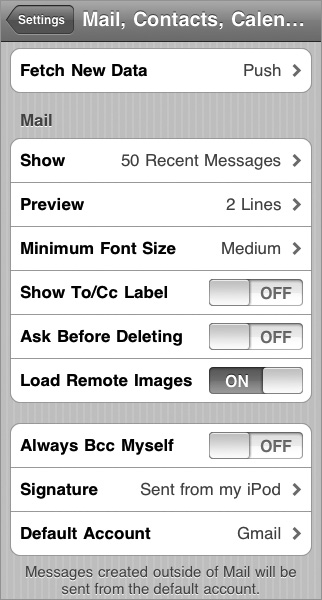
Fetch New Data. Thanks to the iPod 2.0 and later software’s Microsoft Exchange and MobileMe support, new data such as events, contacts, and email can be transferred (or pushed) to your iPod automatically. You don’t have to tell the iPod to retrieve this data; retrieval just happens. When you tap Fetch New Data, you’re taken to the screen of the same name, where you can switch off Push (Figure 5.5).
Figure 5.5 The Fetch New Data screen.
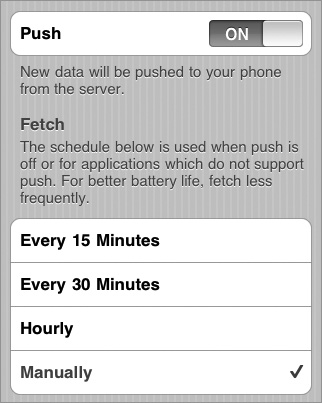
Additionally, you find Fetch settings here. Fetch is essentially a scheduler for your iPod; it tells the device how often to go out and get information such as email messages from an account that can’t push email, such as a POP account. (Fetch can also retrieve data from services such as MobileMe and Yahoo that push data but for which you’ve turned push off.) You can configure the iPod to fetch data every 15 or 30 minutes, hourly, or manually.
If you tap the Advanced button at the bottom of the window, you’re taken to an Advanced screen, where you can determine how your various email accounts behave with regard to pushing and fetching. You can configure a MobileMe or Yahoo account with a Push, Fetch, or Manual option, for example. Accounts that don’t support push can be configured only for Fetch or Manual.
![]() Pushing and fetching burn through a battery charge faster than using a manual setting, because your iPod has to perform battery-draining tasks such as logging onto servers to retrieve data. Fetch demands more from a battery than push does. For this reason, if you need to be miserly with your battery, fetch less often and turn push off.
Pushing and fetching burn through a battery charge faster than using a manual setting, because your iPod has to perform battery-draining tasks such as logging onto servers to retrieve data. Fetch demands more from a battery than push does. For this reason, if you need to be miserly with your battery, fetch less often and turn push off.
Show. How many messages would you like Mail to display? Options include 25, 50, 75, 100, and 200 recent messages.
Preview. When you view message subjects within a mailbox in one of your Mail accounts, you see the first bit of text in each message. The Preview entry determines how many lines of this text you’ll see: none, 1, 2, 3, 4, or 5 lines.
Minimum Font Size. This setting determines how large the text will be in your email messages: Small, Medium, Large, Extra Large, or Giant. Medium is good for most eyes, and it saves a lot of scrolling.
Show To/Cc Label. When this option is set to on, Mail plasters a To next to messages that were sent directly to you and a Cc next to messages on which you were copied.
Ask Before Deleting. When you turn this option on, if you tap the Trash icon to delete the message you’re reading, you’ll be asked to confirm your decision. If you swipe a message and then tap the red Delete icon that appears or use the iPod’s bulk-delete option, however, you won’t be asked for confirmation.
Load Remote Images. Like the email client on your computer, the iPod is capable of automatically showing you images embedded in messages. By default, this option is on.
Always Bcc Myself. If you’re the kind of person who wants a copy of every message you send (but don’t want the recipients of those messages to know), switch on this option. You’ll get your copies.
Signature. Ever wonder where that proud Sent from My iPod message comes from—the one that appears at the bottom of every message you send from your iPod? Right here. As a new iPod owner, you’ll want to stick with this default message for a while, simply for the bragging rights. Feel free to tap this option later and enter some pithy signoff of your own.
Default Account. If you have more than one email account set up, this setting determines which account will send images, notes, and other links. When you send one of these items, you can’t choose which account sends it, so give this option some thought. You may discover that Wi-Fi hotspots are reluctant to send mail through your regular ISP’s SMTP server, whereas Gmail accounts rarely have this problem. For this reason, you may want to make your Gmail account the default.
These Contacts settings appear next (Figure 5.6):
Figure 5.6 Additional Contacts and Calendar settings.
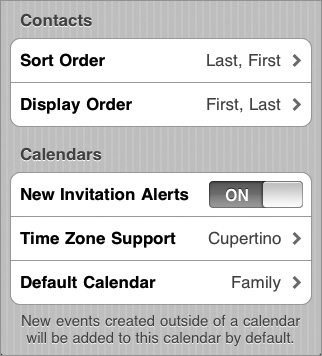
Sort Order. Tap this option to choose between sorting contacts by First, Last name or by Last, First name.
Display Order. Similar to Sort Order, this option lets you display your contacts as either First, Last or Last, First.
Finally, you see these Calendar settings at the bottom of the screen:
New Invitation Alerts. This On/Off switch lets you view—or not—meeting invitations you’ve received (those pushed to you from an Exchange server, for example).
Time Zone Support. Tap this command, and you’re taken to the Time Zone Support screen, where you can turn Time Zone Support on or off. Below that setting is an option to choose the time zone of a major city.
When Time Zone Support is on, Calendar’s events are shown in the time of the selected city. So, for example, you could choose London even if you’re in San Francisco and see events in London time. Switch this option off, and events are shown in the iPod’s current location (which is determined by network time).
Default Calendar. Tap this command to choose a calendar where the iPod will add events created outside the Calendar application.
Sending and Receiving Mail
Now that your accounts are finally set up properly, you can send and receive messages. The process works this way.
Receiving email
Receiving email is dead simple. Just follow these steps:
1. Tap the Mail icon in the iPod’s Home screen.
Mail will check for new messages when you first launch the application. If you have new messages, the iPod will download them.
When it does, a number appears next to the account name, indicating the account’s number of unread messages. Any messages that contain attachments bear a paper-clip icon next to the sender’s name.
2. Tap the account name.
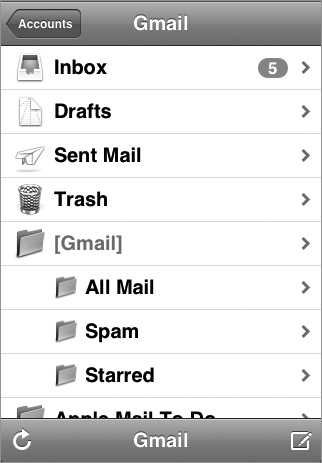
You’ll see a list of that account’s mailboxes. For POP accounts, those mailboxes include Inbox, Drafts (if you’ve saved any composed messages without sending them), Sent (if you’ve sent any messages from that account), and Trash (if you’ve deleted any messages from that account). For IMAP accounts, you’ll most likely see Inbox, Drafts, Sent, Trash, and any folders associated with the account—folders that you’ve added to a MobileMe or Google account, for example.
These folder names, however, depend entirely on what the host service calls them. Gmail, for example, gathers the messages you’ve sent into the Sent Mail folder (Figure 5.7 on the following page).
In the bottom-right corner of an account screen, you’ll see a Compose icon. Tap it, and a New Message screen appears, along with the iPod’s keyboard. I talk about creating new messages in “Creating and sending email” later in this chapter.
3. Tap the Inbox.
Messages appear in a list, with the most recently received messages at the top. Unread messages have a blue dot next to them. The Inbox heading will have a number in parentheses next to it—Inbox (22), for example. That (22) means that you have 22 unread messages.
This screen also bears a Compose icon and, in the bottom-left corner, a Retrieve icon, which you tap to check for new mail.
An Edit button in the top-right corner lets you delete messages. Tap it, and all the messages in the list acquire a dim gray circle next to them. This circle is for marking messages that you want to delete or move. Tap one of these circles, and a red check icon appears within it. Continue tapping messages until you’ve selected all the messages you’d like to delete or move. Then tap the Delete button at the bottom of the screen, and all the messages will be moved to the Trash. (Alternatively, with regard to deleting messages, you can do without the Edit button. Swipe your finger across a message entry to force a Delete button to appear, and tap Delete; the message moves to the Trash.)
Tap Move, and a Mailboxes screen scrolls up from the bottom, listing all available mailboxes for that account. Choose a mailbox, and the selected messages move to it. This move feature is really useful only if you’re using an IMAP account, as unlike POP accounts, IMAP accounts can have additional folders for filing email messages.
![]() When you delete a message, it’s not really gone; it’s simply moved to the Trash mailbox. To delete the message for real, you can either wait out the remove interval listed in the account’s Mail setting (see “Configuring further” earlier in this chapter) or tap Trash. Then you can swipe a message and tap the Delete button that appears next to the message; tap Edit and then tap Delete All at the bottom of the screen; or cherry-pick the messages you want to delete by tapping the gray circles next to them and then tapping the Delete (#) button (where # equals the number of messages you’ve selected). Then—and only then—is a message truly gone.
When you delete a message, it’s not really gone; it’s simply moved to the Trash mailbox. To delete the message for real, you can either wait out the remove interval listed in the account’s Mail setting (see “Configuring further” earlier in this chapter) or tap Trash. Then you can swipe a message and tap the Delete button that appears next to the message; tap Edit and then tap Delete All at the bottom of the screen; or cherry-pick the messages you want to delete by tapping the gray circles next to them and then tapping the Delete (#) button (where # equals the number of messages you’ve selected). Then—and only then—is a message truly gone.
Navigating the Message screen
Simple though it may be, the Message screen packs a punch. In it, you find not only standard email elements such as From and To fields, Subject, and message body, but also icons for adding contacts and for filing, trashing, replying to, and forwarding messages. The screen breaks down this way.
Before the body
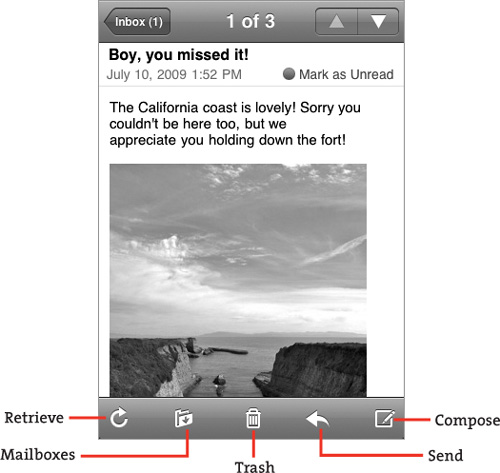
The top of the Message screen displays the number of messages in the mailbox as well as the number of the displayed message—2 of 25, for example. Tap the up or down arrow to the right to move quickly to the previous or next message in the mailbox (Figure 5.8).
Figure 5.8 Message body with document attached.
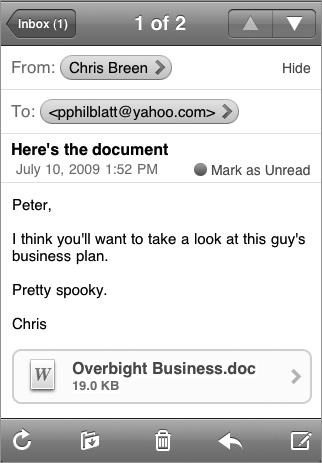
Below that, you’ll see From and To fields. Each field will display at least one contact name or email address (one of which could be your own) in a blue bubble. Tap one of these bubbles, and if the name or address is in your iPod’s Contacts directory, you’ll be taken to its owner’s Info screen. If the name or address isn’t among your contacts, a screen will appear, offering you the hidden option of emailing the person, creating a new contact or adding the address to an existing Contacts entry (Figure 5.9).
Figure 5.9 An unknown contact’s Info screen.
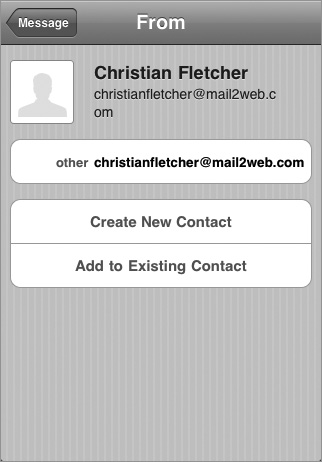
Hidden option? Yes. That person’s email address is listed next to the Other heading. Tap that email address, and a new email message opens with that person’s address in the To field. The email will be sent from the account you’re currently working in.
Tap Create New Contact, and a New Contact screen appears, with that person’s name at the top and his email address filled in below. If the message has no name associated with it—if you were sent a message from a company address such as [email protected], for example—no name will appear in the Name field.
Tap Add to Existing Contact, and a list of all the contacts on your iPod appears. Tap a contact, and the address is added to that contact. If you’d like to edit the contact—indicate that the address belongs to Home or Work, for example—tap the blue bubble again to bring up the contact’s Info screen, tap the Edit button, tap the email address to produce the Edit Email screen, tap Other, and choose a different label in the Label screen.
You can hide the To field by tapping the Hide entry near it. This action hides all the To fields in all the messages in all your accounts, and it changes the Hide entry to Details. To expose the To fields again, just tap Details.
![]() Hiding the To field can be really helpful when someone insists on filling To fields with dozens of addresses (something that’s considered to be both rude and a privacy violation). With the To field hidden, you can see the beginning of the message immediately instead of countless addresses.
Hiding the To field can be really helpful when someone insists on filling To fields with dozens of addresses (something that’s considered to be both rude and a privacy violation). With the To field hidden, you can see the beginning of the message immediately instead of countless addresses.
Below the From and To fields, you’ll see the message subject, followed by the date. If you have details showing, you’ll also see a Mark As Unread entry. Tap this entry to do exactly what it suggests.
Body talk
Finally, in the area below, are the pithy words you’ve been waiting for. Just as in your computer’s email client, you’ll see the text of the message. Quoted text appears with a vertical line to its left—or more than one line, depending on how many quote “layers” the message has. If a message has several quote layers, each vertical line is a different color. (The first three layers are blue, green, and red, respectively; subsequent layers are red from there on out.)
If the message has attachments, they will appear below the message text. If Cousin Bill sends photos from his latest vacation, they’ll appear here (Figure 5.10).
URLs and email addresses contained within messages appear as blue, live links. Tap a URL, and Safari launches and takes you to that Web page. (I cover Safari in Chapter 6.) Tap an email address, and a new email message opens with that address in the To field.
Figure 5.10 Message with attached photo.
![]() The iPod is smart about URLs. Both http://www.example.com and www.example.com appear as live links, for example, but example.com does not.
The iPod is smart about URLs. Both http://www.example.com and www.example.com appear as live links, for example, but example.com does not.
The tools below
The toolbar at the bottom of the screen contains five icons (refer to Figure 5.10):
Retrieve. Tap this circular icon, and the iPod will check for new messages for that account.
Mailboxes. When you tap the Mailboxes icon, you’re presented with a list of all the mailboxes associated with that account. Tap one of these mailboxes, and the message will be filed there. (Use this method to move a message out of the Trash.)
Trash. Tap this icon, and the cute little trash can pops its top and sucks the message into it. Like I said, to move messages out of the Trash, just tap the Trash mailbox in your account screen, tap a message, tap the Mailboxes icon, and then tap the mailbox where you’d like to put the message.
Send. The left-arrow icon is your pathway to the Reply, Reply All, Forward, and Save Image commands (Figure 5.11).
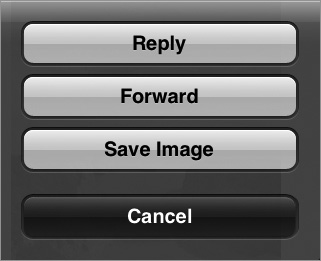
When you tap the Send icon and then the Reply button that appears, a new message appears, with the Subject heading Re: Original Message Subject, in which Original Message Subject is … well, you know. The message is addressed to the sender of the original message, and the insertion point awaits at the top of the message body. The original text is quoted below. The message is mailed from the account you’re working in.
If a message you received was sent to multiple recipients, tapping Reply All lets you reply to all the recipients of the original message.
Tap Forward, and you’re responsible for filling in the To field in the resulting message. You can type it yourself with the keyboard that appears or tap the plus (+) icon to add a recipient from your iPod’s list of contacts. This message bears Fwd: at the beginning of the Subject heading, followed by the original heading. The original message’s From and To information appear at the top of the message as quoted text followed by the original message.
Finally, if a message has images attached to it, you’ll see a Save X Images button, where X is the number of images. (The button will read Save Image if there’s just one image.) Tap that button, and the attached images will be added to the Saved Photos collection in the Photos application.
Compose. Last is your old friend the Compose icon. Tap it, and a New Message screen appears, ready for your input.
Creating and sending email
If it truly is better to give than receive, the following instructions for composing and delivering mail from your iPod should enrich your life significantly. With regard to email, the iPod can give nearly as good as it gets. Here’s how to go about it.
As I mention earlier in the chapter, you can create new email messages by tapping the Compose icon that appears in every account and mailbox screen. You’ll even find the Compose icon available when you’ve selected Trash. To create a message, follow these steps:
1. Tap the Compose icon.
By default, Mail fills the From field with the address for this account. But you needn’t use that account. Just tap From, and any other email accounts you have will appear in a scrolling list. Tap the one you want.
2. In the New Message screen that appears, type the recipient’s email address, or in the To field, tap the plus icon.
When you place the insertion point in the To or Cc/Bcc field, notice that the iPod’s keyboard adds @ and period (.) characters where the spacebar usually resides. (The spacebar is still there; it’s just smaller.) This feature makes typing addresses easier because you don’t have to switch to the numbers-and-symbols keyboard.
![]() Tap and hold the period key, and—good gosh almighty!—.net, .edu, .org, and .com pop up as part of a contextual menu. How handy is that?
Tap and hold the period key, and—good gosh almighty!—.net, .edu, .org, and .com pop up as part of a contextual menu. How handy is that?
When you start typing a name, the iPod will suggest recipients based on entries in your list of contacts (Figure 5.12). If the recipient you want appears in the list below the To field, tap that name to add it to the field.
Figure 5.12 Begin typing to find a contact.

When you tap the plus icon, your list of contacts appears. Navigate through your contacts, and tap the one you want to add to the To field. Some contacts will have multiple email addresses; tap the one you’d like to use. To add more names to the To field, type them or tap the plus icon to add them.
To delete a recipient, tap that contact and then tap the Delete key on the iPod’s keyboard.
3. If you’d like to Cc or Bcc someone, tap in that field, tap in the appropriate field—CC or Bcc—and then use any of the techniques in step 2 for adding a recipient.
4. Tap the Subject field, and enter a subject for your message with the iPod’s keyboard.
That subject replaces New Message at the top of the screen.
5. Tap in the message body (or, if the insertion point is in the Subject field, tap Return on the iPod’s keyboard to move to the message body), and type your message.
6. Tap Send to send the message or Cancel to save or delete your message.
The Send icon, in the top-right corner, is easy enough to understand. Tap that icon, and the message is sent from the current account. You’ll know that it’s been sent when you hear a swoosh sound.
Cancel is a little more confusing. If you’ve typed anywhere in the To field, New Message screen’s Subject field, or message body (even if you subsequently deleted everything you typed), a sheet will roll up when you tap Cancel, displaying Save, Don’t Save, and Cancel icons. Tap Save to store the message in the account’s Drafts mailbox. (If no such mailbox exists, the iPod will create one.) When you tap Don’t Save, the message is deleted. When you tap Cancel, the iPod assumes that you made a mistake when you tapped Cancel the first time, and it removes this sheet.
If the iPod can’t send a message—when you don’t have access to a Wi-Fi network—it creates an Outbox for the account from which you’re trying to send the message. When you next use Mail and are able to send the message, the iPod will make the connection and send any messages in the Outbox, at which point the Outbox will disappear.
Working with pushy MobileMe
Apple’s $100-per-annum MobileMe Web service does a lot of things: provides 20 GB of online storage; gives you a place to post galleries of images and videos; and offers Webcentric mail, calendar, and contacts applications. For purposes of this discussion, one of the most important things it does is automatically synchronize (or push) mail, contact, calendar, and Internet bookmark information among your computers, your iPod touch, and Apple’s Internet-based MobileMe server. So, for example, when you enter a new event in the iPod’s Calendar application, it also soon appears within MobileMe’s Calendar component on the Web, as well as on any computer that’s synced with MobileMe. You set it up this way.
Configuring MobileMe on the Macintosh
You configure MobileMe through the MobileMe system preference, as follows:
1. Choose Apple > System Preferences.
2. Click the MobileMe preference in the Internet & Network section and then click the Sync tab.
3. Check the Synchronize with MobileMe box, and choose Automatically from the pop-up menu.
When you choose Automatically, you enable MobileMe’s push capabilities. This command tells MobileMe that when some new data is added to the MobileMe Web site or to your iPod (you’ve uploaded a photo to a photo gallery, created a new calendar event, or added a new contact, for example), that data should be pushed almost immediately to the other devices synced with your MobileMe account.
Note that this is not the case with data created on your computer. When you choose Automatically from this pop-up menu on your computer, any new data you create will be synchronized every 15 minutes. If you need that data synced sooner, simply click the Sync Now button.
4. In the Sync tab’s scrolling pane, select the kind of data you’d like to synchronize.
You’ll see several options in this pane, but the ones you’re concerned about here are Calendars and Contacts (Figure 5.13).
Figure 5.13 A Mac's MobileMe system preference.

5. To synchronize this data with MobileMe immediately, click Sync Now.
In the process, you may see a dialog box that asks how you’d like to sync your data. The options include merging your computer and MobileMe data, replacing the data on your computer with MobileMe’s data, or replacing MobileMe’s data with the data on your computer.
If you click the More Options button, you can choose a different option for the kinds of data you’re syncing. You can choose to merge contacts but replace the calendars on your Mac with MobileMe’s calendar information, for example.
Your Mac will do as you ask and synchronize your data. If the synchronization was successful, and if you chose to sync calendars and contacts, you should see the same data in iCal and Address Book that is available on the MobileMe Web site.
Configuring MobileMe in Windows
The process of syncing your data with MobileMe in Windows is similar to the Macintosh experience. The difference is that MobileMe syncs with Windows applications such as Microsoft Outlook and Windows Contacts, because Apple’s iCal and Address Book don’t come in Windows versions.
![]() For this procedure to work, you must have iTunes 8.2 or later and, of course, a MobileMe account.
For this procedure to work, you must have iTunes 8.2 or later and, of course, a MobileMe account.
To configure MobileMe on a PC, follow these steps:
1. Download and install MobileMe Setup.
If you don’t have MobileMe installed on your PC, you’ll have to get it from http://support.apple.com/downloads/MobileMe_Control_Panel_for_Windows.
2. Choose Start > Control Panels.
3. Open the MobileMe Preferences control panel, sign in with your MobileMe user name and password, and click the Sync tab.
4. Enable the Sync with MobileMe option, and choose Automatically from the pop-up menu.
(See the Macintosh configuration information in the preceding section to find out why you choose Automatically.)
5. Enable the kinds of data you want to sync.
Your choices are Contacts, Calendars, and Bookmarks. When you choose Contacts, you can sync with Outlook, Google Contacts, Yahoo Address Book, and Windows Contacts. For Calendars, you can sync only with Outlook. And Bookmarks can be synced with Internet Explorer or the Windows version of Apple’s Web browser, Safari (see Chapter 6).
As with Macintosh syncing, you’ll be asked how you’d like to have the sync performed. Here, too, you can choose how particular kinds of data are synced.
Configuring the iPod
Now that your computer is configured, you’re ready to add the iPod to the mix, as follows:
1. Tap Settings and then tap Mail, Contacts, Calendars.
2. In the Accounts area, tap your MobileMe account.
3. In the account screen that appears, switch on those data types you’d like to sync with MobileMe.
Your choices are Mail, Contacts, Calendars, and Bookmarks (Figure 5.14). Contacts, calendars, and bookmarks work as I describe earlier in this chapter; when contacts and calendar items are created, they’re synchronized with MobileMe and any computers linked to your MobileMe account.
Figure 5.14 The iPod touch's MobileMe syncing options.

When you switch on the Mail option, however, you’re telling MobileMe to send any received messages to your iPod immediately. When the Mail option is switched off, you’ll receive that mail only when you launch the Mail application and check for it.
![]() When you enable MobileMe syncing for bookmarks, contacts, or calendars, the syncing option for those enabled data types will no longer be available for the iPod in iTunes.
When you enable MobileMe syncing for bookmarks, contacts, or calendars, the syncing option for those enabled data types will no longer be available for the iPod in iTunes.
Below the syncing options, you see the Find My iPod touch switch. This service, exclusive to MobileMe members, can help you track down a missing iPod. I describe its workings in Chapter 9.
Managing Contacts
The Contacts application is important for a couple of reasons. Not only is it the place to look when you need a quick address or phone number, but it also interacts with other iPod touch applications, including Mail, Calendar, and Maps. For these reasons, you’ll want to know your way around Contacts. You soon will.
Entering the people you know
Tap the Home screen’s Contacts application, and you see a list of your contacts in alphabetical order (Figure 5.15) and, above that, a Search field for seeking out contacts.
This list works very much like any long list of items you see in the iPod’s Music area. A tiny alphabet runs down the right side of the screen. Tap a letter to move immediately to contacts whose names (first or last, depending on how you’ve configured name sorting in the Mail, Contacts, Calendars preferences) begin with this letter. Alternatively, tap in the Search field, and when the iPod’s keyboard swoops up from the bottom of the screen, start typing some letters in your contact’s name. As you type, fewer names appear as the choices narrow.
Figure 5.15 The Contacts screen.

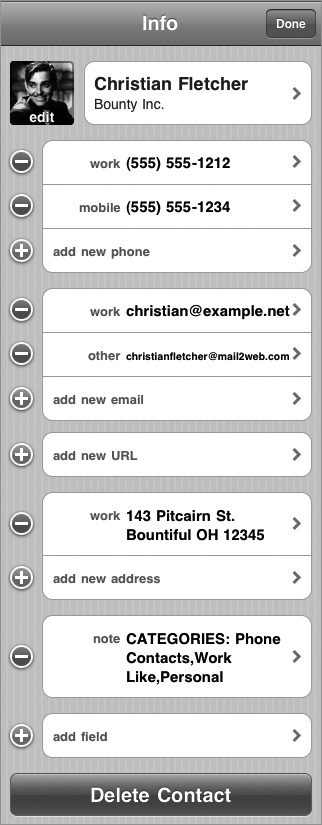
When you tap a name, you’re taken to that contact’s Info screen (Figure 5.16). Here, you can find information including the following:
Figure 5.16 A contract's Info screen.
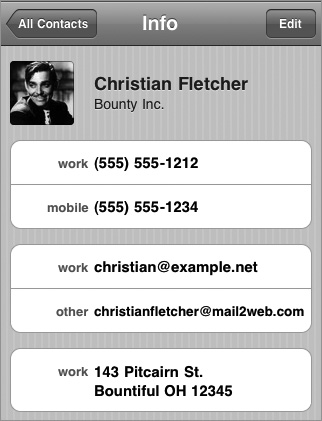
• Photo
This item can be a photo you’ve added in Address Book on a Mac, by tapping Add Photo and choosing a picture from your Photos collection, or by assigning a picture to a contact in the Photos Camera application.
• Company
• Phone number
Possible phone headings include Mobile, iPod, Home, Work, Main, Home Fax, Work Fax, Pager, and Other.
• Ringtone
• Email address
This item includes Home, Work, and Other options, as well as any custom labels you’ve created.
• URL (for the contact’s Web site)
• Home address
• Work address
• Other address
• Other fields
You won’t necessarily find all these entries in a contact’s Info screen; this list just shows you what’s possible to include.
Organizing contacts in groups
Although you see a list of all your contacts when you first tap Contacts, the Contacts application has an organizational layer above the main list. If, in the iPod touch’s Info preference within iTunes, you’ve chosen to sync your address book with select groups of contacts, or if your full address book contains groups of contacts, those groups will appear in the Groups screen, which you access by tapping the Groups button in the top-left corner of the Contacts screen (Figure 5.17).
Figure 5.17 The Groups screen.
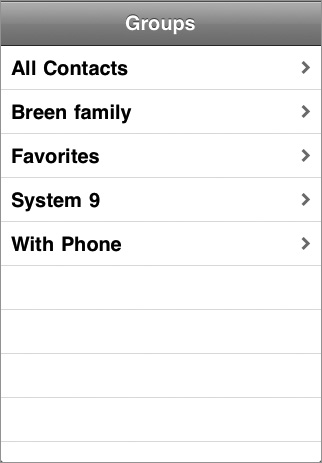
Organizing in groups makes a lot of sense if you have loads of contacts. Although Apple made traversing a long list of contacts as easy as possible, easier still is tapping something like a Family group and picking Uncle Bud’s name out of a list of 17 beloved relatives.
Making contacts
The best way to become familiar with the iPod’s contacts is to make some of your own. To do that now, tap Contacts and then the plus icon in the top-right corner of the iPod’s screen.
Viewing the New Contact screen
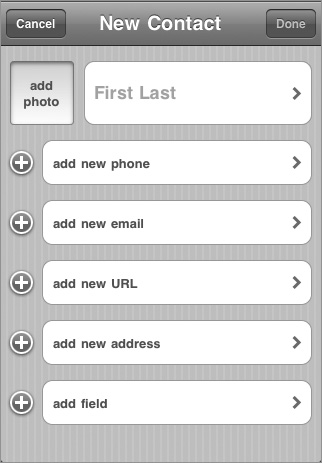
The New Contact screen contains fields for the elements I list in “Entering the people you know” earlier in this chapter—photo, first and last name, phone numbers, email addresses, URL, physical addresses (Home, Work, and Other, for example)—as well as an Add Field entry (Figure 5.18). To add information to one of these fields, tap the field or the green plus icon to its left. In the resulting screen, you’ll find a place to enter the information.
Figure 5.18 The New Contact screen.
Here are the special features of each screen:
Add Photo. Tap this entry to display a sheet containing buttons marked Choose Existing Photo and Cancel. When you tap Choose Existing Photo, you’re taken to your Photo Albums library, where you can select a picture. You can move and scale these images by pinching, stretching, and dragging, and then tap Choose to attach them to the contact.
Name. In this screen, you enter first, last, and company names. Tap Save to return to the New Contact screen.
Add New Phone. As the name says, this field is where you add a phone number. In the Edit Phone screen, you tap in the number from the keypad and then choose the kind of phone number: Mobile, iPhone, Home, Work, Main, Home Fax, Work Fax, Pager, or Other. If you’ve added any custom labels within the iPod, Apple’s Address Book (Mac), or Outlook (Windows), those custom labels will appear below these entries. At the very bottom, you’ll find an Add Custom Label button that, when tapped, lets you type a label of your own making—Dirigible or Private Train Car, for example.
![]() The numeric keypad contains a key that reads +*#. Tap it, and these three characters appear on the keypad’s bottom three keys, along with the word pause, which enters a comma (,) character. What good are these things? Automated answering systems use them for performing certain functions. Some phone systems, for example, require you to press the pound key and then a key combination to unblock a hidden phone number or append an extension. The comma character is commonly used to insert a 1-second delay. It’s useful when an automated answering service demands that you wait a second before punching in another string of numbers. You can’t make a call with your iPod touch as you can with an iPhone, of course, but this information will give you a clue about using such characters when you are talking on a phone.
The numeric keypad contains a key that reads +*#. Tap it, and these three characters appear on the keypad’s bottom three keys, along with the word pause, which enters a comma (,) character. What good are these things? Automated answering systems use them for performing certain functions. Some phone systems, for example, require you to press the pound key and then a key combination to unblock a hidden phone number or append an extension. The comma character is commonly used to insert a 1-second delay. It’s useful when an automated answering service demands that you wait a second before punching in another string of numbers. You can’t make a call with your iPod touch as you can with an iPhone, of course, but this information will give you a clue about using such characters when you are talking on a phone.
Add New Email. Enter your contact’s email addresses here. The iPod’s keyboard in this screen contains @ and period (.) keys to make the process easier. Tap and hold the period key, and a menu appears that contains .net, .edu, .org, and .com. Just slide your finger over to the extension you want, and let go to enter it.
Add New URL. Similar idea here. The more-convenient keyboard is in evidence, but instead of an @ symbol, you’ll find period (.), slash (/), and .com. You can apply a Home Page, Home, Work, or Other label to the URL, as well as any custom labels on your iPod.
Add New Address. In the United States, the default Edit Address screen contains two Street fields and areas for City, State, and Zip. Ah, but tap the country button and choose a different nation from the list that appears (these lists are divided into geographic regions such as Europe and Oceana), and these fields change. If you choose Belarus, for example, the bottom fields change to Postal Code, City, and Province. Tap the Label button next to the Country button to choose the nature of this address: Home, Work, Other, or (as you might expect) one of those custom labels.
Add Field. Tap Add Field, and you can add more fields to a contact’s Info screen. These fields include Prefix, Phonetic First Name, Phonetic Last Name, Middle Name, Suffix, Nickname, Job Title, Department, Instant Message, Birthday, Date (Anniversary and Other are the options), and Note. Both the Birthday and Date screens contain the iPod’s spinning date wheel for selecting the month, day, and year quickly.
Working with existing contacts
When you have contacts on your iPod, you can delete them, edit the information that they contain, or use that information to perform other tasks on your iPod.
To delete a contact, just tap the Edit icon that appears in the contact’s Info screen, scroll to the bottom of the screen, and tap the big red Delete Contact button. You’ll be asked to confirm your choice.
To edit a contact, tap that same Edit icon in the contact’s Info screen, and make the edits you want (Figure 5.19). You can add information by tapping a field that begins with the word Add (or just tap its green plus icon). To delete information, tap the red minus (–) icon next to the information and then tap the now-revealed Delete button. When you’re finished editing the contact, tap Done.
As for initiating actions on your iPod via a contact’s Info screen, most of the elements in the screen are live, meaning that if you tap them, something happens. If you tap an email address, a New Message window appears in the Mail application, addressed to that person. If you tap a URL, Safari opens and takes you to that Web page. Tap an address, and Maps opens to show you its location.
At the bottom of an Info screen, you’ll find a Share Contact button. Tap it to create a new email message that contains that person’s contact information in the form of a vCard (a cross-platform file type that can be read on all computers and most devices that use contacts).
Figure 5.19 An elongated view of the contact edit screen.
Using Calendar
In the old days, the only way to get events on the iPod’s calendar was to either type them on the device or sync the iPod with iTunes and ask it to copy your events from computer to iPod. Thanks to the introduction of Exchange and MobileMe push synchronization, the iPod’s Calendar is a smarter application than it once was. In this section, I look at all the ways you can put life’s events on your iPod.
Managing many calendars
With the iPod 2.0 and later software, the Calendar application can display more than one calendar—but it won’t when you first launch the application. Instead, it shows your default calendar, as you configured it in the Mail, Contacts, Calendar setting. To view a list of all the calendars on your iPod, just tap the Calendars icon in the top-left corner of the screen. To view another calendar, tap that calendar’s name. Or view all your calendar events by tapping the All entry.
Viewing events
Calendar is capable of displaying events in three views: List, Day, and Month. They’re laid out like so.
Month
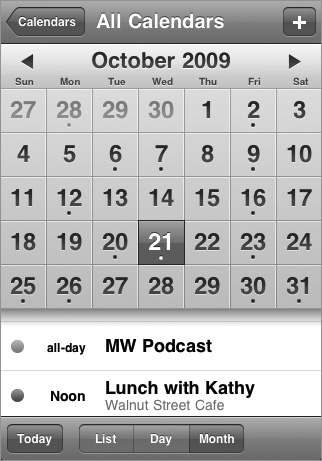
Tap Calendar, and by default, you’ll see this month’s calendar, with today’s date highlighted in blue. Other days maintain a gray, businesslike appearance. Tap another day, and it adopts the blue box, while the present day gains a deeper gray hue. To return to the current day, either tap it (if you’re viewing the current month) or tap the Today button in the bottom-left corner of the screen. To move to the next or previous month, tap the Previous or Next arrow, respectively, next to the month heading. To scan ahead more quickly, tap and hold one of these arrows.
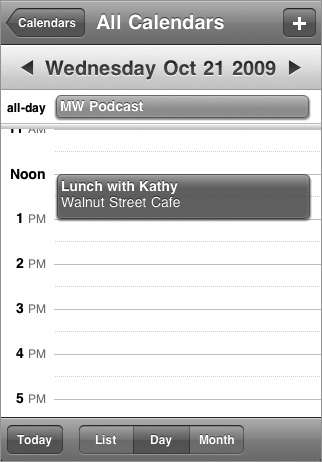
Any days on the calendar that have events appended to them bear a small black dot below the date. Tap a day with a dot, and the events for that day appear in a list below the calendar (Figure 5.20), each preceded by its start time and colored dot, indicating the calendar to which the event is attached. (Each calendar is color-coded.) Tap an event in this list, and you’re taken to the Event screen, which details the name and location of the event, its date, its start and end times, any alerts you’ve created, and any notes you’ve added to the event.
Figure 5.20 Month view with two events.
To edit or delete the event, tap the Edit icon in the top-right corner of the screen. Within the Edit screen, tap one of the fields to change its information. (I discuss these fields in “Creating events” later in this chapter.) To delete an event, tap the red Delete Event button at the bottom of the screen; then tap the Delete Event confirmation icon that appears.
Day
Tap the Day view button, and as you’d expect, you see the day laid out in a list, separated by hours. The day of the week and its date appear near the top of the screen. To move to the previous or next day, tap the Previous or Next arrow, respectively. To scan back or forward more quickly, tap and hold the appropriate arrow.
Events appear as colored bars (again, each calendar is color-coded, and that coding is reflected here) in the times they occupy and are labeled with the name of the appointment and its location (Figure 5.21 on the following page). Just as you do with events in Month view, tap them to reveal their details; to edit them, tap the Edit button.
Figure 5.21 Day view with two events.
List
List view shows a list of all the events on your calendar, separated by gray date bars. Each gray bar bears the day’s abbreviated name (Fri or Mon, for example) and the month, date, and year of the event. The event’s title appears just below, preceded by its start time and colored dot indicating its calendar association. Once again, tap an event to view its details. Tap Edit to edit the event or delete it via the Delete Event button (Figure 5.22). List is the single view that provides a Search field for finding events quickly.

Creating events
Creating events on the iPod is simple. Just tap the plus icon in the top-right corner of the screen to produce the Add Event screen, where you’ll find fields for Title & Location, Start & End, Repeat, Alert, Calendar, and Notes. In more detail:
Title & Location. The title of the event will appear when you select the event’s date in Month view. Both an event’s title and location appear in the Day-view list. And in List view, you see just the event’s title. As with any other field on the iPod, just type the entries and tap Save when you’re done.
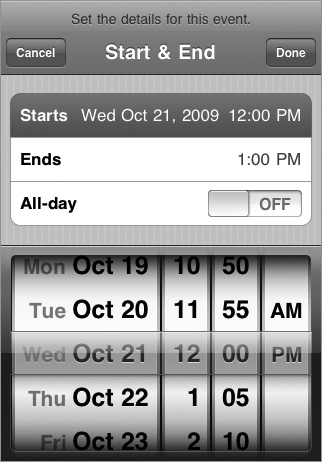
Start & End. The title is explanation enough. Just tap the Starts field, and enter a date and time by using the spinning wheels at the bottom of the screen (Figure 5.23). Ditto with the Ends field. If the event lasts all day, tap the All-Day On/Off switch.
Figure 5.23 Set the duration of an event.
![]() Unlike most calendar applications you’re familiar with, this one lets you create events that span multiple days. Just dial in a different day when you tap Ends.
Unlike most calendar applications you’re familiar with, this one lets you create events that span multiple days. Just dial in a different day when you tap Ends.
Repeat. You can create an event that occurs every day, week, 2 weeks, month, or year. This method is a convenient way to remind yourself of your kid’s weekly piano lesson or your own wedding anniversary.
Alert. A fat lot of good an electronic calendar does you if you’re not paying attention to the date or time. Tap Alert and direct the iPod to sound an alert at a specific interval before the event’s start time: 5, 15, or 30 minutes; 1 or 2 hours; 1 or 2 days before; or on the date of the event.
You can create two alerts per event—useful when you want to remind yourself of events for the day and need another mental nudge a few minutes before the event occurs. Regrettably, you can’t change the alert sound; you can only turn it on or off in the Sound Settings screen.
Calendar. Using this command, you can assign the new event to any calendar you have on your iPod.
Notes. Feel free to type a bit of text to remind yourself exactly why you’re allowing Bob Whosis to dominate your Thursday afternoon.
Syncing events
Your computer and your iPod have a nice sharing relationship with regard to events. When you create an event on one device, it’s copied to the other, complete with title, location, start and end times, alerts (likely called alarms in your computer’s calendar program), and notes.
As I explain in Chapter 2, you can pick and choose the computer-based calendars you want to sync with the iPod within iTunes’s Info tab. If you have an Exchange or MobileMe account, calendar events associated with those accounts are pushed to your iPod (and the iPod pushes right back those events that you create on it).
Deleting events
Quite frankly, deleting events by using the iPod’s interface is a pain in the neck. As I mention earlier in the chapter, you tap an event, tap the Edit button in the Event screen, tap the red Delete Event button at the bottom of the screen, and then tap Delete Event again. This procedure is a very inefficient way to delete events, particularly lots of events that have expired. You’re better off letting iTunes lend a hand.
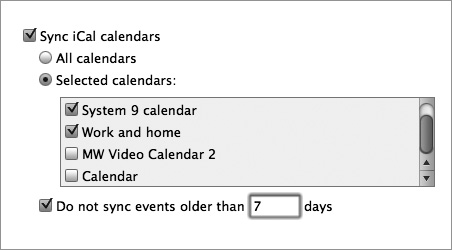
To do so, plug your iPod into your computer and then select it in iTunes’ Source list. Click the Info tab, and configure the Calendars delete option to read Do Not Sync Events Older Than X Days, where X is the number of past days you’re willing to keep expired events on your iPod. When you next sync your iPod, events that occurred more than X days before the current date will be removed from the iPod (Figure 5.24).
Figure 5.24 It’s easier to delete lots of events through iTunes.
If you’d like to delete multiple future events, delete them from your computer’s calendar. If you’re using a nonpush account, when you sync your iPod, the events will disappear from the iPod’s calendar as well. When Exchange and your MobileMe account are set up to synchronize calendars, deleting events either on the server or on the iPod will cause the event to vanish from every synced service and device.
Subscribing to a calendar
You can also subscribe to Web-based calendars with your iPod, which supports both CalDAV and iCal formats. To do so, follow these steps:
1. Travel to Settings > Mail, Contacts, Calendars, and tap Add Account.
2. Tap Other in the Add Account screen.
3. In the Calendars area of the Other screen, choose either Add CalDAV Account or Add Subscribed Calendar.
Which you choose depends on the kind of calendar you want to subscribe to. iCal calendars are generally available to the public and require only that you have a server address in the form example.com/example.ics. iCalShare (http://icalshare.com) is a repository for such public calendars.
CalDAV calendars are server-based and require that you know the name of the host server and have a user name and password for that server.
4. Enter the required information to subscribe to the calendar.