
6. Safari
From Day One, the iPod touch has had a real live Web browser, very much like the one on your computer. In this chapter, I show you how to use it to best advantage. Let’s go surfing!
Importing Bookmarks
I know you’re eager to start surfing the Web with Safari, but you’ll find the experience far more pleasant if you first sync your Safari (Mac) or Safari or Internet Explorer (Windows) bookmarks to your iPod. This is easy to do:
1. Jack your iPod touch into your computer’s USB 2.0 port, launch iTunes (if it doesn’t launch automatically), select the iPod in iTunes’ Source list, and click the Info tab.
2. In the Web Browser area of the window, on a Mac, enable the Sync Safari Bookmarks option (Figure 6.1); on a Windows PC, enable the Sync Bookmarks From option and choose either Safari or Internet Explorer from the pop-up menu.
Figure 6.1 Syncing Safari within the Mac version of iTunes.

3. Export your bookmarks, if you’re not using Safari or Internet Explorer.
To sync your bookmarks with the iPod via iTunes, you must make sure that your bookmarks are in one of these two browsers. If you’re using a browser such as Mozilla Firefox, check its help system for details on exporting its bookmarks.
4. Open Safari and choose File > Import Bookmarks, or fire up Internet Explorer and choose File > Import and Export.
5. Navigate to the bookmarks file you saved.
Your bookmarks are now in a browser that’s compatible with the iPod. When you next sync your iPod, those bookmarks will be available to the iPod’s copy of Safari.
Surfin’ Safari
When you first tap the Safari icon at the bottom of the iPod’s Home screen, you may be surprised to see a full (though tiny) representation of a Web page appear before your eyes. Safari on the iPod touch is nearly the real deal. (In “Seeing Safari’s limits” later in this chapter, I talk about how that isn’t quite the case.)
At first glance, though, it’s the real small deal. The pages Safari displays on the iPod are Lilliputian at first, but you have ways to make these pages legible:
• Turn the iPod on its side. Yes, Safari, like nearly all the included apps, works in both portrait and landscape orientation. It displays the entire width of a Web page in either view, so when you switch to landscape orientation, you see more detail as the page enlarges to fill the iPod’s screen (Figure 6.2).
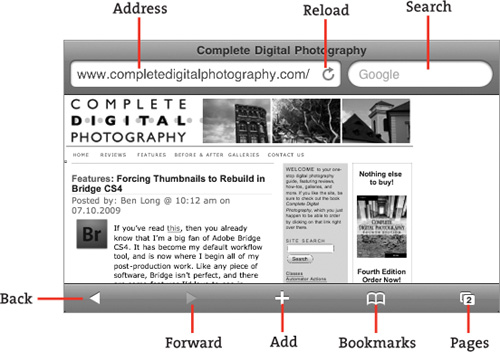
Figure 6.2 A Web page in landscape orientation, showing Safari’s tool icons.
• Stretch the page open. You can enlarge the page by using the stretch gesture (see Chapter 1). When the page is enlarged, tap and drag to reposition it.
• Double-tap a column. Most Web pages include columns of text and graphics. To zoom in on a single column, double-tap it. That column expands to fill the iPod’s screen. To shrink the page to its original size, double-tap the screen again.
• Double-tap part of the page. If a Web page lacks columns, you can still zoom in by double-tapping the page.
Browsing the Web
Like any good browser, Safari provides numerous ways to get around the Web. Let me count the ways.
Getting addressed
Like your computer’s Web browser, Safari has an Address field at the top of its main window. (If you don’t see the Address field, just tap the gray menu bar at the top of the screen, and you’ll be taken to the top of the page, where the Address field is revealed.) To travel to a Web site, tap in this field. When you do, the iPod’s keyboard appears. If ever there were an argument for using Safari in landscape orientation, this feature is it, because the iPod’s keyboard is far less cramped this way (Figure 6.3).
Figure 6.3 The landscape Safari keyboard (with the .com key held down).
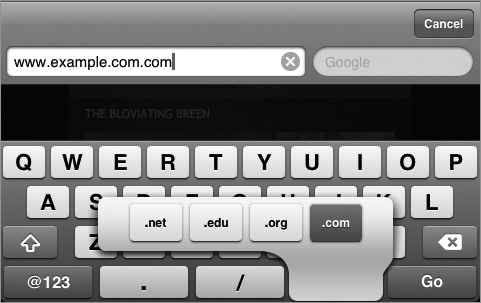
Type the Web address you want to visit. The iPod and its keyboard make this process as easy for you as possible. To begin with, you needn’t type http://www. Safari understands that just about every Web address begins this way and doesn’t require you to type the prefix. Just type examplesite; then tap the .com key at the bottom of the keyboard (even .com is unnecessary sometimes), and tap Go. In a short time, the page you desire will appear.
![]() If a site’s URL ends with something like .net or .org, you needn’t key that in. Just tap and hold the keyboard’s .com entry until a pop-up menu appears, offering additional .net, .edu, and .org entries. Glide your finger over to the entry you want, and let go. The address will complete with the extension you chose.
If a site’s URL ends with something like .net or .org, you needn’t key that in. Just tap and hold the keyboard’s .com entry until a pop-up menu appears, offering additional .net, .edu, and .org entries. Glide your finger over to the entry you want, and let go. The address will complete with the extension you chose.
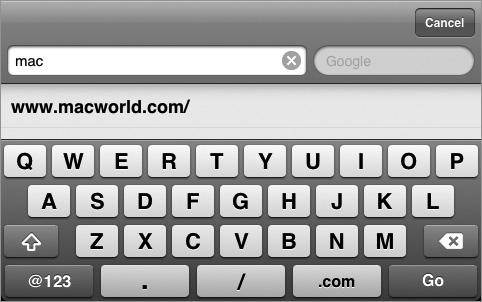
Safari offers some other convenient shortcuts for entering addresses. If you’ve visited the site before, for example, it’s likely to be in Safari’s History list. If so, just begin typing the address, and it will appear below the Address field (Figure 6.4). Tap the address to go to that Web site.
Figure 6.4 The iPod’s History list can save typing.
![]() If the Address field is full when you tap it, you can erase its contents quickly by tapping the X icon that appears at the right edge of the field.
If the Address field is full when you tap it, you can erase its contents quickly by tapping the X icon that appears at the right edge of the field.
![]() If you’re concerned that the contents of your iPod’s History list may give others pause, you can clear the list. See “Setting Safari” at the end of the chapter to learn how.
If you’re concerned that the contents of your iPod’s History list may give others pause, you can clear the list. See “Setting Safari” at the end of the chapter to learn how.
If you need to type a more complex address—example.com/pictures/vacation.html, for example—the iPod’s default keyboard for Safari can help, because it includes both period (.) and slash (/) keys.
To leave the keyboard behind without doing anything, tap the Cancel button. If the page you’re trying to visit is taking too long to load, or if you’ve changed your mind about visiting it, just tap the X that appears next to the Address field while the page is loading. Safari will stop loading the page. If you’d like to reload a page that’s fully loaded, tap the Reload icon next to the Address field (the one that takes the place of the X when a page is completely loaded).
Searching
You can also conduct Google or Yahoo searches from the keyboard. To begin a search, just tap the magnifying-glass icon in the top-left corner of a Safari window. This tap causes the keyboard to appear and the insertion point to blink in the Search field. Enter your query in this field and then tap Google or Yahoo (depending on which search engine you’re using).
By default, the iPod uses Google search. To switch to Yahoo, go to the Settings screen, and tap Safari. Tap Search Engine and then tap Yahoo.
Navigating with links
Links work just as they do in your computer’s browser. Just tap a link to go to the associated Web page. Two things are worth noting:
• Safari is sometimes reluctant to use a link while it’s still loading a Web page. To speed things up, tap the X icon next to the Address field to stop the current page from loading; then tap the link to load its target immediately. (In some cases, you’ll see a blank page instead of the page you were on, because Safari had started to load the new page but hadn’t completed the process. In such cases, tap the back-arrow icon to return to the previous page.)
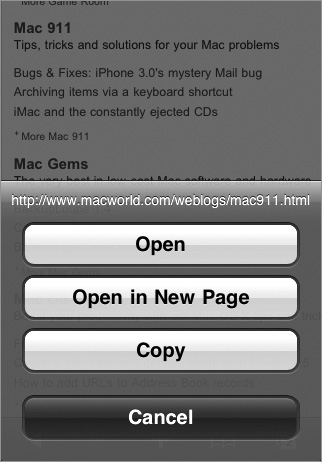
• When you hover your mouse pointer over a link in your computer’s Web browser, you can view information about where that link will take you. The iPod offers a more powerful, though hidden, capability. Just tap and hold a link, and a sheet scrolls up from the bottom. This sheet displays not only the full address of the link, but also four options—Open, Open in New Page, Copy, and Cancel—whose names match their purposes (Figure 6.5).
Figure 6.5 Tap and hold a link to see these options.
Going back and forward
Just like your computer’s Web browser, Safari has Back and Forward arrows for moving through sites you’ve visited.
Saving pages
In the bottom-right corner of the Safari screen, you’ll see a small Pages icon. Tap it, and you’ll see a small representation of the page you’re currently viewing. Tap the New Page button in the bottom-left corner of the screen, and you can create a new empty Web page, saving the page you were just viewing in the process (Figure 6.6). This feature is the iPod’s equivalent of browser tabs.
Figure 6.6 Safari lets you save up to eight pages.
You can repeat this process to save as many as eight pages; the Pages icon displays the number of pages you’ve stored. To visit one of your saved pages, tap the Pages icon, and swipe your finger across the display to move back or forward through the saved pages. To view a page full-screen, tap its thumbnail or tap the Done button while its thumbnail is on view. To delete a page, tap the red X in the top-left corner of the page.
![]() The contents of saved pages aren’t cached to the iPod—just their locations—so you won’t be able to read them if your iPod is offline (when you can’t access a Wi-Fi network).
The contents of saved pages aren’t cached to the iPod—just their locations—so you won’t be able to read them if your iPod is offline (when you can’t access a Wi-Fi network).
Navigating with bookmarks
You heeded my advice to import your computer browser’s bookmarks, right? Great. Bookmarks are another fine way to get where you want to go.
Just tap the Bookmarks icon at the bottom of Safari’s screen. The Bookmarks screen will appear, replete with your bookmarks organized as they were on your computer. By this, I mean that if you’ve organized your computer’s bookmarks in folders, that’s just how they’ll appear on your iPod. Bookmarks that you’ve placed in Safari’s Bookmarks bar are contained in their own folder, named (aptly enough) Bookmarks Bar.
Tap a folder to view the bookmarks it contains. To travel to a bookmark’s target page, tap the bookmark.
Working with bookmarks
Bookmarks are important-enough components of Safari that they deserve more than this so-far-brief mention. How, for example, do you create bookmarks, organize and edit the ones you have, and delete those you no longer need? Like this.
Creating bookmarks
You’ve found a Web site you like while surfing with the iPod. To bookmark the site, follow these steps:
1. Tap the plus (+) icon at the bottom of the screen.
In the sheet that appears, the first option is Add Bookmark. (I look at the other two options soon.)
2. Tap Add Bookmark.
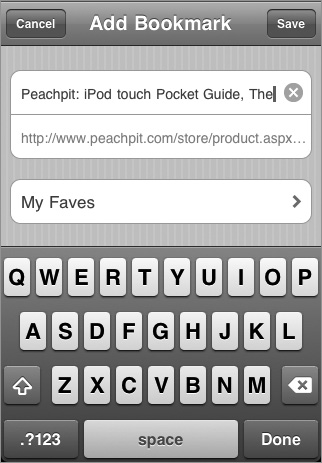
The Add Bookmark screen opens, displaying the name of the bookmark. If the name is too long for your liking, edit it with the iPod’s standard text-editing keyboard.
3. Tap the Bookmarks entry, and choose a location for your bookmark.
When you do this, a list that contains your bookmarks-folder hierarchy appears. Tap the folder where you’d like to file your bookmark. From now on, this folder is where you’ll find that bookmark (Figure 6.7).
Figure 6.7 Creating a bookmark.
4. Tap Save to save the bookmark in this location, or tap Cancel to cancel the bookmarking operation.
Organizing and editing bookmarks
If you’re as organized as I am (meaning not very), your bookmarks may be a bit of a mess. Although you’re better off organizing the bookmarks on your computer and then syncing them to your iPod, you can organize them on the iPod as well. To do so, follow along:
1. Tap the Bookmarks icon.
2. In the resulting Bookmarks screen, tap the Edit button.
3. To delete an item, tap the red minus (–) icon that appears next to it.
The red minus icon appears next to all entries in the screen save History, Bookmarks Bar, and Bookmarks Menu—in short, all the items you’ve created but none of the items that the iPod requires.
You’ll also notice the three-line reposition icon to the right of these marked items, indicating that you can change their positions in the list by dragging the icons up or down. You can also rename your bookmark, change its URL, or file it in a different folder by tapping its name while in editing mode and then making those changes in the resulting Edit Bookmark screen.
Additionally, you can create a new folder this way:
1. Tap the New Folder icon in the bottom-right section of the screen to open an Edit Folder screen.
2. Use the onscreen keyboard to give your folder a name; then choose a location for it by tapping the field below, which displays the name of the folder you’re currently in (such as Bookmarks Bar).
3. Tap this field, and up pops the bookmarks hierarchy.
4. Tap the folder in which you’d like to place this new folder.
5. Tap the arrow icon in the top-left section of the screen.
Your folder is created.
Getting more from the plus icon
As I mention in “Creating bookmarks” earlier in this chapter, when you tap the plus (+) icon at the bottom of Safari’s screen, you see two options after Add Bookmark: Add to Home Screen and Mail Link to This Page.(OK, you see a Cancel button too, so technically, there are four options.) These two buttons work this way:
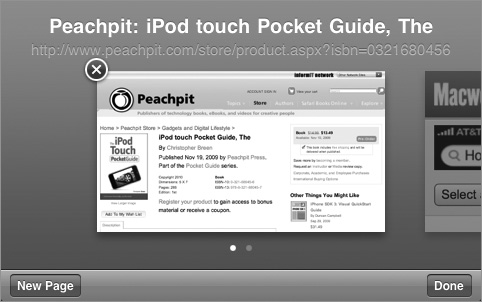
Add to Home Screen. When you tap this button, an Add to Home screen appears, displaying the name of the Web page you’re currently viewing with some kind of icon next to the page’s name (Figure 6.8). (Some Web sites have gone to the trouble to create a cool icon that looks great on an iPod touch and iPhone. Other icons are just undistinguished thumbnails of a portion of the page.) You’re welcome to rename the saved page by using the keyboard.
Figure 6.8 Adding a Web site to your Home screen.

Click Add, and an icon representing that Web page is created in the iPod’s Home screen (Figure 6.9). In the future, when you tap that icon, Safari will launch and take you directly to that page.
Figure 6.9 The icon of a Web site on the Home screen.

![]() Should you grow tired of this icon, you can remove it just as you can remove other expendable items (meaning applications other than the ones originally included with the iPod) from the iPod’s Home screen. Tap and hold the icon until all the icons start wiggling. Then tap the X in the top-left corner of the icon you want to delete, and it’s gone.
Should you grow tired of this icon, you can remove it just as you can remove other expendable items (meaning applications other than the ones originally included with the iPod) from the iPod’s Home screen. Tap and hold the icon until all the icons start wiggling. Then tap the X in the top-left corner of the icon you want to delete, and it’s gone.
Mail Link to This Page. If you find a Web page that cries out to be shared with your nearest as well as dearest, tap Mail Link to This Page. When you do, a new, unaddressed mail message opens. The Subject heading is the name of the Web page, and the body of the message contains a link to the page. All you need to do is address the message and tap Send.
Understanding Safari and RSS
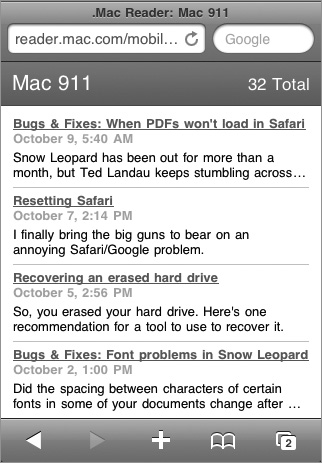
Safari supports RSS (Really Simple Syndication), the standard for distributing Web headlines. To view collections of these headlines (called feeds) on your iPod, just locate a page’s RSS link and tap it. The page that appears bears a blue bar at the top, along with the name of the site connected to the feed—Mac 911, for example (Figure 6.10). The site’s headlines appear below the blue bar. Tap a headline to read the full story.
Figure 6.10 A Safari RSS feed.
![]() RSS URLs are clumsy to enter yourself; they’re long and rarely contain real words. For this reason, bookmarking those that you intend to revisit is a good idea.
RSS URLs are clumsy to enter yourself; they’re long and rarely contain real words. For this reason, bookmarking those that you intend to revisit is a good idea.
Seeing Safari’s limits
Earlier in this chapter, I hint that although the iPod’s version of Safari is about as full-featured as you’re likely to find on a mobile iPod, it doesn’t have all the capabilities of your computer’s browser. The following sections discuss its limitations.
No Flash support
Many modern Web sites greet you with luxurious animations, flickering icons, and animated menus created with Adobe’s Web-animation design tool, Flash. The iPod doesn’t support Flash, and because it doesn’t, you may see nothing at all on such a site’s home page. Ideally, the designer took into account the fact that not everyone likes (or, in the case of the iPod touch and iPhone, can use) Flash and inserted a Skip Animation link that takes you to a Flashless version of the site.
Similarly, many of the movies you find on the Web are Flash-based. If, while traipsing through a Web site, you see a small blue box with a question mark inside it, you’re looking at the placeholder for a Flash movie. Tapping that icon will do you no good whatsoever.
The good news is that the iPod will play a lot of QuickTime content (though not all). As the iPod touch and iPhone increase in popularity, Web sites likely will increase their use of QuickTime.
No downloading
You’re accustomed to downloading files with computers and Web browsers. You give up that feature when using the iPod touch’s browser, however, because it’s not supported.
No Find
Web pages can be packed with information, and the iPod’s screen is a pretty small place to view that much content. I’d love to be able to pull up a Search field and key in a word or phrase I seek. I can’t.
Setting Safari
Like other iPod applications, Safari has its own collection of settings. As you might guess, you find them by tapping Settings in the iPod’s Home screen and then tapping Safari in the Settings screen (Figure 6.11).
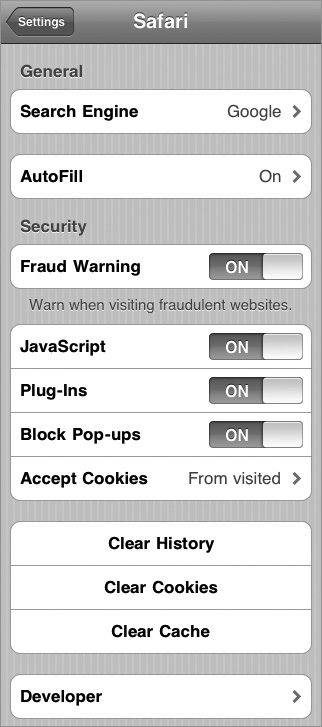
These settings include the following:
Search Engine. The iPod can use either Google or Yahoo for its Web searches. Choose the one you want here.
AutoFill. This feature was new with the 3.0 software. AutoFill, like your computer’s Web browser, can fill in contact information, user names, and passwords. To enable those options, tap AutoFill and toggle the Use Contact Info and Names & Passwords sliders to On.
Fraud Warning. Your iPod will warn you when it believes you’re about to enter a Web site that pretends to be something it’s not. This might be a Web site that pretends to belong to your bank or credit card company but exists only to steal money from people who unwarily provide their account information.
JavaScript. JavaScript is a scripting language that helps make Web sites more interactive. By default, Safari allows JavaScript to work. If you care to disable JavaScript for some reason, you do it with this On/Off switch.
Plug-Ins. The iPod supports some plug-ins that allow it to display or play certain Web content—QuickTime movies and audio, for example. You can turn off these plug-ins by toggling this switch to Off.
Block Pop-Ups. I make a lot of my living by writing for advertising-based Web sites, but I’ve yet to see a pop-up window that did more than annoy me. If you’re haunted by pop-up ads, leave this option’s switch set to On.
Accept Cookies. Many Web sites leave little markers called cookies stored in your Web browser. Cookies can store information such as when you visited the site and which pages you saw there. Sometimes, they also store information such as your user name and password for that site.
The Accept Cookies setting gives you a measure of control:
• You can choose never to accept them (which some people consider to be more secure and private, but which forces you to reenter passwords and user names each time you return).
• You can opt to accept just those cookies sent by each site you visit. (Some sites plant cookies from their advertisers, and this option prevents that behavior.)
• You can choose to always accept cookies, which means that your iPod is now a cookie-gathering machine. The default setting is From Visited, which I think nicely balances privacy and convenience.
Clear History, Clear Cookies, and Clear Cache. This group of three buttons in the Safari Settings screen allows you to wipe your tracks:
• Earlier, I told you that when you start typing a URL in Safari’s Address field, the iPod makes suggestions based on past searches. To stop this behavior, tap Clear History.
• If you’re concerned that the iPod’s stored cookies reveal more about your browsing habits than you’re comfortable with, tap Clear Cookies.
• Safari’s cache stores some of the contents of pages you visit so that they open faster when you revisit. If new content isn’t showing up, and you believe that it should, tapping Clear Cache will help by forcing Safari to reload entire pages that were previously cached.
When you tap any of these buttons, you’re asked to confirm that you really want to perform the action.
Developer. You can turn on a Debug Console within Safari if you’re interested in seeing any coding errors a Web page might have. If you’re an übergeek and find such errors fascinating, knock yourself out and switch it on. Everyone else, feel free to leave it off.