Chapter 9: Creating a Dataset and Ingesting Your Data
In the previous chapter, you learned about anomaly detection problems and some ways to tackle them. You also had an overview of Amazon Lookout for Equipment, an AI-/ML-managed service designed to build anomaly detection problems in multivariate, industrial time series data.
The goal of this chapter is to teach you how to create and organize multivariate datasets, how to create a JSON schema to prepare the dataset ingestion, and how to trigger a data ingestion job pointing to the S3 bucket where your raw data is stored.
In addition, you will also have a high-level understanding of all the heavy lifting the service is performing on your behalf to save as much data preparation effort as possible (imputation, time series alignment, resampling). You will also understand what kind of errors can be raised by the service and how to work around them.
In this chapter, we're going to cover the following main topics:
- Preparing a dataset for anomaly detection purposes
- Creating an Amazon Lookout for Equipment dataset
- Generating a JSON schema
- Creating a data ingestion job
- Understanding common ingestion errors and workarounds
Technical requirements
No hands-on experience in a language such as Python or R is necessary to follow along with the content of this chapter. However, we highly recommend that you read this chapter while connected to your own AWS account and open the Amazon Lookout for Equipment console to run the different actions on your end.
To create an AWS account and log in to the Amazon Lookout for Equipment console, you can refer yourself to the technical requirements of Chapter 2, An Overview of Amazon Forecast.
In the companion GitHub repository of this book, you will find a notebook that will show you the detailed steps to prepare the dataset we are going to use from now on. This preparation is optional to follow along with this chapter. At your first reading, I recommend that you download the prepared dataset from the following link:
From there, you can log in to the AWS console and follow along with this chapter without writing a single line of code.
At a later reading, feel free to go through the preparation code to understand how to prepare a dataset ready to be consumed by Amazon Lookout for Equipment. You will find a notebook with all this preparation on the companion GitHub repository of this book:
This notebook will help you understand the format expected to build a successful model.
Preparing a dataset for anomaly detection purposes
Before you can train an anomaly detection model, you need to prepare a multivariate time series dataset. In this section, you will learn how to prepare such a dataset and how to allow Amazon Lookout for Equipment to access it.
Preparing the dataset
The dataset we are going to use is a cleaned-up version of the one that can be found on Kaggle here:
https://www.kaggle.com/nphantawee/pump-sensor-data/version/1
This dataset contains known time ranges when a pump is broken and when it is operating under nominal conditions. To adapt this dataset so that it can be fed to Amazon Lookout for Equipment, perform the following steps:
- Download the raw time series dataset. This data contains 5 months' worth of data at a 1-minute sampling rate with several events of interest. The original dataset ranges from 2018-04-01 to 2018-08-31.

Figure 9.1 – Industrial pump dataset overview
- Amazon Lookout for Equipment requires a minimum of 6 months of data to train a model. To obtain a sufficiently long period of time while having some anomalies to verify, I applied a new date time index using the same number of data points and start date, but applied a 5-minute sampling rate. This yielded the equivalent of 25 months' worth of data ranging from 2018-04-01 to 2020-05-04.
- Use the machine_status column to identify the time ranges during which the pump was broken. I compiled these ranges into a DataFrame with the start and end date time for each event.
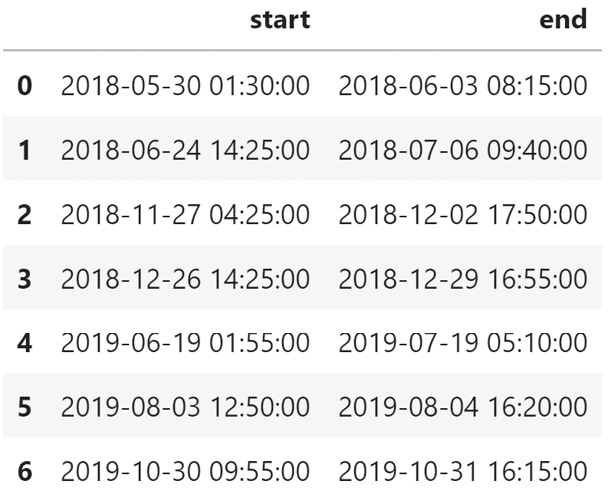
Figure 9.2 – Anomalous ranges overview
- Two sensors were also missing a lot of data (sensor_15 and sensor_50). For the purpose of this tutorial, I removed these two columns from the dataset altogether.
- Create a single CSV file for each sensor and host each of them inside a dedicated folder. In the end, the dataset structure obtained will be as follows:
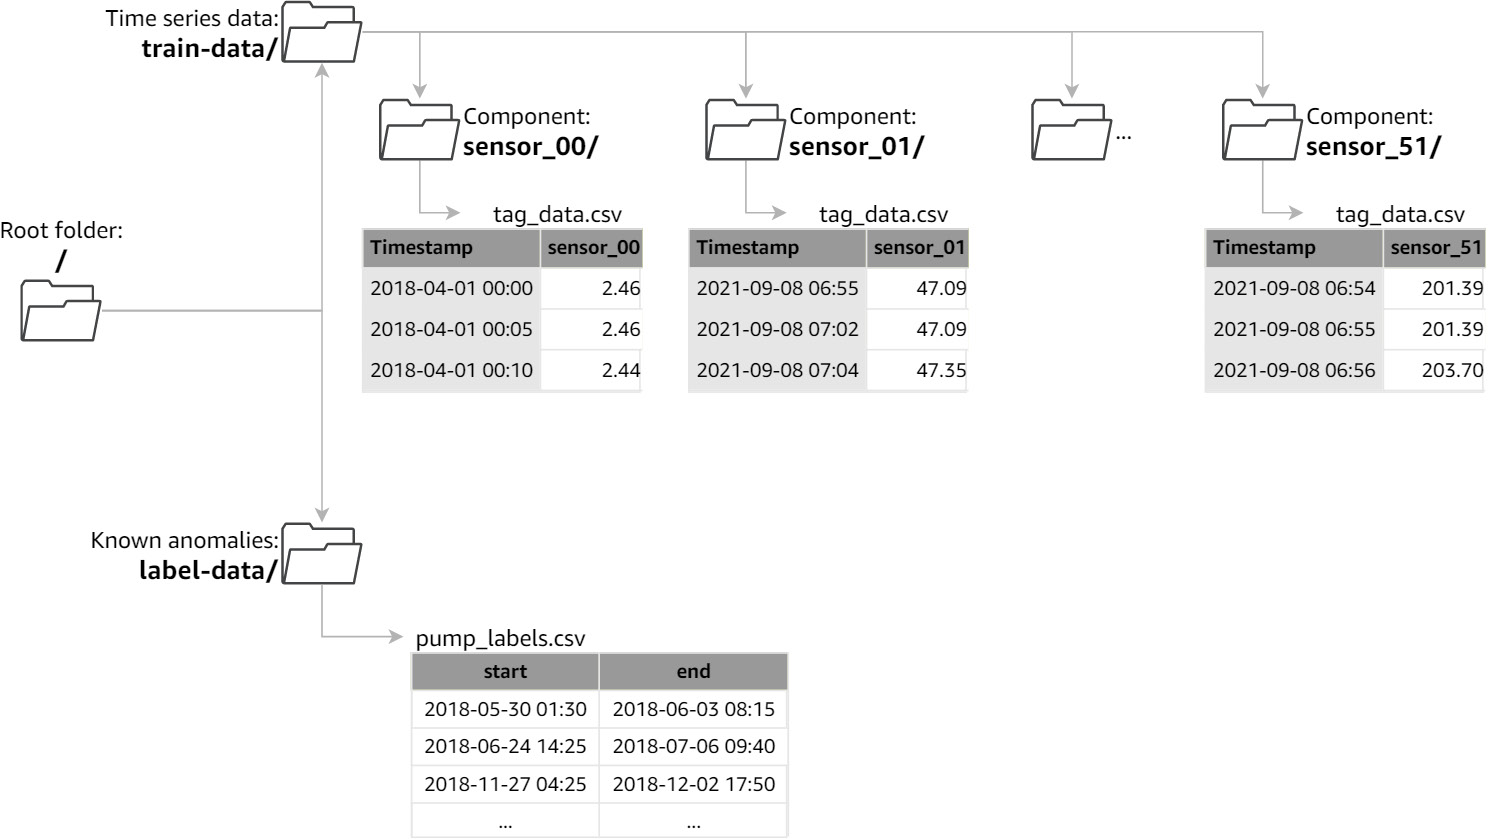
Figure 9.3 – Pump dataset structure overview
No other specific preprocessing was necessary and you will now upload this prepared dataset in a location where Amazon Lookout for Equipment can access it.
Uploading your data to Amazon S3 for storage
You can download the archive I prepared directly from the following location:
Download this archive and unzip it. You should have the following:
- 50 CSV files (located in the train-data folder) containing the time series data for 50 sensors
- One CSV file (named pump_labels.csv and located in the label-data folder) containing the label data with the known periods where anomalies are expected
- One JSON file (named schema.txt) that contains the schema you are going to use later when creating the dataset
In the next section, you are going to create an Amazon S3 bucket, upload your dataset there, and give Amazon Lookout for Equipment permission to access this data.
Creating an Amazon S3 bucket
Equipped with our prepared datasets, let's create a bucket on Amazon S3 and upload our data there:
- If you went through the Technical requirements prerequisites at the beginning of this chapter, you should already be logged in to your AWS console, otherwise, fire up your favorite browser and log in to your AWS console.

Figure 9.4 – AWS Console home page
- At the top left of your console, you will see a Services drop-down menu that will display all the available AWS services. In the Storage section, look at the S3 service and click on its name to go to the S3 console.
- From here, we are going to click on the Create bucket button located at the top of your bucket list section.

Figure 9.5 – Amazon S3 console landing page
- You are brought to the bucket creation page.

Figure 9.6 – Amazon S3 bucket creation form
- Choose a name for your bucket. This name must be unique across the whole S3 service. I will call mine timeseries-on-aws-lookout-equipment-michaelhoarau. That should be unique enough.
- Select an AWS Region from where your data will be fetched by Amazon Lookout for Equipment. I selected the Europe (Ireland) region for mine.
Important Note
At the time of writing this book, Amazon Lookout for Equipment is only available in the following regions: US East (N. Virginia), Asia Pacific (Seoul), and Europe (Ireland). Make sure you select one of these regions to create your bucket or you won't be able to ingest your data into Amazon Lookout for Equipment.
- You can keep all the other fields at their default values and click on Create bucket. You will be brought back to the S3 home page and you should see your newly created bucket in the buckets listing. A green message at the top of the window will also confirm that your bucket was created successfully.
Your Amazon S3 bucket is now created and you can start uploading your files to this location.
Uploading your dataset to Amazon S3
To upload your dataset, complete the following steps:
- Click on the name of the bucket you just created in the buckets list that appears on the S3 home page.
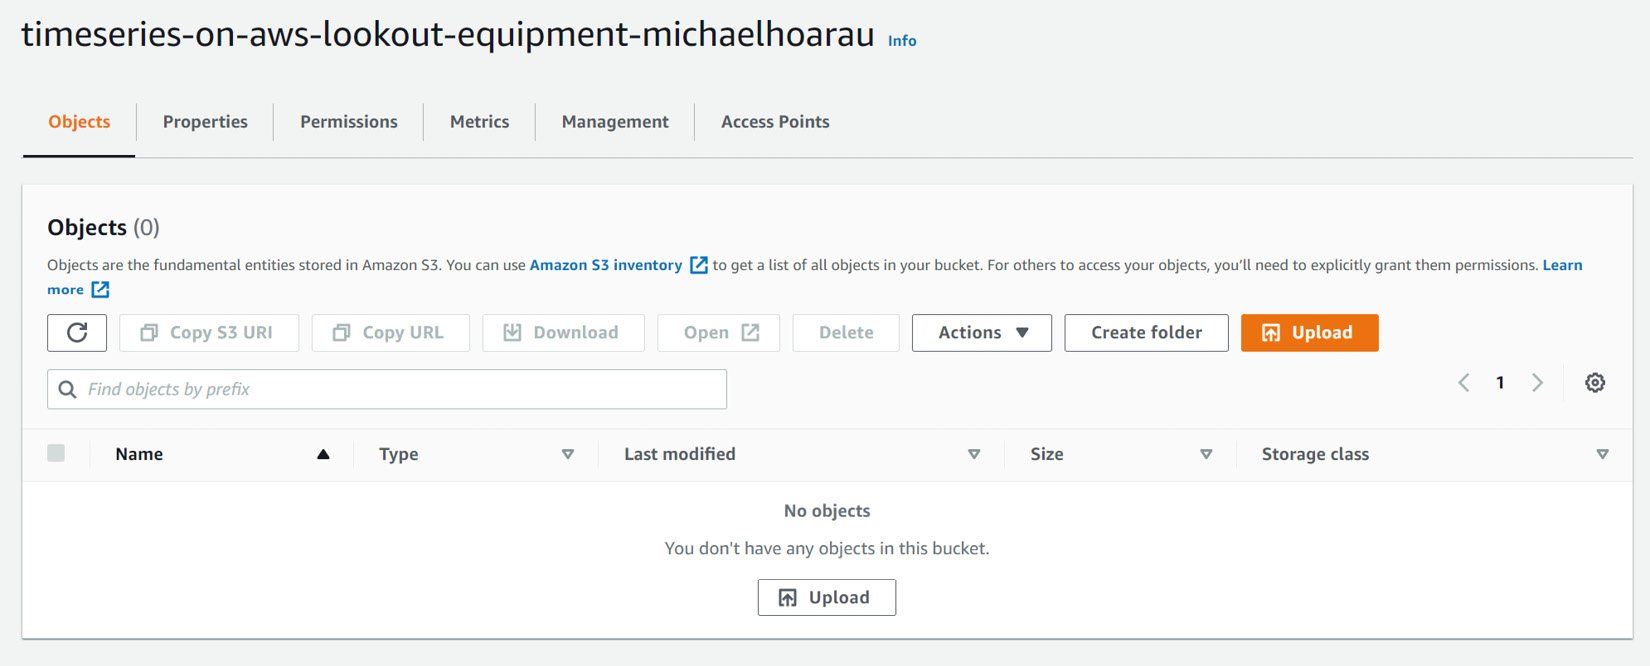
Figure 9.7 – Amazon S3 empty objects listing from your new bucket
This page lists all the objects available in this bucket: it is empty for now.
- From here, click on the Upload button at the top of the objects list. You will be brought to the upload page where you can either click on the Add files button or drag and drop all the CSV files unpacked from the archive you previously downloaded. They should be located in two directories named train-data and label-data. You can drag and drop these two folders directly in your browser window. You don't need to upload the schema.txt file.

Figure 9.8 – Industrial pump dataset upload on Amazon S3
- Leave all the other fields at their default values, scroll to the bottom of the screen, and click on Upload to start uploading the files. There is a total of 313 MB and it may take a while depending on your internet upload bandwidth. An upload status page is displayed while the transfer is in progress.
- Once this is done, you can click on the Exit button to be brought back to the objects list at the root of your bucket.
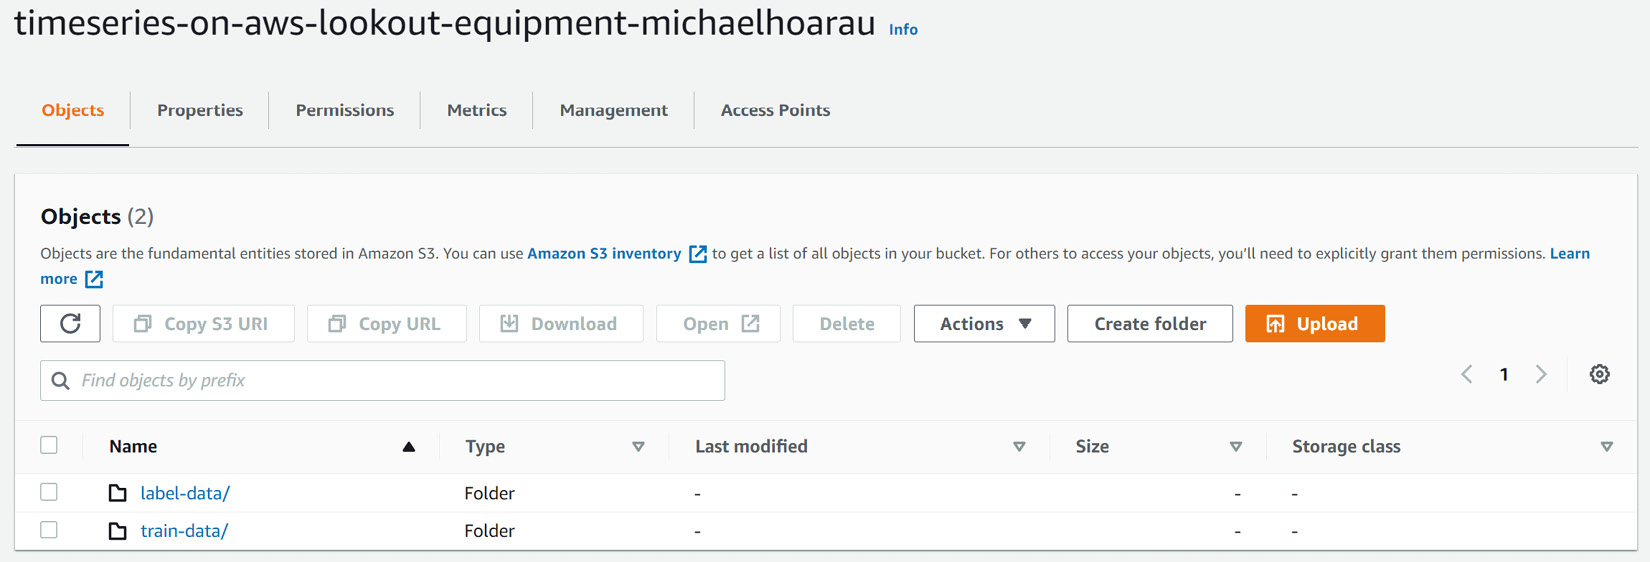
Figure 9.9 – Industrial pump dataset upload completed
Once your upload is complete, you should see two folders in the objects list, one for the label data and the other (train-data) containing the time series sensor data you are going to use for training a model.
- Click on each of the folder names and copy their S3 URI (their address in Amazon S3) where you will be able to access it later (in a notepad on your desktop, for instance); the S3 URI of these folders in Amazon S3 takes the following format:
s3://BUCKET_NAME/FOLDER_NAME/
For instance, my train-data folder S3 URI is the following:
s3://timeseries-on-aws-lookout-equipment-michaelhoarau/train-data/
We will need the train-data link at ingestion time and the label-data link when training a new model. Let's now give access to this S3 bucket to Amazon Lookout for Equipment.
Giving Amazon Lookout for Equipment access to your S3 bucket (optional)
By default, the security mechanisms enforced between different AWS services will forbid any service other than Amazon S3 from accessing your data. From your account, you can upload, delete, or move your data from the bucket you just created. Amazon Lookout for Equipment, however, is a different service and will not be able to access this data. We need to specify that it can access any data in this bucket.
You can configure this access directly from the Amazon Lookout for Equipment console during the ingestion step. However, if you want to have more control over the roles and the different accesses created within your account, you can read through this section. Otherwise, feel free to skip it and come back here later.
To enable access to your S3 bucket to the Amazon Lookout for Equipment service, we are going to use the AWS Identity and Access Management (IAM) service to create a dedicated IAM role:
- At the top left of your console, click on the Services drop-down menu and search for the Security, Identity, and Compliance section. Click on the IAM service name to go to this service console.
- On the left panel menu, click on Roles and then click on the Create role button on the top left of this screen.
- On the Create role screen, select AWS service as the type of trusted entity.

Figure 9.10 – IAM role creation – trusted entity type selection
- In the following section (Choose a use case), locate SageMaker and click on the service name.
Note
Not all AWS services appear in these ready-to-use use cases, and this is why we are using Amazon SageMaker (another AWS Managed Service). In the next steps, we will adjust the role created to configure it specifically for Amazon Lookout for Equipment.
- Click on the Next button until you reach the last step (Review). Provide a name and a description of your role (I called it LookoutEquipmentIndustrialPumpDataAccess).

Figure 9.11 – IAM role creation – Review step
- Click on Create role. Your role is created and you are presented with a summary of your role. At the top of this screen, you will see a Role ARN (Amazon Resource Name) field. Copy this ARN and paste it somewhere handy. We will need it when we ingest your data into the service.
You are brought back to the list of roles available in your account. In the search bar, search for the role you just created and choose it from the returned result.
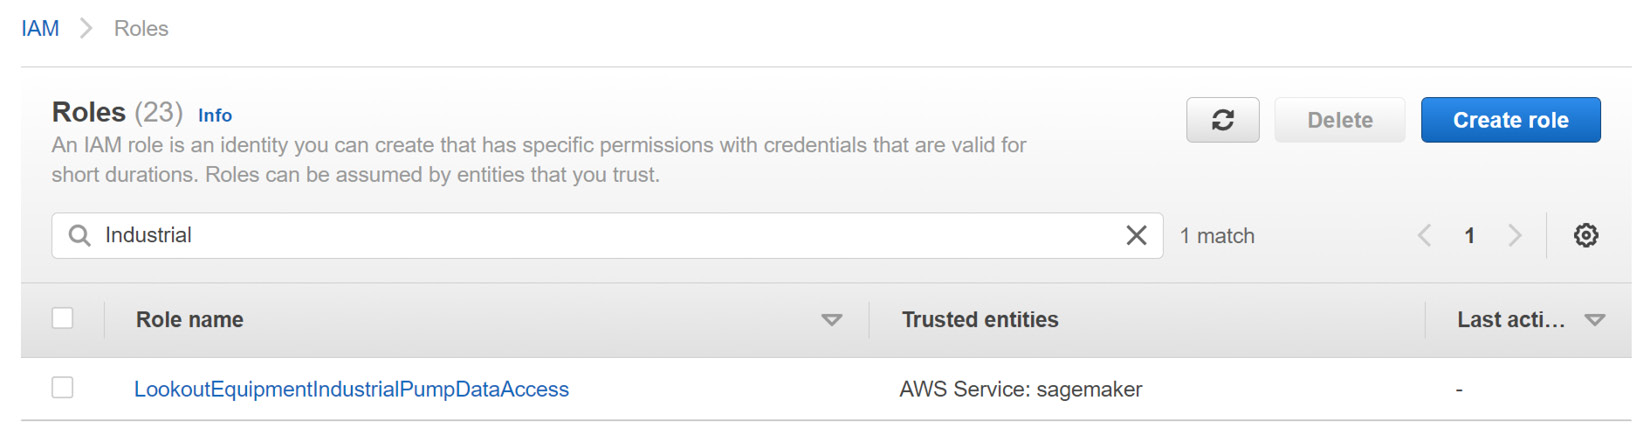
Figure 9.12 – Selecting your IAM access role
- Click on the cross at the far right of the AmazonSageMakerFullAccess managed policy to remove the permission for this role (we only need this role to have access to Amazon S3 data).
- Click on Add inline policy and then on the JSON tab. Then fill in the policy with the following document (update the name of the bucket with the one you created earlier):
{
"Version": "2012-10-17",
"Statement": [
{
"Effect": "Allow",
"Action": [
"s3:ListBucket",
"s3:GetObject",
"s3:PutObject"
],
"Resource": [
"arn:aws:s3:::<<YOUR-BUCKET>>/*",
"arn:aws:s3:::<<YOUR-BUCKET>>"
]
}
]
}
- Give a name to your policy (for instance, LookoutEquipmentS3Access) and then click on Create policy.

Figure 9.13 – Reviewing the S3 access policy
- On the Trust relationships tab, choose Edit trust relationship.

Figure 9.14 – Editing the trust relationship
- Under the policy document, replace the whole policy with the following document and click on the Update trust policy button on the bottom right:
{
"Version": "2012-10-17",
"Statement": [
{
"Sid": "",
"Effect": "Allow",
"Principal": {
"Service": "lookoutequipment.amazonaws.com"
},
"Action": "sts:AssumeRole"
}
]
}
When Amazon Lookout for Equipment tries to read the datasets you just uploaded in S3, it will request permissions from IAM by using the role we just created:
- The trust policy allows Lookout for Equipment to assume this role.
- The inline policy specifies that Lookout for Equipment is authorized to list and access the objects in the S3 bucket you created earlier.
You are now ready to ingest your dataset into Amazon Lookout for Equipment.
Creating an Amazon Lookout for Equipment dataset
As mentioned in Chapter 8, An Overview of Amazon Lookout for Equipment, a dataset is a convenient way to organize your time series data stored as CSV files. These files are stored in an Amazon S3 bucket and organized in different folders.
Each dataset is a container that can contain one or several components that groups tags together. In S3, each component will be materialized by a folder. You can use datasets and components to organize your sensor data depending on how your industrial pieces of equipment are organized themselves.
For instance, you can use the dataset level to store all the tags from a factory and then each component to group all the tags relative to a given production line (across multiple pieces of equipment) or a given piece of equipment.
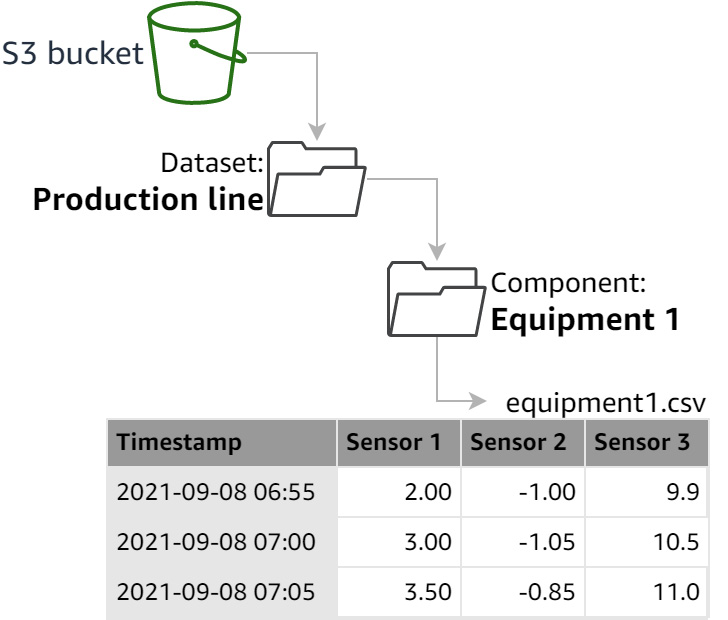
Figure 9.15 – Folder structure factory/equipment
In this configuration, each component contains several sensors in the same CSV file. Depending on how your sensor data is generated, you may have to align all the timestamps so that you can join all your sensor data in a single CSV file sharing a common timestamp column.
An alternative is to match each piece of equipment with a dataset and then store each sensor in its own component.

Figure 9.16 – Folder structure equipment/sensors
In this configuration, the timestamps for each sensor do not need to be aligned. This timestamp alignment will be dealt with on your behalf at ingestion time by Amazon Lookout for Equipment.
For the industrial pump dataset, throughout this tutorial, you will use the second format described previously, to remove the need for any preprocessing. To create your first anomaly detection project with Amazon Lookout for Equipment, complete the following steps:
- Log in to your AWS console and search for Lookout for Equipment in the search bar at the top.
- Click on Amazon Lookout for Equipment to go to the service home page.

Figure 9.17 – Amazon Lookout for Equipment home page
- On this page, you can either click on the Create dataset button on the right side of the screen or click the hamburger icon (the one with three horizontal lines) on the top left to open the left panel, where you can click on Datasets. You will land on a page listing all the datasets visible from your AWS account. If this is your first time using the service, your list will be empty and you can click on the Create dataset button at the top right of the list to bring up the dataset creation page.
- On this screen, you are asked to give a name to your dataset (let's call it industrial-pump) and a data schema. In the dataset archive you downloaded in the initial technical requirements paragraph from this chapter, I provided a schema.txt file. Open it and copy and paste its content into the dataset schema widget.
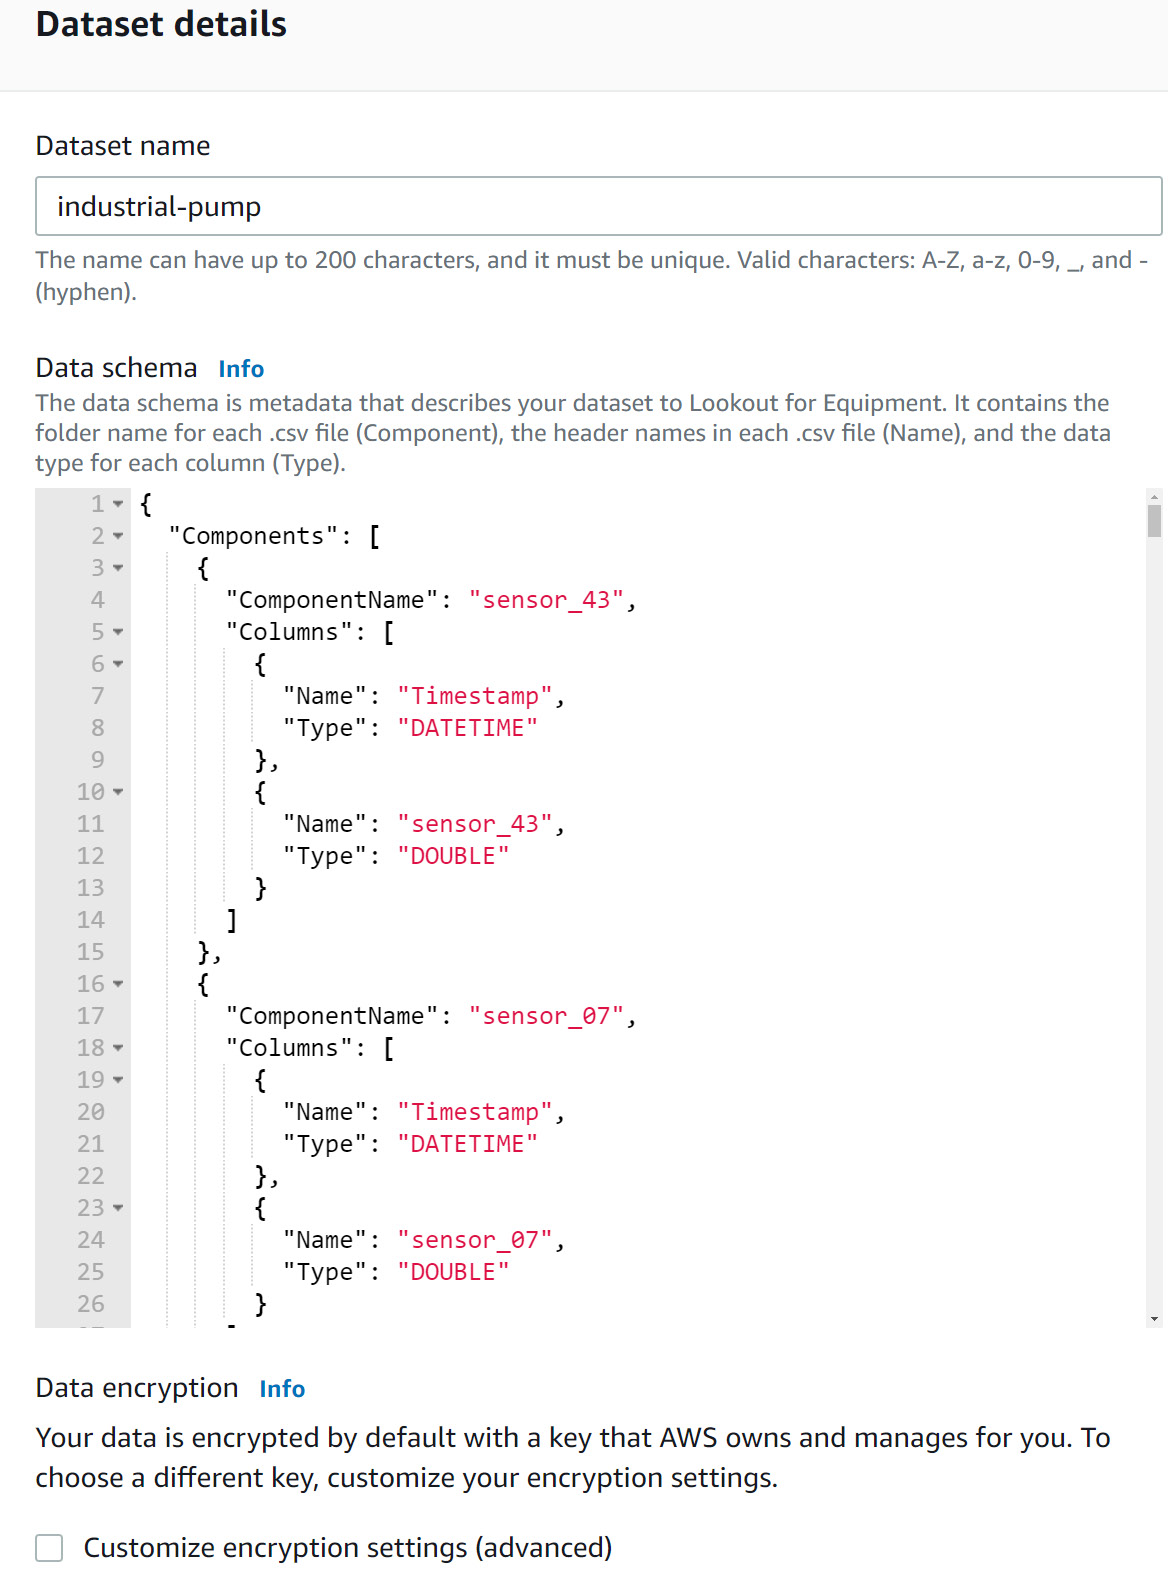
Figure 9.18 – Dataset creation details
The dataset is created and you are brought to the dataset dashboard. Before you actually ingest your data, let's take a short pause to look at the dataset schema.
Generating a JSON schema
To create a dataset in Amazon Lookout for Equipment, you need to describe the list of sensors it contains. You will do this by writing a data schema in JSON format. In this section, you will learn how to write one manually and how to generate one automatically.
Dataset schema structure
The data schema to describe an Amazon Lookout for Equipment dataset is a JSON string that takes the following format:
{
"Components": [
{
"ComponentName": "string",
"Columns": [
{ "Name": "string", "Type": "DOUBLE" | "DATETIME" },
…
{ "Name": "string", "Type": "DOUBLE" | "DATETIME" }
]
},
…
]
}
The root item (Components) of this JSON string lists all the components of the dataset. Then, each component is a dictionary containing the following:
- The name of the component as a string (ComponentName).
- The list of all columns in this component (Columns).
- Each column of a component is a dictionary with the name of the column (Name) and its type, which can either be DOUBLE or DATETIME. The latter is reserved for the timestamp columns of the dataset.
Writing such a schema from scratch can be hard to get right, especially for datasets that contain several dozen, if not hundreds, of signals shared between multiple components. In the next section, I will show you how to programmatically generate a data schema file.
Using CloudShell to generate a schema
Building a schema from scratch manually is a highly error-prone activity. In this section, you are going to use the CloudShell service to run a script that will build this schema automatically from an S3 path you provide it. Let's go through the following instructions:
- Log in to your AWS console.
- At the top right of your console, make sure the Region selector is set to one of the regions where Amazon Lookout for Equipment is available: either Europe (Ireland), US East (N. Virginia), or Asia Pacific (Seoul).
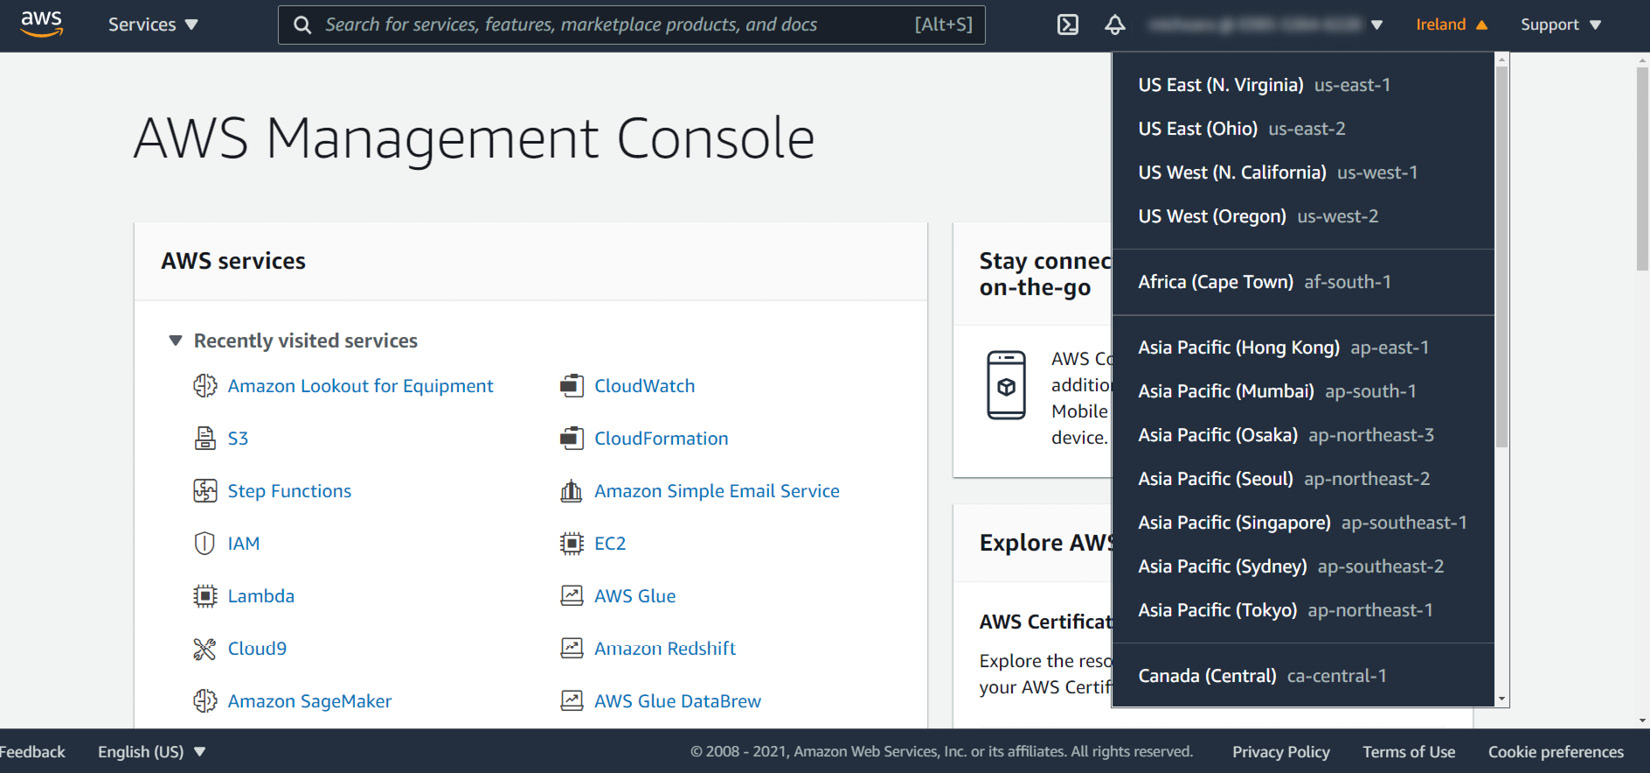
Figure 9.19 – AWS console region selector
- Once your region is selected, click on the CloudShell icon located not far to the left of the region selector.

Figure 9.20 – Locating the CloudShell icon
- When clicking on the CloudShell icon, a new tab is opened in your browser. If you don't have a CloudShell session already opened, you should see a blue ribbon stating that your environment is in preparation. After a minute, your environment is ready and you are presented with a Linux command prompt.

Figure 9.21 – Your CloudShell environment is ready!
- Now, run the following commands in this terminal (don't forget to replace <<YOUR_BUCKET>> with the name of your own bucket):
python3 -m pip install --quiet s3fs pandas
wget https://github.com/PacktPublishing/Time-Series-Analysis-on-AWS/blob/main/Chapter09/create_schema.py
python3 create_schema.py s3://<<YOUR_BUCKET>>/ train-data/
After a few seconds this script will output a long JSON string starting with {"Components":…. You can now copy this string when you need to create a dataset based on this time series dataset.
Note
After running the first line from the preceding code, you might see some error messages about pip dependencies. You can ignore them and run the dataset generation script.
You have seen how you can create a Lookout for Equipment dataset and how you can generate a schema with a script. Let's now ingest actual data in our dataset.
Creating a data ingestion job
At the end of dataset creation, you are automatically brought to the dataset dashboard.
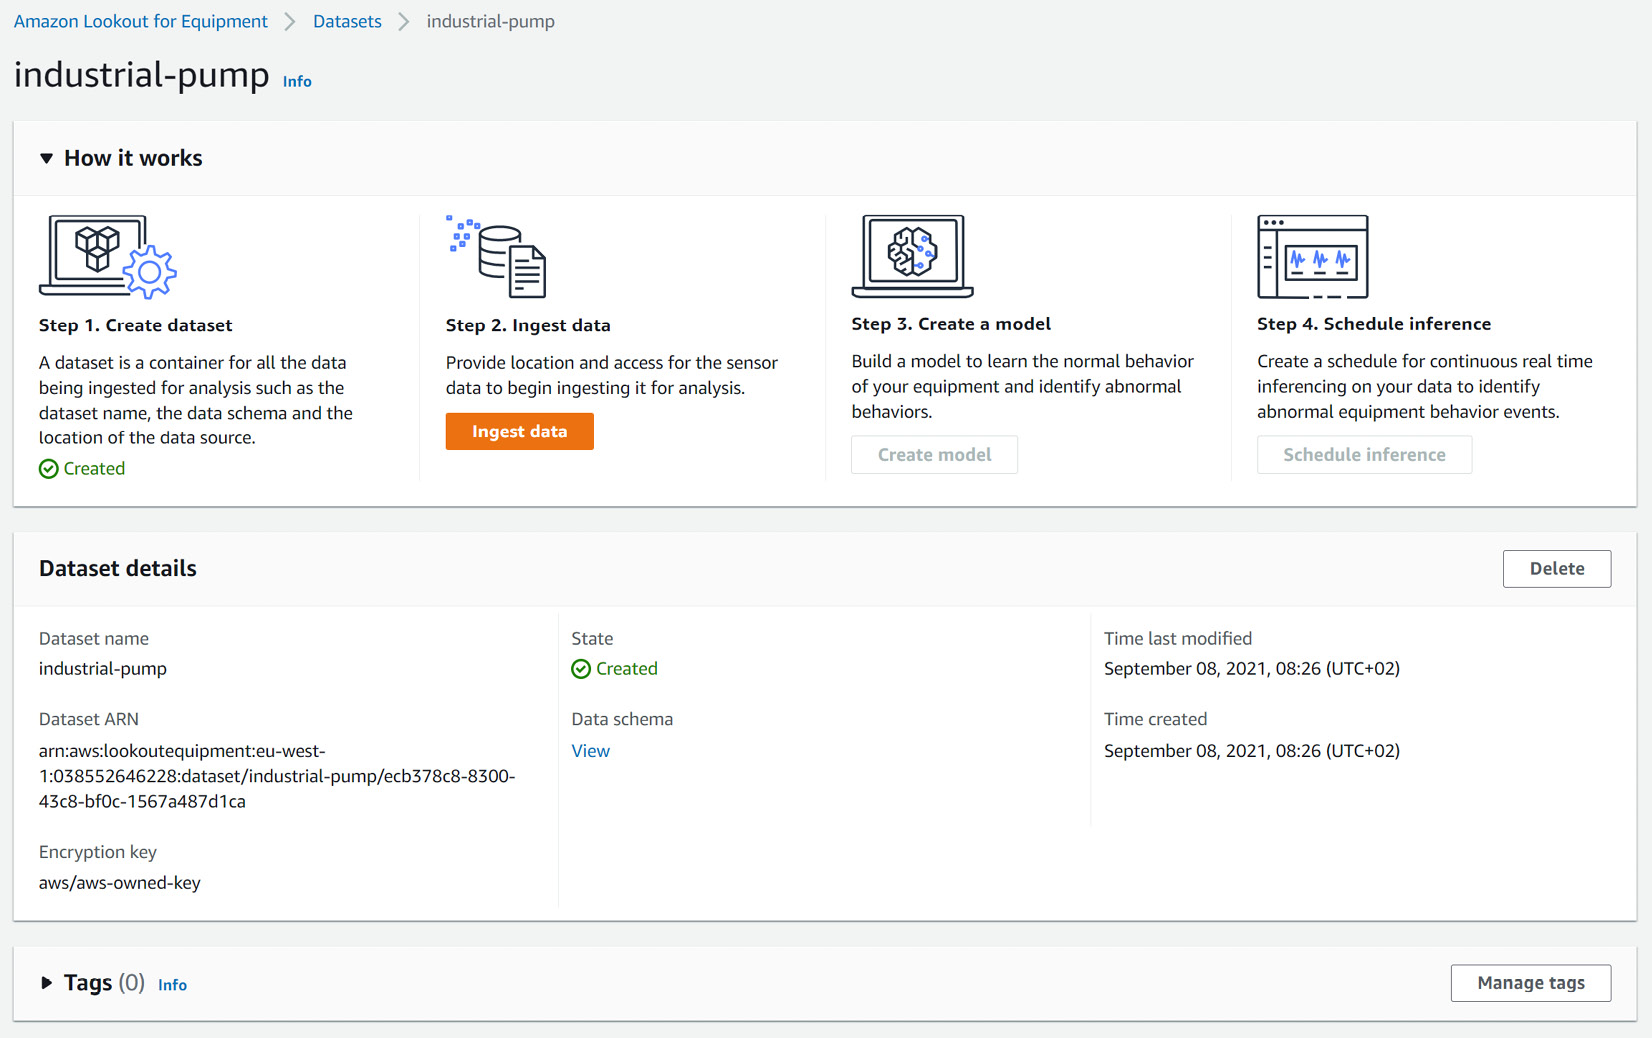
Figure 9.22 – Dataset dashboard after creation
From here, you can click the Ingest data button in the Step 2 column and start configuring the data ingestion job.

Figure 9.23 – Data ingestion job configuration
When configuring the ingestion, the job details you must define are as follows:
- S3 location: The S3 location of the training data where the time series are located. In step 5 of the Uploading your dataset to Amazon S3 section, you copied the S3 URI of your training data. Paste it into this field.
- In the IAM role field, select Enter a custom IAM role ARN and paste the ARN of the AmazonForecastEnergyConsumption role that you created earlier in the IAM service. The format of the ARN should be arn:aws:iam::<ACCOUNT-NUMBER>:role/LookoutEquipmentIndustrialPumpDataAccess, where <ACCOUNT-NUMBER> needs to be replaced with your AWS account number.
Once you're done, you can click on Ingest to start the ingestion process. Your process starts and can last around 5-6 minutes depending on the GB of data to be ingested. During the ingestion process, Amazon Lookout for Equipment checks your data, performs some missing value filling on your behalf, aligns the timestamps, and prepares the sequence of time series so that they are ready to be used at training time by the multiple algorithms the service can run.
Understanding common ingestion errors and workarounds
When ingesting data, Amazon Lookout for Equipment performs several checks that can result in a failed ingestion. When this happens, you can go back to your dataset dashboard and click on the View data source button. You will then access a list of all the ingestion jobs you performed.

Figure 9.24 – Data ingestion history
This screen lists all the ingestion jobs you performed. When ingestion fails, the Success icon is replaced by a Failed one and you can hover your mouse on it to read about what happened. There are three main sources of errors linked to your dataset. Two of them can happen at ingestion time, while the last one will only be triggered when you train a model:
- The S3 location where the time series data is not the right one.
- The data file for a given tag/sensor is not found.
- You have too many missing values in a given sensor.
Let's dive into each of these issues.
Wrong S3 location
The S3 location you used when you configured your ingestion job may not be the right one. Remember that your dataset can contain several components. The S3 URI you should mention is the root folder that contains the folders materializing these components. This is a common mistake when you have only one component.
When you see this error, you just need to relaunch the ingestion process and set the correct S3 location before attempting the ingestion again.
Component not found
When you ingest your data, Amazon Lookout for Equipment matches the data structure as being available in S3 with the data schema you used when configuring your dataset. If a component is missing (an entire folder), if a tag is missing from a given component, or if a tag is misplaced and positioned in the wrong component file, you will find this error.
Double-check the file structure in your S3 bucket and make sure it matches the schema used at dataset creation time (each folder must match a component name that is case-sensitive and each CSV file must contain exactly the sensors as listed under this component in the dataset schema).
If your file structure is correct, you may have to do the following:
- Delete the dataset.
- Regenerate a schema based on your current file structure.
- Recreate a new dataset with the new data schema.
- Reattempt the ingestion.
Missing values for a given time series
If you did not generate the dataset programmatically, you may have had no opportunity to look into your time series data. Some of this data might miss a significant portion of its data points or be empty altogether (an unused or malfunctioning sensor for instance). When you train a model with Amazon Lookout for Equipment, you must choose a training start date and end date. Lookout for Equipment will check whether all the sensors have at least one data point present in this time period and forward fill any missing values.
If a time series is completely empty (100% missing values) in the selected training range, the model will fail to train. When this happens, you have the following possibilities:
- If this is a data generation issue, regenerate your data, upload it in S3, and reattempt ingestion.
- If you have good knowledge of the process that generates this data and know how to fill these values, you can update the time series for this sensor, upload them to S3, and reattempt ingestion.
- If you want to remove this signal altogether, you will have to delete your dataset, build a new schema that doesn't include this sensor data, create a new dataset with the new schema, and reattempt ingestion.
Now that you understand the key issues that may happen with your dataset, it is time to conclude this chapter and move to the fun part – training and evaluating a model!
Summary
In this chapter, you learned how you should organize your dataset before you can train an anomaly detection model with Amazon Lookout for Equipment. You also discovered the dataset we are going to use in the next few chapters and you performed the first tasks necessary to train a model, namely, creating a dataset and ingesting your time series data in it.
With the help of this chapter, you should now have an understanding of what can go wrong at this stage with a few pointers to the main errors that can happen at ingestion time.
In the next chapter, we are going to train and evaluate our first anomaly detection model.