Interaction diagrams describe how groups of objects collaborate in some behavior. The UML defines several forms of interaction diagram, of which the most common is the sequence diagram.
Typically, a sequence diagram captures the behavior of a single scenario. The diagram shows a number of example objects and the messages that are passed between these objects within the use case.
To begin the discussion, I’ll consider a simple scenario. We have an order and are going to invoke a command on it to calculate its price. To do that, the order needs to look at all the line items on the order and determine their prices, which are based on the pricing rules of the order line’s products. Having done that for all the line items, the order then needs to compute an overall discount, which is based on rules tied to the customer.
Figure 4.1 is a sequence diagram that shows one implementation of that scenario. Sequence diagrams show the interaction by showing each participant with a lifeline that runs vertically down the page and the ordering of messages by reading down the page.
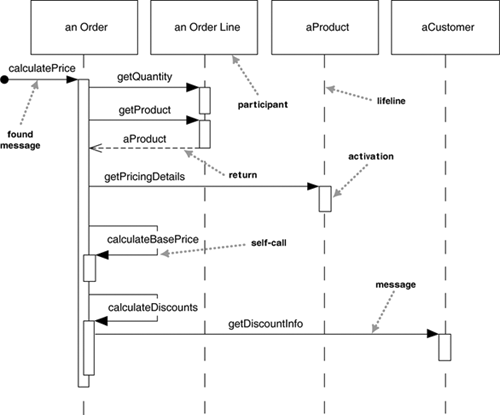
One of the nice things about a sequence diagram is that I almost don’t have to explain the notation. You can see that an instance of order sends getQuantity and getProduct messages to the order line. You can also see how we show the order invoking a method on itself and how that method sends getDiscountInfo to an instance of customer.
The diagram, however, doesn’t show everything very well. The sequence of messages getQuantity, getProduct, getPricingDetails, and calculateBasePrice needs to be done for each order line on the order, while calculateDiscounts is invoked just once. You can’t tell that from this diagram, although I’ll introduce some more notation to handle that later.
Most of the time, you can think of the participants in an interaction diagram as objects, as indeed they were in UML 1. But in UML 2, their roles are much more complicated, and to explain it all fully is beyond this book. So I use the term participants, a word that isn’t used formally in the UML spec. In UML 1, participants were objects and so their names were underlined, but in UML 2, they should be shown without the underline, as I’ve done here.
In these diagrams, I’ve named the participants using the style anOrder. This works well most of the time. A fuller syntax is name : Class, where both the name and the class are optional, but you must keep the colon if you use the class. (Figure 4.4, shown on page 58, uses this style.)
Each lifeline has an activation bar that shows when the participant is active in the interaction. This corresponds to one of the participant’s methods being on the stack. Activation bars are optional in UML, but I find them extremely valuable in clarifying the behavior. My one exception is when exploring a design during a design session, because they are awkward to draw on whiteboards.
Naming often is useful to correlate participants on the diagram. The call getProduct is shown returning aProduct, which is the same name, and therefore the same participant, as the aProduct that the getPricingDetails call is sent to. Note that I’ve used a return arrow for only this call; I did that to show the correspondance. Some people use returns for all calls, but I prefer to use them only where they add information; otherwise, they simply clutter things. Even in this case, you could probably leave the return out without confusing your reader.
The first message doesn’t have a participant that sent it, as it comes from an undetermined source. It’s called a found message.
For another approach to this scenario, take a look at Figure 4.2. The basic problem is still the same, but the way in which the participants collaborate to implement it is very different. The Order asks each Order Line to calculate its own Price. The Order Line itself further hands off the calculation to the Product; note how we show the passing of a parameter. Similarly, to calculate the discount, the Order invokes a method on the Customer. Because it needs information from the Order to do this, the Customer makes a reentrant call (getBaseValue) to the Order to get the data.
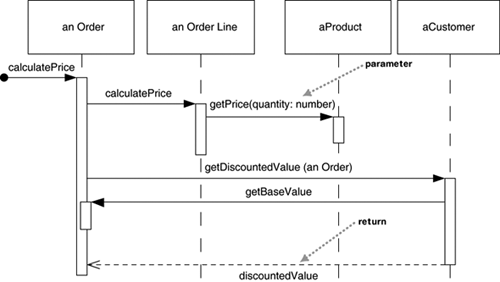
The first thing to note about these two diagrams is how clearly the sequence diagram indicates the differences in how the participants interact. This is the great strength of interaction diagrams. They aren’t good at showing details of algorithms, such as loops and conditional behavior, but they make the calls between participants crystal clear and give a really good picture about which participants are doing which processing.
The second thing to note is the clear difference in styles between the two interactions. Figure 4.1 is centralized control, with one participant pretty much doing all the processing and other participants there to supply data. Figure 4.2 uses distributed control, in which the processing is split among many participants, each one doing a little bit of the algorithm.
Both styles have their strengths and weaknesses. Most people, particularly those new to objects, are more used to centralized control. In many ways, it’s simpler, as all the processing is in one place; with distributed control, in contrast, you have the sensation of chasing around the objects, trying to find the program.
Despite this, object bigots like me strongly prefer distributed control. One of the main goals of good design is to localize the effects of change. Data and behavior that accesses that data often change together. So putting the data and the behavior that uses it together in one place is the first rule of object-oriented design.
Furthermore, by distributing control, you create more opportunities for using polymorphism rather than using conditional logic. If the algorithms for product pricing are different for different types of product, the distributed control mechanism allows us to use subclasses of product to handle these variations.
In general the OO style is to use a lot of little objects with a lot of little methods that give us a lot of plug points for overriding and variation. This style is very confusing to people used to long procedures; indeed, this change is the heart of the paradigm shift of object orientation. It’s something that’s very difficult to teach. It seems that the only way to really understand it is to work in an OO environment with strongly distributed control for a while. Many people then say that they get a sudden “aha” when the style makes sense. At this point, their brains have been rewired, and they start thinking that decentralized control is actually easier.
Sequence diagrams show some extra notation for creating and deleting participants (Figure 4.3). To create a participant, you draw the message arrow directly into the participant box. A message name is optional here if you are using a constructor, but I usually mark it with “new” in any case. If the participant immediately does something once it’s created, such as the query command, you start an activation right after the participant box.
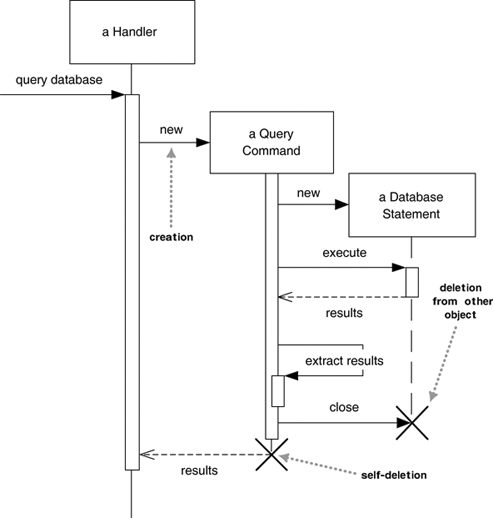
Deletion of a participant is indicated by big X. A message arrow going into the X indicates one participant explicitly deleting another; an X at the end of a lifeline shows a participant deleting itself.
In a garbage-collected environment, you don’t delete objects directly, but it’s still worth using the X to indicate when an object is no longer needed and is ready to be collected. It’s also appropriate for close operations, indicating that the object isn’t usable any more.
A common issue with sequence diagrams is how to show looping and conditional behavior. The first thing to point out is that this isn’t what sequence diagrams are good at. If you want to show control structures like this, you are better off with an activity diagram or indeed with code itself. Treat sequence diagrams as a visualization of how objects interact rather than as a way of modeling control logic.
That said, here’s the notation to use. Both loops and conditionals use interaction frames, which are ways of marking off a piece of a sequence diagram. Figure 4.4 shows a simple algorithm based on the following pseudocode:
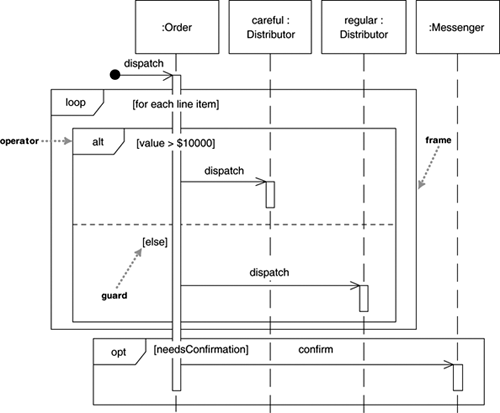
procedure dispatch
  foreach (lineitem)
    if (product.value > $10K)
      careful.dispatch
    else
      regular.dispatch
    end if
  end for
  if (needsConfirmation) messenger.confirm
end procedure
In general, frames consist of some region of a sequence diagram that is divided into one or more fragments. Each frame has an operator and each fragment may have a guard. (Table 4.1 lists common operators for interaction frames.) To show a loop, you use the loop operand with a single fragment and put the basis of the iteration in the guard. For conditional logic, you can use an alt operator and put a condition on each fragment. Only the fragment whose guard is true will execute. If you have only one region, there is an opt operator.
Interaction frames are new in UML 2. As a result, you may see diagrams prepared before UML 2 and that use a different approach; also, some people don’t like the frames and prefer some of the older conventions. Figure 4.5 shows some of these unofficial tweaks.
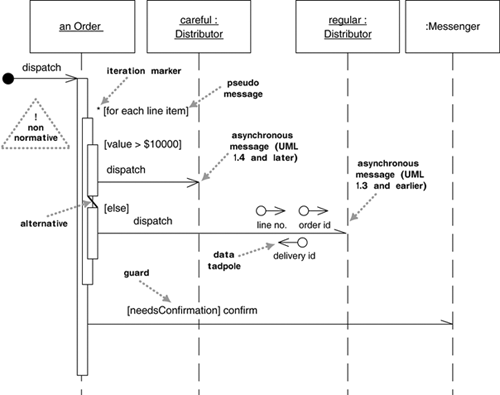
UML 1 used iteration markers and guards. An iteration marker is a * added to the message name. You can add some text in square brackets to indicate the basis of the iteration. Guards are a conditional expression placed in square brackets and indicate that the message is sent only if the guard is true. While these notations have been dropped from sequence diagrams in UML 2, they are still legal on communication diagrams.
Table 4.1. Common Operators for Interaction Frames
Operator | Meaning |
|---|---|
| Alternative multiple fragments; only the one whose condition is true will execute (Figure 4.4). |
| Optional; the fragment executes only if the supplied condition is true. Equivalent to an |
| Parallel; each fragment is run in parallel. |
| Loop; the fragment may execute multiple times, and the guard indicates the basis of iteration (Figure 4.4). |
| Critical region; the fragment can have only one thread executing it at once. |
| Negative; the fragment shows an invalid interaction. |
| Reference; refers to an interaction defined on another diagram. The frame is drawn to cover the lifelines involved in the interaction. You can define parameters and a return value. |
| Sequence diagram; used to surround an entire sequence diagram, if you wish. |
Although iteration markers and guards can help, they do have weaknesses. The guards can’t indicate that a set of guards are mutually exclusive, such as the two on Figure 4.5. Both notations work only with a single message send and don’t work well when several messages coming out of a single activation are within the same loop or conditional block.
To get around this last problem, an unofficial convention that’s become popular is to use a pseudomessage, with the loop condition or the guard on a variation of the self-call notation. In Figure 4.5, I’ve shown this without a message arrow; some people include a message arrow, but leaving it out helps reinforce that this isn’t a real call. Some also like to gray shade the pseudomessage’s activation bar. If you have alterative behavior, you can show that with an alternative marker between the activations.
Although I find activations very helpful, they don’t add much in the case of the dispatch method, whereby you send a message and nothing else happens within the receiver’s activation. A common convention that I’ve shown on Figure 4.5 is to drop the activation for those simple calls.
The UML standard has no graphic device to show passing data; instead, it’s shown by parameters in the message name and return arrows. Data tadpoles have been around in many methods to indicate the movement of data, and many people still like to use them with the UML.
All in all, although various schemes can add notation for conditional logic to sequence diagrams, I don’t find that they work any better than code or at least pseudocode. In particular, I find the interaction frames very heavy, obscuring the main point of the diagram, so I prefer pseudomessages.
If you’re exceptionally alert, you’ll have noticed that the arrowheads in the last couple of diagrams are different from the arrowheads earlier on. That minor difference is quite important in UML 2. In UML 2, filled arrowheads show a synchronous message, while stick arrowheads show an asynchronous message.
If a caller sends a synchronous message, it must wait until the message is done, such as invoking a subroutine. If a caller sends an asynchronous message, it can continue processing and doesn’t have to wait for a response. You see asynchronous calls in multithreaded applications and in message-oriented middleware. Asynchrony gives better responsiveness and reduces the temporal coupling but is harder to debug.
The arrowhead difference is very subtle; indeed, rather too subtle. It’s also a backward-incompatible change introduced in UML 1.4, before then an asynchronous message was shown with the half-stick arrowhead, as in Figure 4.5.
I think that this arrowhead distinction is too subtle. If you want to highlight asynchronous messages, I would recommend using the obsolete half-stick arrowhead, which draws the eye much better to an important distinction. If you’re reading a sequence diagram, beware of making assumptions about synchrony from the arrowheads unless you’re sure that the author is intentionally making the distinction.
You should use sequence diagrams when you want to look at the behavior of several objects within a single use case. Sequence diagrams are good at showing collaborations among the objects; they are not so good at precise definition of the behavior.
If you want to look at the behavior of a single object across many use cases, use a state diagram (see Chapter 10). If you want to look at behavior across many use cases or many threads, consider an activity diagram (see Chapter 11).
If you want to explore multiple alternative interactions quickly, you may be better off with CRC cards, as that avoids a lot of drawing and erasing. It’s often handy to have a CRC card session to explore design alternatives and then use sequence diagrams to capture any interactions that you want to refer to later.
Other useful forms of interaction diagrams are communication diagrams, for showing connections; and timing diagrams, for showing timing constraints.
CRC Cards
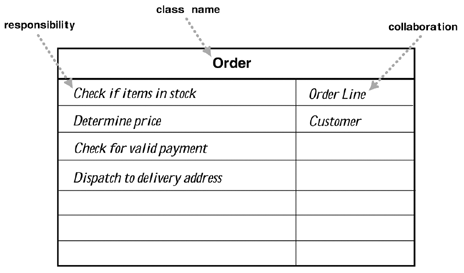
One of the most valuable techniques in coming up with a good OO design is to explore object interactions, because it focuses on behavior rather than data. CRC (Class-Responsibility-Collaboration) diagrams, invented by Ward Cunningham in the late 1980s, have stood the test of time as a highly effective way to do this (Figure 4.6). Although they aren’t part of the UML, they are a very popular technique among skilled object designers.
To use CRC cards, you and your colleagues gather around a table. Take various scenarios and act them out with the cards, picking them up in the air when they are active and moving them to suggest how they send messages to each other and pass them around. This technique is almost impossible to describe in a book yet is easily demonstrated; the best way to learn it is to have someone who has done it show it to you.
An important part of CRC thinking is identifying responsibilities. A responsibility is a short sentence that summarizes something that an object should do: an action the object performs, some knowledge the object maintains, or some important decisions the object makes. The idea is that you should be able to take any class and summarize it with a handful of responsibilities. Doing that can help you think more clearly about the design of your classes.
The second C refers to collaborators: the other classes that this class needs to work with. This gives you some idea of the links between classes—still at a high level.
One of the chief benefits of CRC cards is that they encourage animated discussion among the developers. When you are working through a use case to see how classes will implement it, the interaction diagrams in this chapter can be slow to draw. Usually, you need to consider alternatives; with diagrams, the alternatives can take too long to draw and rub out. With CRC cards, you model the interaction by picking up the cards and moving them around. This allows you to quickly consider alternatives.
As you do this, you form ideas about responsibilities and write them on the cards. Thinking about responsibilities is important, because it gets you away from the notion of classes as dumb data holders and eases the team members toward understanding the higher-level behavior of each class. A responsibility may correspond to an operation, to an attribute, or, more likely, to an undetermined clump of attributes and operations.
A common mistake I see people make is generating long lists of low-level responsibilities. But doing so misses the point. The responsibilities should easily fit on one card. Ask yourself whether the class should be split or whether the responsibilities would be better stated by rolling them up into higher-level statements.
Many people stress the importance of role playing, whereby each person on the team plays the role of one or more classes. I’ve never seen Ward Cunningham do that, and I find that role playing gets in the way.
Books have been written on CRC, but I’ve found that they never really get to the heart of the technique. The original paper on CRC, written with Kent Beck, is [Beck and Cunningham]. To learn more about both CRC cards and responsibilities in design, take a look at [Wirfs-Brock].