Setting Up Research Facilities
Introduction
You may already have access to a usability lab at your company or your client’s site. If so, it was most likely built with the intent of conducting one-on-one usability evaluations. Will this lab work for all types of user experience research? Yes and no. For individual activities (e.g., interviews, solo card sort), your current setup may be fine. However, it is unlikely that a “standard” usability lab is able to accommodate group activities (e.g., group card sort). Since standard labs are typically the size of an office, they are just too small. It may also be inadequate for simulating home environments if you are interested in evaluating video games, Internet-connected TVs, or other products that are more likely to be used in a casual home environment instead of a formal office setting.
If you are conducting user requirements gathering, you may be wondering whether a permanent space needs to be built to conduct these activities. The answer is no. It is great if you have the budget, but it is not absolutely necessary. If you want to observe users in their own environment (e.g., field studies) or collect data from a lot of users (e.g., surveys, diary studies), then a usability lab is unnecessary. However, labs are excellent for card sorting, interviews, and focus groups. In this chapter, we discuss the options for setting up facilities to conduct a user requirements activity. We look at the pros and cons for each option, as well as what you should be aware of when making your selection.
Using Your Company’s Existing Facilities
If your budget is razor-thin, your only option may be to use your organization’s existing space (e.g., conference room, classroom), but that is actually not a problem! If you are conducting a group activity, then when choosing a room for your session, you must obviously ensure it can comfortably accommodate all of the participants, plus one or more moderators. It should be flexible enough to allow multiple activity configurations. For example, it should allow everyone to sit around one large table for brainstorming with enough room for you, an optional notetaker, and a whiteboard or flip charts at the front of the room (see Figure 4.1 for two possible configurations).
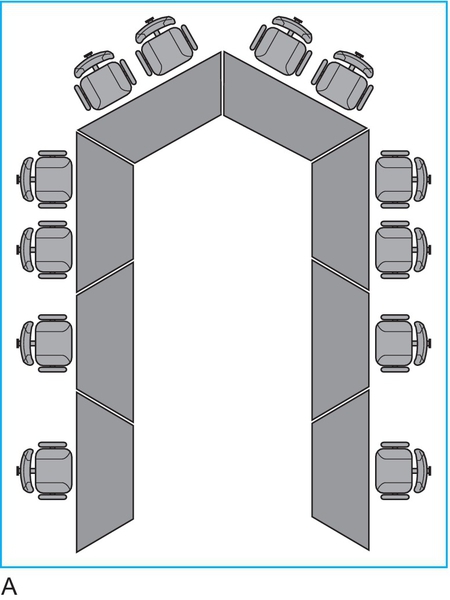
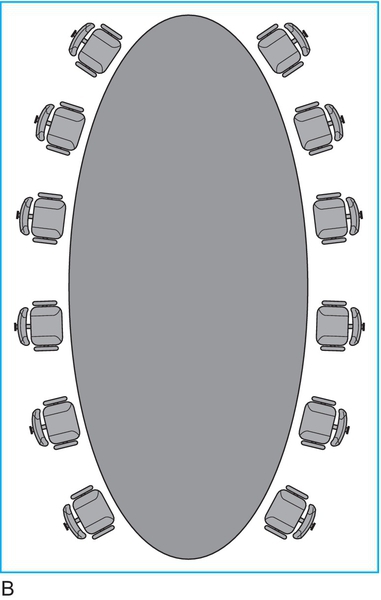
This arrangement will accommodate a group card sorting activity (Chapter 11, page 304) and a focus group (Chapter 12, page 340). It should also allow you to bring in smaller tables for a group of three participants for triad interviews (see Figure 4.2 for two possible configurations). A large conference room is the most likely candidate for these purposes.
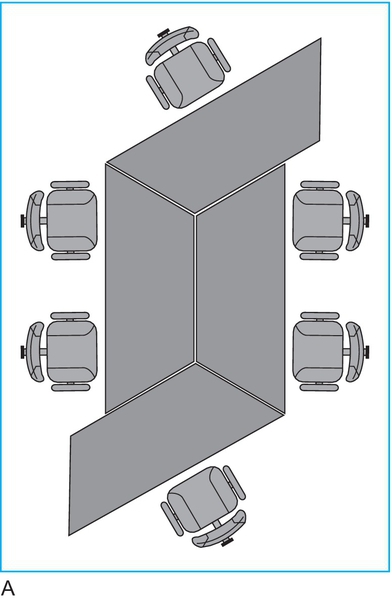
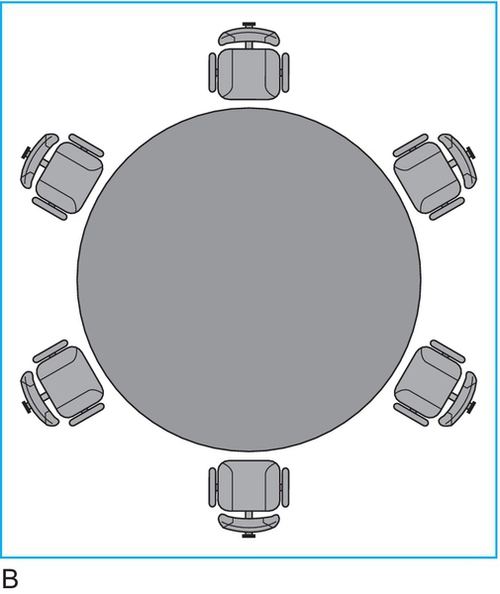
Individual activities (e.g., interviews) can be conducted in a conference room, or you may choose a more intimate location that is quiet, such as an empty office. Whatever location you choose, it does not need to be permanently devoted to user activities. As long as you can get access to the room when needed, and no one disturbs your activities, there is no reason why a good conference room or office should be locked up when not in use for their primary purpose.
When using your company’s existing facilities, you may be tempted to leave enough space in the back of the room for observers, but you must resist this temptation. It is important to keep the observers in a room that is separate from the participants. The participants will feel very self-conscious if there are people in the room who are not taking part in the activity but simply watching them. Instead, you can transmit an image of the session live to a TV in the next room, use a video-conferencing tool for people to dial into from another room, or record the activity for later viewing by product team members. A mobile lab or portable lab is ideal for situations when you must move between rooms. It also works well for studies in the field. A laptop with a web camera and screen-capture or video-recording software is all that is really needed. An additional laptop for notetaking, video camera and tripod, and external mic (to pick up quiet participants or in noisy environments) can be very helpful but are not strictly necessary.
A videographer to control the camera will be necessary if the participants will be moving around (refer to Chapter 7, During Your User Requirements Activity, “Recording and Notetaking” section, page 171).
Renting a Marketing or Hotel Facility
If you have a little more budget and you prefer not to conduct studies in a conference room or classroom, you can often rent a room from a marketing research vendor. Rooms are available in most major cities in the United States and the Western world. One benefit of this option is that the activity is being held on neutral territory. You may also be able to hire one of the employees of the vendor to help conduct the study. Participants may feel free to be more honest in their statements if they are not sitting in the middle of the company’s conference room.
These firms are typically set up for focus groups with one camera and an observation room. These full-service facilities may offer focus group moderators for an additional fee. They will also typically recruit participants and provide food for your session. If you do not conduct user research activities frequently and cannot acquire the funds for a permanent lab, this is a good option. You can find market research companies in your area through one of the sources below:
■ Quirk’s Researcher SourceBook™ (a directory of marketing research and market research companies) (http://www.quirks.com/directory/sourcebook/index.aspx)
■ AAPOR/WAPOR Blue Book (http://www.aapor.org/Blue_Book1.htm#.U58DgWSSx2k)
■ ESOMAR Directory of Research (http://directory.esomar.org/)
■ MRA Blue Book Marketing Research Services Directory (http://www.bluebook.org/)
■ AMA Marketing Resource Directory (http://marketingresourcedirectory.ama.org/)
If you do not have marketing research vendors in your area, you may wish to go to the nearest hotel and reserve a meeting room. As was noted in “Using Your Company’s Existing Facilities,” you should not have observers in the same room as the participants, and you will need to set up video equipment to record the session. Some hotels will not let you bring in your own video camera, requiring you to use their services for a fee, so make sure you ask about this when making the reservation.
Building a Permanent Facility
Usually, the most difficult thing to convince a company of is to give you a permanent space to build your lab. The budget to purchase the equipment is usually easier to get approved, but committing a space that could otherwise be used as a conference room or a set of offices is quite difficult. However, there are several benefits to having a dedicated usability lab:
■ It tells/reminds people in your company that they have a research group—one important enough in the company’s agenda to get their own lab (hopefully in a prominent location near the main entrance so that participants can get to it easily).
■ You do not have to ask someone for permission to use the facility to conduct your research activity or worse, get evicted from the room by a higher-ranking individual.
■ You do not have to transport the audio-video equipment and other materials from one room to another because you can keep them there permanently. Not only will this save your back and time, but it will prevent damaging equipment during as well.
■ You will have your own room in which to analyze data, post affinity diagrams and session artifacts without fear of someone removing them, or hold design discussions. You will also have a ready location to hold meetings and brainstorms.
Components of a Devoted User Research Facility
If your company is supportive of creating a permanent room devoted to user research, you are in luck! You should not feel overwhelmed, however, by the daunting task of figuring out what equipment you should choose. There are many audiovisual installation companies that can help you assess your needs (and your budget) and build the lab of your dreams—but you should at least be knowledgeable about the equipment available and its purpose. Technology often drops in price over time, and you may be able to find the equipment on discount websites. But do keep in mind that often you get just what you pay for, so saving money in the short term may cost you in the long term.
Lab Layout
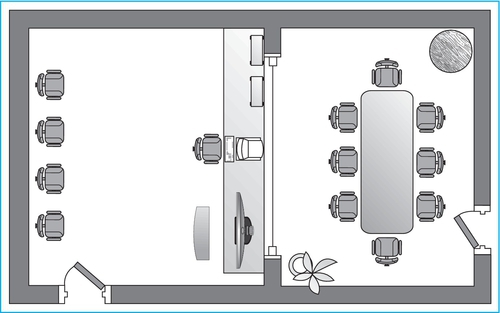
We recommend having a “user” room and an “observation” room in your lab configuration (see Figure 4.3). If you are unable to build this type of layout, but you do have access to a second room, you can stream the sessions over a local network or the Internet.
Tables
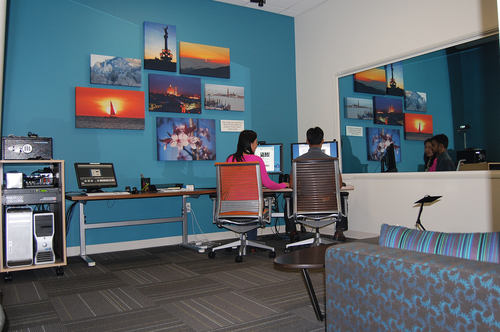
Figure 4.4 shows a lab at Google that can be used for individual interviews, group discussions, and eye-tracking usability studies. Large group activities are typically done in one of the large conference rooms on campus. Configurable tables for the user room, as sketched in Figures 4.1 and 4.2, are extremely useful. These tables have rollers with locks on them so they can be pushed from one arrangement to another quickly and easily and then locked in the chosen position. Standard tables for the observation room allow stakeholders to comfortably sit and take notes while observing your studies.
Chairs
Try to find chairs that are stackable (for storing in tight places) and easy to move. The chairs should be well made so that participants, researchers, and observers can sit comfortably for one to two hours. If the participants are uncomfortable, you will not be getting their best. Chairs with armrests are not only more comfortable but also take up more room. If you are in a tight space, you might be better off skipping the armrests, but keep in mind that comfortable participants are happy participants.
Couch
If there is enough space, it is nice to have a couch in the user room to conduct interviews and mobile evaluations comfortably.
One-Way Mirror
If you have the luxury of dividing a space into two halves—a user half and an observer half—a one-way mirror is optional. Obviously, this allows stakeholders to watch a session without being seen by the participants. Unfortunately, it can be expensive to purchase and install a one-way mirror (the cost depends on the size of the room and the construction required). It can also decrease the soundproofing. A cheaper and easier solution is to install televisions or monitors and run cables to transmit the live feed.
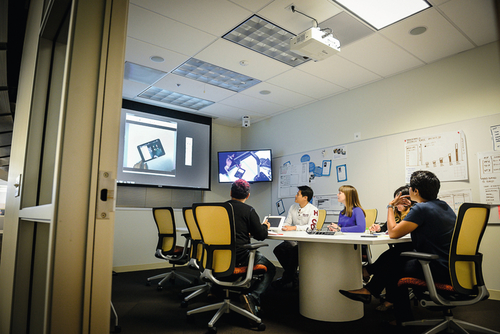
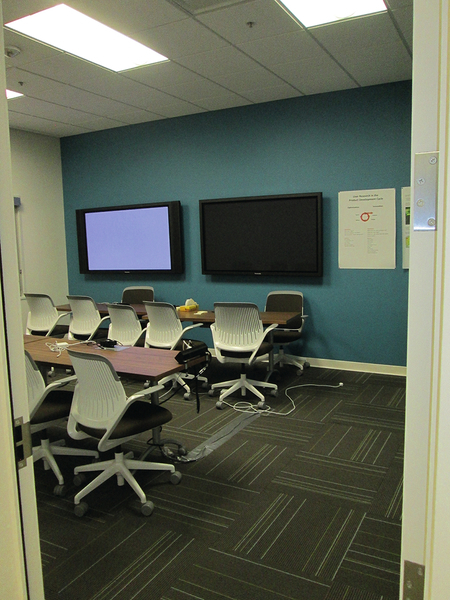
Remember that if you use a one-way mirror, you will need to keep the observation room dark. You can have low levels of light, and it will still be extremely difficult for participants to see through. However, keep in mind that reflective surfaces (e.g., television screens, laptop screens, white paper, white clothes) in the observation room can sometimes be seen even when the lights are very low. Figures 4.5 and 4.6 show the observation rooms for Citrix and Google, respectively.
Adjustable Lighting
Because the activities in the lab will vary, different levels of lighting may be necessary. Dimmer switches, and lights that can be turned on independently throughout the room, will allow you to provide as much or as little light as needed. You should also provide dimmer switches in the observation room so that very low levels of light can be achieved to ensure the participants will not see the observers during a user research activity. Task lighting can be very helpful for solo card-sorting tasks and to avoid glare when evaluating mobile devices.
Video Cameras
Purchasing a high-definition (HD) video camera that has pan/tilt control (i.e., allowing horizontal and vertical movement) will be an excellent investment; however, this will also require a separate control system. Alternatively, a sturdy tripod with two-way pan/tilt control can be used for less.
The ideal location of video cameras is wherever they give you the best range of desired angles. Whether that is on the ceiling, wall, or a crane arm depends on the layout of the room, furniture, and equipment. For example, ceiling-mounted cameras are extremely useful when conducting group activities or a mobile evaluation. Good-quality dome cameras have remote pan/tilt/zoom capabilities and are perfectly silent (see Figure 4.7). Of course, you will not be able to use the cameras in other rooms or in field studies.
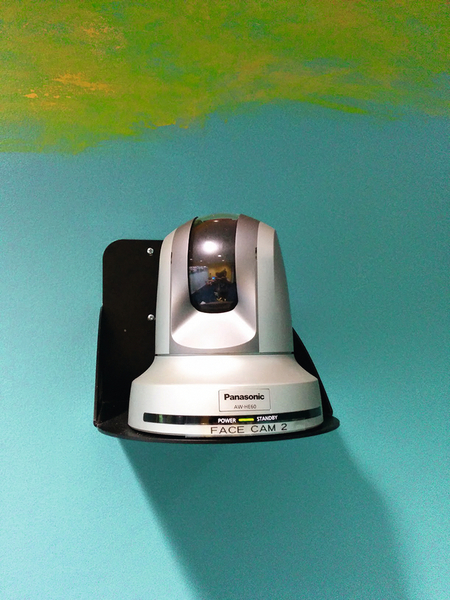
If you have a couch, you can also consider a crane to mount the camera, giving you the flexibility to shoot over the participant’s shoulder during card sorting or mobile evaluations. Document cameras can also be used for mobile studies but they are less flexible, as the participant must keep the mobile device on the table.
Microphones
Microphone placement depends on the type of activity being recorded. Ideally, microphones should be small and unobtrusive. Omnidirectional table microphones are often best for in-room studies. They go virtually unnoticed by participants, which is ideal when you do not want to make people self-conscious about being recorded. Lavalier microphones are ideal for the moderator in group sessions when he or she is often on the move. They offer improved audio quality, but they require a mixer to receive the wireless signal. Mics can be connected directly to an audio recorder or computer, but for good sound quality, the lab will need an audio processor to combine the signals from all mics and computer inputs for recording, streaming, and local observation.
Computer and Monitors
A laptop or single workstation will likely be sufficient in the user-half of the lab. An additional laptop or workstation in the observation room allows a colleague to take notes during the activity. At the very least, ensure that plenty of outlets are installed so that stakeholders can bring in laptops to take their own notes during a session.
Screen-Capture Software
You can purchase software that captures the image on a computer hard drive while a participant works. Products like TechSmith’s Morae® and Camtasia®, Hyperionic’s HyperCam™, MatchWare’s ScreenCorder, and SmartGuyz’s ScreenCam® allow you to edit the images to create a highlight video (a visual summary of actions the user made or comments the user said). Many of these tools have free trial versions, so you can see which one best suits your needs.
Soundproofing
Whether or not you have a separate control room, it is wise to have soundproofing in your lab. At a minimum, it blocks out conversations from the hallway or surrounding offices. In addition, it keeps the confidential discussions within the lab. If you do have an observation room (e.g., control room), soundproofing is necessary between this room and the participant’s room, so that the participants do not hear any discussions in the control room between the observers.
To ensure quality soundproofing, double-glass one-way mirrors with a bit of space for air between the two mirrors will work well.
The cost of soundproofing will vary depending on the size of the room and the materials used. Having separate entrances to the two rooms will also ensure that sound does not travel through the door. Double walls between the control room and the users’ room, with a little space between the walls, also ensures good soundproofing. Regardless of the quality of soundproofing, it is always a good idea to ask the observers to be as quiet as possible.
Mixer
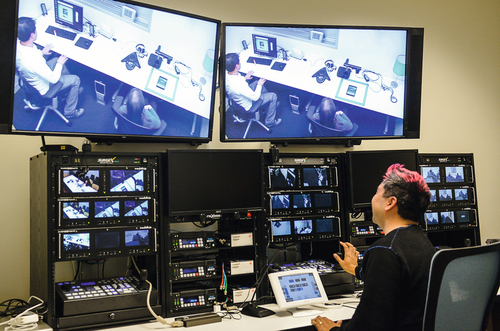
A video mixer/multiplexer will allow multiple inputs—from cameras, computers, or other inputs—to be combined into one mixed image. Some mixers will also allow the creation of “picture in picture” (PIP) overlays. The output from a video mixer can be fed either directly into a screen (e.g., in the observation room) or into a recording device locally. If you are only looking to create a PIP (e.g., of a computer input with the user’s face overlaid), some screens/TVs have this option built in. Figure 4.8 shows the control room for the Citrix labs. All of the equipment for all of the labs is centralized in this one room.
Datalogging Software
Special software for taking notes during the session is not required, although it is extremely valuable to have a program that time stamps each entry to match the corresponding video. If you want to create a highlights tape to showcase particular user comments, you can check the datalog and then go to the exact section of the recording.
There are actually quite a few datalogging products available, but as their availability changes over time, we recommend you do a web search for “usability datalogging software” to find the latest ones and read reviews for them. These tools support customizable functions that allow you to create codes for specific user actions (e.g., each time a participant references a specific topic). This allows faster notetaking and allows you to categorize behavior for easy analysis. Some tools come with analysis functions, while other tools allow the data to be exported to a spreadsheet or statistical analysis program.
Unfortunately, some datalogging applications available today are really designed more for usability testing than for requirements gathering activities. Make sure you do your homework and insist on a free trial period before investing in any application. Some things to look for in a datalogging application:
■ Automatic clip extraction of digital recordings based on comments and codes
■ Free form text notetaking and structured coding
■ Searching digital video files
In the majority of cases, a simple text editor or spreadsheet (most will give you time stamps) will do just fine to record users’ comments and unique events.
Television/Computer Monitor
If observers are watching from another room, a television or monitor is necessary to show what you are recording. Make sure it is large enough for everyone to see and the resolution is high quality so they can see what the participant sees.
Equipment Cart
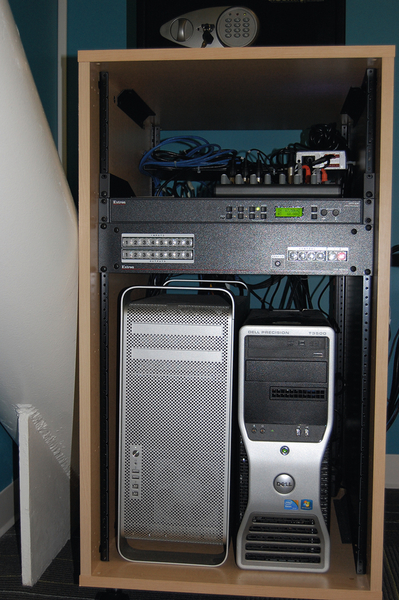
If you have been unable to convince your company to give you a space that is yours alone, you may wish to move the equipment out to prevent curious individuals from altering your settings or unintentionally breaking your hard-earned equipment. You will need a sturdy, high-quality equipment cart on wheels. Do not try to save money by buying a cheaper cart only to have all your equipment crash to the floor! The best kinds have a built-in power strip so you only need one outlet to power all of your equipment. You can keep the equipment permanently stored on the cart, so when it comes time to relocate, you simply unplug the cables and roll away. Even if you have a dedicated space, an equipment rack is a convenient way to organize all of your equipment neatly (see Figure 4.9 for the equipment storage rack in one of Google’s labs). A door on the cart also hides all that potentially scary-looking equipment from view.
Magnetic Whiteboards or Walls That You Can Tape Paper to
Some conference room walls are covered in carpet or fabric to provide a level of soundproofing. Unfortunately, this makes it almost impossible to tape anything to it. Additionally, some walls are so dense that you cannot use pushpins. For capturing brainstormed ideas, affinity diagramming, displaying paper prototypes, etc., you will need a surface from which you can hang paper. Unless you have a whiteboard to write on or a smooth surface to tape paper to, you will need multiple easels. Painting the walls in whiteboard paint is ideal; however, you will still likely need to type up what was written on the board. For this reason, we find it faster and easier to just capture text on paper flip charts and take them back to our desks to retype or have someone else copy text from the board during the session.
Space for Refreshments
It is always nice to offer at least a light snack and drinks during long group sessions, especially those conducted during dinnertime. Obviously, you need to be sure there is enough room to set the refreshments out of the way so they do not get bumped into while allowing participants to easily access them.
Storage Space
Storage space (e.g., closet, cabinet) is often forgotten when designing a lab. Space is at a premium and you may be thinking it is more important to use that space for additional observers. A small storage closet or cabinet with a lock will allow you to keep all of your materials (e.g., sticky notes, easels, flip charts, markers, incentives) and additional chairs locked away so that others do not “borrow” them. Ideally, you want this in or next to your lab so you do not have to haul chairs or an armful of materials back and forth between sessions. Also, if you must move your equipment out of the lab from time to time (see “Equipment Cart” discussion), the storage closet is a convenient place to lock it away.
Pulling It All Together
User research activities can be quick and easy to run and do not require expensive, high-tech usability labs. We have offered solutions for any budget, as well as resources to build the lab of your dreams!
