
This chapter is about setting up the VRTK to work with Unity’s UI system and controls. In the last chapter, we reviewed the VRTK’s spatial 3D UI controls. If you’ve used version 3.3.x of the VRTK in the past, you probably noticed that in some instances you were provided with a menu layout that includes the commonly used Unity UI controls. This menu layout is based on a Unity World Space UI canvas. To use Unity’s UI system in VR, you need to similarly base it on a World Space UI canvas.
Downloading and Importing Unity Package Files
For this chapter, there are two associated Unity package files that you need to download and import into your project. Both files are available to you as part of the downloads included with this book. First, download the “Tilia_Unity_UI” Unity package file and import it into your project. This is the core package that enables VRTK 4 to interact with Unity’s UI system.
The developers of VRTK 4 didn’t create the “Tilia_Unity_UI” Unity package file. This package file is a port of the original VRTK 3.3.0 UI system with some additional tweaks and fixes added that enable it to work with VRTK 4. It was ported for use with VRTK 4 by an individual in the VRTK community. It could take a while for this import to complete.
The second file you need to download is the“UI Menu Elements 2D” Unity package file, a skeletal menu layout built using various Unity UI controls. In its current state, it can’t interact with any VRTK menu pointers. In this chapter, we’ll set up the required menu pointer and connect it to various components to get the menu working in your VR scene. Further updates could be made to the “Tilia_Unity_UI” package in the future, so it would be good to periodically visit the following GitHub page to check for any updates: https://github.com/studentutu/Tilia.UnityUI.
Once you’ve imported the “Tilia_Unity_UI” package file into your project, select the “Assets” folder. In it, you’ll notice a new “Tilia_Unity_UI” folder containing the required prefabs and scripts to get VRTK 4 working with Unity’s UI system. After you’ve imported the “UI Menu Elements 2D” package file into your project, you’ll see that a UI Elements 2D prefab has been added to your “Assets” folder.
Setting Up the UI Elements 2D Skeletal Menu
In this section, we’ll create a new game object in VRTK SETUP that will be home to your skeletal menu structure. To start, select the VRTK SETUP game object in the hierarchy, and create a new empty child object in it and rename it “VRTK UNITY UI 2D CONTROLS.”
Then, drag and drop the UI Elements 2D prefab from the “Assets” folder onto the VRTK UNITY UI 2D CONTROLS game object, making it a child. With the UI Elements 2D game object selected in the hierarchy, right-click it and select the menu item Unpack Prefab Completely from the context menu that appears.
Double-click this UI Elements 2D game object to have it obtain focus in the scene. You’ll see that it has already been positioned to the right of the table.
Setting Up a Straight 2D UI Menu Pointer
You’ll need to set up a new menu pointer that exclusively interacts with your UI Elements 2D game object: the Straight 2D UI Menu Pointer. This is a dedicated menu pointer that you’ll need to activate if you intend to use this 2D UI menu system. In this case, your Indicators Object Pointers Straight Spatial Menu Pointer will need to be deactivated when you activate the Straight 2D pointer, as both menu pointers can’t function together.
In the hierarchy, select the Indicators Object Pointers Straight Spatial Menu Pointer game object and duplicate it and rename the copied game object “Indicators Object Pointers Straight Unity UI.” Now, deactivate the Indicators Object Pointers Straight Spatial Menu Pointer.
Select the Indicators Object Pointers Straight Unity UI game object in the hierarchy. In the Inspector, delete the Entered, Exited, and Selected events by clicking the minus symbol in the bottom right corner of each event. You’ll notice that these events point to the Indicators Spatial Targets Processor, which you won’t be addressing with your 2D UI menu system. The rest of the properties on the Pointer Facade will remain the same.
The Indicators Object Pointers Straight Unity UI game object is a copy of the Indicators Object Pointers Straight Spatial Menu Pointer game object. It contains the Interactor game object you added for interacting with the Slider’s knob. This game object isn’t required by your Indicators Object Pointers Straight Unity UI game object, which will only be interacting with Unity’s 2D UI controls, so you need to get rid of this nested Interactor game object.
In the hierarchy, ensure that the Indicators Object Pointers Straight Unity UI game object has been selected. Expand it until you reach its Valid Container game object, which you can do as follows: Expand Object Pointer Internal, then expand Elements, next expand Destination, followed by expanding Elements Sphere, and finally expand Valid Container. In the Valid Container game object, you’ll see the Interactions Interactor game object. Select it in the hierarchy and delete it.
Having the 2D UI Menu Pointer Interact with the 2D UI Menu System
You now need to set up the Indicators Object Pointers Straight Unity UI game object to interact with the UI Elements 2D game object and its controls. Select the Indicators Object Pointers Straight Unity UI game object in the hierarchy and expand it until you reach its Points Renderer game object. To reach the Points Renderer game object, navigate as follows: Expand Object Pointer Internal, then expand Logic, next expand Points Handler, and finally select the Points Renderer game object.
In the Assets folder, expand the “Tilia_Unity_UI” folder, then expand its “Runtime” folder, followed by expanding its “Shared Resources” folder, and finally double-click its “Prefabs” folder. You’ll see that there exists a [L_R]_Points Renderer UI Pointer prefab in this “Prefabs” folder. Drag and drop this prefab onto the Points Renderer game object selected in the hierarchy. With the [L_R]_Points Renderer UI Pointer game object selected in the hierarchy, look at the Inspector. It has been fitted with two components, a VRTK 4 UI Pointer component and a VRTK 4 Ui to Pointer component. Because the names of these components sound similar, you need to ensure that you set up the correct component, as will now be discussed.

Setting up the properties on the VRTK4 UI Pointer and VRTK 4 Ui To Pointer components of the [L_R]_Points Renderer UI Pointer game object
Let’s next set up the properties in the VRTK 4 Ui to Pointer component. For its Pointer Facade property, drag and drop the Indicators Object Pointers Straight Unity UI game object into this parameter.
You now have set up your Indicators Object Pointers Straight Unity UI pointer to interact with only your UI Elements 2D game object, which has been created using Unity’s UI controls, see Figure 18-1.
Next, you need to ensure you have at least one Unity UI Event System active in your scene. Select the Demo game object in the hierarchy and right-click it. From the context menu that pops up, navigate to Game Object ➤ UI ➤ Event System. Note that Unity won’t allow you to add another Event System to your scene as long as one already exists.
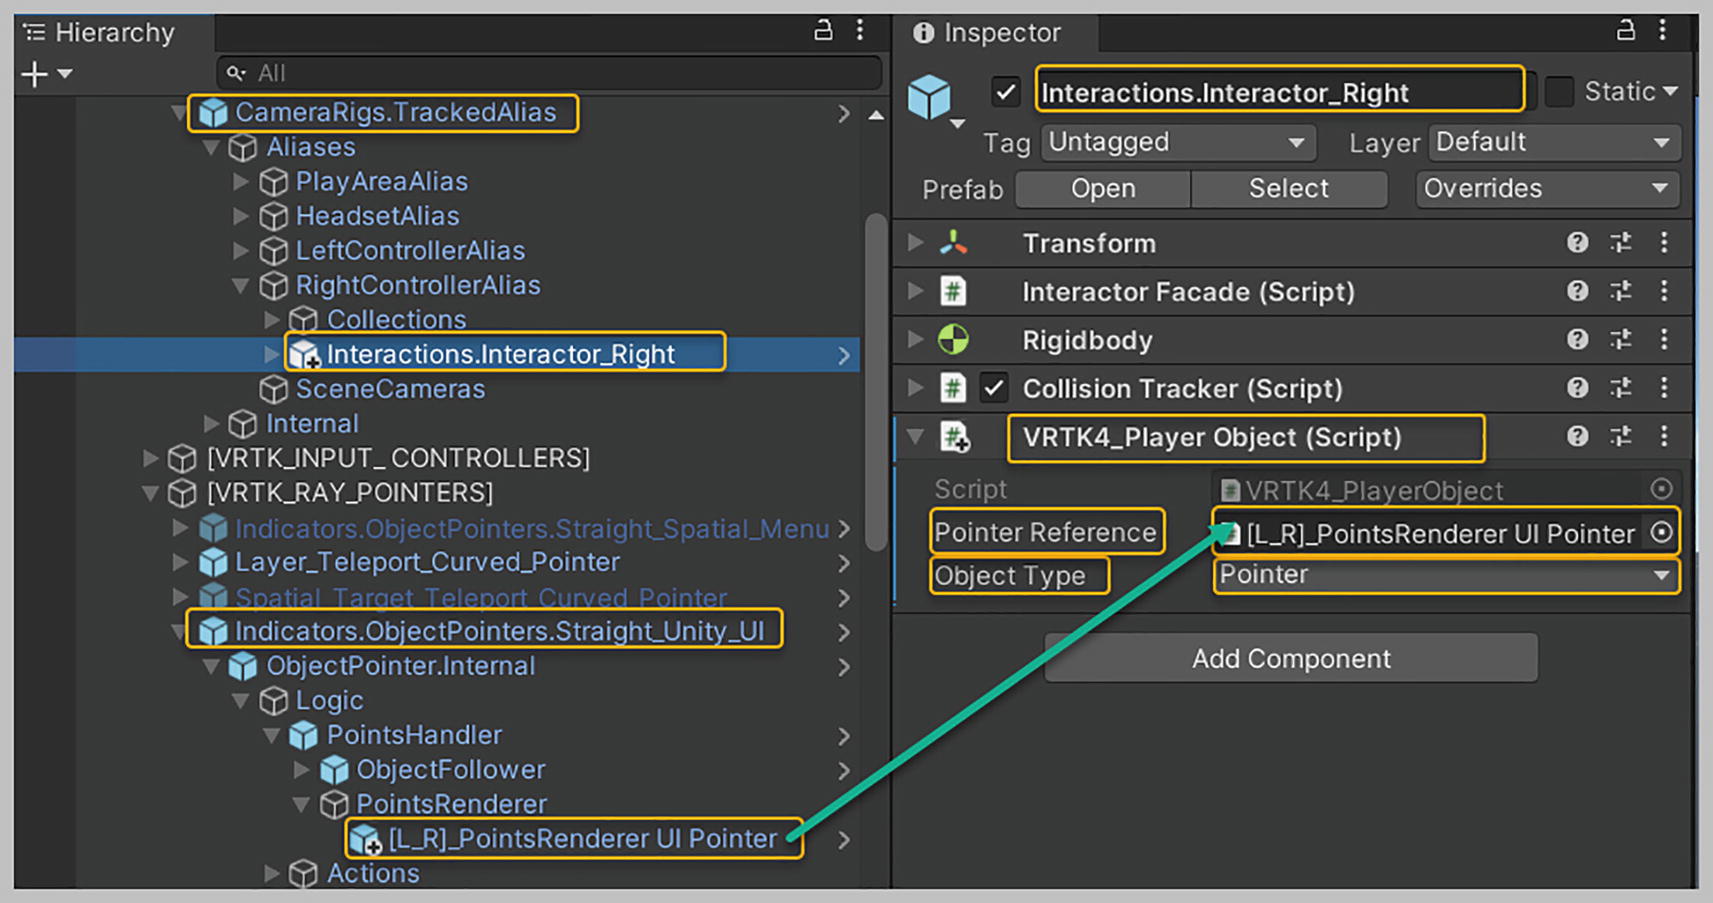
Setting up properties for the VRTK4 Player Object component that has been added to the Interactions Interactor Right game object
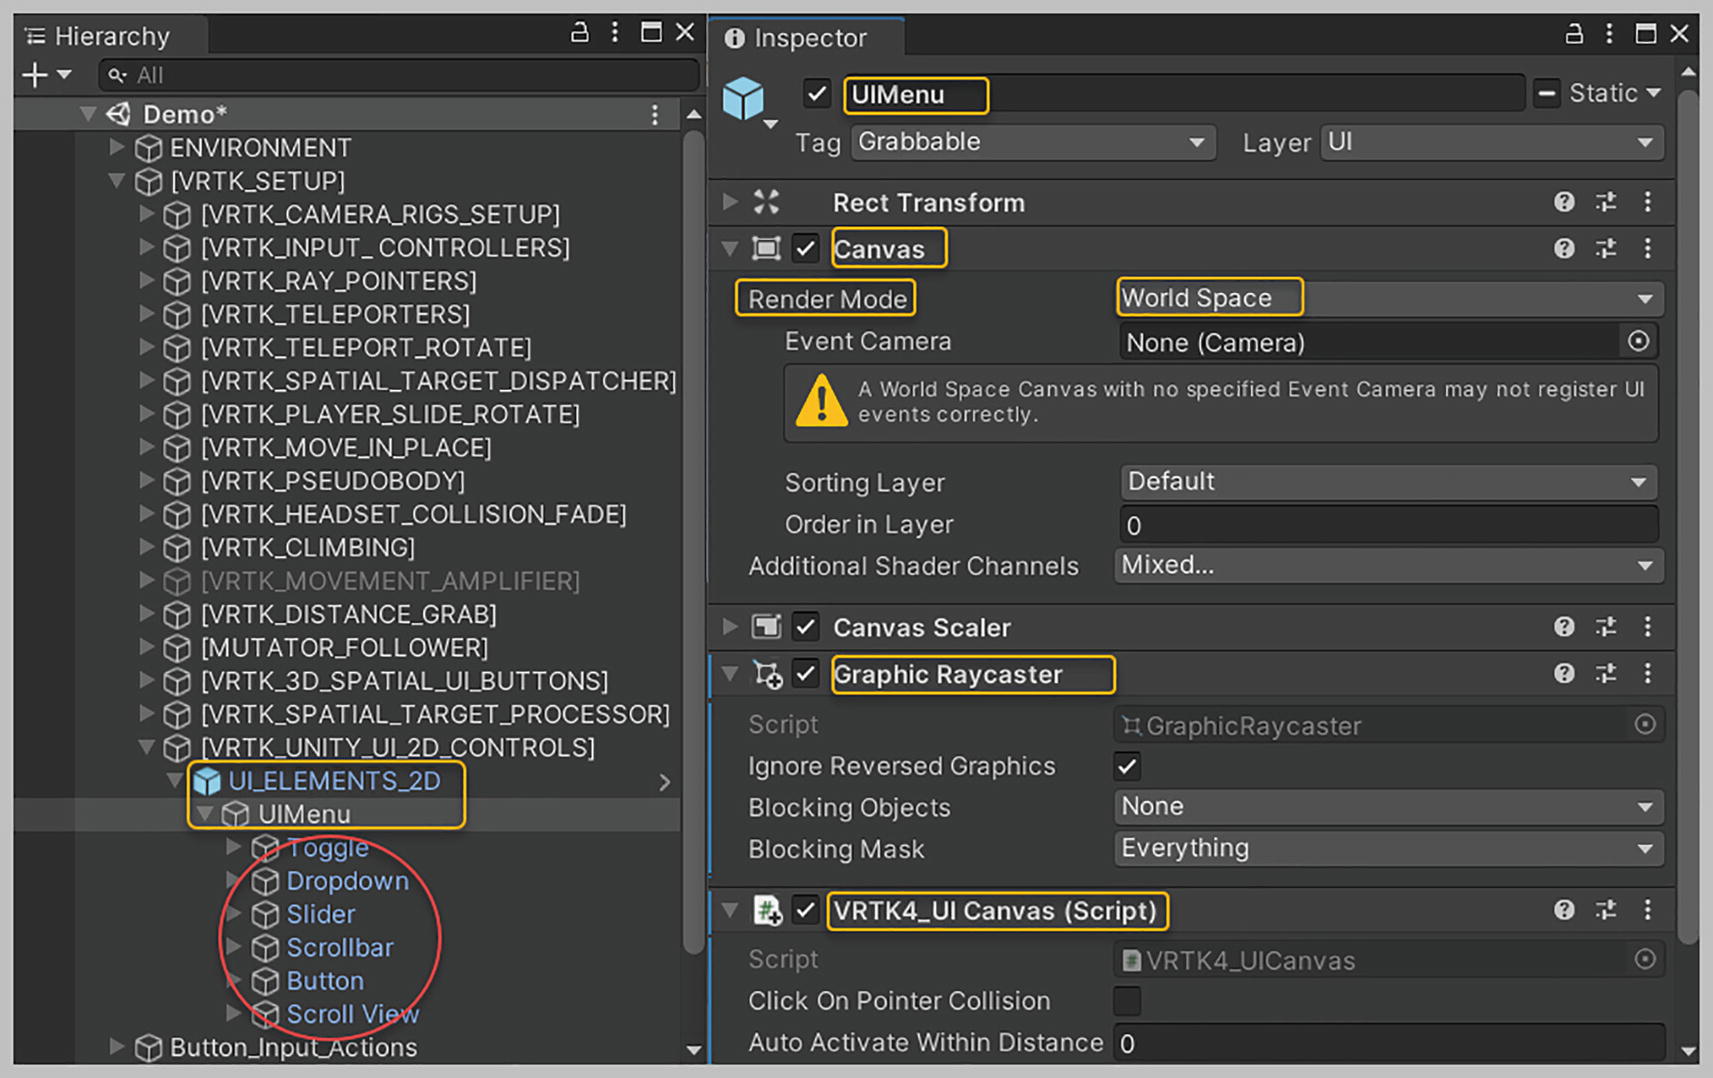
Adding the VRTK 4 UI Canvas and Graphic Ray Caster components onto the UI Menu child game object of the UI Elements 2D game object
This is all the setup required to have your UI Elements 2D game object interact with your Indicators Object Pointers Straight Unity UI menu pointer.
Now, playtest your scene using your VR headset. Activate the straight Unity UI menu pointer and point it at your UI Elements 2D menu. Pull on the Trigger button to use the various UI controls available in this UI Elements 2D menu. Note that you can’t use this straight Unity UI menu pointer to interact with any of your spatial 3D UI buttons.
Summary
In this chapter, we went over how to implement Unity’s UI controls in our VRTK project. We began by downloading and importing two essential Unity package files into the project. The “Tilia_Unity_UI” package is the core package that enables VRTK 4 to interact with Unity’s UI system. We then imported the UI Elements 2D skeletal menu containing the most widely used Unity UI controls. We set up a new Straight 2D UI Menu Pointer to interact with the Unity UI Elements 2D skeletal menu. To do this, we had to deactivate our Indicators Object Pointers Straight Spatial Menu Pointer, as both menu pointers can’t function together. You then learned how to configure various components to enable your UI Elements 2D skeletal menu to work with your Straight 2D UI Menu Pointer. Last, it was noted that to set up a Unity UI canvas for use in VR, its Render Mode property must be set to World Space.