
In this chapter, we will go over how to import VRTK 4 Tilia packages into a project using the manifest.json file. You will learn how to add manifest lines for several Tilia packages in your project’s manifest.json file. You will then see how these packages are reflected in the Package Manager and how they can be updated. We’ll also look at the Tilia input axis definitions that get added to Unity’s Input Manager. Finally, we’ll look at the “Packages” folder in the project tab to see how the Tilia packages have been structured.
Importing Version 4 of VRTK
Now that you have set up your project for VR development, it’s time to bring version 4 of the VRTK Tilia packages into your project. VRTK 4 comprises a repository of several Tilia packages that provide valuable features for developing spatial solutions. These Tilia packages are like the packages you have probably seen available within Unity’s Package Manager and can be found within the Package Manager once imported.
All Tilia packages can be accessed by visiting the following site: www.vrtk.io/tilia.html. The beauty of version 4 of the VRTK is that you can install only the packages that are required for your project.

Screen where VRTK 4 Tilia packages are available on the VRTK website
For our purposes, we will install all the packages that will be helpful for working with projects in this book. You can always add a new package by adding its manifest line to your project’s manifest.json file . You are not compelled to install every package listed here, even though you can.

Tilia package manifest line
To bring Tilia packages into your project, you need to modify your projects manifest.json file, which is available within your project’s “Packages” folder, so that it contains all the manifest lines of the VRTK Tilia packages you need for your project.
As part of this book, you’ve been provided with a modified manifest.json file to download, which will overwrite the manifest.json file that currently exists. Note that you cannot access the manifest.json file directly from the Unity editor; you need to get it using Windows file explorer.
This modified manifest.json file contains all the manifest lines from the Tilia page located at www.vrtk.io/tilia.html, as required for this book’s projects.

Opening the Windows file explorer from within Unity’s editor
Doing this will open Windows file explorer externally for you, with the “Packages” folder selected. Now, shut down Unity, ensuring that you have quit the Unity application entirely and only have the Windows file explorer open, with the “Packages” folder highlighted. Then, double-click the “Packages” folder to open it, and you should see the manifest.json file that you need to download to replace the old manifest.json file. In the “Packages” folder, select the existing manifest.json file and delete it. Now copy the modified manifest.json file you downloaded as part of this book and paste it into the “Packages” folder.

Contents of the manifest.json file
Finally, close the manifest.json file. Now, using the Unity hub, launch your VR_Playground project . The Unity Package Manager will immediately begin resolving and importing the various Tilia packages listed within your manifest.json file.
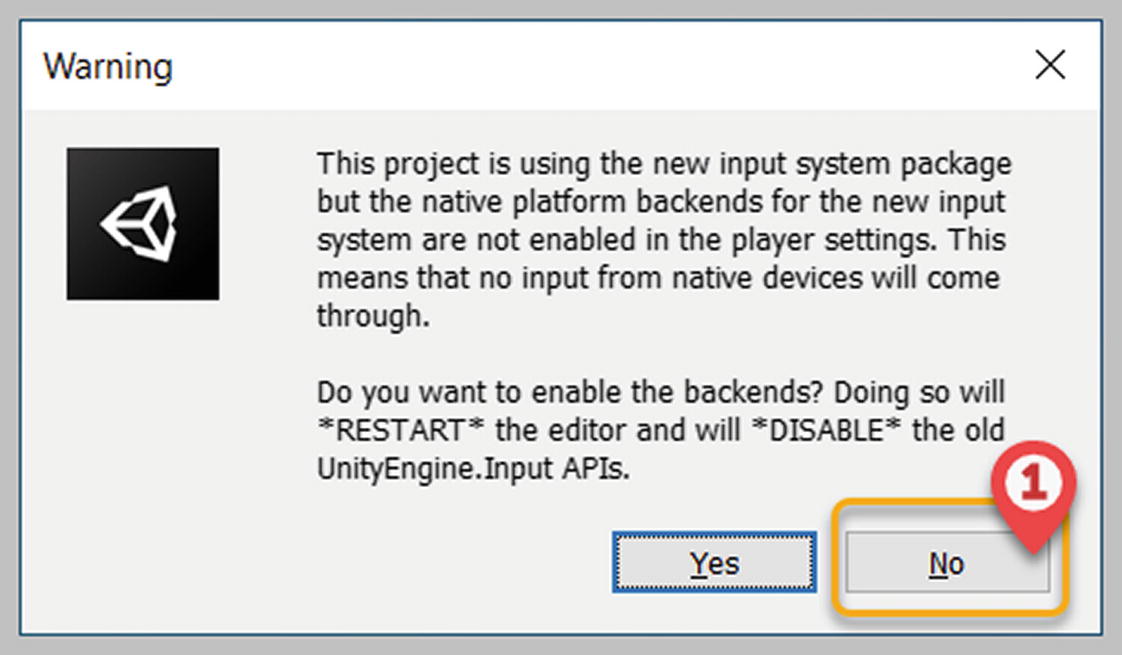
Warning message asking whether you want to enable back ends for the new input system, for which you should click No
The warning message shown in Figure 4-5 will pop up each time you launch Unity. Make sure you always click No, as the new input system is not relevant to VR development using version 4 of the VRTK.
Unity will now continue the importing process, which may take a while. Once it’s complete, you may get a message requesting that you upgrade spatializer plug-ins. Click to upgrade. You will then be asked to restart Unity. Click to restart. You will be immediately prompted with another dialog box stating that a new scoped registry is now available within Unity’s Package Manager and telling you that VRTK’s Tilia packages are now a part of Unity’s Package Manager. You can close this dialog box now. Unity will now restart, and you will see the warning message shown in Figure 4-5. Click No.
Once Unity’s editor launches, you’ll notice that another dialog box has popped up, which is the Manage Unity Input Manager Axis Definitions dialog . This box states that Tilia would like to add its own input axis definitions to Unity’s Input Manager. All you need to do is click the Add Input Definitions button at the bottom of the dialog to add twenty Tilia input axis definitions to Unity’s Input Manager. Also, within the project settings dialog that is open in Unity’s editor, note that a scopedRegistries npmjs has been added, which has two scopes within it, as shown in the manifest.json file in Figure 4-4. Now close this project settings dialog.
Next, select the console tab and note that the three runtime errors you got in the last chapter have disappeared, as version 4 of the VRTK has been imported into your project. Clear the console of any warning message that may have shown up.
Congratulations! you have now successfully set up VRTK 4 within your project.
You now need to verify that the twenty Tilia input axis definitions have been added to Unity’s Input Manager. To do so, select Edit ➤ Project Settings on the main menu, and from within the pane on the left, select the item Input Manager . From the pane on the right, expand the Axes section and scroll down to the bottom, where you will see that the twenty Tilia input axis definitions have been added. Finally, close the project settings dialog.
Unity’s Package Manager and VRTK 4 Tilia Packages
The advantage of having VRTK 4 Tilia packages as part of the Package Manager is that now, at any time, you can open the Package Manager and select any Tilia package. You can then check if any new update is available for a specific package and update the package by simply clicking the Update button. Let’s see how this can be achieved.

Package Manager with the imported Tilia packages listed
Exploring the “Packages” Folder

Tilia Package prefabs are located in the “Packages” folder of the Project tab
Summary
In this chapter, we imported version 4 of the VRTK Tilia packages into our project. We looked at the various Tilia packages that are available for VR development. We used the provided manifest.json file to import several Tilia packages into our project. We then saw how these Tilia packages are reflected within Unity’s Package Manager and how to update them. Lastly, we explored the “Packages” folder, noting how the Tilia packages have been structured, and looked at its “Prefabs” folder that contains prefabs that provide you with the awesome VR mechanics you seek.