
In the previous chapter, we learned about the VRTK’s Angular Drives. In this chapter, we’ll get familiar with the VRTK’s Linear Drive and implement two examples of its use. You’ll recall that we’ve already used the Linear Transform Drive when we created the Slider game object in Chapter 17. In this chapter, however, we’ll be using the Linear Joint Drive to set up a Drawer, and we’ll then again use the Linear Transform Drive to set up a Push button. A Linear Drive is a controllable mechanism that provides you with physics- and nonphysics-based linear Interactable controls. These controls can be used with a wide variety of game objects. Ideally, you’ll want to use the nonphysics-based linear/angular transform drive prefabs wherever possible. The physics-based joint drives rely heavily on Unity’s joints, and if you intend to build multiplayer games, it’s best to keep joints to a bare minimum.
Setting Up a Drawer
Let’s begin by moving the Steering Wheel to the opposite side of the worktable so that there’s enough space to also place the Drawer on the table. From within the Environment game object in the hierarchy, select the Steering Wheel and change its Transform Position values to X = -14; Y = 0.775; and Z = -4.33. This ensures that your Steering Wheel is placed on the other side of the worktable beside the Lever, which now clears sufficient space to place the Drawer on the table.
As part of the downloads that came with this book, you were provided with a Unity package file named “Drawer,” which contains one prefab, the Drawer game object. Download this “Drawer” package file and import it into your project. Once that’s done, you’ll have access to the Drawer Cabinet prefab in the “Assets” folder. In the hierarchy, select and expand the “Environment” folder. Then, from within the “Assets” folder, drag and drop the Drawer Cabinet prefab onto the Environment game object in the hierarchy, making it a child. Note that the Drawer Cabinet has now been positioned on your worktable. Select this Drawer Cabinet game object in the hierarchy, right-click it, and go to Prefab, Unpack Completely in the context menu that pops up. Expand this game object in the hierarchy, and you’ll see that it contains five child box game objects that make up the outer Container that holds the Drawer. It also contains a separate Drawer child game object that is made up of individual parts that constitute the actual Drawer.
Next, select the Project tab and expand the “Packages” folder. Locate the Tilia Interactions Controllables Unity package, expand it until you reach its “Prefabs” folder, then expand its “Physics Joint” folder. Drag and drop the Interactions Linear Joint Drive prefab onto the Drawer Cabinet game object in the hierarchy, making a child of it. You will notice that a giant white cube has encompassed your Drawer.

Deactivating the Cube game object and making the Drawer game object a child of the Mesh Container

Setting up the properties of the Linear Drive Facade component of the Drawer
Now, playtest the Demo scene using your VR headset. Approach the Drawer, and grab its Handle and pull it open. Then, push its Handle to close it. You’ll see that your Drawer now opens and closes smoothly in a realistic way. That’s all the setup required to get a Drawer working in VR.
Setting Up a Push Button
In this section, we’ll go over how to set up a Push button that will be pressed down upon being touched and will automatically spring back up upon being released. We’ll create this Push button using a Linear Transform Drive, and along the way, we’ll set up a couple of events.
As part of the downloads that came with this book, you were provided a Unity package file named “Button.” This file contains one prefab, the Push Button game object. Download this “Button” package file and import it into your project. Once that’s done, you’ll have access to the VR Button prefab in the “Assets” folder.
From within the “Assets” folder, drag and drop the VR Button prefab onto the Environment game object in the hierarchy, making it a child. Select this VR Button game object in the hierarchy and set its Transform Position values as follows: X = -13.32; Y = 0.74; and Z = -4.37. You’ll see that the button has now been positioned on your worktable.
With the VR Button game object selected in the hierarchy, right-click it, and from the context menu that pops up, select Prefab, Unpack Completely. Expand this VR Button game object in the hierarchy, and you’ll see that it contains two child game objects, a Button and a Container, both of which have been fitted with Box Colliders. Now, from within the Project tab, expand the “Packages” folder, locate the Tilia Interactions Controllables Unity package, and expand it until you reach its “Prefabs” folder and then expand its “Transform” folder. Drag and drop the Interactions Linear Transform Drive prefab onto the VR Button game object in the hierarchy, making it a child. You’ll notice that a giant white cube has encompassed your VR Button.

Deactivating the Cube game object and making the Button game object a child of the Mesh Container

Setting up properties of the Linear Drive Facade component of the Push button
When your button encounters a collision with your Interactor or some other game object, you want the button to be pressed down. Then, you want it to immediately pop back up once it’s no longer colliding with your Interactor. To achieve this, we’ll use the First Touched event, available in Interactions Interactable, whose Mesh Container the Button game object is nested in.

Setting up the First Touched event in for the Push button in Interactions Interactable. The Linear Drive Facade, Target Value has been set to the value 0
By setting the Target Value property to 0, as shown in Figure 20-5, you have ensured that the Push button will go fully down when any Interactor touches it. You also need to make sure that the button springs back up once the Interactor stops touching the button. You will see that achieving this is easy; all you need to do is set up the Last Untouched event in the Interactable Facade component. Let’s set this up now.

Setting up the Last Untouched event for the Push button in Interactions Interactable. The function Linear Drive Facade, Target Value has been set to the value 1
Last, let’s add a Mutators Collision Ignorer prefab to the VR Button so that collisions between its Container parts colliders and the button collider are ignored. Select the “Packages” folder from within the Project tab, locate the Tilia Mutators Collision Ignorer Unity package, and expand it until you reach its “Prefabs” folder. Now, drag and drop the Mutators Collision Ignorer prefab onto the VR Button game object in the hierarchy.
Select this Mutators Collision Ignorer game object in the hierarchy, and within the Inspector, set the Sources Elements property size value to 5, which will make five element slots available. In the hierarchy, expand the Container game object that is a child of the VR button game object, and drag and drop each of its Edge and Bottom child game objects into each of the five available element slots. Next, in the Inspector, set the Targets Elements property size value to 1, which makes an Element 0 slot available. Drag and drop the Interactions Linear Transform Drive into this slot.
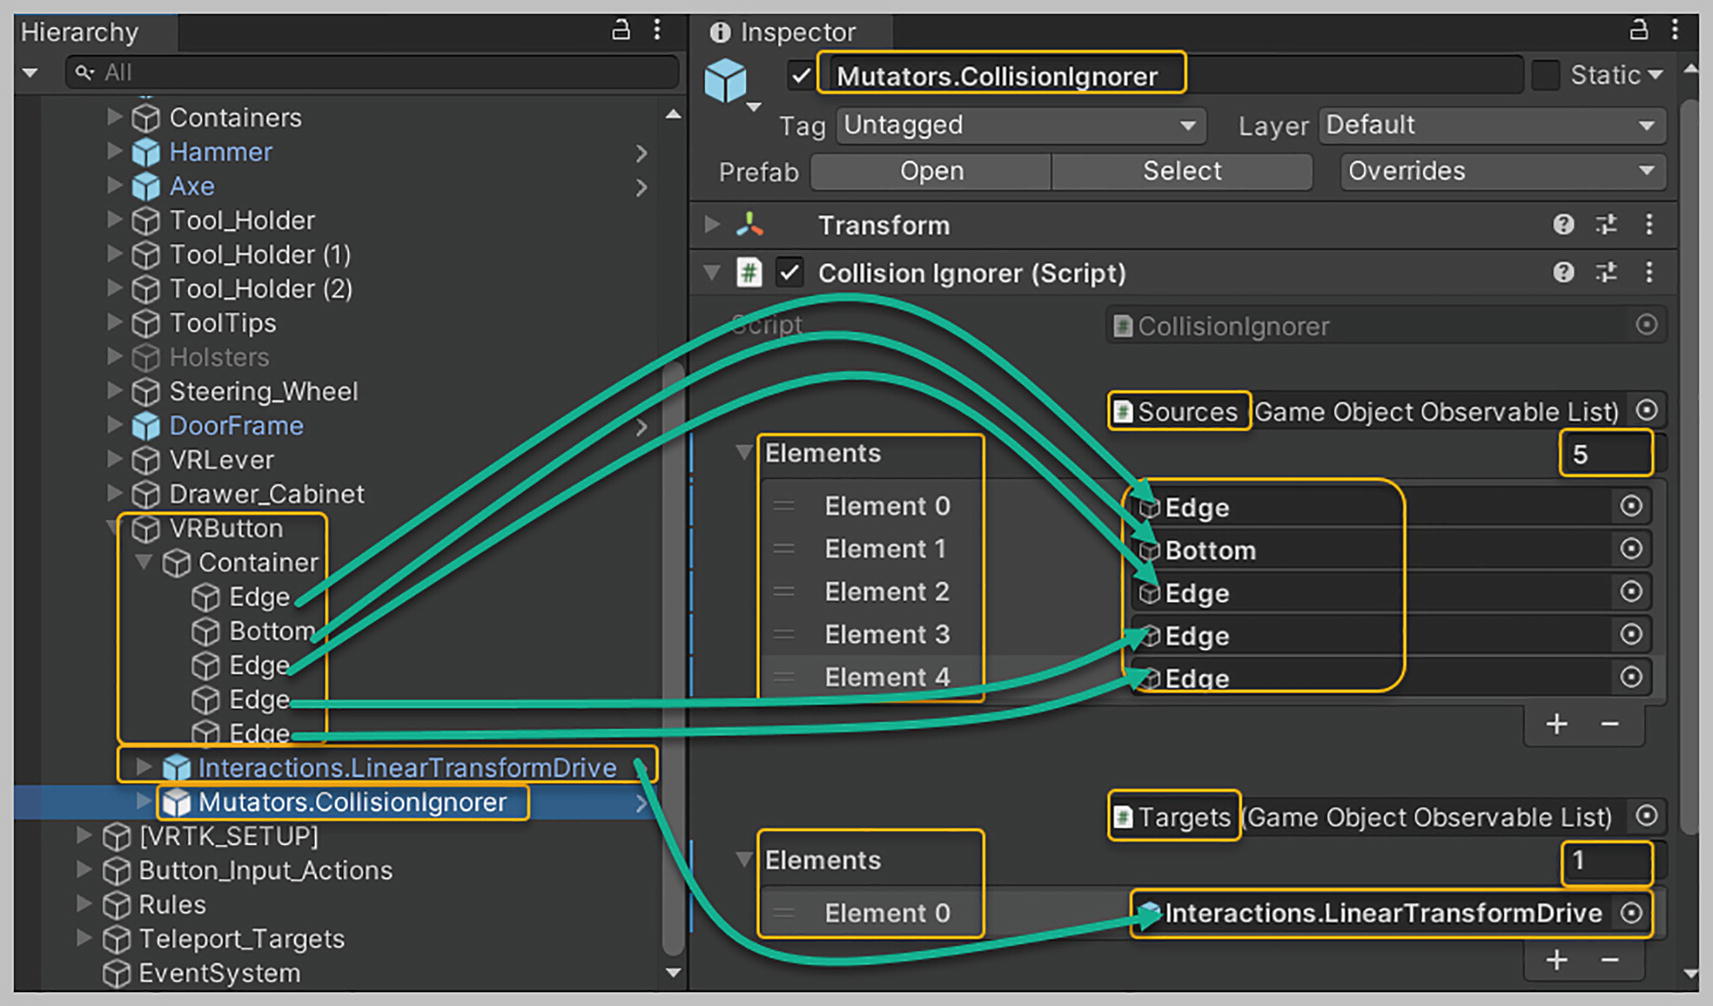
Setting up the Mutators Collision Ignorer on your VR button
Now, playtest the Demo scene using your VR headset. Approach the Push button on the worktable and push down on it with your hand. You’ll find that it gets pressed down and immediately springs back up upon being released.
Summary
In this chapter, we learned all about using Linear Drives provided by the VRTK. We learned to implement both a Linear Joint Drive and a Linear Transform Drive. We started by setting up a Drawer, for which we used a Linear Joint Drive. You probably noticed that setting up the Drawer was like setting up the Lever in Chapter 19. After that, we tested the Drawer in VR. Next, found out how to set up a more involved Push button, but nothing that was too challenging to achieve. We set up this Push button using a Linear Transform Drive, putting in place two new properties: the Move to Target Value and the Target Value properties. We also set up the First Touched and Last Touched events so that the button would push down and spring back up automatically. Finally, we playtested the Demo scene to ensure that the Push button worked as it was meant to.