
The goal of this chapter is to set up a Unity3D project for virtual reality development. I will discuss the VR hardware requirements and the versions of Windows and Unity that you will be using. I will walk you through setting up the required SDKs, Unity’s XR plugin management, choosing the various Player settings within Unity, and finally, switching your platform for Android development. You will also import your first Unity package, which will serve as the environment in which you will build your VR framework.
VR Hardware Prerequisites
To follow along with the content in this book, you’ll need to have either an Oculus Rift, Oculus Rift S, Oculus Quest, or an HTC Vive headset , which are all 6DOF. As we proceed, I’ll assume that you have already set up your headset and ensured it is working, indicating that your computer is VR ready. If you haven’t, now is a good time to do this. Both Oculus and Steam VR provide system tools that allow you to check whether your computer meets the minimum requirements to be VR ready. Head to www.vive.com/eu/setup/ or www.oculus.com/setup/, and run through the guided installation and setup process listed there. Lastly, ensure that you have your VR headset set to developer mode . Be sure to test out your headset and ensure that it is working before setting up your development environment.
If the VR system you’re using is Oculus Quest, it would be good to connect your Oculus Quest to your PC or laptop with a link cable and playtest using link mode. Doing this would be more convenient than having to deploy a complete build to the Oculus Quest each time you need to do a test run. You do not need to get the Oculus-approved link cable. There are several cheaper options available online from Anchor, Belkin, and Amazon. I use a six-foot Anchor USB C to USB 3 cable.
Unity Prerequisites and Oddities
The only requirement for following along with the content in this book is that you use Windows 10 and Unity version 2020.3.15f2. The project we will build throughout this book uses Unity’s LTS, version 2020.3.15f2, which is the latest LTS version at the time of this writing. I have experienced with different versions of Unity 2020, and even though LTS has a lot of oddities, I suggest you stick with LTS version 2020.3.15f2 throughout the exercises in this book. Other LTS versions do not provide any new features anyway. One thing you should not do is upgrade midway throughout your project to a newer version of LTS. Doing so will cause your project to malfunction.
When installing Unity, ensure that you set up the Android Build Support by checking the boxes for Android SDK, NDK Tools, and OpenJDK . Also, ensure that you check the box for the module, Windows Build Support (IL2CPP).
Setting Up Your VR project
As part of this book, you have been provided with Unity package files that you will download and import into your Unity project, as explained in this chapter.
To proceed, you’ll need to download the provided Unity package file, “VRTK_Playground,” to an easily accessible location, such as your desktop or any other folder on your computer.
Then, launch the Unity hub, click the New button in the upper right-hand corner, and ensure that you select the latest version of Unity, LTS 2020.3.x, that you downloaded. Note that I am using Unity Hub, version 2.4.5.
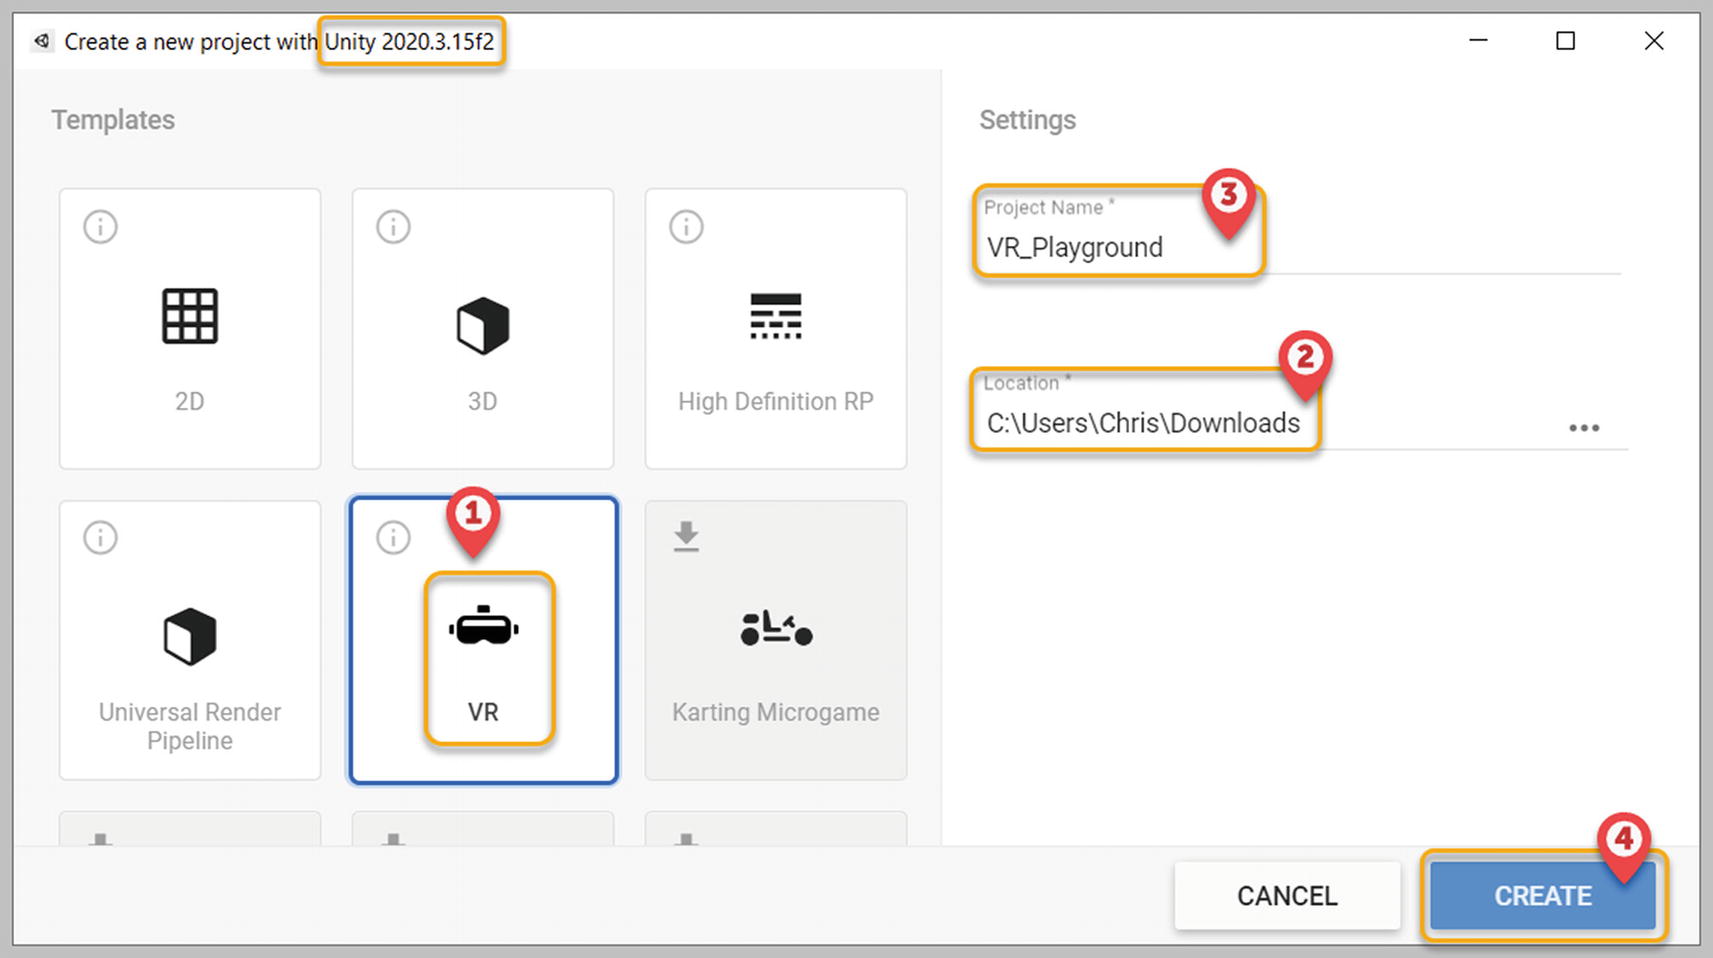
Creating a new Unity3D project
Within the Unity editor console tab, you may see a message stating that a new Visual Studio Editor package version is available and asking you to update to this latest version for better visual studio integration. To do so, open the Package Manager in Unity, select the Visual Studio Editor item from the pane on the left, and click the Update to 2.x.x button.
Importing the Unity Package File
Now that you have downloaded the provided Unity package file, “VRTK_Playground,” it’s time to import it into your project.

Importing the Unity package file

Error messages indicating that namespaces are missing
Now that you have imported the provided VRTK_Playground unity package, go to the “Assets” folder in your Project tab and delete the “Scenes” folder, as it is no longer required. Note that a new “VRTK_Playground” folder is now available in your “Assets” folder. Expand the “VRTK_Playground” folder and then expand the “Scenes” folder, and you will find a Demo scene. Double-click this scene to launch it in the Unity editor. You will be asked whether you’d like to save the Sample Scene that is currently open. Click the Don’t Save button, as you do not need the Sample Scene anymore . Select the Scene tab within the Unity editor to view your VR framework environment. Select the Game tab within the Unity editor, and you will note that it displays a message stating that there are no cameras rendering. This is because there is no camera set up within your Demo scene yet.
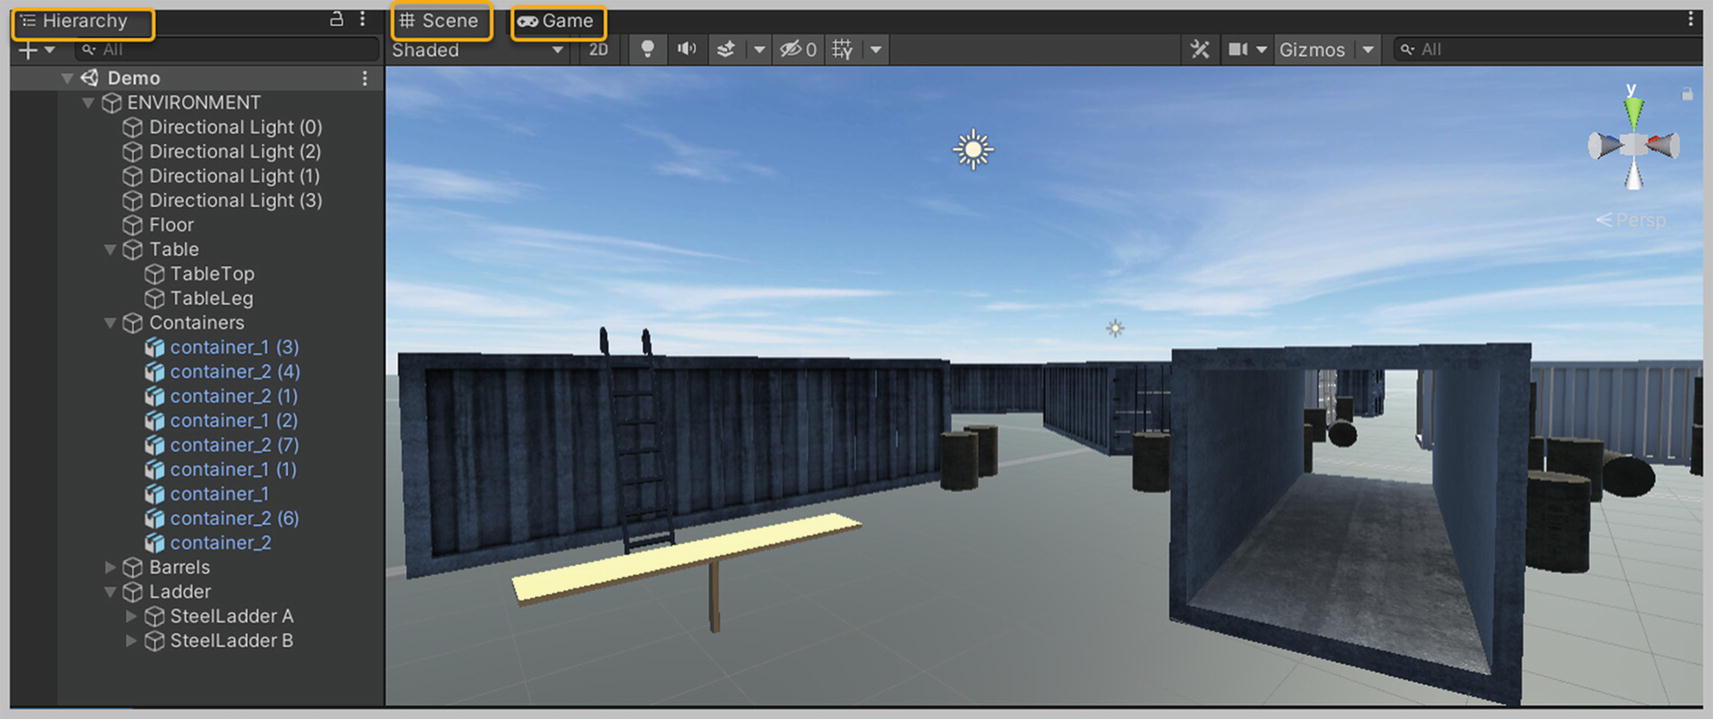
Demo scene with objects within the hierarchy expanded
First, expand the Environment game object within the hierarchy, then expand all the child objects; namely, Table, Containers, Barrel, and Ladder. The Ladder game object contains two child game objects: Steel Ladder A and Steel Ladder B. Expand these objects.
Let’s now look at each game object within the hierarchy and note the collider components they have been set up with and their Layer and Tag settings .
Begin by selecting the Floor game object in the hierarchy . Note that the inspector has been set up with a mesh collider, its Layer has been set to Water, and it has been left Untagged.
Now, select the Table game object in the hierarchy, and note that it is made up of Table Top and Table Leg game objects, both of which have box colliders on them. Also note that their Layer and Tag properties have been left at their default values.
With the Containers game object expanded in the hierarchy, select any Container game object within it. All Container child game objects within the Containers parent game object have similar components. Note that all the Container child game objects have been fitted with a box collider. Also note that their Layer and Tag properties have been left at their default values.
With the Barrels game object expanded in the hierarchy, select any Barrel game object in it. All Barrel child game objects within the Barrels parent game object have similar components. Note that all the Barrel child game objects have been fitted with a box collider. Also note that their Layer and Tag properties have been left at their default values.
With the Ladder game object expanded, as well as both Steel Ladder A and Steel Ladder B child game objects, you will see that both of the child game objects contain several numbered Collision game objects. With the Move Tool on Unity’s toolbar toggled on, select several of the numbered Collision game objects in the hierarchy to see them highlighted within the scene view. Note that each of these numbered Collision game objects denotes either a side portion or a rung of the ladder. All the numbered game objects have been fitted with capsule colliders. As we will see in later chapters, this kind of collider setup allows you to grab onto either side of the ladder’s rungs and climb up.
Should you shut down Unity and then relaunch it for whatever reason, you may be prompted with a message asking if you would like to enter safe mode, as shown in Figure 3-5. Click the Ignore button. The compilation errors that this message refers to are the three errors listed earlier in this chapter, which will disappear once you have installed version 4 of the VRTK.

Dialog box prompting you to enter safe mode
Exploring the XR Plugin Management for Unity
Let’s begin by exploring the XR Plugin Management that Unity set up for you by default when you used the VR template provided. To do so, navigate to the main menu and select Edit ➤ Project Settings to open the Project Settings dialog box. From the pane on the left, select and expand the XR Plugin Management item, and you will notice that it has two child items—namely, Oculus and Windows Mixed Reality—set up by default. You won’t be developing for a Windows Mixed Reality device in this book, so select the Oculus item from beneath XR Plugin Management. On the pane on the right, you will see the PC, Mac & Linux Standalone settings tab, as well as the Android tab. On both these tabs, the Stereo Rendering mode has been set up by default. Also, for the Android tab, target devices have been set to Quest and Quest 2 by default.

XR Plugin Management, with no Steam VR Plug-in included in the list
The Oculus plug-in has already been installed by default, so you may now close the Project Settings dialog.
If you’re building for the HTC Vive, even though the XR Plugin Management does not support a plug-in for Steam VR, you won’t need to download the Steam VR Plugin from the Unity Asset store to have your framework work with your HTC Vive devices. However, you will need to have the Steam VR client installed on your PC to build to the HTC Vive.
Importing the Oculus Integration SDK
You, however, need to download and import the Oculus Integration SDK, as the VRTKs Camera Rigs, Oculus Integration wrapper will require it. This will become clearer once you install version 4 of the VRTK in the next chapter.
I’m using the latest version of the Oculus Integration SDK currently available, version 29, and I advise you to do the same. You can download the Oculus Integration SDK from the Unity asset store or the Oculus Developer site; the latter is a repository for all earlier versions.
Log in to the Unity asset store and search for Oculus Integration, and download and import it into your project. The Package Manager dialog should then open. If not, you can launch it by selecting Window ➤ Package Manager from the main menu. On the left-hand pane, ensure that the Item Oculus Integration is selected and then click the Import button located in the bottom right corner of the right-hand pane. The Import Unity Package dialog will be displayed. Click the Import button to begin importing the Oculus Integration SDK into your project. Once you’re done, close the Package Manager. Then, navigate to the “Assets” folder in the Project tab, where you will notice an Oculus folder, which is essentially the Oculus Integration SDK.
Upon restarting Unity, you may be prompted with an Update Oculus Utilities Plugin dialog box stating that a new OVR Plugin is available and recommending that you use it. Click the Yes button to proceed. You will then most likely be prompted with another dialog asking you to restart Unity. Click the Restart button. You may also be asked to upgrade spatializer plug-ins. Go ahead and click Upgrade, then click Restart. Unity will restart with your Demo scene launched.
Choosing Player Settings within Unity
Other Settings section configuration properties in the PC, Mac & Linux Standalone settings tab
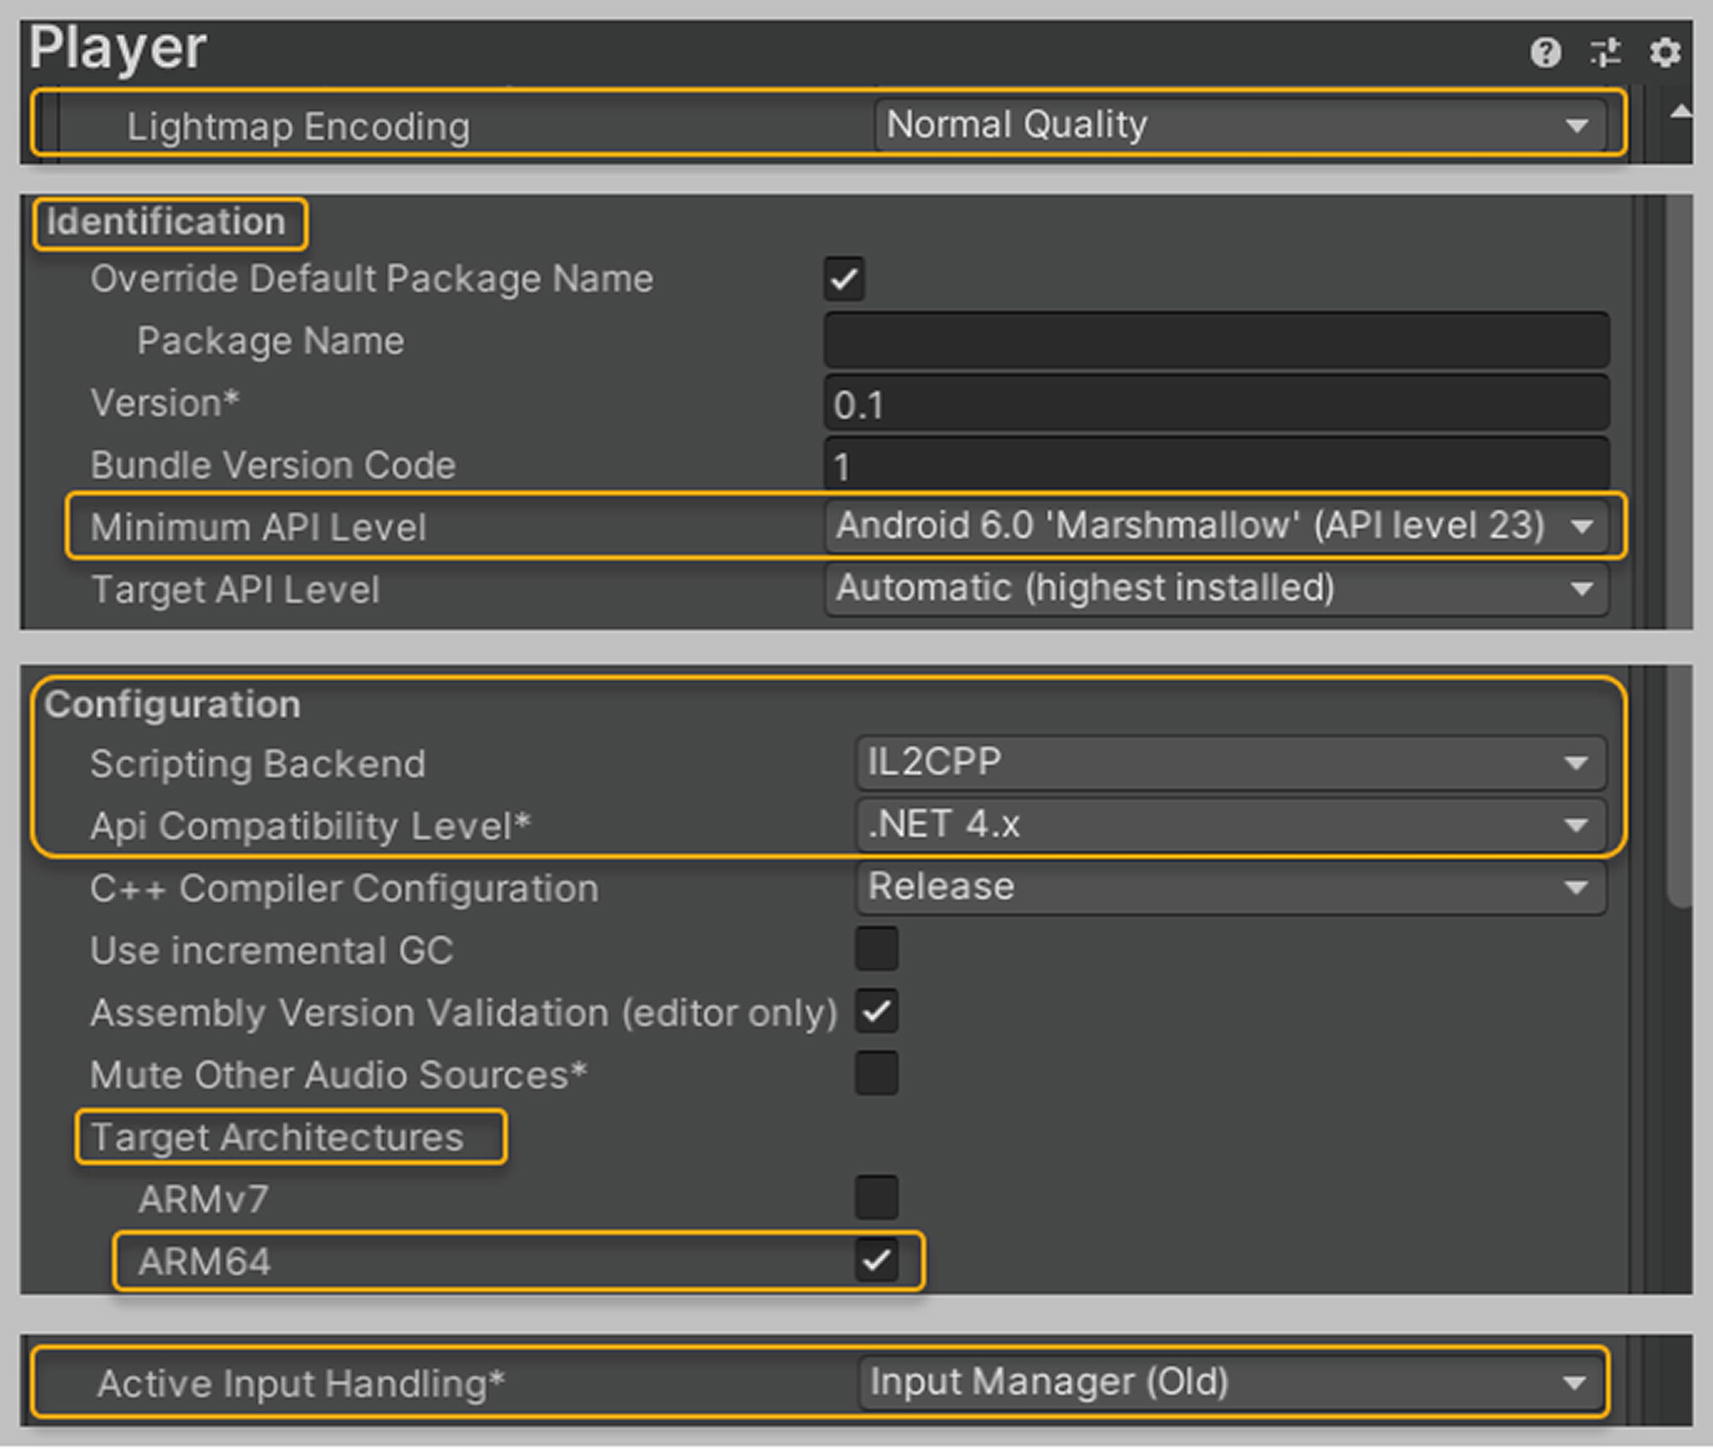
With the Other Settings section still open, click the Android Settings tab. Scroll down until you see the Lightmap Encoding property , and set its value to Normal Quality .
Then scroll further down until you see the Identification section. Ensure that the Minimum API level property has been set to Android 6.0 “Marshmallow” (API level 23).
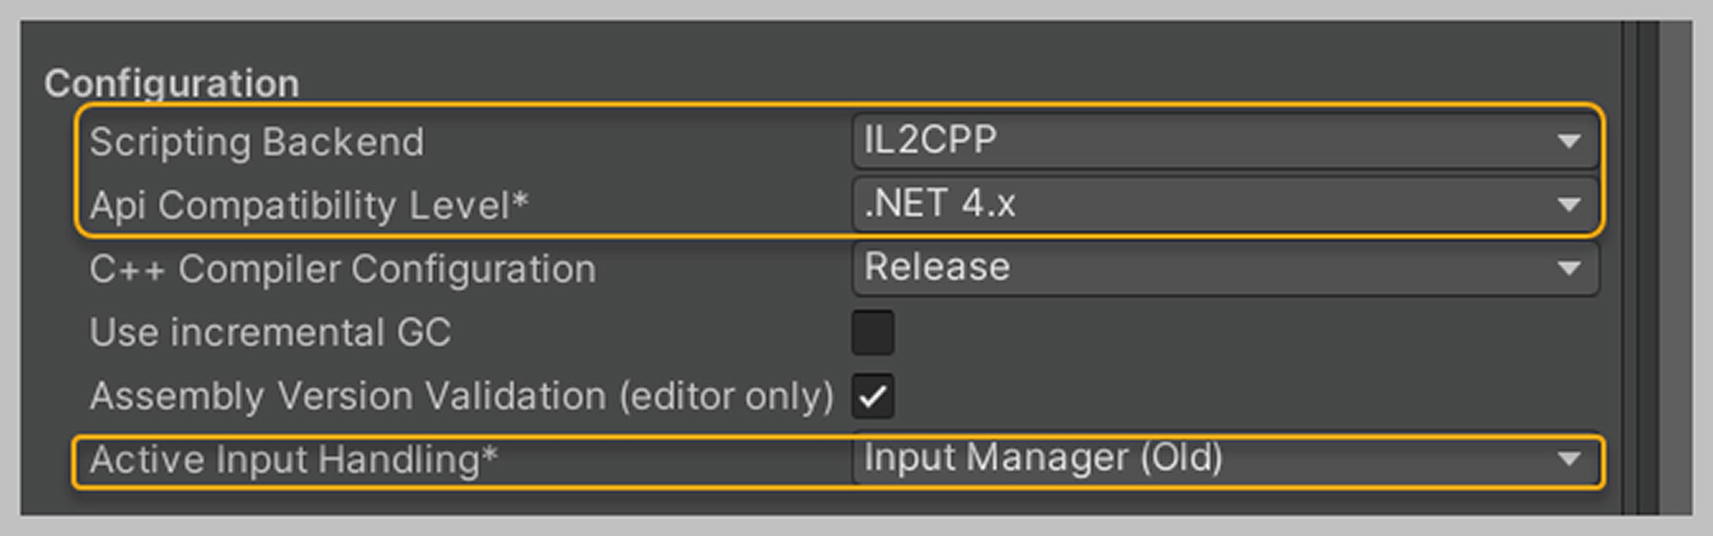
Scroll further down to the Configuration section and set the API Compatibility Level to .NET 4.x. Next, locate the Target Architectures section that follows, and ensure that the box for ARMv7 is unchecked and the box for ARM64 is checked.
Android settings tab in the Other Settings section: Lightmap Encoding, Identification, and Configuration properties
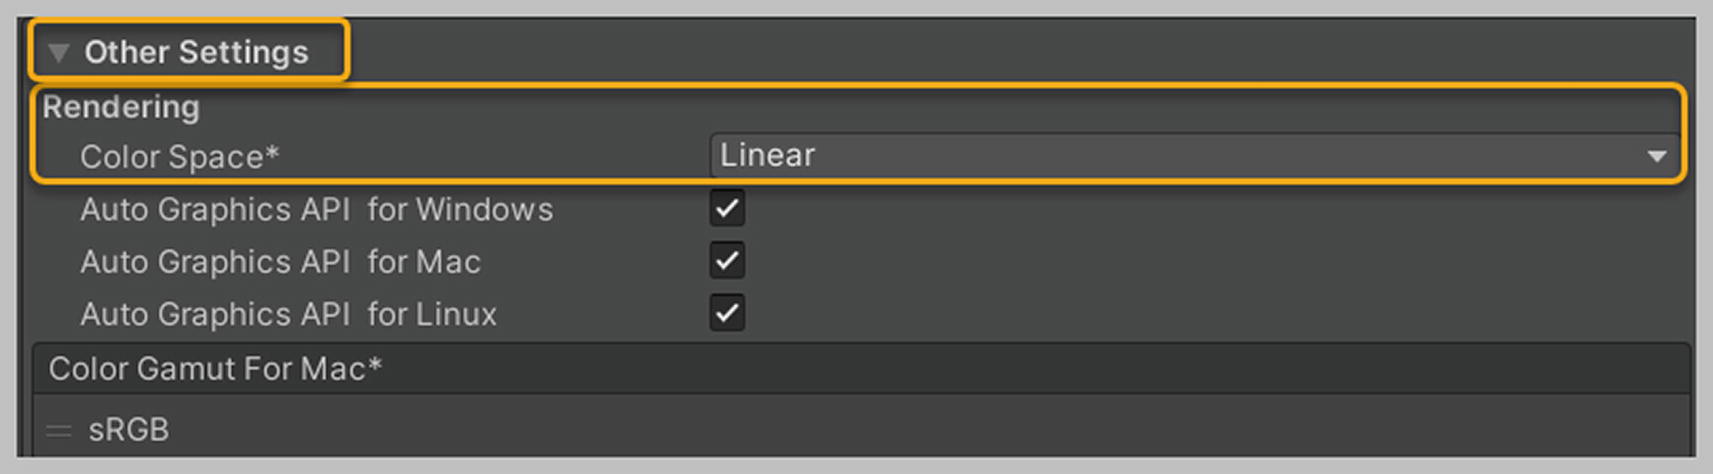
Android settings tab in Other Settings: Rendering the Color Space property
Finally, collapse the Other Settings section and close the Project Settings dialog.

Build Settings dialog box for deploying a project to a Oculus Quest headset
Summary
In this chapter, we went over the various VR hardware prerequisites and the hardware you’ll need to follow along with this book. We explored prerequisites for the Windows version of Unity. You created a new empty VR project and then downloaded and imported the Unity package file provided to you in the new VR_Playground project. The assets you imported via the Unity package file set the environment in which you will build your VR framework. You explored each game object within the environment provided. Next, you delved into the XR Plugin Management for Unity and saw the default plug-ins installed. You then downloaded and imported the Oculus Integration SDK, which we will use once we have installed version 4 of the VRTK packages in a later chapter. Lastly, you set up several Player settings within Unity and looked at the Build Settings dialog box and saw how you could switch your development platform to work with an Android-based device like the Oculus Quest. In the next chapter, we’ll take a look at version 4 of the VRTK.