
Dynamic soundtracks are the ones that change according to what is happening to the player in the game, musically reflecting that place or moment of the character's adventure. In this recipe, we will implement a soundtrack that changes twice; the first time when entering a tunnel, and the second time when coming out of its end. To achieve this, we will use the new Snapshot feature of the Audio Mixer.
Snapshots are a way of saving the state of your Audio Mixer, keeping your preferences for volume levels, audio effects, and more. We can access these states through script, creating transitions between mixes, and by bringing up the desired sonic ambience for each moment of the player's journey.
For this recipe, we have prepared a basic game level, contained inside the Unity package named DynamicSoundtrack, and two soundtrack audio clips in .ogg format: Theme01_Percussion and Theme01_Synths. All these files can be found in the 1362_09_06 folder.
To make a dynamic soundtrack, follow these steps:
- Import the
DynamicSoundtrackpackage and both.oggfiles to your Unity Project. - Open the level named Dynamic.
- From the Project view, use the Create drop-down menu to add Audio Mixer to the project. Name it MusicMixer. Double-click on it to open the Audio Mixer window.
- From the Groups view, highlight Master and click the + sign to add a child to the Master group. Name it as Music. Then, add two child groups to Music: Percussion and Synths:

- From the Hierarchy view, create a new Empty GameObject. Name it Music. Then, add two Empty Child GameObjects to it. Name them as Percussion and Synth.
- From the Project view, drag the Audio Clip named Theme01_Percussion into the Percussion GameObject in Hierarchy. Select Percussion and in the Inspector view, access the Audio Source component. Change its Output to Percussion (MusicMixer), make sure the Play On Awake option is checked, check the Loop option, and make sure its Spatial Blend is set to 2D, as shown in the following screenshot:

- Now, drag the Theme01_Synths audio file into the Synths GameObject. From the Inspector view, change its Output to Synths (MusicMixer), make sure the Play On Awake option is checked, check the Loop option, and make sure its Spatial Blend is set to 2D, as shown:

- Open the Audio Mixer and play the scene. We will now use the mixer to set the soundtrack for the start of the scene. With the scene playing, click on the Edit in Play Mode button, as shown in the screenshot, at the top of the Audio Mixer. Then, drop the volume on the Synths track down to -30 dB:

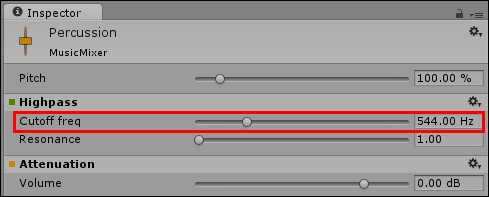
- Now, select the Percussion track. Right-click on Attenuation and add the High-pass effect before it:

- From the Inspector view, change the Cutoff frequency of the High-pass effect to 544.00 Hz:
- Every change, so far, has been assigned to the current Snapshot. From the Snaphots view, right-click on the current Snapshot and rename it to Start. Then, right-click on Start and select the Duplicate option. Rename the new snapshot as Tunnel, as shown:

- Select the Tunnel snapshot. Then, from the Inspector view, change the Cutoff frequency of the Highpass effect to 10.00 Hz:

- Switch between the Tunnel and Start snapshots. You'll be able to hear the difference.
- Duplicate the Tunnel snapshot, rename it as OtherSide, and select it.
- Raise the volume of the Synths track up to 0 dB:

- Now that we have our three Snapshots, it's time to create triggers to make transitions among them. From the Hierarchy view, use the Create drop-down menu to add a Cube to the scene (Create | 3D Object | Cube).
- Select the new Cube and rename it
SnapshotTriggerTunnel. Then, from the Inspector view, access the Box Collider component and check the Is Trigger option, as shown in the following screenshot. Also, uncheck its Mesh Renderer component. Finally, adjust its size and position to the scene tunnel's interior:
- Make two copies of
SnapshotTriggerTunneland rename them toSnapshotTriggerStartandSnapshotTriggerOtherSide. Then, adjust their size and position, so that they occupy the areas before the tunnel's entrance (where the character is) and after its other end, as shown in the following screenshot:
- In the Project view, create a new C# Script file and rename it to
SnapshotTrigger. - Open the script in your editor and replace everything with the following code:
using UnityEngine; using UnityEngine.Audio; using System.Collections; public class SnapshotTrigger : MonoBehaviour{ public AudioMixerSnapshot snapshot; public float crossfade; private void OnTriggerEnter(Collider other){ snapshot.TransitionTo (crossfade); } } - Save your script and attach it to
SnapshotTriggerTunnel,SnapshotTriggerStart, andSnapshotTriggerOtherSideobjects. - Select
SnapshotTriggerTunnel. Then, from the Inspector view, access the Snapshot Trigger component, setting Snapshot as Tunnel, and Crossfade as2, as shown in the following screenshot:
- Make changes to
SnapshotTriggerStartandSnapshotTriggerOtherSideby setting their Snapshots to Start and OtherSide respectively. - Test the scene. The background music will change as the character moves from its starting point, through the tunnel, and into the other side.
The Snapshot feature allows you to save Audio Mixer states (including all volume levels, every filter setting, and so on) so that you can change those mixing preferences at runtime, making the audio design more suitable for specific locations or gameplay settings. For this recipe, we have created three Snapshots for different moments in the player's journey: before entering the tunnel, inside the tunnel, and outside the tunnel. We have used the Highpass filter to make the initial Snapshot less intense. We have also turned the Synths track volume up to emphasize the open environment outside the tunnel. Hopefully, changes in the audio mix will collaborate with setting the right mood for the game.
To activate our snapshots, we have placed trigger colliders, featuring our Snapshot Trigger component in which we set the desired Snapshot and the time in seconds, that it takes to make the transition (a crossfade) between the previous Snapshot and the next. In fact, the function in our script is really this straightforward—the line of snapshot.TransitionTo (crossfade) code simply starts a transition lasting crossfade seconds to the desired Snapshot.
Here is some information on how to fine-tune and customize this recipe.
You might have noticed how different the Theme01_Percussion audio clip sounds when the Cutoff frequency of the High-pass filter is set as 10.00 Hz. The reason for this is that the high-pass filter, as its name suggests, cuts off lower frequencies of the audio signal. In this case, it attenuated the bass drum down to inaudible levels while keeping the shakers audible. The opposite effect can be achieved through the Lowpass filter. A major benefit is the opportunity of virtually having two separate tracks into the same audio clip.
To avoid loss of audio quality, you should import your sound clips using the appropriate file format, depending upon your target platform. If you are not sure which format to use, please check out Unity's documentation on the subject at http://docs.unity3d.com/Manual/AudioFiles.html.
Although we have applied Snapshots to our music soundtrack, background noise can also benefit immensely. If your character travels across places that are significantly different, transitioning from open spaces to indoor environments, you should consider applying snapshots to your environment audio mix. Be careful, however, to create separate Audio Mixers for Music and Environment—unless you don't mind having musical and ambient sound tied to the same Snapshot.
In this recipe, we have mentioned the High-pass and Low-pass filters. However, there are many effects that can make audio clips sound radically different. Experiment! Try applying effects such as Distortion, Flange, and Chorus. In fact, we encourage you to try every effect, playing with their settings. The creative use of these effects can bring out different expressions to a single audio clip.