
As much as the background music can be important in establishing the right atmosphere, there will be times when other audio clips should be emphasized, and the music volume turned down for the duration of that clip. This effect is known as Ducking. Maybe you will need it for dramatic effect (simulating hearing loss after an explosion took place), or maybe you want to make sure that the player listens to a specific bit of information. In this recipe, we will learn how to emphasize a piece of dialog by ducking the audio whenever a specific sound message is played. For that effect, we will use the new Audio Mixer to send information between tracks.
For this recipe, we have provided the soundtrack.mp3 audio clip and a Unity package named Ducking.unitypackage, containing an initial scene. All these files are available inside the 1362_09_07 folder.
To apply Audio Ducking to your soundtrack, follow these steps:
- Import
Ducking.unitypackageandsoundtrack.mp3into your project. - Open the Ducking scene (available in the Assets | Ducking folder). Play the scene and walk towards the semitransparent green wall in the tunnel, using the W A S D keys (by pressing Shift to run). You will hear the robotDucking audio clip play as the character collides with the wall.
- From the Create drop-down at the top of the Hierarchy view, choose Create Empty to add a new GameObject to the scene. Name it Soundtrack.
- Drag the soundtrack audio clip you have imported into the Soundtrack GameObject. Then, select the Soundtrack object and from the Inspector view, Audio Source component, check the Loop option. Make sure the Play On Awake option is checked and Spatial Blend set to 2D, as shown in the following in the following screenshot:

- Test the scene again. The soundtrack music should be playing.
- From the Project view, use the Create drop-down menu to add an Audio Mixer to the project. Name it MainMixer. Double-click on it to open the Audio Mixer window.
- From the Groups view, highlight Master and click the + sign to add a child to the Master group. Name it Music. Then, highlight Master again and add a new child group named FX, as shown in the following screenshot. Finally, add a third child to the Master group, named Input:

- From the Mixers view, highlight MainMixer and click the + sign to add a new Mixer to the project. Name it MusicMixer. Then, drag it into the MainMixer and select the group Music as its Output. Repeat the operation to add a mixer named FxMixer to the project, selecting the FX group as the output:

- Now, select MusicMixer. Select its Master group and add a child named Soundtrack. Then, select FxMixer and add a child named Bells, as shown:

- From the Hierarchy view, select the DialogueTrigger object. Then, in the Inspector view, Audio Source component, Change its Output track to MainMixer | Input:

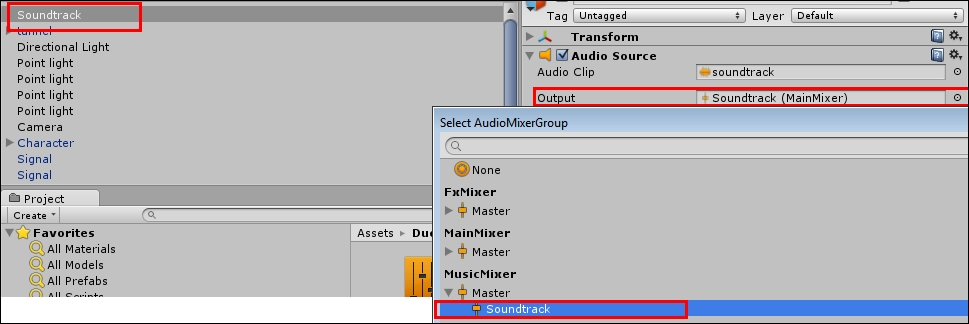
- Now, select the Soundtrack GameObject and in the Inspector view, in the Audio Source component, change its Output track to MusicMixer | Soundtrack:
- Finally, from the Assets folder in the Project view, select the Signal prefab. From the Inspector view, access its the Audio Source component and change its Output to FxMixer | Bells:

- Open the Audio Mixer window. Choose MainMixer, select the Music track controller, right-click on Attenuation, and using the context menu, add the Duck Volume effect before Attenuation:

- Now, select the Input track, right-click on Attenuation, and using the context menu, add Send after Attenuation:

- With Input track still selected, go to the Inspector view and change the Receive setting in Send to MusicDuck Volume and its Send level to
0.00 db, as shown:
- Select the Music track. From the Inspector view, change the settings on the Duck Volume as follows: Threshold: -
40.00 db; Ratio:300.00 %; Attack Time:100.00 ms; Release Time:2000.00 ms, as shown in the following screenshot:
- Test the scene again. Entering the trigger object will cause the soundtrack volume to drop considerably, recovering the original volume in 2 seconds.
In this recipe, we have created, in addition to Music and Sound FX, a group named Input, to which we have routed the audio clip that triggers the Duck Volume effect attached to our music track. The Duck Volume effect changes the track's volume whenever it receives an input that is louder than indicated in its Threshold setting. In our case, we have sent the Input track as input, and adjusted the settings so the volume will be reduced as soon as 0.1 seconds after the input had been received, turning back to its original value of 2 seconds after the input has ceased. The amount of volume reduction was determined by our Ratio of 300.00 %. Playing around with the setting values will give you a better idea on how each parameter affects the final result. Also, make sure to visualize the graphic as the trigger sound is played. You will be able to see how the Input sound passes the threshold, triggering the effect.

Duck Volume
Also, please note that we have organized our tracks so that the other sound clips (other than speech) will not affect the volume of the music—but every music clip will be affected by audio clips sent to the input track.