
Time to expand the game.
In the last chapter, we learned a lot about how classes work, how each subclass inherits the variables and functions of its parents, and how to use this to our advantage to get the functionality we want. Where do we go from here? In this chapter we're going to start creating more of our own classes to expand our custom game.
In this chapter we will:
Discuss when and why we would want to create our own classes
Talk about class modifiers and what they do for our classes
Discuss the difference between Actors and Objects
Talk about the most commonly used classes in UnrealScript
First up, we're going to talk about when and where to make custom classes for our game.
In my work with UnrealScript, one of the most common questions I see is "I understand how the language works, but I have no idea where to start writing my own code. What do I do?" For any project, before you start writing code it's best to have an idea of what you want your game to be. For most games this involves a design document. Let's see if we can come up with a quick one for our Awesome Game that we'll refer to when making programming decisions.
Most design documents have a detailed description of the game, from the storyline right down to the control scheme. However, we're going to keep things a little simplified for this. First of all we need to decide what type of game this will be.
Having examples of other games in the style that you want helps define what programming needs your game will have. Let's see if we can expand this further:
Enemies will spawn off screen and move toward the player. The player will have to shoot them before they get close or they will take damage.
There are a lot of programming tasks in that brief description. Let's see if we can break it down:
Enemies will spawn off screen and move toward the player: This is actually three tasks if we think about it. First, we need them to spawn. This will involve a placeable
Actorclass we'll create that will handle spawning of enemies. The second task is getting them to spawn off screen. We don't want them randomly spawning, otherwise one could suddenly appear right next to the player which would be terribly frustrating. We'll need some code to handle this. The third task is the major one, the creation of the enemies themselves. Do we want more than one type? Maybe one type moves faster but has a weaker attack. These are things to think about when preparing a programming task list.The player will have to shoot them before they get close...: There are a few things to consider here. How many different types of weapons are there? How does the player get them? Maybe we'll want the player to start with a default weak weapon, and have others be picked up in the level. Some of this functionality can already be found in the UDK classes, but we'll need our own subclasses to handle some specific things we want to do. We could also have the enemies drop pickups that can upgrade our weapons. That would involve creating a group of classes for the dropped pickups as well as some code in the enemy classes that creates them when they die.
… or they will take damage: This will involve some code in the enemy class to handle attacking. Am I close enough to the player to attack? What kind of attack do I want to use? This will also involve some interaction between our enemy class and the player to handle taking damage.
As we can see, even with short descriptions there are a lot of decisions that need to be made and programming tasks that can come out of it. It might seem overwhelming at first, but breaking the entire game down into a list of tasks makes it easier to figure out what classes will be needed as well as making it easier to keep track of our progress.
Let's see if we can go a bit further in our description of our game:
Enemies will attack in waves, with each wave having more and stronger enemies.
For this we'll need some code that will keep track of the number of waves and enemies, how many enemies still need to be spawned, and how strong the current wave of enemies is.
That seems like a good start for our example game, so let's see if we can figure out a few classes that we'll need for the game, and where to put them in the class tree.
Weapons
We've worked with weapons a bit in the last chapter, so this is a good place to start. Remembering our lessons on inheritance, if there is any common functionality we want out of our classes they should all have a common superclass. For instance, if we want our weapons to be upgradable through pickups, we should have some common functions in our main weapon class that any subclasses can change if we need them to. Let's set them up now.
Looking in the class tree with UnCodeX, under Actor | Inventory | Weapon | UDKWeapon | UTWeapon, we can see the rocket launcher, shock rifle, and link gun are all subclasses. It might seem like we should subclass off of these since they're already made, but in order for us to be able to use inheritance with our classes we'll need to create a different branch here for our own weapons. Let's do that now.
Create a new file in our
Development/Src/AwesomeGame/Classesfolder calledAwesomeWeapon.uc. While we're here, let's deleteAwesomeGun, AnotherGun, andUberActorif they're still there. Now we should haveAwesomeActor, AwesomeGame, AwesomePlayerController, and nowAwesomeWeapon.Type the following code into it:
class AwesomeWeapon extends UTWeapon;
var int CurrentWeaponLevel;
function UpgradeWeapon()
{
CurrentWeaponLevel++;
}
defaultproperties
{
}
We're adding an int to keep track of our weapon's level, and putting a function in so we can increase the level. Now you might wonder why don't we just increase the level ourselves from our pickup class instead of having a function do it? For the most part it's best to keep all variable changes in the class that has the variables, that way it's easier to track down problems when they happen. Also, if we wanted to change the way things worked it's better to be able to find everything affecting the class inside the class itself instead of having to look in other classes to find places we changed variables. Other classes would just call
UpgradeWeapon(), and everything else is handled in ourAwesomeWeaponclass.We're not going to use the
AwesomeWeaponclass itself in our test level, it's just going to be the base for all of our other weapons. Let's create an actual weapon that we can place and test with. Create a new file inDevelopment/Src/AwesomeGame/ClassescalledAwesomeWeapon_RocketLauncher.ucand type the following code into it:class AwesomeWeapon_RocketLauncher extends AwesomeWeapon; defaultproperties { Begin Object Name=PickupMesh SkeletalMesh=SkeletalMesh'WP_RocketLauncher.Mesh.SK_WP_RocketLauncher_3P' End Object AttachmentClass=class'UTGameContent.UTAttachment_RocketLauncher' WeaponFireTypes(0)=EWFT_Projectile WeaponFireTypes(1)=EWFT_Projectile WeaponProjectiles(0)=class'UTProj_Rocket' WeaponProjectiles(1)=class'UTProj_Rocket' AmmoCount=30 MaxAmmoCount=30 }For now this is all default properties setting up the rocket launcher's visuals and functionality. We're increasing the default ammo from nine to 30 from the UDK's rocket launcher.
Compile the code and open up the editor. Open our
AwesomeTestMapand change the weapon pickup's properties to add our rocket launcher.
Save the map and close the editor, then run the game using our batch file. It works the same as before, except now we have 30 rockets instead of nine to start with.
That's good so far, but now we need a way to upgrade the weapon. Let's create a pickup class that can do this. The functionality of this class will be pretty simple, so we don't need to extend off of any UDK classes like
InventoryorUDKInventory. Let's simply extend off of ourAwesomeActor. WhyAwesomeActorand not just Actor? To keep things organized. If we had several of these types of classes that we only needed to extend off of Actor, they'd end up all over the place in the class tree depending on their names. By using a common superclass, even if it's empty, we can keep all of our stuff in one place.Let's make sure our
AwesomeActorclass is emptied out:class AwesomeActor extends Actor; defaultproperties { }Now, using that as a parent class for our pickup, let's create a new class called
AwesomeWeaponUpgrade.ucin ourDevelopment/Src/AwesomeGame/Classesfolder and type the following code into it:class AwesomeWeaponUpgrade extends AwesomeActor placeable; event Touch(Actor Other, PrimitiveComponent OtherComp, vector HitLocation, vector HitNormal) { if(Pawn(Other) != none && AwesomeWeapon(Pawn(Other).Weapon) != none) { AwesomeWeapon(Pawn(Other).Weapon).UpgradeWeapon(); Destroy(); } } defaultproperties { bCollideActors=True Begin Object Class=DynamicLightEnvironmentComponent Name=MyLightEnvironment bEnabled=TRUE End Object Components.Add(MyLightEnvironment) Begin Object Class=StaticMeshComponent Name=PickupMesh StaticMesh=StaticMesh'UN_SimpleMeshes.TexPropCube_Dup' Materials(0)=Material'EditorMaterials.WidgetMaterial_Y' LightEnvironment=MyLightEnvironment Scale3D=(X=0.125,Y=0.125,Z=0.125) End Object Components.Add(PickupMesh) Begin Object Class=CylinderComponent Name=CollisionCylinder CollisionRadius=16.0 CollisionHeight=16.0 BlockNonZeroExtent=true BlockZeroExtent=true BlockActors=true CollideActors=true End Object CollisionComponent=CollisionCylinder Components.Add(CollisionCylinder) }A pretty sizable chunk of code, but pretty simple. Here we're using an event called
Touchthat is called when two actors run into each other. Inside it, we check if the Actor that touched us is a Pawn and if so, check to see if it's holding anAwesomeWeapon. Remembering our lessons about typecasting, here we're using two of them at the same time so it might look a bit confusing at first.The first typecast is here:
Pawn(Other)
Since the event gives us an
Actorto work with calledOther, we need to typecast it to see if it's a Pawn. If this typecast works, we know the Actor that touched us is a Pawn and we can continue the check:Pawn(Other).Weapon
Since the
Weaponvariable doesn't exist inActor, only inPawn, we need to keep thePawn(Other)typecast to be able to access theWeaponvariable. Finally, we typecast that weapon to see if it's one of our custom classes:AwesomeWeapon(Pawn(Other).Weapon)
This checks whether the weapon, which is of the
Weaponclass, is anAwesomeWeaponor subclass ofAwesomeWeapon. If it is, then the if statement is true and we can execute some code inside it:AwesomeWeapon(Pawn(Other).Weapon).UpgradeWeapon();
We keep the typecast here so we can call our custom
UpgradeWeaponfunction. You can see why having functions instead of variables is preferred. If we wrote it like this:AwesomeWeapon(Pawn(Other).Weapon).CurrentWeaponLevel++;
If we wanted to change how the leveling system works, for example, to add a maximum level, we would have to search through all of our code to see where we changed it, and add more code there. This could leave us with a lot of duplicated, messy code.
The
bCollideActorsin the default properties lets this actor receive Touch calls when something runs into it.We then add a static mesh; in this case, a plain cube with a green material on it, with a light environment to make sure it's properly lit up.
Finally we give it some collision.
Before we test our code, let's add a log to our weapon class so we can see that it's working.
function UpgradeWeapon()
{
CurrentWeaponLevel++;
`log("Current Weapon Level:" @ CurrentWeaponLevel);
}
Compile the code, and then open up the editor. In the Actor Browser select our AwesomeWeaponUpgrade, if Show Categories is checked it will be under Uncategorized | AwesomeActor. If Show Categories is unchecked it will be under Actor | AwesomeActor. Right-click in the level and place one near our weapon spawner.

Click on the Rebuild All button to build the map, then save and exit the editor. Run the game with the batch file and walk over to the AwesomeWeaponUpgrade WITHOUT picking up the weapon first. You can see that no matter what you do, the pickup stays there and we don't get anything in the log. Why is that? Well, the default inventory we start with gives us a link gun, which isn't a subclass of our AwesomeWeapon. In the if statement on our AwesomeWeaponUpgrade, the typecasting fails and the code inside it never executes.
Now walk over to the weapon spawner and pick up the rocket launcher. Once we have it, run over to the weapon upgrade again. This time it disappears, and checking the log file we can see this:
[0009.47] ScriptLog: Current Weapon Level: 1
Remembering that ints start at 0, incrementing CurrentWeaponLevel leaves us with 1.
Now that we have the upgrades working, let's make them affect the weapons in some way. First we need to make a maximum level for the weapons so we don't get too crazy with them. Let's add a few things to our
AwesomeWeaponclass:class AwesomeWeapon extends UTWeapon; const MAX_LEVEL = 5; var int CurrentWeaponLevel; function UpgradeWeapon() { if(CurrentWeaponLevel < MAX_LEVEL) CurrentWeaponLevel++; `log("Current Weapon Level:" @ CurrentWeaponLevel); } defaultproperties { }A const is a special type of variable that cannot be changed (constant). They're declared slightly different from other variables because we set their value on the same line they're declared. In this case we're creating one called
MAX_LEVELand setting it to 5.Why would we want to use a const instead of just 5? Let's say for some reason we wanted to change it. If we used the number 5 in our code, we would have to go through it line by line to find everywhere we used it and change the number. We could easily miss one, or worse change one that was only the same number by coincidence. Using a const, we would only have to change the value where it's declared and all the code that uses it would be changed.
Let's go into the editor and add some more
AwesomeWeaponUpgradeactors so that we have at least 6 in the level.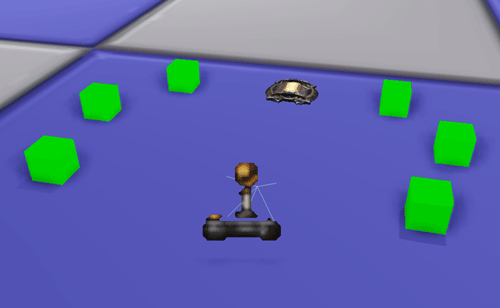
Save the map and exit the editor, then run the game. Pick up our rocket launcher and run around picking up the weapon upgrades. Exit the editor and take a look at the log:
[0008.29] ScriptLog: Current Weapon Level: 1
[0008.60] ScriptLog: Current Weapon Level: 2
[0008.87] ScriptLog: Current Weapon Level: 3
[0010.24] ScriptLog: Current Weapon Level: 4
[0011.76] ScriptLog: Current Weapon Level: 5
[0012.55] ScriptLog: Current Weapon Level: 5
There we go, once we reach 5, our weapon can't be upgraded any further. Now that we have that in place, let's make it affect the gameplay in some way.
Let's add some more code to our
AwesomeWeaponclass. We're going to make the weapon fire faster as we upgrade it. First we'll add an array of firing rates:var float FireRates[MAX_LEVEL];
You'll notice that we're using our
MAX_LEVELconst here to define the array size. This is another difference between consts and regular variables. Consts can be used in other variable declarations to define array sizes while normal variables cannot. IfMAX_SIZEwere declared as an int and set in the default properties, using it here would give us a compiler error.Now let's set the array in the default properties, making the max level really fast:
FireRates(0)=1.5
FireRates(1)=1.0
FireRates(2)=0.5
FireRates(3)=0.3
FireRates(4)=0.1
That should do it. The number is the time between shots, so the lower the number the faster the weapon fires. The fastest firing rate is the same that we used before in our first experiment with weapons.
Now to change the firing rate in our
UpgradeWeaponfunction:FireInterval[0] = FireRates[CurrentWeaponLevel 1];
Remembering our arrays, when we increase
CurrentWeaponLevelwe need to access the array element that's 1 less. When the weapon is level 1 we wantFireRates[0], and when it's5we want the last element in the array,FireRates[4].There is another little bit of code we need to add to make sure our weapon functions properly. If we're holding down the fire button while we pick up an upgrade, we want the firing timer to reset to the new value. Let's add this bit of code to the function:
if(IsInState('WeaponFiring'))
{
ClearTimer(nameof(RefireCheckTimer));
TimeWeaponFiring(CurrentFireMode);
}
I know you wouldn't be able to just figure that out instantly, which is why I keep stressing the importance of reading through the source code. Using UnCodeX to track down what functions get called where, what variables are used to do what, it definitely helps to read through the source. You don't even have to memorize any of it. I forget most of it when I stand up from my computer. The important thing is knowing how to find it, by reading through the functions that get called and being able to search through the source code to trace the chain of events.
In this case, we're checking to see if the weapon is currently firing and if so we clear the refire timer and reset it to the new value.
Now just for some icing on the explosive tipped cake we'll refill the weapon's ammo when we pick up an upgrade.
AddAmmo(MaxAmmoCount);
With this line we don't need to worry about overfilling the weapon, if we look at the
AddAmmofunction inUTWeapon.uc:AmmoCount = Clamp(AmmoCount + Amount,0,MaxAmmoCount);
We can see that it uses the Clamp function to limit the
AmmoCountto between0andMaxAmmoCount.Now our
AwesomeWeaponclass should look like this:class AwesomeWeapon extends UTWeapon; const MAX_LEVEL = 5; var int CurrentWeaponLevel; var float FireRates[MAX_LEVEL]; function UpgradeWeapon() { if(CurrentWeaponLevel < MAX_LEVEL) CurrentWeaponLevel++; FireInterval[0] = FireRates[CurrentWeaponLevel - 1]; if(IsInState('WeaponFiring')) { ClearTimer(nameof(RefireCheckTimer)); TimeWeaponFiring(CurrentFireMode); } AddAmmo(MaxAmmoCount); } defaultproperties { FireRates(0)=1.5 FireRates(1)=1.0 FireRates(2)=0.5 FireRates(3)=0.3 FireRates(4)=0.1 }Almost done, let's just set some defaults in our rocket launcher class.
Let's give our rocket launcher a default
FireIntervalthat's higher than the fire rates for our upgrades.FireInterval(0)=1.75 FireInterval(1)=1.75
Compile the code and run the test map. After picking up the rocket launcher we can pick up the upgrades and see our weapon firing faster and faster as it gains levels!

Now that we've created a few of our own classes, we can start to see how a design document can be turned into tasks that can be broken down into the classes we need to finish those tasks. Sometimes the functionality we need in our classes can already be found in the UDK source, as with our weapons, but sometimes we'll want to create our own branch in the class tree so we can fully control what happens, as with our upgrade pickups.
Next we'll take a look at some class modifiers we can use to control how our classes are used.
Class modifiers change the way a class behaves in the editor and in the engine. Two of them we have seen before, but let's go through them to see how they're used.
Class modifiers are always specified at the top of our class in the class declaration line.
This one we've used before, it tells the editor that this class can be placed in the editor. This is useful for most objects such as lights, player starts, weapon spawners, and so on. Some things don't need to be placed in the editor such as our PlayerController or Pawn, since those are spawned by the game during play. Some things wouldn't make sense to be placeable, such as a HUD. Things like that aren't level-specific, they're spawned and assigned to the player during the game. Generally, placeable classes are only those things that are level-specific and need to be put in a specific place in the level.
We can see an example right in our own code with our AwesomeWeaponUpgrade class:
class AwesomeWeaponUpgrade extends AwesomeActor
placeable;
In the editor actors declared as placeable will appear bold in the Actor Browser.
The opposite of placeable, this tells the editor that we don't want this actor to be able to be placed in the levels. By default, an actor class is not placeable; but say we had a subclass of our AwesomeWeaponUpgrade like this:
class AwesomeWeaponUpgrade_MaxAmmo extends AwesomeWeaponUpgrade;
defaultproperties
{
}
Even though we haven't put the placeable modifier in this class, if we compile and open the editor, this class will appear in bold and be placeable. The placeable modifier has been inherited from our parent class.
So why would we use this modifier? Say we had a group of a few different weapon upgrade classes that had a lot of common functionality and we wanted to use a common parent for them underneath our main AwesomeWeaponUpgrade class. If the common parent didn't have any specific functionality itself, we wouldn't want it to be placed in the editor, just its subclasses. In this case we would put the notplaceable modifier in our class.
Take the following example:

In this case we're making a group of upgrades under an AwesomeWeaponUpgrade_AmmoType class. The AmmoType class itself wouldn't have any specific functionality, it would just have functions and variables common to all of its subclasses. We wouldn't want the generic AmmoType class itself to be placed, so we use the notplaceable modifier to let the editor know.
This one's related to notplaceable, except this doesn't allow the class to be spawned or referenced at all. We would use this for similar reasons as we would use notplaceable, this class itself isn't useful, and all of the specific functionality is in its subclasses.
Let's take a look at how we can use this in our own classes.
We'll use this modifier in our AwesomeWeapon branch to see how it's useful.
Before we change anything, open up our test map in the editor and take a look at the weapon spawner properties. We can change the weapon it spawns to be an
AwesomeWeaponinstead of anAwesomeWeapon_RocketLauncher: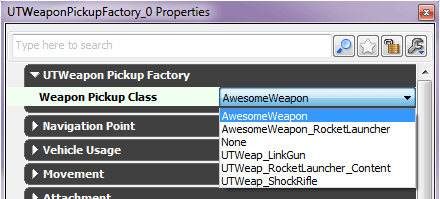
But if we look in our
AwesomeWeaponclass compared to the rocket launcher subclass, theAwesomeWeaponclass by itself is pretty useless. It doesn't have a static mesh specified, no firing modes or projectile classes or ammo count. If we change the spawner to use AwesomeWeapon, in game we immediately get switched back to our default link gun.So with this in mind, why would we want
AwesomeGunto show up in this list or be spawned in game at all? This is where the abstract modifier comes in handy.Change the top of our
AwesomeWeaponclass to the following:class AwesomeWeapon extends UTWeapon abstract;
Now compile and take a look at the spawner properties.

Now the class doesn't even show up in the list.
As a test, let's add the following code to our
AwesomePlayerController:var AwesomeWeapon AW; simulated function PostBeginPlay() { AW = spawn(class'AwesomeWeapon'), `log(AW); super.PostBeginPlay(); bNoCrosshair = true; }We'll try to spawn an
AwesomeWeapondirectly to see what happens.Compile and test.
[0004.58] Warning: SpawnActor failed because class AwesomeWeapon is abstract
[0004.58] ScriptLog: None
Remove the test code from the
AwesomePlayerController. ThePostBeginPlayshould look as it did before and the variable declaration should be removed:simulated function PostBeginPlay() { super.PostBeginPlay(); bNoCrosshair = true; }
With abstract classes, we can't even spawn them through code. And for our AwesomeWeapon class, this is exactly what we want. This class doesn't do anything by itself; it's only the common parent class for all of our weapon classes. The abstract modifier is not inherited by subclasses, which is why our rocket launcher still showed up in the weapon spawner's list.
A quick word about the native modifier. As UDK users we'll never be using this, so even though you may see it in the source code, do NOT put this in your own classes. This keyword tells the engine that there is C++ code behind the class, which as UDK users we don't have access to. The engine code is only available to full licensees. We can do almost anything we want without it though, so don't fret.
We've used this one before in our experiments with variables. This one comes with parentheses after it which tells the game which configuration file in the UDKGameConfig folder to look in for this class' config variables. As a recap, with the following code:
class AwesomeActor extends Actor
config(Game);
var config int Something;
defaultproperties
{
}
The game would look in the UDKGame.ini file for our default. Since UDKGame.ini is generated from DefaultGame.ini, we would place our default value in there:
[AwesomeGame.AwesomeActor]
Something=4
Following the standard format of:
[Package.Class]
VariableName=Value
The Package is the name of our folder in DevelopmentSrc, and Class is the .uc file inside that folder that has the config values.
The config modifier is inherited, so any subclasses can use config variables without having the config modifier or file name specified. Each subclass needs to have its own section in the INI file though:
[Package.Subclass]
VariableName=ADifferentValue
AnotherVariable=SomeDefault
In our discussion of variables, we learned how we could put editable variables in certain categories by putting the name of the category in parentheses like this:
var(MyCategory) int MyInt;
And if we take a look at our AwesomeWeaponUpgrade actor's properties in the editor, we can see that there are a lot of categories already applied to it:

For organizational purposes, if we wanted to hide some of these categories that we're not going to need, we would use the hidecategories modifier.
Let's take a look at our AwesomeWeaponUpgrade actor.
Let's change the top line of our
AwesomeWeaponUpgradeactor to the following:class AwesomeWeaponUpgrade extends AwesomeActor hidecategories(Attachment,Physics,Debug,Object) placeable;
Note that the class declaration line doesn't end until the semicolon, and it's perfectly fine to spread it across a few lines to keep it readable.
Compile the code and take a look at the properties in the editor again.

There are a lot less this time!
The hidecategories modifier should only be used when you're sure that a level designer isn't going to need to change any variables in that category. It doesn't get rid of any variables; it just hides them from the editor. This modifier is inherited, and if we wanted to reverse a hidecategories modifier in a subclass we would use the showcategories modifier, for example this hypothetical subclass:
class SomeOtherUpgrade extends AwesomeWeaponUpgrade
showcategories(Attachment,Physics);
This would override the hidecategories modifier in AwesomeWeaponUpgrade for those two categories.
This will be a short topic, but an important one. Object.uc is the highest class in the class tree; all other scripts are subclasses of it. The most important subclass of Object is Actor. When working with UnrealScript, almost all of your work will be under Actor in the class tree. Actor contains code that gives classes a position in the world, lets them easily interact with each other and affect the game in some way. All of the other subclasses of Object can be thought of as more "informational" classes. For instance, if we take a look at InterpTrack and its subclasses, we can see that these classes define the tracks we can use in a Matinee such as movement or animation. The classes themselves have no useful purpose in the game world itself as, say, a projectile would.
Only Actor classes can be spawned, and indeed if we search through Actor.uc we can find the place where that function is declared:
native noexport final function coerce actor Spawn
(
class<actor> SpawnClass,
optional actor SpawnOwner,
optional name SpawnTag,
optional vector SpawnLocation,
optional rotator SpawnRotation,
optional Actor ActorTemplate,
optional bool bNoCollisionFail
);
There are ways of creating non-Actor object classes during gameplay, but this will rarely be needed. Nearly 100% of your time will be spent under Actor in the class tree. The only real exception to that is Kismet classes, which will be discussed in a later chapter and fall under SequenceObject in the class tree.
Simply put, when creating new classes, they will almost always be subclasses of Actor, not Object.
Our final topic for this chapter will be a long one. We're going to go through the most commonly used classes in UnrealScript and take a look at how we can change them for our game. We'll expand their functionality and see if we can get something resembling our Awesome Game's design document. First up, let's take a look at the GameInfo class.
The GameInfo class handles all of the rules for our game. It logs people in and out, tells the game when to start, keeps track of the time limit and score and decides when the game is over and who won. It also handles a few default properties like the PlayerController and HUD class the game uses.
Let's expand ours to see if we can make a game we can win.
We'll start with something simple. Usually when you're working on a project you might not want to go straight toward your goal, but instead you'd use a process like the one we're about to use to slowly work your game towards your desired goal. This helps to break down tasks even further and make sure your code is working each step of the way.
Let's start by making it so we win the game by collecting all of our AwesomeWeaponUpgrade actors.
The first thing we need to do is count the number of
AwesomeWeaponUpgradeactors and set our goal to that number. We'll use the foreach iterator to find them. Let's add aPostBeginPlayfunction to ourAwesomeGameclass:simulated function PostBeginPlay() { local AwesomeWeaponUpgrade AW; super.PostBeginPlay(); GoalScore = 0; foreach DynamicActors(class'AwesomeWeaponUpgrade', AW) GoalScore++; }GoalScoreis a variable declared inGameInfothat holds the score limit for the game. When this number is reached, the game ends. It could be number of kills forDeathmatch, number of flags captured for Capture the Flag, or in our case we're temporarily using it to hold the number ofAwesomeWeaponUpgradeactors we need to collect.Since we're extending from
UTDeathmatch, there is a variable we need to change for the default properties. SinceDeathmatchby default scores by number of kills, we need to change that so we don't get messages like "double kill" or "m-m-m-monster kill!"bScoreDeaths=false
bScoreDeathsis declared in UTGame.That's it for our AwesomeGame class for now, let's see what it should look like:
class AwesomeGame extends UTDeathmatch;
simulated function PostBeginPlay()
{
local AwesomeWeaponUpgrade AW;
super.PostBeginPlay();
GoalScore = 0;
foreach DynamicActors(class'AwesomeWeaponUpgrade', AW)
GoalScore++;
}
defaultproperties
{
bScoreDeaths=false
PlayerControllerClass=class'AwesomeGame.AwesomePlayerController'
}
Now we need to change our
AwesomeWeaponUpgradeclass a bit. In our Touch event, let's add a bit of code so it looks like this:event Touch(Actor Other, PrimitiveComponent OtherComp, vector HitLocation, vector HitNormal) { if(Pawn(Other) != none && AwesomeWeapon(Pawn(Other).Weapon) != none) { if(Pawn(Other).Controller != none && Pawn(Other).Controller.PlayerReplicationInfo != none) WorldInfo.Game.ScoreObjective(Pawn(Other).Controller.PlayerReplicationInfo, 1); AwesomeWeapon(Pawn(Other).Weapon).UpgradeWeapon(); Destroy(); } }Now we're checking if the Pawn that touched us has a Controller, and if so does that Controller have a
PlayerReplicationInfo. PlayerReplicationInfois a class created for every Controller that holds the number of deaths, our score, our team number, even our ping for multiplayer games. It is mainly an informational class that stores variables other players will need to know about. When we tell theGameInfothat a player scored, instead of telling the GameInfo which Controller or Pawn it was, we pass thePlayerReplicationInforeference instead.On the next line is where we tell the game about the score.
WorldInfo.Gameholds a reference to theGameInfoclass, which in our case is ourAwesomeGame.ScoreObjectiveis a function declared inGameInfowhich handles things like figuring out if the game has ended because of this score. For this, we tell the GameInfo that the player that touched us receives 1 to their score. Since we set the goal to the number ofAwesomeWeaponUpgradeactors, this makes it so that we have to collect all of them to end the game.Compile the code and test. Pick up the rocket launcher and then run around collecting all of the weapon upgrades. When you pick up the last one the game should stop and you will hear "Flawless Victory!"
This is a small example of how to work with a class to slowly expand the game. Starting from something simple, we can work toward what we want the game to be while making sure we don't majorly break anything along the way. Next, let's make it so we have something to shoot at instead of ending the game by picking stuff up.
Once again, instead of jumping right in and creating enemies with AI and attacks and health and long complicated pieces of code, let's start with something simple: A box we can shoot at and kill.
Create a new file in our
Development/Scr/AwesomeGame/Classesfolder and call itTestEnemy.uc. This way we'll know it's not a class we'll be keeping. Copy the following code into it:class TestEnemy extends AwesomeActor placeable; event TakeDamage(int DamageAmount, Controller EventInstigator, vector HitLocation, vector Momentum, class<DamageType> DamageType, optional TraceHitInfo HitInfo, optional Actor DamageCauser) { Destroy(); } defaultproperties { bBlockActors=True bCollideActors=True Begin Object Class=DynamicLightEnvironmentComponent Name=MyLightEnvironment bEnabled=TRUE End Object Components.Add(MyLightEnvironment) Begin Object Class=StaticMeshComponent Name=PickupMesh StaticMesh=StaticMesh'UN_SimpleMeshes.TexPropCube_Dup' Materials(0)=Material'EditorMaterials.WidgetMaterial_X' LightEnvironment=MyLightEnvironment Scale3D=(X=0.25,Y=0.25,Z=0.5) End Object Components.Add(PickupMesh) Begin Object Class=CylinderComponent Name=CollisionCylinder CollisionRadius=32.0 CollisionHeight=64.0 BlockNonZeroExtent=true BlockZeroExtent=true BlockActors=true CollideActors=true End Object CollisionComponent=CollisionCylinder Components.Add(CollisionCylinder) }The
TakeDamagefunction is a biggie, there are a lot of parameters that are passed in. For now we don't need to worry about them though, we only care that it gets called.Also notice the default properties. It may look the same as our weapon upgrades, but we've changed the collision and cube mesh sizes and added
bBlockActors=True. This makes it so we can't run through our fake enemies.Compile the code and open up the editor. Select our
TestEnemyclass in the Actor Browser and place a few around the level close to our weapon spawner and weapon upgrades.
Kinda creepy actually.
Run the game with our batch file and shoot at the test enemies. You'll notice that they disappear when shot, so our
TakeDamagefunction is working! Time to change ourAwesomeGameclass.Change the
PostBeginPlayof ourAwesomeGameclass to this:simulated function PostBeginPlay() { local TestEnemy TE; super.PostBeginPlay(); GoalScore = 0; foreach DynamicActors(class'TestEnemy', TE) GoalScore++; }This changes it so our goal is based on the number of enemies in the map instead of the weapon upgrades. Getting there!
Now let's get rid of the code in our weapon upgrades that gives us a score when they're picked up. The
Touchfunction inAwesomeWeaponUpgradeshould now look like this:event Touch(Actor Other, PrimitiveComponent OtherComp, vector HitLocation, vector HitNormal) { if(Pawn(Other) != none && AwesomeWeapon(Pawn(Other).Weapon) != none) { AwesomeWeapon(Pawn(Other).Weapon).UpgradeWeapon(); Destroy(); }And lastly, we need to move the goal scoring code into our
TestEnemyclass. TheTakeDamagefunction there should now look like this:event TakeDamage(int DamageAmount, Controller EventInstigator, vector HitLocation, vector Momentum, class<DamageType> DamageType, optional TraceHitInfo HitInfo, optional Actor DamageCauser) { if(EventInstigator != none && EventInstigator.PlayerReplicationInfo != none) WorldInfo.Game.ScoreObjective(EventInstigator.PlayerReplicationInfo, 1); Destroy(); }You'll notice that the if statement has changed a bit. Since
TakeDamagealready gives us a Controller in the form of theEventInstigatorvariable, we can just check that instead now.Compile the code and run the game. Now when we shoot all of our TestEnemy actors, the game ends. Nice!
While we're here, let's make another small change to our
AwesomeGameclass. We start out with the Link Gun, but in our game we only want to use our own weapon classes. Let's start the player out with no weapon for now. We can do this with a simple change to theAwesomeGamedefault properties:DefaultInventory(0)=None
Compile and test.
We've created a new class, TestEnemy, which will react to our weapon fire through its TakeDamage function. When destroyed they report to AwesomeGame, which has a tally of how many of the TestEnemy actors are in the map. When that number is reached, the game ends.
Now, what in the world are those two things around our player? To find out, we're going to need to investigate another class that we're soon going to need for our game, our own Pawn.
We're going to get more into the Pawn class in a bit, but since the GameInfo class tells the game which Pawn class to use, we'll create it now and investigate what those two things around our player are, now that we start with no weapon.
Create a new file in our
Development/Src/AwesomeGame/Classesfolder calledAwesomePawn.uc. As always, we'll put some test code inPostBeginPlayto make sure our class is working:class AwesomePawn extends UTPawn; simulated function PostBeginPlay() { super.PostBeginPlay(); `log("AwesomePawn spawned! ====="); } defaultproperties { }That's it for this class for the moment; now let's tell the game to use our class.
In
AwesomeGame.uc, let's set ourPawnclass in the default properties:DefaultPawnClass=class'AwesomeGame.AwesomePawn'
Compile the code and run the game, and we'll see our log show up:
[0006.55] ScriptLog: AwesomePawn spawned! =====
Now to get rid of the floaty thingies. As with our giant floating gun awhile back, the two floating things are supposed to be used for our first person view. They're the arms that you see holding whatever weapon you have. Since we now have no weapon by default, we need to hide these arms.
Let's change our AwesomePawn's
PostBeginPlayfunction to look like this:simulated function PostBeginPlay() { super.PostBeginPlay(); if(ArmsMesh[0] != none) ArmsMesh[0].SetHidden(true); if(ArmsMesh[1] != none) ArmsMesh[1].SetHidden(true); }We can see the
ArmsMesharray declared inUDKPawn(don't put this anywhere):var UDKSkeletalMeshComponent ArmsMesh[2];
Then they're set in the default properties of UDKPawn's subclass,
UTPawn(don't write this either):Begin Object Class=UDKSkeletalMeshComponent Name=FirstPersonArms PhysicsAsset=None FOV=55 Animations=MeshSequenceA DepthPriorityGroup=SDPG_Foreground bUpdateSkelWhenNotRendered=false bIgnoreControllersWhenNotRendered=true bOnlyOwnerSee=true bOverrideAttachmentOwnerVisibility=true bAcceptsDynamicDecals=FALSE AbsoluteTranslation=false AbsoluteRotation=true AbsoluteScale=true bSyncActorLocationToRootRigidBody=false CastShadow=false TickGroup=TG_DuringASyncWork bAllowAmbientOcclusion=false End Object ArmsMesh[0]=FirstPersonArms
At this point I shouldn't need to say it but yep, reading through the source code definitely helps find things like this. The Pawn branch of the class tree is another one that should be added to your must-read list.
Compile and test. The floating arms are gone now!
Now we've seen a bit about how the GameInfo class works and what it controls. Using the functions there we can set the end game condition to whatever we want. Using a system similar to the weapon upgrades, we could make it so that the player has to reach a certain level before the game ends.
Now that you know more about how the game comes to an end, let's see about changing it a bit. How would you rewrite the code so that you don't have to kill all of the TestEnemy actors, but instead a fixed amount, say 10 of them?
Solution: Rewrite AwesomeGame's PostBeginPlay function to look like this:
simulated function PostBeginPlay()
{
super.PostBeginPlay();
GoalScore = 10;
}
The Controller is a class we've already messed around with a bit, and is obviously very important to a custom UDK game. It's the puppet master to our Pawn, it controls the camera and processes player input, and also handles other functions such as muting players on a server. We've done some simple stuff with the camera for our AwesomePlayerController, but let's see if we can expand it a bit to make it work better.
Right now we have a pretty simple setup for our camera. It stays at a fixed position over our player and never moves from that relative position. Let's change it so that it's focusing on a point a bit ahead of our player, that way it will let them see more of what's in front of them while leaving their backs exposed to a surprise attack.
Let's take a look at our
GetPlayerViewPointfunction:simulated event GetPlayerViewPoint(out vector out_Location, out Rotator out_Rotation) { super.GetPlayerViewPoint(out_Location, out_Rotation); if(Pawn != none) { Pawn.Mesh.SetOwnerNoSee(false); if(Pawn.Weapon != none) Pawn.Weapon.SetHidden(true); out_Location = Pawn.Location + PlayerViewOffset; out_Rotation = rotator(Pawn.Location - out_Location); } }Well some of this looks more familiar now that we have our own Pawn class. We can move the first two parts of our if statement out of this function, so let's do that real quick.
Delete the first two parts of our if statement:
simulated event GetPlayerViewPoint(out vector out_Location, out Rotator out_Rotation)
{
super.GetPlayerViewPoint(out_Location, out_Rotation);
if(Pawn != none)
{
out_Location = Pawn.Location + PlayerViewOffset;
out_Rotation = rotator(Pawn.Location - out_Location);
}
}
Now let's put the first part in our
AwesomePawnclass instead. Add this function to ourAwesomePawn:simulated function SetMeshVisibility(bool bVisible) { super.SetMeshVisibility(bVisible); Mesh.SetOwnerNoSee(false); }This will let us keep seeing our Pawn.
As for the weapon hiding, we can move that to our AwesomePlayerController's
NotifyChangedWeaponfunction. Add this line after the call to the super:NewWeapon.SetHidden(true);
Here's what the function should look like now:
function NotifyChangedWeapon(Weapon PrevWeapon, Weapon NewWeapon)
{
super.NotifyChangedWeapon(PrevWeapon, NewWeapon);
NewWeapon.SetHidden(true);
if(Pawn == none)
return;
if(UTWeap_RocketLauncher(NewWeapon) != none)
Pawn.SetHidden(true);
else
Pawn.SetHidden(false);
}
We'll leave the rocket launcher invisibility code in there for now.
Now we've cleaned out our
GetPlayerViewPointfunction, and it should look like this:simulated event GetPlayerViewPoint(out vector out_Location, out Rotator out_Rotation) { super.GetPlayerViewPoint(out_Location, out_Rotation); if(Pawn != none) { out_Location = Pawn.Location + PlayerViewOffset; out_Rotation = rotator(Pawn.Location - out_Location); } }Now let's change it so it focuses on a position ahead of the player. Change our
PlayerViewOffsetin the default properties to this:PlayerViewOffset=(X=384,Y=0,Z=1024)
We've just changed the value of X; we'll use this in a moment to keep the camera ahead of the player.
Change the if statement in our
GetPlayerViewPointfunction to this:if(Pawn != none) { out_Location = Pawn.Location + (PlayerViewOffset >> Pawn.Rotation); out_Rotation = rotator((out_Location * vect(1,1,0)) - out_Location); }There are a few changes that we should walk through so you know what the new code is doing. First we're changing the
out_Locationpart by changing this:+ PlayerViewOffset
To this:
+ (PlayerViewOffset >> Pawn.Rotation)
Using the
>>operator effectively converts ourPlayerViewOffsetinto our Pawn's local coordinates. In other words, instead of our X value of 384 always being in a certain direction in the world (say North), no matter which direction the Pawn was facing, it would make the offset change with the Pawn's rotation to always be 384 units in a certain direction according to the Pawn's viewpoint. In this case, it will always be in front of our Pawn no matter what direction it's facing.Let's take a look at the following diagram to see how this works:

Without the
>>operator, thePlayerViewOffsetis always 384 units along the X axis of the world, no matter what direction our Pawn is facing. With the>>operator,PlayerViewOffsetis 384 units along the X axis relative to the Pawn, so as the Pawn rotates the>>operator makes thePlayerViewOffsetmove with it.For our
out_Rotation, we've changed this:rotator(Pawn.Location - out_Location)
To this:
rotator((out_Location * vect(1,1,0)) - out_Location)
Remembering our vector lessons, we subtract the start (A) from the destination (B), so B-A would give us a vector pointing from A to B. When we multiply the
out_Locationvariable byvect(1,1,0), all we're doing is making the Z value 0. The X and Y are unchanged since we multiplied them by 1. We do that to get a location that's directly below our camera, and then have the camera point in that direction. This makes the camera always point down.Compile the code and test. It works ok, but yeesh that's some ugly twitching going on. Let's keep going with our camera code to smooth that out.
Let's add some smoothing to the camera so it doesn't immediately set its location. To do this we'll store the current location code as a desired position that the camera will constantly move towards. At the top of our
AwesomePlayerControllerlet's add two vectors:var vector CurrentCameraLocation, DesiredCameraLocation;
We'll use
DesiredCameraLocationto store the position we want the camera to be at, and interpolateCurrentCameraLocationtowards that continuously.Now let's change our
GetPlayerViewPointfunction.simulated event GetPlayerViewPoint(out vector out_Location, out Rotator out_Rotation) { super.GetPlayerViewPoint(out_Location, out_Rotation); if(Pawn != none) { out_Location = CurrentCameraLocation; out_Rotation = rotator((out_Location * vect(1,1,0)) - out_Location); } }We won't change our rotation code, but now the location will use our saved
CurrentCameraLocationvariable. Now we need to setDesiredCameraLocationand moveCurrentCameraLocationtowards it. To do this we'll use a function we haven't talked about yet,PlayerTick.PlayerTickis a function that's run every frame during the game, so it's important to avoid putting any really slow pieces of code in it. For example, when we were learning about using actor classes as variables we used aForEachiterator to find actors in the world. Using aForEachhere inPlayerTickwould be really slow since it would be running every frame.Add the following to our
AwesomePlayerControllerclass:function PlayerTick(float DeltaTime) { super.PlayerTick(DeltaTime); `log(DeltaTime); }The variable in the function,
DeltaTime, tells us how much time has passed between frames. For example, if our game were running at 60 frames per second,DeltaTimewould be 1 / 60 = 0.016667. We'll take a look for ourselves with the log.Compile the code and run the game. Exit the game and take a look at the log:
[0005.34] ScriptLog: 0.0169
[0005.36] ScriptLog: 0.0169
[0005.37] ScriptLog: 0.0169
[0005.39] ScriptLog: 0.0169
That seems about right!
One of the important uses of
DeltaTimeis to make sure code we write here runs at the same speed no matter how fast our computer is or how bad our framerate gets. For instance, if we had an integer that we were adding 1 to every timePlayerTickran, it would count much faster at 60 frames per second than at 30 sincePlayerTickis run every frame. To compensate for this, we useDeltaTime. If we had a float that we were addingDeltaTimeto, it would count at the same speed no matter what our framerate was, since the lower the framerate the higherDeltaTimewould be since more time would be passing in between frames.Knowing this, we'll use
DeltaTimeto make sure our camera moves at the same speed no matter what our framerate. Let's change ourPlayerTickfunction:function PlayerTick(float DeltaTime) { super.PlayerTick(DeltaTime); if(Pawn != none) { DesiredCameraLocation = Pawn.Location + (PlayerViewOffset >> Pawn.Rotation); CurrentCameraLocation += (DesiredCameraLocation - CurrentCameraLocation) * DeltaTime * 3; } }As we can see, now we're setting our
DesiredCameraLocationbased on the old code we were using to setout_LocationinGetPlayerViewPoint.We're also moving
CurrentCameraLocationtowardsDesiredCameraLocationin the next line. The first part gets the vector pointing fromCurrentCameraLocationtowardsDesiredCameraLocation(remember, B A?), then we multiply it byDeltaTime. If we think about it, this makes sense. If our framerate drops this function won't be called as often, so DeltaTime increases and this line of code makes our camera move faster to "make up for lost time". Multiplying it by 3 just speeds it up a bit more and is completely arbitrary. This can be changed if you want a slower or faster camera.The following diagram illustrates what's happening with the camera now:

We're calculating where we want the camera to be with
DesiredCameraLocation, and constantly moving theCurrentCameraLocationtowards it every frame. This causes the camera movement to smooth out.Compile the code and test it out. Much better, the camera lost the jerkiness it had before!
Now we've played around a bit more with the player's camera and learned about the PlayerTick function. But the PlayerController class can't all be about camera, camera, camera can it? The key word here is Controller, right? Earlier I mentioned that the PlayerController also processes the player's input, so let's see if we can change the way that works for our game.
As a top down game, our control scheme is pretty terrible. When we press any of the direction keys on the keyboard, it's pretty tough to tell where the player is going to go. Right now our movement is based on our Pawn's rotation, so if we're facing the bottom of the screen, pressing left will actually make the pawn move to our right. Let's fix that.
To do this we're going to need a Rotator variable. We can't just pull
out_Rotationfrom theGetPlayerViewPointfunction, so we'll do the same thing we did with ourDesiredCameraRotationand create a variable to store it.var rotator CurrentCameraRotation;
Now let's add a line to the end of our
GetPlayerViewPointfunction to store ourout_Rotation:simulated event GetPlayerViewPoint(out vector out_Location, out Rotator out_Rotation) { super.GetPlayerViewPoint(out_Location, out_Rotation); if(Pawn != none) { out_Location = CurrentCameraLocation; out_Rotation = rotator((out_Location * vect(1,1,0)) - out_Location); } CurrentCameraRotation = out_Rotation; }So why do we need that variable? We're going to use it to make our Pawn move in the direction we want it to. For this we'll use the
ProcessMovefunction inside thePlayerWalkingstate. States will be covered in depth in Chapter 6, but for now it's enough to know that the player has many states it can be in, like walking, falling, or dead. For now we're only concerned with thePlayerWalkingstate.Let's add this code to our
AwesomePlayerController:state PlayerWalking { function ProcessMove( float DeltaTime, vector newAccel, eDoubleClickDir DoubleClickMove, rotator DeltaRot) { super.ProcessMove(DeltaTime, AltAccel, DoubleClickMove, DeltaRot); } }As we can see this is another function that gets called every frame, we're getting a
DeltaTimevariable here too. We don't need to worry about using it this time though. Instead, let's intercept thenewAccelvariable. This is what's making our movement completely wrong, so let's replace it with our own vector and set it to what it should be.Type the following code for our
ProcessMovefunction:state PlayerWalking { function ProcessMove( float DeltaTime, vector newAccel, eDoubleClickDir DoubleClickMove, rotator DeltaRot) { local vector X, Y, Z, AltAccel; GetAxes(CurrentCameraRotation, X, Y, Z); AltAccel = PlayerInput.aForward * Z + PlayerInput.aStrafe * Y; AltAccel.Z = 0; AltAccel = Pawn.AccelRate * Normal(AltAccel); super.ProcessMove(DeltaTime, AltAccel, DoubleClickMove, DeltaRot); } }And now it's story time! In the first line we're declaring a few vectors to use in the function.
AltAccelis the one we'll be using to replacenewAccel.The second line,
GetAxes, is declared inObject.uc.We feed it a rotator, and it gives us three vectors pointing forward, to the right, and up from that rotator's perspective. NormallyProcessMoveuses the Pawn's rotation for this, but here we're using ourCurrentCameraRotationvariable instead so we can base our movement on our camera.In the next line, we're pulling
aForwardandaStrafefrom thePlayerInput, which is the class that gets all of the keyboard and mouse input and sends it to thePlayerController. aForward is either positive or negative depending on whether we're pressing forward or backward on the keyboard, and the same with aStrafe being dependent on left/right presses.From our camera's perspective, forward and backward are up and down, so we use the Z vector we got from
GetAxesand multiply it byaForward. Left and right are left and right for our camera, so we use the Y vector and multiply it byaStrafe. These two added together give us the direction we want to move in.Remembering our talk about vectors, in the next line we use
Normalto getAltAccelto be one unit in length but still in the same direction. We multiply that by our Pawn's acceleration rate to get the final AltAccel value, the direction we want the player to move.Finally we call ProcessMove's super, substituting
newAccelwith our ownAltAccelvalue.The following diagram illustrates what's going on:

While
newAccelis relative to the player, we've madeAltAccelrelative to the camera.That was a long talk, so let's compile the code and test it out. Now the player moves like we would expect it to! The rotation and camera still work, so we're done here!
Now we've seen how we can change the way input is processed in the PlayerController classes. It seems we've done most of our work so far in this class, and looking at all of the code we have we can see how easily it can grow just from doing simple tasks.
We're done with AwesomePlayerController for now, so let's see what we can do with another of the UDK's common classes, the Pawn.
The Pawn is our physical representation in the world, with the PlayerController being its brain. The Pawn interacts with other objects in the world, has our health, speed, and jump height among other things. It also obviously has the visual mesh for our player, which we've experimented with when we made ourselves invisible.
For our experiment with the Pawn class, let's see if we can get our fake enemies to hurt us.
As the physical representation of the player, the Pawn class uses the function TakeDamage to subtract from our health, give us any momentum the weapon used has (such as rockets pushing us away when they explode), and tells the game what type of damage it was so it can play the appropriate effects and send the right death messages. We'll call that function from another function we're going to use, Bump.
While in the real world using Bump resurrects old forum threads, in the UDK it lets us know when two actors that have
bBlockActorsset totruerun into each other. First, let's set a damage amount in ourTestEnemyclass. Add this variable toTestEnemy:var float BumpDamage;
And give it a value in the default properties:
BumpDamage=5.0
Now let's add the
Bumpfunction to ourAwesomePawn:event Bump(Actor Other, PrimitiveComponent OtherComp, vector HitNormal) { `log("Bump!"); if(TestEnemy(Other) != none) TakeDamage(TestEnemy(Other).BumpDamage, none, Location, vect(0,0,0), class'UTDmgType_LinkPlasma'), }Here we test if the actor that bumped into us was a
TestEnemy, and if so callTakeDamageand use itsBumpDamageas the amount of damage we receive.Compile the code and test it out. Wow, what just happened? Seems like we took a lot of damage and died pretty quick when we ran into a
TestEnemy. Let's take a look at the log:[0008.05] ScriptLog: Bump! [0008.05] ScriptLog: Bump! [0008.06] ScriptLog: Bump! [0008.06] ScriptLog: Bump!
It seems like it gets called a lot while we're running into something. Well this is no good. Let's see if we can add an invulnerability timer to prevent constantly taking damage.
We'll use a
booland afloatfor this. Let's add these variables to the top of ourAwesomePawn:var bool bInvulnerable; var float InvulnerableTime;
We'll set
bInvulnerabletotruefor a bit after we take damage.Let's give
InvulnerableTimea value in our default properties:InvulnerableTime=0.6
That should be long enough. Now for the Bump function.
Let's change the
Bumpfunction to look like this:event Bump(Actor Other, PrimitiveComponent OtherComp, vector HitNormal) { if(TestEnemy(Other) != none && !bInvulnerable) { bInvulnerable = true; SetTimer(InvulnerableTime, false, 'EndInvulnerable'), TakeDamage(TestEnemy(Other).BumpDamage, none, Location, vect(0,0,0), class'UTDmgType_LinkPlasma'), } }Now we've added a check to our
ifstatement to make sure we aren't invulnerable. If we're not, we set ourselves to be invulnerable and start a timer, and then do theTakeDamagecall.Now let's write the
EndInvulnerablefunction we're calling from our timer. This one's pretty simple:function EndInvulnerable() { bInvulnerable = false; }Now let's compile and test out this new code. Much better! We still take damage if we stand against a
TestEnemy, but it isn't instantly killing us.
We've used the Bump function to identify what's running into us, and giving damage to the player if it was a TestEnemy. When hit we make the player invulnerable for 0.6 seconds to avoid rapid Bump calls from instantly killing the player.
This was just a simple experiment with our Pawn class, but now we can start to see the difference between it and the PlayerController. With the Pawn being our physical representation it is the thing that takes damage in the game.
Now that we're taking damage from our TestEnemy class let's have a little fun with TestEnemy. They're not much of a challenge just sitting there, so let's make them move towards us if we get too close.
Since TestEnemy is only a temporary class, we won't get too complex with its behavior. We'll just use some simple math and adapt some of our camera movement code to get them working.
The first thing we need to do in
TestEnemy.ucis get a reference to theAwesomePawnthat's running around shooting at us. Since the player doesn't spawn right away, we can't do this inPostBeginPlay. Instead, we're going to constantly check if we have a reference, and if not try to find one until we do.Let's add a Pawn variable to our
TestEnemyclass:var Pawn Enemy;
Now let's see if we can get a reference to the player after they've spawned. Let's use the
Tickfunction for this:function Tick(float DeltaTime) { local AwesomePlayerController PC; if(Enemy == none) { foreach LocalPlayerControllers(class'AwesomePlayerController', PC) { if(PC.Pawn != none) { Enemy = PC.Pawn; `log("My enemy is:" @ Enemy); } } } }For non-Controller actors the function is called
Tickinstead ofPlayerTick, but it is still run once every frame. Now, if our Enemy variable isn't referencing any Pawn, we use theLocalPlayerControllersiterator to run through all of theAwesomePlayerControllersin the game and see if they have a Pawn. If so, set our Enemy variable and log it.Compile the code and let's test it out. Close out the game and take a look at the log:
[0008.99] ScriptLog: My enemy is: AwesomePawn_0
[0008.99] ScriptLog: My enemy is: AwesomePawn_0
[0008.99] ScriptLog: My enemy is: AwesomePawn_0
[0008.99] ScriptLog: My enemy is: AwesomePawn_0
Four
TestEnemyactors in our test level, four enemies set to AwesomePawn_0. It's almost as if they want to kill us or something.Now we need to expand on our
Tickfunction. First, let's add afloatvariable to the top to set a distance we'll check:var float FollowDistance;
And give it a default value:
FollowDistance=512.0
Now for the movement code. Let's change our
Tickfunction to the following:function Tick(float DeltaTime) { local AwesomePlayerController PC; local vector NewLocation; if(Enemy == none) { foreach LocalPlayerControllers(class'AwesomePlayerController', PC) { if(PC.Pawn != none) Enemy = PC.Pawn; } } else if(VSize(Location - Enemy.Location) < FollowDistance) { NewLocation = Location; NewLocation += (Enemy.Location - Location) * DeltaTime; SetLocation(NewLocation); } }Now we've added an else if to our if statement. If our
EnemyisNoneit will execute the code in the if statement, but if we have an enemy set it will go through the else if code. There, we check if the distance between us and ourEnemyis less than ourFollowDistance, and if so we use our newly declaredNewLocationvariable to move us closer to ourEnemy. The second line there should look familiar; we used the same code to move our camera towardsDesiredCameraLocationearlier.Compile the code and test it out. Well that's pretty frightening. But something's wrong. If we just stand still the enemies run right through us and don't cause any more damage. The way we're moving our
TestEnemyclass seems to be causing problems, so let's make them stop and deal damage directly when they get close enough.Let's add another float to our
TestEnemyclass:var float AttackDistance;
And add a value to our default properties:
AttackDistance=96.0
Now let's change our
Tickfunction:function Tick(float DeltaTime) { local AwesomePlayerController PC; local vector NewLocation; if(Enemy == none) { foreach LocalPlayerControllers(class'AwesomePlayerController', PC) { if(PC.Pawn != none) Enemy = PC.Pawn; } } else if(VSize(Location - Enemy.Location) < FollowDistance) { if(VSize(Location - Enemy.Location) < AttackDistance) { Enemy.Bump(self, CollisionComponent, vect(0,0,0)); } else { NewLocation = Location; NewLocation += (Enemy.Location - Location) * DeltaTime; SetLocation(NewLocation); } } }Compile the code and test it out. Nice! Now when the TestEnemy actors get close enough they'll stop moving and start damaging us.
Now inside our else if statement, we check if we're close enough to attack, and if so we call the Bump function on our enemy ourselves. With the invulnerability code in place it will still prevent us from taking damage too fast.
If we're not close enough to attack, we go into the else statement and continue moving towards our enemy.
This is starting to look more and more like an actual game. We didn't have a whole lot to start with, but adding more and more code with each task gets us closer to where we want to be.
The next class we'll talk about is the HUD, which we can use to display information for the player.
We're going to use our HUD to display some useful information, such as our weapon level and the number of enemies we have left to kill. First we need to create our own HUD class.
Create a new file in our
Development/Src/AwesomeGame/Classesfolder calledAwesomeHUD.uc. Type the following code into it:class AwesomeHUD extends UTGFxHUDWrapper; simulated function PostBeginPlay() { super.PostBeginPlay(); `log("AwesomeHUD spawned!"); } defaultproperties { }Now we're going to replace the default HUD with our own class. In our
AwesomePlayerController, add the following function:reliable client function ClientSetHUD(class<HUD> newHUDType) { if(myHUD != none) myHUD.Destroy(); myHUD = spawn(class'AwesomeHUD', self); }Now our HUD will be the only type that can be spawned for our
AwesomePlayerController.Compile the code and run the game. Nothing looks different, but close the game and check the log:
[0004.37] ScriptLog: AwesomeHUD spawned!
At least we know it's working!
We're not going to use
Scaleform, but there are still some functions we can use for our prototype game. We'll use a function calledDrawTextto write our weapon's current level on the screen. Let's add theDrawHUDfunction to ourAwesomeHUD:event DrawHUD() { super.DrawHUD(); if(PlayerOwner.Pawn != none && AwesomeWeapon(PlayerOwner.Pawn.Weapon) != none) { Canvas.DrawColor = WhiteColor; Canvas.Font = class'Engine'.Static.GetLargeFont(); Canvas.SetPos(Canvas.ClipX * 0.1, Canvas.ClipY * 0.9); Canvas.DrawText("Weapon Level:" @ AwesomeWeapon(PlayerOwner.Pawn.Weapon).CurrentWeaponLevel); } }PlayerOwneris a variable referencing our Controller, so all we need to do is check if the Controller's Pawn is there and if it's holding anAwesomeWeapon. If so, we can move into the if statement.First, we set the Canvas'
DrawColorandFont. TheCanvasis the part of the HUD we actually draw on. Next, we set the position we want to draw at.ClipXwill give us the horizontal size of the screen in pixels, so multiplying it by 0.1 will make us draw at a location 10% from the left side of our screen. We do a similar multiplication withClipY, making it 90% down from the top of the screen (or 10% up from the bottom).Let's compile the code and take a look at the game. The text will only draw if we're holding an
AwesomeWeapon, so run to our weapon spawner and pick up the rocket launcher. The text should now show up, and it will change as we pick up the weapon upgrades: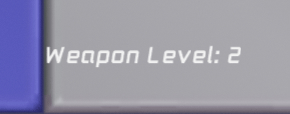
Nice!
What other information could we put here? Let's make it so we can tell how many enemies are left to kill. In our
AwesomeGameclass, add a new variable:var int EnemiesLeft;
Now let's change our
PostBeginPlayfunction to set its value to the initial number of TestEnemy actors:simulated function PostBeginPlay() { local TestEnemy TE; super.PostBeginPlay(); GoalScore = 0; foreach DynamicActors(class'TestEnemy', TE) GoalScore++; EnemiesLeft = GoalScore; }Finally, let's add the
ScoreObjectivefunction and subtract fromEnemiesLeftevery time it's called:function ScoreObjective(PlayerReplicationInfo Scorer, Int Score) { EnemiesLeft--; super.ScoreObjective(Scorer, Score); }Now let's change our
DrawHUDfunction to add the new info. We'll move the font and color lines outside our weapon level's if statement since we'll be using it for both now:event DrawHUD() { super.DrawHUD(); Canvas.DrawColor = WhiteColor; Canvas.Font = class'Engine'.Static.GetLargeFont(); if(PlayerOwner.Pawn != none && AwesomeWeapon(PlayerOwner.Pawn.Weapon) != none) { Canvas.SetPos(Canvas.ClipX * 0.1, Canvas.ClipY * 0.9); Canvas.DrawText("Weapon Level:" @ AwesomeWeapon(PlayerOwner.Pawn.Weapon).CurrentWeaponLevel); } if(AwesomeGame(WorldInfo.Game) != none) { Canvas.SetPos(Canvas.ClipX * 0.1, Canvas.ClipY * 0.95); Canvas.DrawText("Enemies Left:" @ AwesomeGame(WorldInfo.Game).EnemiesLeft); } }Compile the code and run the game to check it out.

Perfect!
Although we wouldn't want this for our finished game, using the HUD in this way helps us quickly prototype our game and put useful information up for the player to see. We could also use this for debugging, since we can get access to pretty much any variable we want and put it up on the HUD so we can see it in real time.
Now that we've played around with the HUD a bit, see if you can get it to display the number of enemies that we've killed instead of the number that are left.
Solution - Change the last section of the DrawHUD function to look like this:
if(AwesomeGame(WorldInfo.Game) != none)
{
Canvas.SetPos(Canvas.ClipX * 0.1, Canvas.ClipY * 0.95);
Canvas.DrawText("Enemies Killed:" @ AwesomeGame(WorldInfo.Game).GoalScore - AwesomeGame(WorldInfo.Game).EnemiesLeft);
}
We've done a lot in this chapter. We've gone from messing around with weapons to having an almost fully functional game. While these are the most common classes in UnrealScript, it would still be very helpful to read through the class tree to see how everything is arranged and what classes already exist so we don't reinvent the wheel when we're working on our own project. As always, I will say that reading through the source code will give you a great insight into how the UDK's classes work and interact with each other.
We learned a lot in this chapter about the UDK's classes and how we can use them to customize our own game.
Specifically, we covered:
Breaking down a game's design document into programming tasks
When and where to create custom classes for our game
Class modifiers and what each of them does
How to change the functionality of the UDK's classes by using our own subclasses
The most common UDK classes and what they do
Now that we've learned about creating classes, it's time to start learning more about functions. We've been using them a lot so far, but what are they and how do they work exactly? In the next chapter, we'll take a closer look at what we can do with them.