
Random knick knacks
We're pretty much done with our lessons in UnrealScript. By now you should have enough confidence to start poking around in the scripts on your own to learn how things work. There are a few other random topics I wanted to discuss though, ones that didn't really fit with any of the other chapters.
In this chapter we will:
Discuss the use of Components in our Actor classes
Interact with code outside the UDK (Unreal Development Kit) with DLLBind
Discuss other resources for UnrealScript
So with that, let's take a look at Components!
Components let us add objects to our Actors through its default properties. We can think of it like a weapon-upgrade system in a game: You can add a silencer, laser sight, a bigger clip to a weapon. With an Actor, we could add a static mesh, a directional light, or an ambient sound using Components. Let's take a look.
For these experiments, we'll go back to our AwesomeGame classes, specifically our AwesomeActor. We'll take a look at how to add and remove Components and how to manipulate them through our functions.
We'll need a blank map for our experiments, so open
AwesomeTestMapin the editor and delete all of the Kismet,AwesomeEnemySpawners, the look target, and the weapon spawner. All that should be left is the ground, the player start, and the lights.Save the map and close the editor.
Open
AwesomeActor.ucin ConTEXT.Components are found under
Objectin the class tree. The one we're most concerned with for this isActorComponents, which is the one that will be used most when working with UnrealScript. We'll start by adding a SpriteComponent to a new class we'll create,AwesomeComponentActor. SpriteComponents are most commonly used to give the Actor a physical representation in the editor. First let's create a new file calledAwesomeComponentActor.ucinDevelopment/Src/AwesomeGame/Classesand write the following code in it:class AwesomeComponentActor extends Actor; defaultproperties { }Let's add a
SpriteComponentto the default properties and also make this classplaceable:class AwesomeComponentActor extends Actor placeable; defaultproperties { Begin Object Class=SpriteComponent Name=MySprite Sprite=Texture2D'EditorResources.S_Keypoint' End Object Components.Add(MySprite) }Anything can be used as the
Nameof the Component, just make sure the name is the same in theComponents.Add()line.Compile the code and open up
AwesomeTestMapin the editor.Select
AwesomeComponentActorin the Actor tab of the content browser and place one in the map. We'll see the sprite on it:
Save and close the map. If you deleted the batch file to run the game or don't have one, then create a new file called
Awesome Test Map.batand write the following in it:C:UDKUDK-AwesomeGameBinariesWin32UDK.exe AwesomeTestMap?GoalScore=0?TimeLimit=0?Game=AwesomeGame.AwesomeGame -log
Run the game and we'll also see the sprite in game.
Good so far, but we usually don't see the sprites of Actor classes in game. If we take a look at
SpriteComponent'sparent class,PrimitiveComponent, then we can see a few properties we may find useful:var(Rendering) const bool HiddenGame; var(Rendering) const bool HiddenEditor; /** If this is True, this component won't be visible when the view actor is the component's owner, directly or indirectly. */ var(Rendering) const bool bOwnerNoSee; /** If this is True, this component will only be visible when the view actor is the component's owner, directly or indirectly. */ var(Rendering) const bool bOnlyOwnerSee; /** If true, bHidden on the Owner of this component will be ignored. */ var(Rendering) const bool bIgnoreOwnerHidden;
These options control when the Component is visible. For this Actor, we want it to be visible in the editor, but not in game, so let's add that to the Component's properties:
defaultproperties
{
Begin Object Class=SpriteComponent Name=MySprite
Sprite=Texture2D'EditorResources.S_Keypoint'
HiddenGame=true
End Object
Components.Add(MySprite)
}
Now when we compile the code, we can see the Component in the editor, but not in game.
Sprites are nice, but let's see if we can find something more useful. We'll add a
SkeletalMeshComponentto ourAwesomeComponentActor. Start by deletingSpriteComponent.Now let's add a
SkeletalMeshComponentto the default properties:defaultproperties { Begin Object Class=SkeletalMeshComponent Name=AwesomeMesh SkeletalMesh=SkeletalMesh 'CH_IronGuard_Male.Mesh.SK_CH_IronGuard_MaleA' End Object Components.Add(AwesomeMesh) }Compile the code and open
AwesomeTestMapin the editor. We can see the skeletal mesh, but it's all dark!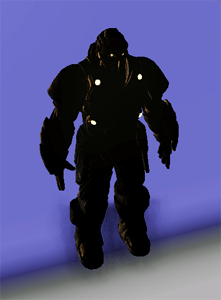
In order for our Component to be able to receive light, we also need to add a
DynamicLightEnvironmentComponent. Any subclass ofPrimitiveComponentcan have a light environment assigned to itsLightEnvironmentvariable, but they're mainly only used forStaticMeshComponentsandSkeletalMeshComponents. Sprites and other components don't really need lighting calculations.Let's add a
DynamicLightEnvironmentComponentto ourAwesomeComponentActor:Begin Object Class=DynamicLightEnvironmentComponent Name=AwesomeLightEnvironment End Object Components.Add(AwesomeLightEnvironment)
As we're not changing any of the variables in the light environment declaring one is as simple as those three lines. However, if for example, we didn't want our mesh to cast shadows, we could write it like this if we wanted:
Begin Object Class=DynamicLightEnvironmentComponent Name=AwesomeLightEnvironment
bCastShadows=false
End Object
Components.Add(AwesomeLightEnvironment)
Now that we have the light environment, we can assign it in our
SkeletalMeshComponent:Begin Object Class=SkeletalMeshComponent Name=AwesomeMesh SkeletalMesh=SkeletalMesh 'CH_IronGuard_Male.Mesh.SK_CH_IronGuard_MaleA' LightEnvironment=AwesomeLightEnvironment End Object Components.Add(AwesomeMesh)
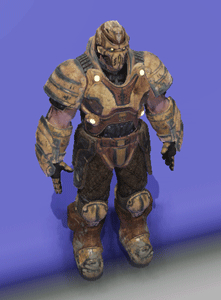
Our
AwesomeComponentActorclass should look like the following code snippet:class AwesomeComponentActor extends Actor placeable; defaultproperties { Begin Object Class=SpriteComponent Name=MySprite Sprite=Texture2D'EditorResources.S_Keypoint' HiddenGame=true End Object Components.Add(MySprite) Begin Object Class=DynamicLightEnvironmentComponent Name=AwesomeLightEnvironment End Object Components.Add(AwesomeLightEnvironment) Begin Object Class=SkeletalMeshComponent Name=AwesomeMesh SkeletalMesh=SkeletalMesh 'CH_IronGuard_Male.Mesh.SK_CH_IronGuard_MaleA' LightEnvironment=AwesomeLightEnvironment End Object Components.Add(AwesomeMesh) }Compile the code and open
AwesomeTestMapin the editor. Now we can see him!
As we can see, Components are primarily used to give our Actors a physical representation. It could just be a sprite whose only use is to let us know where our Actor is in the editor so we can select it, or it could be a character or vehicle mesh that's used in game.
Components are inherited from parent classes just as variables and functions are. But what if we don't want a Component from our parent class? With a function we could just override it in the subclass and empty it out, but with Components there is a function that we can use in the default properties to do this. Taking our example SpriteComponent:
defaultproperties
{
Begin Object Class=SpriteComponent Name=MySprite
Sprite=Texture2D'EditorResources.S_Keypoint'
HiddenGame=true
End Object
Components.Add(MySprite)
}
Removing it in a subclass would only require one line in the subclass' default properties:
Components.Remove(MySprite)
This way we have complete control over our Actor's appearance.
Components being inherited can also create a problem that we need to avoid when working with them. In the previous chapter, we discussed compiler errors, and Components have one specifically for them. Let's take a look.
The problem happens when we declare a Component that has already been created in our parent class. To see it we'll create a new class with a Component:
Create a new file in
Development/Src/AwesomeGame/ClassescalledAwesomeInfo.uc.Open
AwesomeInfo.ucin ConTEXT and write the following code in it:class AwesomeInfo extends Info placeable; defaultproperties { Begin Object Class=SpriteComponent Name=Sprite Sprite=Texture2D'EditorResources.S_Keypoint' HiddenGame=true End Object Components.Add(Sprite) }Compile the code and we'll get the following error:
[0004.20] Log: R:UDKUDK-AwesomeGameDevelopmentSrc AwesomeGameClassesAwesomeInfo.uc(6) : Error, BEGIN OBJECT: The component name Sprite is already used (if you want to override the component, don't specify a class): Begin Object Class=SpriteComponent Name=Sprite
This error is telling us that the name
Spriteis already being used by a Component, and if we take a look atAwesomeInfo'ssuperclass,(Info), we can see it in the default properties there:Begin Object Class=SpriteComponent Name=Sprite Sprite=Texture2D'EditorResources.S_Actor' HiddenGame=TRUE AlwaysLoadOnClient=FALSE AlwaysLoadOnServer=FALSE End Object Components.Add(Sprite)
If we didn't want to override this Component, then we would need to choose a different name for our own. However, if we did want to override this Component and change some variables, then we would just need to remove the
Class= part of our Component:Begin Object Name=MySprite Sprite=Texture2D'EditorResources.S_Keypoint' HiddenGame=true End Object Components.Add(MySprite)
Compiling that code works, and now we would be able to change the properties of that Component inherited from our parent class.
This is another case of a scary looking compiler error with a simple solution, it all depends on whether we wanted to override the Component or not. The only other compiler error dealing with Components has to do with putting variables in one that don't exist for that Component class, so when working with them, make sure the variables you're setting in the Component actually exist.
As our new AwesomeInfo class doesn't have any subclasses, we can mess around with it without worrying about breaking anything, so let's keep working there.
First, we're going to put a
StaticMeshComponentin the class, similar to what we did with ourAwesomeEnemyclass. Let's rewrite ourAwesomeInfoclass to look like the following code snippet:class AwesomeInfo extends Info placeable; defaultproperties { Begin Object Class=StaticMeshComponent Name=MyMesh StaticMesh=StaticMesh'UN_SimpleMeshes.TexPropCube_Dup' Materials(0)=Material'EditorMaterials.WidgetMaterial_Y' Scale3D=(X=0.25,Y=0.25,Z=0.25) End Object Components.Add(MyMesh) bHidden=false }As we're using an emissive material, we don't need to set a light environment for the
StaticMeshComponent. TheInfoclass hasbHiddenset toTrue, we need to change it so we can see theAwesomeInfoin game.Compile the code, and open
AwesomeTestMapin the editor.If the
AwesomeActoris still there, delete it.Select
AwesomeInfoin the Actor tab of the Content Browser (under Actor | Info) and place one in the map near the player start. In its properties, make sure Display | Hidden is unchecked.Save the map and close the editor.
Run the game, and we'll see the
AwesomeInfoActor in the game. Exit the game.Now that the
AwesomeInfoActor is there, we need a way to interact with it. We can do this by declaring a variable of the Component's class. Add this line to the top ofAwesomeInfounder the class declaration:var StaticMeshComponent MyMeshComponent;
Next, we'll add a line at the end of our
Componentdeclaration in the default properties:defaultproperties { Begin Object Class=StaticMeshComponent Name=MyMesh StaticMesh=StaticMesh'UN_SimpleMeshes.TexPropCube_Dup' Materials(0)=Material'EditorMaterials.WidgetMaterial_Y' Scale3D=(X=0.25,Y=0.25,Z=0.25) End Object Components.Add(MyMesh) MyMeshComponent=MyMesh bHidden=false }Setting the variable such that it lets us interact with the component through script. If we wanted to make the
StaticMeshComponentchangeable in the editor, then we could add the parentheses to the variable declaration like the following code:var() StaticMeshComponent MyMeshComponent;
This would be useful in, for example, a decorative class that had some UnrealScript functionality behind it, like to for example, if you wanted to have it explode when shot. You'd want the level designer to be able to set the static mesh that it used along with other properties, so you would make the class user editable.
Now that we have the variable, let's see if we can use it. We'll use some Kismet to toggle the material that's on it. First, let's declare two variables in our class for the materials. Add the following line to the top, under the class declaration line:
var Material GreenMat, RedMat;
Now let's define their default properties:
GreenMat=Material'EditorMaterials.WidgetMaterial_Y'
RedMat=Material'EditorMaterials.WidgetMaterial_X'
Now for the function that will interact with the Component. We'll use the
OnTogglefunction so we can use the Toggle Kismet action on ourAwesomeInfoActor:simulated function OnToggle(SeqAct_Toggle Action) { if(Action.InputLinks[2].bHasImpulse) { if(MyMeshComponent.GetMaterial(0) == GreenMat) MyMeshComponent.SetMaterial(0, RedMat); else MyMeshComponent.SetMaterial(0, GreenMat); } }In this function, we check if the material on the Component is GreenMat, if it is set it to RedMat. If it's not, then we know it's RedMat, so set it to GreenMat.
Compile the code.
Open
AwesomeTestMapin the editor.Click on the
AwesomeInfoActor to select it, and then open the Kismet editor.Right-click and select New Object Var Using AwesomeInfo_0.
Right-click above the object variable and select New Action | Toggle | Toggle.
Connect the Target variable link to the
AwesomeInfo_0object variable.Close the Kismet editor and select Trigger in the Actor tab of the Content Browser.
Double-click to open the Trigger's properties, and uncheck Display | Hidden.
With the Trigger still selected, open the Kismet editor.
Right-click to the left of the other two parts of the sequence and hit New Event Using Trigger_0 | Touch.
With the Trigger event selected, set its Sequence Event | Max Trigger Count to 0.
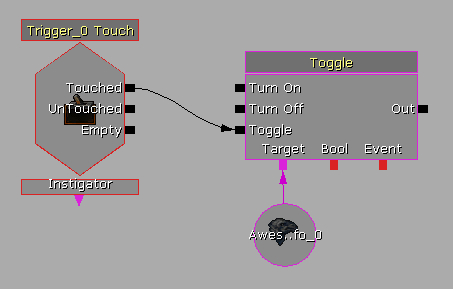
Connect the Touched output of the Trigger event to the Toggle input of the Toggle action. The Kismet sequence should look like the following screenshot:
Run the game, and every time you run over the trigger the
AwesomeInfoActor will toggle its material.
This was a simple example of interacting with Components, but with a little experimentation this could be used for a lot of different purposes. For example, if we had a vehicle that could be modified with different parts, then we could use the SetStaticMesh or SetSkeletalMesh functions to change the component appearance.
Using all the knowledge you've gained from the previous chapters, see if you can create an array of static meshes (choose any you can find in the Content Browser, right-click and select Copy Full Name to Clipboard to get them for your default properties) and toggle through them when the player runs over a Trigger. Remember that the static mesh component's scale is currently set to 0.25, so you may want to change that as well!
We had the hypothetical example of using Components to customize a vehicle, but let's see if we can come up with something more practical for our AwesomeGame. Sprites and meshes aren't the only thing we can use as Components, we can also use lights. Let's see if we can create a toggleable flashlight for our player.
We'll be working in our AwesomePawn class for this, but first, let's set the mood.
Open
AwesomeTestMapin the editor.Select all of the lights, and in their properties set Light | Light Component | Brightness to 0.3.
Rebuild the map by clicking on the Build All button in the top toolbar.
Save the map and close the editor.
Open
AwesomePawn.ucin ConTEXT.We'll need a variable to store our light component, so let's add it:
var SpotLightComponent Flashlight;
Now let's add the Component to the default properties:
Begin Object Class=SpotLightComponent Name=MyFlashlight
bEnabled=true
Radius=1024.000000
Brightness=1.90000
End Object
Components.Add(MyFlashlight)
Flashlight=MyFlashlight
Compile the code and run the game. We have a flashlight!

Now to toggle it. We can use an already existing function for this,
Use(). It's inPlayerController, so we'll have to override it in ourAwesomePlayerControllerclass. If it's already there, then change it to the following code snippet. If not, then write the following code inAwesomePlayerController:exec function Use() { if(AwesomePawn(Pawn) != none) AwesomePawn(Pawn).Flashlight.SetEnabled (!AwesomePawn(Pawn).Flashlight.bEnabled); }Compile the code and run the game. Now when you click on Use (default key is E), the flashlight will toggle!
Now we can see some of the more practical uses of interacting with Components in our classes. Components help keep things organized by avoiding creating unnecessary classes and code. In our flashlight example, the light could be created as a separate Actor that's attached to our Pawn, but keeping it as a Component keeps things simple.
DLLBind gives us a way to interact with code outside of the UDK. It is not a replacement for UnrealScript, but lets us extend the functionality if we find we need to. As an example, as UnrealScript's only interaction with files is through the ini's by way of config variables, creating a save game system might be complicated or easily hacked. By using DLLBind, we can send calls to an external file to take care of that. Let's take a look at a simple DLL interaction.
One thing to note is that currently, DLLBind only works with the 32-bit code. If your ConTEXT or batch files are set up to run the Win64 folder's UDK.exe, then you need to change it to run from Win32 for DLLBind to work. You will get a compiler warning about it if you try to compile with the Win64 UDK.exe.
First up, we need to create the DLL. I've provided one in the files included with the book, but for reference sake, here is the code inside it:
#include "stdafx.h"
#include <stdio.h>
extern "C"
{
__declspec(dllexport) void DLLFunction(wchar_t* s)
{
MessageBox(0, s, L"DLL has been called!", MB_OK);
}
}
Basically, we're creating a function called DLLFunction that takes a wchar_t (equivalent of a string) and pops up an OK box with the string as a message.
Grab
AwesomeDLL.dllfrom the files included with the book and place the.dllin theUDK-AwesomeGameBinariesWin32UserCodefolder.Now for the UnrealScript side of things. We're going to use our
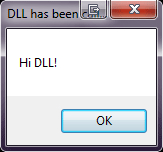
AwesomeInfo.ucActor for this, so let's write it as follows:class AwesomeInfo extends Info placeable DLLBind(AwesomeDLL); dllimport final function DLLFunction(string s); simulated function PostBeginPlay() { local string s; s = "Hi DLL!"; DLLFunction(s); } defaultproperties { }We use DLLBind as a class keyword with the name of the DLL in parentheses. The DLL function must be declared as dllimport final, and we're passing it a string called s (the name of the variable is arbitrary).
In PostBeginPlay, we create a local string, assign it a value, and then call our DLLFunction with it.
Compile the code. If the compiler gives you any warnings about the DLL, make sure it is in the right location and the name is the same as in UnrealScript. Furthermore, make sure you're compiling with the Win32 version of
UDK.exe.We still have the
AwesomeInfoActor placed inAwesomeTestMap, but open the editor to make sure it's there. You may get a warning about a missing component (we've removed them from the default properties), if so just click on OK and save and close the editor.Run the game. We should see a message box pop up as the game starts!
No amount of reading books and tutorial is going to explain everything about UnrealScript to you. The lessons you've learned in this book are enough to get you started, but the best way to learn more is by experimenting with the code on your own. I really can't stress enough the importance of reading through the source code. Object, Actor, Controller, and Pawn are the four most important classes to read through. Reading through these classes, taking a look at the functions and variables they have that you can use, and seeing how they do things will help you understand how everything fits together in the UDK world.
Take your time, and be patient. Unless you're coming into UnrealScript with years of experience in another programming language, don't expect to create an entire game in a few weeks or even months. Personally, it took me a few years to get to the point where I felt comfortable programming an entire game using UnrealScript. Start small, creating variations on the weapons that come with the UDK, or altering the rules of the GameInfo a bit. Don't set your initial goals so high that they'll be unattainable, you'll only become frustrated.
And finally, have fun! You are making video games after all.
There are resources available on the internet to help you along. Here are the ones that I use:
http://udn.epicgames.com/Three/WebHome.html
The Unreal Developer Network is Epic Games' official site for everything related to developing games with the Unreal Engine and the UDK in particular. There are resources here for everything from UnrealScript to level design to the material editor.
The official Epic forums are a great place to get answers to your UDK questions and show off your work. I post there pretty often, so if your question is answered by Angel Mapper you know you've come to the right place!
Another great resource for UnrealScripters. The information here spans all versions of the Unreal Engine going back more than 10 years, so make sure the information you're reading applies to Unreal Engine 3!
http://forums.beyondunreal.com/
The Beyond Unreal forums are another great place to post questions and show off your work.
http://www.unrealplayground.com/forums/
My personal favorite hangout. It's not as active as it used to be, but I'm loyal. UP'ers unite!
I hope you've enjoyed reading this book, and I hope the lessons you've learned here will help you make some awesome UDK games. I always love to hear from fans, so if you'd like you can send me an email at [email protected]. I can't wait to see what you create!
We learned a lot in this chapter about components and DLLBind.
Specifically, we covered:
How Components are created and how to interact with them through script
How to use DLLBind to extend the functionality of the UDK
Other resources you can use in your quest to learn UnrealScript
Now that we've learned about UnrealScript, you're ready to start making games. Have fun!