
Variables are a Programmer's Best Friend
If someone asked if it were raining, or which bag had more apples in it, it would be a pretty simple conversation. But how do you have that same conversation with a computer? In this chapter we're going to take a look at how to use variables and flow control to get our code to react to what's going on in the game.
In this chapter we will:
Discuss different types of variables including booleans, structs, enums, and arrays.
Learn how to set default properties for variables and how to let level designers change them.
Use operators on variables to add, subtract, and more.
Learn about using flow control to do different things under different circumstances.
Let's get started by learning about the different types of variables!
There are many different types of variables. Choosing which one we want to use depends on what we want to do with it. Knowing whether it's raining or not (true/false) is different from say, knowing a character's name ("Big McLargeHuge"). Let's take a look at some of the variables we can use and what they're used for.
Quick, is it raining? Boolean variables, or bool for short, are your basic true/false questions. They're used for everything from asking if the player is driving a vehicle, to if the game has started, to whether or not an object can collide with anything.
It's standard for boolean variables' names to start with a lower case "b". This isn't required, but it's good to follow the guidelines to keep code consistent and easily readable.
Let's take a look at how we can use booleans in our code by adding to our AwesomeActor class.
The first thing we need to do is tell the game about our variable. This is called declaration. Variables need to be declared before they can be used. Our declaration tells the game what type of variable it is as well as its name.
We'll continue with our "is it raining?" scenario for this experiment. In a game we might want to use this variable to check whether we should spawn rain effects or make changes to the lights, and so on.
Variable declaration in UnrealScript happens after the class declaration line, and before any functions. Let's add a variable to AwesomeActor.uc to see if it's raining or not.
Open up our
AwesomeActor.ucclass in ConTEXT and add this line after our class declaration:var bool bIsItRaining;
The
vartells the game that we're declaring a variable. After that, is the variable type, in this case bool for boolean. After that, we tell the game our variable's name,bIsItRaining. Spaces can't be used in variable names, but underscore characters ( _ ) are allowed. The semicolon finishes the line. It's important never to forget the semicolon at the end of the line. Without it the compiler will think any lines after it are part of this line and will look at us confused, as well as give us an error.Now let's add a log to our
PostBeginPlayfunction to see our variable in action. Change thePostBeginPlayfunction to this (don't forget the tilde):function PostBeginPlay() { 'log("Is it raining?" @ bIsItRaining); }This will output our text as well as tell us the value of
bIsItRaining. The@operator combines the text with the value of the variable into one sentence which the log uses. This is known as concatenation and will be discussed later in the chapter.Our
AwesomeActorclass should look like this now:class AwesomeActor extends Actor placeable; var bool bIsItRaining; function PostBeginPlay() { 'log("Is it raining?" @ bIsItRaining); } defaultproperties { Begin Object Class=SpriteComponent Name=Sprite Sprite=Texture2D'EditorResources.S_NavP' HiddenGame=True End Object Components.Add(Sprite) }Now let's compile it. If we get any errors go back and make sure everything is spelled correctly and that we haven't missed any semicolons at the end of lines.
Open the editor and open our test map with the AwesomeActor placed, and run the game. Nothing obvious will happen, but let's close the game and see what our
Launch2.logfile looks like:[0008.59] ScriptLog: Is it raining? False
Our variable is working! As we can see, even without doing anything to it our variable has a default value. When created, booleans automatically start out false. This is a good thing to know when creating variables, especially booleans. It's best to avoid words like Not or No in boolean names to avoid having double negatives. For example, if we had a
boolnamedbIsNotActive, and it was False, would the object be active or not? In this case it would be active, but to avoid confusion it would be better to have a variable namedbIsActiveso it would be easier to tell what it means when it's true or false.Now that we have our bool, how do we change it? Let's add a line to our
PostBeginPlayfunction.bIsItRaining = true;
Now our function should look like this:
function PostBeginPlay()
{
bIsItRaining = true;
'log("Is it raining?" @ bIsItRaining);
}
Compile and run the game again, and we should see the change in the log:
[0007.68] ScriptLog: Is it raining? True
There we go!
We can also change it back just as easily. Let's add a line after our log to change it to false, and then add another log to see the change.
bIsItRaining = false;
'log("Is it raining?" @ bIsItRaining);
Now our PostBeginPlay function should look like this:
function PostBeginPlay()
{
bIsItRaining = true;
'log("Is it raining?" @ bIsItRaining);
bIsItRaining = false;
'log("Is it raining?" @ bIsItRaining);
}
Let's compile and test out the changes!
[0007.65] ScriptLog: Is it raining? True
[0007.65] ScriptLog: Is it raining? False
There isn't much to use in booleans; they're the simplest type of variable in UnrealScript. Don't underestimate them though, they may be simple, but a lot of the variables we'll be working with will be bools. Anything where we only need a simple true/false answer will fall under this category.
Let's make an Int.
Declaring an integer is similar to what we did with bools, so let's replace our bool declaration line with this:
var int NumberOfKittens;
We can see that we have the same
vartext that declares our variable, and then we tell the game that our variable is anint. Finally, we set the name of ourinttoNumberOfKittens.The name of the variable should give a hint as to the difference between ints and floats, and why we need ints to begin with instead of using floats for everything. Since we don't want to hurt any defenseless kittens we should only be using whole numbers to represent the number of them. We don't want to have half of a kitten.
As with our bool variable ints have a default value, in this case zero. We can check this by changing our
PostBeginPlayfunction:function PostBeginPlay() { 'log("Number of kittens:" @ NumberOfKittens); }Now our
AwesomeActor.ucclass should look like this:class AwesomeActor extends Actor placeable; var int NumberOfKittens; function PostBeginPlay() { 'log("Number of kittens:" @ NumberOfKittens); } defaultproperties { Begin Object Class=SpriteComponent Name=Sprite Sprite=Texture2D'EditorResources.S_NavP' HiddenGame=True End Object Components.Add(Sprite) }Let's compile and run the game to test it out!
[0007.63] ScriptLog: Number of kittens: 0
Notice there is no decimal place after the
0; this is what makes an int an int. We use this type of variable for things that wouldn't have fractions, like the number of kills a player has made in deathmatch or the number of people in a vehicle.Now let's see what happens when we change the variable. At the beginning of our
PostBeginPlayfunction add this:NumberOfKittens = 5;
Now the function should look like this:
function PostBeginPlay()
{
NumberOfKittens = 5;
'log("Number of kittens:" @ NumberOfKittens);
}
Let's compile and test!
[0008.07] ScriptLog: Number of kittens: 5
What would happen if we tried to add a fraction to our int? Only one way to find out! Change the line to this and compile:
NumberOfKittens = 5.7;
Well, it compiles, so the engine obviously doesn't care about that
.7of a kitten, but what actually happens? Run the game and then check the log to find out.[0007.99] ScriptLog: Number of kittens: 5
Interesting! We can see that not only did it ignore the fraction, but also truncated it instead of trying to round it up to 6. This is important behavior to remember about ints. Ints will also act this way when we use math on them.
Change the line to this:
NumberOfKittens = 10 / 3;
This should end up as 3.333333, but with the truncation, we can see that it ignores the fraction.
[0007.72] ScriptLog: Number of kittens: 3
Ints are one of the ways the game stores numbers, and we use it when we don't need to worry about fractions. Usually we use them when we're just trying to count something and not trying to perform complex math with them. For that, we would use floats. Let's take a look at those now.
Floats are used when we need something that doesn't have nice neat values, like how far away something is or how accurate a weapon is. They're declared the same way as our bools and ints, so let's make one now.
Replace our int declaration with this:
var float DistanceToGo;
Floats have a default value of 0.0. Let's change our
PostBeginPlayfunction to check this.function PostBeginPlay() { 'log("Distance to go:" @ DistanceToGo); }Compile and test, and our log should look like this:
[0007.61] ScriptLog: Distance to go: 0.0000
We can see that unlike ints, floats will log with a decimal place. Let's see if we can change the value. Add this line to the beginning of our
PostBeginPlayfunction:DistanceToGo = 0.123;
Compile and test, and we should see the fraction show up in the log:
[0007.68] ScriptLog: Distance to go: 0.123
Let's see what happens when we use the same line we did for our int. Change the line to this:
DistanceToGo = 10 / 3;
Compile and test, and our log should look like this:
[0007.68] ScriptLog: Distance to go: 3.3333
Floats are used when we need precision in our numbers, such as calculating the distance between two points or the time remaining in a game. We also use them for complex math since they can have fractions.
No, these are not strings for our kittens to play with. In programming, strings store a series of characters, be it letters, numbers, symbols, or a combination of them. We can use them to hold the name of our character, messages to display on the screen, or the name of the weapon we're holding. Let's take a look at how to use them.
Well, by now we know the drill, so let's declare a string!
Change our float declaration to this:
var string DeathMessage;
By default, strings are empty. We can see this... or not see this, rather, by changing our
PostBeginPlayfunction:function PostBeginPlay() { 'log("Death message:" @ DeathMessage); }Compile and test to see that nothing shows up:
[0007.74] ScriptLog: Death message:
Well that doesn't help much. Let's change that.
Add this line to our PostBeginPlay function:
DeathMessage = "Tom Stewart killed me!";
Now it looks like this:
function PostBeginPlay()
{
DeathMessage = "Tom Stewart killed me!";
'log("Death message:" @ DeathMessage);
}
Compile and run the code, and check the log.
[0007.67] ScriptLog: Death message: Tom Stewart killed me!
There's not much to strings either, and they're not used nearly as much as other types of variables. They're mostly used for things that need to be made readable to the player like character or weapon names, or messages on the HUD. A few are used for other things like telling the game which level to load.
Enumerations (enums for short) are an odd variable type. They function as a list of possible values, and each value can be represented by its name or number. This allows them to be put in an order and compared with other values much like integers. As an example, if we had an enum called Altitude, we might write it like this:
enum EAltitude
{
ALT_Underground,
ALT_Surface,
ALT_Sky,
ALT_Space,
};
As we can see from the order these are in, ALT_Space would be "greater than" ALT_Surface if compared to it. Sometimes we might use enums where we don't care about the order. An example of this would be the EMoveDir enum from Actor.uc:
enum EMoveDir
{
MD_Stationary,
MD_Forward,
MD_Backward,
MD_Left,
MD_Right,
MD_Up,
MD_Down
};
This enum describes the directions an actor can be moving, but in this case we only care that the variable can only have one value. The order of the elements doesn't matter in this case.
Enum values can also be used as bytes. If we looked at our example enum, this means that they would have the following values:
ALT_Underground = 0
ALT_Surface = 1
ALT_Sky = 2
ALT_Space = 3
Now the order makes sense, and we know why we can compare them to each other like integers. But then why not just use ints instead of enums to represent the values? For readability, mostly. Would you rather see that an actor's Altitude variable has been set to ALT_Sky, or 2?
That's all well and good, but how do we use them? Let's set one up in our AwesomeActor class.
Add the enum below our class line.
enum EAltitude
{
ALT_Underground,
ALT_Surface,
ALT_Sky,
ALT_Space,
};
The E isn't necessary, but it helps to follow standard guidelines to make things easier to read.
Now we need to declare a variable as that enum type. This is similar to declaring other variables.
var EAltitude Altitude;
Now we have a variable,
Altitude, that's been declared as the enum typeEAltitude. Enums default to the first value in the list, so in this case it would beALT_Underground. Let's see if we can change that in ourPostBeginPlayfunction.function PostBeginPlay() { Altitude = ALT_Sky; 'log("Altitude:" @ Altitude); }Now our class should look like this:
class AwesomeActor extends Actor
placeable;
enum EAltitude
{
ALT_Underground,
ALT_Surface,
ALT_Sky,
ALT_Space,
};
var EAltitude Altitude;
function PostBeginPlay()
{
Altitude = ALT_Sky;
'log("Altitude:" @ Altitude);
}
defaultproperties
{
Begin Object Class=SpriteComponent Name=Sprite
Sprite=Texture2D'EditorResources.S_NavP'
HiddenGame=True
End Object
Components.Add(Sprite)
}
Compile and test, and we'll see the enum show up in the log:
[0007.69] ScriptLog: Altitude: ALT_Sky
To see how they compare to each other, let's add another log after our first one:
'log("Is ALT_Sky greater than ALT_Surface?");
'log(EAltitude.ALT_Sky > EAltitude.ALT_Surface);
Doing a comparison like this will come back with a boolean true or false for the answer, which we'll see in the log when we compile and test:
[0007.71] ScriptLog: Altitude: ALT_Sky
[0007.71] ScriptLog: Is ALT_Sky greater than ALT_Surface?
[0007.71] ScriptLog: True
There we go!
Enums aren't normally something you'd start using when you're new to UnrealScript, but knowing how they work can definitely save time and jumbled code later on. If you were making a card game for example, representing the four different suits as an enum would make it a lot easier to read than if you had numbers representing them. They're not used often, but when they are they're a great help.
Now let's take a look at some more complicated uses of variables. Let's say we have several baskets full of kittens, and we wanted to keep track of how many were in each basket. We could make a variable for each basket like this:
var int Basket1;
var int Basket2;
var int Basket3;
But that would get really messy if we had dozens to keep track of. How about if we put them all on one line like this?
var int Basket1, Basket2, Basket3;
UnrealScript lets us put more than one variable declaration on one line like that, as long as they're the same type. It saves space and keeps things organized. But in this case we'd run into the same problem if we had dozens of baskets. For something like this, we'd need to use an array.
Arrays act as a collection of variables, and when we declare one you'll see why.
Change our variable declaration line to this:
var int Baskets[4];
This will create an array of four baskets. That's easy enough, but how do we change their values?
In our
PostBeginPlayfunction, add these lines:Baskets[0] = 2; Baskets[1] = 13; Baskets[2] = 4; Baskets[3] = 1;
One important thing to remember about arrays is that they start at 0. Even though we have 4 elements in our array, since it starts at 0 it only goes up to 3. If we tried to add a line like this to our function:
Baskets[4] = 7;
We would get an error.
Let's go ahead and add the line to see what happens. It will compile just fine, but when we test it in the game we will see the error in the log file:
[0007.53] ScriptWarning: Accessed array 'AwesomeActor_0.Baskets' out of bounds (4/4)
AwesomeActor UEDPCAwesomeMap.TheWorld:PersistentLevel.AwesomeActor_0
Function AwesomeGame.AwesomeActor:PostBeginPlay:0046
The out of bounds error lets us know that we tried to access an element of the array that doesn't exist. It takes a bit of getting used to; just remember that the first element of our array will always be 0.
Let's take that line out of our function, and change the log line to look like this:
'log("Baskets:" @ Baskets[0] @ Baskets[1] @ Baskets[2] @ Baskets[3]);Now our
PostBeginPlayfunction should look like this:function PostBeginPlay() { Baskets[0] = 2; Baskets[1] = 13; Baskets[2] = 4; Baskets[3] = 1; 'log("Baskets:" @ Baskets[0] @ Baskets[1] @ Baskets[2] @ Baskets[3]); }Let's compile and test. In our log file we should see this:
[0007.53] ScriptLog: Baskets: 2 13 4 1
Success!
Now for something a bit more complicated. We can also access the elements of our array with an int. Let's see if we can do that. Let's declare an int:
var int TestNumber;
Then set it at the beginning of
PostBeginPlay:TestNumber = 2;
Now let's access the array with it and log the result.
'log("Test Basket:" @ Baskets[TestNumber]);So now our class should look like this:
class AwesomeActor extends Actor
placeable;
var int Baskets[4];
var int TestNumber;
function PostBeginPlay()
{
TestNumber = 2;
Baskets[0] = 2;
Baskets[1] = 13;
Baskets[2] = 4;
Baskets[3] = 1;
'log("Test Basket:" @ Baskets[TestNumber]);
}
defaultproperties
{
Begin Object Class=SpriteComponent Name=Sprite
Sprite=Texture2D'EditorResources.S_NavP'
HiddenGame=True
End Object
Components.Add(Sprite)
}
Now compile and test, then look at the log.
[0007.99] ScriptLog: Test Basket: 4
We can see that it logged the value of Basket[2], which is 4.
We can start to see how powerful arrays can be. We can make an array out of any variable type except for booleans, but there are ways around that. If we used an array of ints and used 0 for false and 1 for true, it could act as a boolean array.
Now we know how to make an array with a specific number of elements, but what if we don't know the number of baskets, or want to change how many baskets there are while the game is running? In that case we'll want to use a dynamic array.
Dynamic arrays are declared a bit differently than static arrays. Let's declare one now.
Change our variable declaration line to this:
var array<int> Baskets;
As we can see, with dynamic arrays we don't put a number anywhere in it; it can be whatever size we need it to be. By default they're completely empty, so if we tried to log any of its values we would get an out of bounds warning similar to our experiment with static arrays.
We can, however, assign values any time we want, so let's add this line to our
PostBeginPlayfunction:Baskets[3] = 9;
Then log the value like this:
'log("Baskets:" @ Baskets[3]);Now our function should look like this:
function PostBeginPlay()
{
Baskets[3] = 9;
'log("Baskets:" @ Baskets[3]);
}
Compile and test, and we can see that the value logs fine, and we didn't get any warnings.
[0007.82] ScriptLog: Baskets: 9
When we assign a value, the size of the array automatically
changesto that value. As with before, if we tried toaccess Baskets[4]we would get an out of bounds warning.Now that we have our dynamic array, there are a few things we need to know about so we can use them properly. The first thing that would be nice to know is the size of the array. Just how many baskets are there anyway? To find out we can use the length of the array.
Change our log line to look like this:
'log("Basket array length:" @ Baskets.length);Now our function looks like this:
function PostBeginPlay()
{
Baskets[3] = 9;
'log("Basket array length:" @ Baskets.length);
}
Compile and test, and check the log file.
[0007.67] ScriptLog: Basket array length: 4
Remember that arrays start out at 0, so when we assigned a value to Basket[3] it's the fourth element in the array.
Now that we know the length of the array, we can use it to add values to the end of it. In our example, the length of the array is 4, with
Baskets[3]being the last one. If we wanted to add another one to the array, it would beBaskets[4]. Since 4 is the length of our array right now, we would simply put that in the index.Let's add these three lines to the end of our function:
Baskets[Baskets.length] = 23;
'log("Basket array length:" @ Baskets.length);
'log("Last basket:" @ Baskets[Baskets.length - 1]);
Our function should look like this now:
function PostBeginPlay()
{
Baskets[3] = 9;
'log("Basket array length:" @ Baskets.length);
Baskets[Baskets.length] = 23;
'log("Basket array length:" @ Baskets.length);
'log("Last basket:" @ Baskets[Baskets.length - 1]);
}
The value 23 will now be assigned to the next element in the array, which now expands to five elements.
Remember that the length is one higher than the last index, so to see what the last value is we need to subtract 1 from the array length. In this case the length would be 5, so to check the last one, Basket[4], we need to use 5-1.
Compile and test, then check the log.
[0008.46] ScriptLog: Basket array length: 4
[0008.46] ScriptLog: Basket array length: 5
[0008.46] ScriptLog: Last basket: 23
And it works! The first line in our function changes the array length to 4 by giving Basket[3] a value of 9. Next we assign a value of 23 to Baskets.length, which is 4, making Baskets[4] = 23. This also increases the size of the array to 5 which is shown in the log.
Dynamic arrays are very useful when we don't know how many elements we need ahead of time, or the number of elements in the array needs to change during gameplay. As an example, the player's weapons could be held in an array of Actor classes, since they may pick up or lose some during the game.
Let's say we had an array and PostBeginPlay set up like this:
var int TestArray[3];
var array<int> CopyArray;
function PostBeginPlay()
{
TestArray[0] = 9;
TestArray[1] = 5;
TestArray[2] = 6;
}
Without using numbers, how would we copy the TestArray values into the CopyArray? Think about our experiment on adding to the end of arrays for hints, and when you are ready; check the following code for the answer.
var int TestArray[3];
var array<int> CopyArray;
function PostBeginPlay()
{
TestArray[0] = 9;
TestArray[1] = 5;
TestArray[2] = 6;
CopyArray[CopyArray.length] = TestArray[CopyArray.length - 1];
CopyArray[CopyArray.length] = TestArray[CopyArray.length - 1];
CopyArray[CopyArray.length] = TestArray[CopyArray.length - 1];
}
If you tried TestArray[CopyArray.length] at first, you probably noticed an out of bounds error in the log. Why is that? Well, an important thing to know about dynamic arrays is that assigning a value to the end of the array increases the size of the array first, before assigning the value. By the time the code reaches the right-hand side of the equals sign, the array's length has already increased by 1.
The best way to describe a struct would be to call it a variable holding a bunch of other variables. It can be called a collection of variables. As an example, let's take a look at one from Object.uc:
struct Cylinder
{
var float Radius, Height;
};
As we can see, this struct contains two floats, Radius, and Height. Structs themselves can be used as variables, like this:
var Cylinder MyCylinder;
To change variables inside a struct, we would use a period in between the struct name and the variable name like this:
MyCylinder.Radius = 50;
Structs can contain variables, arrays, and even other structs. Let's take a closer look and make our own struct to learn more about them.
Going back to our basket of kittens example, what if there were other things in the basket besides kittens? How would we represent them?
Let's create a struct at the top of our AwesomeActor class and put a few things in it.
struct Basket
{
var string BasketColor;
var int NumberOfKittens, BallsOfString;
var float BasketSize;
};
Now we have two types of items in the basket as well as some variables to describe the basket itself.
Now we need a variable of that struct so we can use it:
var Basket MyBasket;
Now we can change the values in our
PostBeginPlayfunction.function PostBeginPlay() { MyBasket.NumberOfKittens = 4; MyBasket.BasketColor = "Yellow"; MyBasket.BasketSize = 12.0; MyBasket.BallsOfString = 2; }That seems easy enough to handle. Let's try something a bit more complex.
I heard you like structs, so we'll Inception-ize it by adding a struct inside a struct.
struct SmallBox
{
var int Chocolates;
var int Cookies;
};
Now let's put a box inside our basket struct.
struct Basket
{
var SmallBox TheBox;
var string BasketColor;
var int NumberOfKittens, BallsOfString;
var float BasketSize;
};
Now our class should look like this:
class AwesomeActor extends Actor
placeable;
struct SmallBox
{
var int Chocolates;
var int Cookies;
};
struct Basket
{
var SmallBox TheBox;
var string BasketColor;
var int NumberOfKittens, BallsOfString;
var float BasketSize;
};
var Basket MyBasket;
function PostBeginPlay()
{
MyBasket.NumberOfKittens = 4;
MyBasket.BasketColor = "Yellow";
MyBasket.BasketSize = 12.0;
MyBasket.BallsOfString = 2;
}
defaultproperties
{
Begin Object Class=SpriteComponent Name=Sprite
Sprite=Texture2D'EditorResources.S_NavP'
HiddenGame=True
End Object
Components.Add(Sprite)
}
Now we're getting somewhere. How would we access the struct inside a struct? Using the same method as before, we would access the box like this:
MyBasket.TheBox
So accessing variables inside the box struct would look like this:
MyBasket.TheBox.Chocolates = 2;
Easy enough. It would work the same way with arrays. Let's say we added a static array of fortune cookie messages to our basket. Our new struct would look something like this:
struct Basket
{
var string Fortunes[4];
var SmallBox TheBox;
var string BasketColor;
var int NumberOfKittens, BallsOfString;
var float BasketSize;
};
To assign a value to one of them, we would use the same method as before:
MyBasket.Fortunes[2] = "Now you're programming!";
Structs are a powerful tool in UnrealScript, and they're used extensively in the source code. A lot of the code you'll make will involve structs. As an example, think about the one thing that every actor in the game has: A location. How is an actor's location stored? A variable appropriately called Location, which is declared as a 3D position using a Vector variable. If we look in Actor.uc, we can see how a Vector is defined:
struct immutable Vector
{
var() float X, Y, Z;
};
This leads nicely into our next topic...
Since we already know that an actor's Location is a vector, let's play around with our AwesomeActor's location.
First we'll declare a vector of our own at the top of our class.
var vector LocationOffset;
Vectors have their X, Y, and Z values set to 0.0 by default. We'll give ours a new value and add that to our actor's current location in our
PostBeginPlayfunction.function PostBeginPlay() { LocationOffset.Z = 64.0; SetLocation(Location + LocationOffset); }When used as a location, the Z float inside a vector represents the up and down axis. Making the values of Z greater means moving it up, lower or more negative means moving it down. In our example we're going to move the actor up 64 units. We use the function in the second line,
SetLocation, to tell the game to move ourAwesomeActor. Since we already know its current location with the Location variable, we just add ourLocationOffsetto move it up 64 units.There's one thing we need to do before we test this out. When we first created our
AwesomeActor, we made it invisible in game. Let's change that so we can see what happens. In the default properties of our actor, delete this line:HiddenGame=False
Now our
AwesomeActorshould look like this:class AwesomeActor extends Actor placeable; var vector LocationOffset; function PostBeginPlay() { LocationOffset.Z = 64.0; SetLocation(Location + LocationOffset); } defaultproperties { Begin Object Class=SpriteComponent Name=Sprite Sprite=Texture2D'EditorResources.S_NavP' End Object Components.Add(Sprite) }Let's compile and test! In the editor, we can see our
AwesomeActorstill halfway stuck in the floor:
Run the game from the editor, and we can see that our code has worked! The
AwesomeActorhas moved up:
That seems like a bit too much code just to add two vectors together. Luckily, there's a much simpler way to use vectors to do what we want here. Vectors can be created and assigned a value at the same time that we're using it in code, like this:
vect(X value, Y value, Z value)
So if we just wanted to move our actor up 64 units, we could do it all on one line.
Let's get rid of our
LocationOffsetvariable line and change ourPostBeginPlayto look like this:function PostBeginPlay() { SetLocation(Location + vect(0,0,64)); }Compile and test, and we get the same result!
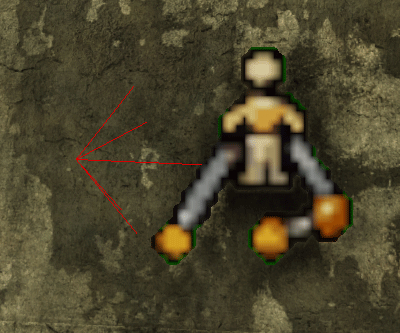
Another useful function we can use with vectors is called VSize. If you remember your old geometry lessons, Pythagoras' Theorem lets us find the hypotenuse of a triangle by using the two sides. We can use a 3D version of the same equation to find the length of our vector.

With that diagram, the length of Vector would be expressed as this:
Length = √(X² + Y² + Z²)
With VSize, all of that is done for us:
Length = VSize(Vector)
So with that in mind, let's find out how far our
AwesomeActoris from the world origin (0,0,0).Let's change our
PostBeginPlayfunction to this:function PostBeginPlay() { 'log("Distance:" @ VSize(Location)); }Compile and test, and the answer shows up in the log!
[0007.88] ScriptLog: Distance: 2085.2571
If we wanted to find out the distance between two actors, we would use their locations like this:
Distance = VSize(A.Location - B.Location);
The order doesn't matter inside the VSize, we could also find the distance like this:
Distance = VSize(B.Location - A.Location);
Vectors are the struct we'll be using the most in UnrealScript, especially since they're used to hold an actor's Location. As we can see from the VSize and vect examples, vectors go beyond being just a struct and have their own functions dedicated exclusively to them.
One other variable to discuss also has functions dedicated to it.
In the same way vectors are defined as a struct, rotators are as well.
struct immutable Rotator
{
var() int Pitch, Yaw, Roll;
};
Rotators define a rotation in 3D space. To visualize it it helps to think of an airplane flying in the sky.

Pitch would be the airplane tilting forwards and backwards to climb or descend. Roll would be the plane tilting sideways, and Yaw would be the plane rotating horizontally, like a spinning frisbee.
In addition to a Location vector, every actor in the game has a rotator variable called Rotation that tells the game what direction it's facing. Rotating a wall in the editor changes that static mesh's rotation value. The player's view rotation is held in a rotator. They're not used as often as vectors, but they're obviously still important. Let's take a look at them.
Before we use rotators on our AwesomeActor, we need to add some visual clue to let us know that it's actually rotating. To do that we're going to add another bit to our default properties like the sprite, but this time it will be an arrow we'll be able to see in the editor.
Below the sprite in the default properties, add this:
Begin Object Class=ArrowComponent Name=Arrow
End Object
Components.Add(Arrow)
We're going to log our actor's current rotation, so inside our
PostBeginPlayadd this:'log("Rotation:" @ Rotation);Our class should now look like this:
class AwesomeActor extends Actor
placeable;
function PostBeginPlay()
{
'log("Rotation:" @ Rotation);
}
defaultproperties
{
Begin Object Class=SpriteComponent Name=Sprite
Sprite=Texture2D'EditorResources.S_NavP'
End Object
Components.Add(Sprite)
Begin Object Class=ArrowComponent Name=Arrow
End Object
Components.Add(Arrow)
}
Compile and take a look in the editor. Our actor now has an arrow to indicate its current rotation.
By default we know its current rotation is going to be (0,0,0), so let's rotate it in the editor. Click on the
AwesomeActorto select it, and then press the Space bar once to change to the rotation tool.
Now click and hold anywhere on the blue part of the rotation tool. We're going to change our actor's Yaw, so move it as close to 90 degrees as you can get. Don't worry if it's not perfect.
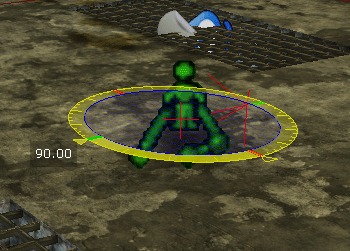
Save our map, and then run it in the game. Exit and check the log for our rotation value.
[0008.33] ScriptLog: Rotation: 0,16160,0
It's logging, but why is the value so high? That's definitely not 90. Internally, the ints that make up rotators are 32 bits and have a range of 0 to 65535. Therefore, in Unreal's unit system, 360 degrees = 65536. That would make 90 degrees = 16384, which is close to what was logged.
Rotators can be created the same as we did with vectors. You can make a var like this:
var rotator MyRot;
And then change the individual components in the PostBeginPlay function.
MyRot.Yaw = 2000;
You could also create a rotator as it's being used, like we did with vectors. The names of the functions we use for this are specific to rotators though:
SetRotation(Rotation + rot(0,0,4000));
Rotators, like vectors, are important structs to be examined on their own. Every actor in the game has a rotation, and the most noticeable use of rotators is in the player's camera, to tell the game where we're looking.
We've talked a lot about variables in this chapter. Next we're going to discuss ways we can change how they work.
Now we know what different types of variables are available to us and how to work with them. There are a few different variable properties that we need to know about to be able to use them to their fullest, first up, default properties.
We know how to change a variable's value in our PostBeginPlay function, and that integers for example start out at 0 by default. But is there a better way to set an initial value? We've used it before, so you may have guessed that the default properties block at the end of our class is where we do this. Let's take a look at an example.
Let's start by defining some variables in our
AwesomeActorclass.var string MyName; var int NumberOfKittens; var float DistanceToGo;
In our default properties block, we can give these variables initial values. These are assigned before any of the code is run.
Defaultproperties
{
MyName="Rachel"
NumberOfKittens=3
DistanceToGo=120.0
}
In our
PostBeginPlayfunction, instead of changing the values we'll just log them to see the default properties in action.function PostBeginPlay() { 'log("MyName:" @ MyName); 'log("NumberOfKittens:" @ NumberOfKittens); 'log("DistanceToGo:" @ DistanceToGo); }Now our class should look like this:
class AwesomeActor extends Actor
placeable;
var string MyName;
var int NumberOfKittens;
var float DistanceToGo;
function PostBeginPlay()
{
'log("MyName:" @ MyName);
'log("NumberOfKittens:" @ NumberOfKittens);
'log("DistanceToGo:" @ DistanceToGo);
}
defaultproperties
{
MyName="Rachel"
NumberOfKittens=3
DistanceToGo=120.0
Begin Object Class=SpriteComponent Name=Sprite
Sprite=Texture2D'EditorResources.S_NavP'
End Object
Components.Add(Sprite)
}
Now let's look at the log.
[0008.73] ScriptLog: MyName: Rachel
[0008.73] ScriptLog: NumberOfKittens: 3
[0008.73] ScriptLog: DistanceToGo: 120.0000
Arrays have a slightly different syntax in the default properties. When used in code we use brackets to define the index, like MyArray[2]. In the default properties, we use parentheses instead.
MyArray(0)=3
MyArray(1)=2
You'll also notice that none of the lines in the default properties block have a semicolon at the end. The default properties block is the only place where we don't use them. You'll also notice that there are no spaces before or after the equal sign. This is also a quirk of the default properties block. If the formatting isn't correct you may get a compiler error or even worse, it may compile but ignore your default properties altogether. Make sure to follow these guidelines for the formatting, including having the curly brackets on their own lines. Some programmers like to have the opening curly bracket on the same line, but with UnrealScript's
defaultpropertiesblock, this would cause it to ignore all of the default properties.Moving on! For structs, we define the default properties right inside the struct, not in the
defaultpropertiesblock. So taking our example struct from earlier, we would define the defaults for it like this:struct Basket { var string BasketColor; var int NumberOfKittens, BallsOfString; var float BasketSize; structdefaultproperties { BasketColor="Blue" NumberOfKittens=3 BasketSize=12.0 } };
You may notice that I didn't define a default for BallsOfString, and that's perfectly fine. Any variable you don't make a default for, will use that variable type's default; in that case BallsOfString would default to 0.
This is good for structs of our own making, but what about predefined ones like vectors and rotators? Once we declare a variable of those types we can change their default properties in our default properties block, all on the same line. If we had a vector called MyVector for example, the syntax for the default property would look like this:
MyVector=(X=1.0,Y=5.3,Z=2.1)
This is true for any struct where we've declared a variable of that struct type.
The defaultproperties block is a convenient place to keep the defaults for our variables, we could use functions like PostBeginPlay to set values, but it's cleaner and more convenient to have them all in one place. In addition, even if we change the variable during play we can always find out the default value by using this code:
'log(default.BasketSize);
If we wanted to get rid of any changes we've made, we would just reset the variable to its default.
BasketSize = default.BasketSize;
This one's simple. To make a variable changeable in the editor, add a set of parentheses after var, like this:
var() int MyEditableInt;
Add that variable to our class, then compile and open the editor. Double-click on the AwesomeActor to open up its properties, and we'll see the variable show up.

We can also put it in a specific category if we wanted to separate our variables into groups. Let's see what it would look like in the Physics tab.
var(Physics) int MyEditableInt;
Let's compile and take a look.

The level designers don't need to know about every variable an actor has, but some may need to be exposed this way. This is how lights have their brightness and color changed, for instance. When creating an actor class, it's best to give some thought to what a level designer might need to change and give them access to it.
That's good for the level designer, but what about the player? Sometimes we want to let the player themselves change a variable. For instance, which hand the character holds the weapon in or the amount of bob as the player walks. We briefly discussed this in the first chapter, but now we'll cover it more in depth. Remember the INI files in the Config folder?
To let the game know that our class needs to save config variables, first we need to let it know which file to use.
class AwesomeActor extends Actor
placeable
config(Game);
This tells the game that our class' config variables will be defined in the Game ini files as opposed to Engine or Input and so on.
Now, let's make a config variable.
var config int MyConfigInt;
Config vars can have parentheses to let level designers change them, but they can NOT be put in the default properties block. Doing so will give a compiler error. Instead, we define their default properties in the INI file we specified. Since we used
Game, we would put the default inDefaultGame.ini. Let's open that up now.In
DefaultGame.iniwe can see a bunch of different sections, starting with a line surrounded by brackets. The inside of these brackets specifies the package and class that the section is defining defaults for, like this:[Package.Class]
In our case our package name is
AwesomeGame, and the class we need to define isAwesomeActor. At the end ofDefaultGame.ini, make a new section surrounded by brackets.[AwesomeGame.AwesomeActor]
Right after that we can define any default values we need.
MyConfigInt=3
Once we're done, our section should look like this:
[AwesomeGame.AwesomeActor]
MyConfigInt=3
Let's see if it works! In
AwesomeActor.uc, changePostBeginPlayto logMyConfigInt.var config int MyConfigInt; function PostBeginPlay() { 'log("MyConfigInt:" @ MyConfigInt); }Compile and run, then check the log file.
[0008.66] ScriptLog: MyConfigInt: 3
Knowing what you know about different ways to define default values for variables, what do you think would take precedence: The config file or a value set by the level editor? Try adding a variable that's both configurable and editable and logging the result.
If we look in UDKGame.ini, we can see that the variable has shown up there as well. Remember that the UDK.ini files are built from the Default.ini files, and instead of changing the Default.ini files, the player and the game work with the UDK.ini ones. That way the game always has a fail safe with the Default.ini files. If the player or a setting menu in the game changed MyConfigInt to 5 for example, then the player changed their mind and used a settings menu to reset everything to the default value, we would be able to do that by using the Default.ini value for that variable.
Now that we've learned about the different types of variables and ways to set their values, let's take a look at some common operators we can use on our variables.
Beyond simple arithmetic there are many ways of dealing with our variables, each with its own syntax and effects on the different variable types. Let's discuss some of the most commonly used operators and variable functions.
Addition ( + ), subtraction ( - ), multiplication ( * ), and division ( / ) work on all of the variable types we discussed, but have different effects on them. For floats and ints they work as we'd expect, but with multiplication and division, keep in mind the truncating that happens when working with ints.
It's also possible to use floats and ints together.
As an example, take a look at this code.
var float Float1, Float2;
var int Int1;
function PostBeginPlay()
{
Float2 = Int1 / Float1;
'log("Float2:" @ Float2);
}
defaultproperties
{
Int1=5
Float1=2.0
}
We can divide an int by a float or vice versa, and we get the result we expect:
[0008.10] ScriptLog: Float2: 2.5000
However, if we divide an int by an int and assign it to a float, what would we expect the result to be?
Let's take a look at this code:
var float Float1;
var int Int1, Int2;
function PostBeginPlay()
{
Float1 = Int1 / Int2;
'log("Float1:" @ Float1);
}
defaultproperties
{
Int1=5
Int2=2
}
With that it looks like we'd expect the same result. Let's take a look at the log:
[0007.66] ScriptLog: Float1: 2.0000
When dividing ints, the truncating happens before assigning the result, even if it's a float. Depending on what we're doing this may be what we want, but it's good to keep that in mind.
Two other operators that can be used for simple math are increment ( ++ ) and decrement ( -- ).
Int1 = 5;
Int1++;
'log("Int1" @ Int1);
This would give us 6 in the log.
For vectors and rotators, the arithmetic works with each element of the struct individually. For example, with the following code:
var vector Vect1, Vect2, VectResult;
function PostBeginPlay()
{
VectResult = Vect1 + Vect2;
'log("VectResult:" @ VectResult);
}
defaultproperties
{
Vect1=(X=1.0,Y=4.5,Z=12.0)
Vect2=(X=2.0,Y=4.0,Z=8.0)
}
We get the following result in the log:
[0007.74] ScriptLog: VectResult: 3.00,8.5,20.00
As we can see, each individual element has been worked with separately. X added to X, Y to Y, and Z to Z.
Vectors can also be multiplied or divided by floats and ints. This has the effect of changing the vector's VSize while keeping the direction the same.
The basic arithmetic operators are simple stuff, but when working with different types of variables it's important to remember how they'll respond to the operators.
You may be asking yourself, when will this ever come in handy? Let's say you wanted to know how many bullets a player had in their gun, but you only had the gun's clip size and the player's total number of bullets to work with. A line of code like this would work:
CurrentBullets = TotalBullets % ClipSize;
Instead of having to do any complicated math to figure it out you would be able to use modulo to save some headaches.
Comparing one variable to another is one of the essential tools of any programming language, and UnrealScript is no different. Comparisons give you a boolean true or false. If we wanted to know if two variables were the same, we would use a double equal sign.
Variable1 == Variable2
Why a double equal sign? What does it mean? Well, UnrealScript needs a way to assign variables as well as compare them. Using a single equal sign denotes assignment, like this:
Variable1 = 5;
We need a different operator for comparison, so UnrealScript uses the double equal sign. Let's write some example code.
Let's take a look at two ints and the various comparison operators we can use on them.
var int Int1, Int2;
function PostBeginPlay()
{
'log(Int1 == Int2);
}
defaultproperties
{
Int1=5
Int2=5
}
Setting both of them to the same value and using the equal comparison gives us
Truein the log:[0007.79] ScriptLog: True
If the variables weren't exactly the same, we would get False.
The opposite of this comparison is "Not Equal", which is denoted by an exclamation point followed by an equal sign. If we wanted to know if two variables weren't the same, we would use this.
var int Int1, Int2;
function PostBeginPlay()
{
'log(Int1 != Int2);
}
defaultproperties
{
Int1=3
Int2=5
}
Since they have different values, we'll get
Truein the log again:[0007.70] ScriptLog: True
Equal or not equal also apply to vectors and rotators. Each element in those structs is compared to each other, and it will return
Falseif any of them are different.For greater than or less than, we would simply use those symbols.
var int Int1, Int2;
function PostBeginPlay()
{
'log(Int1 < Int2);
'log(Int1 > Int2);
}
defaultproperties
{
Int1=3
Int2=5
}
And the log:
[0007.60] ScriptLog: True
[0007.60] ScriptLog: False
The same works for "greater than or equal to" and "less than or equal to", we simply follow it with an equal sign:
var int Int1, Int2;
function PostBeginPlay()
{
'log(Int1 <= Int2);
'log(Int1 >= Int2);
}
defaultproperties
{
Int1=5
Int2=5
}
The log for this:
[0007.45] ScriptLog: True
[0007.45] ScriptLog: True
Greater than or less than do not apply to vectors or rotators and the compiler will give an error if we try to use them.
A special comparison operator for floats and strings is the "approximately equal to" operator, denoted by a tilde followed by an equal sign ( ~= ). For floats, it returns true, if they are within 0.0001 of each other, useful for making sure complicated equations don't have to return the exact same result, just close enough to account for rounding errors.
var float Float1, Float2;
function PostBeginPlay()
{
'log(Float1 ~= Float2);
}
defaultproperties
{
Float1=1.0
Float2=1.000001
}
This returns
Truein the log:[0007.94] ScriptLog: True
For strings, the "approximately equal to" operator is a case-insensitive comparison.
var string String1, String2;
function PostBeginPlay()
{
'log(String1 ~= String2);
}
defaultproperties
{
String1="STRING TEST"
String2="string test"
}
The log:
[0007.74] ScriptLog: True
As long as the letters are the same it will return true even if different letters are capitalized.
Comparisons, like arithmetic operators, are one of the basic things to know about a programming language. They'll be used all the time, and like arithmetic it's good to know how they interact with each variable type.
In logical operators, AND is expressed by two "and" signs (&&), OR by two vertical bar or "pipe" characters (||), and NOT is expressed using an exclamation point (!). To understand logical operators, think about how we use those words in sentences. As an example, take a look at this sentence:
If it's not raining and we have enough money...
Expressing this in code with logical operators would look like this:
!bRaining && CurrentMoney > RequiredMoney
We can see the use of the NOT and AND logical operators. NOT raining AND current money > required money. Let's take a look at another example:
Tuesday or Thursday
In code that would look like this:
Day == "Tuesday" || Day == "Thursday"
Let's put our first example in code.
var bool bRaining;
var float CurrentMoney, RequiredMoney;
function PostBeginPlay()
{
'log(!bRaining && CurrentMoney > RequiredMoney);
}
defaultproperties
{
CurrentMoney=20.0
RequiredMoney=15.0
}
Remembering that bools are false by default, let's take a look at the log:
[0007.94] ScriptLog: True
Even though
bRainingisFalse, we're asking the code if it's NOT raining, which is True. You can see why naming booleans is important now. If our variable were calledbNotRaining, working with logical operators would get messy pretty quickly.Let's look at our second example.
var string Day;
function PostBeginPlay()
{
'log(Day == "Tuesday" || Day == "Thursday");
}
defaultproperties
{
Day="Monday"
}
Since the day variable is neither of those two, we'll get False in the log:
[0007.79] ScriptLog: False
One final operator to discuss is the EXCLUSIVE OR, denoted by two carets ( ^^ ). This will return true if one and only one of our statements is true. Let's look at the following code:
var string Day, Month;
function PostBeginPlay()
{
'log(Day == "Tuesday" ^^ Month == "January");
}
defaultproperties
{
Day="Tuesday"
Month="January"
}
If we were using a normal OR, this would return true, but since both of them are true, an EXCLUSIVE OR returns false:
[0007.60] ScriptLog: False
We can see how intertwined logical operators are with normal comparisons. We used the equal and greater than comparisons in our examples. When working with them, the best way to figure out how to write a statement is to say it out loud first and take note of words like AND, NOT, and OR in your sentence. This will help you figure out how to construct a logical operator statement.
The good news is we've been using concatenation for awhile now, in our log lines. The two operators are the at symbol (@) and the dollar sign ($). The only difference between the two is whether or not we want a space in between the strings we're joining.
Let's write some code.
var string String1, String2, AtSign, DollarSign;
function PostBeginPlay()
{
AtSign = String1 @ String2;
DollarSign = String1 $ String2;
'log("At sign:" @ AtSign);
'log("Dollar sign:" @ DollarSign);
}
defaultproperties
{
String1="This is"
String2="a test."
}
Looking at the log shows us the minor difference between the two:
[0007.77] ScriptLog: At sign: This is a test.
[0007.77] ScriptLog: Dollar sign: This isa test.
The choice between them is as simple as the space between the joined strings.
The concatenation operators can also be used with equal signs to shorten the code and get rid of the need for extra variables. The @ code could also be written like this:
var string String1, String2;
function PostBeginPlay()
{
String1 @= String2;
'log("String1:" @ String1);
}
defaultproperties
{
String1="This is"
String2="a test."
}
The log ends up the same:
[0007.56] ScriptLog: String1: This is a test.
Concatenation is specific to strings and easy to remember. There are instances when you'd want to use the dollar sign and ones where the @ symbol is needed, it just depends on what we're trying to do with the string. As an example, death messages often use the @ symbol to join the player name to the death message so there is a space in between them, while strings that tell the game which level to load use the dollar sign specifically to avoid spaces.
There are many other variable functions we can use; some of them are handy to know. Let's go over a few.
Rand(int Max):Returns a random int between 0 and the maximum number specified. Note that this will never return Max itself. As an example,Rand(10)would return a random number 0-9.Min(int A, int B):Returns the smaller of the two ints.Min(5, 2)would return 2.Max(int A, int B):Returns the higher of the two numbers.Max(3, 8)would return 8.Clamp(int V, int A, int B):Clamps V to be between A and B. If V is lesser than A it would return A, if it were greater than B it would return B. If it were already in between, V would stay the same.Clamp(3, 5, 8)would return 5 whileClamp(5, 2, 9)would return 5.
Len(string S):Returns the length of the string as an int. This includes spaces and any symbols.InStr(string S, string T):Returns the position of string T in string S, or -1 if T can't be found in S. This is useful for figuring out if a string has a certain word in it, since we can check if the result is >= 0 to indicate that the word is there.Left(string S, int I):Returns the left I number of characters.Left("Something", 3)would return "Som".Right(string S, int I):Returns the right I number of characters.Right("Something", 3)would return "ing".Mid(string S, int I, optional int J):Returns a string from position I.Mid("Something", 2, 3)returns "met". If J isn't specified this has the same effect as Right.Repl(string S, string Match, string With, optional bool bCaseSensitive):Replaces Match with With in string S.Repl("Something", "Some", "No")would return "Nothing". The optional bool specifies if you only want it to replace With if letters have the same case as Match.
We learned about comparisons and logical operators earlier. Now what do we do if we want different things to happen depending on the results of those comparisons? Flow control helps us do exactly that. Let's learn how we can specify what happens under different circumstances.
If/else is the basic flow control statement. Let's look at this sentence:
If it's raining I'll take an umbrella.
Using an if statement, that sentence would be written like this:
if(bRaining)
{
bUmbrella = true;
}
We could also add an else statement to it:
If it's raining I'll take an umbrella, otherwise I'll wear short sleeves.
That would be written like this:
if(bRaining)
{
bUmbrella = true;
}
else
{
bShortSleeves = true;
}
We can also use Else If for other conditions.
If it's raining I'll take an umbrella, or if it's cold I'll wear a coat, otherwise I'll wear short sleeves.
We could write that like this:
if(bRaining)
{
bUmbrella = true;
}
else if(Temperature < ComfortableTemperature)
{
bCoat = true;
}
else
{
bShortSleeves = true;
}
The important thing to remember about else/if is, that only one of these conditions will run. If it's raining and cold, only the bRaining section of the code will run, not bRaining and Temperature < ComfortableTemperature.
Let's write some code to see if/else in action for ourselves.
Take the following code:
var int Int1, Int2;
function PostBeginPlay()
{
if(Int1 > Int2)
'log("Int1 is greater than Int2");
else if(Int1 == Int2)
'log("Int1 is equal to Int2");
else
'log("Int1 is less than Int2");
}
defaultproperties
{
Int1=5
Int2=2
}
What would we expect the result to be? Let's look at the log for the answer:
[0007.72] ScriptLog: Int1 is greater than Int2
We can see that the if statement is executed and not the else if or else statements. Notice that in this example we didn't use the curly brackets in our statements. If there is only one line after the if, else if, or else statements brackets aren't necessary. However, if there are two or more lines, we would need to use brackets.
It might not seem like it's saving much time in this simple example, but consider a case where we would want to run the loop a hundred times. Putting it in a for loop would save a lot of unnecessary code!
If we write the PostBeginPlay function above into our AwesomeActor.uc class and compile it, then take a look at the log, we can see that it executed the code inside the for loop three times:
[0007.57] ScriptLog: Stop hitting yourself. 0
[0007.57] ScriptLog: Stop hitting yourself. 1
[0007.57] ScriptLog: Stop hitting yourself. 2
The first part of the for statement lets us set a variable to an initial value. Most of the time it will be 0, but there may be times when we need a different value, for example if we wanted to count down instead of up. The second part of the statement tells the for loop when to stop. Once the condition is false the loop exits, in this case once m reaches 3. The third part of the statement runs every time a loop finishes. In this case, the ++ operator is used to increment m by 1 each time.
As an example of what NOT to do, let's take this code.
var int Int1;
function PostBeginPlay()
{
Int1 = 5;
While(Int1 > 0)
{
Int1 = 5;
}
}
When we run the game with this code, it will crash.

It is EXTREMELY IMPORTANT to always make sure the "while" condition will be met to avoid infinite loop crashes.
Let's take a look at the right way to use it:
var int Int1;
function PostBeginPlay()
{
While(Int1 < 5)
{
'log("Int1" @ Int1);
Int1++;
}
}
In this case,
Int1will keep incrementing until it reaches 5, and the While loop will exit.We could also use a statement called
breakto exit the loop:var int Int1; function PostBeginPlay() { While(Int1 < 5) { 'log("Int1" @ Int1); Int1++; if(Int1 == 3) break; } }In this case, the loop will exit when
Int1reaches 3 instead of continuing until it hits 5.Another statement we can use is called continue. Instead of exiting the loop completely, it just skips to the next cycle.
var int Int1;
function PostBeginPlay()
{
While(Int1 < 5)
{
'log("Int1" @ Int1);
Int1++;
if(Int1 == 3)
continue;
'log("This will not log if Int1 is 3");
}
}
In this case, the loop will keep going until Int1 hits 5, but when it's equal to 3 the continue statement will cause it to skip the rest of the code for that loop and move on to the next loop.
Using while statements can be handy when you don't know the number of loops you'll need beforehand, or if it would change during play. You always have to make sure the loop will be able to finish though; crashing the game is a very real concern when using while loops.
Let's take a look at an example of a Switch statement.
var int Int1;
function PostBeginPlay()
{
Int1 = 2;
switch(Int1)
{
case 1:
'log("Int1 == 1");
case 2:
'log("Int1 == 2");
case 3:
'log("Int1 == 3");
default:
'log("Int1 isn't any of those!");
}
}
Running the code, the log looks like this:
[0007.97] ScriptLog: Int1 == 2
[0007.97] ScriptLog: Int1 == 3
[0007.97] ScriptLog: Int1 isn't any of those!
Why did the other lines log? Unlike if/else statements, switches will continue executing the next steps after the condition is met. Sometimes we'll want it to do that, but if not we can use the break statement here too.
var int Int1;
function PostBeginPlay()
{
Int1 = 2;
switch(Int1)
{
case 1:
'log("Int1 == 1");
break;
case 2:
'log("Int1 == 2");
break;
case 3:
'log("Int1 == 3");
break;
default:
'log("Int1 isn't any of those!");
}
}
The log file for this would have our desired behavior.
[0007.69] ScriptLog: Int1 == 2
Return simply exits out of a function. This is most commonly combined with other flow control statements like if/else. Take the following code:
var int Int1;
function PostBeginPlay()
{
if(Int1 == 5)
{
'log("Int1 equals 5");
return;
}
'log("This will not log");
}
defaultproperties
{
Int1=5
}
We can see what happens in the log:
[0007.83] ScriptLog: Int1 equals 5
Once the code reaches the return statement, it stops running any more code in that function.
Goto jumps to a specific place in a function. If we had the following code:
function PostBeginPlay()
{
'log("PostBeginPlay");
goto EndOfFunction;
'log("This will not log");
EndOfFunction:
'log("This will log.");
}
The log would look like this:
[0007.55] ScriptLog: PostBeginPlay
[0007.55] ScriptLog: This will log.
Like Return, Goto isn't really useful on its own and is more commonly combined with other flow control statements.
What is the difference between an integer and a float?
What type of variable is a vector?
How do we make a variable changeable in the editor?
a. Add it to a config file.
b. Add parentheses after var.
c. Add it to the default properties.
How would we write "If there's no water we will be thirsty" using logical operators?
We learned a lot in this chapter about the different types of variables and how to use them.
Specifically, we covered:
The different types of variables including ints and floats, strings, vectors, and rotators.
How structs and arrays are created and how to use them.
How to set default properties for variables and use config files.
Common operators used with variables.
The various flow control statements to do different things under different circumstances.
Now that we've learned about variables, we're ready to start learning about the class tree and the commonly used classes in a UDK project. By the end of the next chapter we will be running our own custom game!