
Dual-classing as a programmer/designer.
As a programmer working within a team, or even as a lone wolf creating a game by yourself, knowing how to use Kismet can be an essential tool when working with the UDK. Instead of relying solely on the Kismet events and actions that come with the UDK, we can expand on them by creating and using our own.
In this chapter we will do the following:
Take a look at what Kismet is and what it is used for
Create our own Kismet events and actions
Learn how to use latent Kismet actions
So with that, let's take a look at Kismet!
While UnrealScript can cover fundamental game mechanics, Kismet works with level-specific functionality such as opening doors or reacting to game events, such as the death of the player, in ways specific to that level.
As an example, in our game, if we wanted to have the weapon upgrades spawn in specific locations when we killed a boss, we would use UnrealScript to create generic Kismet actions and events. Some of the events and actions we would need for this purpose already exist, so in the end we would have a mix of stock and custom Kismet in our game.
This section is mostly going to take place in the editor, so let's fire it up and get to work!
Start up the editor, then open
AwesomeTestMap.We'll start with some simple Kismet at first, so let's open up the Kismet window by pressing the green K button in the top toolbar:

The Kismet window will open. Let's see what's going on here:

The main gray area with the binary on the right side is the workspace where the Kismet actions and events are placed and linked together. At the bottom left, we have the Properties panel where the editable variables of the actions and events can be changed, exactly the same way we've done with Actor classes. Finally to the bottom right is the Sequences panel. If we had multiple streamed levels or groups of Kismet actions combined into sub-sequences, we would select the different Kismet sequences here.

In Kismet, events have the diamond shape and are triggered by UnrealScript classes. In this case, the GameInfo class triggers this event when a player spawns. We could have more than one of these events in our Kismet sequence, if we wanted; all of them would be triggered when a player spawns. That decision is mainly up to aesthetics and organization within the Kismet window.
The pink spikes at the bottom of this event let us get variable references from that event if we need them. In this case, we have the option to get the PlayerController in the form of the Instigator, and the PlayerStart in the form of the Spawn Point variable. We could use these if, for example, we only wanted certain things to happen to a specific player, or any player that spawns at a particular spawn point.
The black node labeled Out is used to connect to other Kismet actions, and these connections define the flow of this Kismet sequence. To see this, let's add an action to our sequence. Right-click off to the right of the Player Spawned event and select New Action | Misc | Log:

The Log action works the same as the log command that we've been using in UnrealScript, which makes Log actions a convenient tool for debugging Kismet sequences. These also have the option of displaying the log on the screen, which makes them even more helpful. If we click on the Log action and take a look at the SeqAct_Log section of the Properties in the lower-left window, we can see the following:

The Properties panel might look more familiar now. In our work with variables in Chapter 2, Storing and Manipulating Data, we created editable variables that showed up in an Actor's properties in a similar way. Kismet is no different; when actions and events are created in UnrealScript, we can define editable variables and their default properties, just like the Actor classes.
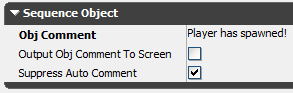
The Obj Comment property is available to all Kismet actions and events, and is normally used to write notes to ourselves so we know what the sequence is doing. In the Log action's case, this is what is written to the log and shown on screen.

Now we can see how the flow works in Kismet. When the Player Spawned event is activated, it in turns activates the Log action. We could connect the Out node of the Log action to more actions. We could also connect the Out node of the Player Spawned event to more than one action. By adding more events and actions, we could create some complex Kismet sequences.
Save the map, but we can keep the editor open for this. Let's fire up the game with our batch file and see what happens. We'll notice the log show up on the screen right as the game starts:
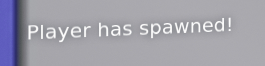
Exit the game and take a look at the log. We can see it show up there as well:
[0005.71] Log: Kismet: Player has spawned!
This was a pretty simple introduction to Kismet, but it's enough to get us started. Next, let's see if we can use it to do something useful.
The idea sounds simple in theory: the player walks over a trigger, and a weapon upgrade appears. In reality, we'll see that simple ideas can get complicated pretty quickly, even in Kismet:
We should still have the editor open, if not, open it and open our AwesomeTestMap. Delete the Kismet from the last experiment by clicking on each action and event and hitting Delete on the keyboard.
Delete all of the AwesomeWeaponUpgrade actors, we'll be placing them in the map through Kismet.
The first thing we'll need is the trigger. Open up the Content Browser and select the Actor Classes tab. Make sure Show Categories is unchecked, and select Actor | Trigger (Not the subclasses, just Trigger). In the level, right-click somewhere near the start player and hit Add Trigger Here.
The trigger we've added won't be visible in game by default, so let's fix that real quick. Double-click on the trigger to open its properties, and under Display, uncheck Hidden. Close the trigger's properties.
We don't want the upgrade weapon to spawn in the same place as the trigger, so we need to add an actor that we'll use in Kismet to set the spawn location. I like to use TargetPoints for this, although any placeable actor will work. Select Actor | Keypoint | TargetPoint, and right-click near the trigger and hit Place TargetPoint Here. Use the blue arrow of the movement widget to raise it up off of the ground a bit.
OK, we're ready for some Kismet. We know from the Player Spawned event that UnrealScript triggers Events. That one was triggered by the
GameInfoclass, but actors placed in the level can also trigger Events in reaction to things happening in the game. In this case, the Trigger actor can fire an Event whenever it is touched.To use Kismet events this way, we need to select the Trigger in the level by clicking on it. Now open the Kismet window and right-click in the main workspace. This time instead of going under New Event, below this we should see an option for New Event Using Trigger_0. If not, make sure the Trigger is selected in the level. Under New Event Using Trigger_0, select Touch:

We can see this Event has three outputs, Touched, UnTouched and Empty. The first two are self-explanatory. The third one acts the same as the UnTouched output, except that UnTouched fires whenever any actor that was touching this trigger moves away from it, and Empty only fires when ALL actors that were touching it aren't touching it anymore.
By default this Trigger event is only set up to fire once. To get it to work an infinite number of times, we need to change one property. Select the Event, and in the Properties panel open up the Sequence Event section. Set Max Trigger Count to 0. This will let this event fire an unlimited number of times.
Now we have the Trigger's event set up, so we need the Action that's going to spawn the AwesomeWeaponUpgrade. For this, right-click to the right of the Trigger event and select New Action | Actor | Actor Factory:

Right now, we're only concerned about two of the nodes, the Spawn Actor input and the Spawn Point property. Let's take care of the Spawn Point property first.
Select the TargetPoint in the level, and in the Kismet window, right-click under the Actor Factory action and hit New Object Var Using TargetPoint_0. We'll see a circle show up with the TargetPoint inside it:

In Kismet, variables are represented as circles and act the same way they do in UnrealScript. We can change their value or read their value to do what we need to do. In this case, we're going to use the target point's location as the spawn point for our weapon upgrades.
Click and hold on the Spawn Point node on the Actor Factory action, and drag the line to the TargetPoint variable. When you let go, the connection should be made.
Now click and hold on the Touched output of the Trigger event, and drag the line over to the Spawn Actor input on the Actor Factory action.
One last thing we need to do: tell the Actor Factory what to spawn. Select the action in the main workspace, and in the Properties panel open up the SeqAct_ActorFactory section. In the Factory property, there should be a blue arrow pointing down. Click it, and in the pop-up list select ActorFactoryActor at the top. Once that's selected, a new property should show up under Factory called Actor Class. Set Actor Class to AwesomeWeaponUpgrade.
For debug purposes, while we're in the Actor Factory action's properties, under the Sequence Object section let's check Output Obj Comment To Screen, and set ObjComment to Upgrade Spawned!
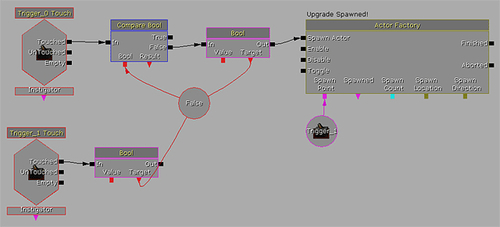
That's it! Our Kismet sequence should now look like this:

Save the map and start up the game. We can see that the Kismet is working fine, whenever we run over the trigger, a weapon upgrade spawns! Remember that to pick the upgrade up, we have to hold a weapon.
One thing we'll notice is that if we just run back and forth over the trigger, it will keep spawning weapon upgrades. What if we only wanted it to be able to spawn one at a time? This is where the complex part comes in, but thinking like a programmer it should be easy to figure out. Let's give it a shot.
If we were writing this Kismet sequence as code, we might use a Boolean to keep track of whether a weapon upgrade has been spawned or not. If we hit the trigger and bUpgradeSpawned was false, we'd set it to true and spawn one. Once it was picked up, we'd set the Boolean back to false. We already know how to do that in code, but how about Kismet?
There are a few different ways we could do this, but to keep it relatively simple we'll just use another trigger:
Open AwesomeTestMap and delete the TargetPoint that we're using as the upgrade spawn location. Since it's referenced by Kismet, the editor will ask you if you're sure. Click on Continue. Now if we open our Kismet editor, we'll see that the variable that held our TargetPoint now has ??? written on it. This lets us know that the variable doesn't have an actor associated with it. If this were UnrealScript, it would be the same as a variable being none. Don't delete this Kismet variable, we'll use it in a second.
Go into the Actor Classes tab of the Content Browser and select Actor | Trigger, and add one where the TargetPoint used to be.
With the new Trigger selected, go into the Kismet editor and right-click on the ??? variable. Press Assign Trigger_1 To Object Variable(s) and the trigger should now show up in the variable.
Now for the Boolean. Right-click underneath the current sequence and hit New Variable | Bool. It will show up as a red circle with False written inside it. We'll use this to indicate whether or not a weapon upgrade has been spawned.
Right-click on either end of the connection between the Trigger event and the Actor Factory action and hit Break All Links. The link should be broken. Now move the Trigger event away from the Actor Factory action so we can add more actions in between them. To move it, select it, then hold Ctrl, then click and drag it.
If we were writing this as code, this part might look like:
if(!bUpgradeSpawned)
{
bUpgradeSpawned = true;
SpawnUpgrade();
}
The
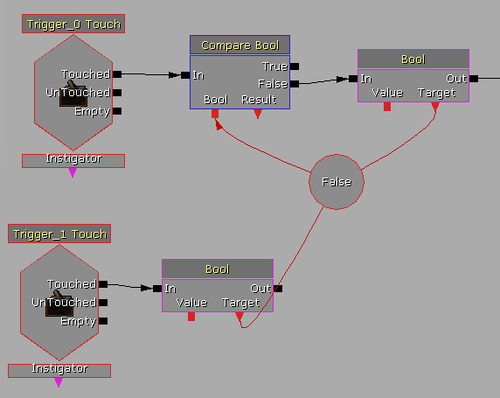
SpawnUpgrade()function would be the Actor Factory action, so that leaves us with two lines of code. Each one can be represented by a Kismet action, so there are two that we need to add. Let's do the bool comparison first.Right-click between the Trigger event and the Actor Factory action and hit New Condition | Comparison | Compare Bool. This will show up as a blue box.
The variable we want to check needs to be hooked up to the Bool node at the bottom of this action, so click on the Bool node and drag the line to our Bool variable.
Now connect the Touched node of our Trigger event to the In node of the Compare Bool action.
That takes care if the
ifstatement in our hypothetical code, so let's do the second line where we set the bool to True. Right-click next to the Compare Bool action and hit New Action | Set Variable | Bool.For this new Action to work, we need to connect it to our Bool variable. Connect the Target node at the bottom of the Bool action to the Bool variable.
With the new action selected, open up the SeqAct_SetBool section of its properties and check Default Value so that it will set the bool to True.
Now connect the False node of the Compare Bool action to the In node of the Bool action, and the Out node of the Bool action to the Spawn Actor node of the Actor Factory action. Our Kismet sequence should look like this:

Almost there. Now we need to set that Bool back to False when the upgrade is picked up. Since we're spawning it on a Trigger, we can simply use its Touch event as a quick way to do this.
Select Trigger_1 in the editor, and go back into the Kismet window. Right-click below the first triggered event and hit New Event Using Trigger_1 | Touch.
In the new Touch event's properties set Max Trigger Count to 0.
Next to the Touch event, right-click and add a New Action | Set Variable | Bool. We don't need to change its properties, so next let's connect everything.
Connect the Touched node of the new Trigger event to the In node of the new Bool action.
Connect the Target node of the new Bool action to the Bool variable.
That's it! The sequence should now look like this:
Save the map and run the game. Now when we run over the first trigger, it will only spawn one upgrade until we pick it up!
We can easily see how complicated Kismet can get. This was only a simple sequence and it took eight Kismet objects to create it. Creating more complex sequences would require even more Kismet actions and events, and a lot of time and testing to make sure they functioned properly.
We can also see a brief glimpse at Kismet's power. Looking at the list, there are a lot of actions and events at our disposal, and with clever use of them it's entirely possible to create a game with nothing but Kismet.
It does have limitations though. Since the sequences only exist in levels, any changes need to be copied to all levels or used in a persistent level with other levels streamed in. Since it's running as a layer on top of UnrealScript, it's not as fast. Dealing with arrays or structs is extremely complicated, and Kismet can be incredibly hard to debug with any sort of complexity. Core gameplay mechanics should be left to UnrealScript, and Kismet should only be used for level-specific functionality of your game.
With that said, it is incredibly useful. Long sequences of events, such as a tutorial level would be tedious to create with UnrealScript, but easy to make and tweak with Kismet. Simple sequences like doors opening and closing, spawning actors at specific locations, and triggering effects and sounds would require entire Actor classes dedicated for those purposes without Kismet, and would clutter up a project's class folder. For teams with separate programmers and designers, it would also be difficult for designers to make changes without programmer support. Kismet makes a level designer's life easier while freeing up programming time for more important core gameplay tasks.
Next, we're going to look behind the scenes at the UnrealScript in the Kismet actions and events, and learn how to create and use our own, or simply modify our classes to work with existing Kismet.
As far as the class tree goes, Kismet classes are not created under Actor. In UnCodeX, if we take a look way down under Object we'll see a class called SequenceObject. This is where all of the Kismet classes are created. Underneath SequenceObject, we can see SequenceOp where Actions, Events, and Conditions are, and SequenceVariable where the Bools, Floats, and other data types are located.
As far as creating a custom class goes, Kismet should be pretty easy for us by now. For our first experiment, let's disable the default spawning of enemies in our game and create a Kismet action to do it instead. That will give us more control over when the enemies spawn in our Awesome Game.
Make sure the editor is closed.
Open AwesomeGame.uc in ConTEXT. At the bottom of our
PostBeginPlayfunction, let's take out the timer that activates the spawners. The function should now look like this:simulated function PostBeginPlay() { local AwesomeEnemySpawner ES; super.PostBeginPlay(); GoalScore = 1; foreach DynamicActors(class'AwesomeEnemySpawner', ES) EnemySpawners[EnemySpawners.length] = ES; }Now we're ready to create the Kismet action that will handle the spawning. In our
DevelopmentSrcAwesomeGameClassesfolder, create a new file calledAwesomeSeqAct_SpawnerActivation.uc.Write the following code in this new file:
class AwesomeSeqAct_SpawnerActivation extends SequenceAction;
defaultproperties
{
ObjName="Spawner Activation"
ObjCategory="Awesome Game"
}
This will do for a moment; let's take a look. Compile the code, then open up the editor. Open the Kismet editor. When we right-click in the main workspace and look under New Action, we can see our new category, Awesome Game, and underneath it is our Spawner Activation action. Place one and let's see what it looks like:

Nice! What's that Target variable node though? Kismet actions use this node to call functions on the object or objects connected to the node. For example, connecting an object variable to the Target node of a SeqAct_Destroy would destroy that actor when the SeqAct_Destroy action is activated. We don't need this node for this action though, since we'll be calling a function in our AwesomeGame class and we can't make a Kismet variable for it. To get rid of it, we'll add a line to our default properties:
defaultproperties
{
ObjName="Spawner Activation"
ObjCategory="Awesome Game"
VariableLinks.Empty
}
This will clear out the variable nodes at the bottom of our action, in this case just the Target node.
Now for the heart of our Kismet action. When a Kismet action is activated, an event called, oddly enough,
Activatedis called. Let's add it to our custom action:event Activated() { }For this event, there isn't any code in our parent class, so we don't need to worry about calling the super. We only need two more lines of code to finish this part of the experiment:
event Activated()
{
if(AwesomeGame(GetWorldInfo().Game) != none)
AwesomeGame(GetWorldInfo().Game).ActivateSpawners();
}
In other classes, we've simply used
WorldInfo.Game, but since Kismet classes aren't subclasses ofActorwe need to use the specialGetWorldInfo()function. We cast ourAwesomeGameclass, then callActivateSpawnerson it.We're done! Well that was easy. Our class should look like this now:
class AwesomeSeqAct_SpawnerActivation extends SequenceAction;
event Activated()
{
if(AwesomeGame(GetWorldInfo().Game) != none)
AwesomeGame(GetWorldInfo().Game).ActivateSpawners();
}
defaultproperties
{
ObjName="Spawner Activation"
ObjCategory="Awesome Game"
VariableLinks.Empty
}
As far as our custom classes go, this one's tiny.
Compile the code and open up AwesomeTestMap in the editor. If the previous Spawner Activation action is still there, delete it. Keep the weapon upgrade Kismet though, we'll use that later.
Now, since we've broken the default behavior of our game to move the spawner activation into Kismet, let's set it up so our game works again. Open the Kismet editor, right-click in the main workspace and add a New Event | Player | Player Spawned event. Next to it, add our New Action | Awesome Game | Spawner Activation action. Connect the Out node of the Player Spawned event to the In node of our Spawner Activation action.
We had a five seconds delay earlier, so let's put that back in. Right-click on the Out node of the Player Spawned event, and click Set Activate Delay. Set it to 5 and click on OK.
As a bonus, let's select our Spawner Activation action and check Output Obj Comment To Screen in its properties, and set the Obj Comment to Enemies Incoming!
Our Kismet sequence should now look like the following:

Save the map and run the game. After five seconds, the message should pop up on the screen, and then enemies should start spawning and heading toward you. Awesome!
We can see how much flexibility Kismet has already added to our game. By giving the level designer control over the spawner activation, we can keep the core gameplay mechanic of the enemies spawning while easily changing when it happens. If we wanted to change the amount of time before they started spawning, or wait until the player walked through a door and hit a trigger, we could easily do that in Kismet now instead of having it always be five seconds after the game starts. Doing something like that in UnrealScript would get messy.
One thing we might want to know from Kismet is the current level of the weapon the player is holding. We could use this information to control the spawning of weapon upgrades, for instance. Let's see if we can do that:
To do this, we'll create a new file in our
DevelopmentSrcAwesomeGameClassesfolder calledAwesomeSeqAct_GetWeaponLevel.uc.Write the following code in the new file:
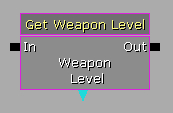
class AwesomeSeqAct_GetWeaponLevel extends SequenceAction;
event Activated()
{
}
defaultproperties
{
ObjName="Get Weapon Level"
ObjCategory="Awesome Game"
VariableLinks.Empty
}
Now we'll need an UnrealScript variable to store the weapon level as well as a node that we can use in Kismet for it. First let's add the variable:
var int WeaponLevel;
Now let's add the variable link node. If we look in SequenceOp in UnCodeX, we can see that
VariableLinksis an array of theSeqVarLinkstruct. Inside that struct are a lot of variables, but we're only concerned about a few of them. Let's use them to define a new variable link in our default properties:VariableLinks(0)=(ExpectedType=class'SeqVar_Int',LinkDesc="Weapon Level",PropertyName=WeaponLevel,bWriteable=true)
Here we're setting the
ExpectedTypeto use an Int variable, giving it a description, and then setting thePropertyNameto the name of ourUnrealScriptvariable we added in the last step. Finally we set it tobWriteableso this action can change the linked Kismet variable (otherwise, it would only be able to read it, which isn't what we need).Now we need to get the player's weapon level and set our
WeaponLevelvariable to it in ourActivatedevent.event Activated() { local PlayerController PC; PC = GetWorldInfo().GetALocalPlayerController(); if(PC != none && PC.Pawn != none && AwesomeWeapon(PC.Pawn.Weapon) != none) WeaponLevel = AwesomeWeapon(PC.Pawn.Weapon).CurrentWeaponLevel; }We're doing a lot of checking here to get all the way down to the AwesomeWeapon, we need to make sure it actually exists before trying to access the
CurrentWeaponLevelvariable.That does it for the UnrealScript side of things. Here's what the class should look like now:
class AwesomeSeqAct_GetWeaponLevel extends SequenceAction;
var int WeaponLevel;
event Activated()
{
local PlayerController PC;
PC = GetWorldInfo().GetALocalPlayerController();
if(PC != none && PC.Pawn != none && AwesomeWeapon(PC.Pawn.Weapon) != none)
WeaponLevel = AwesomeWeapon(PC.Pawn.Weapon).CurrentWeaponLevel;
}
defaultproperties
{
ObjName="Get Weapon Level"
ObjCategory="Awesome Game"
VariableLinks.Empty
VariableLinks(0)=(ExpectedType=class'SeqVar_Int',LinkDesc="Weapon Level",PropertyName=WeaponLevel,bWriteable=true)
}
Compile the code, then open up AwesomeTestMap in the editor. Time to add our new Action.
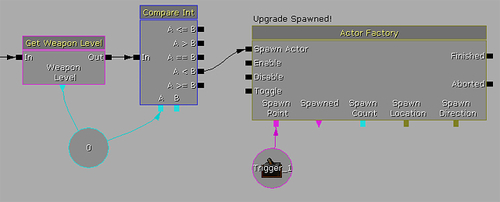
Open the Kismet editor. Our big mess of Kismet from our weapon upgrade experiments should still be there. Right-click on the Spawn Actor input of the Actor Factory action and hit Break Link | Compare Bool. We're going to put our custom action in between.
Move the Actor Factory action off to the right, then right-click in between it and the rest of this sequence and hit New Action | Awesome Game | Get Weapon Level:
To the right of that, right-click and hit New Condition | Comparison | Compare Int.
We're going to need an Int Kismet variable, so let's add it. Right-click below the actions we've just added and hit New Variable | Int | Int. We don't need to change the value, that will be done by our Get Weapon Level action.
Connect the Int variable to the Weapon Level node of our Get Weapon Level action, and to the A node of the Compare Int action.
Select the Compare Int action, and in its properties open the SeqCond_CompareInt section and change Value B to 5. If we're less than this, we still want to spawn upgrades.
Now for the connection between actions. Connect the Out node of the Bool action to the In node of our Get Weapon Level action.
Now connect the Out node of our Get Weapon Level action to the In node of the Compare Int action.
Finally, connect the A < B output node of the Compare Int to the Spawn Actor input of the Actor Factory action.
Our Kismet sequence should now look something like the following (I'm breaking it into two parts so it's clearer):
That section should connect to this:
We're done with the Kismet, unless you want to temporarily break the link to the Spawner Activation action to make it easier to test without being attackedanother advantage to moving that to Kismet!
Save the level and run the game. Now when the player's weapon reaches level 5, the upgrades stop spawning when the player runs over the trigger. It's working perfectly!
We can see that variables in Kismet are really just an outer layer for variables in UnrealScript. They're easy to work with in Kismet, but require a bit of setting up in UnrealScript to make them useful. We could use any type of Kismet variable with these links, all we would have to do is change the variable type in our Kismet class and its associated VariableLinks default property.
We're going to take a rocket ship to goofy town on this one. The easiest way to learn about handler functions is to use an already existing Kismet action, so we're going to use the Toggle action on our AwesomeWeaponUpgrade actors to see how they work. To let us know that it's working, we're going to make the weapon upgrade actors change the size and color when the toggle's handler function is called on them:
Open
AwesomeWeaponUpgrade.ucin ConTEXT.The first thing we need to do is give ourselves access to the static mesh so we can change its size and color. Let's add a variable to reference it:
var StaticMeshComponent MyMesh;
Now let's change the static mesh part of the default properties to add a line:
Begin Object Class=StaticMeshComponent Name=PickupMesh
StaticMesh=StaticMesh'UN_SimpleMeshes.TexPropCube_Dup'
Materials(0)=Material'EditorMaterials.WidgetMaterial_Y'
LightEnvironment=MyLightEnvironment
Scale3D=(X=0.125,Y=0.125,Z=0.125)
End Object
Components.Add(PickupMesh)
MyMesh=PickupMesh
Now some setup for the color change. Add a new material variable at the top:
var Material BigMaterial;
And set its default property to the blue material:
BigMaterial=Material'EditorMaterials.WidgetMaterial_Z'
Now we're ready for the handler function. These have a specific naming convention, and it explains the underscore used in the action name. For example, if we had a Kismet action called SeqAct_Whatever, the handler function for it would be called
OnWhatever. The Kismet action itself is passed into the function as its only parameter. So for the Kismet action SeqAct_Toggle, the handler function for it would be written like this:function OnToggle(SeqAct_Toggle Action) { }
As a hypothetical example with one of our own Kismet actions, if we wanted to use the Target variable link with our AwesomeSeqAct_SpawnerActivation action, the handler function for any of our Actor classes would look like this:
function OnSpawnerActivation(AwesomeSeqAct_SpawnerActivation Action)
{
}
That's just hypothetical code though, for this experiment we're going to use the OnToggle function.
Now for the code inside the
OnTogglefunction:function OnToggle(SeqAct_Toggle Action) { MyMesh.SetScale(2.0); MyMesh.SetMaterial(0, BigMaterial); }Compile the code, then open up the editor.
Away from all of our other experiments, place a few AwesomeWeaponUpgrade actors near a new Trigger. In the Trigger properties, change Display | Hidden to false (uncheck it).
Now for the Kismet. Hold Ctrl and click on the AwesomeWeaponUpgrade actors to select all of them. In the Kismet editor, right-click and hit New Object Vars Using AwesomeWeaponUpgrade_0... This will create multiple Kismet variables, one for each AwesomeWeaponUpgrade actor selected.
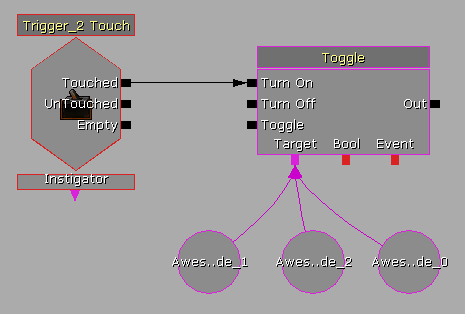
Back in the level, select the Trigger near the AwesomeWeaponUpgrade actors. In the Kismet editor, right-click to the left of the new object variables and hit New Event Using Trigger_2 | Touch (the number may be different for you, it doesn't matter).
Now right-click above the object vars and hit New Action | Toggle | Toggle.
Connect the Touched output of the Trigger event to the Turn On input of the Toggle action.
Connect the Targets variable link of the Toggle action to each of the AwesomeWeaponUpgrade object variables.
The Kismet sequence should now look like the following:
Save the level and run the game. When we hit the trigger the AwesomeWeaponUpgrade actors should get bigger and turn blue. It's working!
Using Kismet actions on object variables will only work if the Actor we're using it on has a handler function defined. As an experiment, delete the OnToggle function from our AwesomeWeaponUpgrade class, compile, and run the game again. This time hitting the trigger will give us log warnings that will also show up on screen:
[0006.77] Warning: Obj AwesomeWeaponUpgrade_0 has no handler for SeqAct_Toggle_0
[0006.77] Log: Obj AwesomeWeaponUpgrade_0 has no handler for SeqAct_Toggle_0
This is a useful warning to let you know that you need to add a handler function, or that you're using the wrong Kismet action on the object variable.
One thing we'll notice with our current setup is that, it doesn't matter what Toggle input node we connect the Trigger event to, the AwesomeWeaponUpgrade actors will do the same thing, regardless. What if we wanted them to act differently depending on the input activated?
That's pretty easy to do actually, so let's do it! We'll have the Turn On input do what it's doing now, and the Turn Off input return the AwesomeWeaponUpgrade actors to their normal size and color.
We only need to change our
OnTogglefunction to make this work, using theInputLinksarray:function OnToggle(SeqAct_Toggle Action) { if(Action.InputLinks[0].bHasImpulse) { MyMesh.SetScale(2.0); MyMesh.SetMaterial(0, BigMaterial); } else if(Action.InputLinks[1].bHasImpulse) { MyMesh.SetScale(MyMesh.default.Scale); MyMesh.SetMaterial(0, MyMesh.default.Materials[0]); } }That's easy enough, but where do we get the numbers from for the
InputLinksarray index? If we look at theSeqAct_Toggleclass, we can see the answer:InputLinks(0)=(LinkDesc="Turn On") InputLinks(1)=(LinkDesc="Turn Off") InputLinks(2)=(LinkDesc="Toggle")
Compile the code with our new
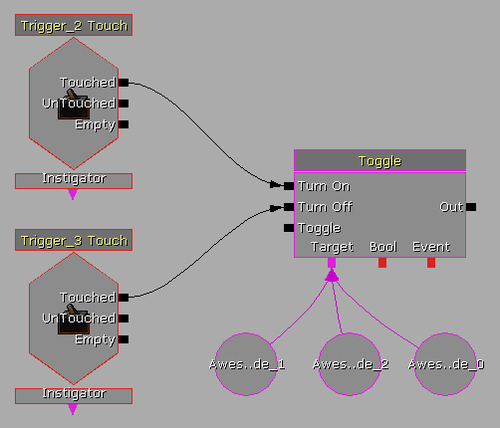
OnTogglefunction, then open the editor.Time for the Kismet. Add another Trigger near the first one that we added for this experiment, and uncheck its Hidden property so we can see it.
Select the Trigger, then add a Touch event for it in the Kismet editor.
Hook the Touched output of this new event to the Turn Off input of the Toggle action.
In both of the Touched events, make sure their Max Trigger Count properties are set to 0.
The Kismet sequence should now look like the following:
Save the map and run the game. Now running back and forth between the two triggers will cause the AwesomeWeaponUpgrade actors to switch between large blue and green and normal size.
Working with multiple inputs is easy, and as we can see from the default properties of SeqAct_Toggle, creating them for our own classes is easy as well. We can also check the bHasImpulse variable on them in the Action's own Activate function to do different things within the Action class itself.
Using a Boolean in the AwesomeWeaponUpgrade class, see if you can have it store the status of the actor so that the OnToggle function could be rewritten to work with the Toggle input on the SeqAct_Toggle action. Make the actor switch back and forth when this input is repeatedly activated.
Hint: A new variable would be added to the AwesomeWeaponUpgrade class:
var bool bLargeBlue;
And the OnToggle function would look like this:
function OnToggle(SeqAct_Toggle Action)
{
if(Action.InputLinks[0].bHasImpulse)
bLargeBlue = true;
else if(Action.InputLinks[1].bHasImpulse)
bLargeBlue = true;
else
bLargeBlue = !bLargeBlue;
if(bLargeBlue)
{
MyMesh.SetScale(2.0);
MyMesh.SetMaterial(0, BigMaterial);
}
else
{
MyMesh.SetScale(default.MyMesh.Scale);
MyMesh.SetMaterial(0, default.MyMesh.Materials[0]);
}
}
For the most part Actions and Events will cover everything you need to do with custom Kismet, but sometimes you'll want to create your own Condition to check for various things. To see how we can use these, we'll create one that has multiple outputs and activate a single one based on the condition we're checking.
We already have a Kismet action to check the level of the player's weapon, but what if we had a custom Condition to check whether the player's weapon was at max level or not? Let's do it!
Create a new file in our DevelopmentSrcAwesomeGameClasses folder called AwesomeSeqCond_IsWeaponMaxLevel.uc.
Now open the new file in ConTEXT. First we'll declare the class and write up a few default properties:
class AwesomeSeqCond_IsWeaponMaxLevel extends SequenceCondition;
defaultproperties
{
ObjName="Is Weapon Max Level"
ObjCategory="Awesome Game"
OutputLinks(0)=(LinkDesc="True")
OutputLinks(1)=(LinkDesc="False")
}
By default SequenceCondition classes don't have any variable links, so we don't need to empty out that array or add any of our own.
You will notice though that we're adding two OutputLinks. Normally all SequenceOp classes have the first one defined by that class's default properties:
OutputLinks(0)=(LinkDesc="Out")
Here we're overriding the default description in our own OutputLinks(0) and setting it to True. We're also adding another output and setting that to False. We could add more outputs if we wanted to, but in this case we only need two. We could also rename and add inputs for our Kismet actions by using the InputLinks array in the same way.
By default Kismet SequenceOp classes activate their output links automatically once any Activated function is finished executing. This is done through a bool called bAutoActivateOutputLinks in SequenceOp, which is set to True in the default properties of that class. SequenceConditions however set this to False. Since SequenceConditions have more than one output, we want to decide for ourselves which one(s) to activate. We can do that in our Activated function.
We use a variable called
bHasImpulseto activate an output link. Let's check the player's weapon level and set it toTruefor the output we want to activate:event Activated() { local PlayerController PC; PC = GetWorldInfo().GetALocalPlayerController(); if(PC != none && PC.Pawn != none && AwesomeWeapon(PC.Pawn.Weapon) != none && AwesomeWeapon(PC.Pawn.Weapon).CurrentWeaponLevel == class'AwesomeWeapon'.const.MAX_LEVEL) OutputLinks[0].bHasImpulse = true; else OutputLinks[1].bHasImpulse = true; }If the weapon is at max level, activate the True output, otherwise activate the False output. Note that we're setting the bool to true both times, don't let the names of the outputs confuse you.
Now let's compile the code and open our map in the editor.
In the Kismet editor, delete the Get Weapon Level, Compare Int, and the Int variable. We're going to add our new condition here instead. Right-click where the deleted actions were and hit New Condition | Awesome Game | Is Weapon Max Level.
Connect the output of the Bool action from our old Kismet to the In node of our condition. Now connect the False output of our condition to the Spawn Actor input of the Actor Factory action.
Right-click above the Actor Factory action and hit New Action | Misc | Log.
Give the Log action an Obj Comment of Weapon At Max Level! The Log action has its own Output To Screen property, so we don't need to worry about checking Output Obj Comment To Screen unless we want two messages to show up. And I'm not just saying that because I forgot about that while I was writing this.
Connect the True output of our Is Weapon Max Level condition to the input of the Log action.
Save the map, then run the game. Pick up the weapon, then run over the trigger and collect the upgrades a few times until the weapon reaches level 5. Now run over the trigger again and we should see our log message. After that the Boolean checks before our condition prevent it from activating again, so we don't get any more messages or pickups.
Conditions aren't the only classes that can have multiple outputs, if we look at SeqAct_CameraFade we can see that actions can also use multiple outputs if we set its bAutoActivateOutputLinks to False. And from our use of the Trigger event we can see that Events can have them as well. And although it's not generally used in Conditions, Actions can have multiple inputs. We can see an example of how to do that in UTSeqAct_ToggleAnnouncements.
The last main topic we'll discuss is the use of Events. As we've seen from our use of the Trigger event, something has to start the chain of activations that make up a Kismet sequence, and Events are it. They have no input nodes, only outputs, and are called directly from within UnrealScript. To discuss how to create and use events, we'll be expanding on our AwesomeGame instead of running random experiments, so let's get to it!
We've made a bit of a mess in our map file again, so let's clean it up in preparation for this section of the chapter.
Open AwesomeTestMap in the editor.
We'll be starting fresh with our Kismet, so open the Kismet editor and delete all of it.
In the level, delete all of the Trigger actors and AwesomeWeaponUpgrades but leave the weapon spawner, enemy spawners, and player start.
For our game there are a few things we might want to know about in Kismet. One thing that comes to mind is when all of the enemies have been killed. We could use this event to do certain things in Kismet, for example, if we wanted to spawn a weapon upgrade as a reward for the player before the boss showed up. Let's see if we can do it!
We're going to make it so that we can spawn as many waves of enemies as we want, so instead of calling this event something like EnemiesDefeated, we'll use something like WaveComplete.
Create a new file in our
DevelopmentSrcAwesomeGameClassesfolder calledAwesomeSeqEvent_WaveComplete.uc.The code for this one is going to be really simple:
class AwesomeSeqEvent_WaveComplete extends SequenceEvent;
defaultproperties
{
ObjName="Wave Complete"
ObjCategory="Awesome Game"
VariableLinks.Empty
bPlayerOnly=false
}
Yep, that's it. We don't have an instigator so we don't need to have any variable links. The
bPlayersOnlyvariable lets classes other thanPlayerControllerstrigger the event.The event is created, so now we need to trigger it. Open up AwesomeGame in ConTEXT and add a line to our
EnemyKilledfunction:function EnemyKilled() { local int i; if(bSpawnBoss) return; EnemiesLeft--; if(EnemiesLeft <= 0) { for(i=0; i<EnemySpawners.length; i++) EnemySpawners[i].MakeEnemyRunAway(); ClearTimer('ActivateSpawners'), bSpawnBoss = true; ActivateSpawners(); TriggerGlobalEventClass(class'AwesomeSeqEvent_WaveComplete', self); } }Calling this function will make the game find all of the Wave Complete actions in Kismet and trigger them.
Now we need to add the Kismet to our level, so open it up in the editor.
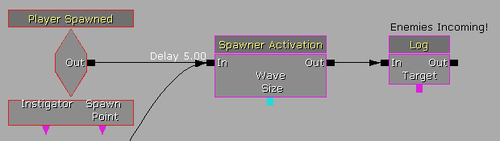
First we need the enemies to spawn, so add a New Event | Player | Player Spawned and hook its output to the input of a New Action | AwesomeGame | Spawner Activation. You can add a delay if you want (right-click on either node of the connection and hit Set Activate Delay).
Below that, right-click and add a New Event | Awesome Game | Wave Complete. Connect the output to a New Action | Misc | Log.
In the Log's properties, give it an Obj Comment of Wave Complete!
Save the map and run the game.
Now when the enemies have been defeated and the boss is spawned, we get our Log's comment, letting us know our custom Event is working!
Having a custom event is good, but right now it seems too passive. It's letting us know the wave is complete, but then the boss immediately spawns. What if we moved that functionality into Kismet to give the level designers some control over when the boss spawns after a wave is complete?
To do this we're going to create a new action that will spawn the boss, and also alter an existing action to give us more control over the waves of enemies:
Create a new file in
DevelopmentSrcAwesomeGameClassescalledAwesomeSeqAct_SpawnBoss.uc.Let's write the following code in it:
class AwesomeSeqAct_SpawnBoss extends SequenceAction;
event Activated()
{
if(AwesomeGame(GetWorldInfo().Game) != none)
AwesomeGame(GetWorldInfo().Game).SpawnBoss();
}
defaultproperties
{
ObjName="Spawn Boss"
ObjCategory="Awesome Game"
VariableLinks.Empty
}
The
SpawnBossfunction doesn't exist in AwesomeGame yet, so let's create it. Open up AwesomeGame.uc and add this function:function SpawnBoss() { bSpawnBoss = true; ActivateSpawners(); }Now to keep the game from automatically spawning the boss, let's delete those two lines from
EnemyKilledso it looks like this:Ok, we're done code side, so compile the code and open our map in the editor.
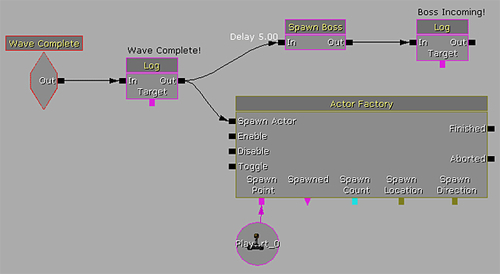
Now let's give the player a weapon upgrade and a bit of time before the boss spawns. Open up the Kismet editor and add a New Action | Actor | Actor Factory. Connect the Wave Complete! log's output to the Spawn Actor input of the Actor Factory.
In the Actor Factory's properties, select ActorFactoryActor from the list that pops up when you click the blue arrow for the Factory property.
In the Actor Class property that shows up, select AwesomeWeaponUpgrade.
Now we need a place for it to spawn. To keep it easy we'll use the player start, so select it in the level and go back to the Kismet editor.
Right-click under the Actor Factory action and hit New Object Var Using PlayerStart_0. Hook the Spawn Point variable link under the Actor Factory action to it.
Ok that's done! Now to spawn the boss. Right-click above the Actor Factory action and hit New Action | Awesome Game | Spawn Boss.
Instead of hooking it to the output of the Actor Factory, hook the output of the Log action to the input of Spawn Boss. We want the boss to spawn even if something goes wrong with the Actor Factory and the Finished output never activates.
Now to give us some delay, right-click the input of the Spawn Boss action and hit Set Activate Delay, and give it a delay of 5.
Finally, add another New Action | Misc | Log and hook it to the output of Spawn Boss. Give the new Log action an Obj Comment of Boss Incoming!
Our Kismet sequence should now look like the following:
Save the map and run the game. Now when we defeat the enemies, a weapon upgrade spawns at the player start, and five seconds later the boss spawns and the log message shows. Nice!
Now we can see how moving parts of our gameplay into Kismet actions and events can help make our game more flexible. We can take this even further, however.
For this we'll need to modify our Spawner Activation action as well as our AwesomeGame. Let's get to it!
Let's start with the Kismet action. We'll need to add an
intthat the level designer can change to set the size of the wave, and then pass that on to the AwesomeGame. Open up AwesomeSeqAct_SpawnerActivation in ConTEXT.Let's add an editable
intvariable to the top of the class:var() int WaveSize;
Then give it a default property:
WaveSize=10
To give some added flexibility, let's hook it up to a variable link so we can set it that way as well if we wanted to. Add this line to the default properties:
VariableLinks(0)=(ExpectedType=class'SeqVar_Int',LinkDesc="Wave Size",PropertyName=WaveSize)
Note that this variable link is optional, we don't have to hook an Int Kismet variable to it, the action will still work fine with the editable property.
Now to pass this along to the game. Let's call a new function that we'll create in AwesomeGame. Change the Spawner Activation's
Activatedfunction to this:event Activated() { if(AwesomeGame(GetWorldInfo().Game) != none) AwesomeGame(GetWorldInfo().Game).StartWave(WaveSize); }The AwesomeSeqAct_SpawnerActivation class should look like the following:
class AwesomeSeqAct_SpawnerActivation extends SequenceAction;
var() int WaveSize;
event Activated()
{
if(AwesomeGame(GetWorldInfo().Game) != none)
AwesomeGame(GetWorldInfo().Game).StartWave(WaveSize);
}
defaultproperties
{
WaveSize=10
ObjName="Spawner Activation"
ObjCategory="Awesome Game"
VariableLinks.Empty
VariableLinks(0)=(ExpectedType=class'SeqVar_Int',LinkDesc="Wave Size",PropertyName=WaveSize)
}
The
VariableLinks.Emptyline might be confusing, but we're using it to clear out the Targets link that was there before adding our own.We're done with the Kismet action, so let's open up AwesomeGame and create the
StartWavefunction that we're calling from Kismet:function StartWave(int WaveSize) { local AwesomeEnemy AE; foreach DynamicActors(class'AwesomeEnemy', AE) AE.Destroy(); EnemiesLeft = WaveSize; bSpawnBoss = false; ActivateSpawners(); }This might seem a bit more complicated than we were expecting, but we need to make sure that any fleeing enemy left behind from a previous wave is properly destroyed before we start a new one. We also need to set
bSpawnBosstofalseto make sure we spawn normal minions for the wave.That's it for the UnrealScript side! Compile the code and open AwesomeTestMap in the editor.
We'll notice in the Kismet editor that our Wave Size variable link shows up on our Spawner Activation action now, and if we look at its properties we can change it there too.
Now let's change our level's Kismet so we have two waves and then a boss. First set our Spawner Activation's Wave Size to 5. Also right-click on its input and set the activation delay to 5.
Hook an Enemies Incoming! log action to the output of our Spawner Activation.
Open up our Wave Complete event's properties and set Max Trigger Count to 0. We want it to be able to trigger more than once this time.
Now right-click on the input of our Spawn Boss action and hit Break All Links. We're going to put some stuff in between.
Add a New Action | Misc | Gate. We use Gates to control the flow of Kismet. If the Gate is closed the output won't activate until we send a signal to its Open input.
In the Gate's properties, set Auto Close Count to 1. This way the Gate will close after it has been activated once.
Hook the output of the Wave Complete log action to the In input of the Gate. Right-click on the gate's In input and set the activation delay to one second. This will become important in a bit.
Hook the output of the Gate up to the input of our Spawner Activation. Now when the first wave is complete, a second wave will start after another five seconds. The Gate will close to prevent any more waves from spawning.
Add another New Action | Misc | Gate. In its properties, set SeqAct_Gate | Open to unchecked. This will close it.
Hook the output of the first Gate to the Open input of this new one. Now when the second wave spawns, it will open the Gate so the next Wave Complete call can pass through it. The one-second delay we added earlier is to prevent both signals from hitting it at the same time and activating the output before we want it to.
Hook the output of the Wave Complete log action to the In input of the new Gate.
Hook the output of the new Gate to the input of the Spawn Boss action.
The Kismet sequences should now look like the following. Here is the first wave:
The line coming from the bottom is from the second wave and boss Kismet here:

That's it! Save the map and run the game.
Now we can definitely see the effect that moving functionality into Kismet has had. We can really customize each level of our game, add more waves, change the size of the waves, and do things in between the waves.
Now that we've separated the minion spawning into Kismet actions and events, see if you can do the same thing with the boss spawning. Create a Boss Defeated event and Game Complete action so that you can have more than one boss per level.
Hint:The Boss Defeated event would look like this:
class AwesomeSeqEvent_BossDefeated extends SequenceEvent;
defaultproperties
{
ObjName="Boss Defeated"
ObjCategory="Awesome Game"
VariableLinks.Empty
bPlayerOnly=false
}
With the following changes to AwesomeBoss:
event TakeDamage(int DamageAmount, Controller EventInstigator, vector HitLocation, vector Momentum, class<DamageType> DamageType, optional TraceHitInfo HitInfo, optional Actor DamageCauser)
{
local AwesomeEnemy AE;
Health--;
if(Health == 0 && EventInstigator != none && EventInstigator.PlayerReplicationInfo != none)
{
// Delete this line:
WorldInfo.Game.ScoreObjective(EventInstigator.PlayerReplicationInfo, 1);
foreach DynamicActors(class'AwesomeEnemy', AE)
{
if(AE != self)
AE.RunAway();
}
TriggerGlobalEventClass(class'AwesomeSeqEvent_BossDefeated', self);
Destroy();
}
if(Health == 10)
GoToState('StageTwo'),
}
The Game Complete action would look like this:
class AwesomeSeqAct_GameComplete extends SequenceAction;
event Activated()
{
if(AwesomeGame(GetWorldInfo().Game) != none)
AwesomeGame(GetWorldInfo().Game).ScoreObjective(GetALocalPlayerController().PlayerReplicationInfo, 1);
}
defaultproperties
{
ObjName="Game Complete"
ObjCategory="Awesome Game"
VariableLinks.Empty
}
In addition to general events that can be triggered globally from any class, Actors have an array of Event classes called SupportedEvents. We've used this before with Triggers. When you have an Actor selected in the level, right-clicking in the Kismet editor will reveal the SupportedEvents of that class under New Event Using (Actor's Name). If we look at Actor's default properties, we can see the list:
SupportedEvents(0)=class'SeqEvent_Touch'
SupportedEvents(1)=class'SeqEvent_Destroyed'
SupportedEvents(2)=class'SeqEvent_TakeDamage'
SupportedEvents(3)=class'SeqEvent_HitWall'
SupportedEvents(4)=class'SeqEvent_AnimNotify'
And under Trigger, a new one is added:
SupportedEvents.Add(class'SeqEvent_Used')
If we had any custom events that we wanted to be used in this way, that's how we would add them. We can also empty out the SupportedEvents array the same way we did with the variable links of our Kismet actions. Taking a look at the TriggerVolume class we can see an example of that:
SupportedEvents.Empty
SupportedEvents(0)=class'SeqEvent_Touch'
SupportedEvents(1)=class'SeqEvent_TakeDamage'
Here, the array is emptied, and then the two desired events are added back in.
Let's see if we can take advantage of these in our game.
Let's see if we can change the beginning of our game. Instead of automatically triggering the first wave when the player spawns, let's make it so they have to pick up the weapon and a weapon upgrade first as a kind of tutorial:
Open AwesomeTestMap in the editor.
Place an AwesomeWeaponUpgrade in the level near the weapon.
With the AwesomeWeaponUpgrade selected, open the Kismet editor.
Right-click above the Player Spawned event and hit New Event Using AwesomeWeaponUpgrade_0 | Touch.
Hook the Touched output of the event to the input of the Spawner Activation action.
Delete the Player Spawned event.
Save the map and run the game.
We can see the problem with this setup pretty quickly. Even if we don't actually pick it up, simply running over it triggers the first wave. The problem is that the AwesomeWeaponUpgrade receives touches and triggers its Touch events regardless of what we're doing inside the UnrealScript class's Touch function. We'll need to create our own event for this.
We'll create a custom event called Picked Up.
Create a new file in
DevelopmentSrcAwesomeGameClassescalledAwesomeSeqEvent_PickedUp.uc.Write the following code in the new file:
class AwesomeSeqEvent_PickedUp extends SequenceEvent;
defaultproperties
{
ObjName="Picked Up"
ObjCategory="Awesome Game"
bPlayerOnly=false
}
Simple enough. Now we need to add this to the
SupportedEventsof our AwesomeWeaponUpgrade class's default properties. In AwesomeWeaponUpgrade add this to the defaults:SupportedEvents.Add(class'AwesomeSeqEvent_PickedUp')
Now we can use it in the editor, but we need to trigger it. Let's rewrite our
Touchfunction to add a new line. Change AwesomeWeaponUpgrade'sTouchfunction to look like the following:event Touch(Actor Other, PrimitiveComponent OtherComp, vector HitLocation, vector HitNormal) { if(Pawn(Other) != none && AwesomeWeapon(Pawn(Other).Weapon) != none) { AwesomeWeapon(Pawn(Other).Weapon).UpgradeWeapon(); TriggerEventClass(class'AwesomeSeqEvent_PickedUp', self); Destroy(); } }The function
TriggerEventClassis defined in Actor, and triggers all of the events that are linked to this Actor. Those events are automatically added to that actor'sGeneratedEventsarray when we create them in the Kismet editor.Compile the code and open up the editor.
In the Kismet editor, delete the Touch event we were using before.
Select the AwesomeWeaponUpgrade in the level, then right-click in the Kismet editor and hit New Event Using AwesomeWeaponUpgrade_0 | Picked Up.
Hook the output of this event to the input of the Spawner Activation action. That takes care of the functionality, but let's see if we can spice it up a bit with instructions for the player.
Right-click above this sequence and hit New Event | Player | Player Spawned.
Next to it, add a New Action | Misc | Log. Give it an Obj Comment of Pick up the weapon.
Connect the Player Spawned event to the Log.
Now select the weapon spawner in the level, and right-click in the Kismet Editor and hit New Event Using UTWeaponPickupFactory_0 | Pickup Status Change. This is a
SupportedEventadded to weapon factories to let us know when it changes.Next to that, add another Log action with an Obj Comment of Now pick up the weapon upgrade.
Connect the Pickup Status Change event's Taken output to this new Log action.
Now add a new Log next to the Picked Up event for the AwesomeWeaponUpgrade, and give it an Obj Comment of Prepare yourself!
Hook up the Picked Up event to the Log.
This is what the Kismet sequence should look like now:
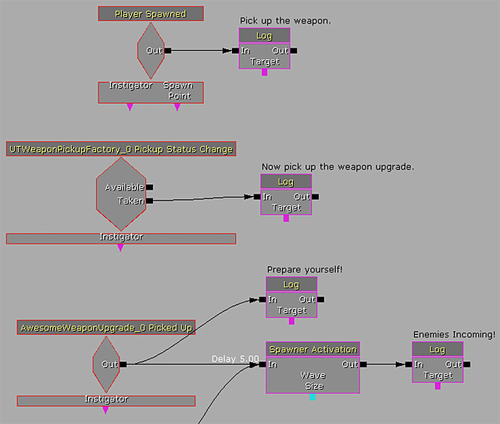
Save the map and run the game. Now we have a small tutorial for the game before the enemies start spawning. Nice!
Using SupportedEvents we can have Kismet events that are specific to an actor placed in the level as opposed to a global event that could be triggered by any actor. Each has its use, and as we can see they're incredibly helpful when trying to create Kismet with flexibility in mind.
The last topic of this chapter is dealing with latent Kismet actions. Normally Kismet actions are activated, some code is run, and their outputs are sent out immediately, but sometimes we'll want to delay an output until some condition has been met. For example, if we take a look at SeqAct_PlaySound, we can see this in the default properties:
OutputLinks(1)=(LinkDesc="Finished")
This obviously isn't an output that activates immediately; it waits until the sound is finished playing and then activates this output. But how do we do that for our own actions? Let's find out!
Latent actions have their own section under the SequenceAction tree, under SeqAct_Latent. Instead of creating an entirely new action, we'll move our Spawner Activation action here. We'll do this so we can create a timer instead of having to use delays on the inputs and outputs. Let's get started!
First we need to create the timer. Let's do this in AwesomeGame. We'll start with the
intvariable at the top:var int NextWaveTimer;
Now let's change the
StartWavefunction:function StartWave(int WaveSize, int WaveTimer) { local AwesomeEnemy AE; foreach DynamicActors(class'AwesomeEnemy', AE) AE.Destroy(); EnemiesLeft = WaveSize; NextWaveTime = WaveTimer; Broadcast(self, NextWaveTime); SetTimer(1, true, 'WaveCountdown'), }We've added a new parameter to take the desired countdown time, then set it to our new variable and called a repeating timer for WaveCountdown, which we'll write next. We also broadcast the time left, similar to how the Log action shows its Obj Comment on screen.
Now we'll write the
WaveCountdownfunction:function WaveCountdown() { NextWaveTime--; if(NextWaveTime <= 0) { ClearTimer('WaveCountdown'), bSpawnBoss = false; ActivateSpawners(); } else Broadcast(self, NextWaveTime); }In this function, if the time has reached 0, we'll clear the repeating timer and start the spawning. If not, we'll broadcast the time left.
Now let's give
NextWaveTimea default property.NextWaveTime=5
This will get overridden the first time the wave is called, but it's good to have a default for it.
Before we get to the Spawner Activation action, let's fix a small bug we've been getting with our HUD. We don't want the number of enemies left to display until the wave starts, so let's change the
DrawHUDfunction of AwesomeHUD. Find this line:if(!AwesomeGame(WorldInfo.Game).bSpawnBoss)
And change it to this:
if(!AwesomeGame(WorldInfo.Game).bSpawnBoss && AwesomeGame(WorldInfo.Game).NextWaveTime == 0)
Now the number of enemies will only show once the wave has spawned. To get the number to stop showing after the wave has ended, let's add a line to our EnemiesKilled function in AwesomeGame:
function EnemyKilled()
{
local int i;
if(bSpawnBoss)
return;
EnemiesLeft--;
if(EnemiesLeft <= 0)
{
for(i=0; i<EnemySpawners.length; i++)
EnemySpawners[i].MakeEnemyRunAway();
ClearTimer('ActivateSpawners'),
TriggerGlobalEventClass(class'AwesomeSeqEvent_WaveComplete', self);
NextWaveTime = -1;
}
}
Since we're checking if
NextWaveTimeis equal to zero in the HUD, setting it to -1 here will make sure it doesn't display after the wave is over, while still letting us set it to an appropriate number whenever we call the next wave.Now for the Spawner Activation action. First we need to change the class we're extending from:
class AwesomeSeqAct_SpawnerActivation extends SeqAct_Latent;
Now we need to add the wave time variable here:
var() int WaveSize, WaveTimer;And give it a default property:
WaveTimer=5
We'll also add a variable link for it:
VariableLinks(1)=(ExpectedType=class'SeqVar_Int',LinkDesc="Wave Timer",PropertyName=WaveTimer)
Now let's change our outputs and make sure they don't automatically activate:
OutputLinks(0)=(LinkDesc="Out")
OutputLinks(1)=(LinkDesc="Finished")
bAutoActivateOutputLinks=false
We want the Out output to activate immediately, so let's change our
Activatedfunction:event Activated() { if(AwesomeGame(GetWorldInfo().Game) != none) AwesomeGame(GetWorldInfo().Game).StartWave(WaveSize, WaveTimer); OutputLinks[0].bHasImpulse = true; }And now for the
Updatefunction. This is what keeps the Kismet action going until we're ready to deactivate it. Returningtruefrom this function tells the game that we're not done, that we want to keep callingUpdateon this action until we returnfalse. Here, we'll check the time in the AwesomeGame and keep updating until it reaches 0:event bool Update(float DT) { if(AwesomeGame(GetWorldInfo().Game) != none && AwesomeGame(GetWorldInfo().Game).NextWaveTime > 0) return true; OutputLinks[1].bHasImpulse = true; return false; }That's it for the UnrealScript, so compile the code and open the editor.
We're going to delete the old Spawner Activation action, but before we do, right-click on its input link and hit Copy Connections. That will make the next step easier.
Delete the Spawner Activation action and add a new one. Right-click on its input link and hit Paste Connections. This saves us a bit of time.
Connect the Finished output link to the Enemies Incoming in the Log action.
Delete the Prepare yourself! in the Log action. The countdown timer will replace that.
Save the map and run the game. Now we have a nice countdown before the enemy spawn, and the number of enemies doesn't show on the HUD until the wave starts. Nice!
Latent actions are useful when you need to wait for something beyond Kismet's control to happen before you end the execution of an action. It's used for camera fades to wait until the fade is complete before activating an output. Matinee is a huge example of latent actions since it's used to create in-game movies and object movement. Knowing how to use latent actions will help you create Kismet that's specifically tailored to your needs.
We learned a lot in this chapter about using and creating Kismet in our game.
Specifically, we covered the following:
How to use existing Kismet
How to create our own Kismet actions and use them to interact with other UnrealScript classes
How to create and use conditions to control the flow of Kismet
How to create and trigger Kismet events
How to use latent Kismet actions to delay activation of outputs
Now that we've learned about Kismet, we're ready to start playing our game on a server, which can run on our own computer!