
Here, we will define three states of AI. This will make it easier when specifying actions in different states. Now, the first state we will add is Wander. It will make the AI move randomly and indefinitely. This will be the initial state of the AI, and it will be capable of transitioning into other states once we approach the AI. The other two states are the two reactions that we give the AI. The idea is that when we approach the AI, there is a chance that it will flee or attack. The chance is the probability that we determined and created in the blueprint.
Let's open Unreal Engine 4! Perform the following steps:
- First, we have to change our Enemy to act as a wandering frightened monster. So, double-click on the Enemy AIController. Now, navigate to Event Graph and zoom in.
- We want to create a new variable for State and make this Integer.
- Next, we have to change the Find Hero script. We will adapt this to detect the Hero. What we also want to keep is the chasing of the Hero blueprint. This will be used to chase or run from us scared, which is the inverse. So, focus on the script.
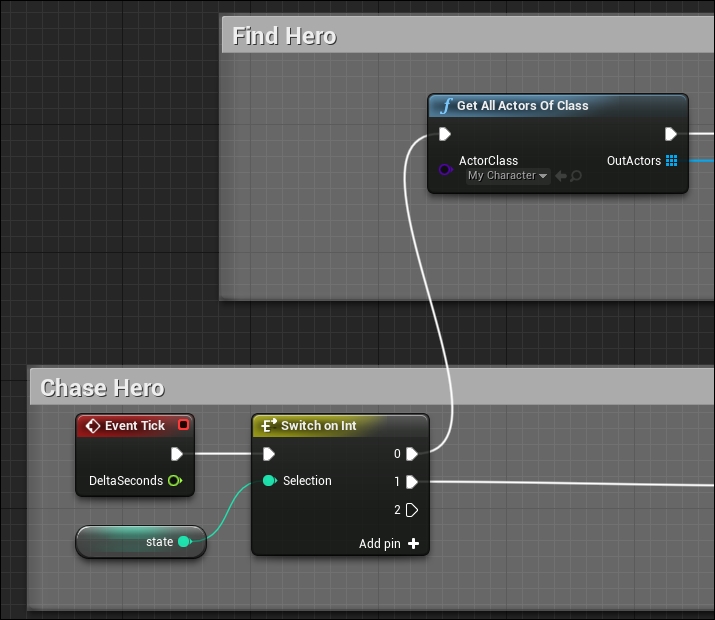
- Remove Event Begin Play from the beginning of the script. Next, pull back Event Tick from the Chase Hero script.
- Replace the Delay node that is after the Event Tick node in the Chase Hero script and put a Switch on Int node. Then, pull the State variable and connect it to the Selection value pin:

- Now, the AI will constantly tick based on State. Different scripts are executed, which can be transitioned in between, and this is the basis for Finite State Machine.
- Next, let's conjoin our two scripts to the Switch on Int node. We want the Find Hero script to be connected to the index 0 of the node. Then, connect index 1 of the node to the Chase Hero script. So, you can press Ctrl and click on index 0, moving Move to Location to index 1 after connecting index 0 to Get All Actors Of Class.
- So, we have to check the distance of the Actors element found from Get All Actors Of Class, and then, if an Actor is within range, we will roll the chance of transiting into Attacking or Running away from this Actor:
- Now, focus on ForEachLoopWithBreak, and let's check the current Actor element for distance using the Get Horizontal Distance To node. Place this node and Get Controlled Pawn and connect this to the Target pin of Get Horizontal Distance To.
- From the Array Element pin, connect to Other Actor of Get Horizontal Distance To. The distance we want the Actor within is 512 units. So, pull from Return Value, type the less than (<) symbol, and compare it to 512. Once more, what we want to do is ensure that we don't ever run from ourselves.
- Compare Array Element node to Get Controlled Pawn using a Not Equal node. Then, create an AND gate node and join both the Boolean results. Create a Branch node from the results from the AND gate node. This Branch node should be after Get Horizontal Distance To.
The Blueprint script we are about to create demonstrates a simple yet effective probability. The system works off the idea of the simple lottery probability of 0-1 with a variant. So, you first determined the chance that TRUE will return from the function. Next, you determined the range that the lottery will span for, which is 1 by default. The rest is left to the script. It now takes Change Weight, and Number Span then calculates an offset. From there, we will calculate a range of probabilities from Chance Weight. Then, we will generate a random number within the range of our Number Span and check whether it's within the range of the probability we determined before. This small variant makes the probability less predictable. The following image shows the simple lottery probability script checking for a random value within the determined probability range:
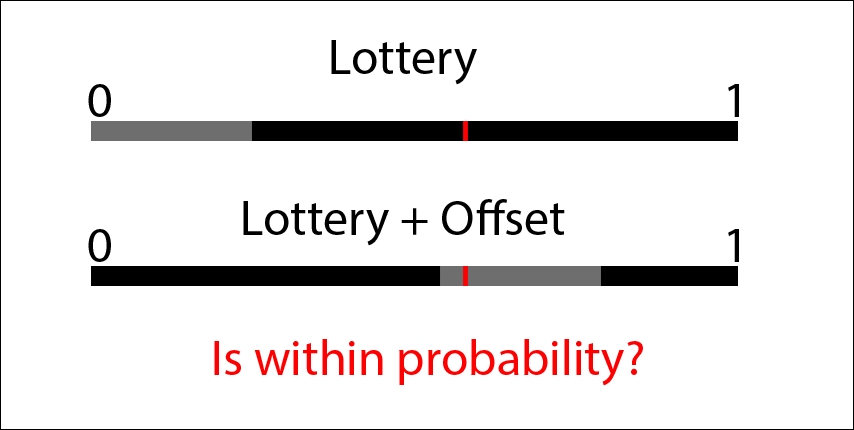
Note Offset from Lottery in the second one, which lands as true. Next time, the range of probability will not be there, and a new random value will be calculated.
The first thing we want to do is initialize RandomStream. We can do this by creating a Make RandomStream node and populating the initial seed pin with a random integer in Range. RandomStream allows us to control the random generation of output. If we do not change the seed within RandomStream, it will constantly produce the same results. So, with that in mind, we must constantly reset the seed within the stream so that the random output changes. Perform the following steps:
- Focusing back to the Enemy AIController, create Random Integer in Range and set the Max value to
65535. Then, pull from Return Value and typeMake RandomStream. - Now, we need to create variables to update RandomStream. Create an Offset float with a default value of 0. Then, create a ChanceWeight float with a default value of .25. Create a Max N float with a default value of 1.
- Then, create Event Begin Play. Drag out the Offset variable and make a SET node. Drag from the exec pin of Event Begin Play to the SET node you just created. Next, create Random Float in Range from Stream and pull from Return Value to the Offset Float:
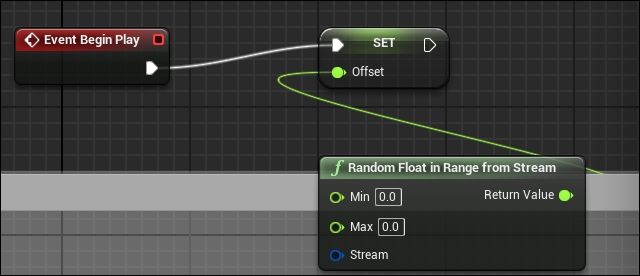
- We now need to plug in our RandomStream to this node and connect the Max N variable to the Max Float of Random Float in Range from Stream. This will now create a random offset at the beginning of the game.
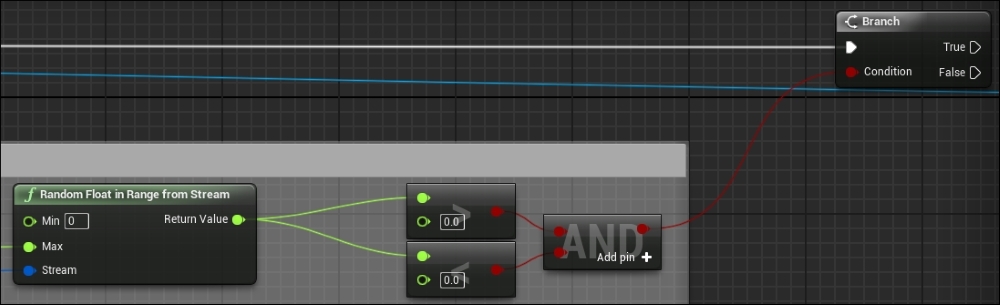
- Now, let's start the probability script. Let's get our variable and create Random Float in Range from Stream. Then, we want to create two nodes from this to compare Return Value. We want to check whether the value is greater than or less than. Then, pull a pin and create an AND logic gate. Finally, pull the other Boolean compare.
- Next, pull the result of AND to a new Branch node. What we need to do next is compare the random result to Lottery Probability Range we calculated using Offset:
- So, get Offset from the variables. We want to put this in modulo (%) and then connect it out to the greater than (>) compare node.
- Next, we want to get ChanceWeight from the variables. Then, we will multiply this by the Max N value to calculate the probability range. We will do two things with the results of this calculation, as in the next steps.
- First, we want to get the difference from the Max N value with the results. Then, we will connect this to modulo (%).
- Next, we want to add the probability range to the results of modulo (%). Then, we will pipe this into a clamp for safety. We will set the Min value to 0 and Max to Max N. The results of this clamp plugs into the less than (<) of the compare node shown as follows:

Transitions help apply the appropriate actions to what's being perceived in the AI's environment. They also continue the execution flow, and this is what makes Finite State Machines so special. We will apply this in our project by transiting into Flee or Attack state, and after sometime, it will calculate whether it should flee or continue attacking. Once no enemy is found, the AI will transition back into a wandering state. Follow these steps:
- So, from the Branch node we last created, let's set our State variable on our True pin for the Branch node. Then, we will set another State variable on the False pin for the Branch node. From there, let's set the True Set State value to 1, then False Set State to 2.
- Next, let's rename our Hero variable to Target just to make it easier. Next, we want to set Target after our two other Set State variables.
- Then, we want to connect both the Set State variable nodes to the Set Target variable node. The Set Target node should be set to Break the ForEachLoopWithBreak.
- Now to reset the RandomStream. Let's zoom out and find the Event Tick node. From there, let's pull pin and create Sequence between Switch on Int.
- From then_1 of the Sequence node, let's create Delay with Duration of 0.2 second. Then, pull from Return Value of Make Random Stream and find Reset Random Stream. This will reset the stream, and if you have Random Integer in Range connected as we do, it will generate a new random Int each time it's reset.
- Plug this in after Delay so that the reset happens every second. Then, we want to pull from reset to the offset variable of the SET node we created from Event:
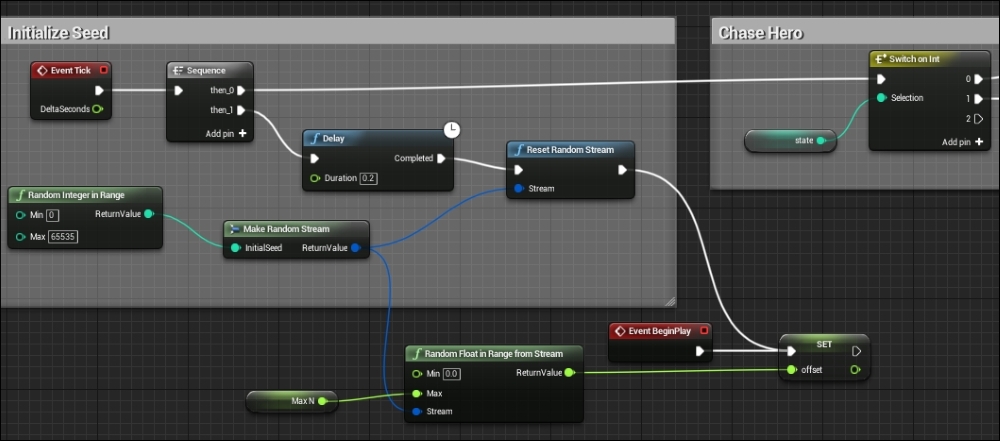
Set offset to a random value
- Now, let's create a new Sequence node by pulling from index 1 of the Switch on Int node. Then, connect index 2 of the Switch on Int node to the Sequence node from before.
- Now, let's pull from Then 1 of the Sequence node and create a Delay node. This node will transition our AI back to the Wandering state from where it can detect Enemy again.
- So, let's create Random Float in Range from Stream and connect Stream to Random Stream, which we created earlier. Then, set the Min value to 3 and the Max value to 5.
- After the Delay node, set the State variable to 0. Then, set Target to none:
