In this chapter, we will focus on flocking and more advanced path-following behaviors. What we will try to achieve is implementing flocking behaviors to create realistic movement for our AI, such as when you need agents to avoid each other while all are moving in the same direction. Sometimes, it's necessary for your agents to seek a leader, so you can create different formations of agents. First, we want to set up everything we need to get some pawns moving around within a level. Next, we will add some blueprints to these pawns to give them the ability to discover new leaders. Lastly, we will introduce flocking behavior so that we can see how our AI moves as a group.
The topics covered in this chapter are as follows:
- Setting up an actor blueprint for movement
- Implementing following behavior
- Implementing flocking behavior with features such as separation, cohesion, and alignment
- Adding behavior control through UMG
Let's create a new project called AdvancedMovement using the Physics Ball template. Currently, we are using Unreal Engine 4.8.3. The first thing we want to do is find our PhysicsBallBP class and open up EventGraph. We can do this by implementing the points given as follows:
- After our project is loaded, navigate into the RollingBP section and then into the Blueprints folder.
- In here, you'll find
PhysicsBallBP, and this will act as our agent in this chapter. Let's open up to EventGraph for this actor. - Now, let's remove any unnecessary logic from the example. I removed the following variables:
- The JumpImpulse variable
- The CanJump variable
All the blueprint code located in EventGraph is not in the following screenshot:

- Okay, now that we have a starting ground, let's create a variable called Direction and give it the vector variable type.
- Next, create a variable called StartLocation and set it as a vector variable type as well.
- Now, find Event Begin Play, and let's initialize our new vector variables. First, right-click the area near the event and find Random Unit Vector. Split the vector (by right-clicking on the pin) from the Random Unit Vector node because we only want the X and Y values.
- Next, let's right-click and create a new node called Get Actor Location. We have to pull down the StartLocation vector set variable. Then, from Return Value, set our Start Location variable. Comment the Give random direction and save start location area:

- Now, we need to set the Direction variable to be the direction of the SpringArm variable. The reason for this is so that the camera always faces the direction in which we are moving in the world. So, when you modify the different variables, you can see it take effect.
- Pull our SpringArm variable into EventGraph. Next, pull from the SetRelativeRotation variable.
- We want to then get our SpringArm variable's current RelativeRotation value to interpolate it between the directions we should be facing. This creates a smooth transition when updating the camera's rotation.
- By pulling from the SpringArm variable's current RelativeRotation pin, we want to create the RInterp To node.
- Next, we want to get our Direction variable and convert this direction to a rotation using Make Rot from X.
- We will change this rotator by an offset. I calculated this as the local rotation offset of the spring. With the direction in A, we should set B to have 0.0 Roll, 45.0 Pitch, and 90.0 Yaw.
- Now, connect the Return Value pin to the Target pin of our RInterp To node.
- Now, right-click, search for Get World Delta Seconds, and plug this into the Delta Time pin on our RInterp To node.
- The Return Value pin must now be plugged into New Rotation for the SetRelativeRotation node we created earlier.
Comment this area Calculate Direction for Camera Spring Arm:

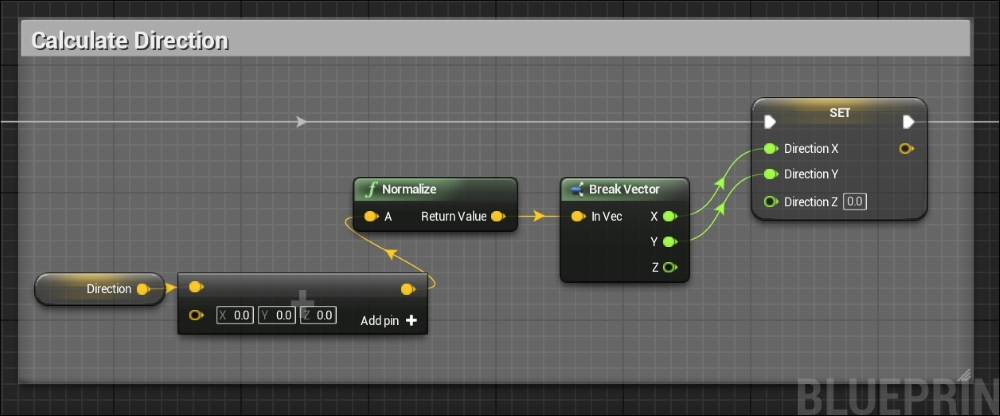
- So, to do this, let's pull our Direction variable down. Pull from the variable and find Vector + Vector. From here, we want to normalize the vector. Lastly, let's break the vector.
- Next, let's pull the Direction variable and create a set variable. Let's split the Direction set variable using Break Vector. Then, plug both X and Y float variables into the Direction X and Direction Y variables of the SET node.
Comment this area Calculate Direction:
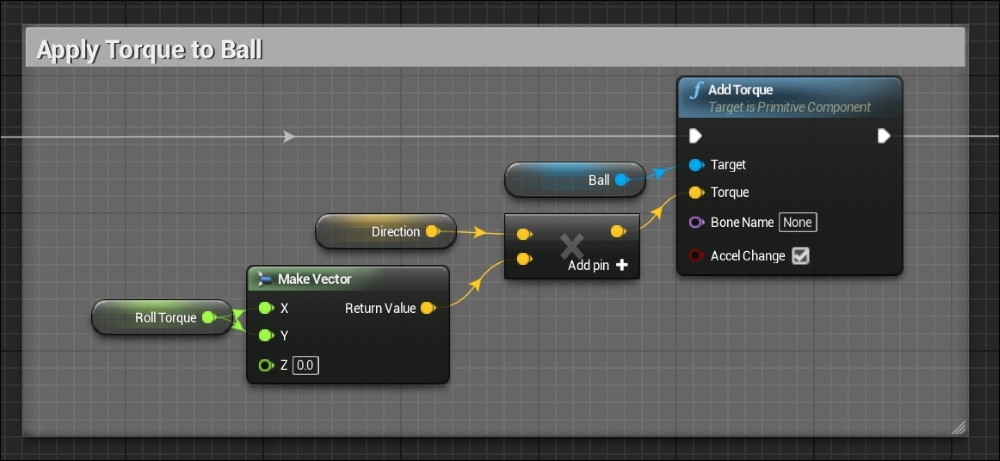
- We need to pull a Ball variable and call a node named Add Torque.
- To calculate the Torque value, we want to take the Direction variable. Get the Roll Torque variable and multiply it by the Direction vector. The results of this should be plugged into the Torque pin of the Add Torque node.
Comment this area Apply Torque to Ball:
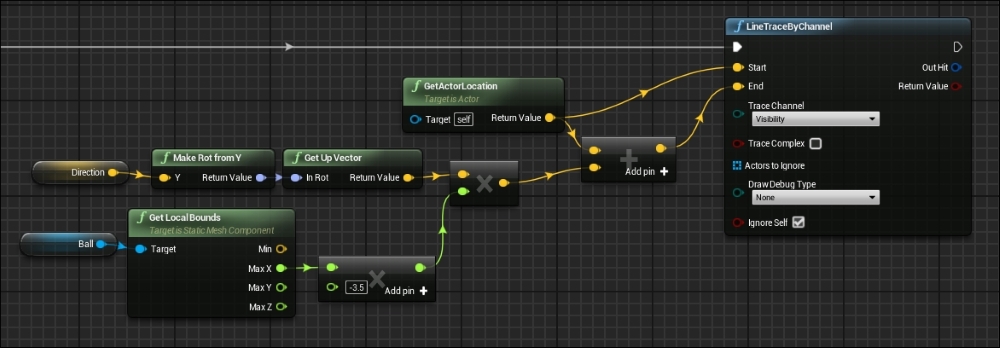
- The next step is creating a function that will scan in front of the Ball variable. If a trace is hit, it means that we hit a wall. From here, we want to use Hit Result to generate a reflection off the wall based on Hit Normal. Let's see this in practice.
- From our last node, let's create a new node called LineTraceByChannel. From here, we want get a new node by right-clicking and searching for Get Actor Location. Plug in Return Value into the Start pin of our newly created node.
- Grab another copy of our Direction variable and place it in the graph. Pull from our Direction vector and right-click for a new node called Make Rot from Y. From Return Value of Make Rot from Y, right-click for a new node called Get Up Vector.
- Get a variable for our Ball vector and then right-click for a new node called Get LocalBounds. Now, split the Max vector and from Max X, right-click for a new node, Float * Float.
- Now, this variable will take our size and use it to determine a distance forward that is outside the sphere. In our example, we will scale by -3.5. We will invert our scale because the vector we will multiply is relative to the ball, not the world.
- In the Float * Float node, let's make the other float -3.5, which is not connected.
- From our Get Up Vector node, let's multiply it by the Float * Float result from the earlier step. Now, we need to right-click and find a Vector + Vector node. Add this vector to our GetActorLocation node. Then, plug the results into the End pin of our LineTraceByChannel node:
- From our LineTraceByChannel node, split hit result. Now, find Out Hit Blocking Hit and create a branch from the Boolean result. Let's pull our Direction vector and get the SET variable. This should be connected with the True output pin of the Branch node created previously.
- From our Out Hit Normal pin, right-click and create a Make Rot from Y node. Now, we want to pull from this return, right-click, and create a Get Up Vector node. This takes the normal from the world to relative direction space. Lastly, we want to get the Direction vector to get the variable.
- Pull from our Direction variable and release to find Mirror Vector by Normal. Let's plug in the Get Up Vector node from the earlier step into In Normal of Mirror Vector by Normal. The results of this node are pinned to the Direction pin of the SET variable executed on the True statement.
Comment this area Bounce current direction off wall cloding in front of ball:

Complete blueprint setup for Bounce current direction off wall
Now that our PhysicsBallBP class or agent is updated to handle the direction vector, we will initialize it with random values. It should perpetually move forward and bounce off walls as the actor gets close enough to the impact.