
Now that we have our soldiers in the world, we want to navigate them to their respective waypoints. This will be done through the AIController we set up on our soldier. If we focus again on Unreal Engine, we can get started! Follow these steps:
- Open the AIController class we created earlier and named
SoliderAI. - Then, we want to navigate to the EventGraph section. From there, we want our AIController to begin navigating to its first route as soon as it possesses a worthy pawn. So, let's add an event to drive this action (I encourage the use of events). The one we are looking for is called Event On Possess. This will also return the pawn it possessed, which we can use to compare with the
Allowed Accesslist from waypoints. - Pull from the exec pin, and let's assign a new event called RecieveMoveCompleted. This event will continue the pawn to the next route as soon as it completes the previous one:
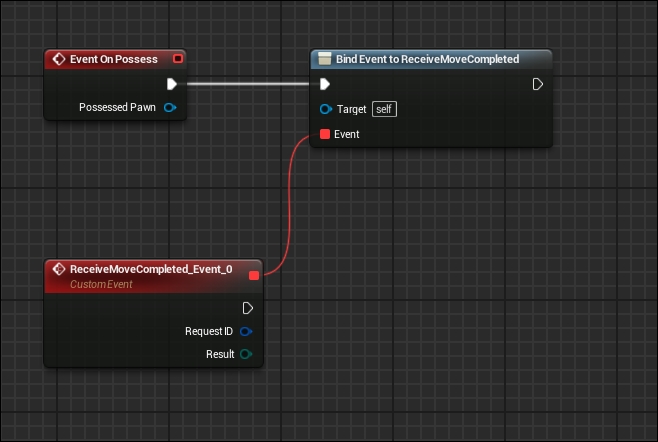
- Now, after the Bind Event exec pin, let's put in Do Once to prevent this from being called twice.
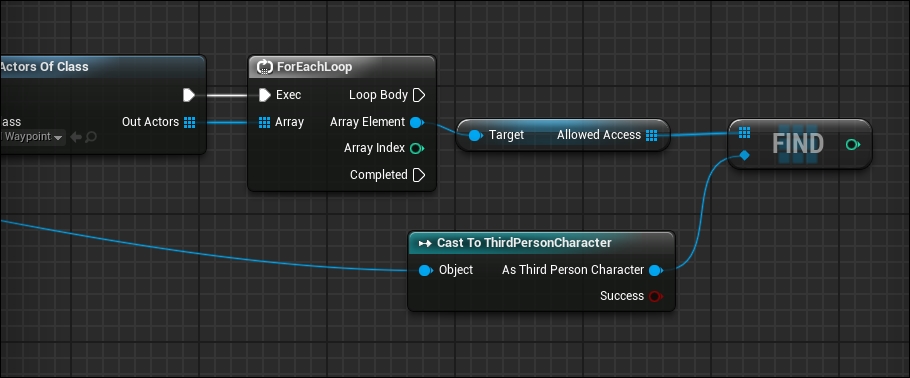
- Next, let's right-click, search for the Get All Actors of Class node, and select our custom blueprint called
Waypoints. We want to now search through the available list of waypoints and check whether we're allowed to navigate there. - So, create a ForEachLoop node from the Out Array of Actors array and pull the Allowed Access array from Array Element. Then, we want to pull the pawn returned from the Event On Possess variable and cast it to the ThirdPersonCharacter pawn.
- From there, let's try to find the pawn in the Allowed Access array. The array will return -1 if nothing is found, which means that we do not have access!
- We need to pull a
Compare Int != Int Booleanoperation and compare our results from Find with -1. This will then be pumped into a Branch node. - Now, when this Branch node returns
True, this means that we are allowed to navigate to the current Array Element pin, and we should add it to our points to navigate to. - Now, let's create a new Routes array on our pawn to hold the waypoints we can navigate. Then, we will pull this node to the Branch node we just created and pull Add from the array node. This will allow us to quickly access the routes we have assigned to us.
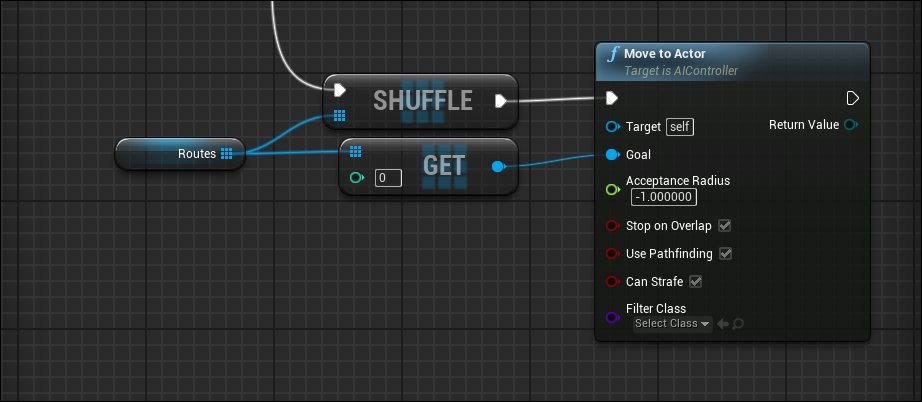
- Now, we need to tell the pawn to navigate to the waypoint after this operation is completed. This can be done by pulling another Routes array out past the last nodes we placed.
- We want to shuffle our Routes array so that our next destination is random. You can do this by pulling from the array and searching for SHUFFLE. This should be called last before our next operation:

- Next, we have the location that the pawn needs to go to, and we need to tell the pawn to move. We have two options: the first is to provide the Move to Location node with a location, and the second is to provide an actor and allow the engine to handle finding the destination. I will choose the latter for this example.
- Right-click and search for the Move to Actor node, and we want to pump the first actor in the index from the Routes array we created earlier:
- From there, let's track back to our ReceiveMoveCompleted event and pull from this to our SHUFFLE node. Now that this is completed, we want to go back to the editor. Let's simulate and see what AI does!

Now, let's get back!
Do you remember when we talked about heuristics? Navigation Modifiers allow you to directly affect the cost of navigating areas in which the modifier directly overlaps. You can also represent this affected area with a new color.
Now, in our example, we will analyze the behavior of AI as it traverses the different Navigation Modifiers we set up. What you want to understand from this is that heuristics help to find an optimal solution faster than Dijkstra's algorithm alone while utilizing the same method of discovery.
So, for example, if you have a cityscape and want your AI to stay on the sidewalks and out of the streets as much as possible, you could place Navigation Modifiers in the streets, which makes traversing the area highly costly. So, your AI will only ever traverse these areas if the appropriate path is blocked off by other high costs, such as obstacles.
Now, let's head to Unreal Engine 4 editor and get ready to create our own obstacles to see this behavior in action. We will also touch on NavModifierVolume and how you can use it in Unreal Engine 4.
Let's navigate and look at the Modes window. In the first tab, we want to click on Volumes. Now, within Volumes, you'll see NavModifierVolume, and this will need to be dragged into the level:
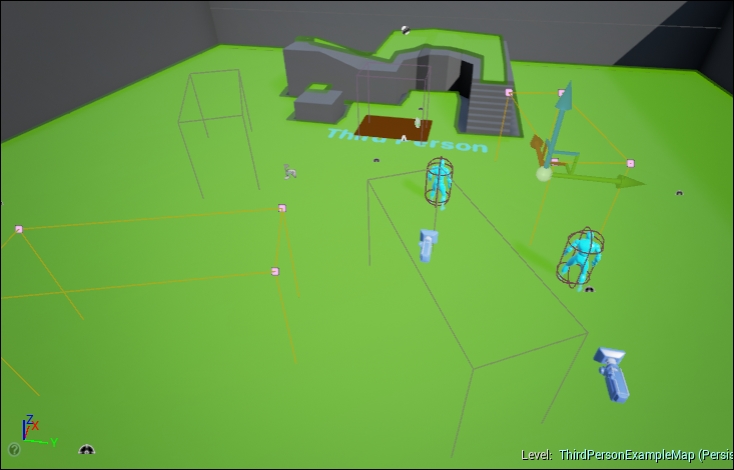
- Drag Multiple NavModifierVolume into the level. We want these volumes to block the direct paths between the waypoints we created earlier.
- So, after dragging the volumes out, we should have some nice separation between NavModifierVolume and Waypoints. The screen should look similar to the following screenshot:
- Next, we need to create NavArea, which will override the properties of the Navigation Mesh that NavModifierVolume overlaps.
This class is responsible for applying the adjusted cost of NavModifierVolume. This also goes to say that NavModifierVolume is used to affect the Navigation Mesh. NavArea classes are used explicitly to override properties or functions in the affected Navigation Mesh. Today, we will create two NavArea classes to represent two different types of environmental situations. One will be the representation of water and the other, mud. The theory behind this is that water would have a high entry cost because it is not as fast as stepping in mud, but mud would have a low travel cost increase because it's not easy to walk in.
With this in mind, let's move on to the next step, which is creating different NavArea classes to apply to our NavModifierVolume actors:
- Right click on our Blueprint folder within Content Browser and go to Blueprint Class.
- From there, we want to go to Custom Classes at the bottom of the window.
- Search for NavArea, and let's create a new subclass from this.
- After creating one more NavArea, let's name one
AreaOfMudand the other,AreaOfWater. - Double-click on
AreaOfMud, and let's go to Default Properties. - In there, you will see Default Cost and Fixed Area Entering Cost.
- We want the Default Cost value to be 2.5, and this will affect the NavModifierVolume actor it belongs to.
- For Fixed Area Entering Cost, we will leave this at 0.0 for mud. Lastly, change the Draw Color color to brown so that we know what's affecting the Navigation Mesh. As we stated earlier, entering mud is relatively easy in comparison to water:

- Let's close this and then open
AreaOfWater. - We want to change Default Cost to 1.5, and let's change Fixed Area Entering Cost to 35. These values could be tuned according to the specific game you are working on. And of course, change Draw Color to something similar to light blue to represent water.
- Save and close and then go back to the editor!
- Now, let's go and apply these NavAreas to the NavModifierVolumes we placed on the level earlier.
- Once you do that, you should now see Draw Color updated. Let's hit Play and now observe our AI!
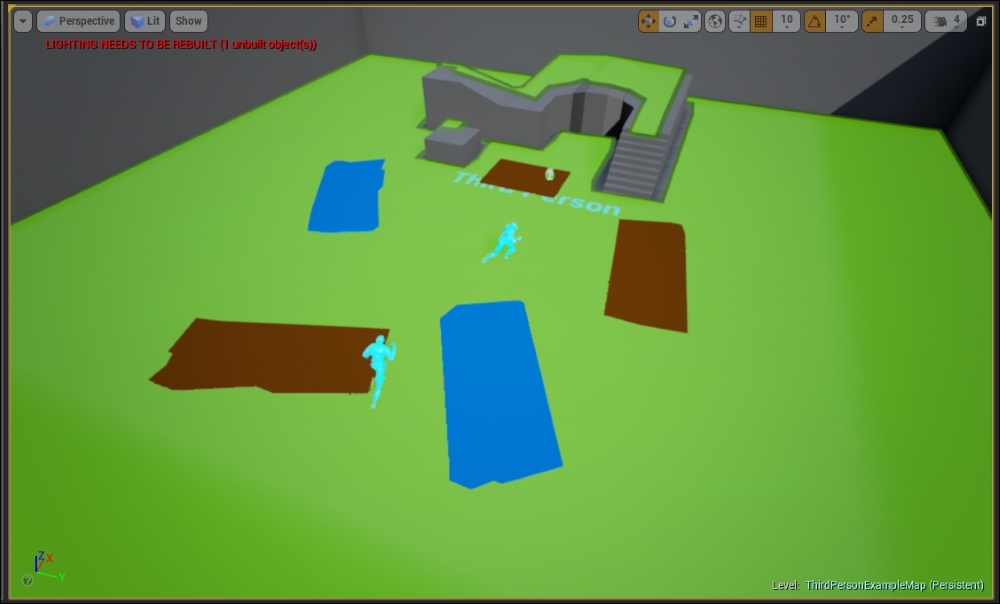
As you can see, the AI does exactly as you predict. It avoids the mud because of the cost that is applied as it traverses NavModiferVolume, and sometimes, water's Fixed Area Entering Cost wards off the AI, although more than often, the AI is found traversing the water because once you're in, everything is okay! This was usually the trick for me. So, with this said, I hope you've understood the A* algorithm and its search to find the most optimal path.