Chapter 2. Reading Content
Although the Kindle offers a wealth of features other than the capability to read books, magazines, newspapers, and blogs, its primary use is as an electronic reading device. Reading content seems like such a simple concept, but the Kindle has plenty of hard-to-find features that can make reading more enjoyable. This chapter covers these features.
Reading on the Kindle
When you select an item from the Home screen, the Kindle switches to the Reader screen. When an item is first opened on the Kindle, you might or might not be taken to the first page. (For example, many books open on the first page of Chapter 1 instead of the cover page.) The Kindle saves your last location for each item, so if you open an item that you’ve opened in the past, you are automatically taken to the place where you were when you last finished reading the item. Using the Whispersync feature, the Kindle can open a book on the same page that you were reading on another Kindle, on your computer, or other device using the Kindle application.
Note
As of this writing, Amazon has a Kindle application for the PC, Mac, Windows Phone, Blackberry, iPhone, iPod touch, iPad, and Android.
→ For more information on using Whispersync, see “Using Whispersync,” later in this chapter.
While reading, you navigate from page to page using the Next Page and Prev Page buttons on the side of the Kindle. When you change pages, you notice a slight delay and the screen flashes. This is perfectly normal and a byproduct of the use of E Ink for the Kindle display. The screen flashing is actually not a requirement for E Ink, but the Kindle flashes to make sure there aren’t any remnants of the previous page that might make the screen look “dirty.”
Note
The Kindle sometimes updates only parts of the screen instead of updating the entire display. (For example, when you turn the page in a book, the bar at the top of the screen is not refreshed.) Because of this, parts of the screen might display artifacts that look smudged or dirty. It’s normal for the Kindle display to do this, and it usually clears up when you turn the page. However, if you find that a particular part of the display remains dirty even after turning the page, you can press Alt+G on the keyboard to refresh the entire display.
Note
You can zoom in on images while reading by moving the cursor to the image and pressing on the 5-way. To restore your view to normal, press the 5-way again.
Keyboard Shortcuts While Reading
While reading, you can use several keyboard shortcuts.
• Alt+Home: This undocumented keyboard shortcut takes you to the Amazon Kindle Store. If wireless is turned off, the Kindle prompts you to turn it on. This is actually available from any screen, not just while reading.
• Alt+B: Adds a bookmark at the current location. If a bookmark already exists at the current location, pressing Alt+B removes it. A bookmarked page has a dog-eared corner in the top right of the screen. For more information on bookmarks, see “Using Bookmarks, Notes, Clippings, and Highlights,” later in this chapter.
• AA: Enables you to change the type size while reading content. You can choose from eight sizes. When you select a type size, the text of your content changes in real-time so that you can more easily determine which size of type works best for you. You can also change the typeface, line spacing, number of words per line, screen rotation, and text-to-speech settings by clicking the AA button.
Note
Changing the type size affects only Kindle content and content in the Web browser. The size of the type in menus, the Home screen, and so on is not affected.
• Letter Key or Space: Opens a search box, enabling you to search your Kindle content or search for items on the Internet. For more information on using the Search feature, see “Using Search on the Kindle,” in Chapter 3.
• Shift+Sym: Toggles the Text-to-Speech function of the Kindle. While Text-to-Speech is activated, you can toggle it on and off, control the reading speed, and change the speaking voice by pressing the AA button and choosing the appropriate item from the menu dialog that appears. For more information on using Text-to-Speech, see “Using Text-to-Speech,” later in this chapter.
Using the Progress Indicator
Unlike traditional reading content, the Kindle doesn’t use page numbers. Instead, it uses location numbers. While reading a book, the progress indicator displays at the bottom of the screen. Using a progress bar, it shows your current location within the book.
The Kindle shows the total number of locations in the current book on the right edge of the progress indicator. On the left edge of the progress indicator, it displays a percentage indicator showing how much of the book you’ve read. Notes, highlights, and bookmarks appear as dots on the progress indicator.
A downward-facing triangle on the progress indicator marks the start position of your current reading session. You can use this indicator to determine how much you’ve read during your current session.
Tip
While reading a book, if you want to move quickly to a note, highlight, or bookmark, select the My Notes and Marks item from the Reader menu. See the next section for more details on using the Reader menu.
Using Whispersync
Whispersync enables you to stop reading on one device and pick up reading on the same page on another device. You can use Whispersync to sync reading on one or more Kindle devices with your reading location on the Kindle application on another device. You can find the Kindle application for your device by going to www.kindle.com.
As long as you have wireless turned on and are connected to Whispernet, the Kindle automatically keeps track of the farthest page you’ve read. If you stop reading on one Kindle and pick up reading the same book on another Kindle, you can select Sync to Furthest Page Read from the Reader menu. If you have read to a later location in the book on another device, the Kindle notifies you and gives you the option of going to the furthest read location. Whispersync also synchronizes bookmarks, notes, and highlights.
Whispersync is not without problems. If you read a book that doesn’t lend itself well to linear reading (such as a cookbook), Whispersync isn’t helpful because it always syncs to the furthest page read, not the page you are currently reading on any one device. Whispersync is also not configurable. Amazon gives you the option to disable it for your Amazon account on the Manage Your Kindle web page, but you can’t choose to disable it only for particular books or only specific devices.
Tip
To turn Whispersync on or off for your Amazon account, visit the Manage Your Kindle page at www.amazon.com/manageyourkindle. Scroll to the bottom of the page, and click the Manage Synchronization Between Devices link.
Using the Reader Menu
The Reader menu makes it easy to jump to specific parts of a book or other Kindle content. It also contains menu items for adding bookmarks, accessing your notes, and so on.
Tip
While you are reading, you can press up on the 5-way to move the cursor from the last line of text to the first line of text or press down on the 5-way to move the cursor from the last line of text to the first line of text. However, menus don’t provide this convenience. If you want to move the cursor from the first item on a menu to the last item, you have to repeatedly press down on the 5-way.
To access the Reader menu, click Menu while reading.
The first item on the Reader menu is the Turn Wireless On if wireless is currently off or Turn Wireless Off if wireless is currently on. You find this menu item available on most of the Kindle’s menus, so you can easily turn wireless on and off.
Second on the Reader menu is Shop in Kindle Store. This takes you to the Kindle Store at Amazon. If wireless is off, the Kindle asks if you’d like to turn it on. For more information on the Kindle Store, see “Using Amazon’s Kindle Store,” in Chapter 3.
The rest of the Reader menu is divided into sections. The first section contains items for navigating books. (This section is not visible when reading newspapers, magazines, or blogs.) The following menu items are available:
• Go To: Opens the Go To dialog. You can then easily navigate to a location number, the cover of the book, the beginning of the book as chosen by the publisher, or the table of contents.
• Sync to Furthest Page Read: Manually synchronizes the furthest page read with Amazon’s servers. You can then pick up on that same page using another Kindle or the Kindle application running on a computer or other device using Amazon’s Whispersync technology. This item is enabled only for books purchased from the Kindle Store and is not available for sample books.
→ For more information on Whispersync, see “Using Whispersync,” earlier in this chapter.
• Book Description: Takes you to the Kindle Store page for the book. This item is enabled only if the book you are reading was downloaded (either as a purchase or as a sample) from the Kindle Store.
The last section of the Reader menu contains the following items:
• Search This Book: Opens a search box at the bottom of the page enabling you to easily search for one or more words or phrases in the book. This menu item also applies to samples and subscriptions, and the label for the item changes according to the item you are reading. (For example, if you are reading a magazine, the item is labeled Search This Issue.) For more information on using the Kindle’s Search feature, see “Using Search on the Kindle,” in Chapter 3.
• Add a Bookmark: Adds a bookmark on the current page. After you select this, the menu item changes to Delete Bookmark so that the bookmark can be deleted. This item is only available if you are reading a book. For more information on using bookmarks, see “Kindle Bookmarks,” later in this chapter.
• Add a Note or Highlight: Displays a message at the bottom of the screen with instructions on how to create a note or a highlight. You can also create a note or highlight by simply typing on the keyboard without selecting this menu item.
• View My Notes and Marks: Displays a screen showing all your bookmarks, notes, and highlights for the item you are currently reading. For more information on bookmarks, notes, and clippings, see “Using Bookmarks, Notes, Clippings, and Highlights,” later in this chapter.
• View Popular Highlights: Displays a list of highlights that are popular with other Kindle users. The location of the highlight displays along with the number of Kindle users who have highlighted the passage. If a book has no passages that are popular highlights, this menu item will be grayed out.
• Keep This Issue: Available only when reading magazines or newspapers content, this menu item causes the current item to remain on your Kindle until you explicitly delete it. Otherwise, subscription content is deleted after 2 weeks. This menu item changes to Do Not Keep This Issue after selected.
Using the Dictionary
One of the great features in the Kindle is the inclusion of the New Oxford American Dictionary and the Oxford Dictionary of English. If you are reading and encounter a word you don’t know, you can quickly look up a definition for the word without losing your place.
Note
The dictionaries are always listed on the Home screen. Some Kindle users have asked how they can be removed from the Home screen, but they cannot be removed.
To look up a definition, move the 5-way to a word, and the definition of the word pops up at the bottom of the screen. The Kindle dictionary works great for single words, but if you want to look up a phrase such as “dree one’s weird,” you need search the dictionary.
If you move the cursor to a word that is not contained in the Kindle dictionary, a definition does not appear. There’s no indicator that a definition wasn’t found.
→ For information on searching the dictionary, see “Using Search on the Kindle,” in Chapter 3.
If you’d like a more thorough definition of a word, press the Return key while the definition is displayed. You can then return to the item you were reading by pressing the Back button.
By default, the Kindle displays definitions using The New Oxford American Dictionary. If you’d like your Kindle to use a different dictionary, go to the Settings screen and press Menu. Select Change Primary Dictionary from the menu and select the desired dictionary.
Using Bookmarks, Notes, Clippings, and Highlights
My father is a book connoisseur. He has an extensive library of books that fill several walls in his house. When I was growing up, he insisted that my siblings and I take great care with our books. Because of that, I never write in my books, and I don’t dog-ear pages to keep my place. However, with the Kindle, I can now benefit from both of those practices.
Note
Bookmarks, notes, and highlights cannot be added to sample books downloaded from the Kindle Store.
Kindle Bookmarks
Bookmarks are a convenient way to mark a particular location within Kindle content. You can add as many bookmarks as you’d like so you can easily find your way back to a particular place.
Following are three ways to add a bookmark on the Kindle:
• Press Alt+B.
• Select Add a Bookmark from the Reader menu.
• Move the 5-way up or down to display the cursor, and then quickly press the 5-way twice. You cannot use this method to remove a bookmark.
When you add a bookmark, the top-right corner of the page changes to a dog-eared corner, as shown in Figure 2.1.
Figure 2.1. A Kindle bookmark.
To navigate to a specific bookmark, use the View My Notes and Marks item on the Reader menu. When you use the View My Notes and Marks menu item, you are presented with a list of bookmarks, notes, and highlights in the current content. Selecting a bookmark takes you to that bookmark’s location.
You can remove bookmarks by pressing Alt+B while at the bookmarked location or by selecting Delete Bookmark from the Reader menu.
Tip
Bookmarks, notes, and highlights can be deleted from the View My Notes and Marks screen as well. Move the cursor to a bookmark, note, or highlight, and press DEL to delete it.
Using Notes
More than once I’ve heard someone say, “I’ve scribbled notes in all the margins,” as evidence that a particular book is a good read. Although you can’t scribble in the margins of Kindle books, you can add notes to any part of a book using the Notes feature.
To add a note, move the cursor to a point in the text, and start typing your note. You can also use the Add a Note or Highlight item on the Reader menu. After you finish entering the text for your note, press down on the 5-way to select Save Note, as shown in Figure 2.2.
Figure 2.2. Saving a note.

Tip
If you need to enter an uppercase letter, you don’t have to hold Shift while you type the letter. Just press and release Shift, and then type the letter. After you type one letter, the keyboard automatically switches back to typing lowercase letters.
If you connect your Kindle to one or more social networks, you can share a note with others by selecting Save & Share after entering your note. You can also share a previously entered note from the View My Notes and Marks screen. Simply select the note you want to share and press Alt+Return to share the note.
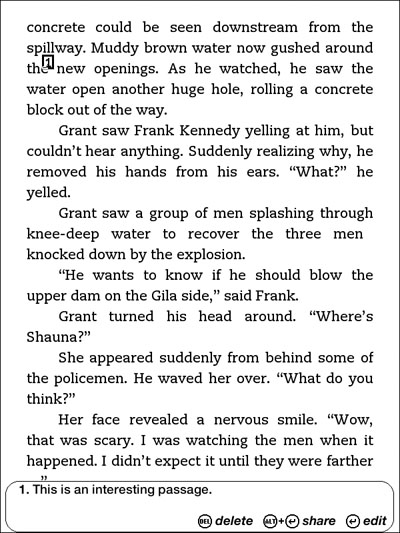
Notes are numbered sequentially, and a small superscripted numeral appears at the point where you entered your note. To review a note, simply move the cursor to the number representing the note. The note displays at the bottom of the screen, as shown in Figure 2.3. Press Return to edit the note, DEL to remove the note, or Alt+Return to share the note.
Figure 2.3. Viewing a note.
You can also access notes from the View My Notes and Marks menu item or by opening the My Clippings item on the Home screen.
Clippings
Clippings enable you to save articles from subscription content in a common location. After you save a clipping, you can access it from the My Clippings item on the Home screen.
To save a clipping, select Clip This Article from the Reader menu while reading subscription content. The article is saved to My Clippings with a notation containing the title of the content and the time and date the clipping was taken.
The My Clippings item is just like any other Kindle content. You can look up words in the clipping, add notes to the clipping, add bookmarks to the clipping, and so on.
Note
The Kindle does not show any kind of notification on an article after it has been saved as a clipping.
Individual clippings cannot be removed from My Clippings. However, you can connect the Kindle to your computer using the USB cable and copy the My Clippings.txt file from the Documents folder on the Kindle to your computer where you can then edit the file.
Tip
Bookmarks, notes, and highlights are also shown in My Clippings. Even after a bookmark, note, or highlight has been deleted, it still appears in My Clippings.
Highlights
The Kindle’s highlight function provides a way to highlight one or more lines of text so you that notice them easily when scanning content. To add a highlight to text, follow these steps:
- Use the 5-way to move the cursor to the point where you want your highlight to begin.
- Press the 5-way. The cursor changes to a slanted line.
- Move the 5-way to the right or down to select the text you want your highlight to encompass.
- Press the 5-way to confirm your highlight.
If you want your highlight to span multiple pages, simply use the Next Page and Prev Page buttons to change pages while creating your highlight.
If you’d like to share your highlight on Facebook or Twitter, press Alt+Return after you highlighted the desired passage. When you do, you see a dialog prompting you to enter a message. The message you enter will be shared on your social network along with the highlighted text. A link to your highlighted passage on Amazon’s site will also be included.
While you are creating a highlight, the Kindle shows the highlighted text as white text on a black background. After you click to finish creating the highlight, the Kindle underlines the highlighted section with a dim underline.
Tip
If you decide to cancel your highlight, you can press the Back button prior to clicking to complete the highlight.
To remove a highlight, move the cursor into the highlighted area. The dim underline showing the highlight turns dark, and the Kindle displays a message at the bottom of the screen indicating you can press DEL to delete the highlight. Highlights can also be deleted from the View My Notes and Marks screen.
Using Text-to-Speech
The Kindle’s Text-to-Speech feature endows the Kindle with a computerized voice using a technology developed by a company called Nuance. Some people describe the Kindle’s voice as being akin to the voice of Stephen Hawking, but the Kindle’s computerized voice mimics inflection and other natural speaking tendencies and is far superior to the famous physicist’s voice. While I wouldn’t want to listen to an entire book using the Kindle’s Text-to-Speech feature, it’s a wonderful addition for those with visual impairments.
To activate Text-to-Speech on the Kindle, press AA and select Turn On in the Text-to-Speech area of the dialog. Alternatively, you can press Shift+SYM while reading any content, and the Kindle begins reading. The default voice is a male voice, but you can change to a female voice by pressing AA while the Kindle is reading and selecting Female from the dialog. You can also slow down, speed up, pause, or stop Text-to-Speech from the same dialog.
Note
Many Kindle users agree the male voice is more realistic than the female voice. In my experience, the Kindle’s Text-to-Speech feature isn’t adept at recognizing heading text and other formatting that commonly appears in books. Because of that, the Text-to-Speech feature is best used for novels or other books where text doesn’t often contain special formatting.
Tip
Amazon gives publishers the right to not enable Text-to-Speech for selected content. Amazon displays whether Text-to-Speech is enabled for a Kindle book in the book’s description in the Kindle store.
Reading Books on Kindle for PC
The Kindle for PC application (available from www.amazon.com/gp/kindle/pc) is a convenient way to read Kindle books even if you don’t own a Kindle device. Using Kindle for PC, you can access your Kindle content from any Windows computer, and Amazon’s Whispersync service keeps your reading position synchronized between Kindle for PC and your other devices.
The Kindle for PC Home Screen
When you first launch it, you’ll be asked for your Amazon account email address and password. When you enter this, Amazon registers Kindle for PC as one of your devices, and you then have access to Kindle books that you ordered from Amazon.
Note
As of this writing, you cannot access newspapers, blogs, or magazines from Kindle for PC. However, Amazon has confirmed that it plans to add that functionality.
After Kindle for PC is registered to your Amazon account, books that you transferred to your computer are available on the Home screen. Each book also displays a progress bar that indicates how much of the book has been read.
You can sort downloaded books by how recently they were downloaded (the default setting), the author name, or the title by using the buttons at the top of the Home screen.
The Menu provides easy access to relevant pages on Amazon’s website, including a link to the Manage Your Kindle page. You can also access the settings for Kindle for PC using the Menu.
Tip
If you decide to remove Kindle for PC from your Amazon account, select Tools, Options, and click the Deregister button in the Registration section of the Options dialog.
Downloading Books to Kindle for PC
To transfer books to Kindle for PC, click the Archived Items button at the top of the main application window. When you do this, you see all the Kindle books that you purchased from the Kindle Store. If you double-click on a book, that book downloads to Kindle for PC and opens to the last page you read on any of your devices. You can also right-click on a book to access a menu where you’ll find the following options:
• Go to Last Page Read: Copies the book to Kindle for PC, and opens the last page read on any of your devices.
• Go to Beginning: Copies the book to Kindle for PC, and opens the book at the beginning.
• Add to Home: Copies the book to Kindle for PC without opening the book for reading.
• Reading on Kindle for PC
While reading in Kindle for PC, you can turn pages using the scroll wheel on your mouse, the arrow keys on your keyboard, or by clicking the left or right edge of the application window. For the greatest control, I find it convenient to use the arrow keys on my keyboard.
You can add a bookmark by either clicking the Add Bookmark button (the plus sign) at the top of Kindle for PC or by clicking in the upper-right corner of a page. Bookmarks added in Kindle for PC are synchronized with your other devices as long as Whispersync is enabled.
Kindle for PC can also display any notes, bookmarks, or highlights you’ve added from another device by clicking the Show Notes & Marks button.
Tip
Kindle for PC y shows only notes and highlights from your Kindle if you have Whispersync enabled for your devices.
The GoTo button on Kindle for PC enables you to easily navigate a book by going to the cover, the table of contents, the beginning of the book, or to a specific location number. You can also choose Sync to Furthest Page Read if you need to manually synchronize your reading location from another device. However, clicking Sync to Furthest Page Read will not synchronize notes or highlights.
To change the type size in Kindle for PC, click the Aa button, and adjust the Font Size slider. You can also use the Words Per Line slider to adjust the width of the page in Kindle for PC, adjust the Brightness slider to adjust the brightness of the page, and click a Color Mode button to adjust the background color of the page.
Amazon also has a version of the Kindle application for the Mac, iPhone, iPad, iPod touch, and many smartphone devices. The most feature-rich experience on a mobile device is Kindle for Windows Phone which enables you to not only read your Kindle books on your smartphone but also enables you to shop for Kindle books right on your device.
Now that you know all the tips and tricks to reading on the Kindle, it’s a great time to explore all the ways you can find content for your Kindle. As you learn in the next chapter, the Kindle content that Amazon makes available in the Kindle Store represents only a small fraction of the content you can access on the Internet and on the Kindle.