Chapter 1. Getting Started with the Kindle
Electronic book (e-book) readers are nothing new; e-book readers have been around for nearly a decade. The first e-book reader (the Rocket eBook) used a black-and-white LCD screen and could hold a whopping 10 books. (You could get the Pro version and increase storage to an incredible 40 books.) A third-generation Kindle can hold 3,500 books, newspapers, magazines, and blogs!
The Amazing Kindle
When most people first hear about the Kindle, they picture a device that is attractive only to people who love tech gadgets. However, as it turns out, the Kindle is much more attractive to readers than it is to people who love tech toys. The E Ink screen makes reading on the Kindle similar to reading a paper book and enables reading without eye fatigue, even in bright sunlight. Kindle can display 16 shades of gray so that images look crisp and detailed. However, color is not an option with current E Ink technology.
Now look at some of Kindle’s unique features.
The Kindle’s Unique Features
The Kindle has several unique features that set it apart from other e-book readers.
• Because the Kindle is made by Amazon, you automatically have access to the largest e–book catalog in the world. At the time of this writing, Amazon has approximately 751,000 books in the Kindle Store, and more are added all the time. You also have access to magazines, newspapers, and blogs.
• The Kindle enables you to listen to audio books purchased from Audible, and the Kindle actually has a speaker, so you can listen to audio without plugging in headphones. (A headphone jack is provided for private listening.)
• The Kindle has a Text-to-Speech feature that reads a book to you using a computer-generated voice, provided the publisher of the book allows it.
• The Kindle carries no reliance on any particular computer architecture. The Sony Reader requires a Windows computer to transfer files because the software that the Sony Reader uses can run only on a Windows computer. (There are workarounds for Mac users, but the most common one is to install Windows on the Mac.)
• Wireless access via Amazon’s Whispernet enables you to access the Kindle Store directly from the Kindle device and permits you to access Wikipedia (an online encyclopedia) and other websites. You can even check your email on the Kindle and do many other powerful and wonderful things on the Internet.
• The Whispersync feature automatically synchronizes your reading content across multiple Kindles, or even between your Kindle and an iPhone, an iPod touch, Kindle for PC or Kindle for Mac, and Kindle for Blackberry.
• The Kindle has native PDF support so that you can read your Adobe Reader documents without conversion.
Amazon’s Whispernet service uses either Wi-Fi or high-speed cellular networks. If using 3G, you get broadband speeds on the Kindle, but the exact speed of your connection can vary dramatically depending on signal quality.
Tip
Only Free 3G Kindles can access Whispernet via 3G cellular networks. To find out if your Kindle has 3G capability, go to the Home screen and press Menu. Select Settings and check the Network Capability field in the Device Info section.
When connecting via 3G, depending on the cell service in your area, you might not always get broadband speed on your Kindle. When browsing the Kindle Store and downloading books and other Kindle content, you aren’t affected too much by slower Whispernet speeds simply because the amount of data you download is limited. However, when you begin browsing websites and using Kindle’s Internet connectivity to check email, you notice a fairly dramatic difference between a good Whispernet connection and one that’s less than optimal. To get the best speeds from Whispernet, you need to be in an area with good 3G reception or in an area with access to a Wi-Fi access point.
→ For more information on accessing the Internet and email with the Kindle, see Chapter 5, “Internet and Email on the Kindle.”
Tip
You don’t have to sign a contract, perform any setup, or pay access fees to AT&T to use Amazon’s Whispernet service over the 3G network. When you get your Kindle, it works automatically.
You can check for access to the 3G network in your area using the Kindle Coverage Tool available from client0.cellmaps.com/tabs.html#cellmaps_na_tab.
Although most of Kindle’s unique features are easy to discover, getting the most from them isn’t always intuitive. Sometimes it helps to have someone show you the details that can help you get the most from your Kindle. With that in mind, now examine the basic Kindle experience and how you can make the most of it.
The Kindle Home Screen
The Kindle Home screen is at the heart of the Kindle reading experience. All the content on your Kindle is available here. You can access the Home screen at any time by pressing the Home key on the Kindle keyboard.
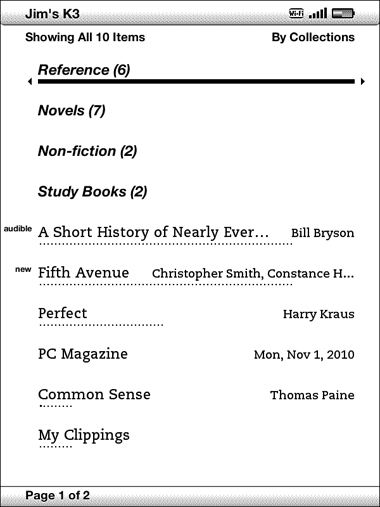
Figure 1.1 shows the Home screen for my Kindle.
Figure 1.1. The Kindle Home screen.
Note
Kindle content can be books, magazines, newspapers, blogs, audio books, podcasts, and clippings. The Kindle uses the term subscriptions to refer to newspapers, magazines, and blogs.
The title of each item appears in the left column. The right column contains the author’s name for book and audio book listings and the date of issue for newspapers, blogs, and magazines. If a title is too long to e display, the Kindle displays ellipses at the end of the title name. If you want to see more information about an item on your Home screen, use the 5-way in the lower-right corner of your Kindle to underline the item you are interested in, and then press the 5-way to the right. You see an expanded view of the item along with common tasks, as shown in Figure 1.2.
Figure 1.2. Book description screen.

Tip
If the title or author of a book is incorrect or if you’d like to change them for any reason, you easily can, as discussed in Chapter 4, “Using Calibre.”
The Home screen may also contain one or more collections. A collection categorizes books. In Figure 1.1, four collections are shown: Reference, Novels, Nonfiction, and Study Books. Collections display in bold and italic text, and the number of books in each collection displays to the right of the collection name.
→ For more information on using collections, see “Using Collections,” in Chapter 4.
While on the Home screen, you can delete an item from your Kindle by moving the cursor to the item and pressing the 5-way to the left. Books you’ve purchased from the Kindle Store display a Remove from Device option, and subscription items and books you transferred to the Kindle display a Delete option. Deleting an item provides you with a confirmation dialog, but selecting Remove from Device immediately removes the item from the device. You need to use Archived Items to move the item back to your Kindle.
Caution
If you delete an item that was not obtained from the Kindle Store, it will be permanently removed. You must have a copy of the item saved elsewhere if you want to add it back to your Kindle.
The label New appears next to an item that hasn’t been opened and is less than 24-hours old, and Sample displays next to book samples downloaded from Amazon’s Kindle Store. Your Kindle also supports audio books from www.Audible.com, and audio books display an Audible label to the right of the title. (In Figure 1.1, the first title on my Home screen, A Short History of Nearly Everything, is an Audible book, and Audible appears to the left of the book’s name.) Games can display an Active label, and finally, any subscription content you’ve chosen to keep using the Keep This Issue feature shows a Keep label to the left of the item.
Tip
You can also use audio books from sites such as audiobooks.org or any other site that provides audio books in MP3 format or in a format that can be converted to MP3. Audio books downloaded from these sources will not be labeled as Audible books on your Kindle.
Under the title is a progress bar for the item. This progress bar uses dots to indicate the relative length of the item, and your current position is indicated by bold dots.
Tip
The Kindle also displays a progress bar (called the location bar) while you read an item. The location bar that’s visible while you’re reading has a percentage indicator that shows your reading progress and an indicator of how much you’ve read during your current reading session.
Sorting and Filtering the Home Screen
By default, the Home screen shows the newest items or recently opened items first, assuming you haven’t defined any collections.
To change the sort order of the Home screen, press up on the 5-way until the Sort Options are highlighted (the top line of the Home screen), and then press the 5-way to the right. You can sort by Most Recent First (the default), Title, Author, or Collections. To change the sort option, move the 5-way to the desired sort option, and then press the 5-way to select it.
→ For more information on using collections, see “Using Collections,” in Chapter 4.
If you choose to sort by Title, you can press any letter to easily jump to titles that start with that letter. If you sort by Author, you can use the same method to jump to titles by a particular author. Simply enter the first letter of the title or author, and press the 5-way to go to items beginning with that letter.
Tip
Jumping to a title or author whose name begins with a particular letter isn’t a filtering function. In other words, it doesn’t limit the items that display on the Home screen. It’s simply a convenient way to quickly jump to a particular title.
The last item listed on the Kindle Home screen is Archived Items, which provides access to all the books you’ve purchased from Amazon’s Kindle Store but have removed from your Kindle. (Subscription content is not included.)
→ For more information on using Archived Items, see “Using Archived Items,” in Chapter 4.
Tip
You can easily go to any page of your Home screen by entering the desired page number and then pressing the 5-way. Holding the Alt key enables you to use the top row on the keyboard as a number row. For example, to jump to page 3 of the Home screen, press Alt-E on the Kindle keyboard and then press the 5-way.
Items Available on the Home Screen Menu
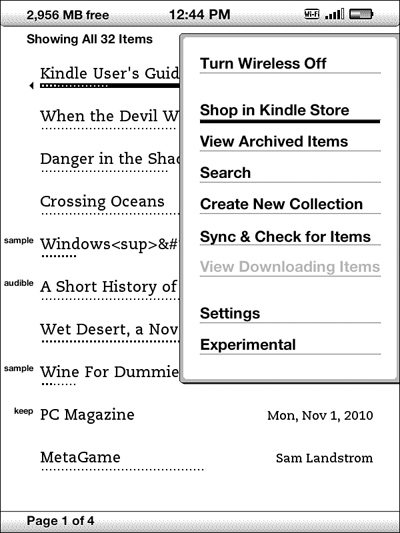
The Home screen menu, shown in Figure 1.3, is accessible by pressing the Menu button while on your Kindle’s Home screen. Think of the Home screen menu as the main menu for the Kindle.
Figure 1.3. Home screen menu.

The following items are available on the Home screen menu:
• Turn Wireless Off: Selecting this turns Wireless (3G and Wi-Fi) off. When Wireless is off, this menu item changes to Turn Wireless On.
• Shop in Kindle Store: Selecting this takes you to the Kindle Store, provided you have access to Amazon’s Whispernet. The Kindle notifies you if wireless is turned off and asks if you would like to turn it on.
→ For more information on using the Kindle Store, see “Using Amazon’s Kindle Store,” in Chapter 3.
• View Archived Items: This item shows books purchased from the Kindle Store that are not currently on your Kindle. Selecting this item performs the same function as selecting Archived Items from the Home screen.
• Search: Selecting this takes you to the Search screen where you can search items on your Kindle, the Kindle Store, the dictionary, Google, Wikipedia, or the Web.
→ For more information on using the Kindle’s Search feature, see “Using Search on the Kindle,” in Chapter 3.
• Create New Collection: Enables you to create a new collection to organize the content on your Kindle.
• Sync and Check for Items: Selecting this synchronizes your Kindle with Amazon’s servers. Subscription content and converted documents that haven’t been transferred to your Kindle are downloaded. The Kindle also synchronizes your current location within your books so that you can resume reading on another Kindle, on your iPhone or iPod touch, on the Kindle for PC or Kindle for Mac, or on Kindle for Blackberry.
• View Downloading Items: This item displays a list of items currently downloading to your device. If no items are downloading, this menu item appears grayed out.
• Settings: This item displays the Kindle Settings and Device Information screen.
→ For more information on the Kindle Settings and Device Information screen, see “Configuring Your Settings,” later in this chapter.
• Experimental: The Experimental menu contains items the Kindle’s developers are working on. These are extra features that might or might not remain on the Kindle. At the time of this writing, the items on this menu are Web Browser, Play MP3, and Text-to-Speech.
→ For more information on using the Web Browser on the Kindle, see “Browsing the Web on the Kindle,” in Chapter 5.
→ For more information on playing MP3s on the Kindle, see “Playing Music,” in Chapter 6.
→ For more information on Text-to-Speech, see “Using Text-to-Speech,” in Chapter 2.
Configuring Your Settings
As mentioned earlier, you can access settings for your Kindle by selecting Settings from the Home screen menu. The Kindle displays page 1 of the Settings screen, as shown in Figure 1.4.
Figure 1.4. Page 1 of the Settings screen.

Note
Depending on how your Kindle is currently configured, your Device Settings screen may not match exactly with what is shown in Figure 1.4 and you may have fewer pages of Settings screens.
There are three pages of Settings screens on the Kindle. The sections available on the Settings screens are described next.
Registration
The Registration section displays the name on the Amazon account to which the Kindle is registered. Your registration connects the Kindle to your Amazon account so that you can purchase books on the Kindle using the credit card on file with Amazon.
You can register as many Kindles as you want to one Amazon account, and up to six of those Kindles can share content with the exception of subscription content. In other words, if you and your spouse both have a Kindle registered to the same Amazon account, and you purchase a great book you want your spouse to read, you can send that book to your spouse’s Kindle using Your Media Library on Amazon’s website without paying for it a second time.
Tip
If you’d like to change the account your Kindle is registered to, select Deregister in the Registration section. You can then register the Kindle to a different Amazon account.
You can also deregister a Kindle on Amazon’s Manage Your Kindle page.
→ For more information on using the Manage Your Kindle page, see “Using Amazon’s Manage Your Kindle,” in Chapter 4.
If your Kindle is ever stolen or lost, make sure you deregister it immediately using the Amazon website to prevent unauthorized purchases on the device.
Device Name
By default, your Kindle’s device name is derived from the account name to which it is registered. If you prefer, you can personalize your Kindle by changing the device name. If you have multiple Kindles registered to your account, you need to give each a descriptive name so that you can easily identify them when using Amazon’s website.
Select Edit Name in the Device Name section, and enter a name for your Kindle. The name you choose displays on the top-left corner of the Home screen. Amazon also uses this name when you browse the Kindle Store on your computer or when you use other Kindle pages on Amazon’s website.
Wi-Fi Settings
The Wi-Fi Settings section enables you to join a Wi-Fi network or forget a Wi-Fi network that you’ve joined previously. It also displays the number of available Wi-Fi networks if any are in range, and if you have joined a Wi-Fi network, it displays the name of that network.
Device Info
The Device Info section shows your Kindle’s Wi-Fi card’s MAC address (a unique number associated with the network card in your Kindle), the serial number of your device, and the network capability (either Wi-Fi or Wi-Fi and 3G) of your Kindle.
Press Next Page to go to the second page of the Settings screen. The following sections are available on the second page.
Voice Guide
When turned on, Voice Guide provides audible prompts as you navigate the menus and screens on your Kindle. Voice Guide is off by default. To enable Voice Guide, select Turn On.
Device Email
The Device Email section shows you the Kindle email address associated with your Kindle. This is the email address you can use when you want to email documents for conversion directly to your Kindle. You can change your Kindle email address by using the Manage Your Kindle page on Amazon’s website.
Device Password
The Device Password option enables you to set a password for your Kindle. If you turn on this feature, you are required to enter a password when turning on your Kindle or when waking your Kindle from sleep mode.
Device Time
The Device Time section enables you to set the clock on your Kindle. If your Kindle has 3G connectivity, the time is set automatically using AT&T’s cellular network. However, you can choose to set it manually.
Annotations Backup
This section enables you to control whether your Kindle synchronizes annotations, collections, and your reading location of your Kindle content. By default, Annotations Backup is turned on.
Popular Highlights
By default, your Kindle content contains an indicator showing sections highlighted often by others in the Kindle community. If you prefer not to see these indicators, you can turn off Popular Highlights.
The following two sections are available on page 3 of the Settings screens.
Social Networks
Your Kindle enables you to share your notes and highlights with your friends and family using Twitter and Facebook. To share notes and highlights, you must first link your Kindle to the desired social network. The Social Networks section enables you to link and unlink your Kindle to a social network.
Personal Info
The Personal Info section displays any personal information you’ve entered. You might choose to enter your contact information or a personal message.
The information that you enter here is displayed on the Settings screen.
Kindle Version
A version number for your Kindle’s software is located at the bottom of each Settings screen. Amazon updates the Kindle’s internal software from time to time, and when it does, your version number changes to reflect the new software version.
Your Kindle automatically downloads any Kindle updates that Amazon makes available. You can then update your Kindle by navigating to any of the Settings screens, pressing Menu, and then selecting Update Your Kindle from the menu. If there isn’t an update available, the Update Your Kindle menu item is disabled.
Note
The Kindle displays free memory, the current time, network status, and the current battery level at the top of the screen when any of Kindle’s menus are active, as shown in Figure 1.5. This is a convenient way to check the time while reading, the quality of your Whispernet or Wi-Fi signal, or your battery’s level.
Figure 1.5. Free memory, time, and network and battery status.
Now that you’ve had a chance to peruse the basic operation of the Home screen and see some of the settings available to you on your Kindle, it’s a great time to look at the details of the Kindle reading experience. In the next chapter, you learn not only the basics of reading on the Kindle, but also how to take advantage of bookmarks, notes, clippings, and much more.